I love cocktails that are full of herbaceousness. (Got that right without spell check!)

So whenever my wife and are dining in a higher-end restaurant, where we see that mixology matters to them as much as the food, we take advantage of their knowledgeable bartenders and have them create something special for us to try.

Coppa is my second favorite restaurant in Boston–Toro being at the top of the list–and both are part of the Ken Oringer empire, with head chef Jamie Bissonette at the helm. Both also take pride in their cocktails, and this one from Coppa, named “Hey Neon,” is a personal favorite that I regularly re-create at home for myself.

The Coppa finished drink:


HEY NEON, BOTH WAYS
1.5 oz Aalborg aquavit

.75 oz Punt e Mes

.5 oz Cynar

.5 oz green Chartreuse

Finely minced, dehydrated kalamata olives


Combine the liquid ingredients in a cocktail shaker with some ice. Stir briskly and pour (straining the ice) into a rocks glass rimmed with the minced kalamata olives.


My version of the cocktail:


I tried mincing and dehydrating the kalamata olives, like they do at Coppa. But the oils in the olives kept them from drying out enough–maybe I was just too impatient for a drink! And I couldn’t get the minced olives to stick to the rim of my glass.
My solution was pretty simple: pour the drink into a martini glass and serve with a skewer of kalamatas. Works for me!


Fast food is a relative term. What we Americans think of as fast food is not what, say, the Italians think of as fast food. We think of drive-thru burger joints serving greasy, salty and fatty food. Swallow a burger, pop a Crestor. The Italians think fast food is something that simply doesn’t take all day to cook! If you can use the freshest of ingredients, and serve it in the time it takes to sip a half a bottle of wine while chatting with a friend, it’s fast food Italian-style.
Years ago, when my wife and I were visiting the island of Capri in Italy, one of the dishes we enjoyed was an incredibly simple pasta and tomato dish called spaghetti sciue-sciue (pronounced “shwee-shwee.”) We were told that sciue-sciue was loosely translated as “quick-quick,” although a check on the web said that it also translates to “improvisation” in Italian. And though quick it was (that is, by Italian standards), it was one of the most memorable dishes we had on our trip. It could be because of our surroundings: the famous Faraglioni rocks all around us at a small seaside restaurant called Da Luigi. We took the small shuttle boat from Marina Piccola, which made its way through those stacks jutting out of the Bay of Naples, and landed at this historic restaurant, built in 1936. People come here not only to dine, but to spend the day sunbathing and swimming.
So the reason Da Luigi’s sciue-sciue was so amazing certainly was, in part, the location…but it was also very much due to the use of the freshest and best possible ingredients…and they didn’t mess around with them too much.
With the growing season coming to a close here in New England, there’s still a chance to get some beautiful ripe tomatoes at local farmstands for this recipe. This version of spaghetti sciue-sciue, our own home-made twist on what we had in Italy, absolutely takes advantage of what’s left of the season!

The ingredients. Yes, so I used lo-carb pasta!

OUR PASTA SCIUE-SCIUE
Ingredients:
1 small can (6 oz) tomato paste
½ cup extra virgin olive oil
2 hot Italian dried peppers, finely chopped
¼ cup white wine
8 to 10 chopped plum or cherry tomatoes (as ripe as possible)
12 to 15 torn fresh basil leaves
½ stick (4 oz) unsalted butter
1 ball of fresh mozzarella
1 lb of spaghetti, or better yet, bucatini
Sea salt
Fleur de Sel (optional)
Heat a large pot of salted water to boil the pasta in.
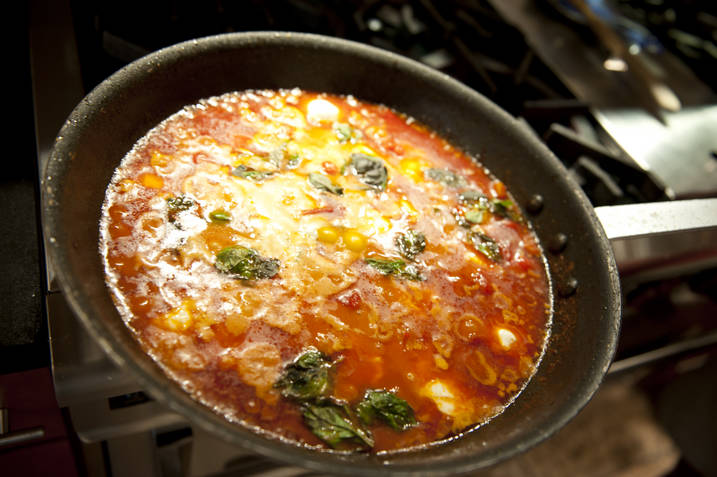
Almost burn—as in “heavily caramelize”—the tomato paste in a large pan with the olive oil, salt, and the dried peppers. Add the white wine to de-glaze, and simmer until reduced by half.
Add the chopped tomatoes and simmer on medium heat until they start to break apart. Hand tear the mozzarella ball into shreds and add to the sauce, stirring gently. Add the basil.
Add the butter, gently stirring until it melts.
When the pasta is slightly firmer than al dente, drain it and add it to the pan with the sauce.
Serve immediately, finishing with a little Fleur de Sel.

Finito!

In a world where buzz words like “probiotics” rule every food product marketing campaign, comes word that good ol’ sauerkraut is actually really good for your health! Who knew? Apparently, some have for many years. 

Lactic acid and beneficial bacteria…those are the two main ingredients that make sauerkraut so good for you. Lactic acid fermented foods such as sauerkraut have made up a significant portion of food eaten by humans for a long time and still do in many developing countries. Lactic acid fermentation is one of the simplest and safest ways of preserving food. 

Archaeological digs have found that mankind has used this technique for thousands of years. (Korean kimchi is a perfect example.) Our forefathers must have consumed large numbers of live lactic acid bacteria in their daily diets. So it seems logical to think that the human gastrointestinal tract has evolved over the years to adapt to a regular supply of live lactic acid bacteria. But this supply slowed down or even stopped in industrialized countries during the 20th century, which may have led to the enormous increase in gastrointestinal and immunological problems that plague us today. 

Here are just a few of the benefits of eating sauerkraut: it provides vitamin C…it reduces bloating and pain to those stricken with irritable bowel syndrome…it significantly helps aid in the digestion of starches and proteins found in soy and grains…and lots, lots more. 

Sauerkraut has been used for hundreds of years to help cure upset stomachs and to increase beneficial flora in the intestinal tract.
It’s amazing how we’ve forgotten about so many things that kept us healthy naturally. Our crazy lifestyles deplete all the beneficial building blocks our bodies need, and then we think we need to take pills and supplements to get them back. All we really need is to eat the right foods again. 

So next time you grab a hotdog, ask for extra sauerkraut! Maybe the dog isn’t the best thing for you, but you can certainly justify the kraut! 

I love the taste of sauerkraut as is. But here’s a recipe that takes it to a whole new level. I make gallon-sized batches of the stuff when I have a cookout in the yard, but this recipe has been reduced to a quarter of that for normal home use. 

1 package (32 oz) sauerkraut
1/4 lb bacon, chopped
1 large sweet onion, finely chopped
salt and sugar to tasteOpen the package of sauerkraut and drain it in a colander. wash the sauerkraut with water to remove the brine. Let drain again.

In a large sauce pan, fry the chopped bacon until just crispy. Don’t drain the fat! Add the onions and cook until they are translucent. Then add the sauerkraut and cook over medium heat until the sauerkraut has caramelized. This could take up to 30 minutes. Stir often.
If you see the sauerkraut sticking to the pot, add a little olive oil.

At the end, add a little salt and a touch of sugar, to taste.


One of the true delicacies of New Zealand is their version of lobster they call crayfish. It’s similar in appearance to a Maine lobster, but it has no claws. And prices are very high. For example, a single crayfish that weighs about 1 1/2 pounds costs 54 New Zealand dollars. That’s about $38 US for what amounts to a 1/2 pound of actual meat.

On the South Island of New Zealand, on the Pacific (eastern) coast near the beach town of Kaikoura, there is a shack that has been serving up crayfish for years…and it’s earned a cult following among foodies that, like me, have traveled thousands of miles just to have a taste of this seafood delicacy.

The place is called Nins Bin, and it’s simply a little shack that sits on the rugged, windy coastline of the Pacific. You walk in, and a plastic container holds already-cooked crayfish, caught that day. The prices for each are marked right on the shell. You pick one, they cut it in half, and serve it with your choice of two sauces: one a sort of thousand island thing, and the other a garlic aioli. We took one of each, walked over to the only picnic table nearby, and quickly finished off this little treat, hungry seagulls buzzing all around us, waiting for any morsel we might accidentally drop. (Not a chance!)


The flesh of the crayfish was sweet…but not really sweet like Maine lobster can be. And although it was a beautiful white in color, its texture was almost meat-like, like chicken. But really good. We devoured the tail, sucked whatever meat we could out of the legs, and that was it…crayfish gone. Experience had. It totally lived up to the foodie hype I had read about.


We hung out around Nins Bin a little longer, taking in the atmosphere before we got back in the rental car and headed down the road to the town of Kaikoura, our next stop on our 3-week, 2000 mile journey through New Zealand.

Sausage, like bacon, is magical. It contains but a handful of simple ingredients. But when you mix them together, they form a truly flavorful food that is far more than the sum of its parts.
What has always kept me from trying to make my own sausage at home was that it seemed like a very complex process, from mixing and grinding all the ingredients, to stuffing them into casings. But then I thought about it: most of the time when I cook sausage at home, I remove the casings beforehand anyway…so why put them into casings in the first place? Once I realized I didn’t have to deal with the hassle of stuffing casings, making sausage became something I knew I really wanted to try.
The best book for anyone interested in making their own sausage, bacon, salami and more is called “Charcuterie,”by Michael Ruhlman and Brian Polcyn. It shows you step-by-step how make these meaty creations, and I used their basic garlic sausage recipe to make my first-ever batch, though I did add a tweak of my own.This recipe makes a 5 lb batch of sausages…enough for you to pig out for some time, and still have enough to share with your friends.
Cutting the pork and bacon pieces into small cubes that grind more easily.
Ingredients:A total of 5 lbs of pork, containing 25% to 30% fat. I used lean pork loin, and then added pork fat to bring the fat level to around 30%. My special tweak was to include a half-pound of my home-made bacon (a future blog), to add some salt and smoky flavor.

3 Tablespoons kosher salt

1 Tablespoon ground black pepper

2 Tablespoons fresh finely minced garlic

1 cup chilled good red wine…I used Pinot Noir

It’s important to use at least 25% fat (or you’ll have dry, tasteless sausage) and I keep the meat as cold as possible at all times, so that the fat doesn’t break down or melt. I chop the meat and fat into small-sized bits that will be easier to grind…place them in a bowl, adding the salt, pepper and garlic. I mix the ingredients really well, place in a Ziploc bag, and store in the refrigerator overnight to chill and marinate.
The next day, I set up the grinder, keeping the meat in the fridge until the last minute. I have a Kitchen Aid mixer with a grinding attachment that does a great job of grinding the sausage. Using the smaller die, I grind the contents of the Ziploc, letting the ground meat fall into a bowl that sits in ice.
Ready to grind!
Once all the meat has passed through the grinder, I place the meat in the bowl of the mixer and, using the mixing paddle, mix the meat slowly for about 1 minute. I then add the 1 cup of cold Pinot Noir and mix for another minute, on medium.
If the sausage meat is sticky, I know I’ve reached the stage where it can go into casings–after I fry up and taste a small sample piece to make sure all of the seasonings are just right. If you do plan to use casings, keep the sausage meat in the fridge until you’ve set your casings equipment up.
As I said, I totally skip the casings part of the equation. So once the sausage meat has chilled for a bit, I roll them into small meatballs, placing the meatballs on trays lined with non-stick aluminum foil for easy removal later. These trays of meatballs go into the freezer, and once the meatballs freeze up, I can place them in freezer bags and properly store them.
I’ve also made sausage patties using a mold I have for beef sliders. Any shape will work.

Once you’ve made your own sausage, you will never settle for store-bought again. Knowing every ingredient that goes in…knowing the quality of the meat you’ve used…binding (and flavoring) with a quality red wine instead of simple water…it makes an incredible difference!

Paris has a special place in the hearts of my wife, myself, and even my 5-year-old daughter. It’s where my wife and I got engaged back in 2002. It’s where we celebrated my wife’s 40th birthday with family and friends in 2005. And it’s where my daughter has ridden on seven—count ‘em—seven—carousels…a record I’m sure she’ll want to break on her next trip.

One of the reasons why Paris is so special to us is a small, unpretentious wine bar called Juvenile’s, at 47 Rue de Richelieu. The owner is Tim Johnston, a sharp-tongued wise-cracking Scotsman who happens to know a helluva lot about wine and spirits, and is in fact a consulting editor to Saveur magazine. Tim takes no BS from his clients, and that adds to the entertainment value of every visit.

Hangin’ with Tim.

My wife met Tim back in 2001, just a few months before she had met me, when she and her Mom took a trip to France. The friendship with Tim was forged, and it has been going strong ever since. Tim, in typical fashion, tolerates me because he enjoys the company of my lovely wife…and I can’t say that I blame him!

The food at Juvenile’s is rustic…nothing fancy here. But it is all very good and satisfying. We’ve found what we consider the best foie gras in Paris here. The potatoes with raclette and bacon are fantastic. Sausage dishes, duck dishes…all the favorites, all wonderfully prepared in a very, very small kitchen in this wine bar that holds, perhaps, 30 people.

Paolo, Tim’s right-hand man, working the tiny kitchen at Juvenile’s.

Juvenile’s is one of Paris’ original wine bars, serving wine by the glass way before everyone else thought it was cool to do so. And even the locals will come in on a regular basis to ask Tim what the latest great wines are. The man has earned the respect of those who know.

We make Juvenile’s a mandatory stop with every visit to Paris we make, lingering sometimes for an entire day…eating, chatting, and sampling wine and even fine cognacs that Tim is willing to share with us. Often, we come back for a second and even third visit during the same trip. It’s a great place to unwind and get away from the hectic pace of the day, whether you’re a tourist or a local.

Yes, that says 1962!

The next time you’re in Paris, stop by Juvenile’s and tell Tim I sent you. He will promptly throw you out!

Tim and me. Great t-shirt!

There are few foods that people take as personally as pizza. Tell someone that your pizza place is better than their pizza place, and chances are you’ll start a fight. Well, my pizza place is better than your pizza place, because I make it at home. Besides, I can run faster than you.

I’m not going to say that much of the pizza that I’ve tried here in Rhode Island is mediocre, but I will say that I was born in Brooklyn and grew up working in many New York pizza places in my youth. So yes, I do have a very strong opinion on what I think makes a good or bad pizza.

My homemade pizza is all about the basics. The better quality my original ingredients are, the better my pizza will be:


The dough…

The key ingredient is 00 flour, and it can be found in specialty stores,  or online. My favorite new source is Central Milling in Logan, Utah. They make a 00 flour that is top notch. I buy it through the Forno Bravo pizza oven website: http://www.fornobravo.com/store/Tipo-00-Pizza-Flour/ It makes a crustier and more flavorful dough. Ratios for this recipe depend on the humidity in my kitchen on any given day, but my basic pizza dough recipe is as follows:

4–5 cups 00 flour

1 cup tepid water

1 Tablespoon salt

1 packet Italian pizza yeast

a squirt of extra virgin olive oil

I mix all the dry ingredients in the bowl of a stand mixer, then slowly add the water as it mixes. After the ingredients are well mixed, and the dough pulls from the side of the bowl, I remove it to a floured board, where I knead the dough by hand for another 5 minutes, until it is smooth and elastic, shaping it into a ball. I rub a little olive oil over the ball of dough, place it in a bowl covered with plastic wrap, and let it rise for 2 hours, punching it down after that, and letting it rise another 2 hours again.

The sauce…

I’ve written a previous blog about real and fake cans of San Marzano tomatoes. I feel that San Marzanos make the best sauce, but not all cans of San Marzanos are created equal. The only way you can be guaranteed you have a real can of these beauties, grown in volcanic Italian soil in the shadow of Mt Vesuvius, is by the D.O.P. designation on the can. (D.O.P. stands for “Denominazione d’Origine Protetta,” and signifies that it’s the real deal.) Anything else that says San Marzano may not be.

San Marzanos are so amazing, that all I do is puree them in a food processor, pour the sauce into a pan, and let it reduce until it has thickened. No spices or additions of any kind.

The cheese…

I don’t need to go super-fancy with mozzarella di bufala (cheese made from the milk of the water buffalo) …but I don’t use the mass-produced supermarket stuff, either. Whole Foods has fresh mozarella from Maplebrook Farms in Vermont, and it is excellent.

The toppings…

A matter of choice. I wrote a while ago about how I make my own guanciale, a cured meat that comes from pork cheeks. Chopped and fried, that is one of my daughter’s favorite pizza toppings.

But my signature pizza that wows my dinner guests is my marinated beef tenderloin and fried chive blossom pizza. I marinate and grill a piece of beef tenderloin, slicing it thin. And in the springtime, when my chive plants are budding like crazy, I snip the blossoms before they open and place them in Ziploc freezer bags to use all year long. When it’s time, I grab a handful of the blossoms and fry them in a little olive oil, salt and pepper, and sprinkle them over the top of the beef tenderloin pizza. A touch of Fleur de Sel on top seals the deal.

My signature marinated beef tenderloin and chive blossom pizza.

The oven…

Many professional pizza ovens reach a temperature of 1000 degrees. My home oven only reaches 500, but it does the trick. I do use a pizza stone, and place it on the center rack of the oven, and let it heat up thoroughly before sliding a pizza onto it for cooking.

Recently, I’ve also started cooking pizzas on my barbecue grill (using a special stone for the grill) to add a smoky component. The grill gets hotter than my home oven, which is great, but it’s obviously a more work to set-up and clean.


My favorite pizza?

There are only a few pizzerias that I know of—all in NYC–that make pizza montanara, and for my money, it’s the best I’ve ever had. It’s a small, rustic pizza margherita using mozzarella di bufala and simple tomato sauce, garnished with a basil leaf. What makes it magical is the fact that after they stretch the dough–but before they put the toppings on it–they fry the dough in deep fryer with olive oil for just a minute. It puffs up like a pillow. Then they put the toppings on and quickly bake it in a very hot oven. The end result is a non-greasy, absolutely heavenly pizza cloud…the most delicious I’ve ever had.

I’ve actually had some great success recreating this pizza at home, frying the dough in a very large skillet of olive oil. The challenge is removing this giant piece of dough out of the skillet and into a pizza pan without dripping olive oil all over my stove and setting my house on fire! So far, so good!

SUMMER ISN’T OVER YET!

OK…at least I refuse to think so.

It’s still not too late to enjoy the fresh fruits and veggies that our local farmers have to offer. Soon, we’ll be forced to go back to the supermarket to buy our produce. But until then, we can enjoy the bright, fresh flavors that only our local farmers can provide.

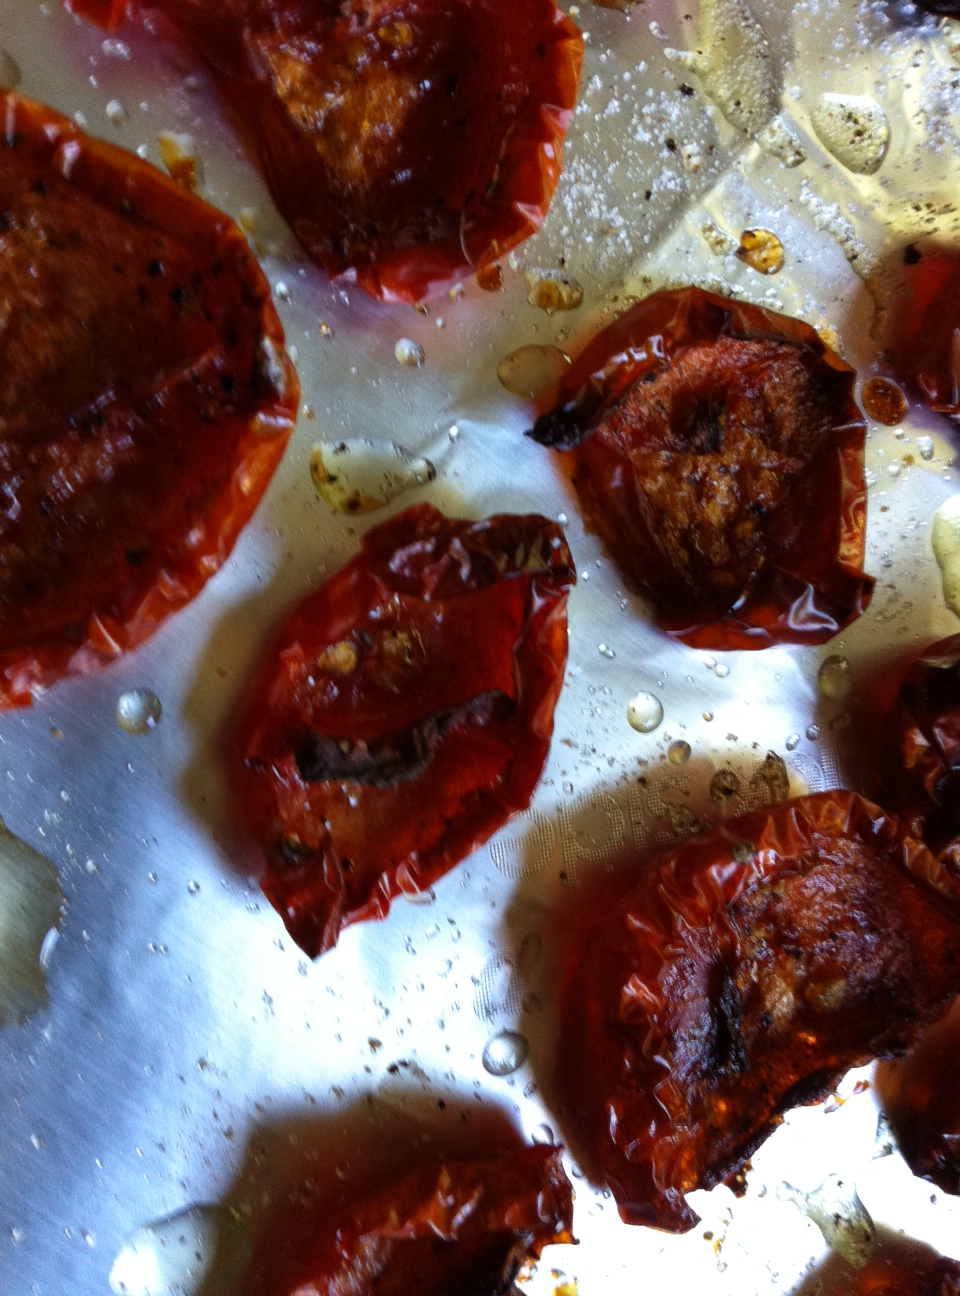
Oven roasted plum tomatoes

These are not sun dried tomatoes. These are seasoned and slow roasted, so that their sweet flavors concentrate, but the moist, chewy texture remains.

Ingredients:

12 to 18 halved, seeded plum tomatoes

Extra virgin olive oil

Sugar

Freshly ground pepper

Fleur de Sel, or other finishing salt

Pre-heat oven to 250.

Line a baking sheet with foil and rub it with olive oil.

Arrange halved and seeded tomatoes on the baking sheet in a single layer, cut side up. Drizzle evenly with ½ cup olive oil, sprinkle with 2 tablespoons sugar, and season with pepper to taste.

Baked the tomatoes until they are still juicy but slightly wrinkled, about 3 hours. Transfer to a platter and let cool slightly.

Just before serving, sprinkle tomatoes with Fleur de Sel, and garnish, if you like, with mint, parsley or basil.


BABY BELL PEPPERS WITH FRESH CORN STUFFING

Bags of these baby bell peppers are appearing everywhere on supermarket shelves this season. Recently, I had about 100 people over for a party, and I came up with this tasty bite to serve as an appetizer.

Ingredients:

Baby bell peppers

1 dozen ears fresh corn, boiled for just a couple of minutes, then removed from the cob…or organic frozen corn

1 Vidalia onion, peeled, quartered, grilled, chopped

Juice of 1 large lime

¾ cup mayonnaise

20 shots of Frank’s Red Hot or Tabasco

1 lb Queso Fresco, crumbled

Salt

Fresh cilantro or parsley, finely chopped

Cook the corn for just a couple of minutes to keep it crisp. If using corn on the cob, cut corn from ears and place in a bowl.

Peel and quarter the Vidalia onion, and throw it on a hot grill with a little olive oil to get some nice grill marks on it, leaving the onion still crispy, not soft. Remove, let cool, then place in a food processor and pulse until the onion is chopped into small bits, just smaller than the corn kernels. Add onions to corn.

In a separate small bowl, combine mayonnaise and Frank’s Red Hot. Pour in crumbled Queso Fresco and mix well. Pour into corn and onion bowl and mix well.

Add lime juice to the bowl and mix well again. Taste mixture and season with salt.

Cut the baby bell peppers in half lengthwise, and remove the seeds and membrane. Stuff the peppers with the corn mixture and garnish with cilantro or parsley.

If preparing ahead of time, refrigerate until ready to eat, but allow some time for them to warm up a little bit. You don’t want to serve them ice cold.

Although Moroccan women have been painstakingly making Argan oil by hand for centuries, it is known by relatively few people outside of Morocco. Argan oil comes from nuts that grow on the Argan tree, and the only place in the world you’ll find Argan trees is in the southwestern part of Morocco, in an area that is only about 1.5 million acres in size.
That may seem like a lot of space, but it really isn’t, and despite the hardiness of the Argan trees and their ability to not only survive but thrive in the harsh climate of Morocco, their numbers disappeared by a third in the last century alone.
I remember my first glimpse of an Argan tree about five years ago when my wife and I visited Morocco. We were driving north from Marrakech to the coastal town of Essaouira and we had to do a double-take when we saw a tree by the side of the road that had about a dozen goats in it, literally standing on the branches of the tree and munching on the fruit. We later learned that although the goats eat the green Argan fruit (they look like olives, only larger and rounder), they leave the interior shell behind, and inside this shell are small kernels from which the Argan oil is extracted.

Nothing is wasted in the process of making Argan oil. Traditionally, the hard shells have to be cracked by hand, the kernels within removed. Then kernels are then crushed and mildy roasted and cooled before being ground by hand using a quern, or grinding stone. Later, the kernels are hand-mixed with water to form a dough, and it is from that dough that the oil is extracted (again, by hand.) Any by-product from this process is used to feed cattle…and the shells are crushed and burned as fuel.
Recently mechanical presses have been introduced to extract Argan oil. This process reduces considerably the time needed to do the job. Once the kernels are roasted, the mechanical press takes care of the grinding and extraction. More oil is extracted by machine than by hand, and since no water is added to press the dough, the oil can be stored longer without spoiling.
The most time consuming part of the process, cracking the nuts, is often still done by hand.
Argan oil is sensitive to heat and can spoil quickly, so once it is made, it is bottled, and once the bottle is opened, the oil is kept under refrigeration. You sprinkle it over salads, pasta, raw tuna, and other dishes at the last minute, just before serving.
It was only a matter of time before American chefs that visited Morocco would discover the wonderful nutty flavor of Argan oil and would bring it back home to use in their restaurants…and now, it’s all the rage.
In our visit to Morocco five years ago, we made a special trip to the Targanine Cooperative, where they gather local women to work together to produce the highest quality organic Argan oil.
The project has two objectives: to preserve what they can of the Argan forest by using sustainable harvesting methods…and to improve the social and economic status of the rural Moroccan women that make the oil.
As you can see in these photos, the women spend their days taking turns with different parts of the extraction process, sitting in a circle, and socializing while performing this tedious job. It’s no wonder that Argan oil is expensive…about $30 for 5 ounces here in the United States at gourmet websites. But, much like a fine olive oil or balsamic vinegar, a little goes a long way to flavor your food. And now Argan oil is becoming a popular ingredient in the world of cosmetics as well.
When you see the women of Morocco making Argan oil from beginning to end, and you realize just how much work it was to do it, the price is very reasonable. And it’s just another example of how often we take for granted what we can so easily buy on a store shelf or with a click of a mouse.
Pork is magical. And though I’ve loved bacon and pork chops all my life, it’s only recently that I’ve started to appreciate other cuts of pork and how they’ve been prepared.
No store-bought bacon for me. I have a favorite website where I’ve bought the best quality bacon on line from Missouri for years: http://www.smokehouse.com/.
My Italian pork sausages and larger cuts of pork (like shoulders, bellies, and big fat pork chops) come from Caw Caw Creek, the only certified humane heritage breed pork farm in North Carolina. http://www.cawcawcreek.com/.
My pork ribs and liverwurst come from my friends at Simmons Farm in Middletown, RI, a certified organic farm. http://www.simmonsorganicfarmri.com/
And sometimes, my pork can come from surprising places, like my rafting guide friend Rob, whose family runs Crabapple Whitewater in the Forks, Maine, where I raft on the kennebec and Dead Rivers every year. Rob decided to raise two pigs this past year, and he’s willing to trade pork jowls for a few bottles of my homemade Lithuanian honey liqueur called Krupnikas.
Pork jowls?
Weighing the jowl pieces
It all started when I wanted to make an authentic spaghetti carbonara. Since I worship at the Italian food altar of chef Mario Batali, I went to his website to look up his recipe. It said that although many people use bacon or pancetta (both from the belly of the pig—the bacon is smoked, pancetta is not)…authentic carbonara is made with guanciale (pronounced gwan-chee-ah-lay).
Guanciale is cured (but not smoked) and made from pork jowls…that would be the cheeks of the pig. According to Batali, you take raw jowls, cure them for about a week in sugar, salt, peppercorns and fresh thyme, then hang the meat to dry. The result is a delicious pork product that you slice and fry and use in carbonara or any other recipe that calls for a tasty addition of porky goodness.
The flavor of pork jowls is subtly different than that of pancetta. There is a very special mouth-feel to the fat that makes guanciale so good. And once I made my first batch, there was no turning back!
But finding raw pork jowls was not easy. Many websites offered smoked jowls. But raw jowls were almost impossible to find, and I just about gave up until I visited my friends Sal and chef Aaron at the Back Eddy in Westport, Massachusetts. I told them of my dilemma and they said: “Pork jowls? Oh, we can order them for you!” I was psyched!
About a week later, I picked up my jowls, individually wrapped in hermetically sealed ¼ pound packages, and my curing began, following Batali’s recipe.
Getting the curing ingredients together: picking thyme leaves.
Finding room in my spare fridge to cure the meat was easy…everything fit snugly in a Ziploc bag. But once it was time to dry the jowls (all 24 of them since I bought 6 pounds,) I had to rig up a special hanging system that used bungy cords, vinyl cable ties, and beer cans…don’t ask. But it worked! And three weeks later, I was frying up my guanciale in a sautee pan and adding it to vegetables, potatoes, and pizza. I even gave guanciale gifts to my foodie friends. And before long, it was time to make more.
Since that first curing effort, some things had changed. My source for heritage pork, Caw Caw Creek, now carried pork jowls, too. And I was able to buy a couple of 3-pound jowls at a time. They were big, thick, and what I originally envisioned when I dreamed of the jowl of a pig that weighed 300 pounds or more. I cut the two big jowls into 1/2–pound, 3-inch thick slabs, and cured them using the same recipe.
A big, beautiful jowl in its native habitat.
Jowls with curing spices.
All was fine until one time, I went away on vacation, and a hurricane hit our neighborhood, knocking the power out. Fortunately, my good neighbors came to my rescue and started up my generator, plugged in the fridge, and saved the guanciale! I was back in business.
Curing and hanging completed (I now used a far more sophisticated system of stereo wire instead of bungy cords and beer cans, as seen in the photo,) I’ve been sharing the goodness of this incredible and little-known pork product with anyone who would listen—and taste.
A year ago, I had never heard of guanciale. Now, I can’t imagine not having a slab at the ready in my fridge. I use it just about anywhere I would use bacon, short of a BLT.
And by the way…I’ve yet to make the spaghetti carbonara recipe!