Author Archive

FRIED GREEN TOMATOES

Posted: September 6, 2023 in Uncategorized

I don’t know why it took me so long to try this recipe. But this year, perhaps with a late start due to a cold spring, my tomato plants didn’t start forming fruits until much later in the season. And so, I still had a lot of green tomatoes on the vine as the summer came to an end. Fried green tomatoes were the tasty solution to the problem.

It’s a really simple process of slicing the tomatoes, seasoning them with salt and pepper, dusting them with flour, dipping them in egg, and then rolling them in some flavored breadcrumbs before frying.

Good news for those that need it all gluten-free! It can happen if you follow my instructions below.

Green tomatoes, sliced
Salt and pepper
All-purpose flour (I use Bob’s Red Mill 1-to-1 Gluten-Free Baking Flour)
2 eggs, beaten
Seasoned breadcrumbs (I make them gluten-free…see below)

At first, I sliced my tomatoes at about 1/4″ thick, but I found that if I could make them just a bit thinner, they would come out even crispier.

I placed the tomatoes on a cutting board, and seasoned them with the salt and pepper.

I then set up my 3 bowls for adding the breading. In the first bowl, the all-purpose flour. (I like using the Bob’s Red Mill 1-to-1 Gluten-Free Baking Flour because it’s mostly rice flour and it makes the coating lighter.)

In the second bowl, I whisk a couple of eggs.

In the third bowl, I place my seasoned breadcrumbs. (You can buy Italian seasoned breadcrumbs, but I make my own by toasting a loaf of Udi GF bread, tossing the pieces into a blender to mill them down to a powder. I add oregano, basil, parsley, salt and pepper, granulated garlic and granulated onion, then whiz the blender for just a few seconds to combine everything. I place this in the third bowl.)

Then it’s time to do the one-handed method of dipping the tomato slices one-by-one into the egg, then dropping it into the breadcrumbs, where the other hand takes over to cover the tomato with a light layer of breadcrumb. Do the same for all the tomatoes.

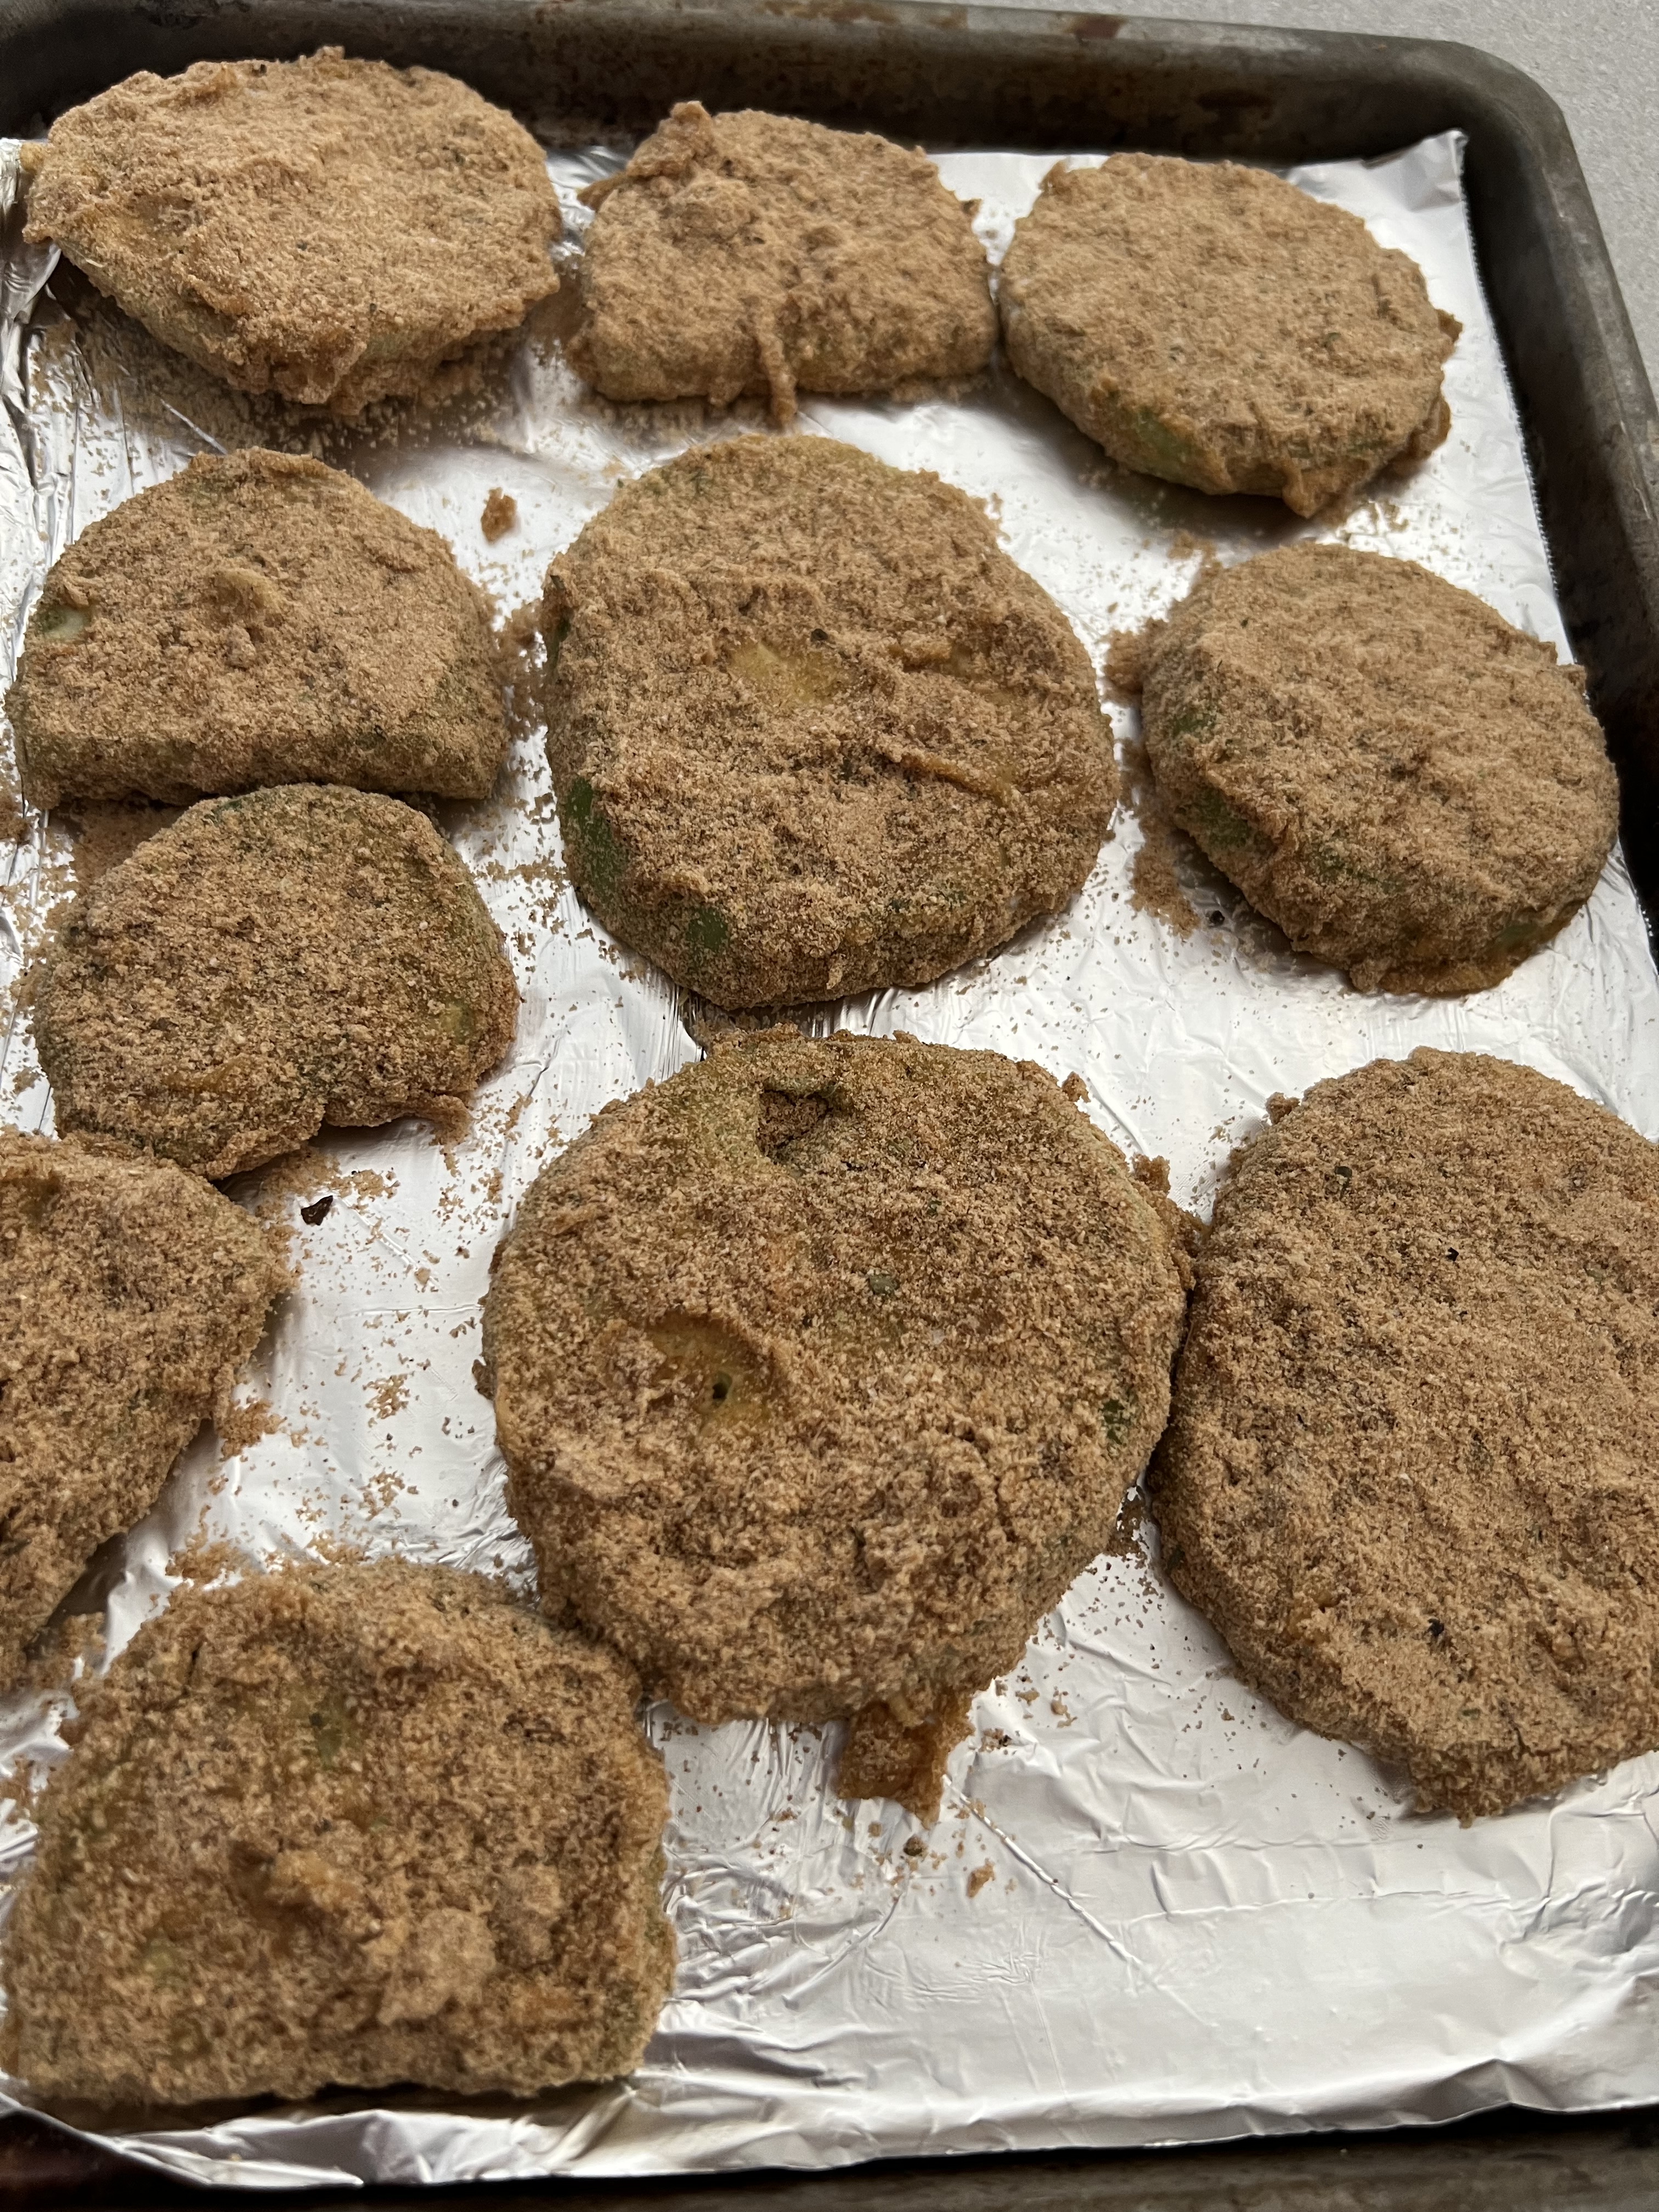
Fry the tomatoes at 350 in an oil with a high smoke point, like grapeseed oil or avocado oil, until golden.

Place the tomato slices on a wire rack to cool, seasoning them immediately out of the fryer with some sea salt.

I’m not a jealous guy….usually. But when I saw my friends post that they’re on their way to one of my favorite islands in the world, St. John in the USVI, I wanted to just drop everything and join them.

I’ve been to St. John at least 7 times, whether solo, or with family and friends, and I always had a dream of retiring there…that is, until Hurricane Irma devastated the island almost to the day 6 years ago. (September 6, 2017) It changed St. John forever, and I haven’t been back since before that catastrophic event. I am long overdue.

I thought about the many trips I’ve taken there, and the mandatory catamaran trip we took to sip Painkillers at my all-time favorite beach bar, the Soggy Dollar on the island of Jost Van Dyke in the British Virgin Islands.

The Painkiller is one of the tastiest rum drinks you can make, and one that certainly brings you back to the Caribbean. And it was invented at the Soggy Dollar. Located on White Bay, a stretch of the whitest most beautiful sand in the Caribbean, surrounded by sparkling turquoise waters, there is no dock. You have to anchor your boat offshore and swim…hence the name: the Soggy Dollar.

Daphne Henderson was the owner of the Soggy Dollar years ago, and she is credited for inventing the Painkiller, which used Pusser’s rum, a British rum that is readily available here in the United States. Charles Tobias, a businessman that received permission from the British Royal Navy to commercialize Pusser’s rum in 1980, tasted the Painkiller and realized the potential of this amazing drink. He took some Painkillers home to the island of Tortola, where he experimented in recreating that drink, coming up with what he thought was something that was as good as—if not better than—the original. He called it the Pusser’s Painkiller.

Tobias never found out what Daphne Henderson’s original recipe was, but when he brought his own Pusser’s Painkillers back to the Soggy Dollar, and had a tasting battle between the two recipes, legend has it that his recipe won 10 out of 10 times. With Pusser’s bars and restaurants in the Caribbean and more in the states, Tobias quickly made the Pusser’s Painkiller the signature drink of these now-famous establishments…and perhaps the most popular drink among the sailing community in the US, Caribbean and West Indies.

The drink itself is simple…

PUSSER’S PAINKILLER
4 parts pineapple juice
1 part cream of coconut
1 part orange juice

Combine these 3 ingredients, with lots of fresh grated nutmeg in a glass with ice. How much Pusser’s rum you use depends on how hammered you want to get! A Pusser’s #2 uses 2 parts rum…a Pusser’s #3 uses 3 parts rum…and a Pusser’s #4 uses 4 parts rum!

I’ve had several Pusser’s #4’s back when there was a Pusser’s bar on St. John many years ago. I’ve also sampled them in the BVI at the Pusser’s locations on Tortola.  But I still prefer going back to Jost Van Dyke and knocking back a few at the place where the Painkiller was born, the greatest beach bar on planet Earth: the Soggy Dollar Bar.

Sailing away many years ago…

A short time ago, there was an article that posted what they claimed was the original recipe of the Painkiller from the Soggy Dollar. It seems the only difference between the original and the Pusser’s version was the ratio of pineapple to orange juice. That’s just a personal preference.

Recently, the Soggy Dollar folks upped the game by putting their name on a line of rum. I just saw it in the store the other day, and have not yet had a chance to try it.

Whether you use this rum, Pusser’s, or whatever your favorite rum is, fact is, the best Painkiller is the one in your hand!

I didn’t mean to cheat…honest. But I wasn’t thinking when I bought my corn in the supermarket, and I bought ears that were already shucked. Classically, Mexican street corn is made by throwing unshucked ears of corn on the grill to cook them. So I improvised.


I took the shucked ears of corn, placed them in a pot of cold water, and brought it to a boil. I boiled the corn for just 2 minutes, removing them from the water at that point.


I placed the ears of corn on the grill, and watched over them carefully, rolling them back and forth so that they would have a nice char on them but wouldn’t burn. When I liked the color of the corn, I brought the ears inside and added the remaining ingredients, which can be prepared ahead of time.


1/2 cup mayonnaise
1/2 cup sour cream
juice of 1 lime
1/2 teaspoon granulated garlic

Combine these ingredients in a bowl and place it in the fridge until it’s ready to use.

Cotija cheese, crumbled
Tony Chachere’s Creole Seasoning
Fresh cilantro, finely chopped


Once the corn comes off the grill, brush on the mayo/sour cream mixture all over the corn. Traditionally, chili powder is sprinkled on, but I prefer the Tony Chachere’s. Sprinkle the cotija cheese on top, and garnish with a little cilantro.

A favorite.

The definition of a consomme is: “a clear soup made with concentrated stock.” I might add “mind-blowing” to that sentence, especially with this recipe. The key to success– and this is crucial–is to use absolutely garden-fresh, in-season ingredients. If you try this with greenhouse or supermarket tomatoes, you’re just wasting your time.


FullSizeRender (9)

4 1/2 lbs. of fresh garden tomatoes (my favorite is the heirloom: Brandywine)
1 large bunch of fresh basil, leaves and stems
1 2-inch piece of fresh horseradish, peeled
1 clove of garlic, peeled
1 tablespoon white wine vinegar (I use Alessi)
2 oz. vodka (I use Tito’s)
sea salt and pepper

Remove the core of the tomatoes, but leave everything else, including seeds and skin.

Put all the tomatoes, basil, horseradish, garlic, vinegar and vodka in a blender or food processor. You might need to do this in batches if your equipment can’t handle it all.

Process until you get a kind of slush.

Line a mixing bowl with a double layer of cheesecloth and pour the tomato slush mixture into it. Gather up the corners of the cheesecloth carefully, and tie them securely so you can lift the bundle up by the knot. Hang the bundle from a hook over a clean bowl in the fridge so that it catches the liquid that drips out, and leave the whole thing in there overnight. The liquid that drips out will be clear.


Cheesecloth bundle dripping overnight in the fridge.

Cheesecloth bundle dripping overnight in the fridge.


To serve, chill bowls (or in this case: the sipping glasses) in the fridge. When you’re ready to serve, ladle out the consomme and garnish each with a tiny basil leaf. A drop of excellent quality olive oil is optional.


Synthetic cheesecloth apparatus. The real thing works better.

Synthetic cheesecloth apparatus. The real thing works better.


I tried using a synthetic cheesecloth for this recipe, and I found that it doesn’t filter out enough of the solids to make a clear consomme. You could use it along with real cheesecloth, just to use the stand, or just hang it all in real cheesecloth, as described in this recipe.

I’m always looking for a new way to enjoy chicken, and I found a chicken wing recipe that sounded pretty good…but it needed a few special tweaks to make it my own.


Sweet, a bit spicy, and incredibly delicious, you can’t stop eating these wings once you get started!

My next project will be to cut up a whole chicken and use this amazing glaze on an entire bird!

3 lbs. chicken wings
1/2 cup ketchup
1/2 cup unseasoned rice vinegar
1/4 cup soy sauce
2 tablespoons honey
1 tablespoon Chinese chili garlic sauce
salt and pepper
chopped scallions
white sesame seeds
chopped cilantro (optional)


To make the glaze, combine the ketchup, rice vinegar, soy sauce, honey, and chili garlic sauce in a sauce pan. Simmer it over medium heat, reducing the sauce by half. Set it aside.

Pre-heat the oven to 350 degrees.

Season the chicken wings with oil, salt and pepper. Spread them out on a sheet pan lined with non-stick foil and bake them until done, about 30 minutes.

Remove the chicken from the sheet pan and place them in a large bowl. Raise the oven temperature to 400. Pour off any fat or liquid from the sheet pan and discard it.


Add the glaze to the bowl with the chicken and toss the wings in it until they are really nicely coated. Then return the wings to the sheet pan.


Bake for another 5 to 10 minutes, until you just start seeing a little char on the edges of the wings.


Plate the wings and top them with the scallions, sesame seeds, and cilantro.


MAPLE CORN BREAD

Posted: August 23, 2023 in Uncategorized

I’ve been substituting maple syrup for honey in a variety of recipes lately, and I found that I prefer it. Doesn’t matter if it’s in a barbecue sauce, a marinade, or, in this case, cornbread. Pure maple syrup just makes the recipe better!


1 cup yellow corn meal
1 cup all-purpose flour (gluten-free flour works great, too)
1/2 cup sugar
1 tablespoon baking powder
1 teaspoon salt
1 cup milk
2 large eggs, beaten
1/2 stick unsalted butter, melted
1/4 teaspoon vanilla extract
1/4 cup real maple syrup

Preheat the oven to 400 degrees.

In a bowl, combine the corn meal, flour, sugar, baking powder and salt. Mix them together well.

In a separate bowl, combine the milk, eggs, butter, vanilla and maple syrup.

Add the wet ingredients to the dry, and stir them together until they’re just blended. Don’t overmix.

Grease an 8 x 8 pan with oil (I used avocado oil), and pour the batter into it.

Bake for 25 to 30 minutes, until golden brown.

To make this corn bread gluten-free, simply substitute a GF flour for the all-purpose flour. I used Bob’s Red Mill Gluten-Free 1 to 1 Baking Flour with great results.

And to reduce the dairy, oat milk is a good substitute for the milk. (But quite honestly, whole milk really adds to the richness and moisture of the corn bread.)

I even baked this once without the eggs (not on purpose!) and it came out a bit drier, but still really flavorful.

As I’ve mentioned previously, I love the Kona-crusted NY strip at the Capital Grille, so much so that it inspired me to make a coffee rub of my own. I’ve been using it on steaks and burgers for years. But recently, I used it on a slow-smoked pork shoulder for the first time, and it was fantastic!

I used a smaller pork shoulder, about 6 lbs., and smoked it for about 12 hours. Obviously, if you use a larger hunka meat, you’ll need more time. I prefer a bone-in shoulder over boneless. I think it gives greater flavor.

Rubbed and ready to smoke!

My coffee rub is easy to make, and I usually make a lot of it at once, since it stores well.

3 tablespoons brown sugar
1 tablespoon Kosher salt
1 tablespoon ground coffee (use your favorite)
1 teaspoon granulated garlic
1 teaspoon granulated onion
1 teaspoon unsweetened cocoa powder

I mix all the ingredients well, then rub generously on the pork shoulder before placing it a 250-degree smoker for about 12 hours. I use an electric smoker, which allows me to set the temperature and forget it, with the exception of occasionally adding hickory chips. I love just a hint of smokiness…I don’t want the rub to be overpowered by the smoke.

Perfectly smoked, with the bone easily sliding out of the shoulder.

The brown sugar in the coffee rub creates a beautiful crust on the meat, which goes really well with the pork and the barbecue sauce I make.

The barbecue sauce uses much-needed vinegar. It cuts through the rich fattiness of the pork, and is absolutely delicious.

2 cups ketchup
3/4 cup water
6 tablespoons cider vinegar
6 tablespoons white vinegar
6 tablespoons brown sugar
3 tablespoons Worcestershire sauce
1 tablespoon chili powder
2 teaspoons salt
2 teaspoons black pepper
1 1/2 teaspoons cumin

Mix all the ingredients in a saucepan and simmer until the flavors have blended, about 20 minutes. Remove from heat and cool to room temp. If you store it in an airtight container in the fridge, it’ll stay good for a few months.

A beautifully smoked pork shoulder, amazing barbecue sauce…what more do you need for an amazing pulled pork sandwich except a toasted brioche bun and perhaps some of my world-famous home fries on the side?

The home fries? That recipe is for another blog!

TUNA TARTARE

Posted: August 17, 2023 in Uncategorized
Tags: , , , , , ,

For me, the only way to eat tuna is raw, and not just sushi or sashimi. I’m not  a fan of what most restaurants do: serving tuna seared on the outside and rare on the inside. You can tell the quality of the tuna just isn’t there. It usually needs to be drowned in soy sauce to have any taste at all.

So getting my tuna fix often means I’ve got to prepare something at home.

If you’re paranoid about parasites, tuna is probably the safest fish to eat raw. I buy my tuna wild-caught and frozen from reputable sources. Occasionally, I’m lucky enough to buy it fresh from the fisherman, but that is a rare treat.

Technically, fish needs to be frozen at a temperature of -4°F (-20°C) or below for 7 days, for parasites to be killed. In the United States, this is required by law of all fish served at sushi restaurants, with tuna being the only exception.

Most marinades or ceviches use lemon or lime. I enjoy the freshness of grapefruit, and it really works here. This recipe was literally created by opening my fridge and pantry, and grabbing whatever looked good.


fullsizerender-10

1 lb. excellent quality raw tuna
juice of 1 grapefruit
1 teaspoon grapefruit zest
2 teaspoons low-salt soy sauce
1/2 teaspoon wasabi powder
1/2 teaspoon hot pepper sauce (I use Frank’s Red Hot)
1/2 teaspoon black pepper
1/2 teaspoon sesame oil
1/4 teaspoon sea salt (I use Fleur de Sel)
1 tablespoon chopped scallions, green part only
sesame seeds (optional)
cubed avocado or plain guacamole


If I’m starting with frozen tuna, I allow it to thaw just enough so I can cut it into small cubes easily. I place the cut tuna on paper towels to soak up excess moisture, and keep it in the fridge.

In a bowl, I combine all the other ingredients, except the sesame seeds and avocado. I add the tuna to the bowl, and mix everything carefully, putting it back in the fridge to marinate for an hour.

When I’m ready to serve, I place the tuna on a plate. (If it’s very runny, I use a slotted spoon.) I top it with a sprinkling of sesame seeds and serve with fresh cubed avocado, or even plain guacamole.


fullsizerender-6


My daughter and I recently had our quarterly “fodder/dodder dinner” at our Providence Capital Grille. Their signature cocktail, the Stoli Doli, reminded me it was time to make a new batch of what I like to think is an upgraded version: my Velvet Elvis.


A Stoli Doli is simply Stoli vodka that has been infused with fresh pineapple. If you sit at the bar at the Capital Grille, you won’t be able to miss the very large jar of freshly-cut pineapple pieces swimming in vodka. They literally pour it “from the tap,” and serve it straight up, like a martini, or on the rocks. It’s delicious, and I’ve certainly had my share of them.

I decided to make my own at home one day, to serve to my friends at an upcoming party. But to my disappointment, I didn’t have any Stoli vodka in the house. (An embarrassment to most Lithuanians.) But…I found a bottle of Stoli Vanil, the vanilla-flavored vodka, and it was a real game-changer! I used that instead of regular Stoli and I came up with a sweeter, smoother drink that is now legendary among my friends.


VELVET ELVIS

2 ripe, sweet pineapples, peeled, cored, and sliced
1.75ml Stoli Vanil

Find a gallon-sized glass jar with a lid. Peel, core and slice the pineapples and drop the pieces in the jar. Pour the vodka in, mix well, and seal the jar. Keep it at room temperature for 7–10 days, giving it a gentle shake every day.

After 7–10 days (don’t worry…a little longer won’t hurt anything), strain it, squeezing the pineapple pieces to get every bit of liquid out. Discard the pineapple pieces. (As much as you might think they would be fun to munch, they’ve given up all their flavor to the cocktail, and taste terrible!)

Keep the Velvet Elvis refrigerated. Serve with rocks (or 1 big rock!), or shaken and poured into a martini glass.


As a martini, or on the rocks!

GREAT ONION RINGS AT HOME

Posted: August 10, 2023 in Food, frying, Recipes
Tags: , , ,
If you look online, there are a  million ways to make onion rings. So, in doing my research, my first step was to decide how I wanted them. Did I want a big, thick batter? Or something extremely light? Or something somewhere in the middle?
I’m not a fan of onion rings that have more batter than onion. After looking through dozens of recipes, I finally came up with one on my own that really satisfied my craving for onion and also a craving for a great crunch.
The set-up requires four trays, and lots of messy dunking before it goes into the oil. But it’s all worth it in the end!
I have a deep fryer, but the basket in it is small, so I can’t fry as many onion rings at one time as I’d like. So using a larger pan with a shallow pool of oil was the answer: it allowed for more onion rings to be fried in a single batch.
Onions, sliced about 1/4″ wide (I like using Vidalias)


In the first pan..
2 raw eggs, scrambled
In the second pan…
1 cup self-rising flour
In the third pan…
2 more raw eggs, scrambled
In the fourth pan…
2 cups fine breadcrumbs
1 teaspoon salt
1 teaspoon granulated onion
1 teaspoon granulated garlic
pinch of dried oregano (optional)
I like to fry with peanut oil or grapeseed oil, so I pour an inch or two into a large pan and heat it to 340°, using a thermometer.
I peel the onions and cut them into quarter-inch wide slices, breaking them up into rings. (If a couple of rings of onion stick together to form a thicker ring, I don’t have a problem with that!)
Once that’s done, the procedure is really simple: dunk the onion rings in the first pan with the egg, coating them well. Then dunk them into the second tray with the self-rising flour, shaking off any excess. Then dunk them into the third tray with the egg, making sure it’s completely coated. And finally, dunk them into the fourth tray with the seasoned breadcrumbs, again, shaking off any excess.
Drop the onion rings into the hot oil and be sure to flip them so they cook on both sides. Cook until they’re golden brown. Place them on a sheet pan with a metal rack to cool.

I experimented with three variations. The top brown ones follow my recipe. The ring on the bottom right is dipped in egg and the flour mix only. The ring on the bottom left is dipped in egg, then the flour mix, back to the egg, and the flour mix again. The breadcrumb procedure is still my favorite way to go. Great crunch!