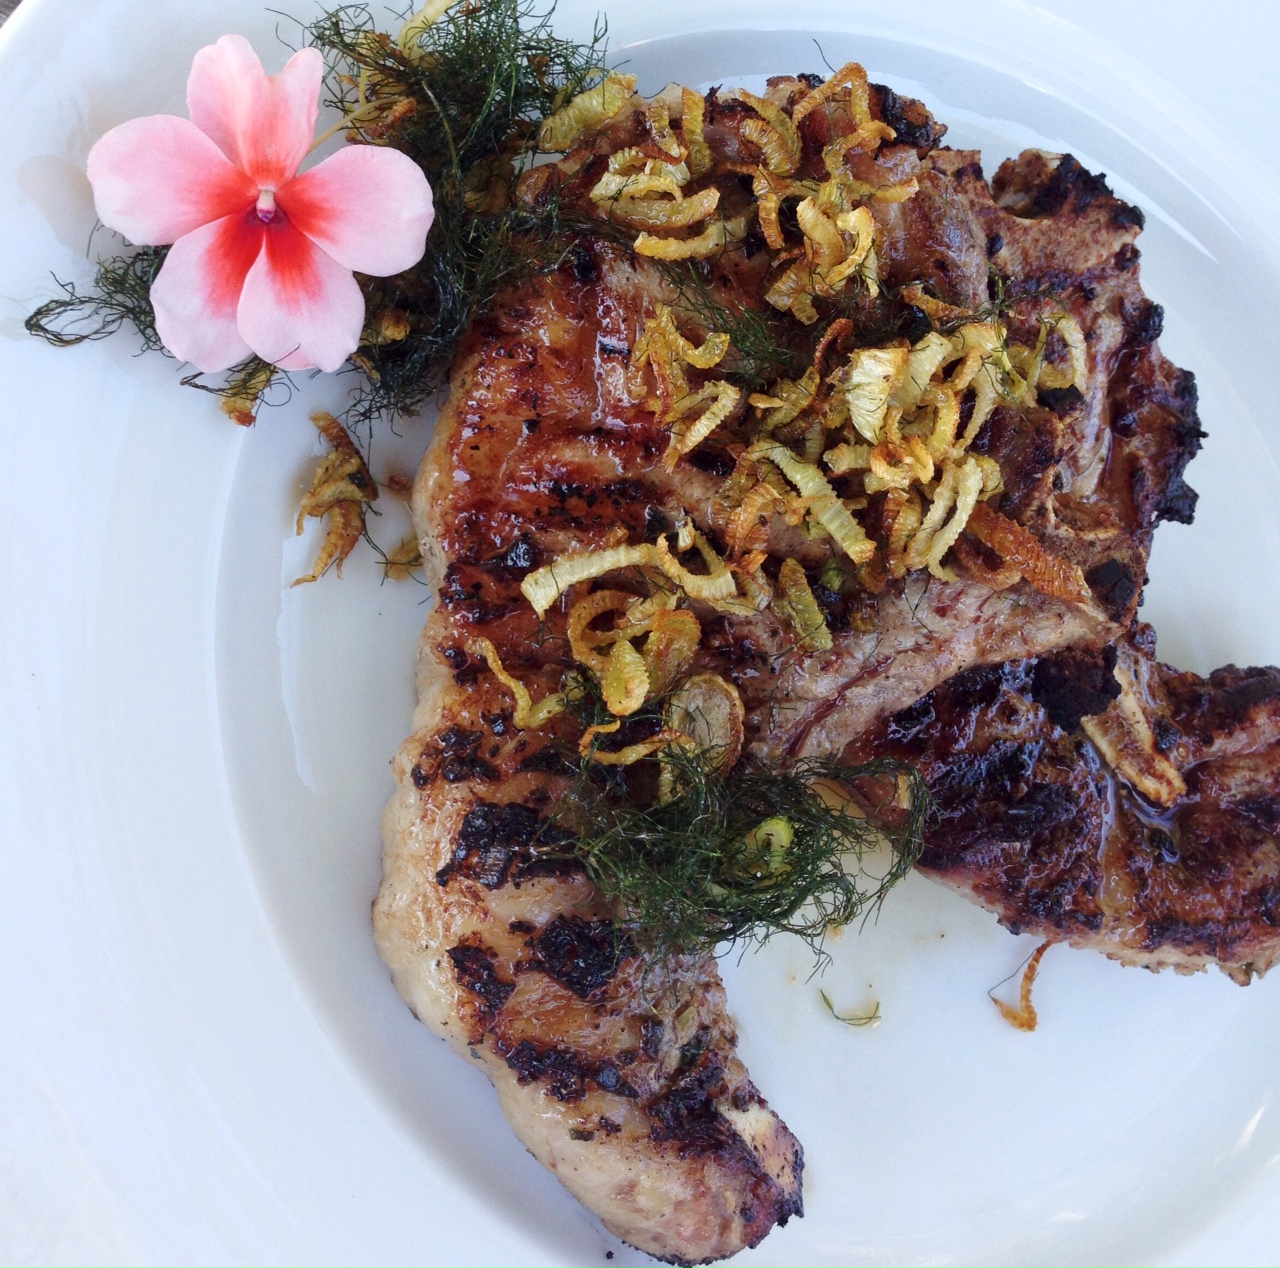
Inspired by a garden full of fennel and my fanatical love for all things pork, this recipe just happened. I use Berkshire heritage pork when possible, a far tastier and healthier choice over standard pork you find in a supermarket.
4 Berkshire pork chops
4 tablespoons finely chopped fennel bulb
2 teaspoons finely chopped fresh sage
3 teaspoons granulated garlic
1 teaspoon Kosher salt
1/2 teaspoon ground black pepper
3 tablespoons extra virgin olive oil
extra fennel bulb and fennel fronds
extra olive oil, salt and pepper for sauteing
Combine the chopped fennel, sage, garlic, salt, black pepper and olive oil in a bowl. Mix well and spread it all over the pork chops. Let them stand for an hour at room temperature.
Light a hot grill. Grill the pork chops until they’re done…with quality pork, that does not mean cook it to death! (An internal temperature of 160 is the way to go.)
Chop the extra fennel bulb into thin strips about an inch long. Remove the fennel fronds from their stems. Saute the bulb strips in olive oil, salt and pepper until they are almost crisp. Toss in the fennel fronds and cook until the fronds and bulb strips are crisp.
Serve the pork chops with crispy fennel and fronds on top.
Since it’s National Bourbon Day, let’s not just drink some bourbon…let’s cook with it!
This recipe uses a smoker. If you don’t have one, or just don’t want all the smoke, start with aper-heated oven at 250° and go from there.
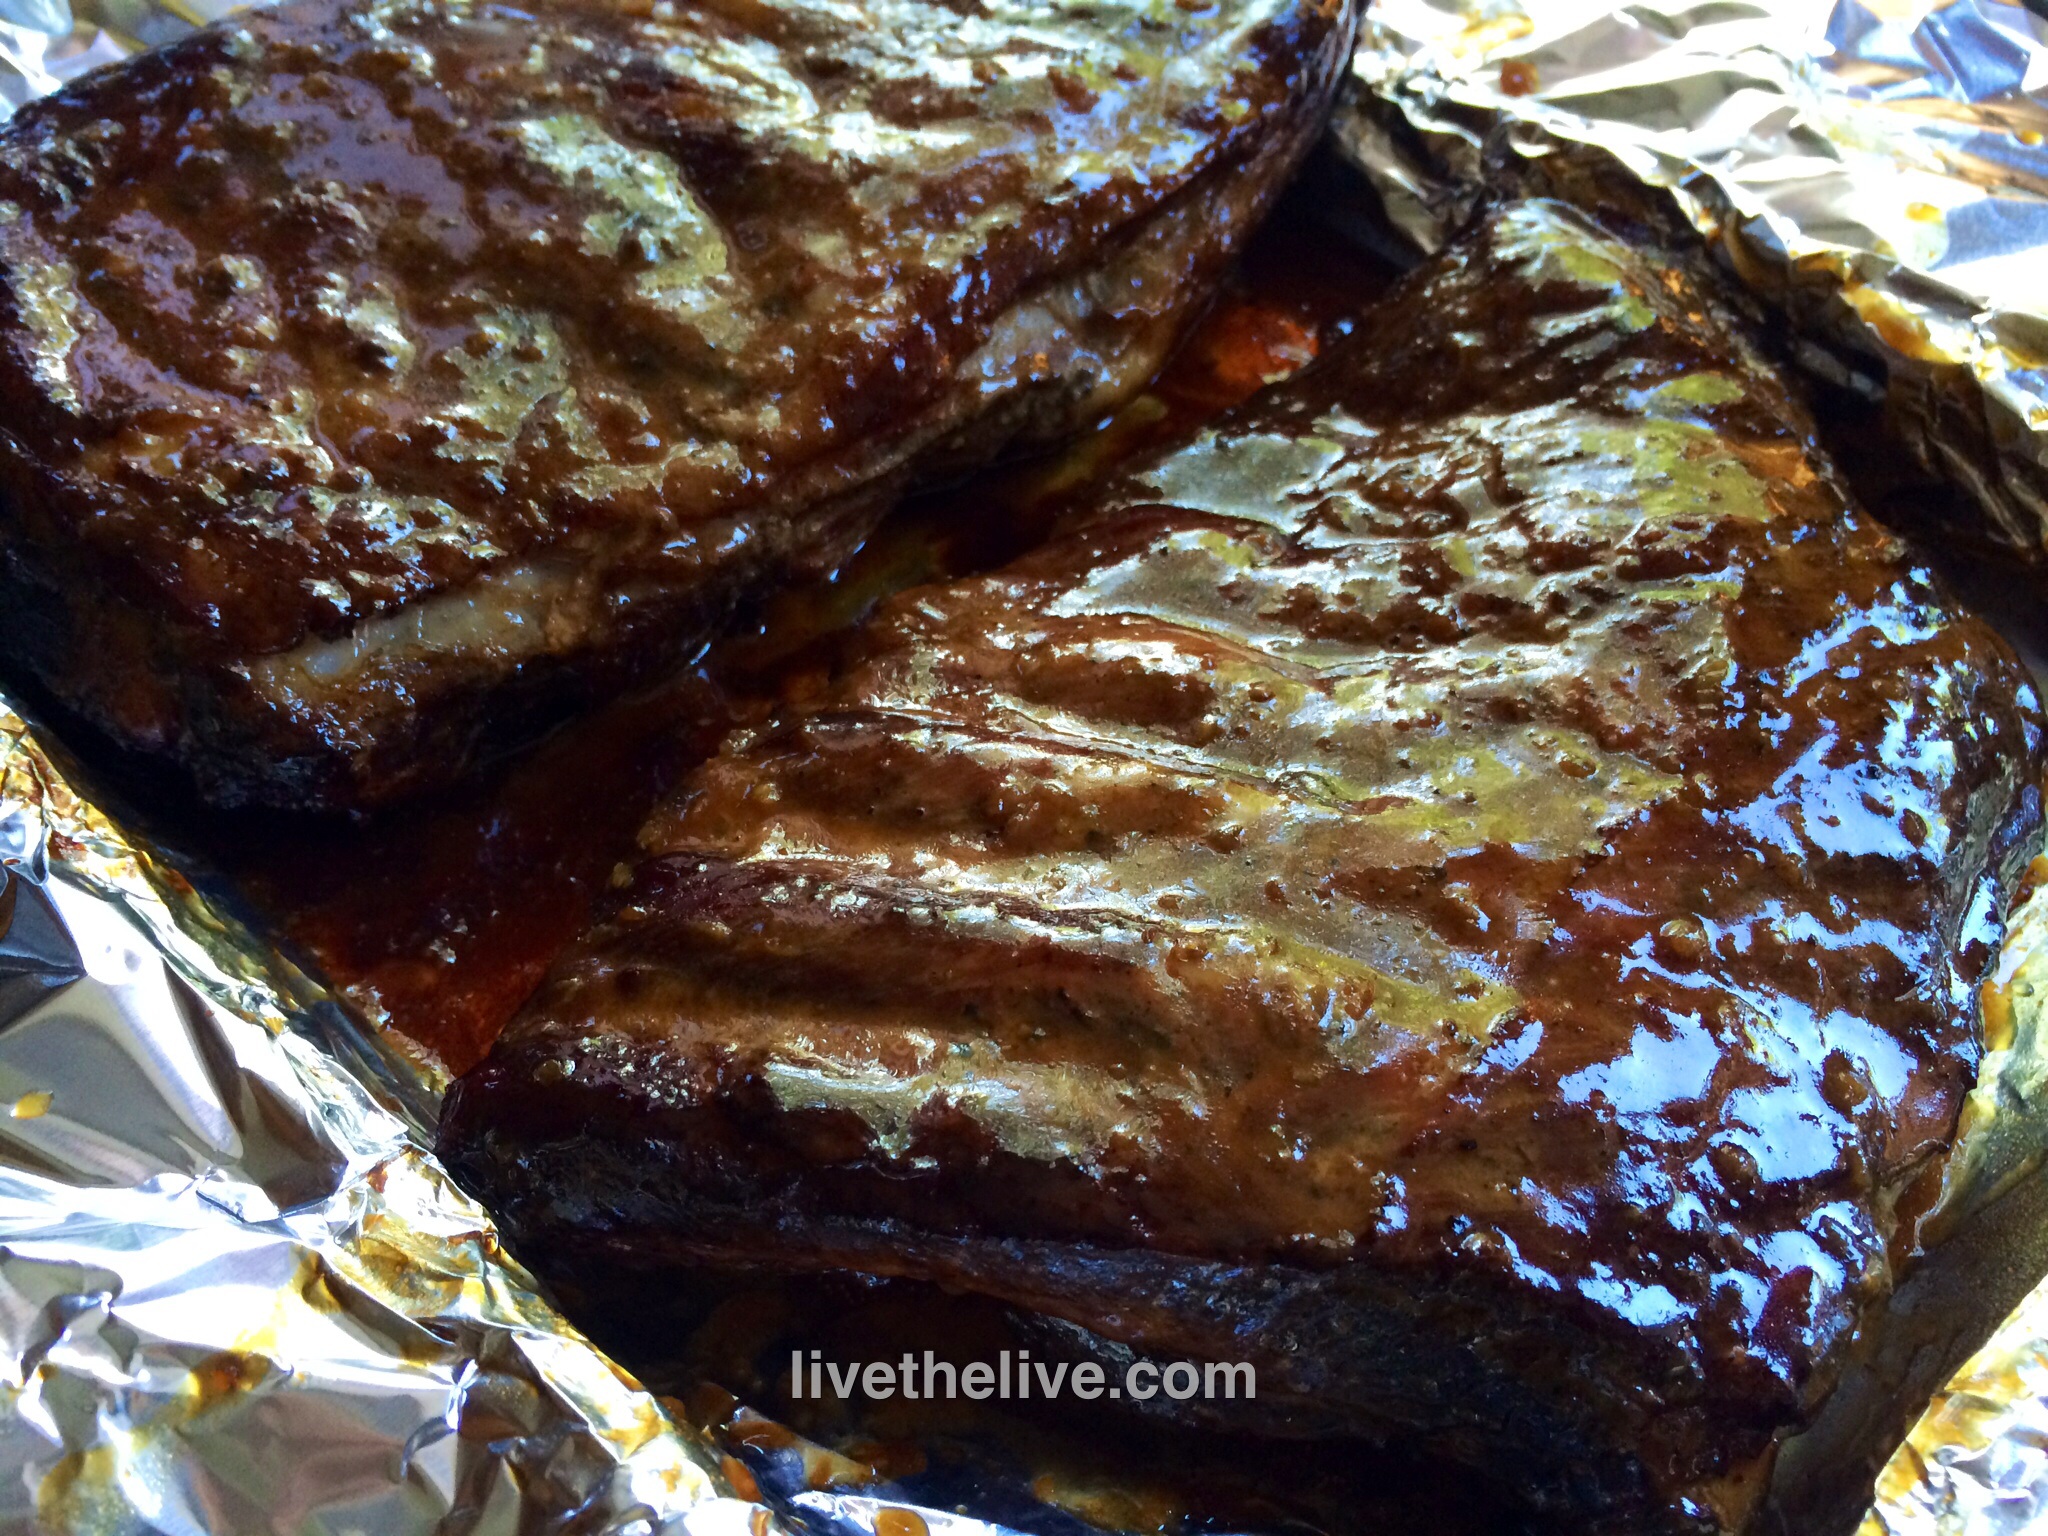
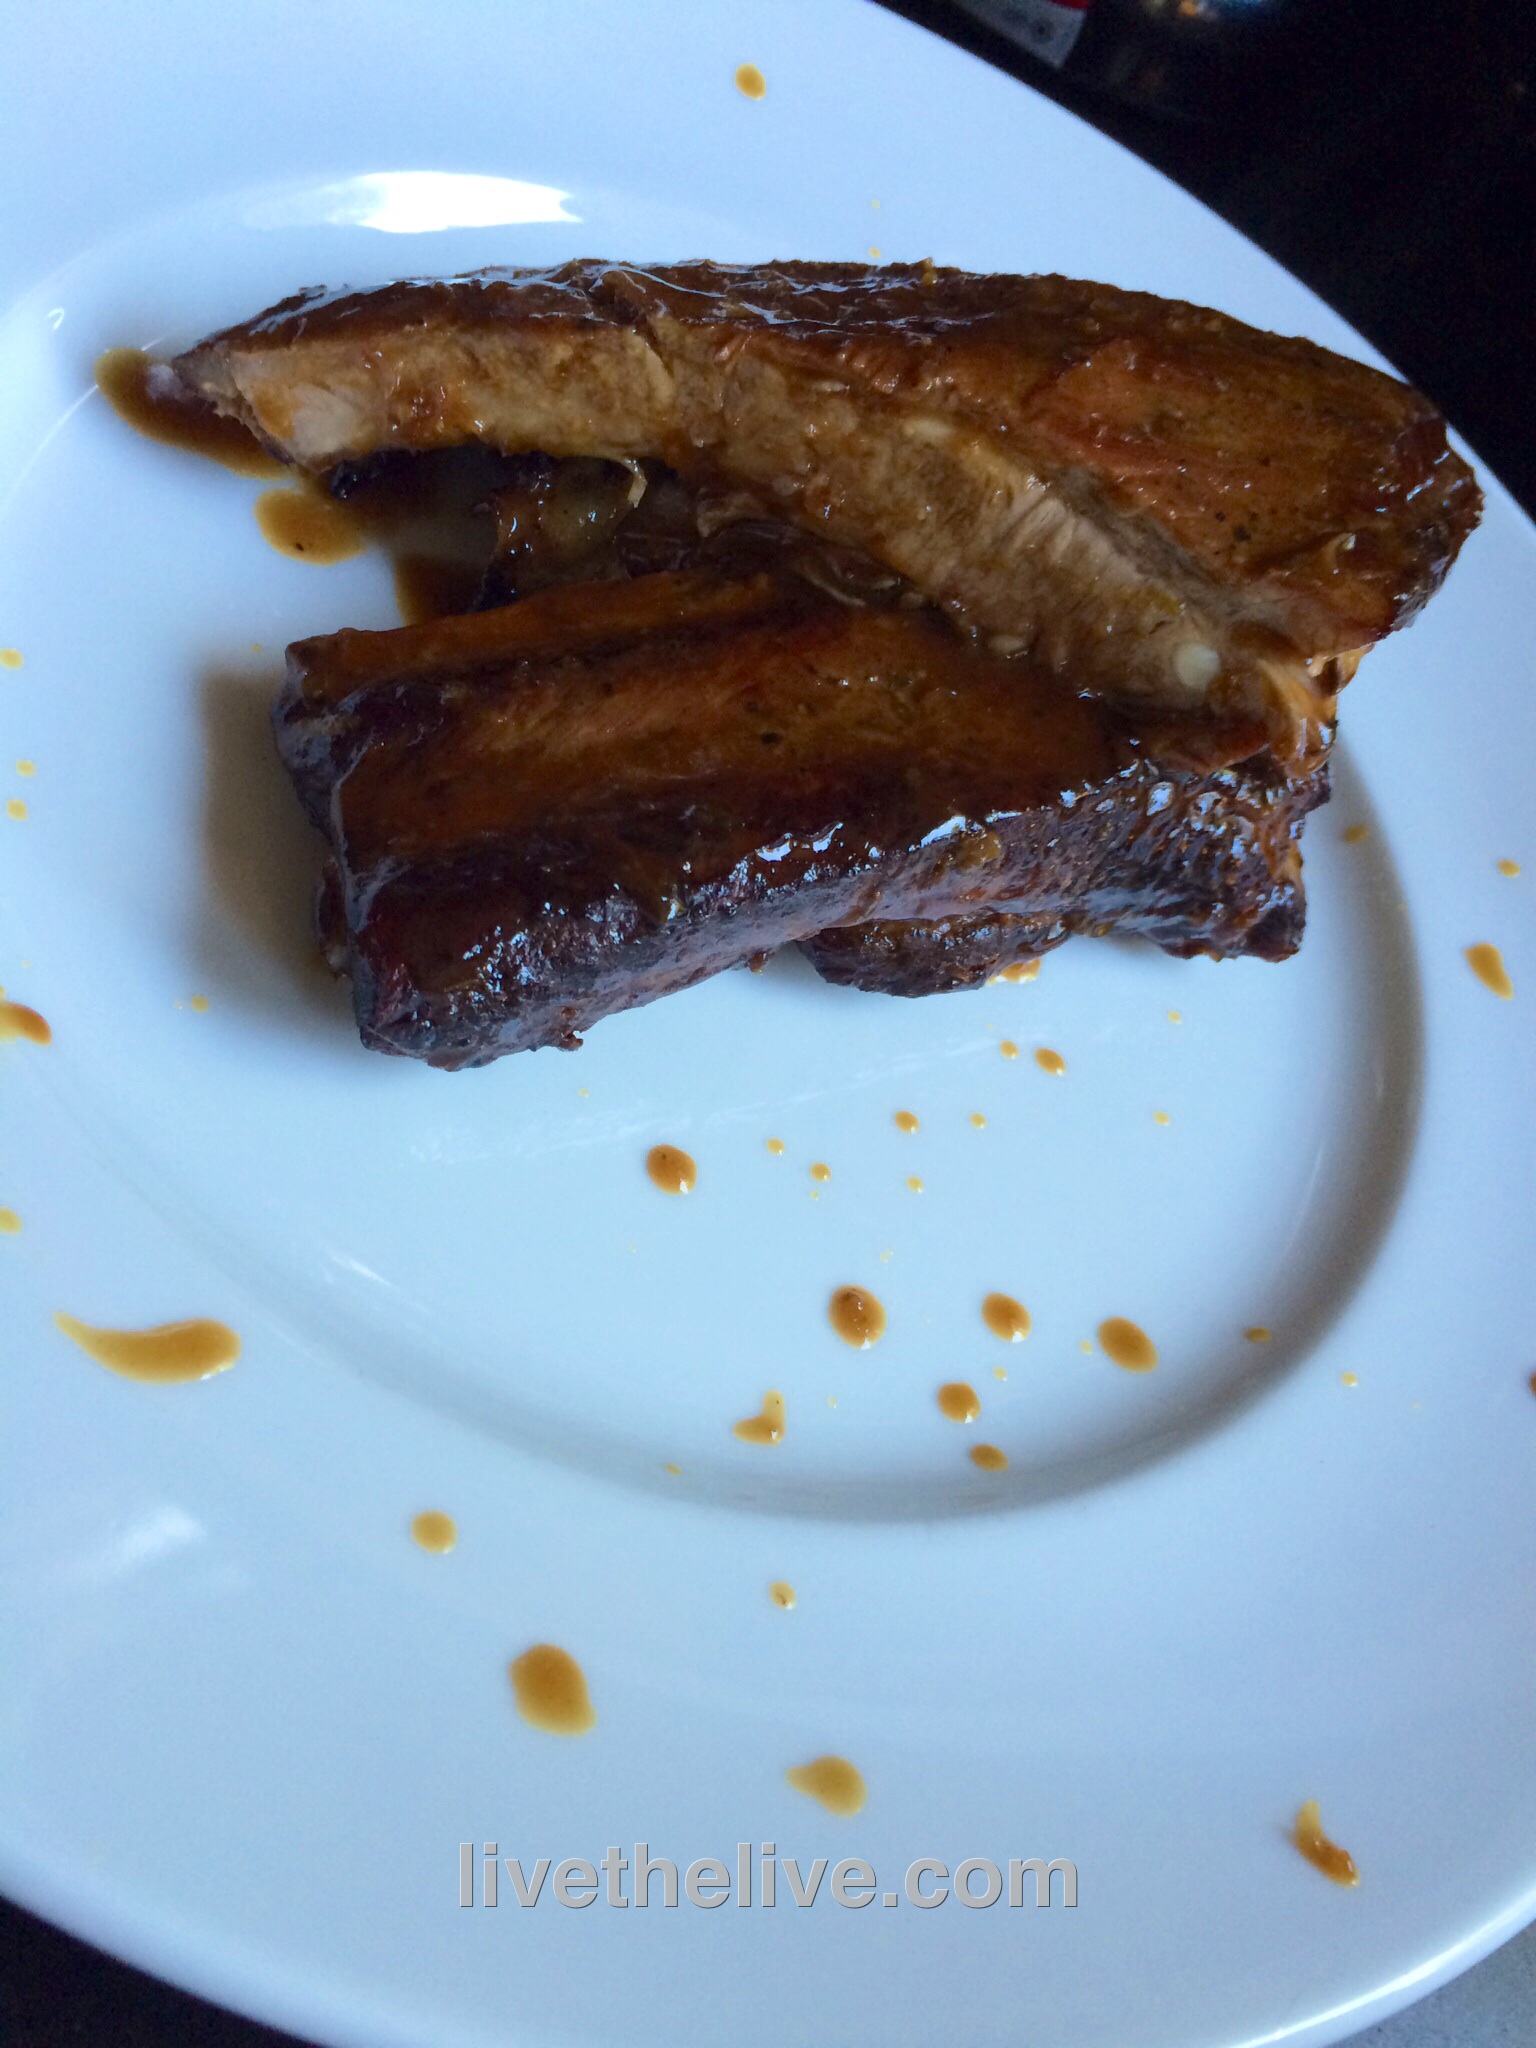
5 lbs St Louis style pork ribs Salt and pepper
1/4 cup honey 1/4 cup bourbon (use whatever you have on hand) zest and juice of 1 lime zest and juice of 1 lemon zest and juice of 1 orange 2 tablespoons Hoisin sauce 1 tablespoon Dijon mustard (I use Maille) 1 tablespoon soy sauce 2 teaspoons Worcestershire sauce 1 teaspoon chili oil
Season the ribs well with salt and pepper and cook in a smoker for 3 hours at 250°, using hickory chips.
While the ribs are smoking, combine the sauce ingredients in a sauce pan, bringing it to a boil, then lowering to medium heat and reducing the sauce by half until it thickens. Stir often, being careful not to let the honey foam up and spill over the top.
Pre-heat the oven at 250°.
Remove the ribs from the smoker and place them on a sheet pan that is lined with aluminum foil, with enough foil to wrap around the ribs. Brush the ribs on all sides with the sauce, stacking no more than 2 sets of ribs on top of each other, and then wrap them with foil.
Cook the ribs in the foil for 2 more hours, until tender.
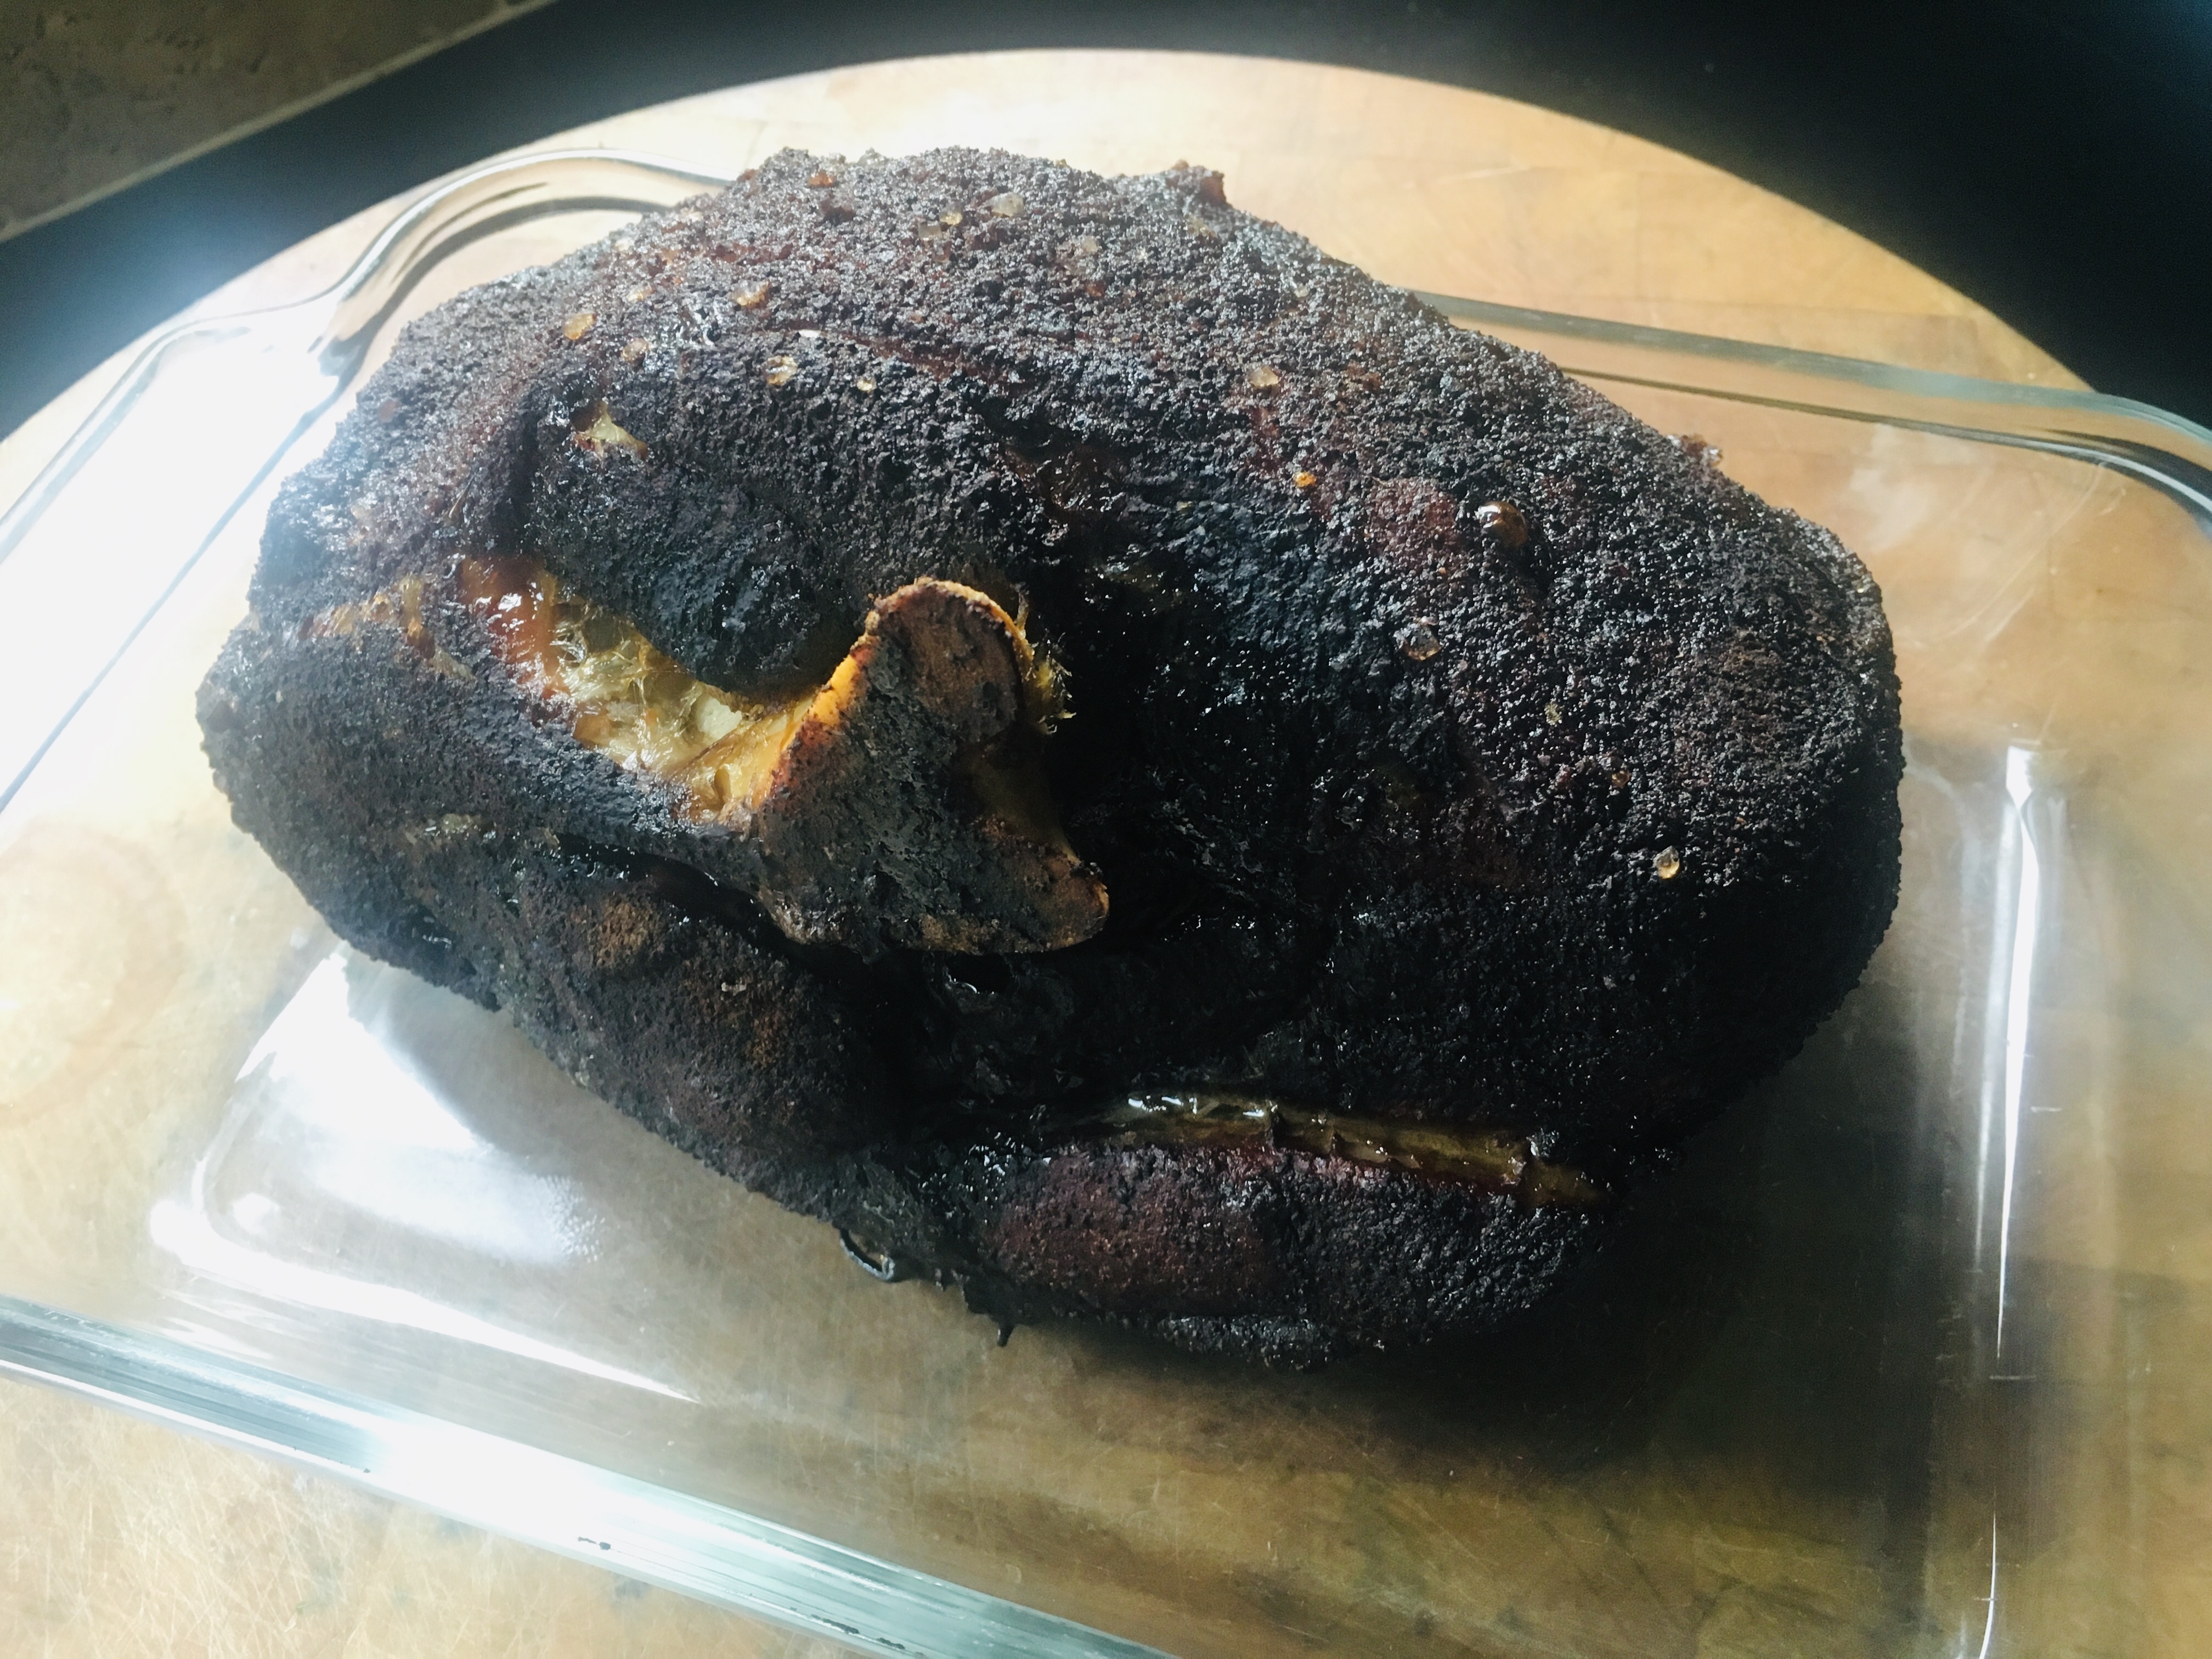
As I’ve mentioned previously, I love the Kona-crusted NY strip at the Capital Grille, so much so that it inspired me to make a coffee rub of my own. I’ve been using it on steaks and burgers for years. But recently, I used it on a slow-smoked pork shoulder for the first time, and it was fantastic!
I used a smaller pork shoulder, about 6 lbs., and smoked it for about 12 hours. Obviously, if you use a larger hunka meat, you’ll need more time. I prefer a bone-in shoulder over boneless. I think it gives greater flavor.
Rubbed and ready to smoke!
My coffee rub is easy to make, and I usually make a lot of it at once, since it stores well.
3 tablespoons brown sugar 1 tablespoon Kosher salt 1 tablespoon ground coffee (use your favorite) 1 teaspoon granulated garlic 1 teaspoon granulated onion 1 teaspoon unsweetened cocoa powder
I mix all the ingredients well, then rub generously on the pork shoulder before placing it a 250-degree smoker for about 12 hours. I use an electric smoker, which allows me to set the temperature and forget it, with the exception of occasionally adding hickory chips. I love just a hint of smokiness…I don’t want the rub to be overpowered by the smoke.
Perfectly smoked, with the bone easily sliding out of the shoulder.
The brown sugar in the coffee rub creates a beautiful crust on the meat, which goes really well with the pork and the barbecue sauce I make.
The barbecue sauce uses much-needed vinegar. It cuts through the rich fattiness of the pork, and is absolutely delicious.
2 cups ketchup
3/4 cup water
6 tablespoons cider vinegar
6 tablespoons white vinegar
6 tablespoons brown sugar
3 tablespoons Worcestershire sauce
1 tablespoon chili powder
2 teaspoons salt
2 teaspoons black pepper
1 1/2 teaspoons cumin
Mix all the ingredients in a saucepan and simmer until the flavors have blended, about 20 minutes. Remove from heat and cool to room temp. If you store it in an airtight container in the fridge, it’ll stay good for a few months.
A beautifully smoked pork shoulder, amazing barbecue sauce…what more do you need for an amazing pulled pork sandwich except a toasted brioche bun and perhaps some of my world-famous home fries on the side?
When my daughter hangs out with me, I always ask her what she wants me to cook for her, and there are a few “Dad” recipes that are her favorites. This is one of them, especially when fresh asparagus is available. And as any parent will tell you, if your kid is craving a dish that has vegetables in it, count yourself lucky–and make it!!
Prepping asparagus is easy, and you don’t need a knife to cut off the woody bottoms of the stalks. Simply bend the stalks at the bottom and they will naturally snap off at the right point.
4 mild Italian sausages, sliced into pieces 1/2″ thick 1 lb. penne pasta 1/2 onion, finely chopped 1 cup chopped fresh trumpet mushrooms (white button mushrooms work, too), optional 2 cups fresh asparagus, sliced into 1-inch pieces 1 clove garlic, passed through a garlic press 1 cup homemade chicken broth 6 fresh sage leaves, finely chopped 1/2 cup freshly grated Parmigiano Reggiano cheese extra virgin olive oil salt and pepper
Have the pasta water salted and boiling, and add the pasta, cooking until just a bit more undercooked than al dente.
Heat a large pan, and drizzle in some olive oil. Sauté the sausage pieces until browned and cooked through, but not overcooked. Remove the sausages from the pan and place them in a separate bowl. Remove all but 2 tablespoons of the fat left behind in the pan.
Place the pan back on stove and sauté the onion until translucent. Add the garlic, and sauté for 10 seconds. Add the sage, and saute for 10 seconds, stirring. Add the chopped mushrooms and saute for a few minutes, then add the chicken broth, and simmer until almost all the liquid has evaporated. Pour the contents of the pan into the bowl with the sausages.
Return the pan to the stove, add a little more olive oil, and on medium heat, sauté the asparagus pieces. Cook them until they are al dente, not too soft. Once the asparagus has reached this stage, return all the contents of the sausage/mushroom bowl to the pan to heat through. Drain the pasta, and add it to the pan as well, combining all the ingredients. If it looks too dry, add a little pasta water to the pan. Season with salt and pepper.
Make sure you serve this hot, with grated Parmigiano Reggiano on top, and drizzle lightly over the top with extra virgin olive oil.
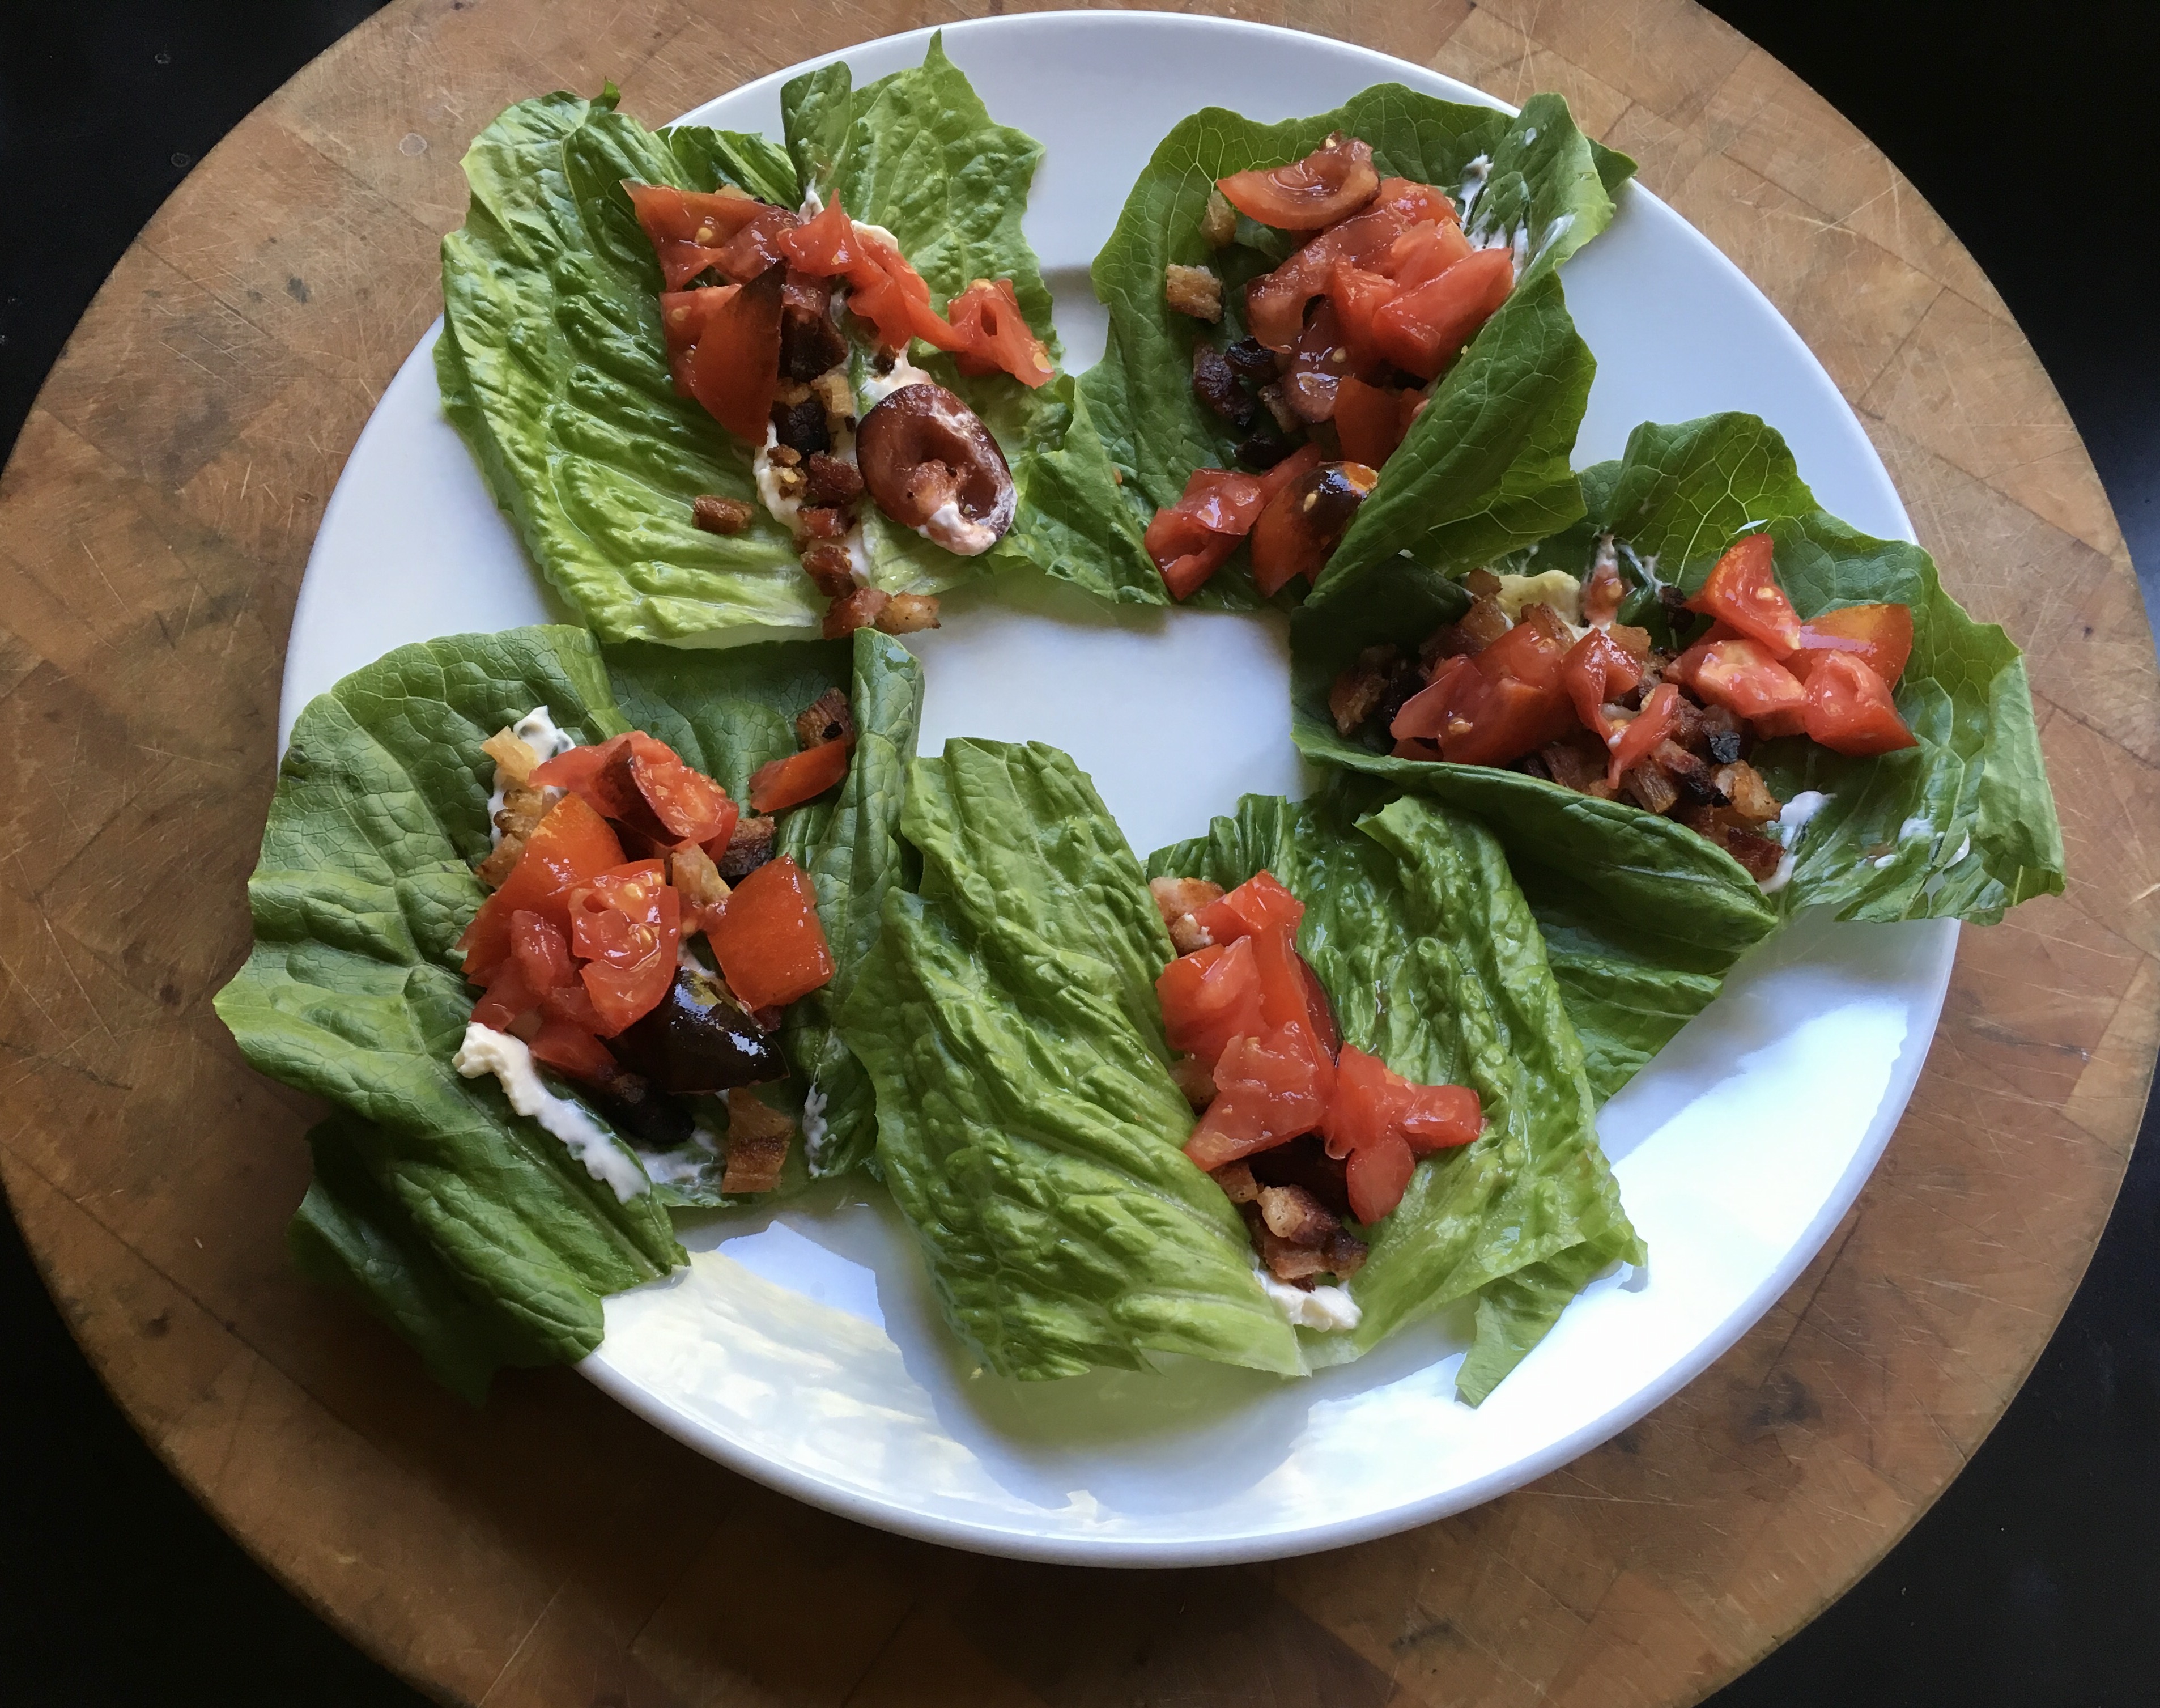
Let’s face it: there are few foods as magical as bacon. Add bacon to just about any dish you’re preparing, and it elevates it to incredible new heights of flavor. The BLT is possibly the greatest food combination ever invented: just a few simple, fresh ingredients, when placed together, transforming into one of the greatest sandwiches on planet Earth.
BLT wraps: home-cured and smoked bacon, local farmstead romaine, home garden tomatoes, always Hellman’s mayo.
If I’m buying bacon, I go on-line to Burger’s Smokehouse, a family run business in Missouri that has made great bacon for decades. The prices are good, and they include shipping. (smokehouse.com) I buy in quantity and freeze what I don’t need right away. My favorite is the thick-sliced country bacon “steaks.”
But nothings beats making your own.
Bacon comes from the pork belly, and they’re easy to find in any good butcher shop. But to get something a notch above, I’ll buy a heritage breed, like Berkshire pork, from Heritage Pork International. (heritagepork.com) I follow the simple curing techniques outlined in “Charcuterie,” a great book written by Michael Ruhlman and Brian Polcyn.
To cure bacon, all you really need is salt and sugar, and what they in the curing biz call “pink salt,” which is not to be confused with salt that happens to be pink, like Himalayan salt you would find in a gourmet store. Pink curing salt is bright pink to let you know that it’s a special salt that should only be used in small quantities for curing. The reason is: nitrites. Nitrites delay the spoilage of the meat, and help keep the flavors of spices and smoke. They also keep the meat nice and pink instead of an unappetizing gray. That’s good. However, nitrites can break down into nitrosamines, which have been known to cause cancer in lab animals. But let’s face it: you would need to eat a ton of cured meat to really worry about this. (I buy uncured deli meats and hot dogs at the supermarket, because processed meats are a different story. But since I know exactly what goes into my own bacon, I’m not worried about the level of nitrites.)
To make the basic dry cure:
1/2 lb. kosher salt (I use Diamond Crystal Kosher salt) 1/2 cup light brown sugar or turbinado sugar 1 oz. pink curing salt
Mix the ingredients well. An important note: all salts do not all weigh the same, so go by the weight and not a cup measurement. (Morton’s Kosher salt, for example, is heavier than Diamond Crystal.) I keep this basic dry cure stored in my pantry, ready to use when I need it.
When it’s time to be makin’ the bacon, I combine this dry cure with other ingredients to make my bacon rub.
My bacon rub:
1/2 cup basic dry cure 1/2 cup brown sugar or turbinado sugar 1 tablespoon fresh cracked black pepper 1 tablespoon granulated garlic 1 tablespoon granulated onion
Mix these ingredients well (yes, there’s quite a bit of sugar there, but I like my bacon a little sweet!) Rub it generously all over the pork belly.
I have a large plastic container with a lid that fits one average (4-lb.) slab of pork belly perfectly. I place the belly inside it, put the lid on, and place the container in the fridge. (Sometimes, I’ll season the belly and wrap it tightly with plastic wrap before putting it in the container. Optional.) The pork belly stays there for at least a couple of weeks, maybe three. I flip the belly every few days. You’ll see that the salt will draw moisture out of the meat and form a gooey brine. This brine will continue to cure your pork belly, so leave it in there. Just flip it, put the lid back on the container, and back in the fridge.
In two or three weeks, you’ll be able to tell the pork belly has cured because it feels firm. Wash the brine off the meat well with cold water, and pat it dry with paper towels. Place the belly in the fridge for an hour or so and it will develop a tackiness to the touch. This is a thin layer of proteins known as a pelicle, and it helps the smoke stick to the meat.
Now it’s time to cook. You can simply cook the pork belly (without smoking it) at 200° for about 2 hours, until the internal temperature reaches 160°. This isn’t bacon…it’s pancetta. Or you can simply slice it and fry it up in a pan. (Also delicious.) But it’s the smoke that makes it bacon.
Smoking foods can be a challenge to many, so a great alternative to the traditional charcoal smoker is an electric one. It allows you to control the exact temperature inside the smoker without checking on it constantly (a real luxury when you’re slow smoking brisket or pork shoulder for many hours), and it offers a tray where you place your wood chips or pellets to give your food that authentic smoky flavor.
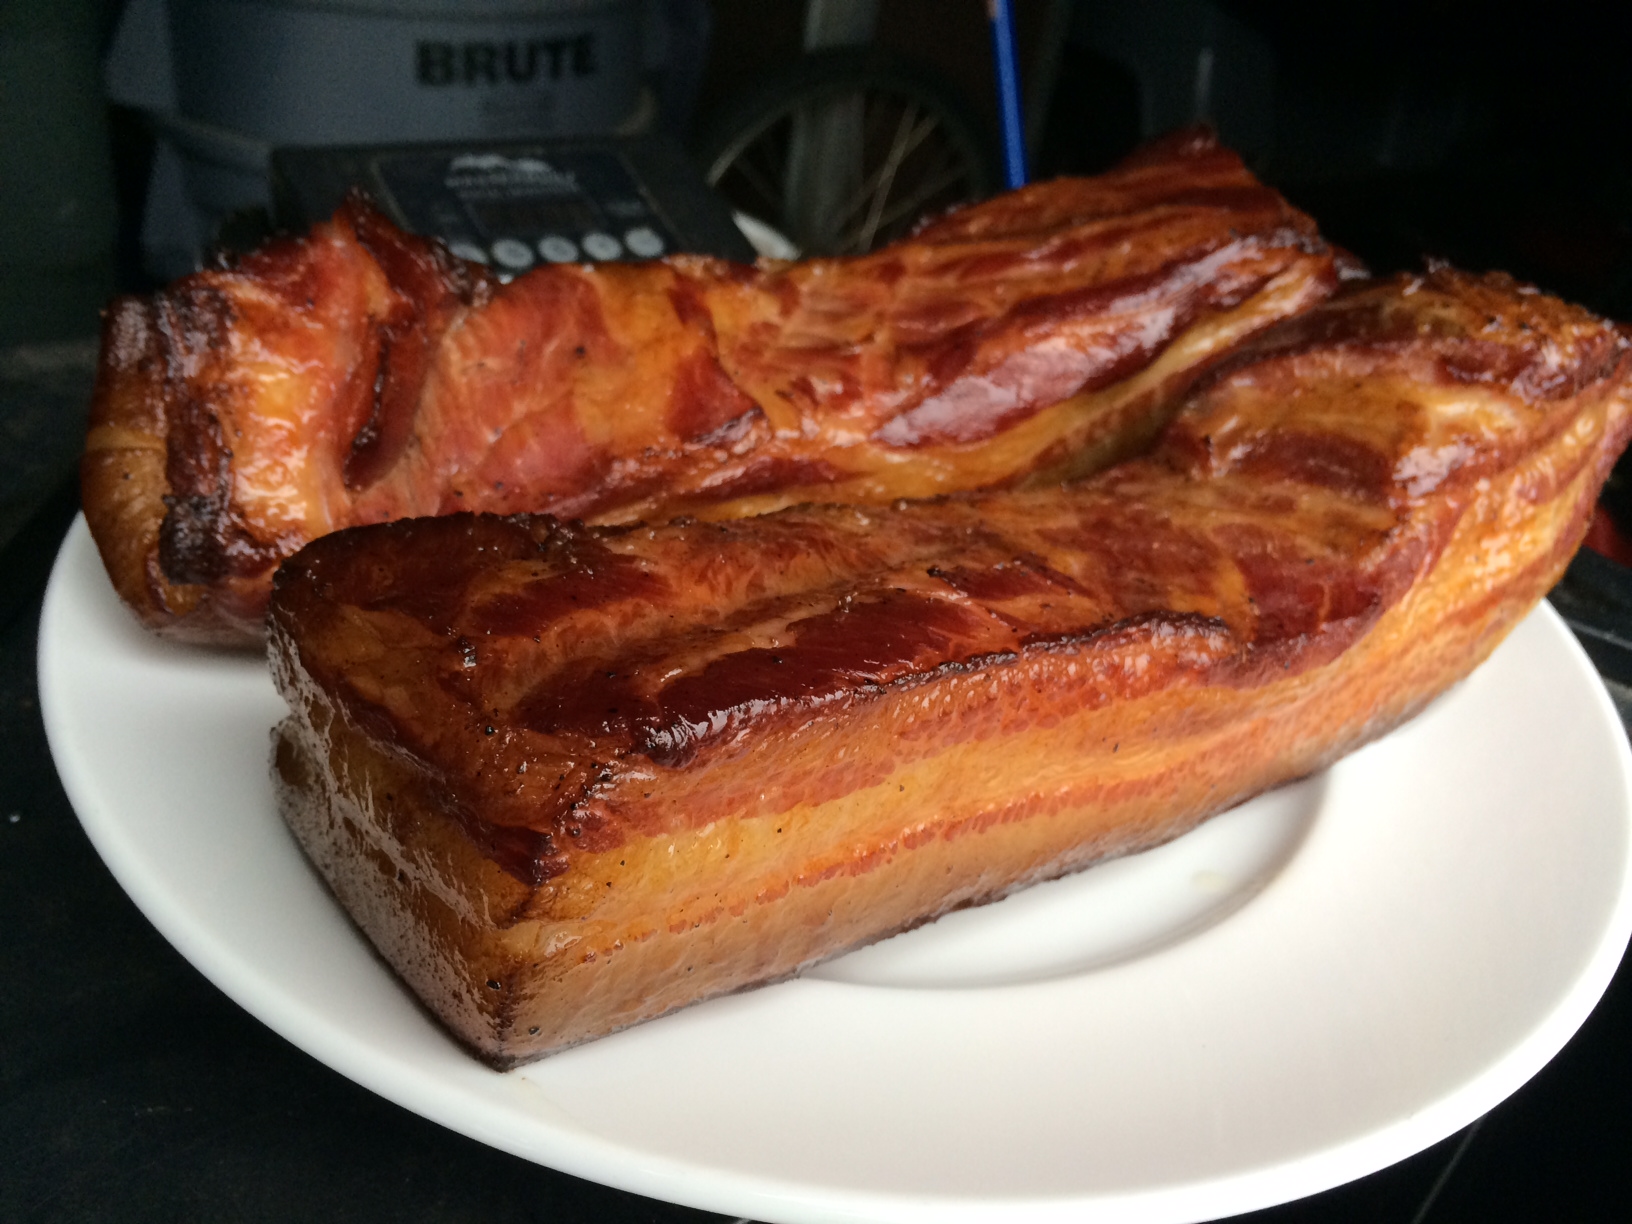
My electric smoker has a digital readout, which allows me to set an exact temperature. I smoke my pork belly at 250° for 2 hours, using hickory chips. (I’m not a fan of applewood, the other commonly used smoking wood for bacon.)
Bellies in the smoker. A water bath underneath to catch any grease drippage.A couple of hours later: beautiful bacon!
The reward is so worth the effort. Just remember that you still need to cook the bacon before you can eat it. Don’t eat it straight out of the smoker. That first slice you cut off your bacon and toss in a pan to lightly fry for a few moments will be the best bite you’ve ever had in your life!
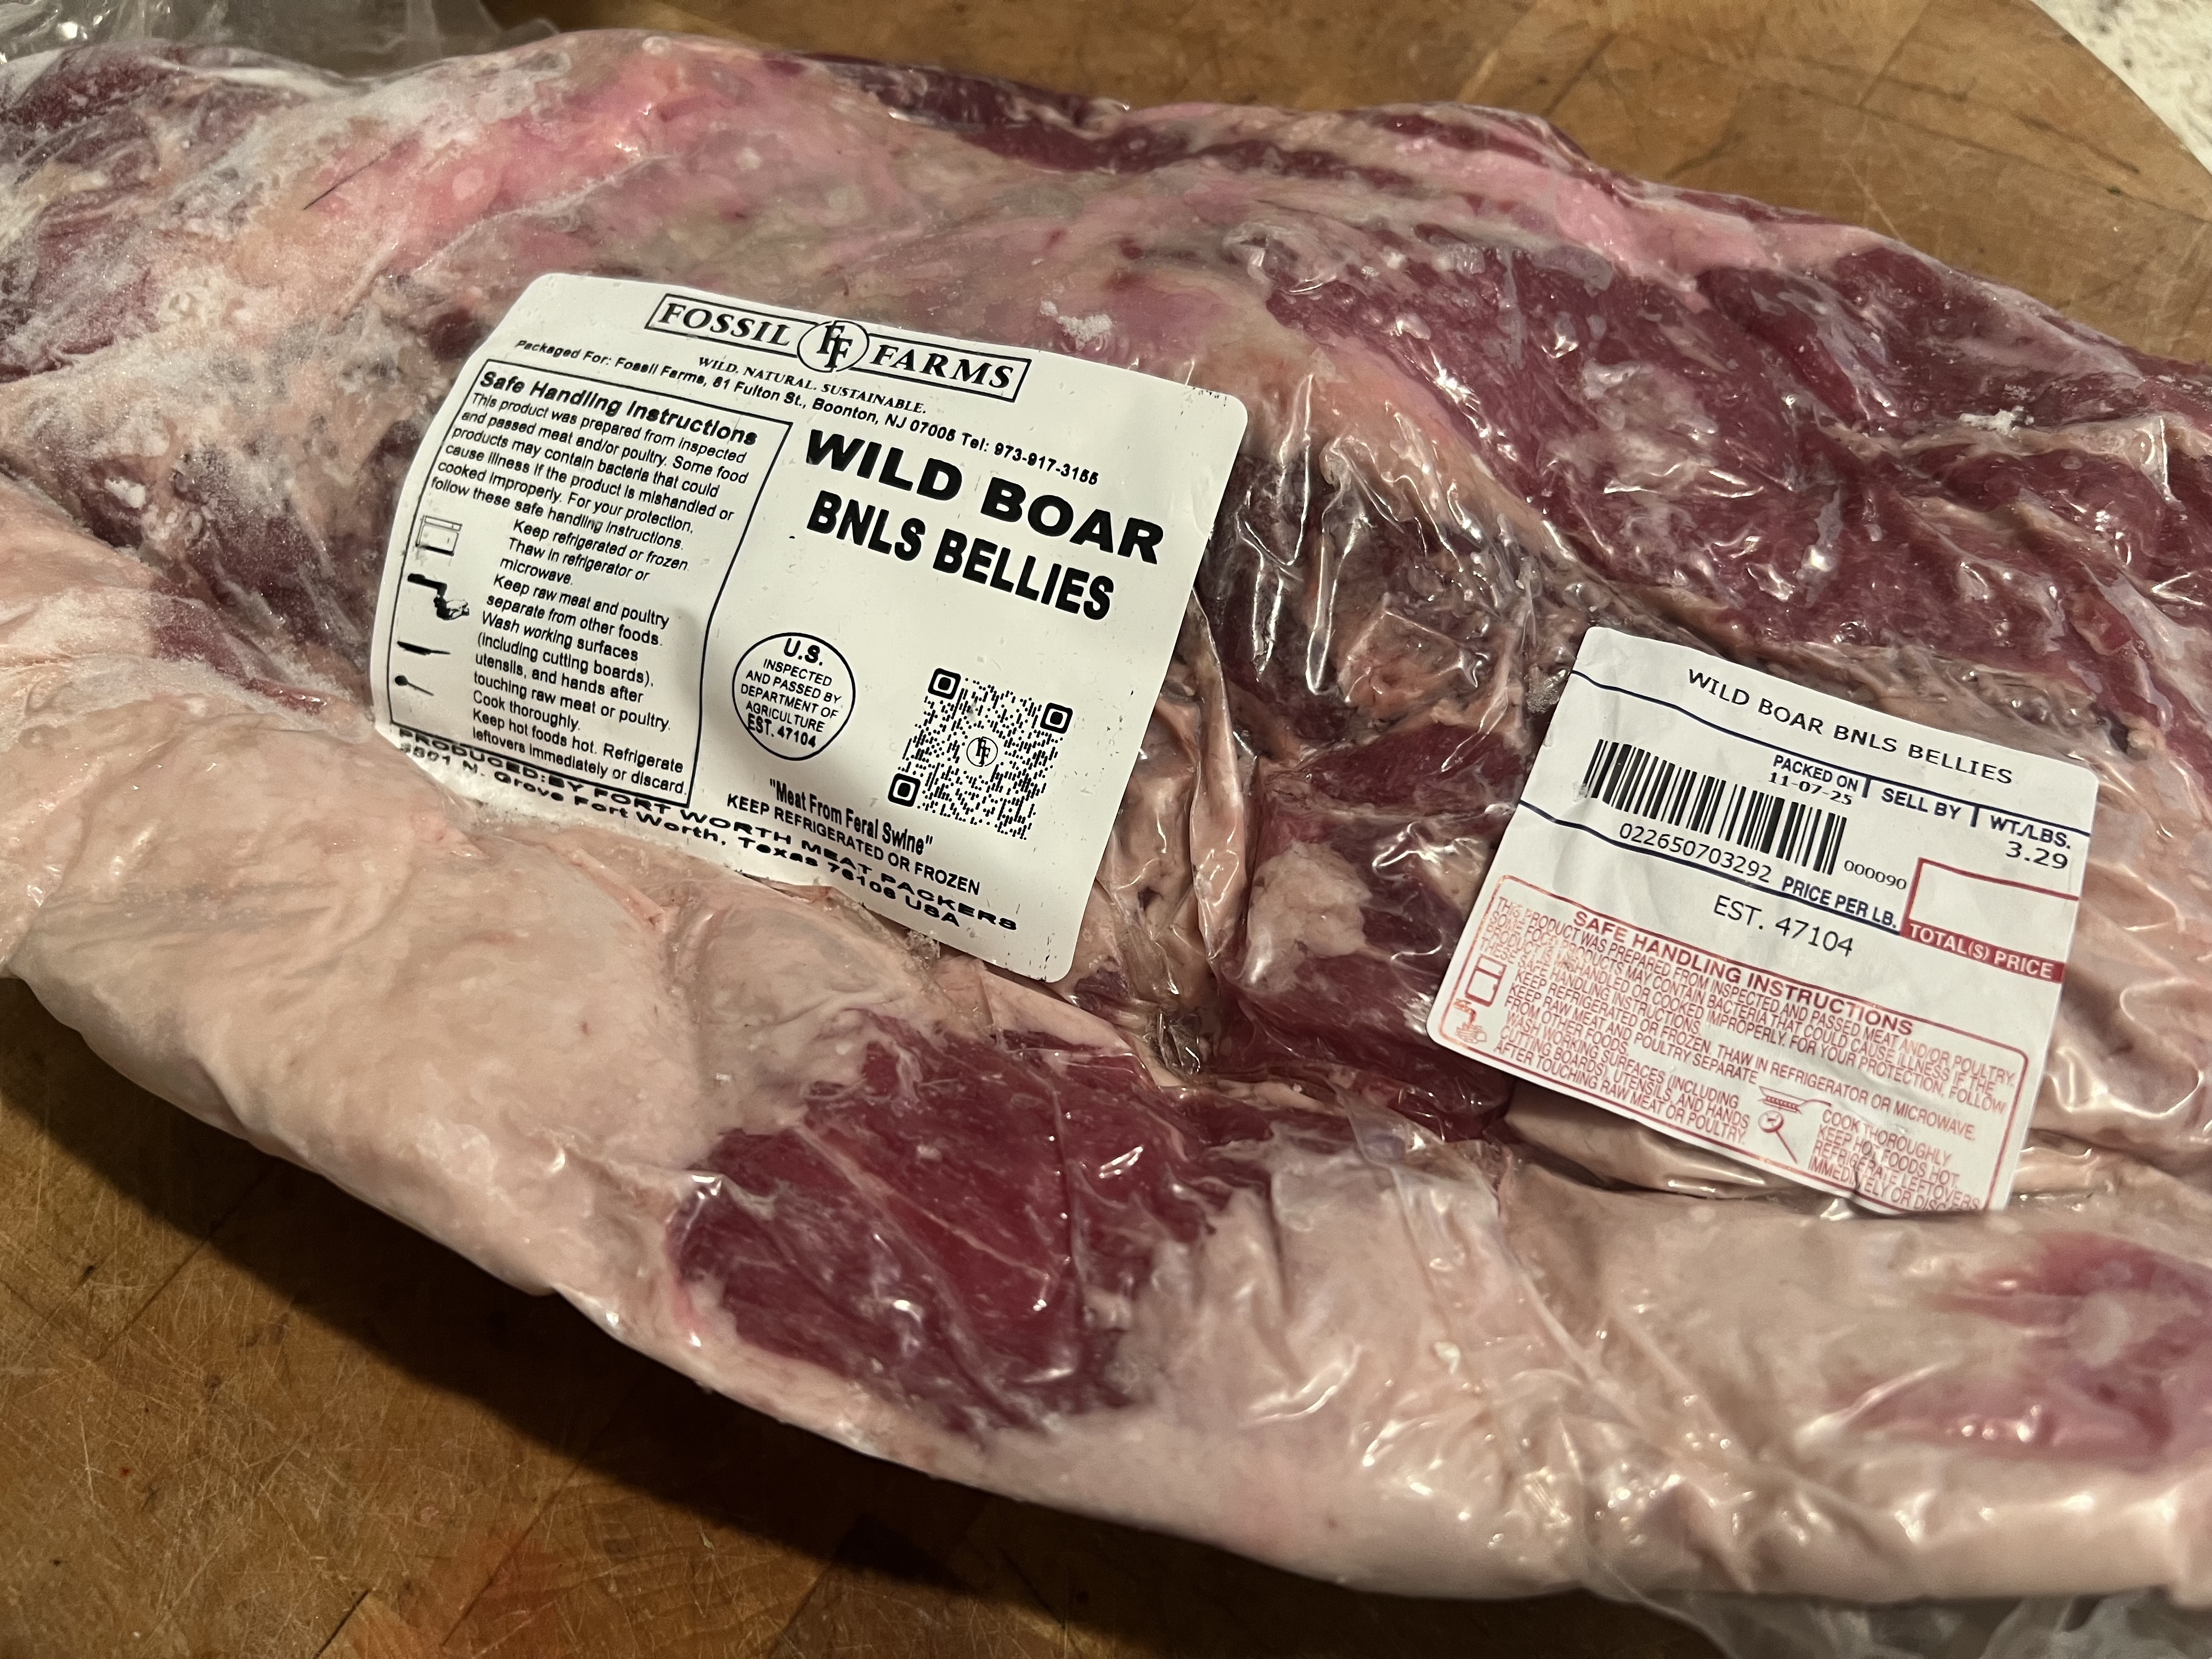
I recently received this wonderful gift from my buddy, Dr. Chezwick. I’ll be using the same techniques that I would for a regular slab of bacon, only I’ll cure it for less time, since it weighs less, and is thinner. I’m thinking it will be delicious!
Spaghetti alla Carbonara and Fettuccine Alfredo are my daughter’s two favorite pasta dishes. When she couldn’t decide which one she wanted for dinner one night, I decided that she’d get both! (Yes, I spoil her rotten!)
The addition of chicken and peas made for a more balanced plate. This is now one of my go-to dishes when guests arrive, since many parts can be prepared ahead of time.
Start with the chicken…
The breading for the chicken is bread that I’ve toasted, crumbled and put into a food processor to make breadcrumbs. I get a lot more flavor this way than using store-bought breadcrumbs from a can. I add flour to it to lighten it up.
For a gluten-free version, I buy Udi’s gluten-free bread, toast it, and put it in the food processor to make delicious GF breadcrumbs. Then I add it in the same proportions as listed in this recipe with GF flour.
1/2 lb. chicken breasts, cut into 1″ pieces
1 egg, scrambled
1/2 cup breadcrumbs
1/2 cup all-purpose flour
3 teaspoons dried parsley
2 teaspoons dried oregano
1 teaspoon dried basil
1/2 teaspoon granulated garlic
1/2 teaspoon granulated onion
1 1/2 teaspoons salt
1/4 teaspoon pepper
olive oil, for frying
Scramble the egg in a bowl. Cut the chicken into pieces, and add them to the egg, making sure they get evenly coated. Set aside.
In another bowl, combine the bread crumbs, flour, parsley, oregano, basil, garlic, onion, salt and pepper. Set aside.
Fill a pan with about an inch of olive oil. Heat to medium-high, for frying.
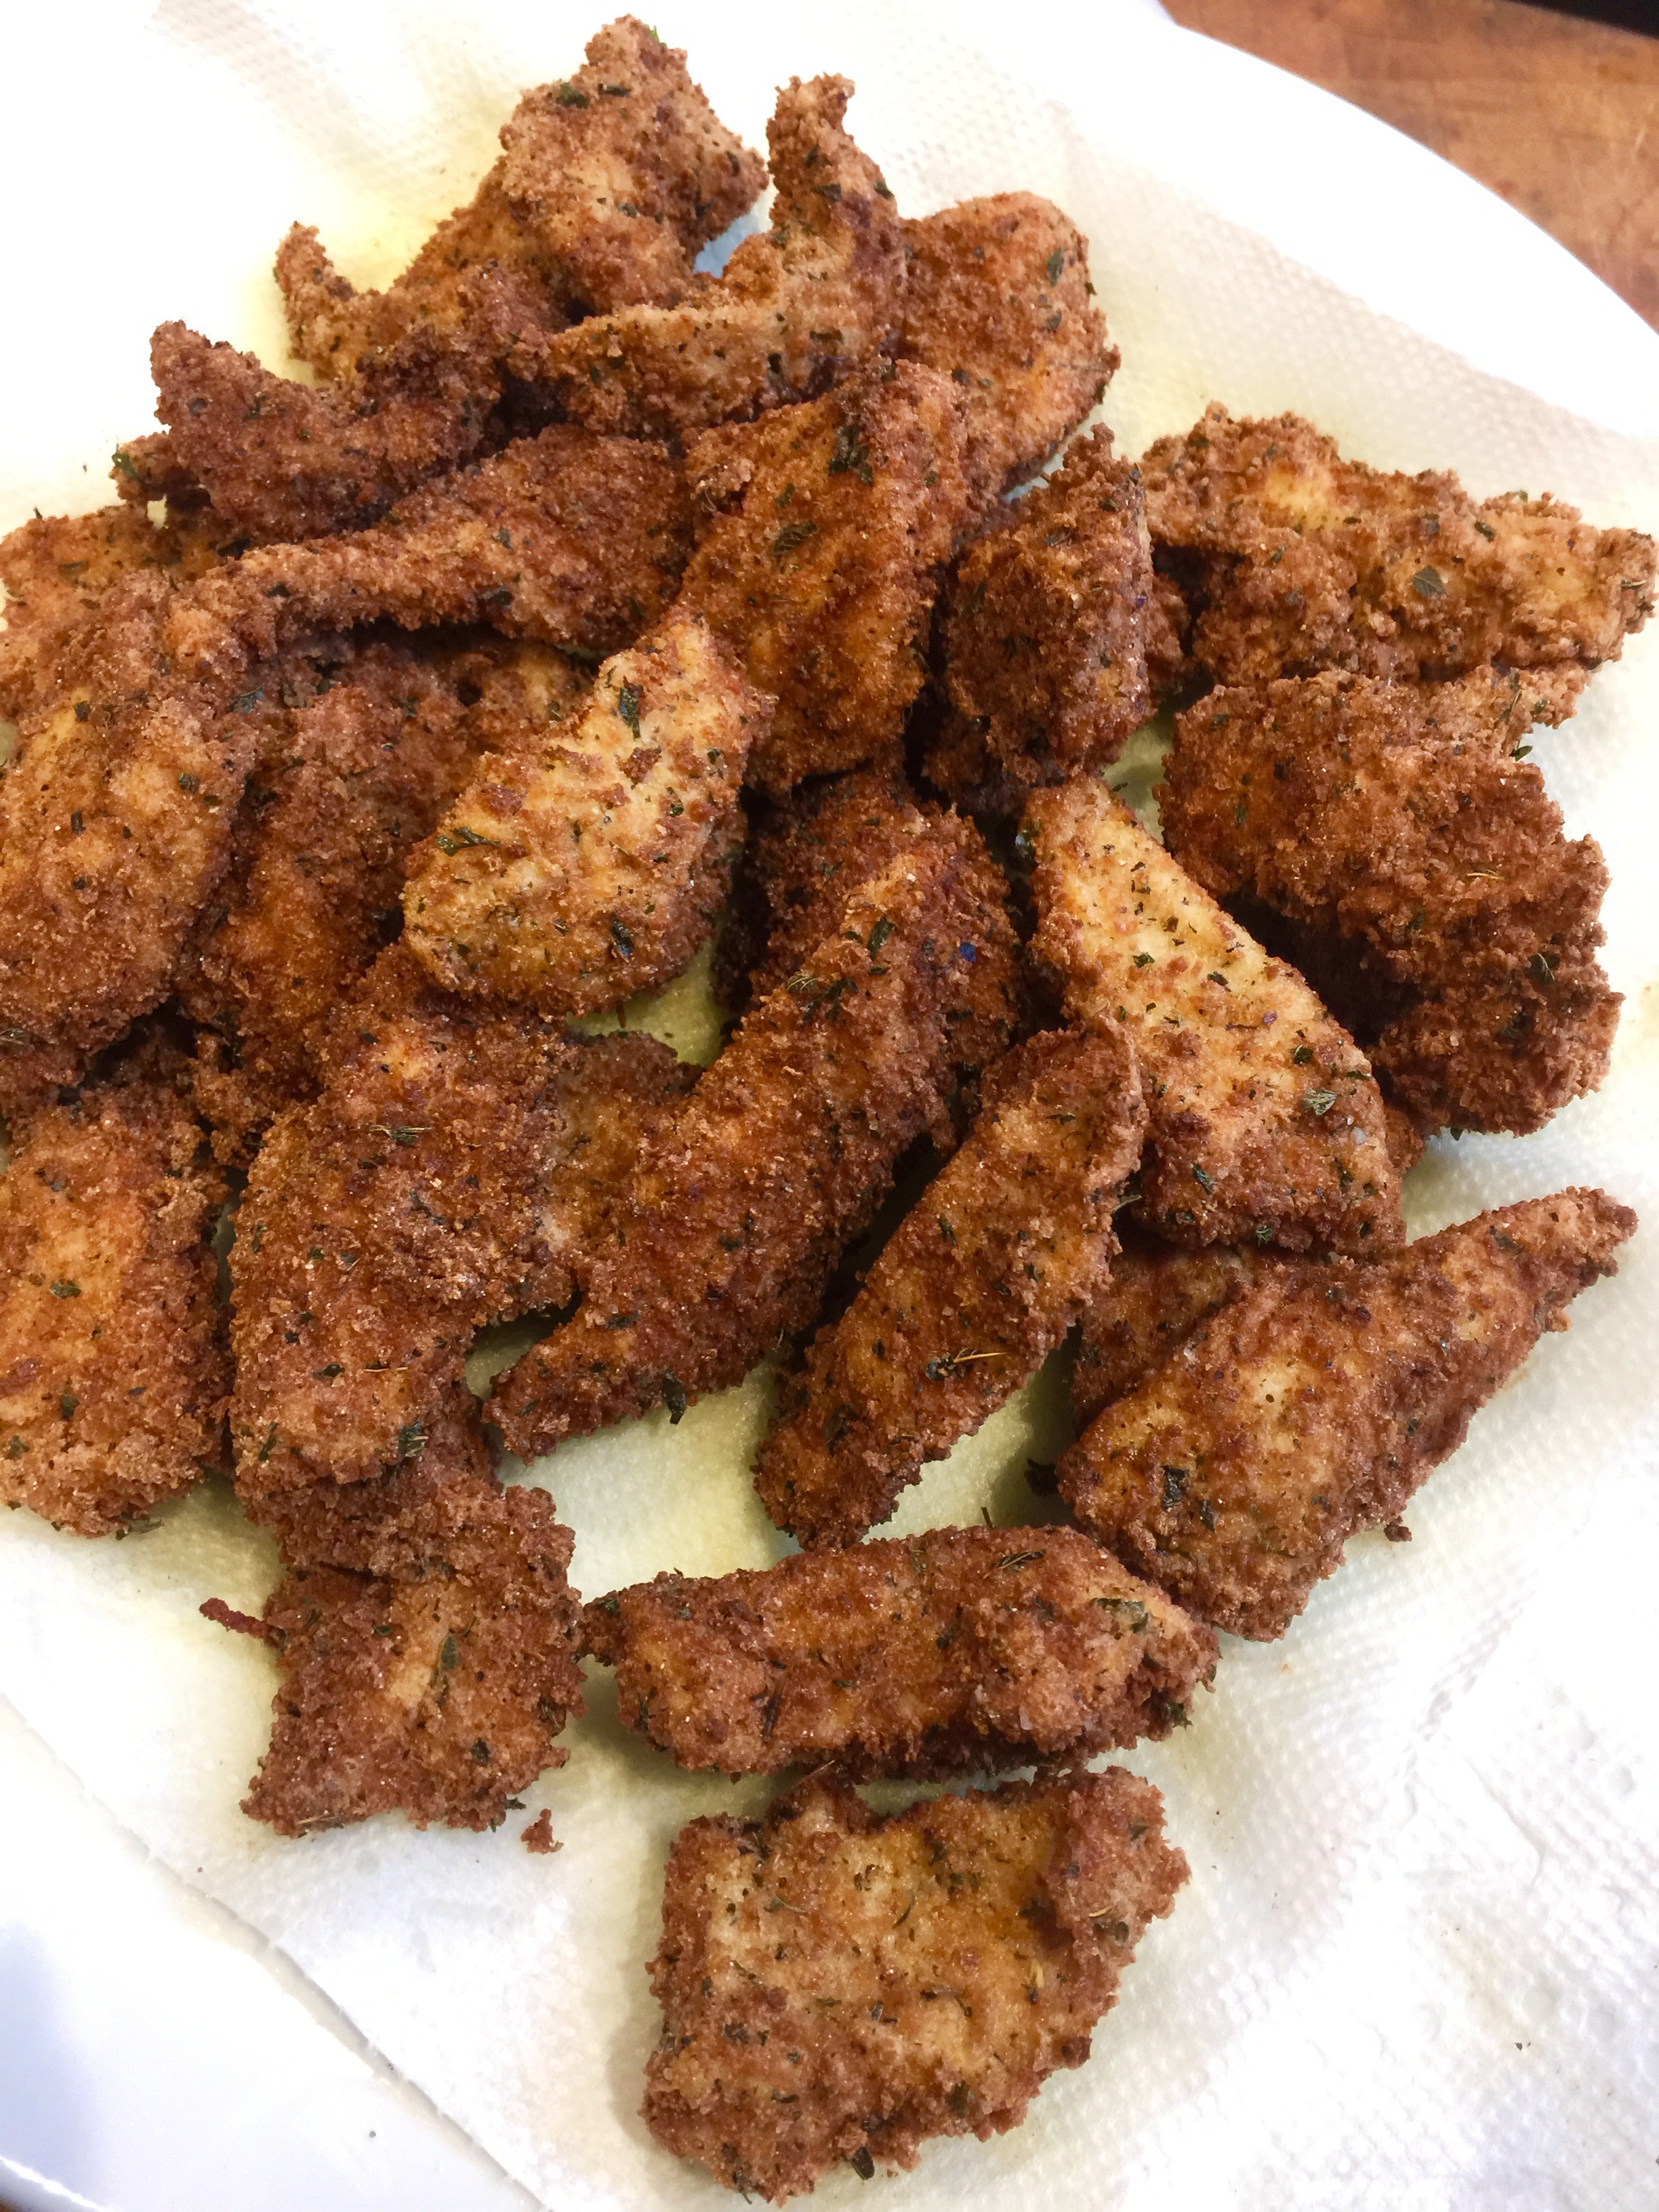
In batches not to overcrowd the pan, take the chicken pieces out of the egg and toss them in the bread crumb mixture, shaking off the excess. Place them carefully in the hot oil and fry on both sides until golden. Since they’re small pieces, they should cook all the way through easily. Drain on a plate covered with paper towels. Do this with all the chicken and set it aside. Try not to eat it all before you make the rest of the dish! (This chicken can also be eaten as is–these are my daughter’s favorite nuggets–or used with tomato sauce and mozzarella cheese to make a delicious chicken parmigiana.)
The carbonara factor…
Many recipes for Spaghetti alla Carbonara use pancetta or bacon. But the original recipe calls for guanciale: cured (but not smoked) pig jowls, or cheeks. It’s easy enough to find in a good Italian food store, but I cure my own. I buy raw heritage Berkshire pork jowls from a farm that raises the pigs humanely, and cure the jowls for about 3 weeks in a combination of salt, pepper and fresh thyme leaves. Then I rinse them, pat them dry, and cut them into portion-sized pieces, wrapping them individually and freezing until I need them. It’s a lot of work, but to me, totally worth it.
3 oz. guanciale
If the guanciale is frozen, let it thaw just a little, then cut it into the smallest cubes you can manage. Place it in a pan and cook them until they’ve browned and crisped beautifully. Keep an eye on the pan, as guanciale can burn easily. Use the fried meat bits for this recipe and save the fat for flavoring a future dish! Set it aside.
The Alfredo sauce…
Despite what you get in crappy restaurants like Olive Garden, Alfredo sauce should not be runny or soupy. It should cling to the pasta and be rich in flavor. My Alfredo sauce is based on a recipe from the legendary Italian cookbook author, Marcella Hazan.
1 cup heavy cream
3 tablespoons butter
Fleur de Sel or sea salt
1 lb. pasta, fresh or dried
2/3 cup freshly grated Parmigiano Reggiano cheese
freshly ground black pepper
Put 2/3 of the cream and all the butter in a large saucepan that will later accommodate all the pasta. Simmer over medium heat for less than a minute, until the butter and cream have thickened a bit. Turn off the heat.
Drop the pasta in a bowl of boiling salted water. (Use gluten-free pasta, if you like.) If the pasta is fresh, it will take just seconds. If it’s dry, it will take a few minutes. (Gluten-free pasta takes a little longer.) Either way, you want to cook the pasta even firmer than al dente, because it will finish cooking in the pan with the butter and cream. Drain the pasta immediately when it reaches that firm stage, and transfer it to the pan with the butter and cream, tossing the pasta gently for a few seconds to coat.
Turn the heat under the saucepan with the pasta on low, and add the rest of the cream, all the Parmigiano Reggiano, and a bit of pepper (no salt because there’s plenty in the guanciale and cheese.) Toss briefly until the sauce has thickened and the pasta is well-coated.
At this point, you don’t want the pasta to get too dry, so you add…
1 cup of frozen peas
…tossing gently to warm them through. Also add the cooked guanciale at this time.
With or without chicken, it’s delicious!
Plate the pasta in a bowl or dish and serve the chicken alongside.
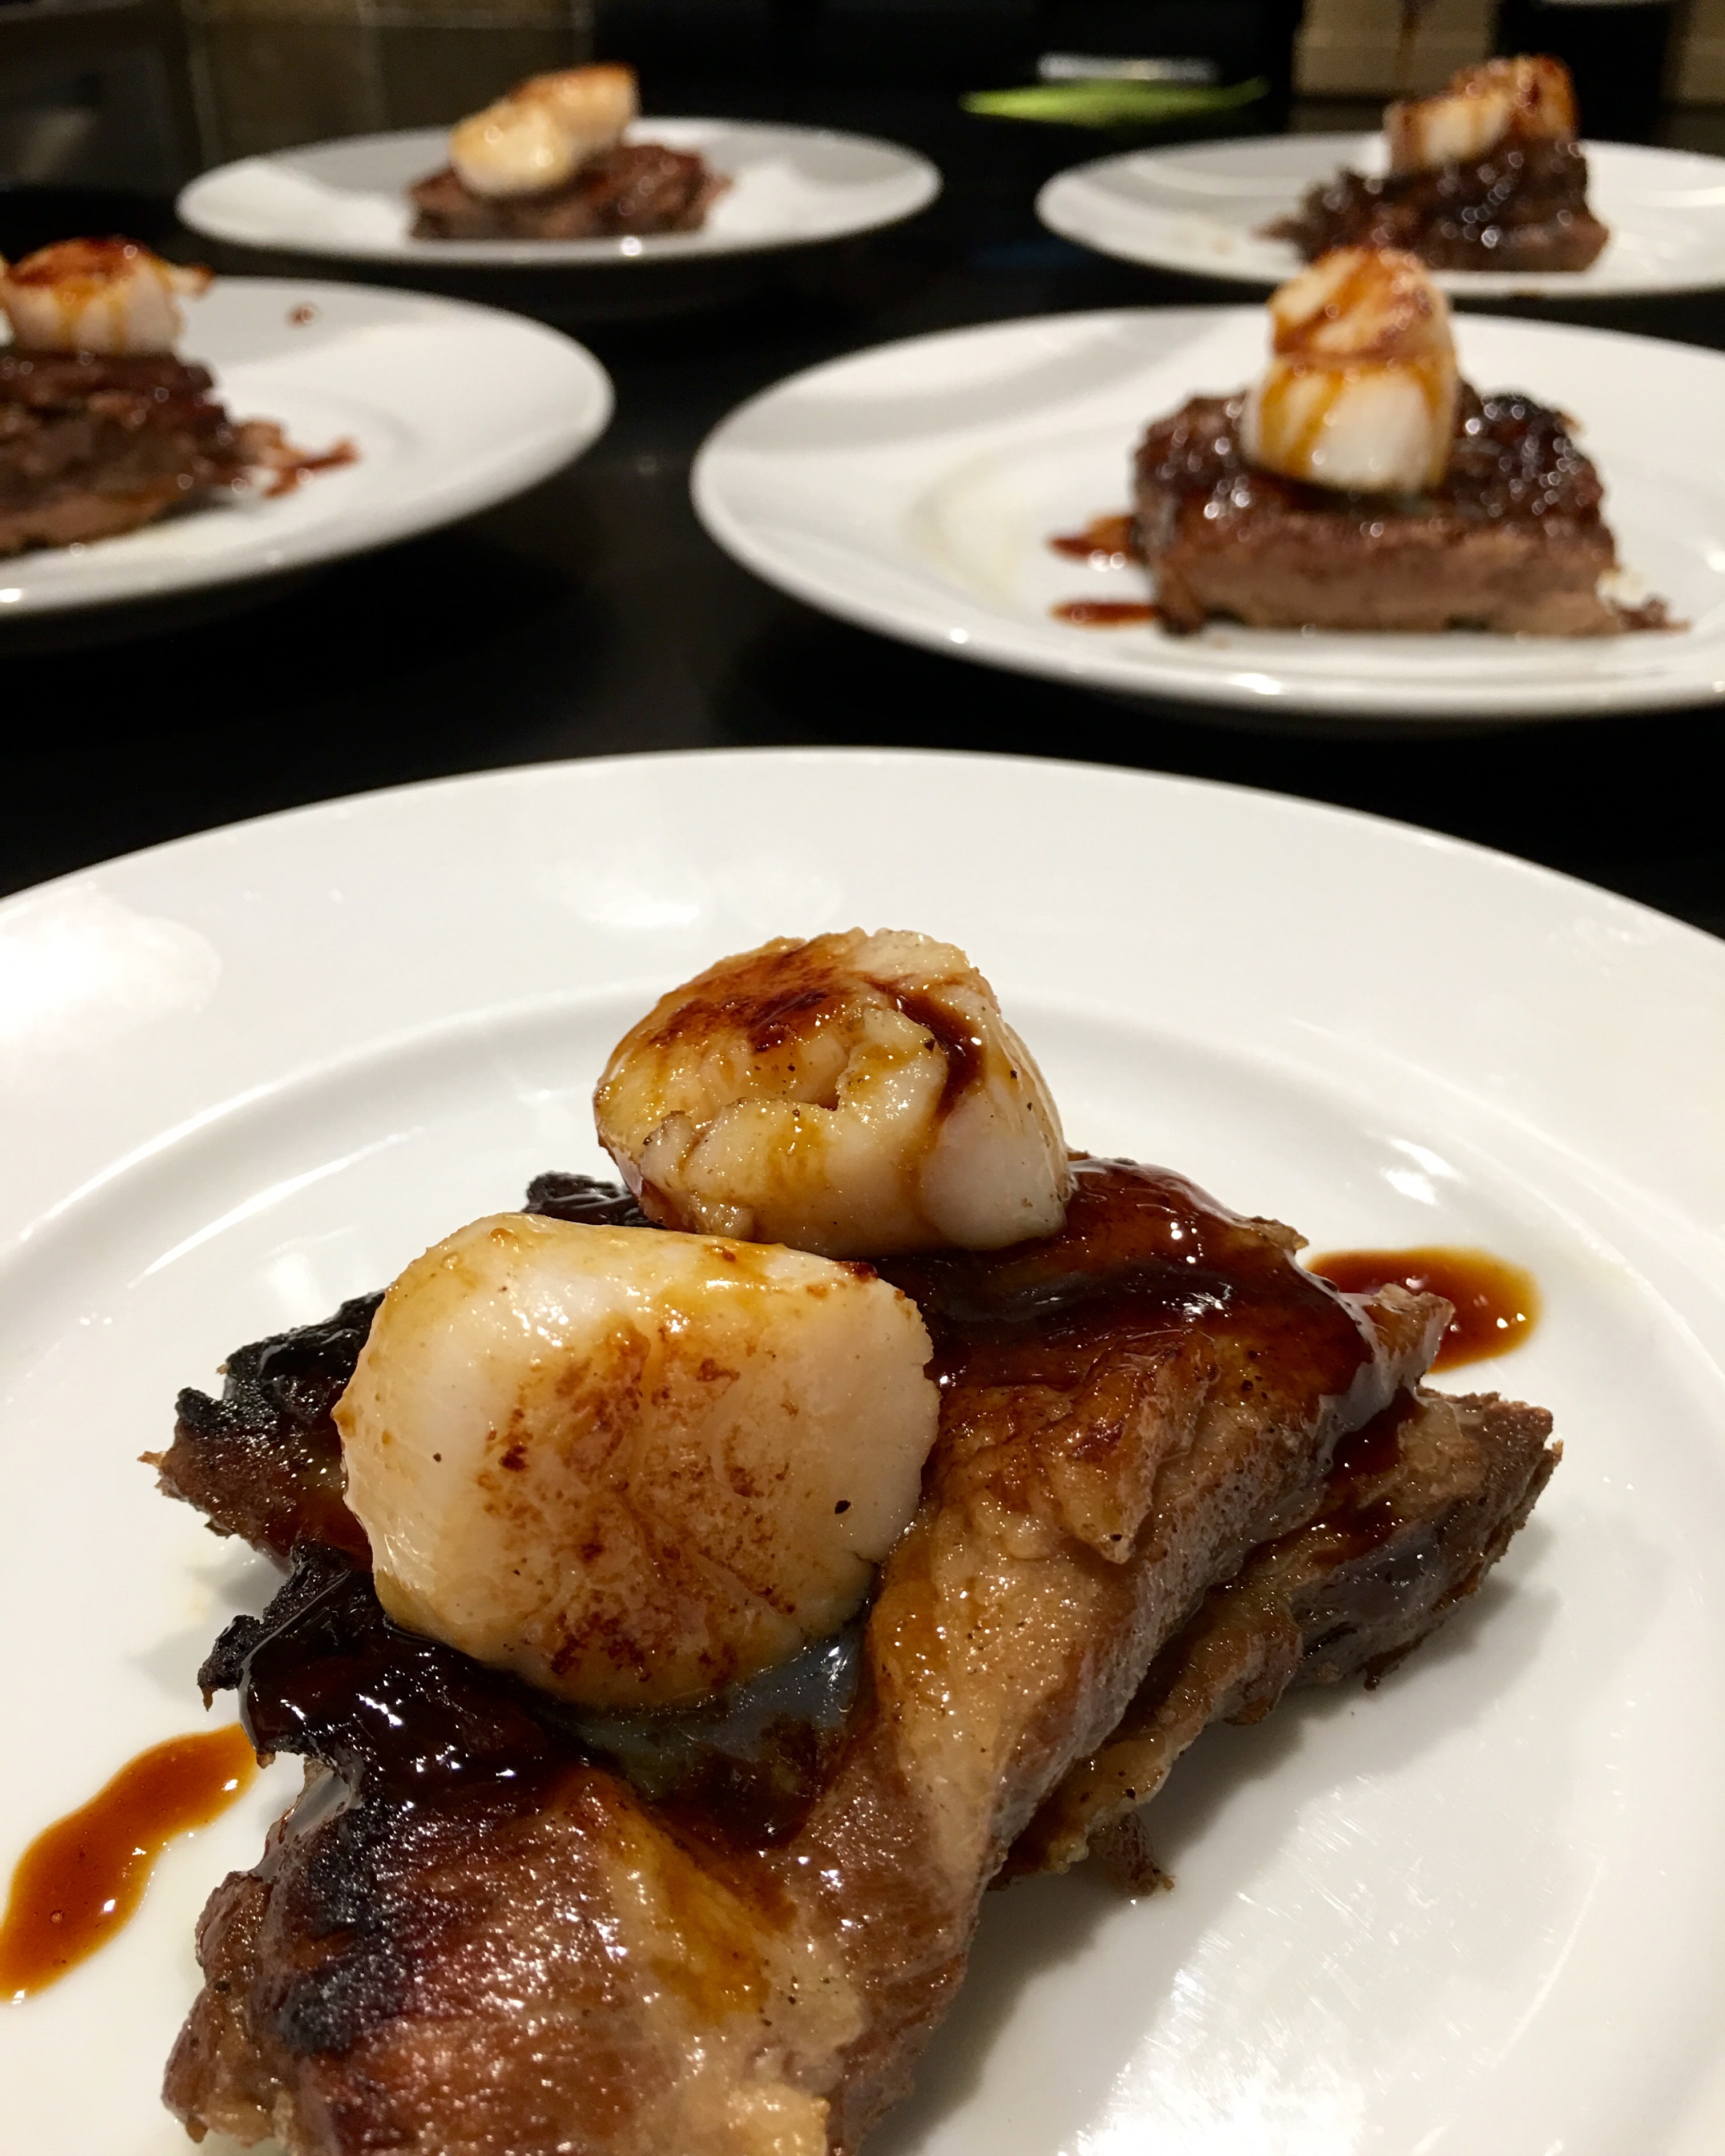
This is a rich, delicious, and unusual surf-and-turf, using wild Texas boar (I got it as a gift from my buddy, Dr. Chezwick!) and locally caught Rhode Island scallops. Wild boar is an ingredient usually only found online, so substituting pork belly, which you can find at your local butcher shop, is a great alternative.
For the pork belly…
3 lbs. fresh pork belly
salt and pepper
1–2 tablespoons leaf lard or olive oil
1 carrot, coarsely chopped
1 celery stalk, coarsely chopped
1 onion, roughly chopped
1 fennel bulb, quartered
2 sprigs fresh thyme
1 teaspoon black peppercorns
4 cups beef stock
1 cup hard cider or apple juice
Pre-heat the oven to 350.
Season the belly with salt and pepper. On medium-high heat, melt the leaf lard, then sear the meat on all sides in an oven-proof pot big enough to hold it in one layer. Add the carrot, celery, onion, fennel, thyme and peppercorns and continue cooking for another 5 minutes, until caramelized.
Add the beef stock and the cider. Cover the pot with a lid or seal it with aluminum foil, and braise the belly in the oven for 3 hours, until tender.
Remove the pot from the oven, carefully remove the pork belly, and put it on a plate. Cover it with foil. If you’re cooking earlier in the day, you can place the belly in the fridge at this point.
Strain the leftover braising liquid from the pot and discard the vegetables and thyme. Skim off the excess fat. If you’re starting this dish earlier in the day, you can put this liquid in the fridge and the fat will harden, making it easier to remove.
In a small saucepan, reduce the brazing liquid by half, then add the espresso and honey. Cook a few more minutes until the sauce thickens. When it coats the back of a spoon, it’s ready. Set it aside.
For the scallops…
Fresh scallops
salt and pepper
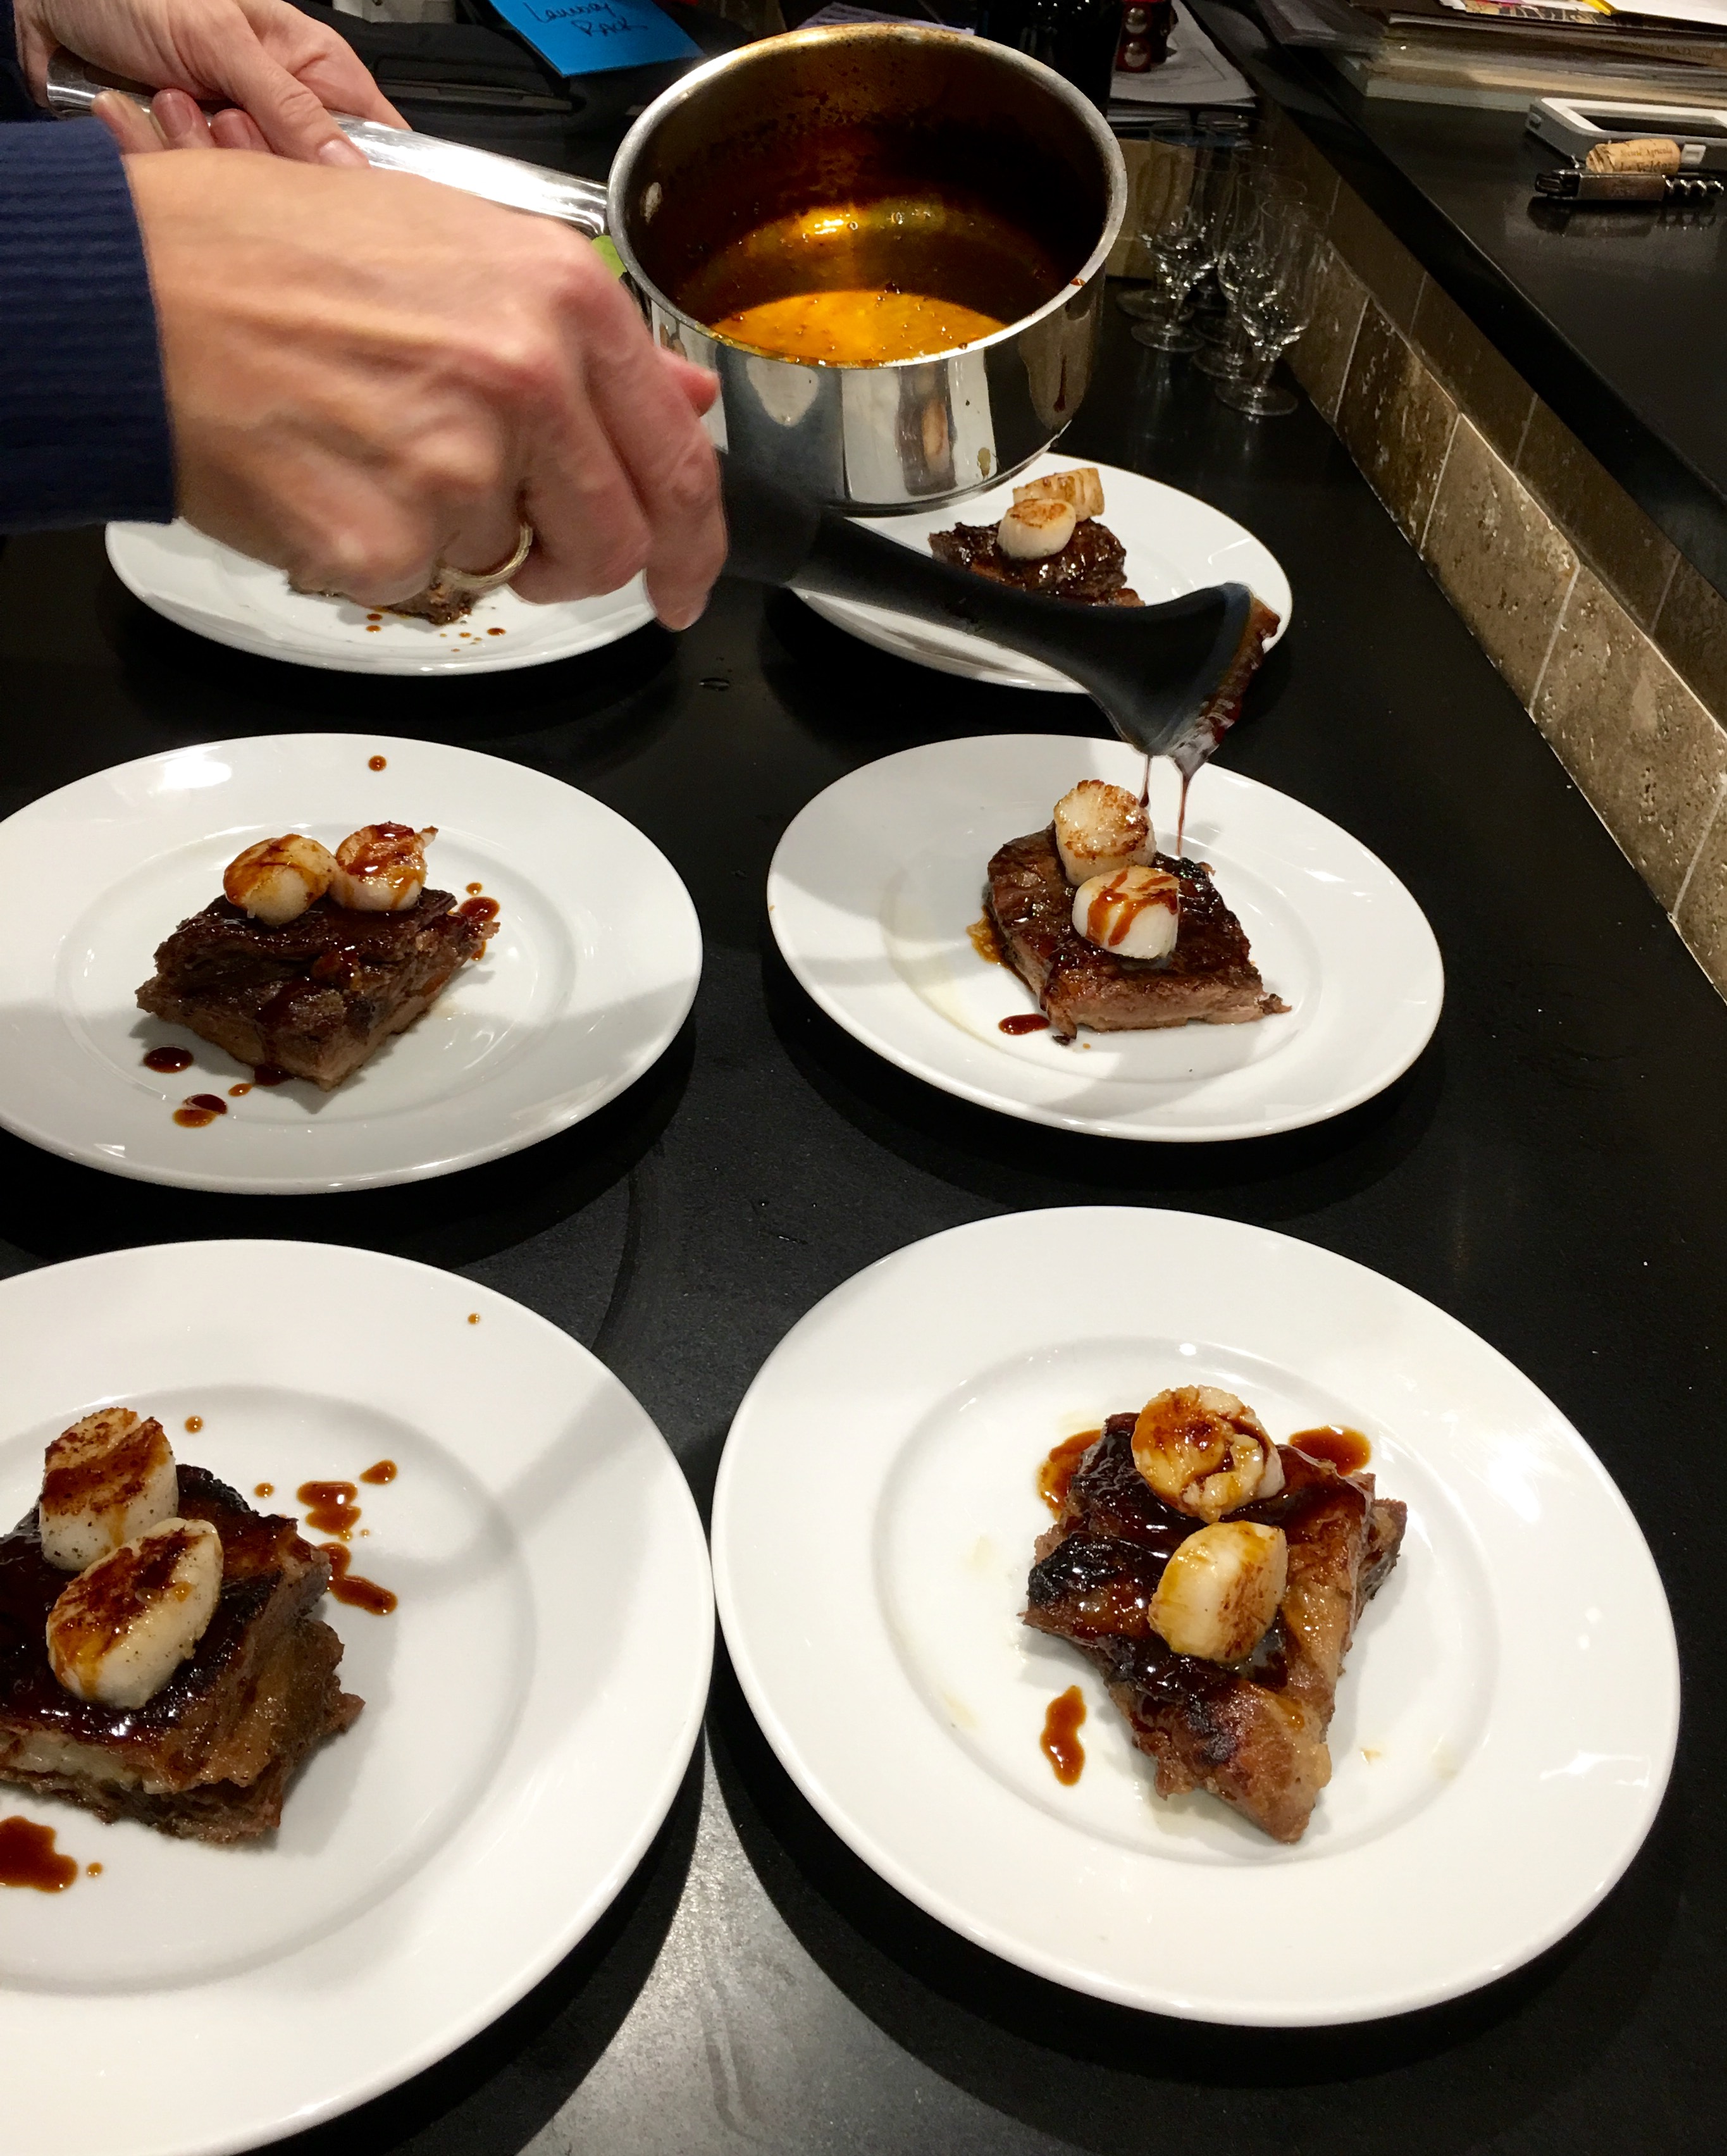
When you’re ready to serve, heat a pan on high heat with a little more leaf lard. Cut the belly into equal pieces and sear them on all sides for about a minute. Place the scallops in the same pan, seasoning with salt and pepper, and sear them on both sides, being careful not to overcook them.
To serve, place the belly on a plate. Top it with a scallop or two. Drizzle the glaze over the top. Season with Fleur de Sel or other finishing salt and serve it immediately.
Sometimes the best ideas come from out of nowhere.
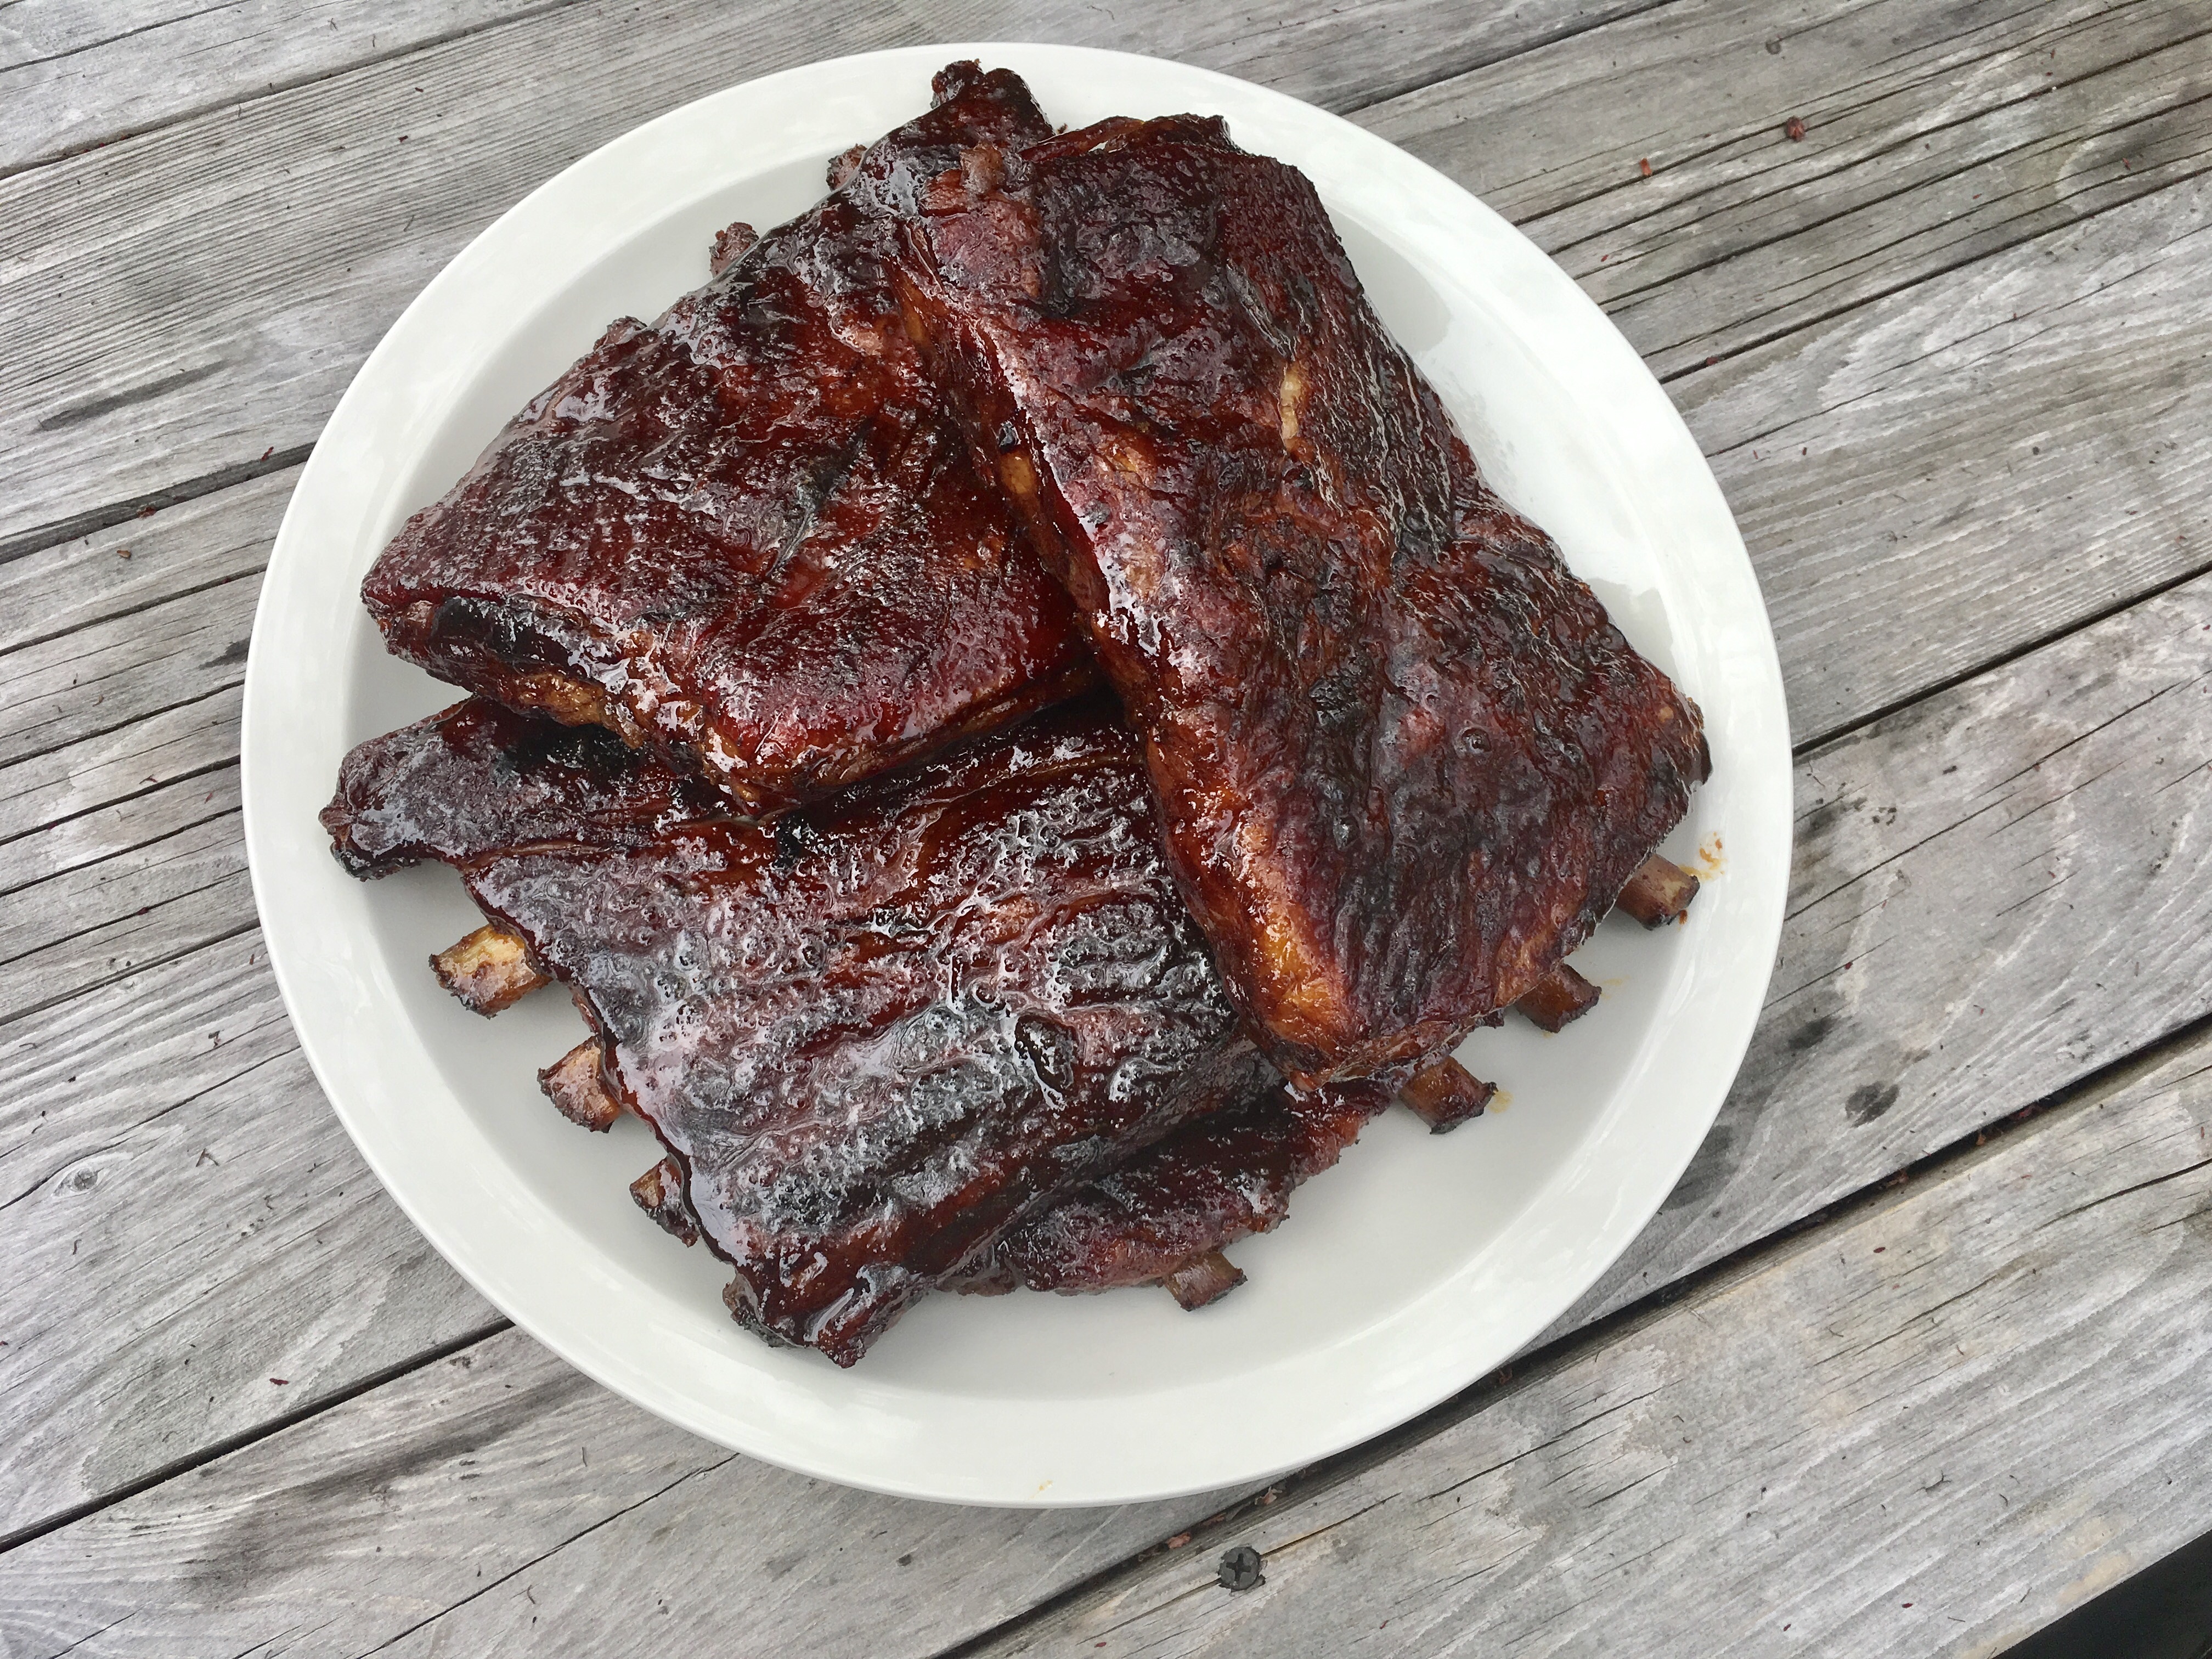
I had 5 lbs. of beautiful St. Louis-style heritage Berkshire (also known as Kurobuta) pork ribs thawing in the fridge, and I knew I wanted to create a new sauce or glaze with them, but I was feeling less than inspired. Our food-loving friends, Don and Johanna, showed up at our door with a gift they bought in Maine, at a shop called LeRoux Kitchen. It was a bottle of maple balsamic vinegar. It smelled wonderful…and tasted even better! I knew I had what I was looking for.
I used a smoker to make these ribs, but if you don’t have one (or just don’t want to bother with one), the ribs are just as awesome when baked in the oven.
You can easily make your own maple balsamic vinegar by combining a 1/2 cup of balsamic (not the super-expensive kind, but the $9-a-bottle kind) with 1 tablespoon of maple syrup. Add more or less maple to taste.
Yup…my old smoker…she’s been used a few times!
I originally used an electric digital smoker made by Masterbuilt. That beauty (above) has now made way for the Ninja Outdoor Woodfire Pizza Oven, which is also a smoker. I like the fact that I can set the temperature and time, and not have to constantly watch it. It has a side chute where I can add hickory smoking pellets when I want, and the results are consistent. I suppose some grilling fanatics might say I’m cheating, but a digital smoker allows me to live a life, hang out, do some yard work, whatever. I don’t have time to babysit.
I chose to smoke my ribs for about 4 hours in the smoker, lightly seasoning them first with Lawry’s Seasoned Salt, adding hickory chips to the smoker only once to give them a “light smoke.”
To avoid drying out the ribs, after a few hours of smoking, I like to brush them with a glaze, wrap them in foil, and then put them back in the smoker…or even in the oven. The glaze flavors the meat and also adds a little steam that tenderizes it.
Brushing with glaze, then wrapping in foil.
5 lbs. pork ribs (I get St. Louis-style Berkshire pork) Lawry’s Seasoned Salt
1 cup water
1/2 cup maple balsamic vinegar (OR 1/2 cup balsamic vinegar + 1 tablespoon maple syrup)
1/4 cup brown sugar
1/2 teaspoon granulated onion
1/2 teaspoon granulated garlic
1/2 teaspoon cayenne pepper sauce (I like Franks’ Red Hot)
Prepare the ribs by removing the inedible skin on the back of the rack. The easiest way to do this is to cut a little “tab” of skin, then pull it with your fingers. Holding the skin with a dry paper towel will help your grip. I cut the racks in half to fit my smoker.
Season the ribs lightly with Lawry’s Seasoned Salt on both sides and place them into a 250° smoker (or oven, if you don’t have a smoker) for 3 hours, smoking lightly with hickory wood. (Skip the hickory if you’re using the oven.)
In a saucepan over high heat, combine the water, maple balsamic vinegar, brown sugar, onion, garlic, and cayenne pepper sauce. Stir well, and let it come to a boil. Let it reduce by half, leaving it still watery. Set it aside.
After 3 hours, remove the ribs from the smoker (or oven), placing them on a sheet of aluminum foil. (I use Reynold’s Non-Stick Foil, since the glaze will be sticky.) Brush both sides of the ribs with half of the glaze, and place the ribs meat-side-up on the foil before sealing the it around the ribs. Place the aluminum foil packets on a baking sheet, then into a pre-heated 250° oven (or back in the smoker.)
Remove the ribs from the oven or smoker after 1 hour. Open the foil packets so that the ribs are now exposed. Brush the top of the ribs one more time, then put the foil back over the top and cook for 1 hour more.
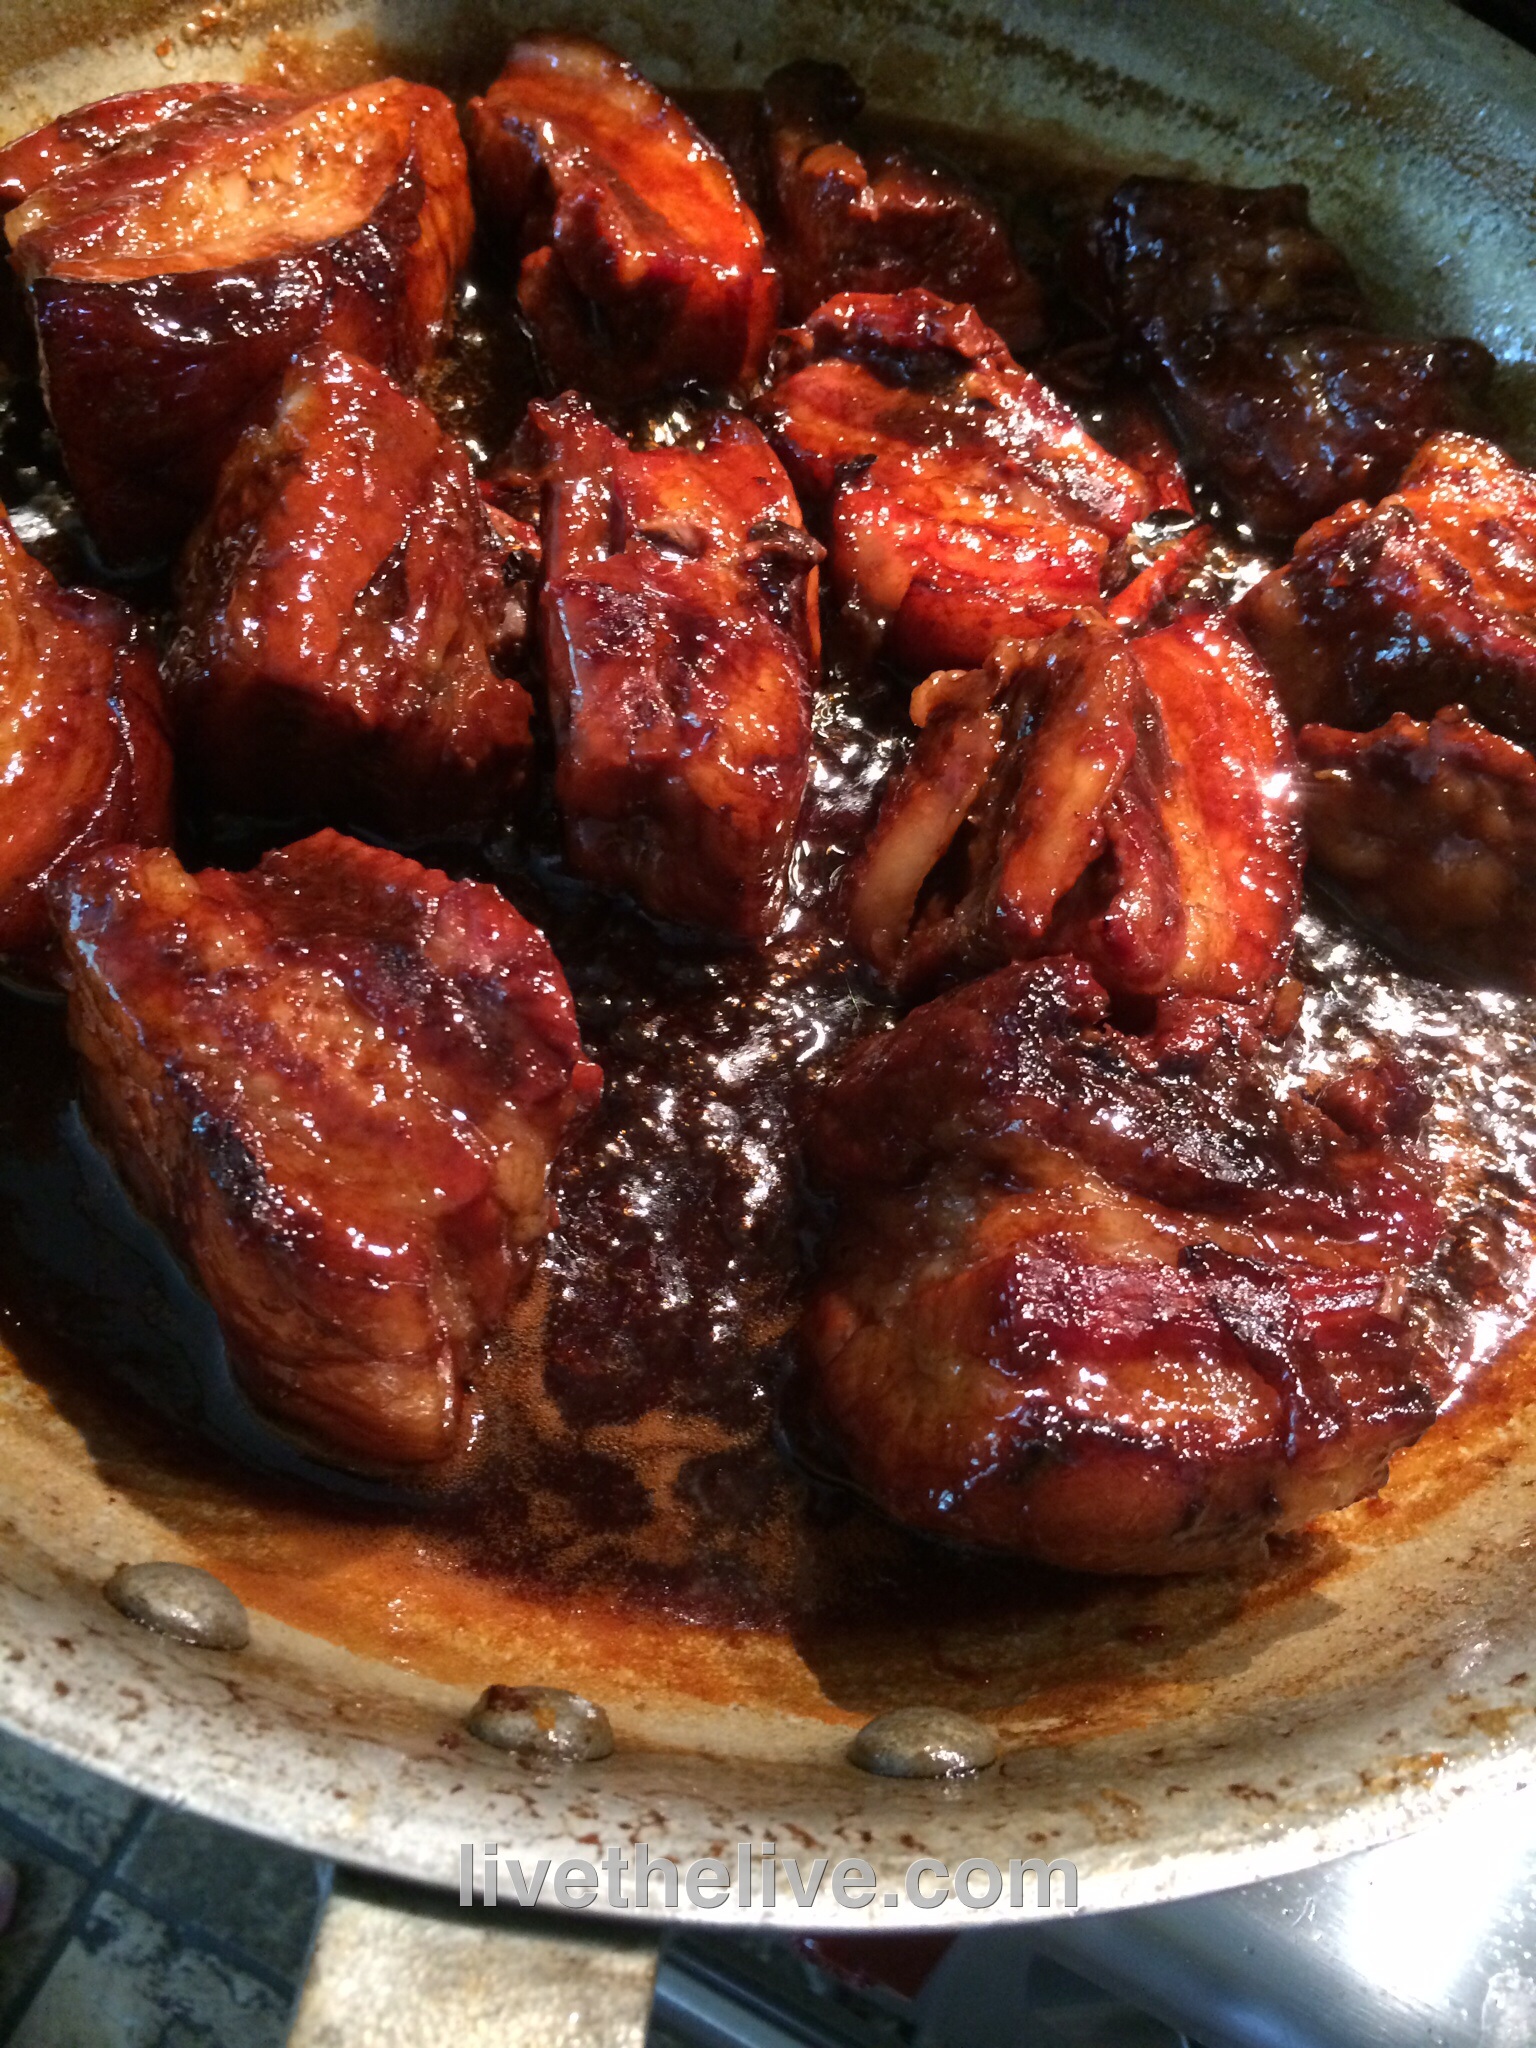
Sometimes the happiest of cooking accidents happen with bacon. My original plan was to make Chinese-style honey ribs for dinner. But instead of pulling a nice rack of ribs out of the freezer, I accidentally took out a slab of pork belly. I only realized my mistake after I thawed it, so I decided to use it! The results were pretty damn tasty.
I like maple syrup instead of honey, but use what you like!
Marinade:
¾ cup light soy sauce 6 Tablespoons hoisin sauce
5 lbs. pork belly
Zest and juice of 1 lemon
2 whole star anise
2 cinnamon sticks (3”)
1/2 cup honey or maple syrup
4 cups chicken broth (preferably homemade)
Pre-heat the oven to 350 degrees.
Mix the marinade ingredients. Set them aside.
Cut the pork belly into pieces that are about 2 inches square. Place them in a large pot. Cover them with water and bring the pot to a boil. Boil it for 5 minutes. Drain the water.
Place the warm pork belly pieces on a sheet pan lined with non-stick aluminum foil. Coat them with the marinade. Let them sit for 10 minutes.
Bake the pork belly pieces on the sheet pan in the oven for 30 minutes.
While the pork belly is baking, start the sauce in a large non-stick pan or pot: combine the lemon zest and juice, star anise, cinnamon sticks, maple syrup or honey, and chicken broth. Bring it to a boil, then reduce it to a simmer.
When the pork belly pieces have finished baking, add them to the sauce pot, lowering the heat to a simmer. Simmer (covered) for about 15 minutes or until meat is tender.
Turn the heat back on high, uncover the pot and cook until the sauce has reduced to a glaze that coats the meat. Reduce the heat as the sauce thickens to avoid the sugars in the syrup or honey from burning. When the pieces are sticky and gooey, they are ready!
Devour them just like that!
If you have leftovers, let the pork belly cool, then slice the pieces it to your desired thickness and fry them like regular bacon. They’re great with eggs!
When my daughter hangs out with me, I always ask her what she wants me to cook for her, and there are a few “Dad” recipes that are her favorites. This is one of them, especially when fresh asparagus is available. And as any parent will tell you, if your kid is craving a dish that has vegetables in it, count yourself lucky–and make it!!
Prepping asparagus is easy, and you don’t need a knife to cut off the woody bottoms of the stalks. Simply bend the stalks at the bottom and they will naturally snap off at the right point.
4 mild Italian sausages, sliced into pieces 1/2″ thick
1 lb. penne pasta
1/2 onion, finely chopped
1 cup chopped fresh trumpet mushrooms (white button mushrooms work, too), optional
2 cups fresh asparagus, sliced into 1-inch pieces
1 clove garlic, passed through a garlic press
1 cup homemade chicken broth
6 fresh sage leaves, finely chopped
1/2 cup freshly grated Parmigiano Reggiano cheese
extra virgin olive oil
salt and pepper
Have the pasta water salted and boiling, and add the pasta, cooking until just a bit more undercooked than al dente.
Heat a large pan, and drizzle in some olive oil. Sauté the sausage pieces until browned and cooked through, but not overcooked. Remove the sausages from the pan and place them in a separate bowl. Remove all but 2 tablespoons of the fat left behind in the pan.
Place the pan back on stove and sauté the onion until translucent. Add the garlic, and sauté for 10 seconds. Add the sage, and saute for 10 seconds, stirring. Add the chopped mushrooms and saute for a few minutes, then add the chicken broth, and simmer until almost all the liquid has evaporated. Pour the contents of the pan into the bowl with the sausages.
Return the pan to the stove, add a little more olive oil, and on medium heat, sauté the asparagus pieces. Cook them until they are al dente, not too soft. Once the asparagus has reached this stage, return all the contents of the sausage/mushroom bowl to the pan to heat through. Drain the pasta, and add it to the pan as well, combining all the ingredients. If it looks too dry, add a little pasta water to the pan. Season with salt and pepper.
Make sure you serve this hot, with grated Parmigiano Reggiano on top, and drizzle lightly over the top with extra virgin olive oil.