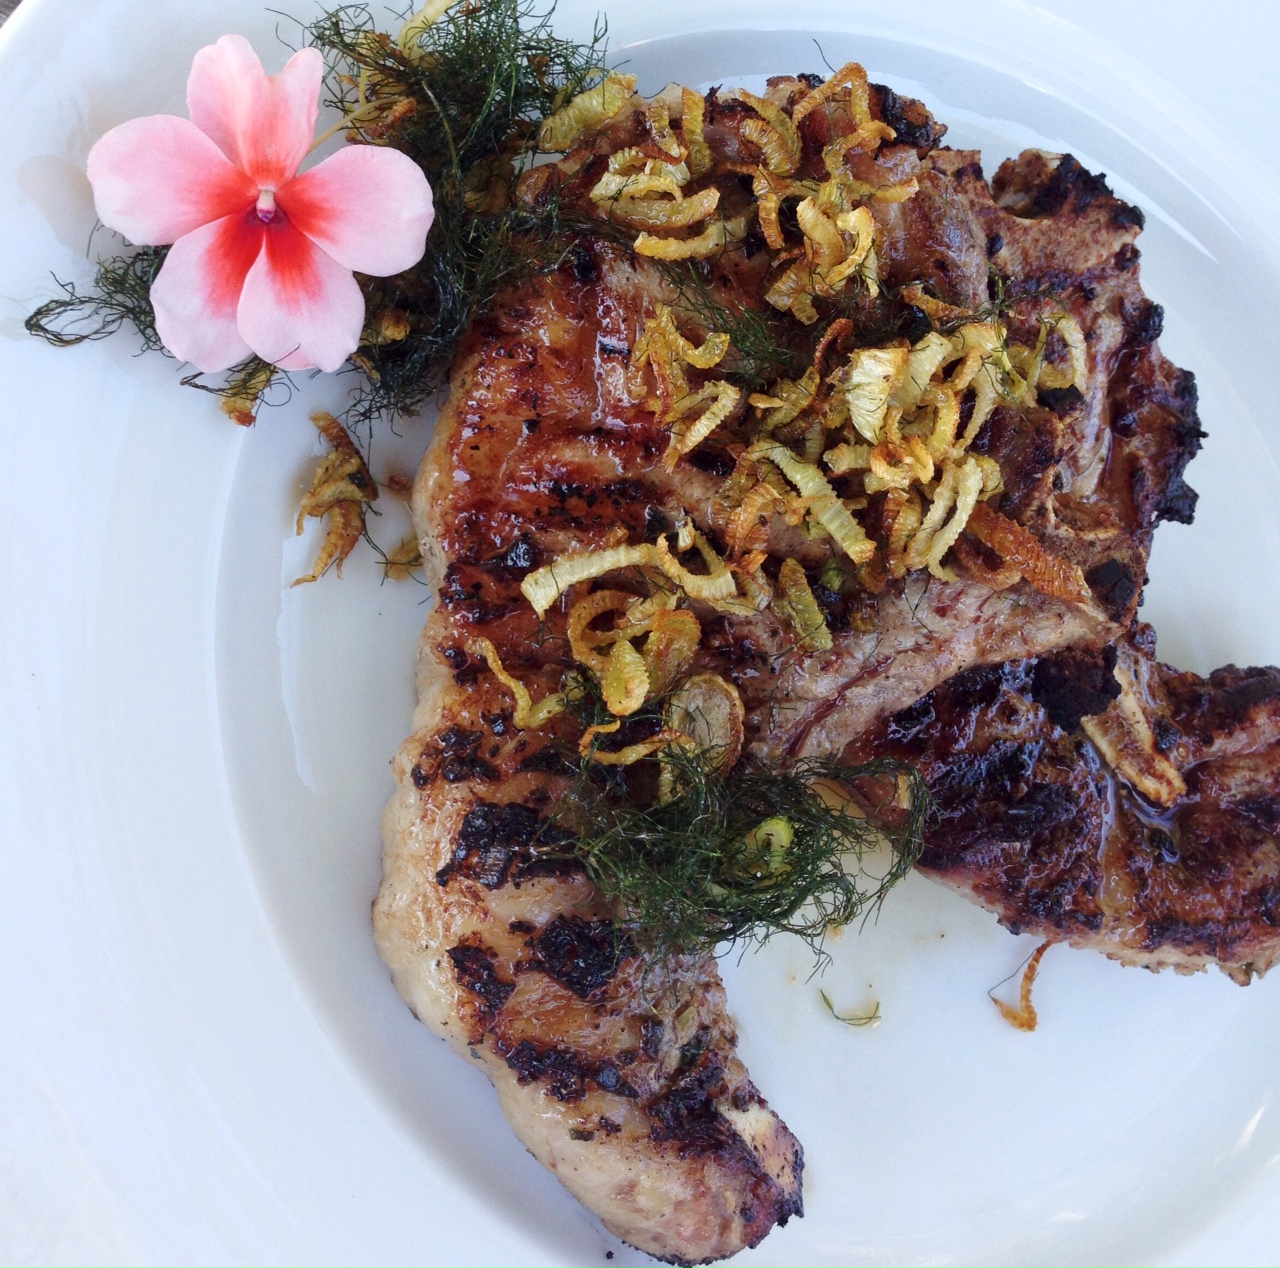
Inspired by a garden full of fennel and my fanatical love for all things pork, this recipe just happened. I use Berkshire heritage pork when possible, a far tastier and healthier choice over standard pork you find in a supermarket.
4 Berkshire pork chops
4 tablespoons finely chopped fennel bulb
2 teaspoons finely chopped fresh sage
3 teaspoons granulated garlic
1 teaspoon Kosher salt
1/2 teaspoon ground black pepper
3 tablespoons extra virgin olive oil
extra fennel bulb and fennel fronds
extra olive oil, salt and pepper for sauteing
Combine the chopped fennel, sage, garlic, salt, black pepper and olive oil in a bowl. Mix well and spread it all over the pork chops. Let them stand for an hour at room temperature.
Light a hot grill. Grill the pork chops until they’re done…with quality pork, that does not mean cook it to death! (An internal temperature of 160 is the way to go.)
Chop the extra fennel bulb into thin strips about an inch long. Remove the fennel fronds from their stems. Saute the bulb strips in olive oil, salt and pepper until they are almost crisp. Toss in the fennel fronds and cook until the fronds and bulb strips are crisp.
Serve the pork chops with crispy fennel and fronds on top.
There’s no problem with your bird, she said to me Just go low and slow to cook it perfectly A few choice seasonings end up deliciously There must be 50 ways to roast your chicken…
There’s nothing better than a whole roasted chicken. Simply season it, pop it in the oven and go low and slow. No maintenance, and you’ve got a great bird in a couple of hours.
Once you go with humanely raised pastured chicken, you’ll never go back to supermarket chicken again. The flavor is fantastic, and you’ll devour it right down to the bones, which you can use to make the best home-made chicken stock or soup you’ve ever had. Nothing goes to waste.
I roast at least one chicken every week, so to change it up, I’ve come up with many different rubs and sauces over the years. All of the rubs are sugar and gluten-free preparations.
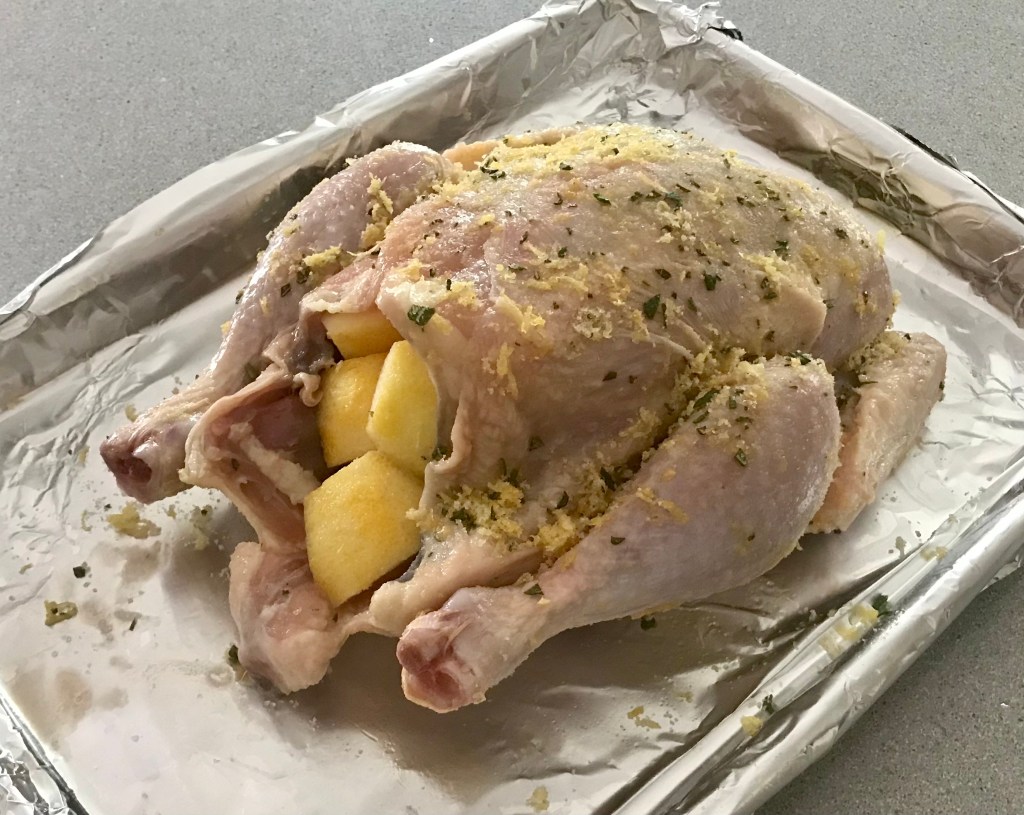
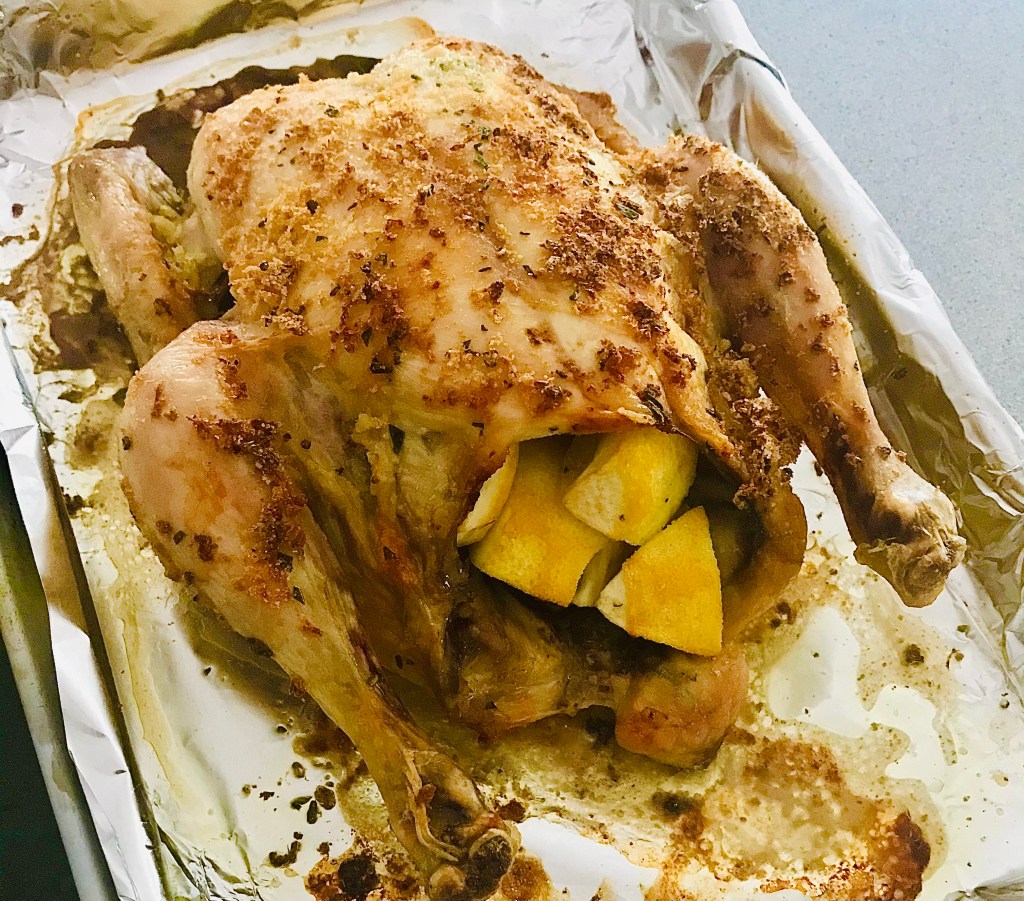
Chicken with Rosemary and Lemon
The lemon serves double-duty in this dish. You use the zest to season the outside skin, then you place the remaining cut up pieces inside the carcass to flavor from the inside out.
1 tablespoon finely chopped fresh rosemary 1 teaspoon granulated garlic
2 teaspoons salt
zest from 2 lemons, using a micro plane zester, the leftover lemons quartered
1/2 teaspoon black pepper
In a bowl, combine the rosemary, garlic, salt, lemon zest, and pepper.
Thaw a bird, remove the giblets, and rub it all over with olive oil. Shove the quartered lemon pieces into the carcass of the bird. Season the bird inside and out with the rosemary seasoning mix.
Place the bird on a pan lined with non-stick aluminum foil in a pre-heated 450-degree oven. Cook for 10 minutes at this temperature, then reduce to 275 degrees and cook low and slow until done.
Tarragon Chicken
I love the taste of chicken seasoned with tarragon. Careful with this, or you will accidentally devour your fingers!
1 tablespoon dried tarragon, crumbled into a powder 1 teaspoon garlic salt
1 teaspoon salt
1/2 teaspoon black pepper
olive oil
In a bowl, combine the tarragon, garlic salt, salt and pepper.
Thaw a bird, remove the giblets, and rub it all over with olive oil. Season the bird inside and out with the seasoning mix.
Place the bird on a pan lined with non-stick aluminum foil in a pre-heated 450-degree oven. Cook for 10 minutes at this temperature, then reduce to 275 degrees and cook low and slow until done.
Italian Chicken
The darker color of the bird comes from rubbing it first with balsamic vinegar, then olive oil, before coating it with Italian seasonings. Don’t use the fancy, expensive balsamic. The bottles that go for about 9 bucks in the supermarket work well for this recipe.
Thaw a bird, remove the giblets, and rub it all over with the balsamic vinegar. Then rub it all over with the olive oil. Season the bird inside and out with the seasoning mix.
Place the bird on a pan lined with non-stick aluminum foil in a pre-heated 450-degree oven. Cook for 10 minutes at this temperature, then reduce to 275 degrees and cook low and slow until done.
My Grandma’s Chicken
My grandmother would cook chicken thighs low and slow all Saturday morning, knowing that I was coming over for lunch after Lithuanian school. The meat just fell off the bone, and I couldn’t stop eating it. This recipe is so simple and works just as well for a whole bird. Every time I make this, I think about those days at my grandmother’s house.
Lawry’s Seasoned salt
Olive oil
Thaw a bird, remove the giblets, and rub it all over with olive oil. Season the bird inside and out with the Lawry’s Seasoned salt.
Place the bird on a pan lined with non-stick aluminum foil in a pre-heated 450-degree oven. Cook for 10 minutes at this temperature, then reduce to 275 degrees and cook until done.
If you’re using chicken thighs, like my grandmother did, make sure they have the skin on and the bone in.
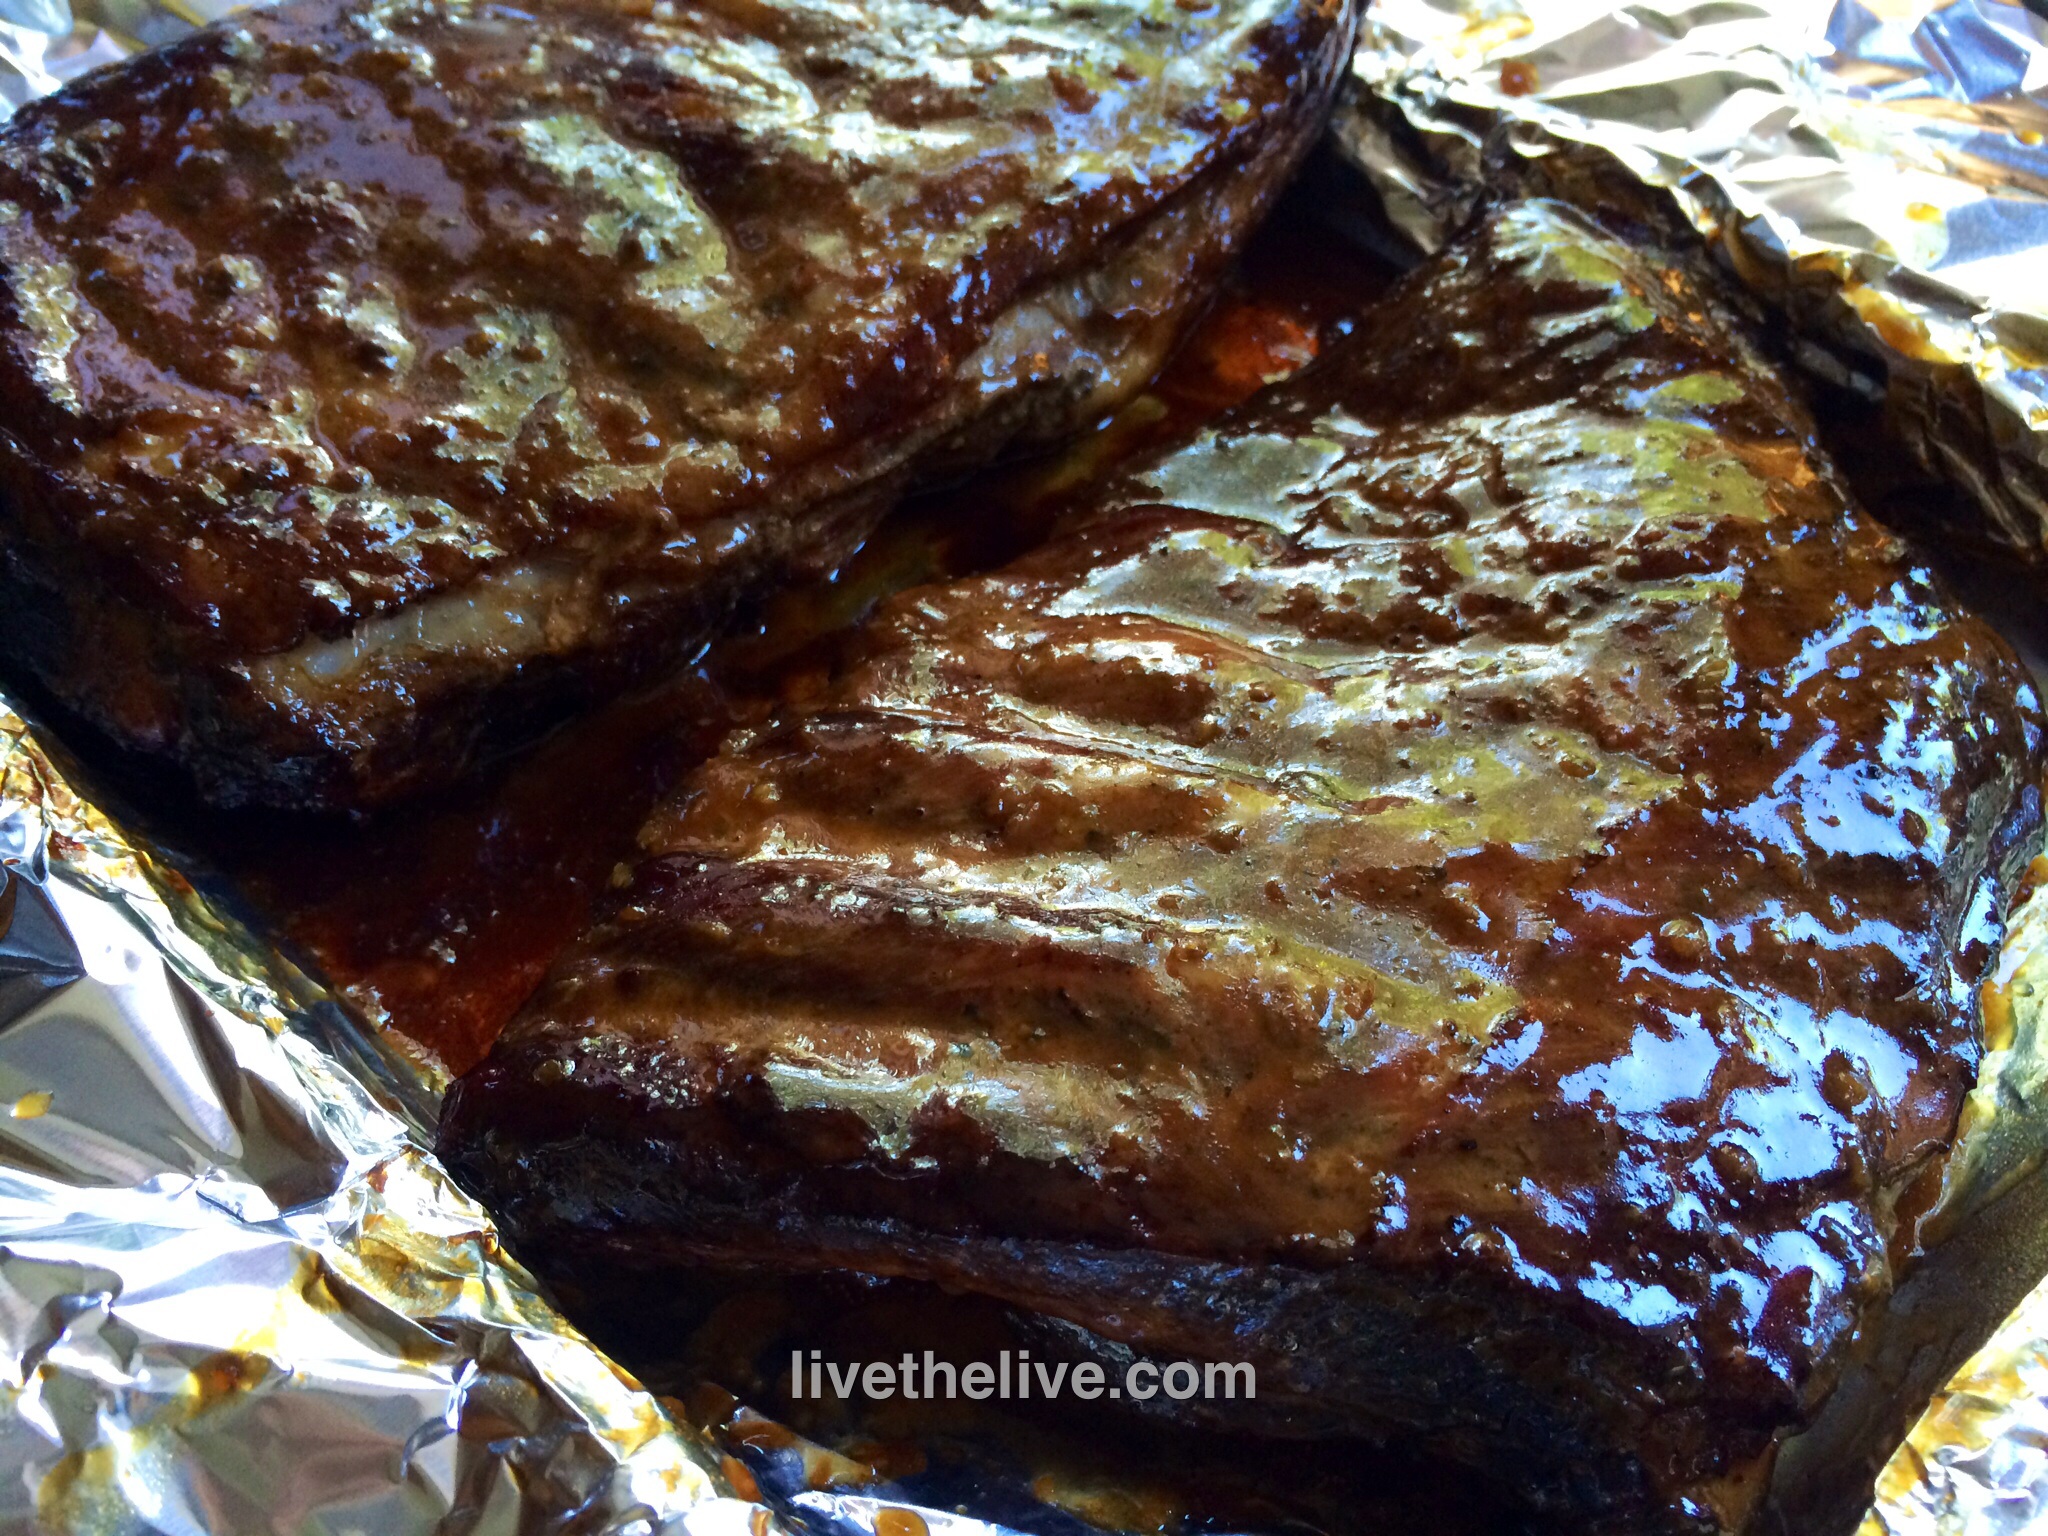
Since it’s National Bourbon Day, let’s not just drink some bourbon…let’s cook with it!
This recipe uses a smoker. If you don’t have one, or just don’t want all the smoke, start with aper-heated oven at 250° and go from there.
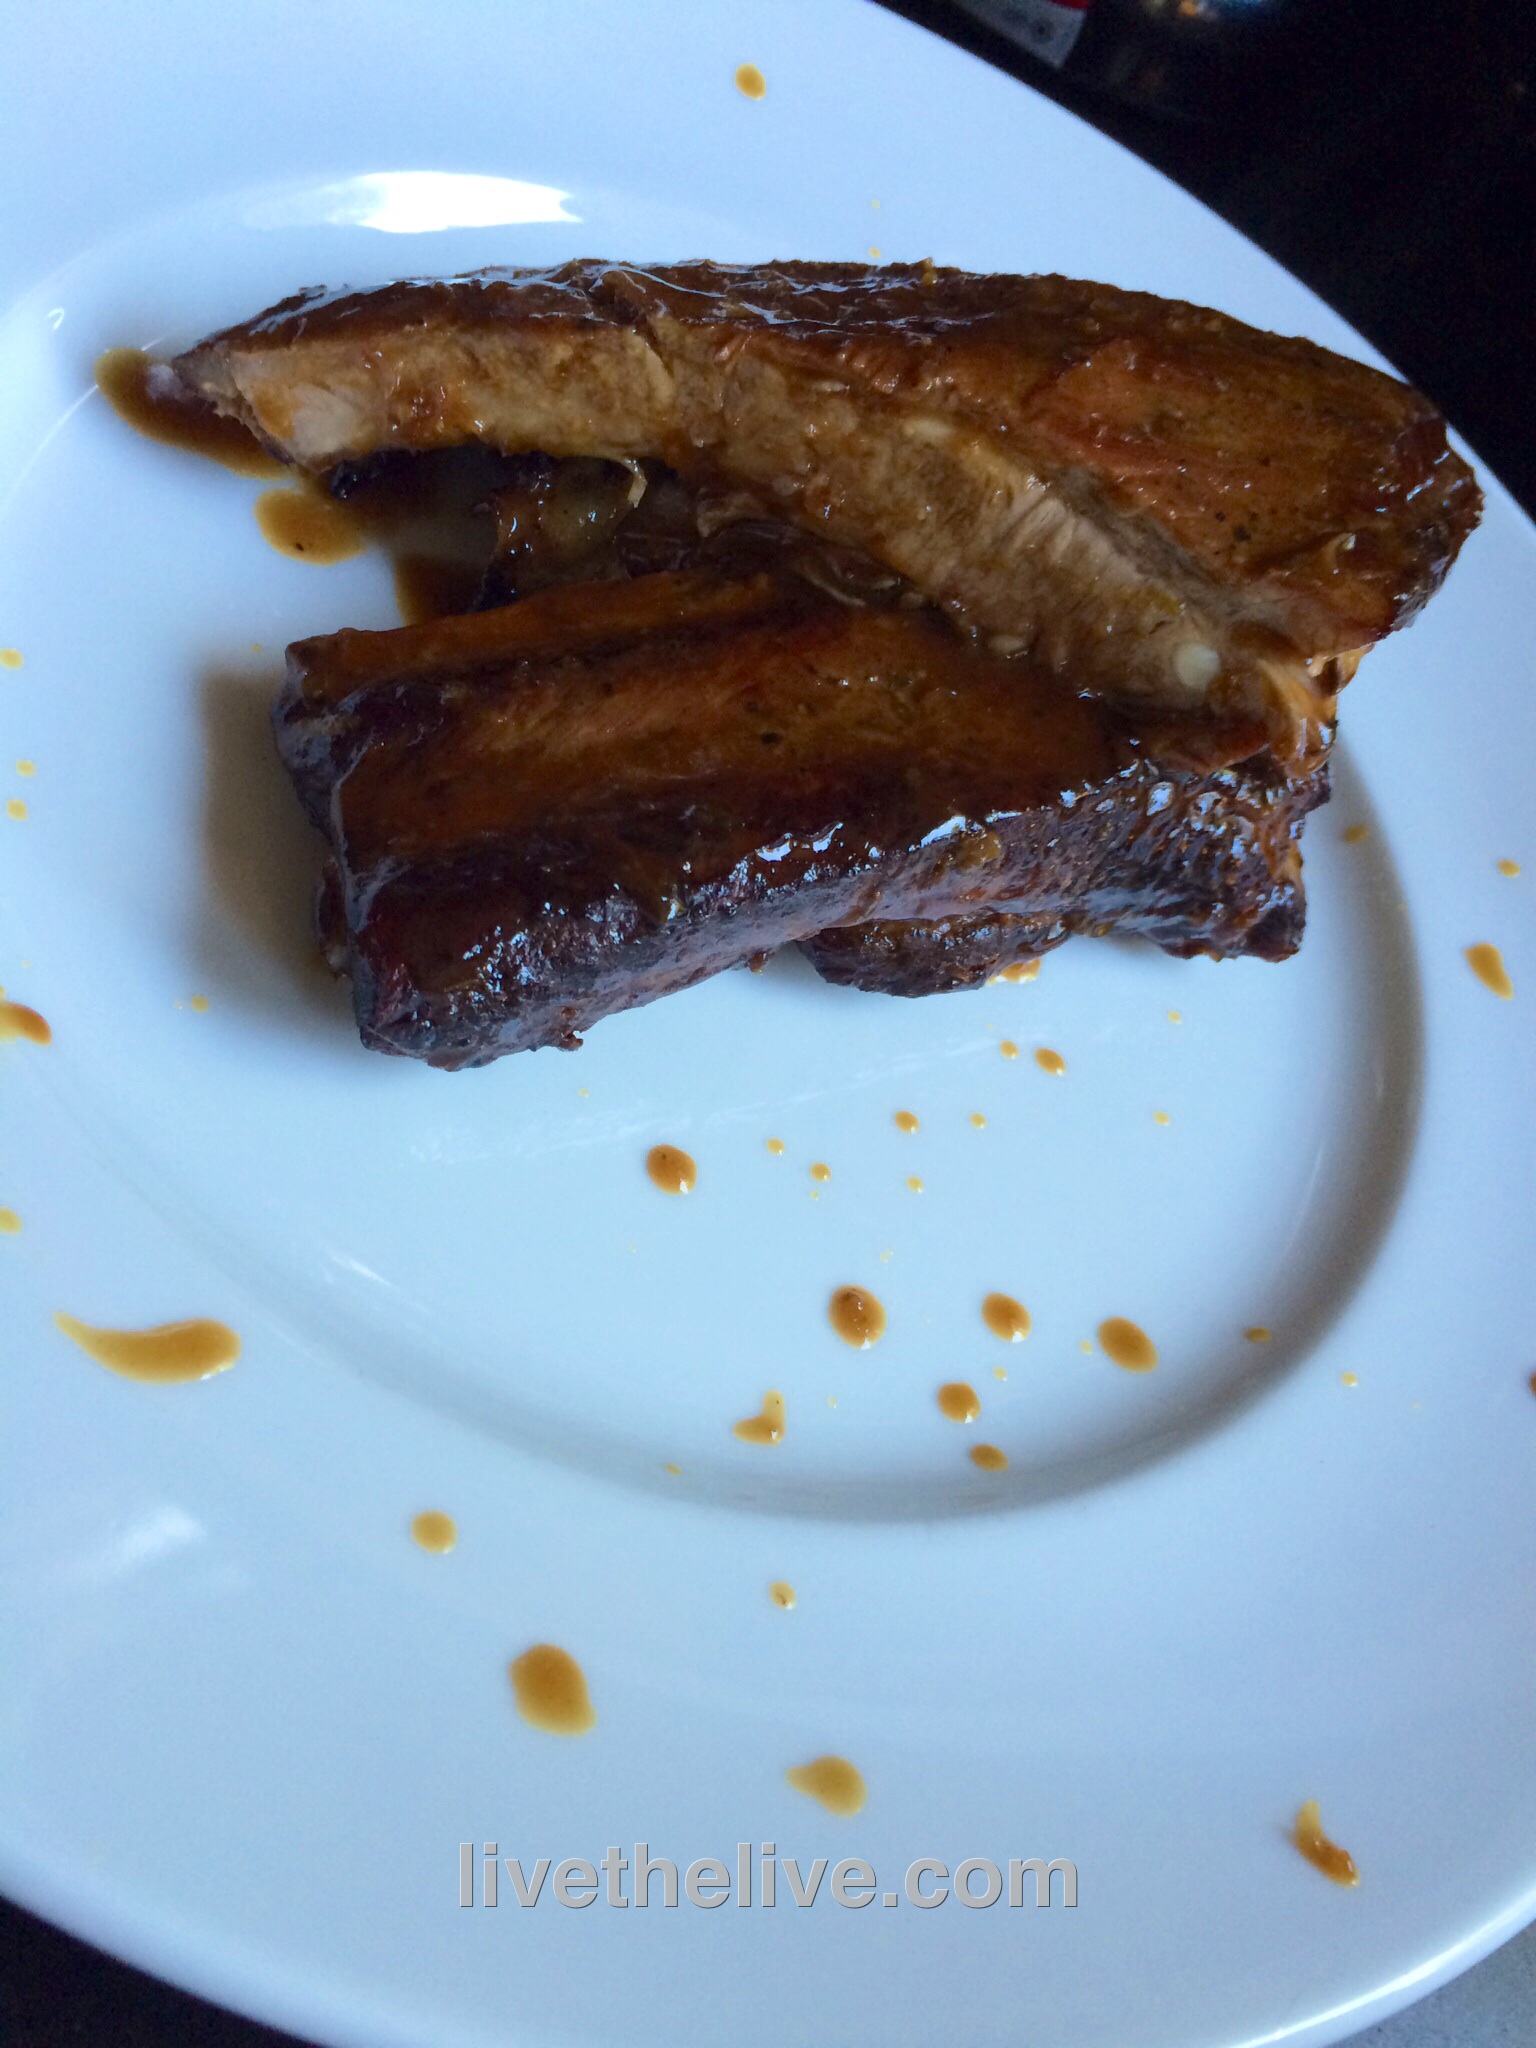
5 lbs St Louis style pork ribs Salt and pepper
1/4 cup honey 1/4 cup bourbon (use whatever you have on hand) zest and juice of 1 lime zest and juice of 1 lemon zest and juice of 1 orange 2 tablespoons Hoisin sauce 1 tablespoon Dijon mustard (I use Maille) 1 tablespoon soy sauce 2 teaspoons Worcestershire sauce 1 teaspoon chili oil
Season the ribs well with salt and pepper and cook in a smoker for 3 hours at 250°, using hickory chips.
While the ribs are smoking, combine the sauce ingredients in a sauce pan, bringing it to a boil, then lowering to medium heat and reducing the sauce by half until it thickens. Stir often, being careful not to let the honey foam up and spill over the top.
Pre-heat the oven at 250°.
Remove the ribs from the smoker and place them on a sheet pan that is lined with aluminum foil, with enough foil to wrap around the ribs. Brush the ribs on all sides with the sauce, stacking no more than 2 sets of ribs on top of each other, and then wrap them with foil.
Cook the ribs in the foil for 2 more hours, until tender.
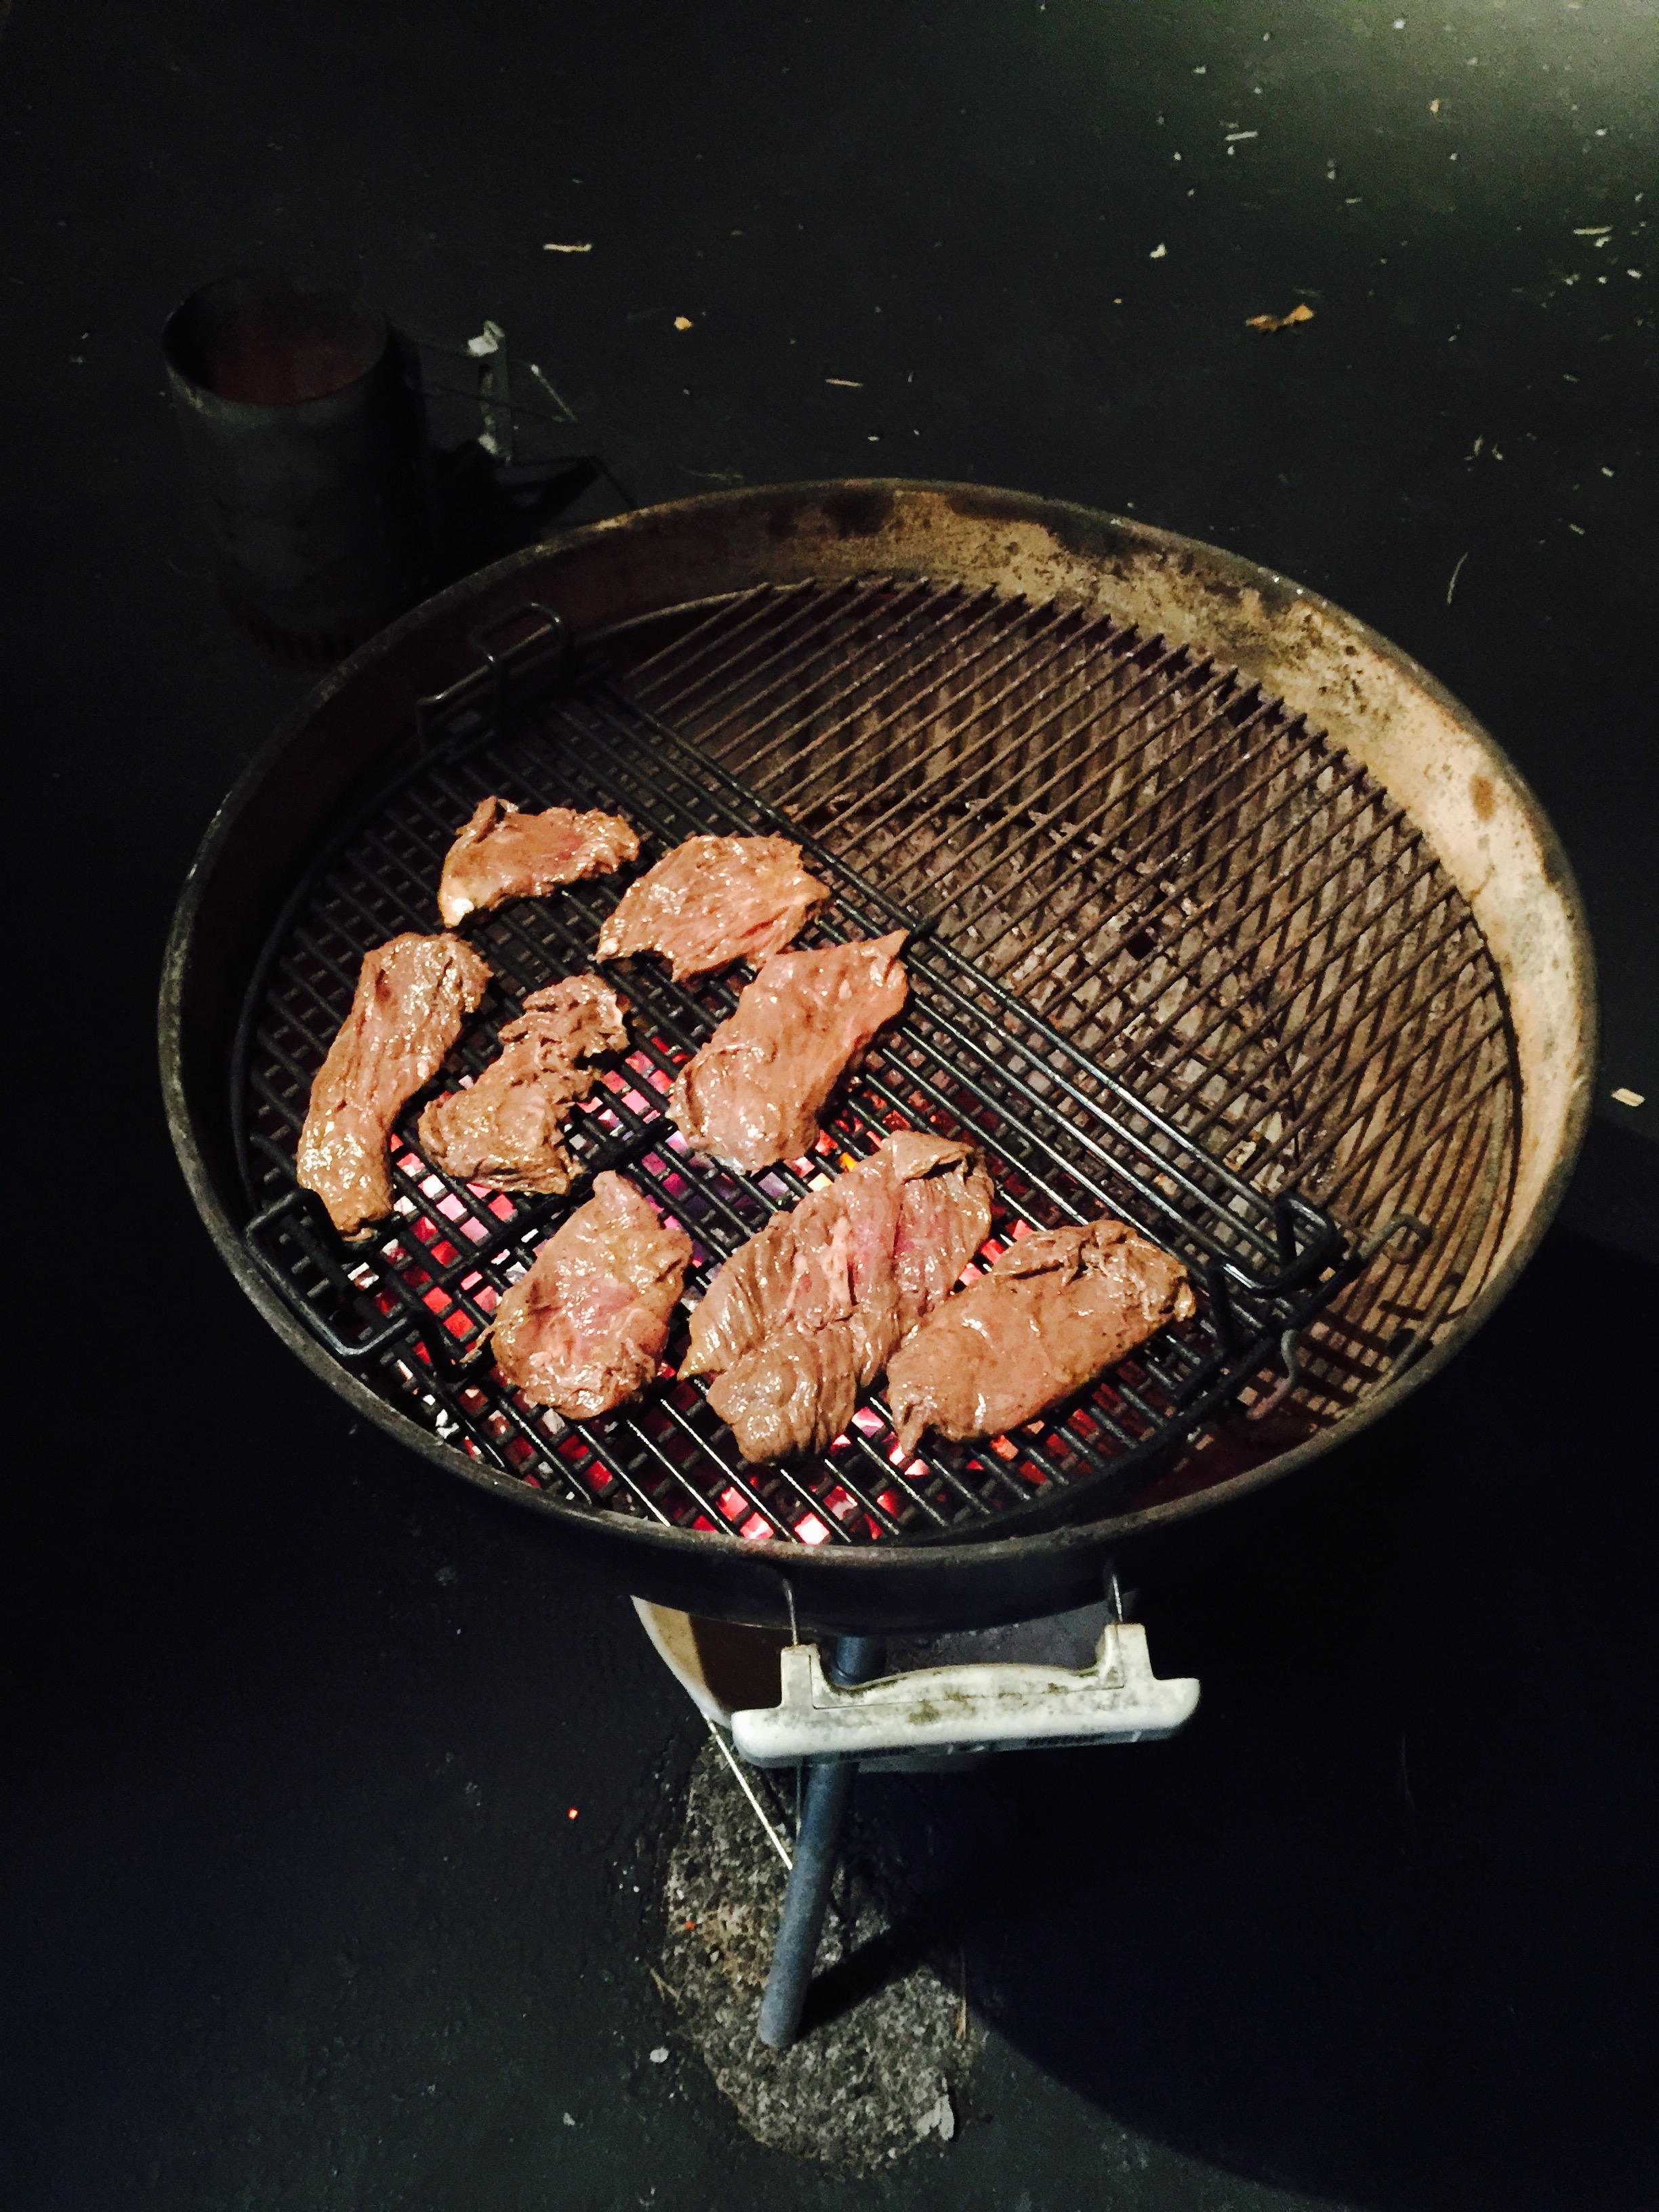
This is a really delicious grilled steak full of wonderful Thai flavors. You do need to marinate it overnight, so keep that in mind. The overnight marinating is key to the intense and unbelievable flavor of the beef.
The original recipe called for skirt steak, but I didn’t have any in my freezer. I did have a fat ribeye, though, so once I thawed it, I sliced it lengthwise to get two large, thin steaks which would easily suck up the marinade I was going to make. And the ribeye was nicely marbled, so it stayed juicy and tender. Beef flap or flank steak are cuts is that would work well with this recipe.
2 lbs. beef ribeye (or skirt steak or beef flap)
1/4 cup chicken stock (homemade is best)
In a bowl, whisk together the sesame oil, soy sauce, ginger, garlic, cilantro, peanuts, scallions, sugar, lime juice and chile oil. Transfer half of it to a shallow dish.
Add the steak to the dish and turn the meat to coat it well. Cover and refrigerate the beef overnight. Refrigerate the other half of the marinade in a separate container.
The next day, light a grill. While it’s warming up, get out a sauce pan and pour the chicken stock in along with the reserved marinade. Heat it to combine it well, but not letting it reach a boil. Remove it from the heat and let it come to room temperature. This will be the dipping sauce for the beef.
About 30 minutes before cooking, take the marinated steak out of the fridge and let it come to room temperature. Season it with salt and pepper, and grill it over high heat until it’s medium-rare, about 5 minutes.
If it’s too cold to light a grill, or if you just want to use the oven, heat a cast iron pan on the stovetop, add a few drops of avocado oil or pork fat, and sear the beef on both sides before placing it in a pre-heated 375° oven to finish cooking.
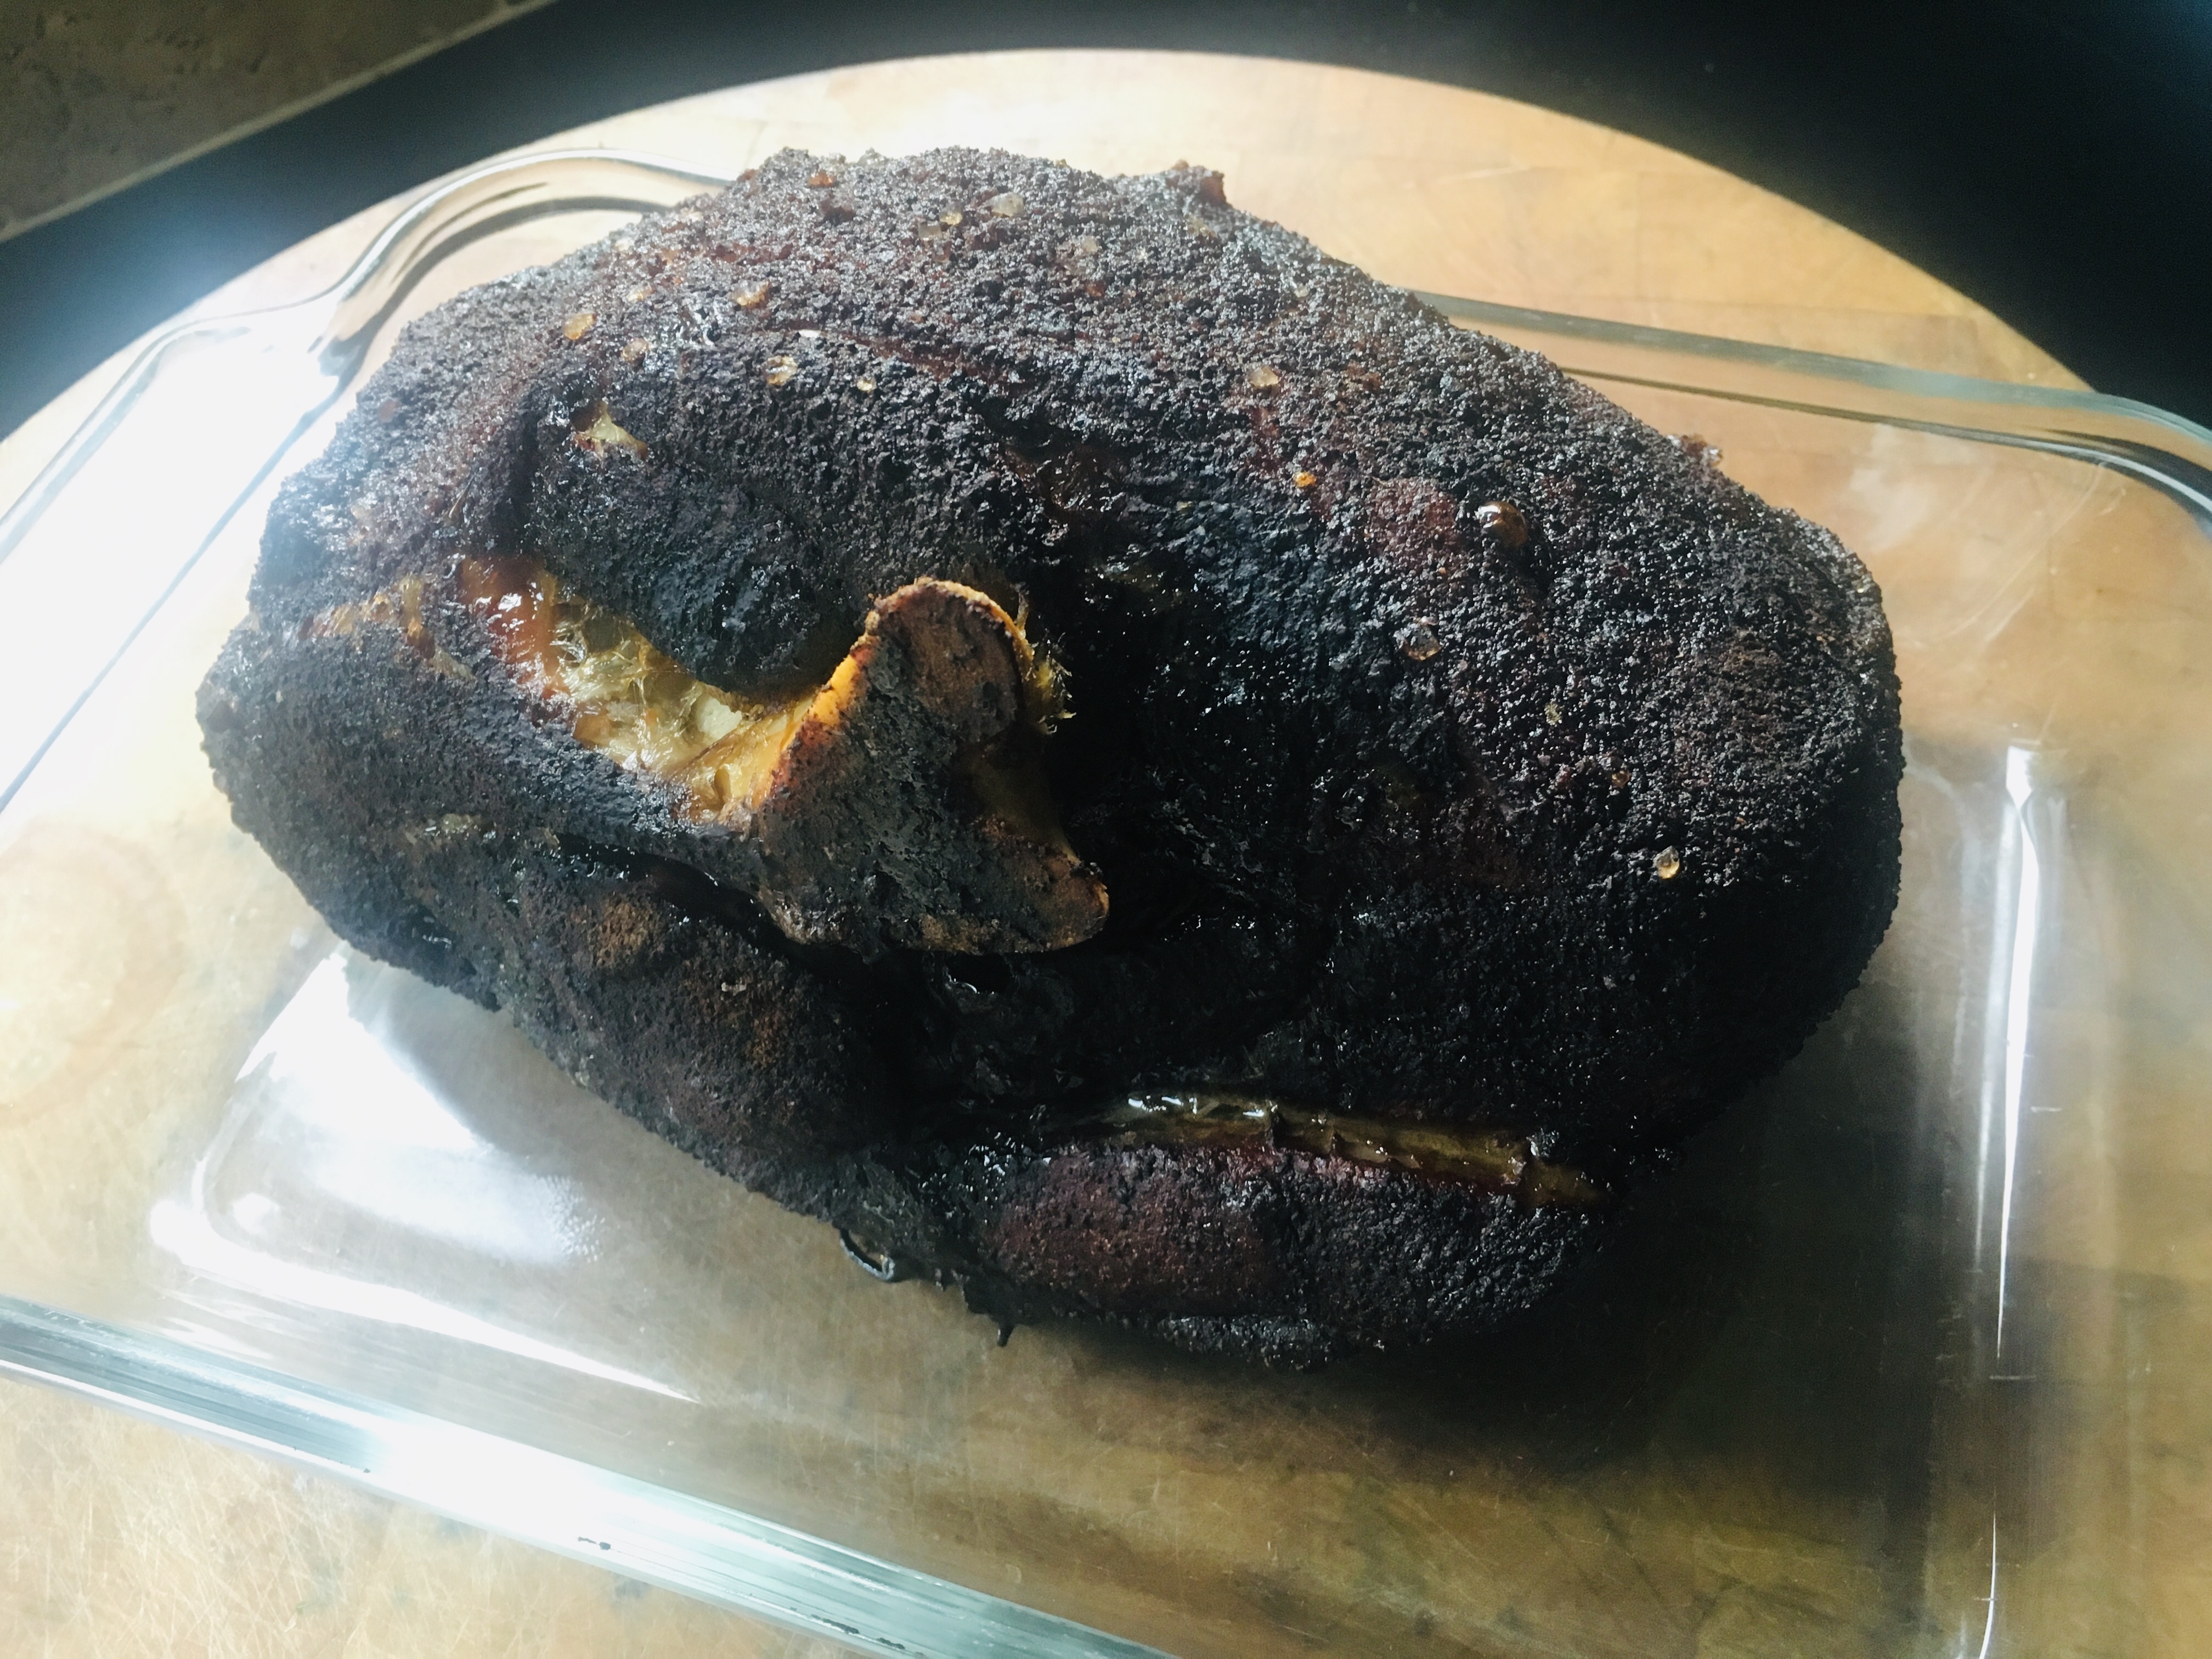
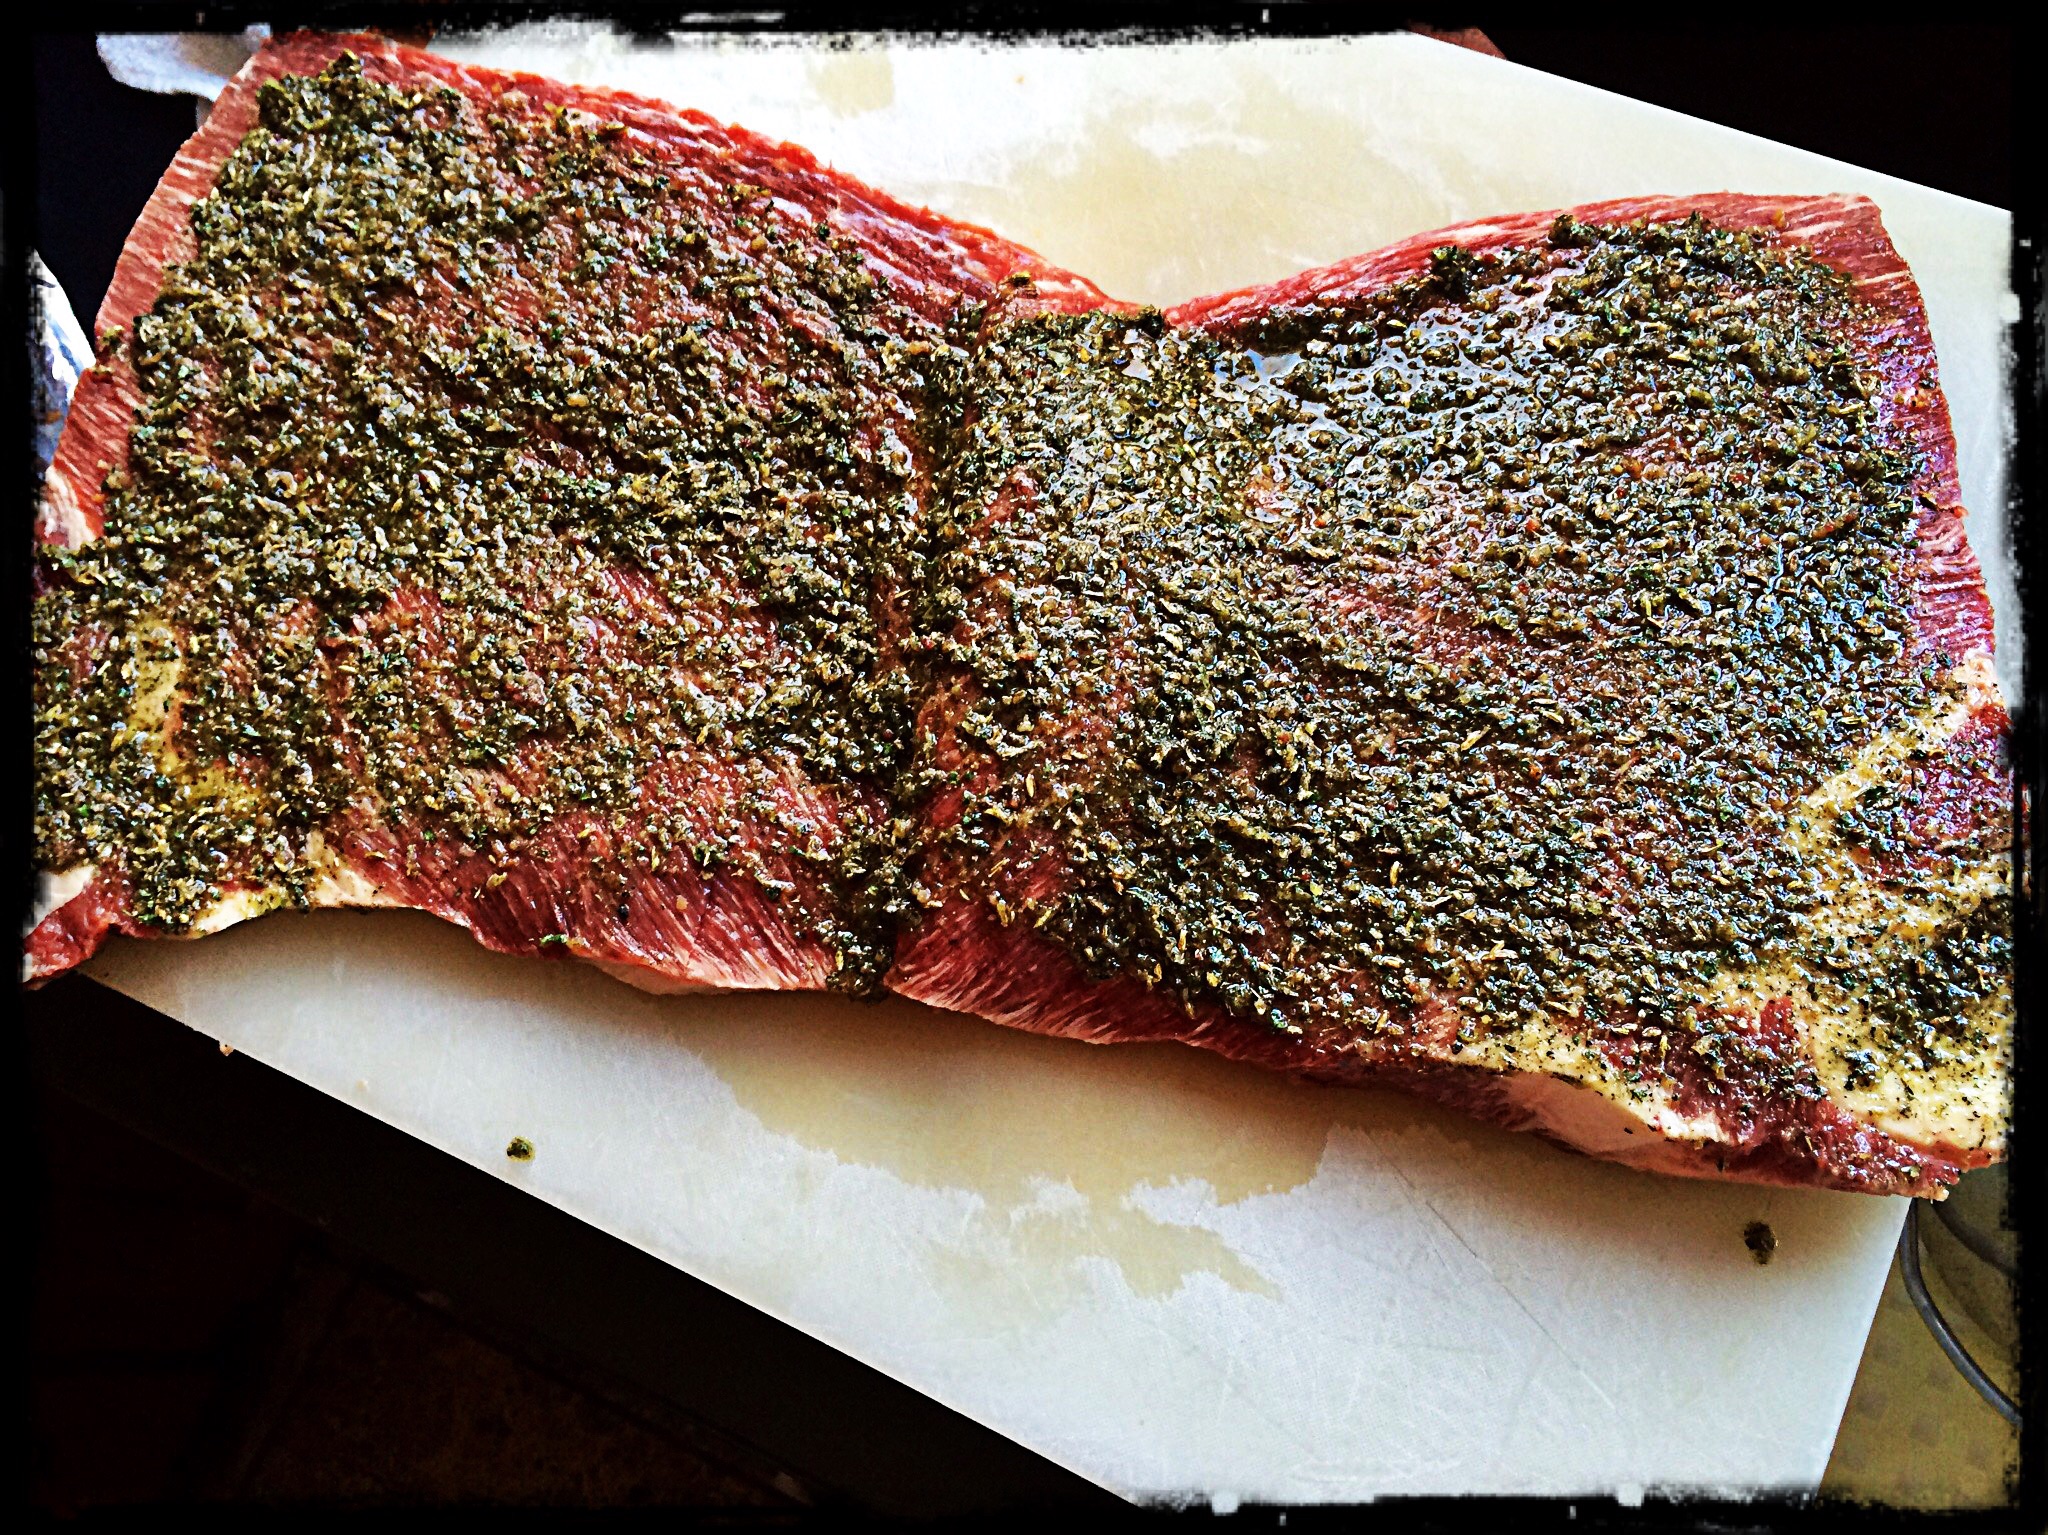
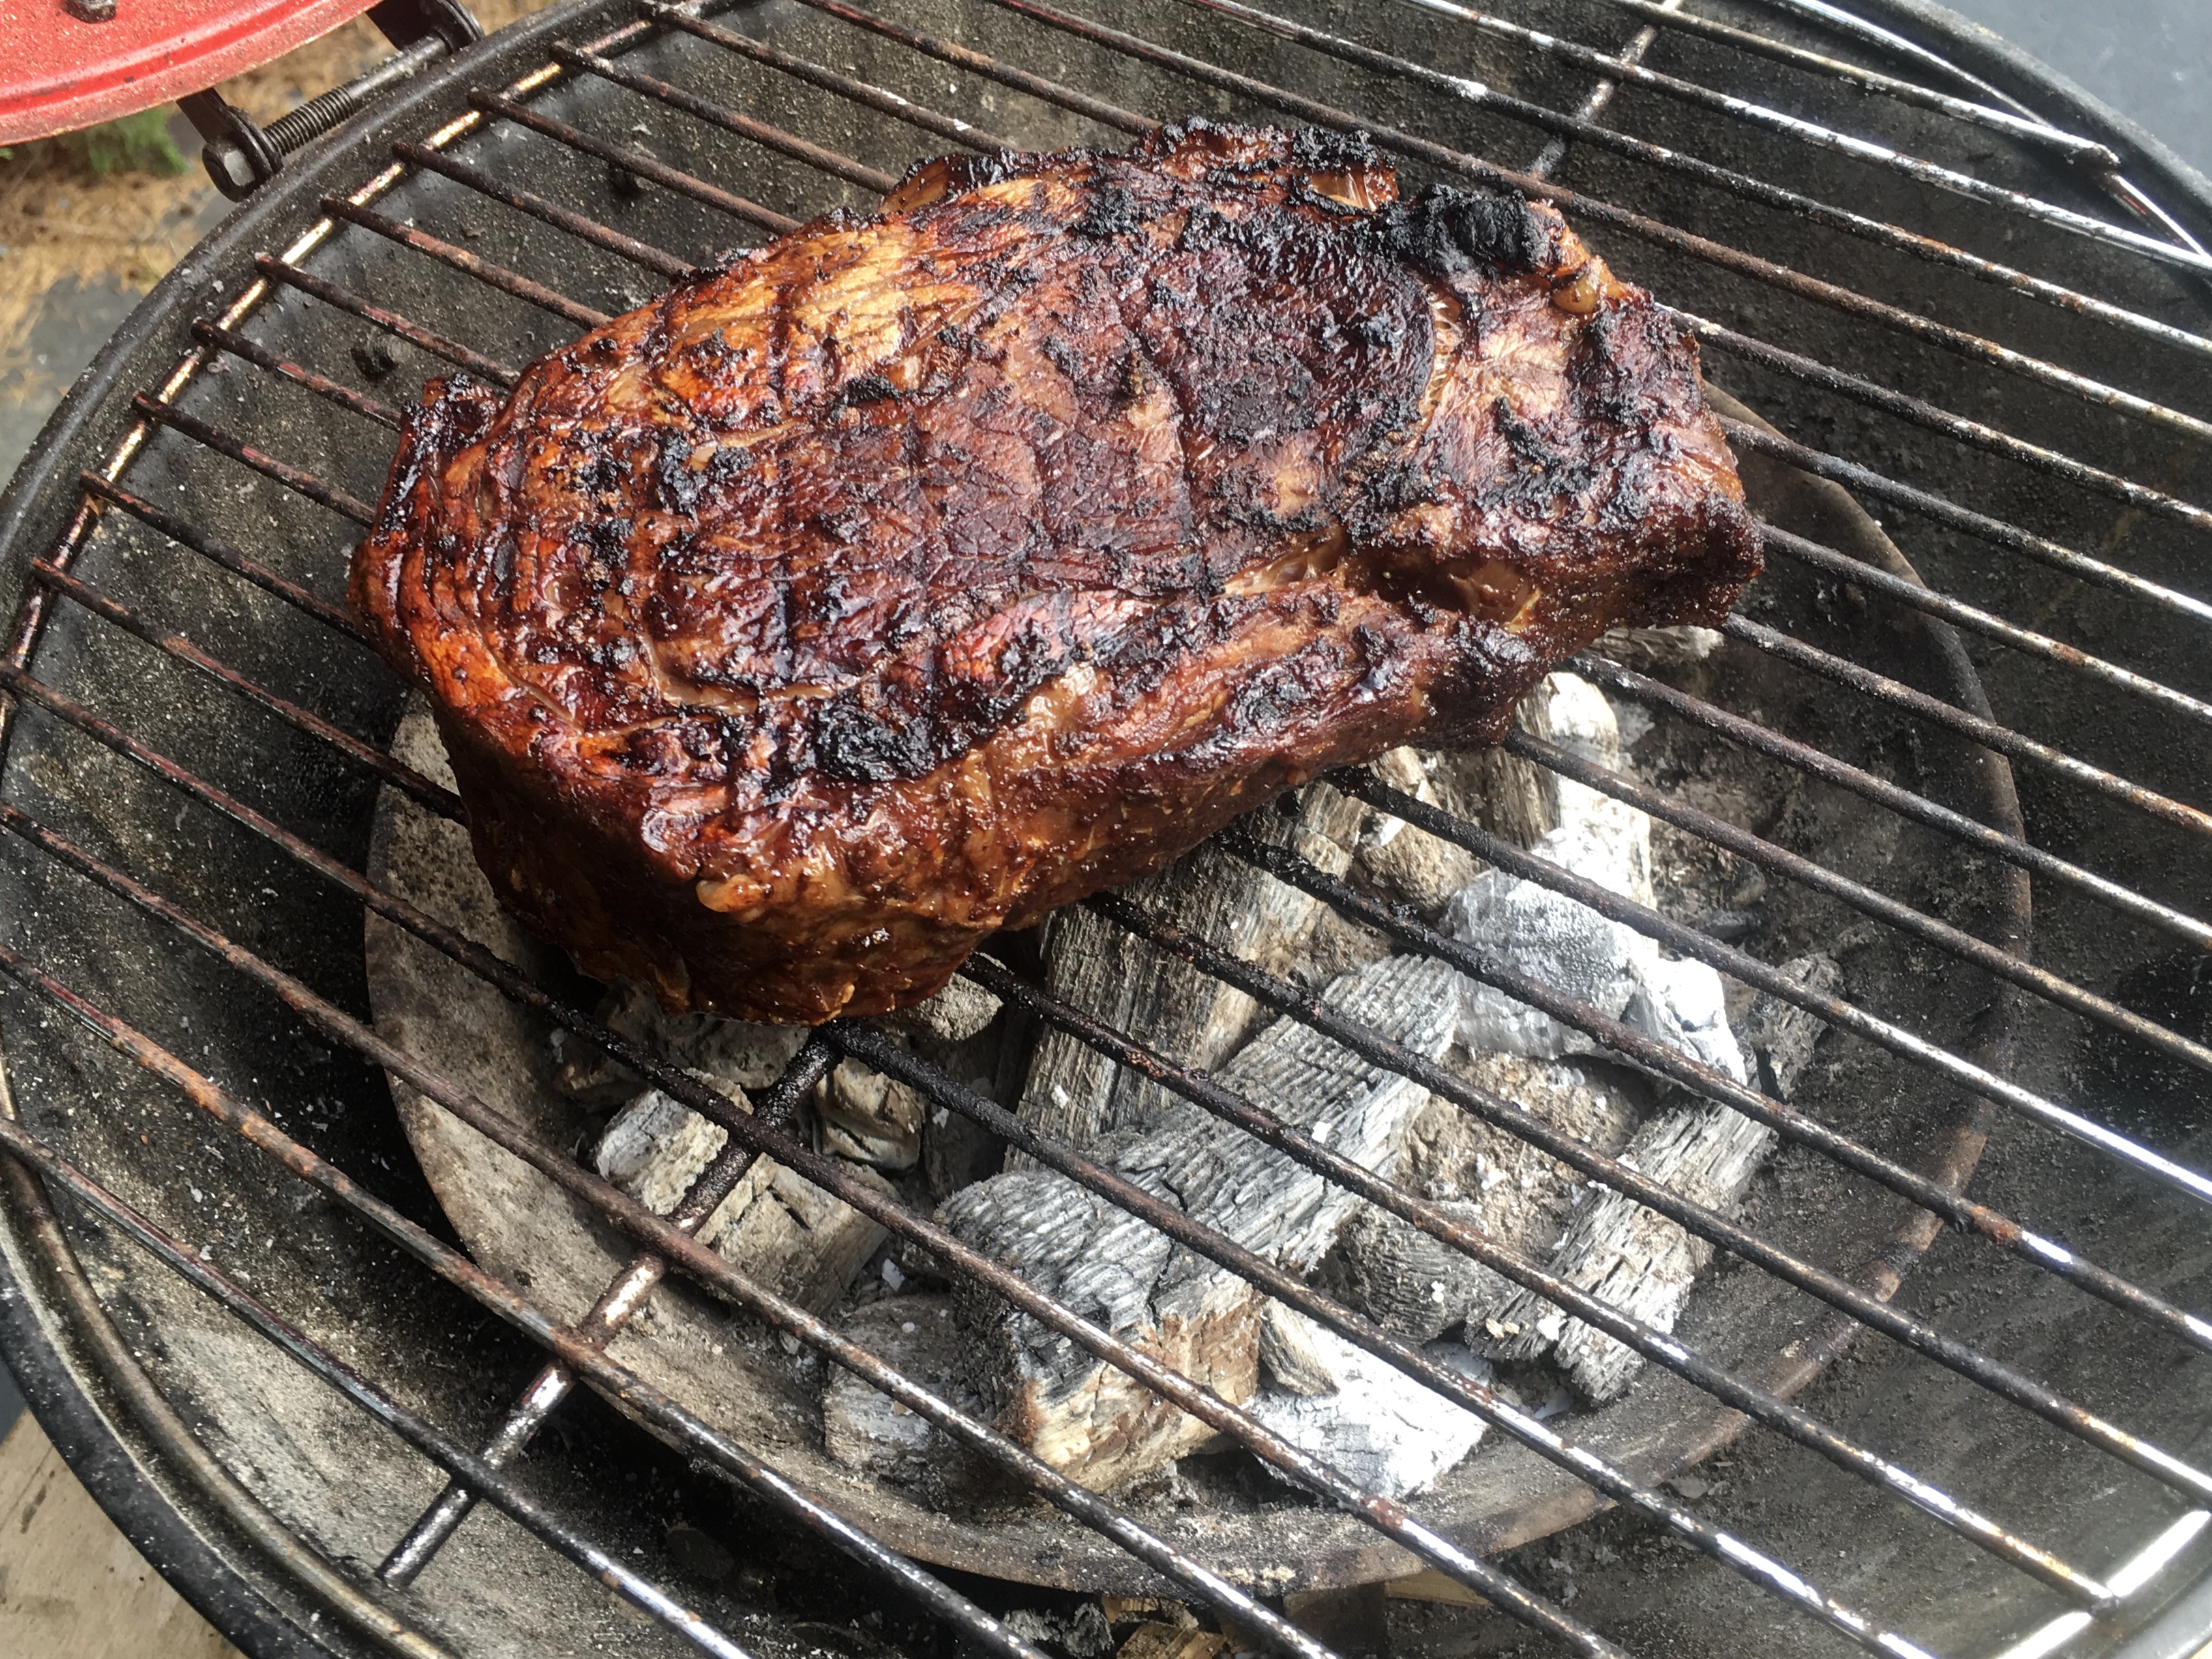
As I’ve mentioned previously, I love the Kona-crusted NY strip at the Capital Grille, so much so that it inspired me to make a coffee rub of my own. I’ve been using it on steaks and burgers for years. But recently, I used it on a slow-smoked pork shoulder for the first time, and it was fantastic!
I used a smaller pork shoulder, about 6 lbs., and smoked it for about 12 hours. Obviously, if you use a larger hunka meat, you’ll need more time. I prefer a bone-in shoulder over boneless. I think it gives greater flavor.
Rubbed and ready to smoke!
My coffee rub is easy to make, and I usually make a lot of it at once, since it stores well.
3 tablespoons brown sugar 1 tablespoon Kosher salt 1 tablespoon ground coffee (use your favorite) 1 teaspoon granulated garlic 1 teaspoon granulated onion 1 teaspoon unsweetened cocoa powder
I mix all the ingredients well, then rub generously on the pork shoulder before placing it a 250-degree smoker for about 12 hours. I use an electric smoker, which allows me to set the temperature and forget it, with the exception of occasionally adding hickory chips. I love just a hint of smokiness…I don’t want the rub to be overpowered by the smoke.
Perfectly smoked, with the bone easily sliding out of the shoulder.
The brown sugar in the coffee rub creates a beautiful crust on the meat, which goes really well with the pork and the barbecue sauce I make.
The barbecue sauce uses much-needed vinegar. It cuts through the rich fattiness of the pork, and is absolutely delicious.
2 cups ketchup
3/4 cup water
6 tablespoons cider vinegar
6 tablespoons white vinegar
6 tablespoons brown sugar
3 tablespoons Worcestershire sauce
1 tablespoon chili powder
2 teaspoons salt
2 teaspoons black pepper
1 1/2 teaspoons cumin
Mix all the ingredients in a saucepan and simmer until the flavors have blended, about 20 minutes. Remove from heat and cool to room temp. If you store it in an airtight container in the fridge, it’ll stay good for a few months.
A beautifully smoked pork shoulder, amazing barbecue sauce…what more do you need for an amazing pulled pork sandwich except a toasted brioche bun and perhaps some of my world-famous home fries on the side?
And May is National Hamburger Month. How can you go wrong? First, a favorite burger recipe, then one for brisket.
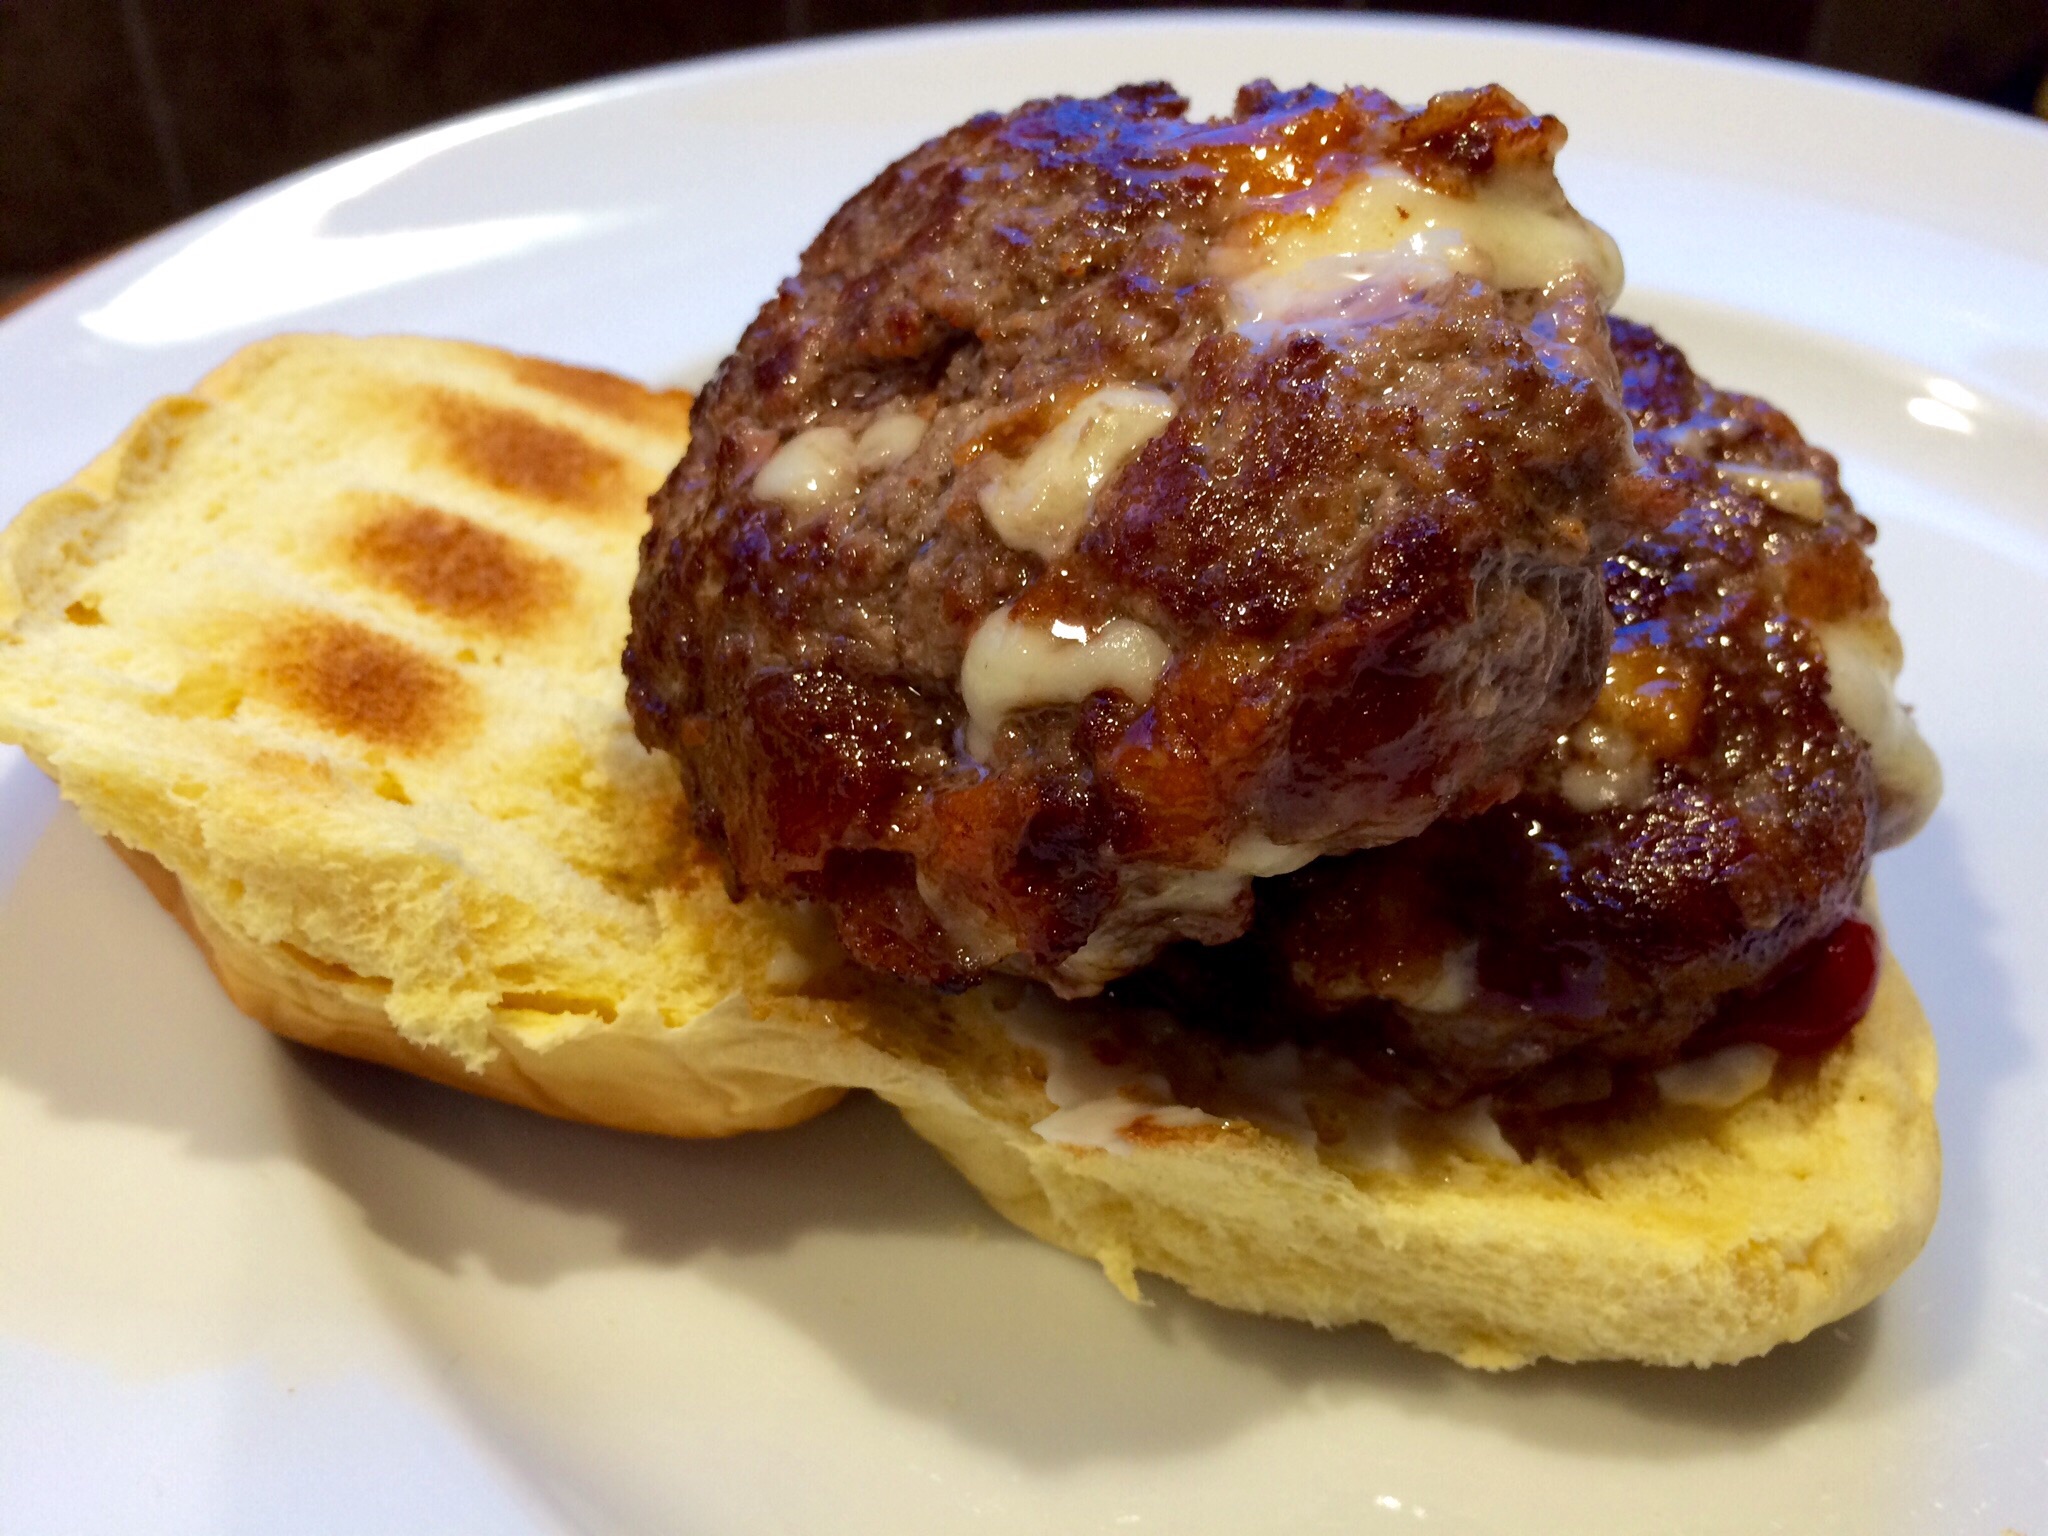
The Inside-Out Burger: If I’m making bacon cheeseburgers to bring to a barbecue, even if it’s on my back deck, instead of bringing a package of bacon and a package of cheese and a stack of burgers, I put all the ingredients inside the patties themselves. As the burgers cook, the fat from the bacon and the gooey cheese melt and combine with the burger meat to make a really tasty and moist burger.
2 lbs. ground beef
1/2 cup sharp cheddar cheese, cut into 1/4″ cubes
1/2 lb. bacon, cooked crisp, cooled and crumbled
garlic salt
avocado oil or pork fat
In a bowl, combine the beef, the cheese and the bacon, mixing well so that all the ingredients are evenly incorporated. Form the beef into 1/4 lb. patties. Refrigerate them until you’re ready to cook to firm them up.
Heat a cast iron skillet and add a drop of oil or pork fat. Place the burgers in the hot skillet to sear and sprinkle with the garlic salt. When browned, flip the burgers and place the skillet in a 350-degree oven to finish cooking.
Brisketta:There’s a wonderful Italian roasted meat dish called Porchetta (por-ketta). The classic version consists of a pork belly that is seasoned and then wrapped around a pork loin. The meat is tied, then roasted slowly for hours, basted with wine and the meat juices until the pork is cooked and the outside skin is crackly and crispy. Then it’s sliced like a log and served as a sandwich or a main dish.
I decided to use the same method of cooking for beef brisket, and I called it “Brisketta.”
I flipped the brisket fat-side-down on my cutting board and carefully sliced it down the middle horizontally to make two large–even thinner–slabs of meat. The bottom half, with the fatty side of the brisket, would eventually be my outside layer. The top half would be my inside layer.
I took the top half and slathered some of my seasonings on it. Then I rolled it tightly into a log. I slathered more of my seasonings onto the bottom half of the brisket, then rolled it around the first log, so that the fattiest side of the brisket would now be on the outside of this large meat log. I tied the meat log up tightly with butchers’ twine and let it rest in my fridge overnight.
7 lbs. beef brisket
1 tablespoon fennel seed, toasted and cooled
5–3″ strips of bacon, cooked and cooled
2 tablespoons oregano
2 tablespoons parsley
2 teaspoons basil
2 tablespoons salt
1 teaspoon pepper
2 teaspoons granulated onion
1 teaspoon granulated garlic
Grated zest of 2 lemons
1/2 cup olive oil
Pour the fennel seed in a hot, dry pan on the stove. Toast the seeds until they release their aroma, but don’t let them burn. Set aside to cool.
Crumble the bacon strips and place in the bowl of a food processor. Add the cooled fennel seeds, oregano, parsley, basil, salt, pepper, onion, garlic, and lemon zest.
Run the food processor and slowly pour in the olive oil, until you have a paste much like pesto.
Slice the brisket in half horizontally. Save the piece with the fatty side for last, because this is the piece that will wrap around the others, with the fatty side out. Smear the rub on the first piece of brisket and roll it tightly into a log. Smear the rub on the second piece of brisket and wrap it around the first piece, making sure the fatty side is on the outside.
Once you’ve rolled both pieces into a single meat log, scored the fatty exterior with a knife and rub any leftover seasoning paste onto it. If you have none left, simply season with salt and pepper.
Tie the meat log tightly with butchers’ twine, tucking in all loose ends.
At this point, you can place the meat log in the fridge until ready to cook, remembering to remove it at least an hour before cooking so that it comes back to room temperature.
Pre-heat an oven or smoker at 250 degrees. Place the meat log directly on the grate, with a pan underneath to catch the dripping fat. Place a bowl of water in there as well, to keep the meat moist while it cooks. Cook for 4 1/2 hours, or until the interior temperature reaches 130 degrees. Let it rest an hour before slicing…if you can wait that long!
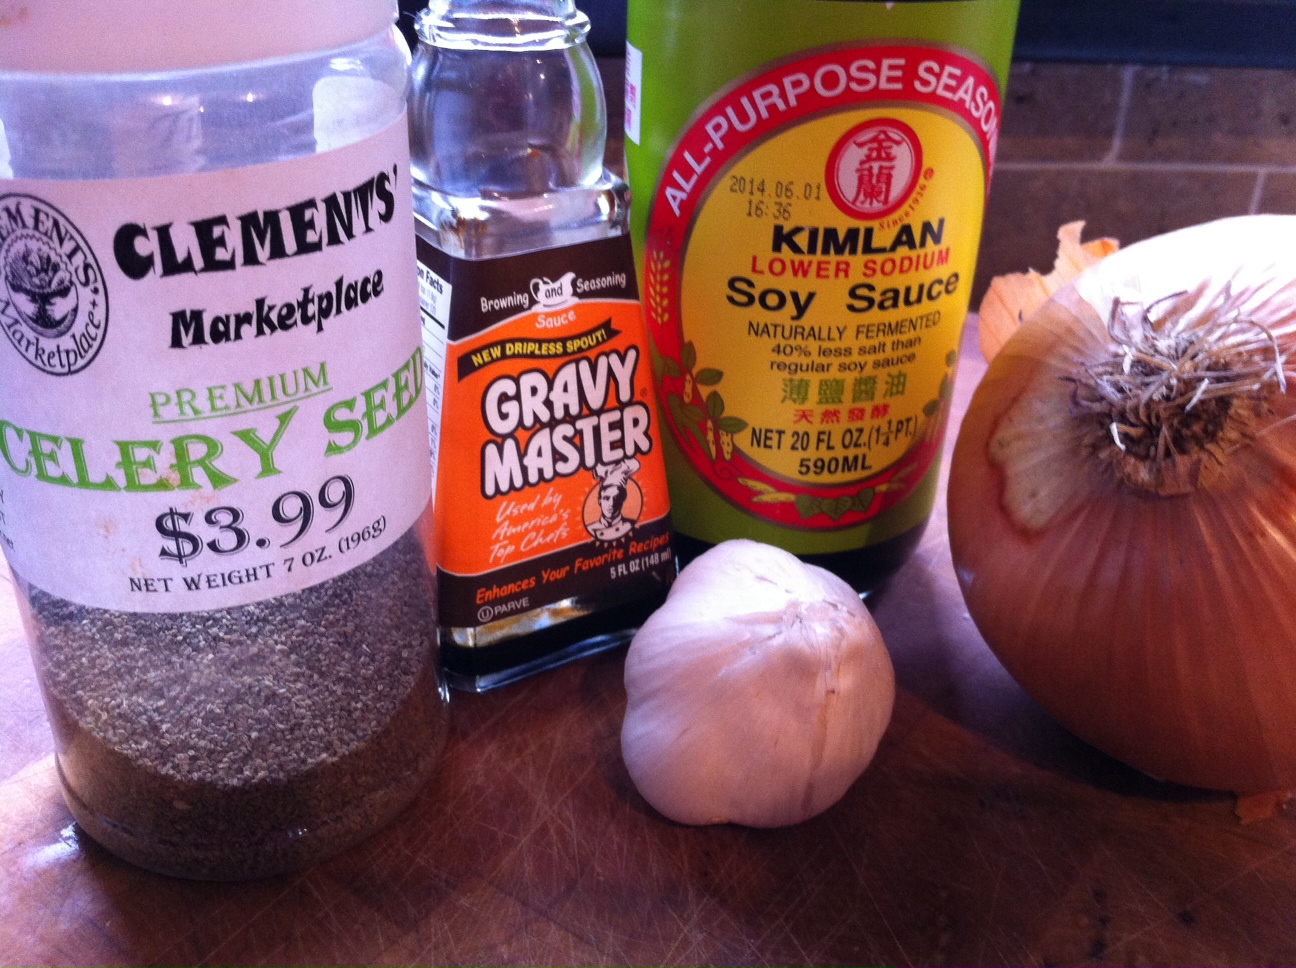
Out on the North Fork of Long Island, there’s a steak restaurant called the Elbow Room. It’s nothing fancy…old school cooking. But they’re famous for their steaks because of a super-secret marinade. Ages ago, I spotted a newspaper article that claimed they found out what that secret marinade was, and they published it. Whether this really is the official Elbow Room marinade or not, I have to say it’s pretty darn tasty and it makes for a delicious steak on the grill.
My biggest concern with the marinade was the salt factor, since it uses soy sauce. But the ribeye I had was almost an inch-and-a-half thick, which meant that it could sit in the marinade for a long time…my ribeye sat in it for 8 hours. If you choose to use a thinner cut of meat, you might need to reduce your marinating time.
The recipe uses a product called Gravy Master, available in most supermarkets. Look for it in the section where you find gravies and instant potatoes.
1 cup soy sauce
1/4 cup Gravy Master
2 large Vidalia onions
2 cloves of garlic
2 teaspoons celery seed
1/2 teaspoon black pepper
Combine the onions and garlic in a large food processor and purée. Add the remaining ingredients and run the processor until it’s smooth and sort of resembles root beer.
Marinate the beef in the marinade overnight, or for as long as possible. The thicker the cut of meat, the longer you can marinate it.
Looks delicious, but it hasn’t been cooked yet! Straight out of the marinade.
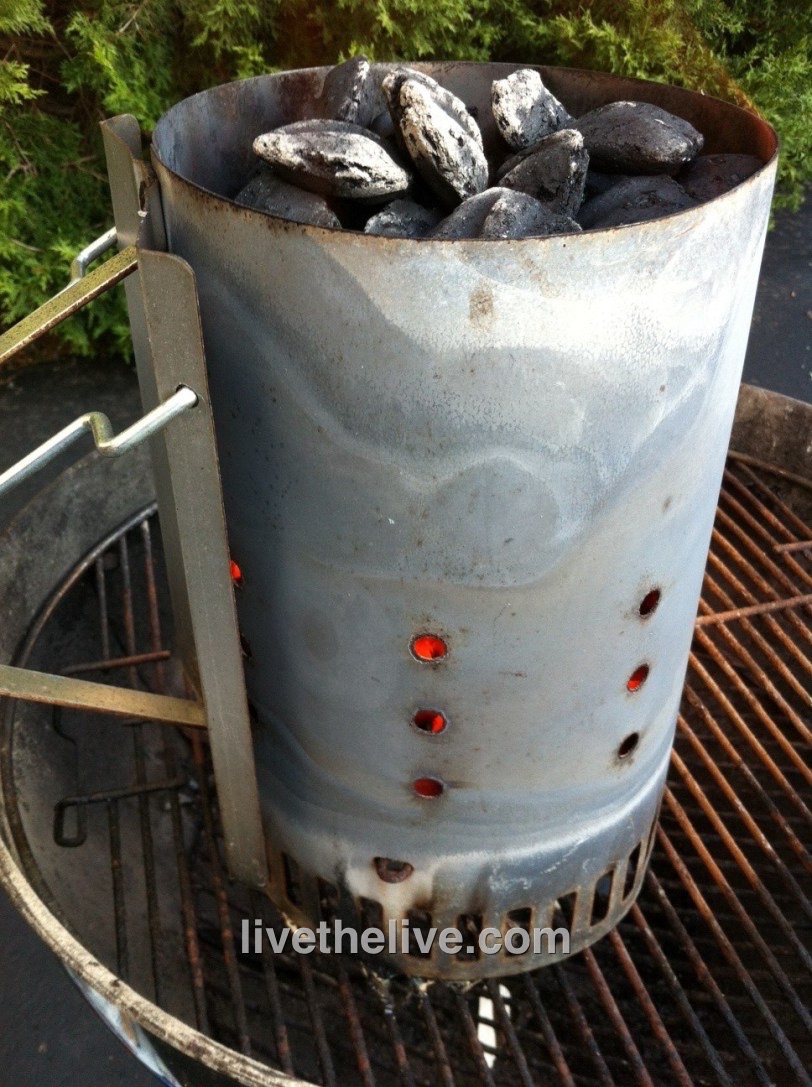
Light the grill. I prefer pure hardwood charcoal because that’s where the flavor is. If I’m just cooking one steak, I get my camping grill out. It lights quickly and easily, and it doesn’t waste a whole lotta charcoal.
Always use a charcoal chimney, never lighter fluid…unless you like the taste of petroleum products in your food.
Pure hardwood charcoal gives you a hot fire. I like to sear the beef really well on both sides, then move the steak to a cooler spot on the grill and close the cover. I’ll let the beef cook until it gets to a perfect medium-rare.
If you try this marinade on burgers–and it’s great on burgers–simply brush the burgers with the marinade as you place them on the grill. Go easy or you’ll get a very salty burger.
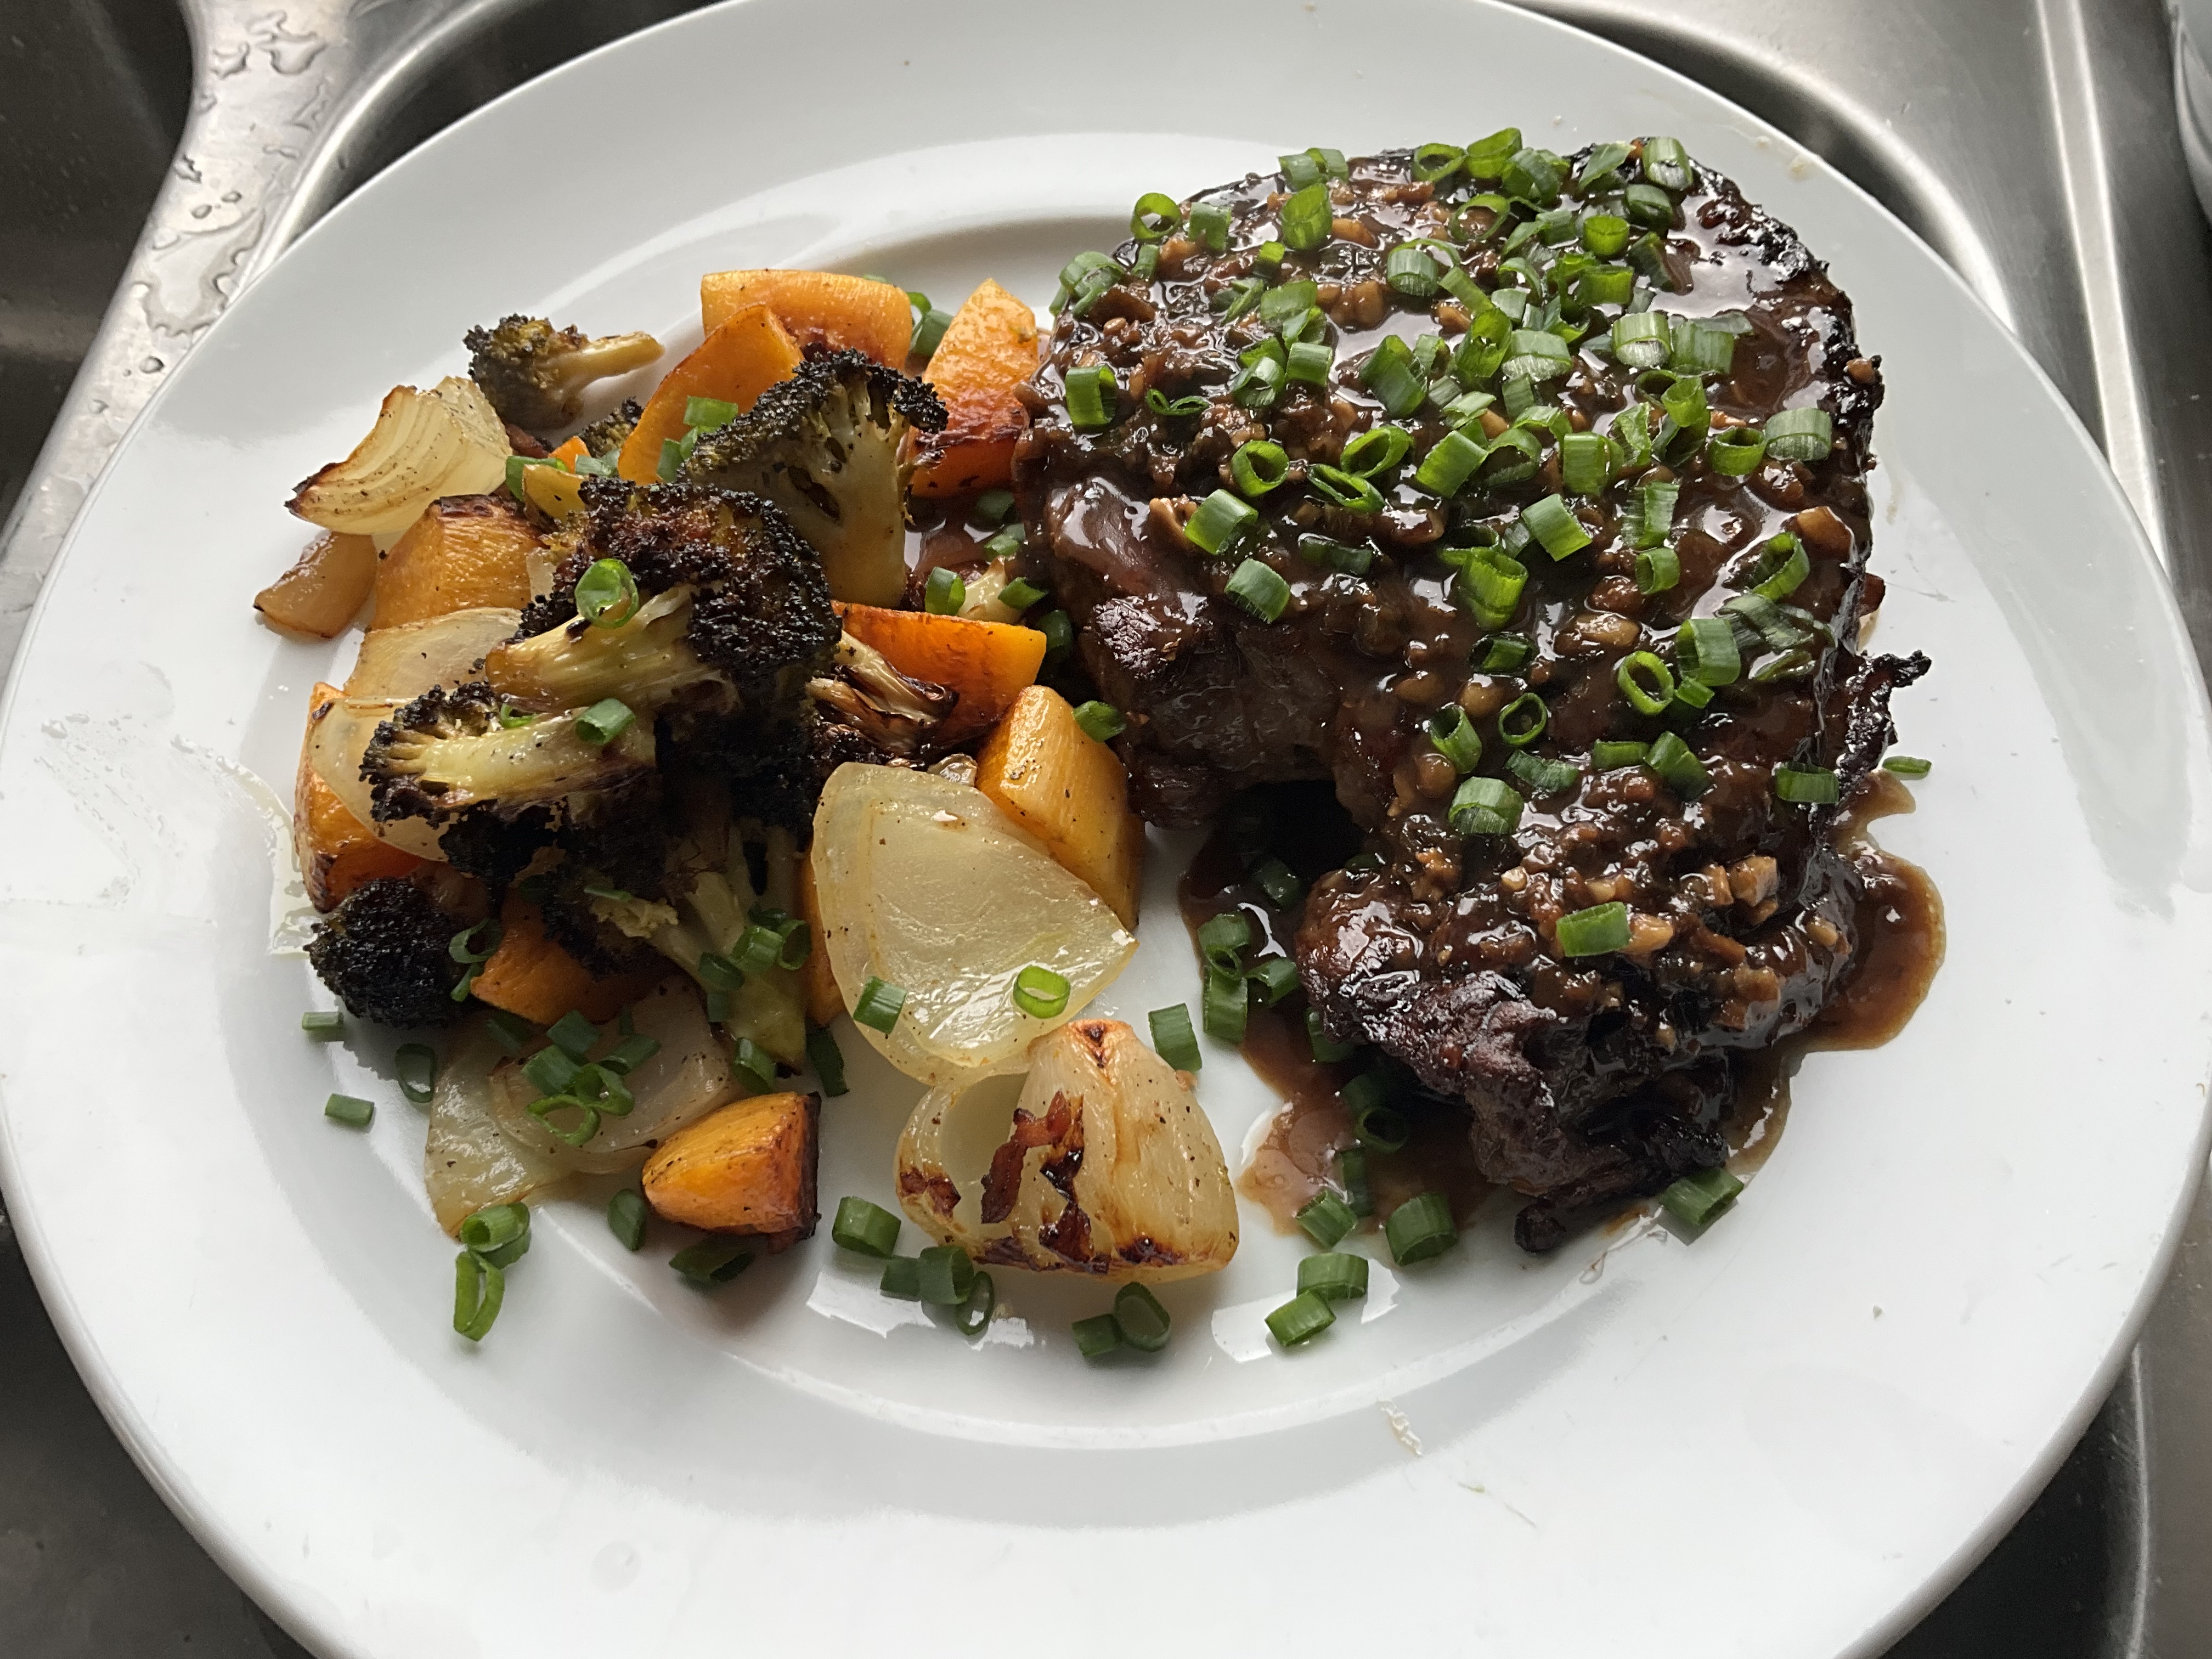
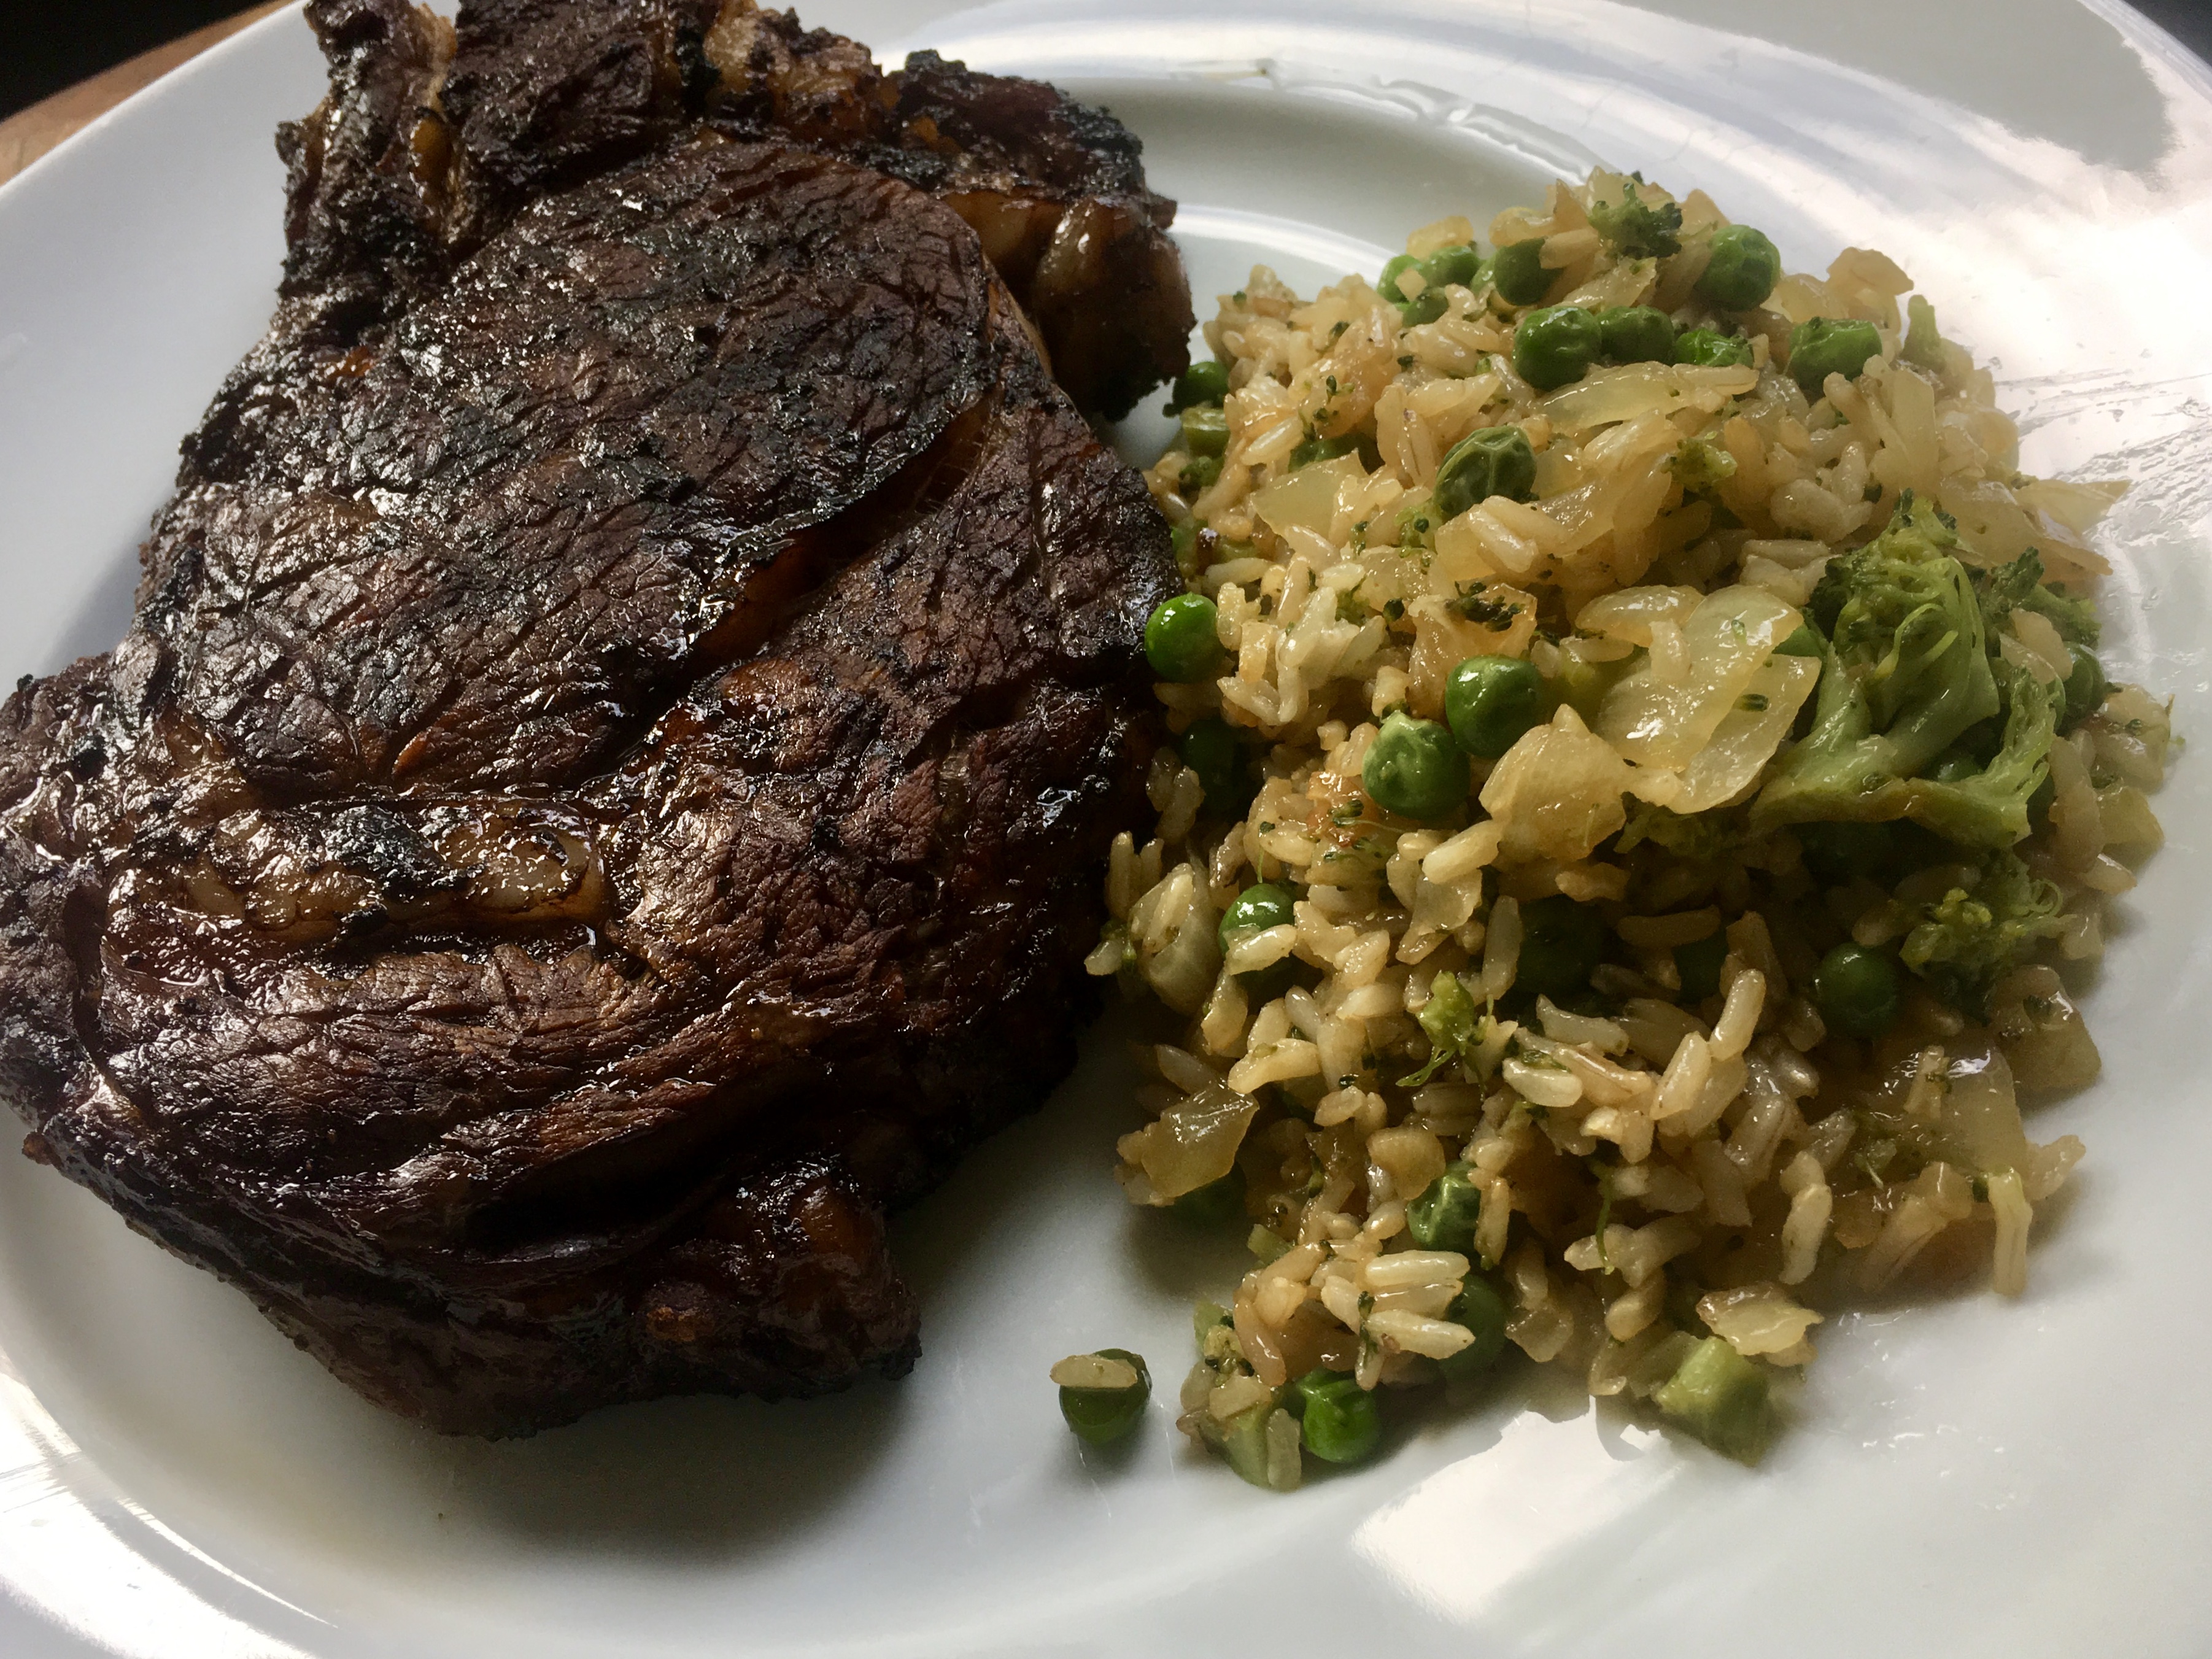
Marinated grilled ribeye with a side of fried rice…an easy combination of veggies and rice leftovers I had in the fridge with a dash of soy sauce.
If I’m at a steakhouse and craving beef, I’ll usually order a cut like porterhouse or ribeye…great cuts of meat that need nothing more than a little salt and pepper, and a skillful grillmaster. The prep on that slab of meat before it even hits the grill has already been done: carving, dry-aging, trimming.
At home, I eat only humanely raised grass-fed beef. It’s expensive, so I buy the cuts that cost less, but need a bit of TLC before cooking. A cut like beef flap, which comes from the bottom sirloin butt (the back of the animal), looks like a skirt steak, a hanger steak, or a flank steak because of its thinness, but each comes from a different part of the animal.
Though the beef flap is somewhat thin, I will often slice it lengthwise into two thinner pieces, because the meat’s thickness often varies, which can give you uneven cooking. I like to cook it hot and fast on a hardwood fire grill, but still keep it medium-rare. If the weather is really unforgiving, like it is right now, cooking the beef in a hot cast iron skillet works really well, too.
Marinades are the key to tenderizing and flavoring tougher or cheaper cuts of meat. What you put in your marinade really depends on what flavors you like.
The recipes below are for 3 to 5 lbs. of beef. I always make more, because leftover marinated grilled beef makes an awesome steak and egg breakfast the next day!
A cold night is no excuse not to grill!
The instructions with all of these marinades is basically the same: combine all the ingredients in a bowl. Cut the beef flap (or whatever cut of meat you’re using) to a manageable size so that it fits a gallon-sized Ziploc bag easily. (Smaller, thinner pieces will also absorb the marinade better.) Place the beef in the bag, and then pour the marinade into the bag. Squeeze the excess air out and seal the bag. Gently squish the bag around so that the marinade makes contact with all the meat. Place the bag in a bowl in the fridge overnight, squishing the bag every few hours to make sure the marinade penetrates the meat. The bowl will prevent any accidents from happening in your fridge in case the bag leaks. The next day, remove the bag from the fridge and let it come to room temperature before grilling the meat. Discard the leftover marinade.
ALZ MARINADE #355
1/4 cup olive oil
1 lemon, zest and juice
1 tablespoon Worcestershire sauce
1 tablespoon soy sauce
1 teaspoon garlic salt
1 teaspoon Dijon mustard
Combine the ingredients. Marinate the meat overnight in the fridge or several hours at room temperature. Grill.
Marinating beef flap.
On the North Fork of Long Island, in the middle of wine country, there’s a restaurant that’s been around for a long time: a sort of hole-in-the-wall place you might not think twice about visiting, unless you hear that they’ve got a special secret marinade for their beef. The place is called The Elbow Room (I think they’ve expanded to a second or third location by now), and though I wasn’t impressed by the quality of their beef, I was impressed with its flavor. Here, with the help of friends, is what we think comes as close to that marinade as we can get. Gravymaster is a product you can find in any supermarket, usually in the gravy section. This marinade also works well with beef tips or a London broil.
1 cup soy sauce
1/4 cup Gravymaster
2 large Vidalia onions
2 cloves of garlic
2 teaspoons celery seed
1/2 teaspoon black pepper
Combine the onions and garlic in a large food processor and purée. Add the remaining ingredients and run the processor until it’s smooth and sort of resembles root beer (below.)
Marinate the meat overnight in the fridge or for several hours at room temperature. Grill. Awesome with beef sirloin tips (below.)
This incredibly simple marinade falls into the “Italian” category. You could almost use it as an Italian dressing on salads, but it works really well as a marinade for beef.
1/2 cup olive oil
1/4 cup balsamic vinegar
2 teaspoons Kosher salt
1 teaspoon pepper
The balsamic vinegar I use is not the expensive aged stuff that costs a fortune. It’s the $9-a-bottle stuff you can find in any supermarket. Simply combine the ingredients. Marinate the meat in the fridge overnight or for several hours at room temperature. Grill.
With Thanksgiving on everyone’s mind, I’d like to share my recipe for what I consider to be the perfect turkey.
I often get asked if I deep-fry my turkey for Thanksgiving. I think it’s way too messy and time-consuming for nothing better than an “OK-tasting” bird. I lived in the South for a few years, and my friends fried a turkey on several occasions. I wasn’t that impressed.
When frying, you need to find a safe spot in the yard to blast the propane-fueled fryer so you don’t burn your house down. Then you need to stand outside and freeze your butt off while it fries, while your friends and family are all indoors having cocktails. Then you need to get rid of gallons of used oil, and clean up a huge mess at the end of it all. And through all this, you need to make sure the oil is at the right temperature so you don’t get a scorched turkey on the outside and a raw turkey on the inside.
No, thanks.
I get great results by cooking my turkey in my Weber grill. I’ve cooked it this way every Thanksgiving for about 30 years. The standard Weber allows me to cook up to a 15 lb. bird–big enough for my purposes–and it comes out crispy, smoky and delicious. If you’re afraid to try this for the first time at Thanksgiving when it really matters, I understand. That’s how I did it years ago, and I never looked back.
The charcoal chimney with hot coals awaits.
Although I’ve stopped using charcoal briquettes for basic grilling a long time ago, and now strictly use natural hardwood charcoal, this recipe works best with Kingsford briquettes. They burn slowly and evenly. I never use lighter fluid…I always start my fire with a few pieces of crumbled newspaper under a charcoal chimney.
The tools you need:
A Weber grill, with the dome top Kingsford charcoal briquettes (don’t t use Match Lite or other pre-soaked briquettes)
A charcoal chimney, easily found at Home Depot or Lowe’s
A heavy-duty disposable aluminum pan
Ingredients:
Whole turkey, up to 15 lbs., thawed and brined (see my previous blog about brining a turkey)
Olive oil (to rub on the turkey)
2 yellow onions, chopped
4 stalks of celery, chopped
½ lb. (2 sticks) of unsalted butter, melted
1 tablespoon granulated garlic
1 tablespoon granulated onion
2 tablespoons salt
1 tablespoon pepper
Spreading the coals away from the center of the grill.
If you want stuffing, it’s always wise to make it separately and cook it separately.
Light 8 to 10 lbs. of charcoal in the grill…depending on the size of the turkey and how cold it is outside.
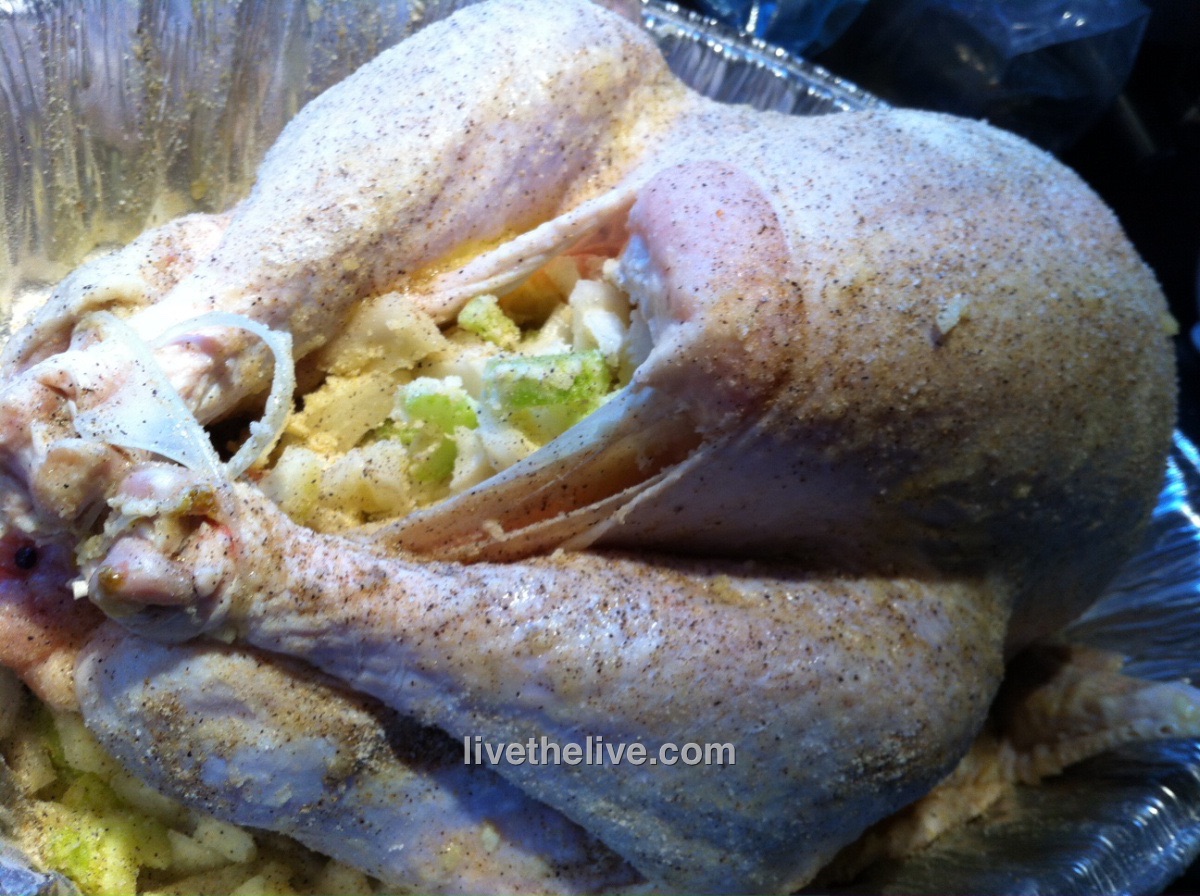
If you brined the turkey first, you’ve already removed the giblets. If you’re not brining, go ahead remove the giblets from the thawed bird now. Place the turkey in the aluminum pan.
In a small bowl, mix the granulated garlic, granulated onion, salt, and pepper. (Add any other seasonings you might like.)
Coarsely chop the onions and celery. Place them in a another bowl. Mix them with the melted butter and 1/3 of the garlic/onion/salt/pepper mixture.
Place a small handful of this onion and celery “stuffing” mixture in the neck cavity of the turkey. Place the rest in the body cavity (where the stuffing would usually go.) You can fasten the bird with turkey skewers if you like. This “stuffing” is strictly to flavor the turkey…you don’t eat it!
The rubbed, stuffed and seasoned bird.
Rub the outside of the entire turkey with the olive oil and sprinkle the rest of the garlic/onion/salt/pepper mixture on the outside of the bird. Make sure you get the bird on the bottom as well.
When the coals in the grill have ashed over, spread them to the outside edges of the Weber grill equally. Put the cooking grill rack in place. Place the aluminum pan with the turkey in the center of the grill, keeping it away from the direct heat of the coals. If you’re using a meat thermometer, insert the probe into the thickest part of the breast, being careful not to hit the bone. Place the lid on the grill. (You may need to bend your aluminum pan a bit.) Open the vents on the bottom of the Weber as well as the vents on the lid. It’s important to get air circulating!
My old-school meat thermometer calls me from as far as 100 feet away! (Newer thermometers are wireless and talk to your smart phone.) Time to join family and friends for a cocktail!
No basting is necessary.
Now here’s the tough part: DO NOT OPEN THE GRILL TO CHECK ON THE TURKEY! (If you must look, shine a flashlight into the vent holes on the lid to take a peek at the pop-up timer, if there is one.) The whole point is to keep the heat inside the kettle. You’ll know your turkey is done when no more smoke or heat rises from the grill, and the turkey inside stops making sizzling noises. The internal meat temperature should be around 165 degrees.
And believe it or not, a 15-lb. turkey will be cooked in about 2 hours!
If you’re using a meat thermometer (recommended), remove the turkey when it hits about 155 degrees, wrap it in foil, leaving the thermometer still in the bird, and let it rest at least 20 minutes. The temperature will go up a bit to 165 or even a little higher, before it starts going down.
I find little or no difference between the stove in my kitchen and an outdoor gas grill…so I don’t own one. I can make a perfectly delicious steak by searing it in a cast iron pan on the stovetop, then finishing it in a hot oven. So, for me, if the real reason for outdoor grilling is flavor, nothing can replace a hardwood charcoal grill.
Besides the quality and source of my beef, wood and smoke are what make the difference between a good steak and a great steak.
I know the #1 argument for going with gas over hardwood charcoal is time. “It takes too long to start a charcoal grill.” That’s completely untrue. It takes no more time to light a charcoal fire than it does to start up a gas grill.
Of course, it starts with the grill itself. The classic Weber is still an awesome choice. For larger cooking needs, I also have a Primo ceramic grill.
Then I get a bag of hardwood charcoal. I’m not talking charcoal briquets, like Kingsford, that have a ton of additives in them. And I’m definitely not talking about Match Light. I’m talking pure hardwood charcoal, easily found in supermarkets and home stores.
Next, a charcoal chimney. It’s a metal tube with a handle and a grate at the bottom. I crumble a couple of sheets of newspaper into the bottom, pour charcoal into the top, light it, and I have hot coals in 10 minutes without lighter fluid.
And I NEVER use lighter fluid! Why spend good money on a great steak only to make it taste like gasoline?
The variety of wood chips available for smoking is another flavor factor when it comes to grilling with charcoal. My personal favorite is hickory, especially when I’m cooking pork or chicken. But apple, cherry, oak, mesquite: they all impart their own unique flavors. And they’re all available in most home stores where you find all the other barbecue gear.
Although I have an electric smoker for those low-and-slow jobs, like a big ol’ brisket or pork shoulder, I don’t need it when grilling a steak. I simply soak some wood chips in water for about a 1/2 hour before grilling (I’ve found that hot water speeds the process up), drain the water, and then sprinkle the moist chips on the hot coals in my grill. I throw the meat on the grill, close the lid (opening the vents, of course) and off we go.
So now, in 10 minutes, I’ve got a grill that’s ready to cook a steak with…about the same time as gas.
If you say: “I don’t cook with charcoal because it’s so messy!” …I honestly don’t know if you and I can be friends.
Because I’m using a small amount of hardwood charcoal for the average dinner, I don’t have to clean out my grill every time I use it. After a while, yes, some ashes pile up in the bottom of my grill and I have to dump them. But because they’re pure wood ashes, I can dump mine into my strawberry or raspberry patch. They love the stuff.
You still have to clean a gas grill after a while, and it always runs out of propane halfway through cooking when you have guests over for dinner. So where’s the convenience in that?
Charcoal grills give you everything you could ask for: low maintenance, ease of use–no propane tanks, valves and igniters–real wood flavor, not lava rocks, and the thrill of cooking meat over a real fire, bonding with the caveman in you. Grab a beer–or even better: a bourbon on the rocks–and start grilling!