Posts Tagged ‘food’

Summer’s approaching and we slurp down more clams and oysters in the summer here in New England than at any other time of year. Freshly shucked oysters and clams–or in this case–beautiful boiled wild-caught American shrimp, call for an equally amazing cocktail sauce…and this sauce kicks butt! And it features a key ingredient that you might not expect: vodka. The small amount of vodka in the mix keeps the cocktail sauce from freezing solid when stored in the freezer. Just scoop out what you need, let it thaw, and put the rest back in the freezer.


image

2 cups ketchup
4 tablespoons prepared horseradish
1 tablespoon fresh lemon juice
1 teaspoon Worcestershire sauce
1/2 teaspoon Frank’s Red Hot, or other hot pepper sauce
5 grinds of fresh black pepper
1/4 teaspoon salt
1 teaspoon good quality vodka, like Tito’s

Combine all the ingredients. Store in a tight plastic container in the freezer. Scoop and thaw whenever you need it!

Sometimes the happiest of cooking accidents happen with bacon. My original plan was to make Chinese-style honey ribs for dinner. But instead of pulling a nice rack of ribs out of the freezer, I accidentally took out a slab of pork belly. I only realized my mistake after I thawed it, so I decided to use it! The results were pretty damn tasty.

I like maple syrup instead of honey, but use what you like!

image

Marinade:
¾ cup light soy sauce
6 Tablespoons hoisin sauce
5 lbs. pork belly
Zest and juice of 1 lemon
2 whole star anise
2 cinnamon sticks (3”)
1/2 cup honey or maple syrup
4 cups chicken broth (preferably homemade)
image
Pre-heat the oven to 350 degrees.
Mix the marinade ingredients. Set them aside.
Cut the pork belly into pieces that are about 2 inches square. Place them in a large pot. Cover them with water and bring the pot to a boil. Boil it for 5 minutes. Drain the water.
Place the warm pork belly pieces on a sheet pan lined with non-stick aluminum foil. Coat them with the marinade. Let them sit for 10 minutes.
Bake the pork belly pieces on the sheet pan in the oven for 30 minutes.
While the pork belly is baking, start the sauce in a large non-stick pan or pot: combine the lemon zest and juice, star anise, cinnamon sticks, maple syrup or honey, and chicken broth. Bring it to a boil, then reduce it to a simmer.
When the pork belly pieces have finished baking, add them to the sauce pot, lowering the heat to a simmer. Simmer (covered) for about 15 minutes or until meat is tender.
Turn the heat back on high, uncover the pot and cook until the sauce has reduced to a glaze that coats the meat. Reduce the heat as the sauce thickens to avoid the sugars in the syrup or honey from burning. When the pieces are sticky and gooey, they are ready!
Devour them just like that!
If you have leftovers, let the pork belly cool, then slice the pieces it to your desired thickness and fry them like regular bacon. They’re great with eggs!
image

It takes a few weeks for this limoncello recipe to be ready, but it’s worth it!


It starts with beautiful lemons…


Many years ago, we visited the Amalfi coast, and spent several nights on the beautiful island of Capri. On our last night, we dined at the historic Grand Hotel Quisisana, and our meal ended with a glass of the most delicious limoncello I ever had.

I asked the waiter if it was possible to get the recipe of the limoncello, and he made a big deal about the recipe being a “secret.” Though disappointed, I understood, and I left Capri thinking that I would never taste it again.


Sure, you can buy limoncello from Capri in a bottle, but what fun is that?


Two weeks later, back at home, I was reading the latest issue of Conde Nast Traveler, and there in black and white, was the Quisisana limoncello recipe! WTF?

After making many batches of this limoncello, I started experimenting with other citrus, and the most successful by far was with grapefruit. Now I make a batch of each: lemon and grapefruit. It’s important to use 100-proof vodka in this recipe. Most vodka is 80-proof, so you’ll need to go to a liquor store with a better selection to find it. Absolut makes a good one, as does Stoli.

Four ingredients, easy to make. The toughest part is waiting for it to mellow a bit.


4 lbs. of lemons, but you only use the zest!


4 lbs. lemons, zest only
2 750-ml bottles 100 proof vodka
5 1/2 cups sugar
6 cups filtered water

Just the zest!


Peel the zest off all the lemons, trying not to get any of the white pith that could make the limoncello bitter. (There will always be some…that’s OK.) Place all the zest in the bottom of a one-gallon glass jar with a lid.

Pour the vodka on top of the lemon zest pieces, seal the jar, and keep it at room temperature for a week, swirling the jar around gently once a day.


Vodka and zest.


On the sixth day, combine the sugar and water in a pot over medium-high heat, and stir until all the sugar completely dissolves. Remove it from the heat, cover it, and let it thoroughly cool to room temperature (overnight is best.)

On day seven, strain the lemon zest, pouring the infused vodka into a clean glass jar. Discard the lemon zest.

Pour the sugar/water mixture into the vodka and mix it well.

At this point, you can pour the finished product into bottles. I like to let it mellow for about a month before drinking. (It’s worth the wait…although nobody says you can’t take a few “cheating sips” every now and then!)

I keep my limoncello refrigerated.

This is a real comfort food we discovered on a trip to Spain in 2014. Croquettes are the Spanish equivalent of chicken nuggets: they’re found on every kids’ menu…and my daughter ordered them just about everywhere we went! So it’s no surprise that I “got the order” to make a batch of croquettes once we got home…and I’ve been making them ever since.

You can make these days ahead of time and then freeze them, re-heating them whenever you have guests. These are way better than your average snacks when your favorite game is on!


image


I found a great recipe for croquettes in Saveur magazine, and decided to try it out. I was a bit clumsy at making them at first–they do need a bit of finesse–but by the end of the batch, I got the hang of it. And to make them gluten-free, I simply substituted GF flour and breadcrumbs for the all-purpose flour and Panko. (The best tasting GF breadcrumbs are the ones you make yourself. Buy a loaf of frozen gluten-free bread, like Udi’s, and toast it in your toaster oven. Crumble the slices into a food processor, processing them until the breadcrumbs are the size you like.)


image


2 lbs. raw potatoes, peeled and cut into 1″ cubes
4 tablespoons unsalted butter
1 onion, minced
1/4 to 1/2 cup heavy cream
6 oz. cheddar cheese, grated
6 oz. ham, finely chopped
salt and pepper
1 cup all-purpose flour (or gluten-free flour like Cup4Cup)
2 eggs
2 cups Panko breadcrumbs (or gluten-free breadcrumbs)
avocado oil for frying


image


Peel the potatoes, cutting them into 1″ cubes. Boil them in salted water until tender. Drain them and set them aside.

Melt the butter in the same pot the potatoes were in, then add the onions and sauté them until they’re translucent. Put the potatoes back in the pot and add 1/4 cup of the heavy cream. Mash the potatoes with a potato masher until smooth. Add more cream, if needed, but be careful not to make it mushy.

Add the cheese and mix until it has melted in. Add the ham and mix again. Season with salt and pepper.

Pour the contents of the pot into a metal bowl and place it in the freezer to cool, stirring every 10 minutes until the mashed potato mix is cold, but not frozen.

Line up three bowls: all-purpose flour (or GF flour) in the first bowl, eggs (scrambled) in the second bowl, Panko (or GF breadcrumbs) in the third.

Remove the mashed potato mix from the freezer, and with floured hands, grab enough to gently roll a small meatball in your hands. (I’ve found that starting with a round shape makes it easier to work with.)

Roll the ball in the flour, then the egg, then drop in the Panko and roll again. With the ball in your hand, gently squeeze into a tubular (or small football) shape, and then place it on a sheet pan lined with non-stick aluminum foil. Continue with the rest of the potato mixture. (You may need to add another scrambled egg or two if you run out.)

Once you’ve rolled all the croquettes, place the sheet pan in the freezer for 20 minutes to firm up.

Heat a pan with 2″ of oil to 350 degrees. Remove the croquettes from the freezer, and working in small batches, fry them until golden brown. Place them on paper towels, and quickly season lightly with salt while hot.


image


The croquettes freeze really well, so this batch goes a long way. Once they’ve been fried, let them cool completely to room temp. Place them in freezer bags and store them in the freezer. When it’s time to cook them, let them thaw for about 15 minutes, then place them in a pre-heated 325 degree oven and cook for 15 minutes.


A LOOK AT GMO’S

Posted: May 10, 2024 in beef, Carnivore!, chicken, Food, pork
Tags: , , , , ,

The controversy over the positives and negatives of GMO’s continues, and I found an old blog from many years ago that I think is worth repeating. I think people that don’t think GMO’s are a bad deal probably don’t completely understand the situation.

My friends at FireFly Farms in Stonington, Connecticut, understood GMO’s better than most. Family owned and certified humane, they raised heritage breeds of pork, pastured chickens, and rare cattle.

Max Mule, by Kelly Milukas

Max Mule, by Kelly Milukas

This was a post from the past on FireFly owner Van Brown’s Facebook page. I’m reprinting with his permission. It’s simple and to the point.

Hi everyone.

I have been thinking about the debate on GMO’s and labeling.

A lot.

Let’s imagine a world where there are two types of pudding cups.

The Blue Pudding Cup definitely will not hurt your kid.

The corporation that makes The Red Pudding Cup states that all the negative tests about The Red Pudding Cup are wrong and they have made lots of tests themselves showing that The Red Pudding cup is okay.

You know The Blue Pudding Cup is safe. There are tests both ways, remembering that many of the tests were funded by The Red Pudding Cup Corporation, so the best you can know is The Red Pudding Cup pudding will probably not hurt your kid. At least according to The Red Pudding Cup Corporation.

Which pudding cup would you buy to feed to your child?

One last thought…

Would it be okay for The Red Pudding cup to put their pudding into a Blue Pudding Cup so no one would know which type of pudding they are feeding their children… your children?
Van

Making spinach pizza dough, as featured in a previous blog, was a fun and tasty recipe idea. But I still had some spinach left over. So I decided to add it to my Chicken Rollatini recipe, and it was delicious!

Chicken Rollatini was one of the first dishes I learned how to make back in my teenage days on Long Island, working at a local Italian restaurant called Pizza City East. (The original Pizza City was in Ozone Park, Queens.) It was a simple dish: a chicken breast rolled up with prosciutto and mozzarella, and baked in a mushroom cream sauce. My version these days substitutes ham for the prosciutto, provolone for the mozzarella, and an Alfredo-like sauce instead of  the mushroom cream sauce.

This time I added the frozen spinach to the mix, and I have to say, I think I’ll always cook it this way from now on.

4 chicken breasts cut lengthwise to make 8 thin breasts, about 2 pounds
8 slices sliced ham
8 slices of provolone cheese
6 oz. frozen spinach, finely chopped

Place the chopped spinach in a bowl and add granulated garlic and oregano to taste. Set it aside.

Remove the chicken tender portion of the chicken breasts and set those aside for another day.
I usually don’t like to pound out my chicken breasts. I like the texture of “real meat.” So I take a large breast, and slice it lengthwise to make 2 thinner breasts. I lay the breast down on the cutting board, add a slice of ham, then a slice of provolone, (and this time, some of the spinach mix), and carefully roll it up, securing it with toothpicks, if necessary. Place the rollatinis on a baking sheet. Set aside, preferably in the fridge, until ready to cook.

The addition of spinach, this time, to the old recipe.

Rolled and ready!

1/2 cup breadcrumbs
1 teaspoon parsley
1/2 teaspoon oregano
1/2 teaspoon salt
1/4 teaspoon pepper
1/4 teaspoon granulated onion
1/4 teaspoon granulated garlic
Combine these ingredients in a bowl. Set it aside.
2 carrots
2 celery stalks
1/2 medium onion
Olive oil
Peel and chop the carrots into quarters. Peel and chop the onion in half. Chop the celery into quarters as well. Place all the vegetables on a sheet pan and drizzle olive oil over the top, tossing them in the oil. Roast the vegetables in a 400° oven until caramelized, and the carrots are fork-tender, about 20 minutes. Remove the sheet pan from the oven and let the vegetables cool. Once the veggies have cooled, chop them finely with a knife or food processor. Set them aside.
3 cups your favorite rice, cooked
Cook the rice according to package directions. Once the rice is cooked, mix it with the chopped carrots, parsnips, celery and onion. Set it aside.
1 cup cream or half-and-half
3 tablespoons butter
1/2 cup freshly grated Parmigiano Reggiano
salt and pepper
For the Alfredo-like sauce, heat a saucepan over medium heat, melting the butter and then adding the cream or half-and-half. Once it’s warmed through, add the cheese and whisk until it has melted and the sauce is smooth. Season with salt and pepper. Set it aside, to re-warm later.
Take the pan of rollatinis out of the fridge to warm to room temperature, and reduce the heat of the oven to 350°.
Drizzle a little olive oil over the top of the rollatinis and rub it in. Sprinkle the breadcrumb mixture over the top, pressing them into the chicken, and bake them for 30-45 minutes, until the chicken has cooked through.
To serve, remove the chicken rollatinis from the pan and plate them on a bed of arugula (optional) with the rice on the side. (Be sure to remove the toothpicks.) Serve with the sauce.

Brining, the process of letting a hunk of protein soak in a salt solution for a few hours, is a great way to add flavor and moisture to any cut of meat. I brine these wings for 3 hours before using a sweet and spicy rub. They can be grilled or roasted in the oven.


image

The brine…

1/2 cup Kosher salt
3 tablespoons light brown sugar
1 teaspoon whole black peppercorns
1 whole bay leaf
2 quarts water

Combine all ingredients in a saucepan and heat until the sugar and salt dissolve. Remove it from the heat, and let it cool to room temperature.

The rub…

1/4 cup light brown sugar
1/4 cup granulated sugar
1/4 cup sweet paprika
1 tablespoon Kosher salt
1 tablespoon granulated onion
2 teaspoons black pepper
1 teaspoon dried thyme
1 teaspoon dry mustard
1 teaspoon ground ginger
1 teaspoon cayenne pepper

Combine all the ingredients in a bowl.

Place 3 lbs. of chicken wings in a Ziploc bag and pour the cooled brine into the bag. Place the bag in a bowl to prevent leaks and keep it at room temp for 3 hours. I wouldn’t brine it longer than that, or it will get really salty.


After 3 hours, remove the chicken from the brine and dry the wings with paper towels. Discard the brine.

Place the chicken pieces in a large bowl and sprinkle them with 1/3 cup of the rub, tossing to coat the chicken well. Place the bowl with the chicken in the fridge until you’re ready to cook.


About 30 minutes before cooking, remove the bowl from the fridge and let the chicken come to room temperature.

Pre-heat the oven to 350 or light a grill.

Toss the chicken with some more of the rub, if you like, then place the pieces on a sheet pan lined with non-stick aluminum foil.

Bake at 350 for 30 minutes or until done. Lower the oven temperature if it starts to burn.

If you’re grilling, cook the wings over medium heat, turning them frequently to prevent burning. Cook until the wings are done.


BURGER HACK

Posted: April 26, 2024 in barbecue, beef, Carnivore!, Food
Tags: , , ,

I’ve bought many burger presses in my day, and I’ve found that the meat gets stuck inside them after pressing, making removal somewhat difficult. Some presses have so many parts to them, they get lost in my cabinet or jam up the dishwasher. Frankly, every one that I’ve bought over the years was a waste of money.

Chances are, somewhere in your storage area, you’ve got a wide mouth Mason jar with a metal top, composed of a flat lid and the band that goes around it and screws onto the jar top. As long as they’re not rusty, you can use them to make perfect quarter-pound burgers. If they are rusty, you can buy a half-dozen lids and bands for just a few bucks in any supermarket.

image

I get my burger meat in 1-lb. packs. If they’re frozen, I let them thaw wrapped. Then I cut the meat into quarters, simply eyeballing it. Each quarter-pound of meat fits quite nicely into the Mason jar top. I flip the top over and press down to compact it, then push the flat lid through the band, and out pops a perfect quarter-pound burger.

Once I’ve got all my burgers made, I place them on a small sheet pan lined with non-stick aluminum foil and keep them in the fridge until I’m ready to cook.

The lid and band go in the dishwasher, and can be used over and over.


I moved to my current home in the fall of 2020. One of the toughest things to say goodbye to in my previous garden was my asparagus patch. Over the years, I had grown loads and loads of delicious asparagus, but sadly, there was no good way to transport that patch to my new place.

I’ve got a much smaller garden space at my current home, a small ledge that gets full sun, and despite its limited size, asparagus is too important of a crop to leave out. So I bought a bunch of plants in the fall of 2020, and planted them. I got some beautiful asparagus ferns at the end of the season. The following spring, some very tiny asparagus spears made an appearance. They say you’re not supposed to harvest asparagus for at least a couple of years to let the new bed establish, but I found that pretty much impossible to do…I have to have at least a bit of a taste.

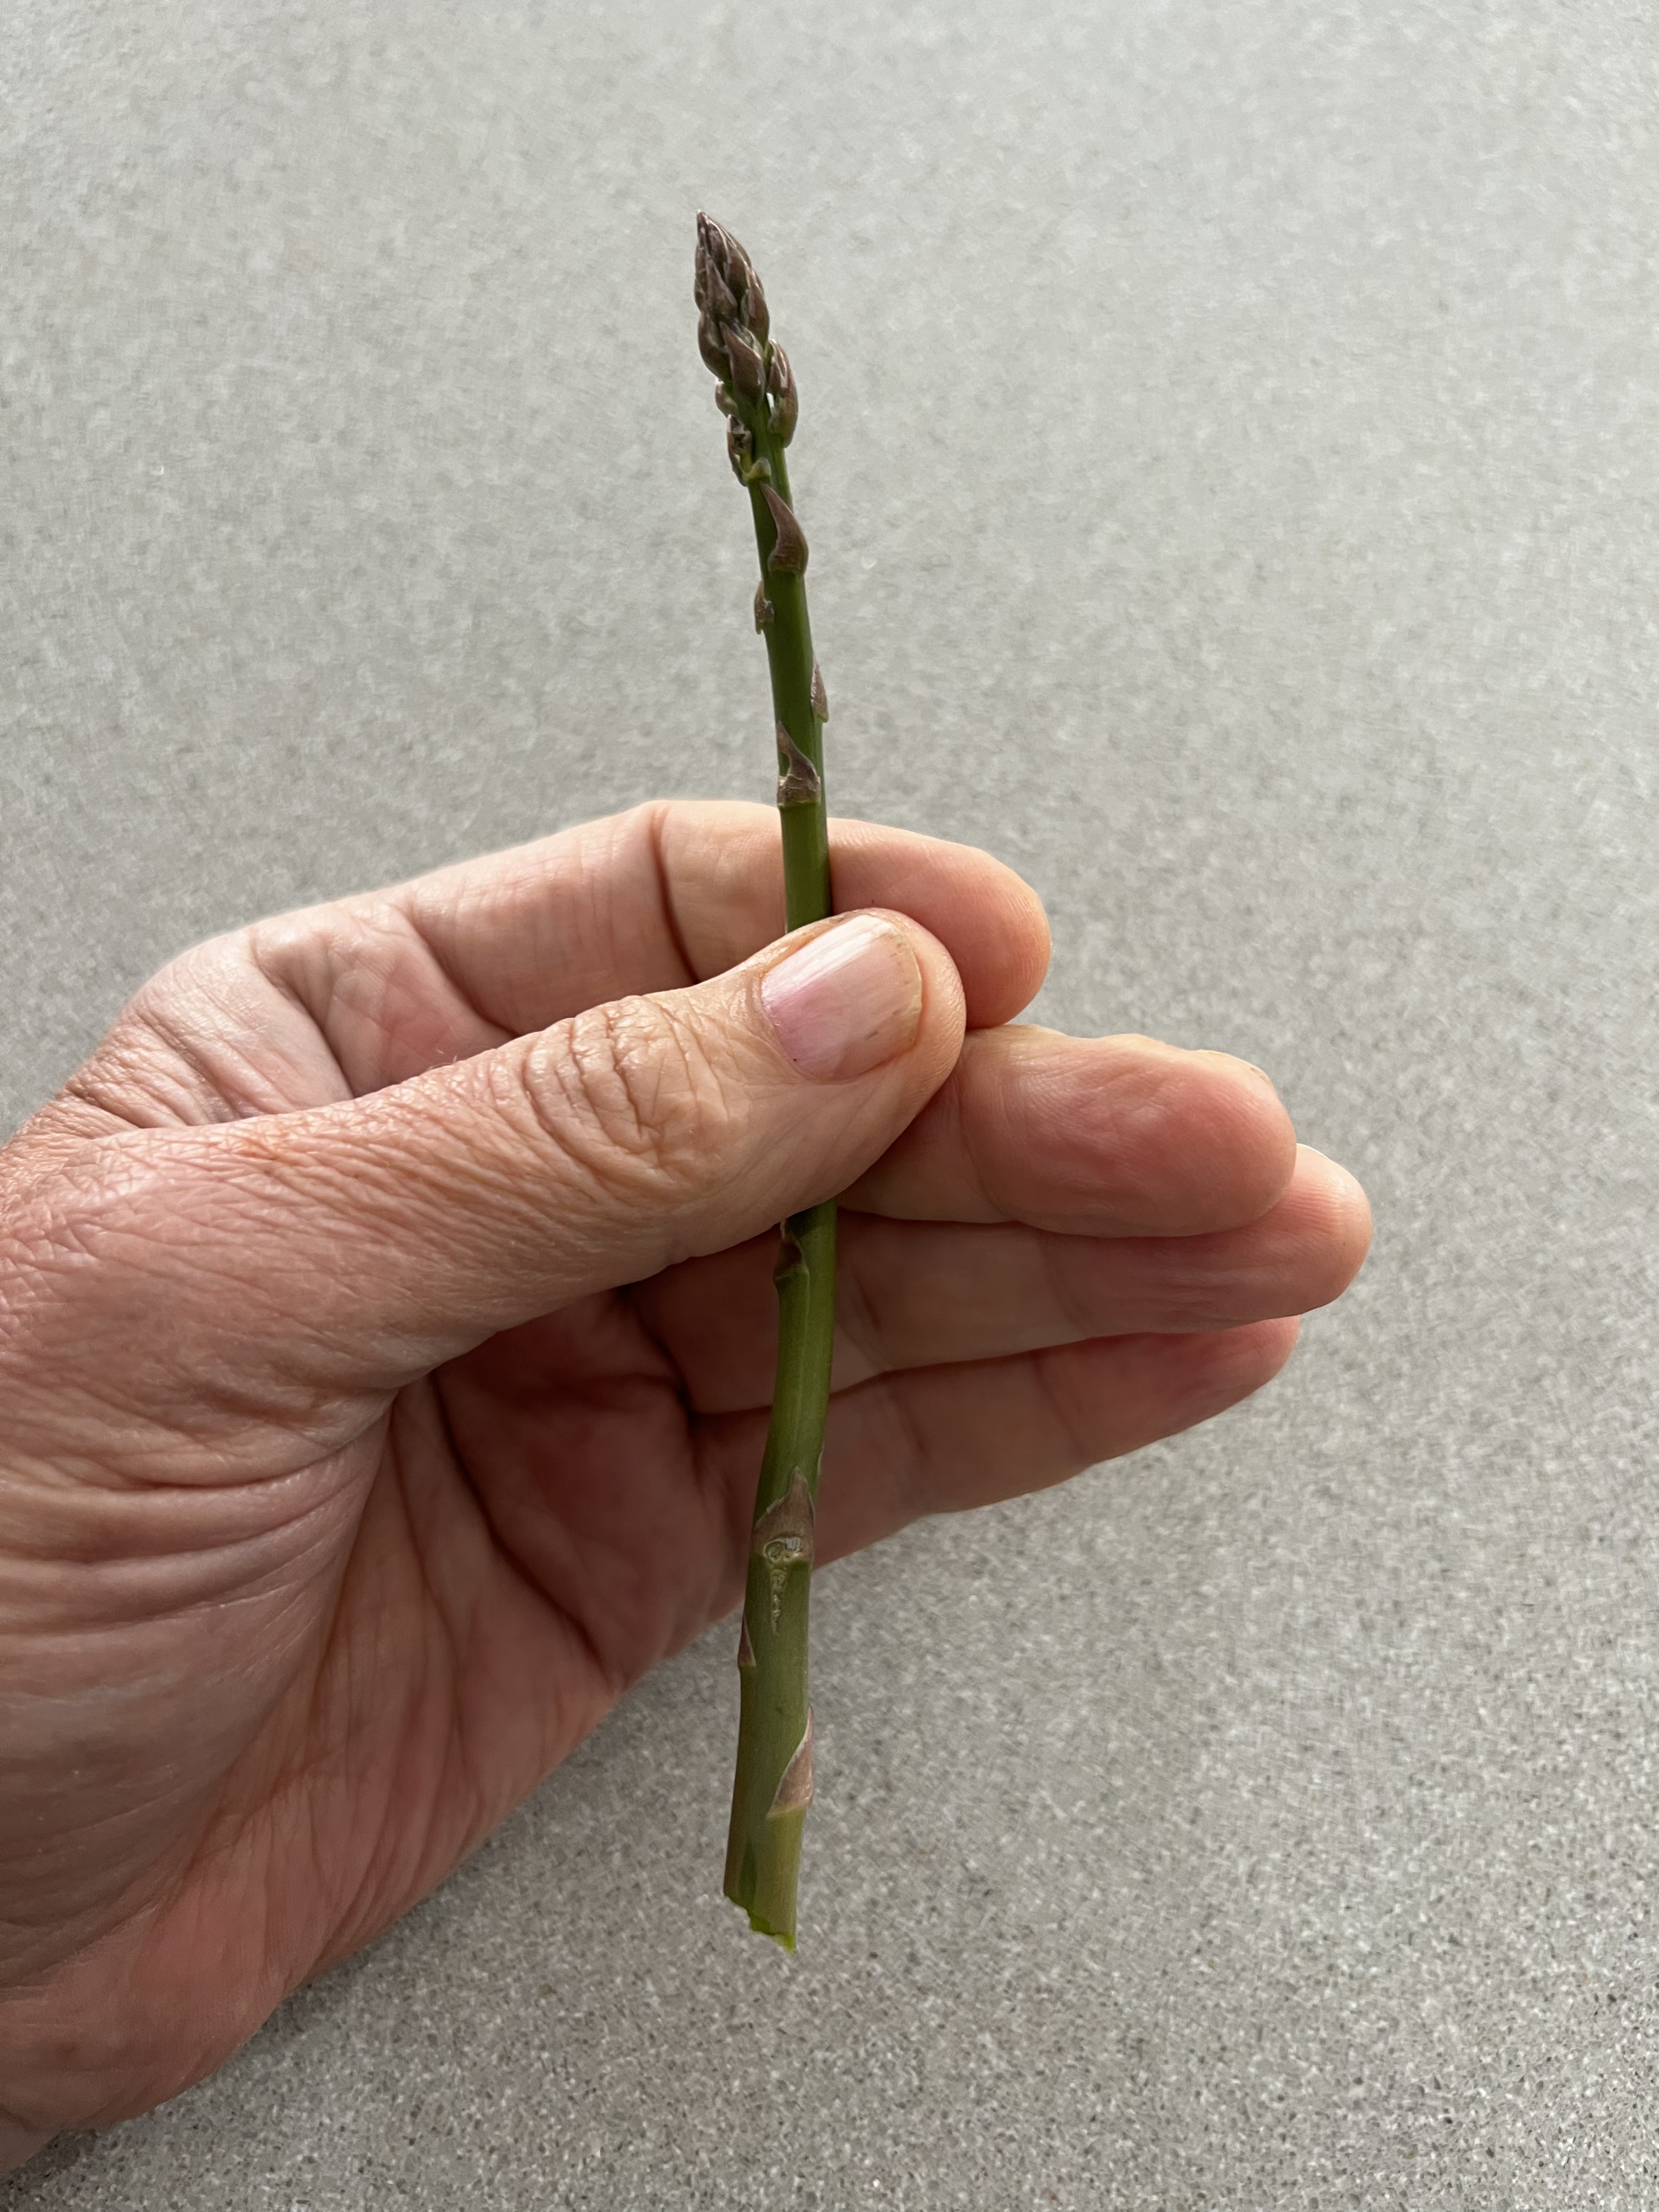
This spring, I’m hoping for a bigger crop. It still won’t be at it’s peak, but the fact that I’m already seeing asparagus spears popping through the soil of my #vedgeledge, as I call it,  is very exciting!


Hoping to get bigger and better spears this season!


In the meantime, I can only look back at my previous success with asparagus…

The home garden is already showing signs of activity. Overwintered dill and arugula seeds are sprouting. And cool weather seeds that I’ve sown early: peas, turnips, radishes, and others are doing the same.


asparagus2013

Asparagus is really easy to grow. You just need the space, and the plants practically do the rest.
Space them about a foot apart, and before you know it, you will have a vast network of tasty stalks sprouting through the soil every spring. They are so much better than anything you can buy in a supermarket.
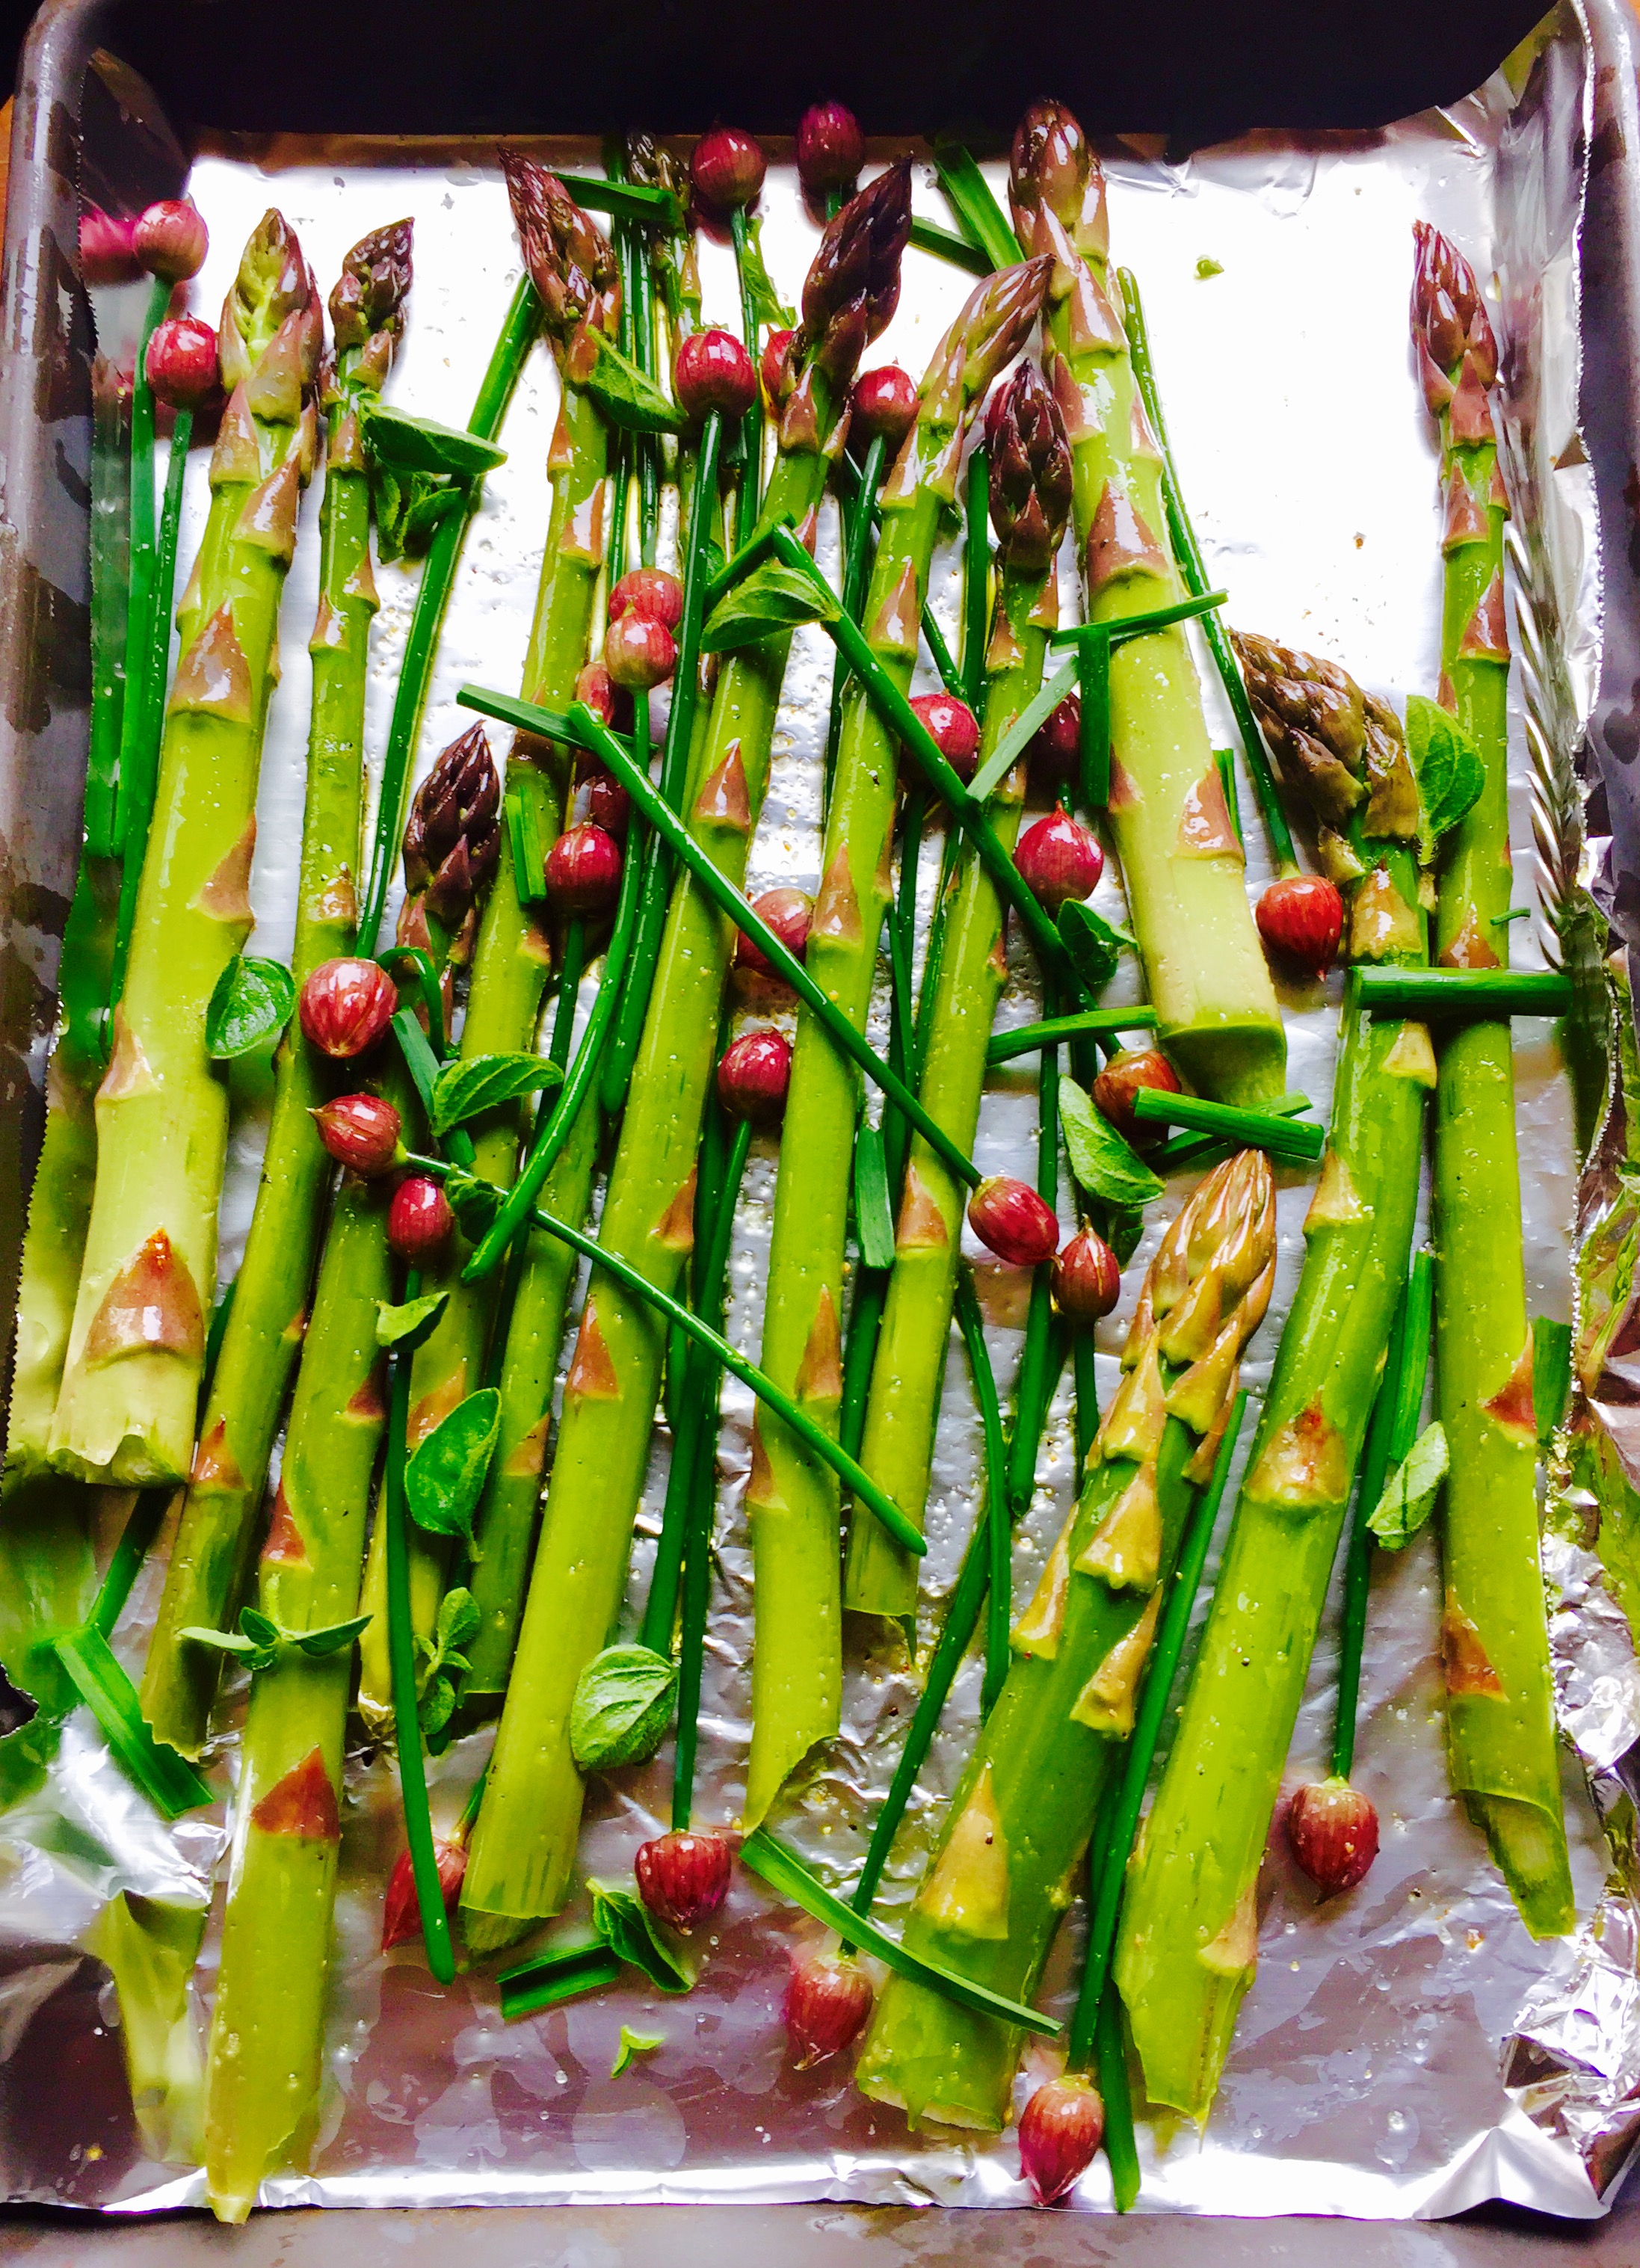
In the start of the growing season, the stalks don’t even make it into the house. I cut them and just eat them straight out of the garden. Eventually, they make the move to the kitchen, where I love to simply place them on a baking sheet and drizzle a little olive oil over them. Salt and pepper…and then in a 400-degree oven until they’ve caramelized.

Sometimes I toss some tasty chives with blossom buds on top of the asparagus and roast.


In the past, I’ve had I so much asparagus that I just didn’t know what to do with them all. So I started pickling them…a really easy process that ensured I had delicious asparagus well into the summer.

Several bunches of asparagus spears
2 cups white vinegar
1 cup cider vinegar
1 1/2 cups sugar
3 cups water
20 peppercorns
Garlic cloves, peeled
Kosher salt (1 teaspoon per quart-sized Mason jar. Use less for smaller jars.)
Bring the vinegar, water, sugar and peppercorns to a boil. Set the pan aside.
Trim the bottom of the asparagus spears so that the spears are just slightly shorter than the height of the quart-sized Mason jar you will use. Or cut them into pieces that will fit smaller jars.
Pack the jars as tightly as you can with the asparagus spears. (They will shrink when processed.) Add the garlic clove and 1 teaspoon of salt to every quart-sized Mason jar…less for smaller jars.
Fill the jars with the vinegar mixture and seal them tightly.
Process the jars for 10 minutes. Let them cool before placing them in the refrigerator. If you know you’re going to eat all the asparagus in the next week, processing isn’t really necessary.


DOES YOUR PEE SMELL FUNNY WHEN YOU EAT ASPARAGUS?

Asparagus has a sulfur-containing compound identified by scientists as methyl mercaptan. A colorless gas, this compound is also found in blood, feces, garlic, eggs, cheese and even skunk secretions. Another ingredient found in asparagus is asparagine. Present in foods like dairy products, seafood, poultry, fish and nuts, this amino acid is known to have a distinctive smell when heated. To metabolize both methyl mercaptan and asparagine, your body needs to break these compounds down and it’s this breakdown that’s responsible for your urine’s strange smell.

Since both methyl mercaptan and asparagine are associated with the sense of smell, there is debate over which ingredient is actually responsible for the asparagus-urine phenomenon. It could be one, or both.

Many people claim that, regardless of asparagus consumption, their urine does not smell. There are multiple theories about that as well. The first claims that everyone’s urine is in fact affected by asparagus, but only about half of the population have the specific gene that is required to smell the change. On the other hand, the second theory states that only half of the world’s population has the gene that’s required to break down the compounds found in asparagus and, if the body doesn’t break them down, no smell is emitted. In fact, one study published in the British Journal of Clinical Pharmacology found that only 46 percent of British people tested produced the odor while 100 percent of French people tested did. So whatever the reason, asparagus will forever be known as the vegetable that makes your urine smell strange.

I’ve never met a ceviche I didn’t like. Sometimes, nothing can stop a serious seafood craving like sushi, sashimi or ceviche. They require the freshest seafood and veggies you can get your hands on. And other than some fine chopping, they require little else.

The acid in citrus juices basically “cooks” the seafood in a process very similar to applying heat, but when I use shrimp in ceviche, I place them in some boiling salted water first…although very briefly.

This recipe is a great appetizer for you and your guests.


Crazy colored shrimp, thanks to blood oranges.

Crazy colored shrimp, thanks to blood oranges.


For the poaching liquid…
2 quarts water
1/4 cup salt
For the ceviche…
1 pound raw wild-caught American shrimp, peeled and deveined
juice of 2 lemons
juice of 2 limes
juice of 2 oranges (I had blood oranges this time)
1 cup diced seeded peeled cucumber
1/2 cup finely chopped red onion
pinch of red pepper flakes
1 cup diced seeded tomato
1 avocado, chopped into 1/2″ cubes
1 tablespoon roughly chopped cilantro leaves, plus more for garnish
1/4 cup extra virgin olive oil
1/4 teaspoon Fleur de Sel

Combine the water and 1/4 cup salt in a saucepan and bring it to a boil. Add the shrimp and immediately turn off the heat. Let the shrimp sit for just a minute, then drain and transfer them to a bowl of ice and place them in the fridge to cool.

Remove the cooled shrimp from the fridge and drain the water, and get rid of the ice. Chop the shrimp into 1/2″ pieces and place them in a medium non-reactive bowl. Add the lemon, lime and orange juice. Stir in the cucumber, onion and pepper flakes. Refrigerate this for an hour.

Stir in the tomato, avocado, chopped cilantro, olive oil and Fleur de Sel into the shrimp mixture. Let it stand at room temperature for 30 minutes before serving. Garnish with cilantro leaves, if desired.