Author Archive

With people in my family that need to be on a gluten-free diet, I often experiment with a variety of doughs, trying to find just the right one for both, those who live a GF lifestyle and those who don’t. Those of us that can eat gluten, know that GF foods are very often sorely lacking in flavor and texture. So when a good recipe comes along, it’s worth sharing.


I originally made dinner rolls with this recipe, and although I was shooting for a Parker roll softness and consistency, what I got was more like a biscuit, although it was still quite soft and delicious. It got a big thumbs-up from the GF members of my family. And I thought they tasted pretty good as well.

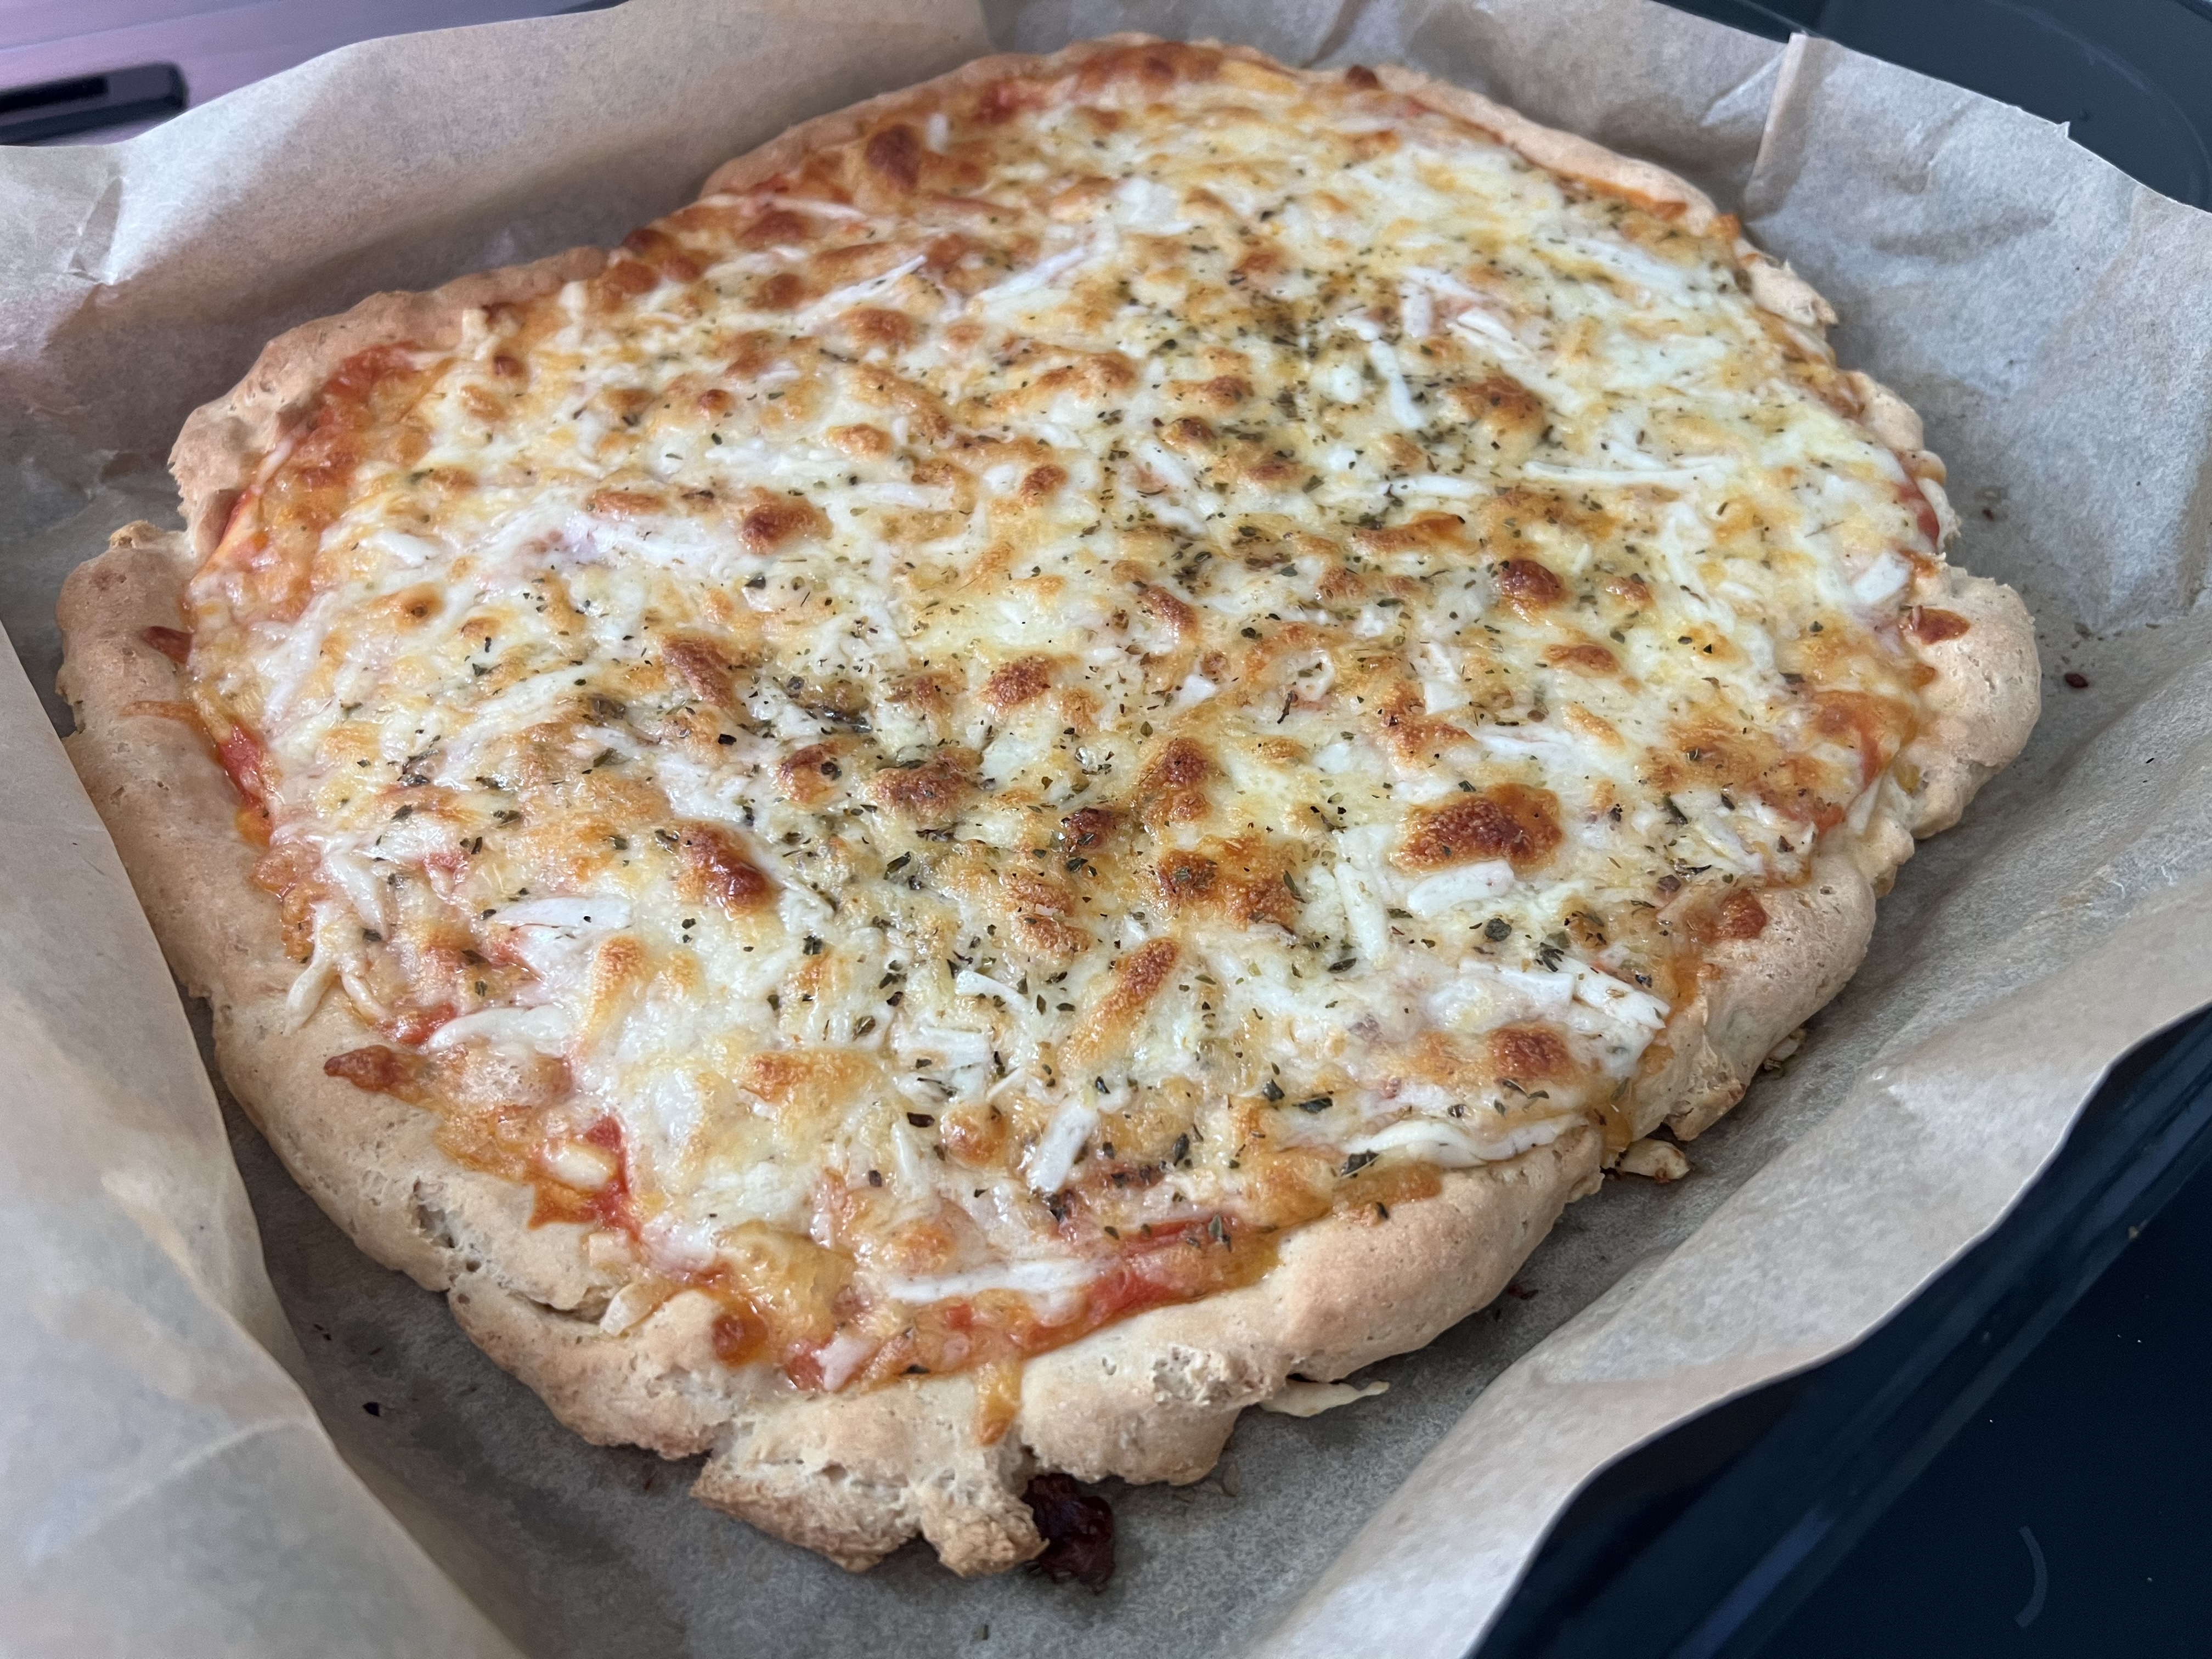
Since I had leftover ingredients, I thought I would try making a pizza dough with the same recipe, and I think it came out quite successfully. In my experience, the biggest problem with gluten-free doughs is that you can’t stretch or mold them, they stick to your hands like crazy, and you need to use tons of oil so that they don’t stick to the pan when you’re baking. This recipe had none of those problems.

I was able to stretch the pizza dough out into a parchment lined pan, wetting my fingertips with cold water every once in a while to keep them from sticking, and then I let the dough rise for a couple of hours before popping it into the oven. But no oil was needed. And it never stuck to the parchment.


Note: not all gluten-free flours are made the same, so it’s important to use the Bob’s Red Mill flour that I have listed here. If you try another all purpose GF flour, the recipe may not work as well. I’ve tried this recipe with King Arthur GF flour, and I was told by my panel of experts that they still prefer the Bob’s Red Mill formulation. I have plans on testing one other brand, Cup4Cup, in the near future. I will keep you posted! 


So here’s the recipe…almost exactly the same for the dinner rolls and pizza crust. Both start out with these ingredients…

1/4 cup warm water, about 110 degrees
1 tablespoon dry yeast
2 3/4 cups Bob’s Red Mill 1-to-1 gluten-free Baking Flour
2 tablespoons sugar, separated
1 teaspoon Xantham gum
1 teaspoon salt
1 cup warm whole milk, about 110 degrees
1 large egg
2 tablespoons melted unsalted butter


In the bowl of a mixer, combine the warm water with the yeast. Add 1 tablespoon of the sugar as well, to get the yeast going. Stir to combine and let it stand for 5 minutes.

In a separate bowl, combine the flour, the other tablespoon of sugar, the Xantham gum, and salt. Mix well.

When the yeast has bloomed, add the dry ingredients to the mixing bowl, along with the warm milk, egg, and melted butter. Mix on medium speed for about 3 minutes. The dough will be somewhat thick.


For the dinner rolls: Scoop out the dough in 1/3 cup measurements into a a baking sheet lined with parchment. Cover it with plastic and place it in a warm place to double in size, about 1 to 2 hours.


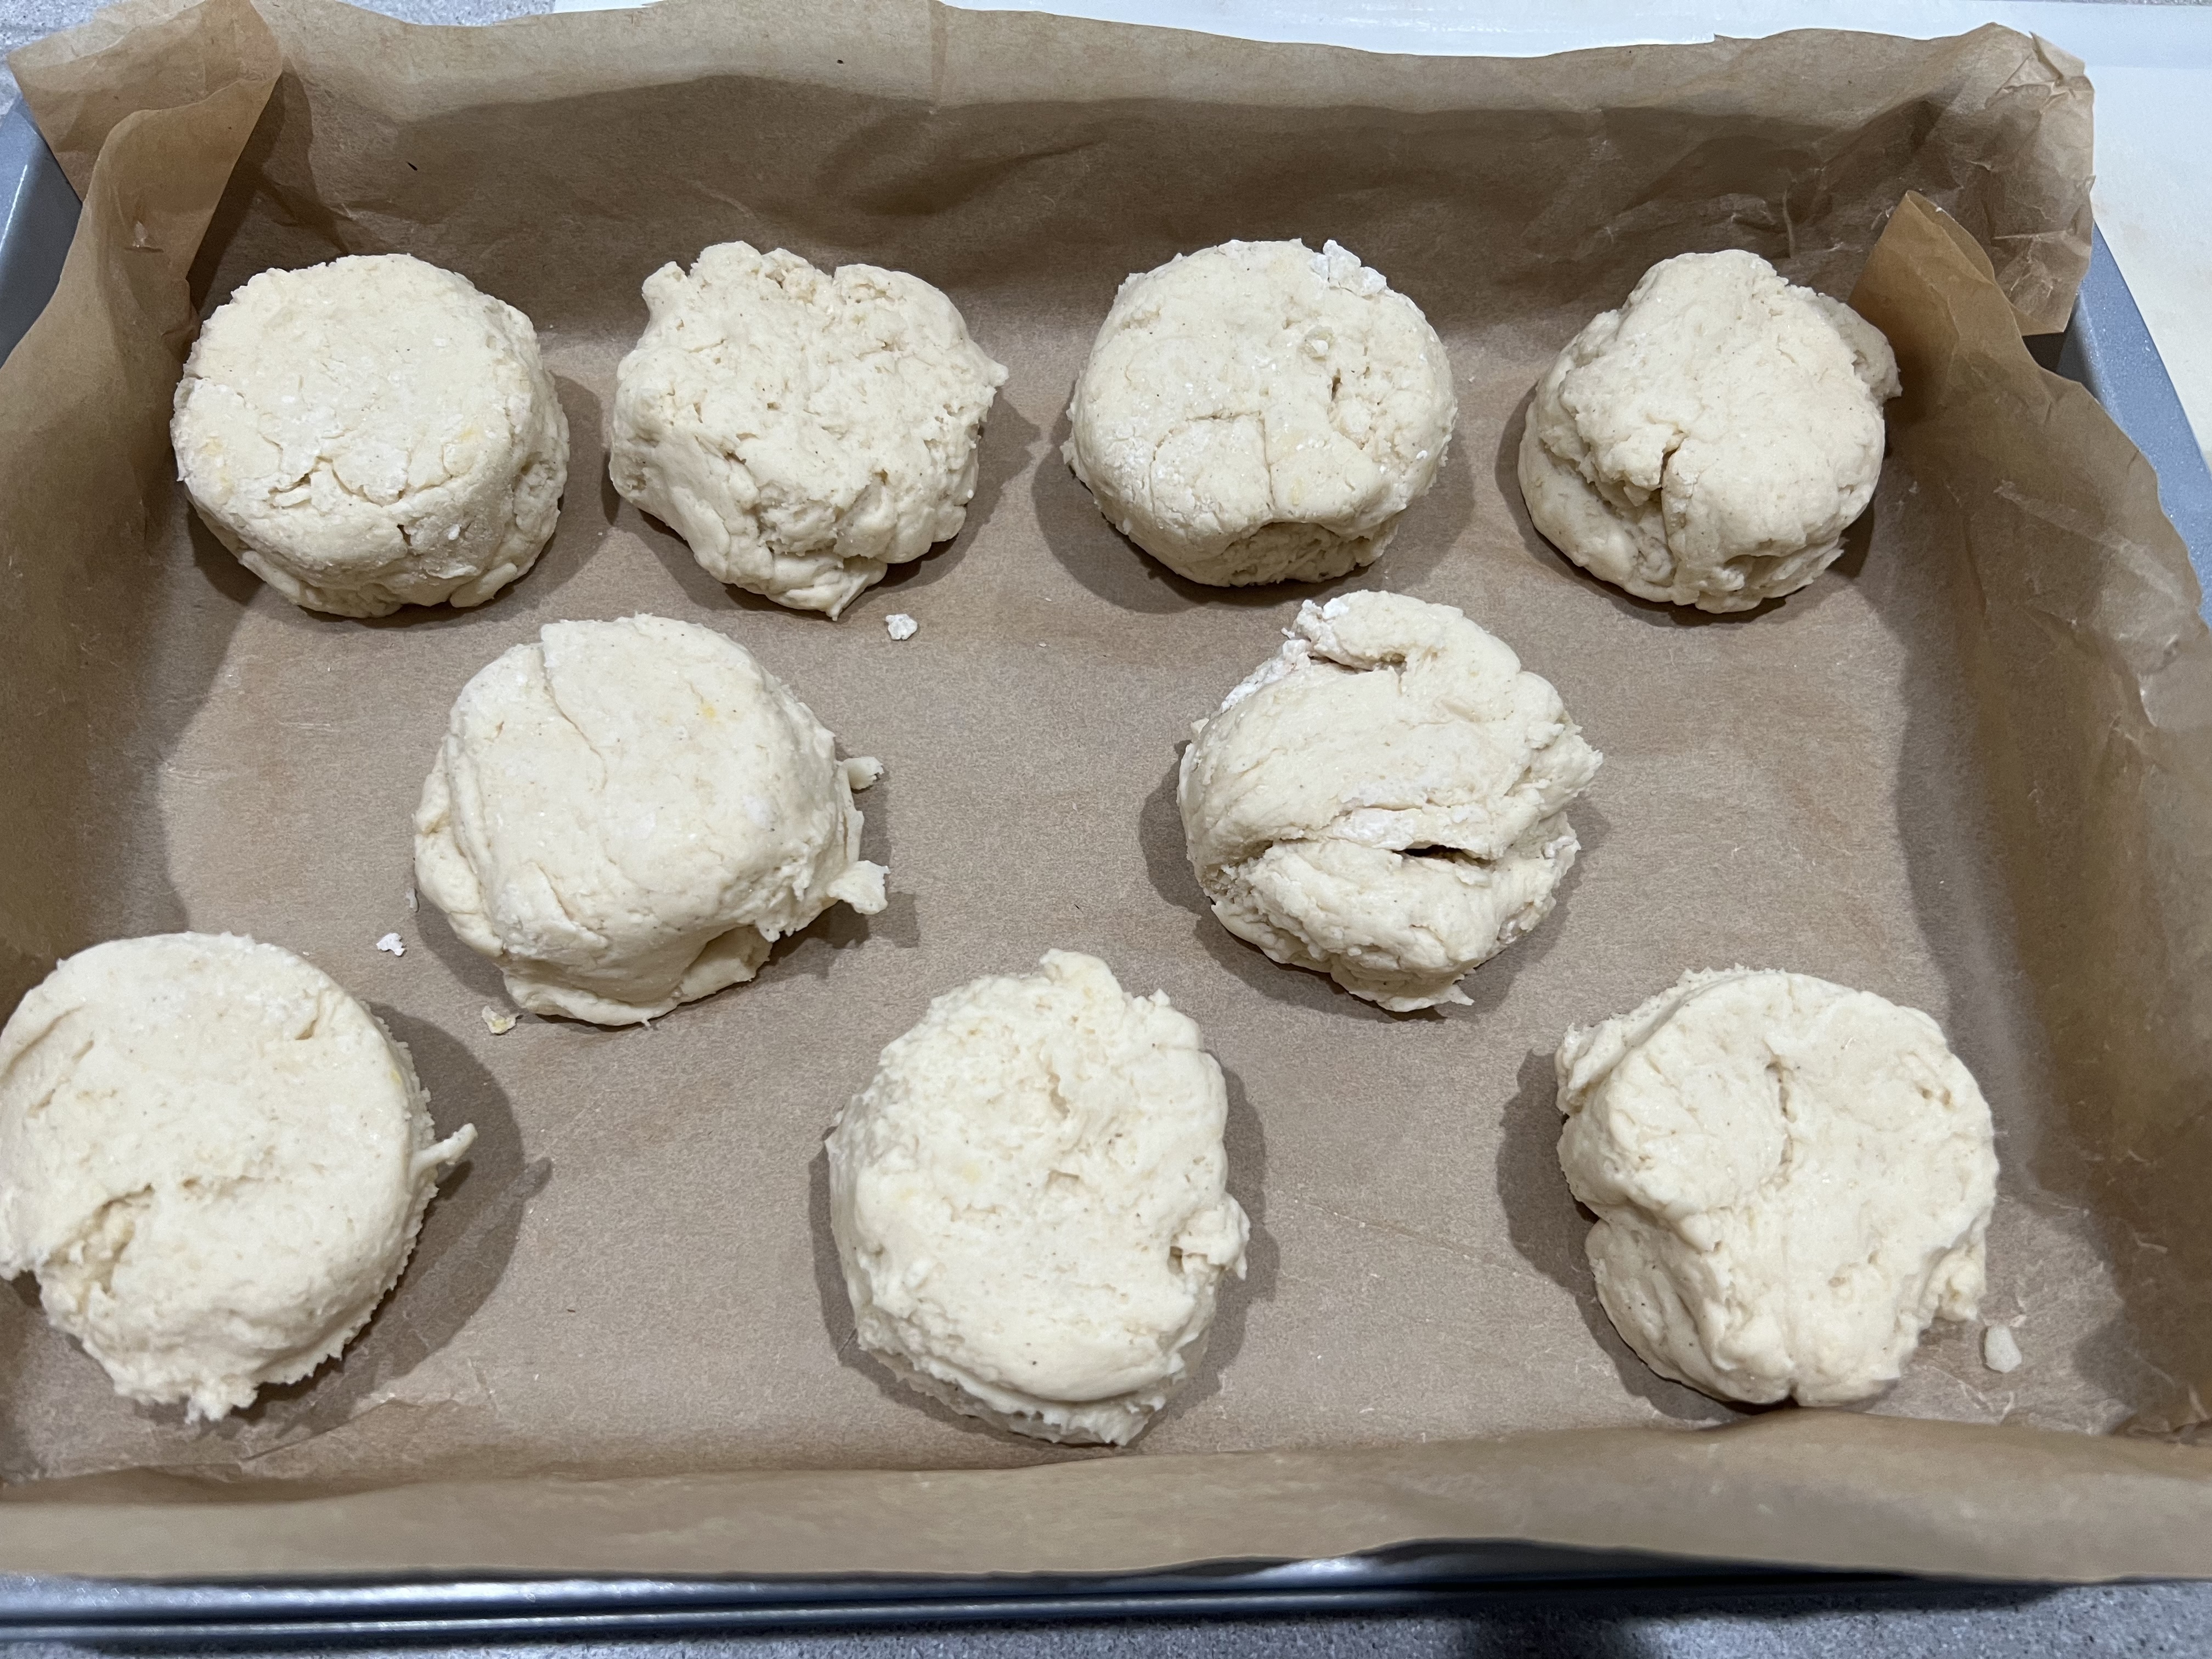
Pre-heat the oven to 350 degrees and bake for about 20 minutes, until they’re slightly golden in color.

While the rolls are baking, melt another 2 tablespoons of butter, and brush the rolls with it when they come out of the oven. Season with a little salt.


For the pizza: Take the ball of dough out of the mixer and spread it evenly onto a parchment-lined baking pan. Wet your fingers with cold water to keep the dough from sticking.


Cover the dough with plastic and let it rise in a warm place for 1 to 2 hours. (This is a good time to prepare your sauce, cheese and toppings for the pizza. Any sauce works here, from homemade to sauce in a jar. I had a variety of cheeses in the fridge, so I made a combination of mozzarella, fontina, pecorino Romano, and provolone.)


The risen dough, 90 minutes later.


Pre-heat the oven to 350 degrees.

Bake the dough—no sauce or cheese—for 10 minutes.


Remove it from the oven, add your sauce, cheese and toppings, then put it back in the oven and bake until the cheese has melted.


Pork tenderloin is a lean cut of meat that can dry out easily when roasted. It’s usually just a couple of inches around, and over a foot long…a shape that can easily go from juicy to overdone in just a few minutes if you’re not watching it carefully.

This recipe really is based on what I had in the fridge and pantry at the time, and it just rocked!

I chose chickpeas as my starch. I don’t worry too much about carbs, as long as they’re good ones and in moderation.

I always use organic kale. Kale is one of the most heavily sprayed veggies out there. You don’t need pesticides in your soup!

The soup is gluten-free if you use gluten-free flour instead of regular all purpose flour.


soup1


1 1/2 lb. pork tenderloin, cut into 1/4″ thick medallions, then cut in half
1 cup all-purpose flour
1/2 onion, finely chopped
3 carrots, peeled and sliced
3 stalks celery, sliced
1 teaspoon garlic salt
1/2 teaspoon pepper
1 pint veal stock or chicken stock (homemade is best)
1/2 cup white wine (I like an un-oaked Australian chardonnay)
1 pint water
large pinch of bouquet garni
1 15-oz. can chickpeas, rinsed and drained
1 head organic kale, cleaned, stems removed, and chopped


Slice the pork tenderloin into 1/4″ medallions, then cut each medallion in half. Set aside.

In a bowl, add the flour (unseasoned). Set it next to the pork.

Heat a heavy skillet big enough to hold all the pork. Add a few tablespoons of olive oil or pork lard. Drop the pork pieces in the flour, coating them well, then shaking off the excess. (No egg wash needed.) Place them carefully in the pan and brown them on both sides. They don’t need to cook all the way through.

Leaving the pork in the pan, add the onions and stir, cooking for a couple of minutes. Then add the carrot and celery slices, stirring again. Sprinkle in the garlic salt and pepper, stirring again.

Add the stock, the wine, and the pint of water. Bring it to a boil and let it simmer for a few minutes, stirring gently.

Add the chick peas. Then add the kale, a handful at a time, waiting for the greens to wilt into the soup before adding another handful. Do this until all the kale is in the pan. Add the pinch of bouquet garni. Bring the soup to a boil again, then reduce it to a medium-low simmer, uncovered.

The soup is ready when the veggies are tender, about 15 minutes. Keep an eye on it, and if the liquid has evaporated and it looks too thick, add more water, bringing to a boil with each addition, then reducing the heat.

Taste for seasoning before serving.


soup2


I love these ribs. They’re one of the the first recipes I ever tried, and still one of my favorites. I’ll be making them again this weekend!
 
I like making these because you don’t need a grill or a smoker. They’re gooey, sweet and absolutely delicious!
 
 
 image
 
¾ cup soy sauce
 1/4 cup hoisin sauce
5 lbs. pork ribs
Zest and juice of 1 lemon
2 whole star anise
2 cinnamon sticks (3”)
1/2 cup honey
4 cups chicken broth
 
Mix the soy sauce and the hoisin in a bowl, and set it aside. These are the marinade ingredients.
 
If the ribs are large, cut them into individual pieces. If smaller, cluster 2 or 3 ribs together. Place them in a large pot. Cover them with water and bring it to a boil. Boil for 5 minutes. Drain.
 
Place the ribs on a baking sheet lined with non-stick aluminum foil or with a rack and coat them with the marinade. Let them sit for 10 minutes.
 
Pre-heat the oven to 350 degrees. Bake the ribs on the baking sheet for 30 minutes.
 
While the ribs are baking, start the sauce in a large non-stick pan or pot that will hold all the ribs: combine the lemon zest and juice, star anise, cinnamon sticks, honey and chicken broth. Bring it to a boil, then reduce it to a simmer.
 
When the ribs have finished baking, add them to the sauce pot and simmer (covered) for at least 15 minutes or until the rib meat is tender.
 
Turn the heat on high, uncover the pot and cook until the sauce is reduced to a glaze that coats the ribs. Be sure to reduce the heat as the sauce thickens or the sugars in the honey will burn! When the ribs are sticky and gooey, they’re ready.
 
Substituting grapefruit for the lemon works really well. And I like to switch the honey for maple syrup! Yum!


STEAK AU POIVRE

Posted: December 5, 2022 in Uncategorized

A classic French beef dish, Steak au Poivre is the perfect example of delicious simplicity. If you love black pepper, you can make this wonderful dish with just a few ingredients. My personal twist was to add porcini mushrooms to the mix because…well…why not?

The classic Steak au Poivre uses a tender, lean cut of beef like filet. But I had a couple of grass-fed sirloins in the fridge, and they worked out just fine.


2 sirloin steaks, about 6 oz. each
Kosher salt
2 tablespoons whole black peppercorns
2 tablespoons butter, divided
1 teaspoon olive oil
1/3 cup Cognac, plus 1 teaspoon
1 cup heavy cream
dried porcini mushrooms (optional)


If you’re using the porcinis, place them in a sauce pan, and add water to cover them. Bring the water to a boil, set the pan aside, and let the porcinis rehydrate. Once they’ve rehydrated, remove them from the pan (save the liquid) and chop them up finely. Set them aside.


Rehydrating the porcinis.


Remove the steaks from the fridge at least 30 minutes before cooking, so they are at room temperature. Season them on all sides with the salt.

Coarsely crush the peppercorns. (I have a pepper mill that makes coarsely crushed pepper, so I used that.) Spread the peppercorns evenly on a plate, and press the sirloins, on both sides, into the pepper so that it coats the surface of the meat. Set them aside.


In a medium skillet over medium heat, melt 1 tablespoon of the butter and the olive oil. As soon as the butter and oil start to smoke, place the steaks in the pan. Cook them for about 4 minutes on each side. Once they’re done, remove the steaks, place them on a plate, and cover them with foil to keep them warm.


Pour off the excess fat from the pan, but don’t wipe the pan clean!

Back to the porcinis: in a separate skillet, add 1 tablespoon of butter and the chopped porcinis, sautéing them for a few minutes over medium heat. Slowly pour in the mushroom liquid from the sauce pan, making sure any sediment at the bottom gets left behind. Cook this liquid down with the mushrooms until it has reduced almost completely.


Back to the steak pan: off the heat, add 1/3 cup of Cognac to the pan and carefully ignite the alcohol with a long match or lighter.


Gently shake the pan until the flames die. Return the pan to the medium heat and add the cream. Bring the mixture to a boil and whisk it until the sauce coats the back of a spoon, about 5 minutes or so. Add the teaspoon of Cognac. (If you’re using the mushrooms, add them to the sauce at this point, stirring them in.)


Add the steaks back to the pan, spooning the sauce over the meat.


Serve!


I recently discovered a new version of chimichurri, one where I use basil instead of parsley, and I don’t know if I’ll go back to the old chimi ever again!

Chimichurri is a garlicky, herby green sauce usually used with grilled meats. This pesto-like condiment originated in Argentina and is also commonly used in Nicaragua and Uruguay. Though some recipes include cilantro, many people insist the original is made only with parsley. I decided to substitute basil for the parsley.

I’ve used this new “chimi” on salads, I’ve cooked shishito peppers with it, and recently, I had great success roasting chicken with it. To make the chimi…


1 large handful of fresh basil leaves, about 4 cups, loosely packed
1/4 cup water
1 medium onion, chopped
3 cloves garlic, minced
3–4 tablespoons fresh oregano, leaves only (or 1 tablespoon dry)
1 tablespoon paprika
1 teaspoon crushed bay leaf
1 tablespoon coarse sea salt
1 teaspoon freshly ground black pepper
pinch red pepper flakes
1/4 cup white wine vinegar
1/2 cup extra virgin olive oil

Place all the basil and the water in a food processor and begin to chop, pulsing for a second at a time. When the basil is in small pieces, stop pulsing and add the remaining ingredients, except the vinegar and olive oil. Start the processor on a full run now, and slowly pour in the vinegar, then the olive oil. Try not to make it too smooth…leave some tasty bits. Allow it to rest for at least 30 minutes, but overnight in a sealed container in the fridge is best.


I had a 4-pack of chicken thighs and a 4-pack of drumsticks in my freezer, so that’s what I used for this dish. But it’s just as easy to use a spatchcocked (a butterflied chicken where the backbone is removed so it lays flat) whole chicken, or any parts you prefer.


8 pieces of chicken
a bunch of tomatoes, cut into small chunks
3 to 4 oz. of feta cheese


Pre-heat the oven to 350.


Place the thawed chicken pieces in a baking pan, and rub them really well with a generous amount of the chimi. Get it under the skin where you can, not just the outside. (Just remember that you’re handling raw chicken, so the moment you touch the chimi with raw chicken hands, you’ve contaminated the batch! Use a separate bowl with part of the chimi, so you don’t ruin the rest.)

Let the chicken marinate in the chimi at room temp for a few hours, or in the fridge overnight.


Grab a bunch of tomatoes, cut them up, removing some of the seeds (but not really worrying about it either way) and mix a little chimi in the tomatoes. Place the tomatoes on the bottom of the roasting pan, and place the chicken pieces on top, so the chicken skin will crisp up while it cooks.


Sprinkle the cubes of feta cheese all around and place the roasting pan in the oven, baking for about 45 minutes.


Serve over pasta, potatoes, or as I did, over rice. I simply boiled some jasmine rice, adding a 1/2 teaspoon of Italian seasoning in the rice water before cooking. No salt, no oil.


REUBEN SOUP

Posted: November 29, 2022 in bacon, cheese, Food, Recipes, sauerkraut
Tags: , , , ,

This is a great recipe for a cold day, and you can buy most of the ingredients at your supermarket.

Why have soup and a sandwich when your soup can be your sandwich? I had all the ingredients to make a Reuben sandwich. But I wanted soup. So I made Reuben Seup…I mean Soup!

Think French onion soup, but using Reuben ingredients…


Rye bread slices
Sauerkraut, drained and rinsed
Chicken stock
Pastrami, sliced thinly
Swiss cheese, sliced thinly


I like to take the sauerkraut, rinse it under cold water, then toss it in a pot that already has some finely chopped bacon and onions cooking in it. Once the ingredients have cooked down, set it aside. (If you prefer not to use bacon and onions, that’s fine, too.)

Find a source for great pastrami, like a good deli in your neighborhood.

Heat the chicken stock in a pot. Take the thinly sliced pastrami and chop it up into bite-sized pieces. Place the pastrami in the chicken stock to warm through. Keep the stock warm on low heat.

Now you’re ready to assemble…

rye

Take an oven-proof soup bowl. Line the bottom with some rye bread.


kraut

On top of that, place a nice helping of the sauerkraut.


stock

Pour the warm chicken stock with the pastrami over the sauerkraut.


swiss

Layer slices of Swiss cheese over the top of the bowl. Place it under the broiler until melted.


melty

Eat!


eat

It satisfied my soup and sandwich craving!


Sometimes a small bite can take a lot of preparation, and you just don’t appreciate it until you decide to make it yourself. That’s especially true with the classic Danish open sandwich called Smørrebrød. The ingredients can vary, but one of my favorite versions is with smoked salmon, which I enjoyed here in Rhode Island, at Persimmon, in Providence.

Chef Champe Speidel’s Salmon Smørrebrød at Persimmon.

A couple of years ago, some very special friends were coming over for dinner, and I decided this would be the event where I debuted my own version of Salmon Smørrebrød. I had my work cut out for me…

It starts with the salmon. One of the finest sources of wild-caught Alaskan sockeye salmon is Vital Choice, a purveyor of extremely high-quality wild-caught seafood. I ordered several large fillets and had them shipped frozen to my home. I thawed a couple of the fillets in the fridge, and then cured them for several days.


Make sure you get your salmon from a reliable source, and always get wild-caught, never farmed.


The recipe for the cure mix is simple:

1 cup Kosher salt
1/2 cup cane sugar
1/2 cup brown sugar
1 tablespoon crushed black peppercorns

Combine these ingredients in a bowl. Mix well.

Use a container that will hold the fillets without bending them. It also needs to be watertight, because the salt extracts moisture from the fish, and you don’t want spills from the liquids released during the curing process.


First, the plastic. Then, a layer of the cure mix. Then the salmon fillet, skin-side-down. More cure mix on top. Then the second fillet, with more cure mix on top of that.


Lay a few sheets of plastic wrap on the bottom, allowing them to fall over the sides of the container. Sprinkle a good, even layer of the cure mix on the bottom. Lay down the first salmon fillet, skin side down, on top of the cure mix. add more cure mix on top of the fillet to cover it completely. Lay the second fillet on top of that, then cover it completely with more of the cure mix. Fold the plastic wrap tightly over the top, pressing out as much air as you can.


Finally, wrapping the whole thing up tightly in plastic.


Pressure on the salmon helps the curing process, so the cure mix makes good contact with the flesh. I weigh it down with a few cans of tomato sauce.


Even pressure on the salmon fillets helps the curing process.


Put the salmon in the fridge for at least 48 hours, until the fillets are firm to the touch.


The fillets have changed color and are firmer to the touch once cured.


Once the salmon has cured, remove it from the plastic wrap and wash it thoroughly with clean, cold water to remove as much of the salt as possible. Some of the peppercorns will imbed themselves in the fish…remove those, too. Pat the fillets dry with paper towels.


The salmon is ready to eat just like this, but…


At this point, you’ve got Gravlax, and it’s delicious just the way it is. But I chose to go one step further and smoke the salmon, so I put the fillets on a metal rack in my fridge, skin side down, and let them dry out a bit for an hour or so. When the salmon dries, the flesh gets a bit tacky. That’s called the pellicle, and the sticky surface of the fish helps the smoke molecules adhere better. It’s a good thing.


The salmon fillets, drying in the fridge.


While the salmon is drying in the fridge, I get my smoking gear ready.

I like to use charcoal briquets and hickory chips for the smoking process. I bring my small camping grill next to my larger home grill. Using my charcoal chimney, I light the briquets and let them burn until they’re ashed over. Using a small smoking box, I place some hickory chips inside, then add a couple of hot briquets to it, making sure they burn the chips and the smoking starts. I place the smoking box inside my large grill with the vents open, laying my salmon fillets (skin-side-down) next to the smoking box. I close the lid of the grill, and let the smoking begin.


Lighting briquets in the camping grill before moving them to the larger grill.


Ashed-over coals in the chimney.


This is as close to a cold-smoking process as you can get at home. There is no heat actually cooking the salmon, just a smoke-filled grill that needs to be replenished every once in a while with hot coals and more hickory chips. I smoke the salmon for a couple of hours.


Let the smoking begin!


Once the salmon has smoked, you’ve got yourself a really special treat. You must eat some at this point, just to reward yourself for a job well done! Then, wrap the rest of the salmon tightly in plastic wrap, and keep it refrigerated until you’re ready to serve it. It will stay fresh in the fridge for several days.

My research for Salmon Smørrebrød resulted in many variations, but I ultimately chose one that used a horseradish cream on the fish. Just so happened that I have a giant horseradish plant growing in my garden, so it was time to dig some of the roots up!


Digging up horseradish.


Once I dug the roots out and washed them clean, they needed to be peeled down to their white center. Then they were ready to be grated. I used the same system my grandfather did, many years ago: a simple hand grater for the job. If you thought you cry when you slice onions, you ain’t seen nuthin’ until you’ve grated horseradish! But it’s worth the effort.


Cleaned horseradish roots, before peeling and grating.


You need freshly grated horseradish, not the prepared stuff you find in the supermarket for the cream…

12 tablespoons sour cream
6 tablespoons plain Greek yogurt
4 tablespoons freshly grated horseradish
8 teaspoons freshly squeezed lemon juice
4 pinches of sugar
Kosher salt to taste

Combine these ingredients in a bowl and mix well. It keeps for at least a day, so you can make it the night before serving. This is a lot of horseradish cream, but I was making enough to serve 12 people.


The horseradish cream…delicious on a lot of things!


1 fennel bulb
2 Granny Smith apples
1 tablespoon freshly squeezed lemon juice

A few hours before serving, thinly slice a fennel bulb–paper-thin if you can–and place the slices in a bowl of ice water. Peel and core 2 Granny Smith apples and slice them as thinly as you can, placing them in the ice bath as well. After an hour, remove the fennel and apple slices from the ice water, pat them dry with paper towels, and place them in a bowl, sprinkling them with the lemon juice. Toss, mixing well, and then place the bowl in the fridge until you’re ready to use it.


Slicing the fennel as thinly as possible.


A few last ingredients…

Sliced bread
Softened unsalted butter
Fresh dill sprigs

Smørrebrød is a sandwich, so of course, I needed some bread. I chose something from my heritage: Lithuanian bread, a combination of rye and pumpernickel that I find when I go back home to New York. I keep it in the freezer until I need it, and for this recipe, I sliced it thin.


Getting the ingredients together. The Lithuanian bread is the brown bread. We also had a couple of slices of gluten-free bread.


Now we’re finally ready to build this thing!


Slicing the salmon as thinly as possible.


Rather than making all the sandwiches myself, I decided I’d teach a Master Class of Smørrebrød-making with my fabulous guests. So I brought all the ingredients out, and we started building our sandwiches as I sliced the salmon as thinly as possible.

First, you take your slice of Lithuanian bread and spread some of the butter on it.

Then, layer the fabulous salmon on top.

Next, a healthy spread of the horseradish cream.

Top with some of the sliced fennel and apple.

Garnish with just a few fresh sprigs of dill.

And then top it all off with a friendly sprinkling of Fleur de Sel, or your favorite sea salt.


Fleur de Sel at the end makes all the difference!


And that’s my Salmon Smørrebrød…a labor of love. But that’s what you do for friends, right?


Time to eat!


Leftover ingredients make a great sandwich on an everything bagel the next day!

Let’s face it: there’s no such thing as healthy eggnog. This recipe is absolutely delicious but is also a heart attack in a glass. I’ve updated it this year so that you don’t need to worry about salmonella…though the alcohol will still get you!

My buddy, Rick Sammarco, a wicked talented bartender, credits his father, Al, for the eggnog recipe I started from. The original recipe called for a lot more of everything. I’ve cut it down to a more “user friendly” size, I’ve made it a touch sweeter, and it no longer contains the usual raw eggs found in traditional eggnogs.

Some say that “aging” eggnog–literally letting it sit in the fridge for up to 6 weeks–will give the alcohol time to kill the salmonella. But there’s no tried and true scientific evidence to support this. Sure, if you pour a ton of alcohol in the batch, 15% or even more, it might be safe. And I might risk it on myself, but I would never take a chance and serve it to friends or family. The only thing that really kills salmonella is heat, and that’s not something the average homeowner can easily do without actually cooking the eggs.

The solution is to buy pasteurized eggs.


Fortunately, some supermarkets now carry whole eggs in the shell that have been pasteurized, though they are hard to find. But my area Whole Foods does carry pasteurized real whole liquid eggs under the Vital Farms name, and they work perfectly with this recipe. The original recipe called for 15 (!) raw eggs. A 16-oz. container of Vital Farms liquid eggs is the same as about 9 eggs. So I need one full container, and then another 10 oz. or so for this recipe.

Now the only thing I need to worry about are too many calories and too much alcohol!


eggnog

1.5 quarts vanilla ice cream (I use Breyer’s)
1 pint half & half
Just over 26 oz. Vital Farms liquid whole eggs (the equivalent of 15 whole raw eggs)
1 teaspoon vanilla extract
1/2 teaspoon cinnamon
1/2 teaspoon nutmeg
1/4 cup pure maple syrup
6 oz.  of each:
spiced rum (I use Captain Morgan)
whiskey (I use Crown Royal)
brandy (I use E&J)


I let the ice cream soften 1 day in the fridge. I mix the ice cream, half-and-half, eggs, vanilla, cinnamon and nutmeg in a blender.

My blender is pretty big, but I find that it’s full at this point. So I pour everything into a gallon-size glass jar.

To the jar, I add the maple syrup and all the liquor. Then I whisk everything together, making sure I get down to the bottom of the jar.


After it’s fully mixed, I place the lid on the jar, and move the eggnog to the fridge, where I let it sit for at least 12-24 hours for the flavors to blend. Even longer is better.

One final taste to determine whether I want more cinnamon, nutmeg or maple syrup, and it’s good to go!


It goes well with coffee…just maybe not for breakfast!


And by the way, it’s pretty darn tasty with coffee! Just imagine a variation on a White Russian, with eggnog and freshly brewed coffee, and a bit of a drizzle of maple syrup on top!

Cheers!


Like hot dogs and Slim Jims, jerky is one of those “mystery meats” we love but don’t really know how it’s made or what part of the animal it comes from.
Really excellent jerky is a rare treat, and once you have it, you will never go back to that rancid, preservative-filled dog meat you find in a bag at the supermarket. And the best part is: it’s easy to make.
Although I started my jerky-making endeavors with beef, I later acquired some beautiful venison from friends and family; hunters that had extra meat they were willing to share. I quickly realized that venison was the ideal jerky meat: really flavorful, with a wonderful texture.

Beautiful venison.

But venison is not all that east to find, and farmed venison is expensive. So beef is still the best option for most people.
Shop around for a really nice slab of London Broil or similar cut. You don’t need to buy an expensive piece of grass-fed beef, but the better the meat, the better the jerky. Remove all the gristle and fat that may be on the meat and then slice it against the grain and on a diagonal, into 1/4″ thick slices. Toss all the meat in a Ziploc bag. Once you’ve done that, all you need to do is make the marinade, marinate the beef overnight, and then dry it the next day. Your final product will be a flavorful beef jerky that is so good, you’ll find it very hard to stop eating it…or to share it.
If you use gluten-free soy sauce and teriyaki sauce (La Choy is the brand I use, found in any supermarket), this recipe can be considered gluten-free. Be careful: regular soy sauce, and even some tamari sauces, have wheat in them. Read the label!
image
1 tablespoon salt
1 1/2 tablespoons granulated garlic
1 teaspoon black pepper
1 teaspoon fresh minced peeled ginger
2/3 cup brown sugar
1 cup teriyaki sauce (I use La Choy)
1 cup soy sauce (I use La Choy)
8 lbs. raw, lean beef, like London broil, cut into 1/4″ thick diagonal slices, against the grain of the meat
Combine all the ingredients except the meat in a large bowl. Whisk it well. Place the meat in a large Ziploc bag, pour the marinade inside, seal it, and refrigerate it overnight. Squish the bag around once in a while, to make sure all the meat surfaces make contact with the marinade. Keep the bag in a bowl to prevent any accidental spillage in your fridge!
The next day, pour off the marinade and discard it. Using a food dehydrator, dry the meat by laying strips in a single layer. You can also dry them in a 140 degree oven on racks slightly elevated off a baking sheet. Drying could take several hours to half a day, depending on how dry and chewy you like your jerky, and how thickly you sliced it.

Jerky in the dehydrator.

Jerky in the dehydrator.

This recipe makes a lot of jerky, but it stores really well in the freezer. I put small amounts into individual freezer bags, then place all of them in one large freezer bag. Thaw as needed.

With Thanksgiving around the corner, I’m sharing my favorite holiday dishes I post every year around this time.

My Mom loved that nasty, gooey cranberry log that oozes out of the can. It would hit the bowl with a splurt and would wiggle for about an hour. I’m more than happy to avoid that and make this delicious side dish, which has become a staple at our Thanksgiving table every year…

1 medium-sized butternut squash, washed and peeled with the seeds removed
Olive oil
Salt
1 cup fresh cranberries
¼ cup sunflower seeds
¼ cup pumpkin seeds or pepitas
¼ cup sesame seeds
¼ cup maple syrup, more if you like it really sweet

image

Pre-heat the oven to 400 degrees.

Once you’ve washed, peeled and seeded the butternut squash, cut it into ½” cubes. Sprinkle a little olive oil and salt on them and toss them to coat. Then spread the squash cubes in a single layer on a baking sheet. Bake them for about 30 minutes or until they’re golden on the edges.

Remove the squash from the oven and pour the cranberries into the hot tray. Mix gently. Pour the squash/cranberry mix into a smaller, deeper baking pan.

Increase the oven temperature to 425.

In a separate bowl, combine the sunflower seeds, pumpkin seeds and sesame seeds. Sprinkle the seeds evenly over the squash/cranberry mixture. Drizzle the maple syrup over everything and place the baking pan in the oven. Cook for another 20 minutes, until the seeds have roasted.

Drizzle a bit of maple syrup over the top just before bringing the pan to the table.