Archive for the ‘Southern New England’ Category

Many people, even avid gardeners, seem to think that composting is extremely complicated and that it will take up too much of their time. And so they miss out on one of the most important free sources of organic matter for their gardens.
Composting is a win–win in every way imaginable.
Composting allows you to recycle kitchen food scraps. When you consider the fact that about 30% of all landfill waste is food scraps that could have been recycled into compost, you quickly see the value of this process.
Composting saves you trips to the dump and dirty looks from your garbage man when you leave too many bags at the end of your driveway. Why put all those grass and leaf clippings into a landfill when you can transform them into organic material that will nourish your garden plants?
Good composting basically means supplying microbes with the right balance of food so that they can thrive and break down your yard and kitchen waste. Despite what you may read elsewhere, the reality of backyard composting is that you will never get that super-hot pile they talk about in all the composting manuals. But, if you have a pile that cooks reasonably well, and becomes a haven for many happy redworms, you can consider your efforts a success.
My compost bins, with dahlias, cosmos and scarlet runner beans in front.

My compost bins, with dahlias, cosmos and scarlet runner beans in front.

Compost piles are aerobic, meaning they need fresh air to be successful, so it is important to aerate your compost pile once in a while. Simply take a shovel or pitchfork and “fluff” the pile up, mixing the contents. You’ll find that this small amount of maintenance will keep the aerobic microbes happy, and will keep the anaerobic microbes (the ones that don’t require air and cause the compost pile to smell bad) away.
Keep your compost pile out of the full sun. Successful composting requires the pile to be moist, and the summer sun will dry things out very quickly. Semi-shade is a better way to go.
The main types of food for your compost pile, easily split into 2 categories, are green and brown. Green waste is made of fresh plant material from the garden, kitchen fruit and vegetable scraps, and coffee grounds. They don’t necessarily need to be the color green. The term “green,” in this case, means they contain nitrogen. Avoid weeds because weed seeds can survive the average home composter and will sprout when you return the compost back to your soil the next season. And avoid all animal products (meat, dairy) unless you like rotten smells and animals tearing up your yard.
Brown waste is made of straw, leaves, wood chips, sawdust, newspaper, and even some cardboard. Brown waste tends to be drier than green waste, so it’s a good idea to soak things like newspaper and cardboard before putting it into your compost pile.
Too much green material will cause your compost to take on a not-so-delightful bouquet reminiscent of ammonia because of the excess of nitrogen. Adding a little brown stuff to it and mixing it through will help it stay odor-free.
The end of the season, when the leaves have fallen in my yard, is the only time I use the bagger on my riding lawn mower. (I let the mulched grass clippings go back into the soil the rest of the season.) But in the fall, I bag the grass clippings and leaves together, effectively combining green and brown in a perfect mix that starts to cook in my compost piles almost immediately. The result is some pretty well broken down material by the springtime.
If you’ve got a lot of leaves, most leaf blowers can suck up leaves, too, and they grind them up into fine particles that are worth their weight in gold. Throw them in your compost pile, or even till into your garden soil in the fall.
I keep a metal compost bucket with a lid under the kitchen sink. No need to buy an expensive bucket with a carbon-filter built into the lid from those garden catalogs. Just a good metal or plastic bucket with a lid, and before I dump my vegetable scraps and coffee grinds into it, I line the bottom with a single sheet of newspaper. That’s all I  need to keep the bucket from stinking up the room until I dump it into the compost pile.
There are many composters to choose from, from rotating drums that claim you’ll get compost in 14 days, to simple wooden or wire frames that hold the pile in check. Use what works best for you. I have a system of 3 bins made from wooden slats. When I fill one, I start on the next. Other than aerating them once in a while, I don’t mess with them. It takes about a year, but at the end of a long winter, I usually have some pretty nice compost to use in the springtime garden.
A word about manure in your garden: You should never use raw manure directly in your garden. You don’t want raw parasite-laden manure touching or splashing up onto your vegetables. If you get a supply of fresh horse or cow manure, mix it into your garden in the fall after you’ve harvested all of your veggies. It will winter over and be ready to make your garden happy the next season. Or let it sit in your compost bin for a year before using it. Though some will rave about the benefits of chicken manure, the fact is it harbors salmonella, which takes a year or two to go away. I won’t use it.

As I mentioned a little while ago, I grow two varieties of bamboo in my yard, and although they are quite invasive, I have my own methods of keeping the plants in check.

One stand of bamboo is in a corner of my yard that is overrun by brambles and other nasty vines. So I have no issues with the bamboo taking over this area at all. I’d rather have a desirable invasive than an ugly one.

The other stand of bamboo is a larger variety that grows to 25 feet tall, and it requires more maintenance to keep it in the area I want it to stay in. So, when some of the shoots get in my way, I simply cut them with a hacksaw and use them in my garden.

image

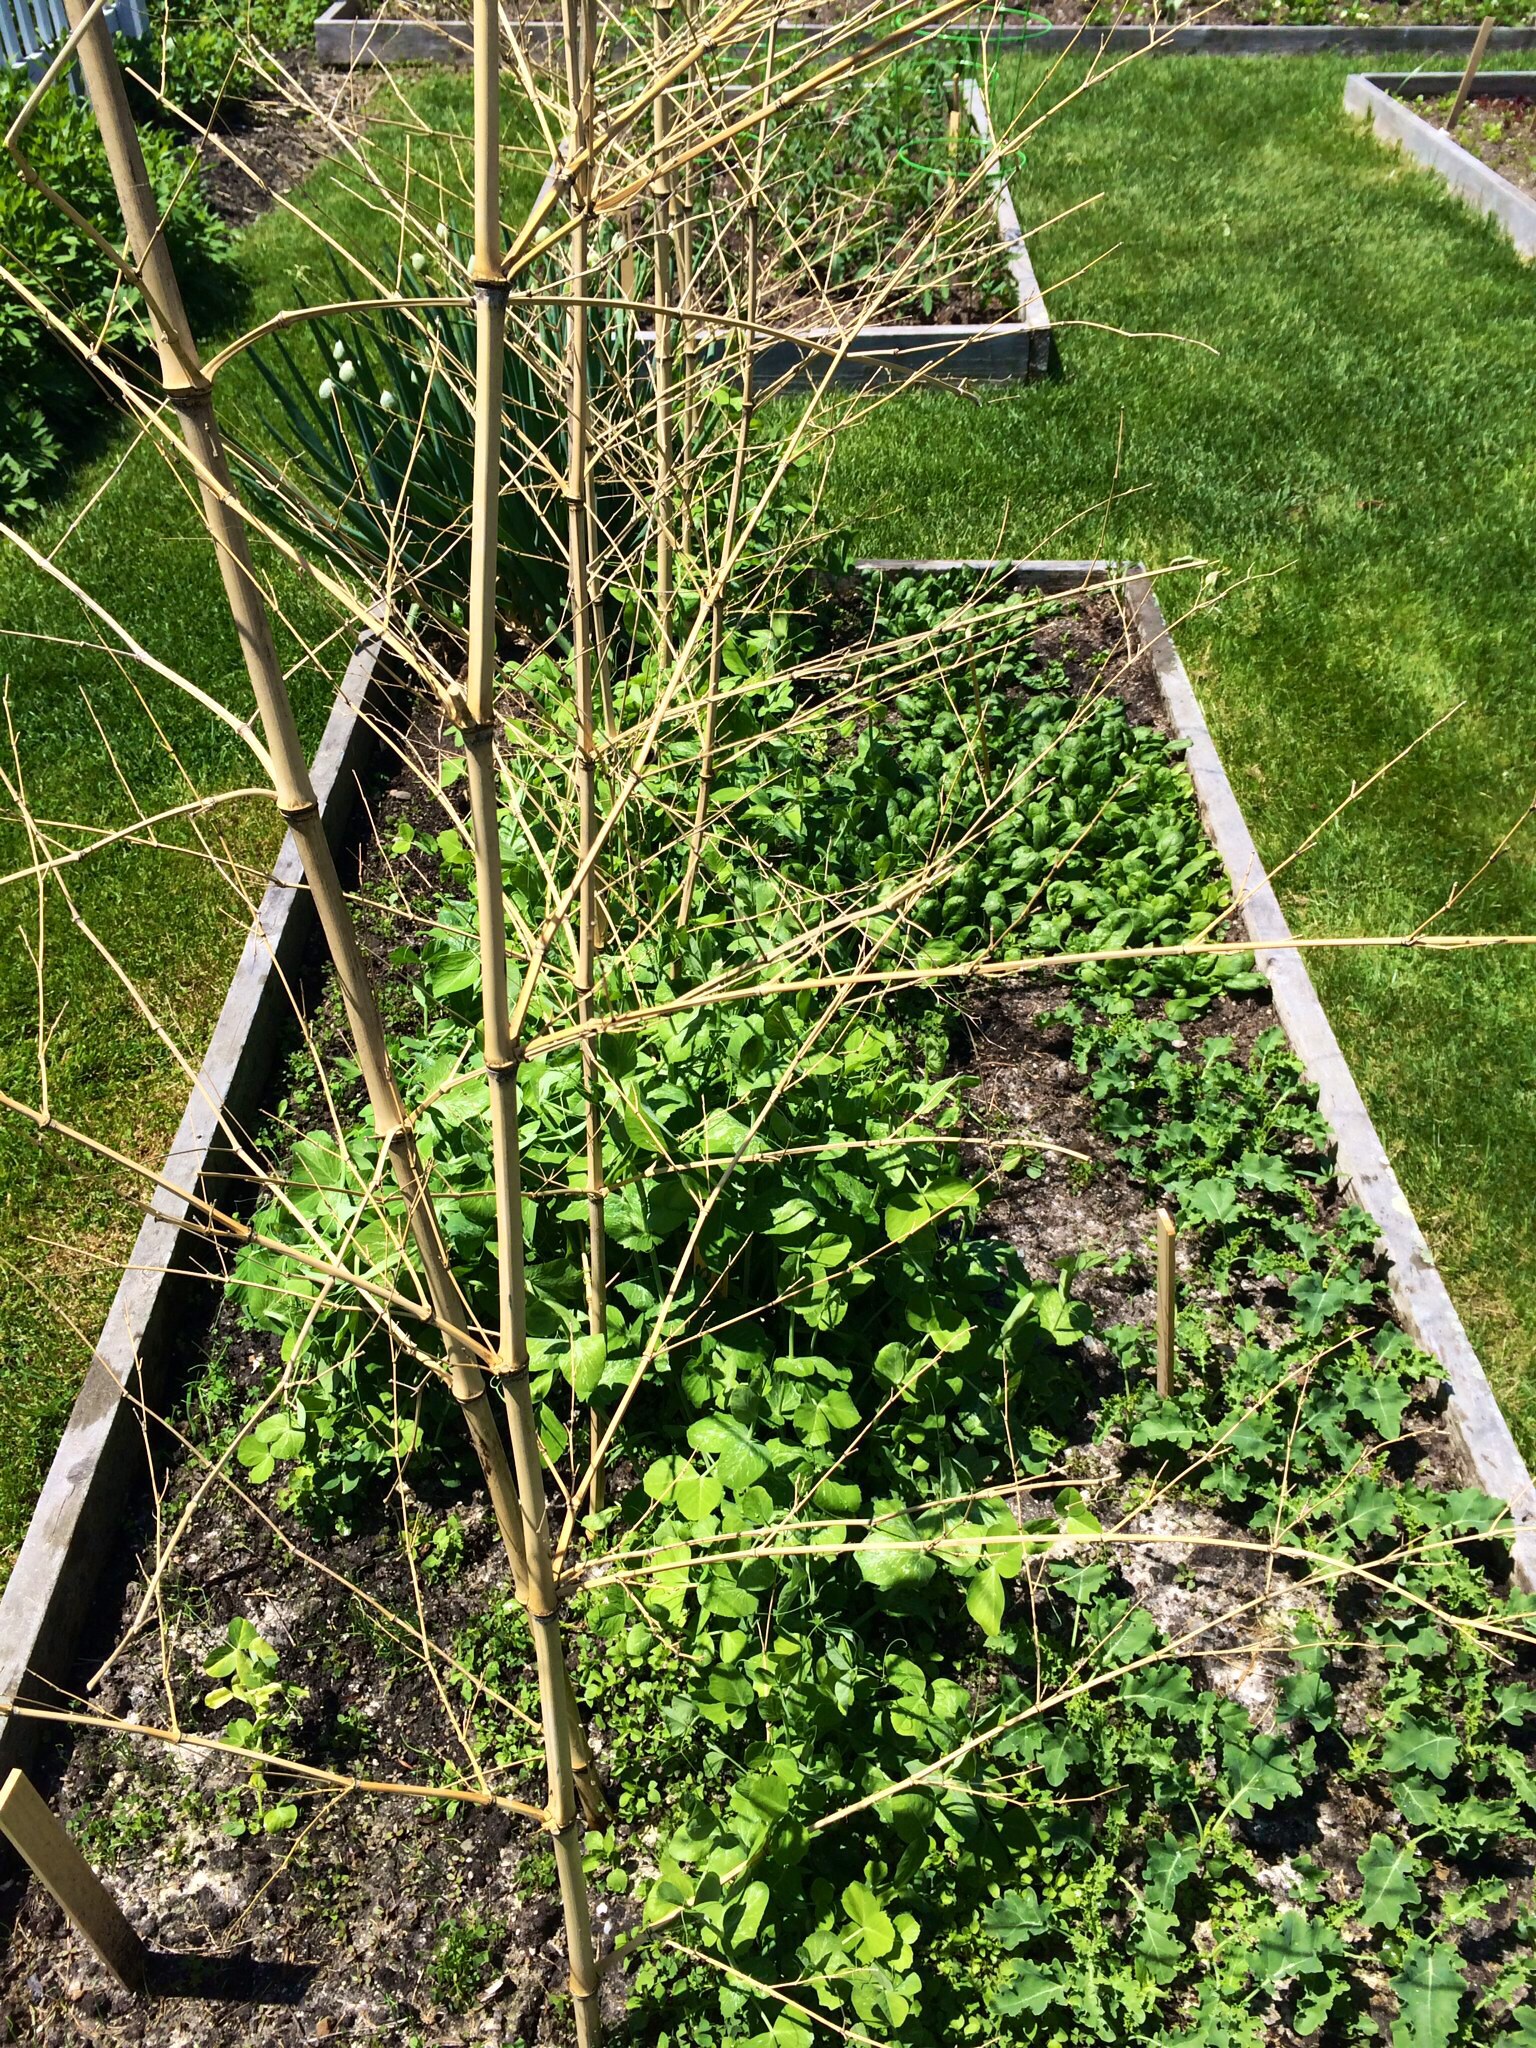
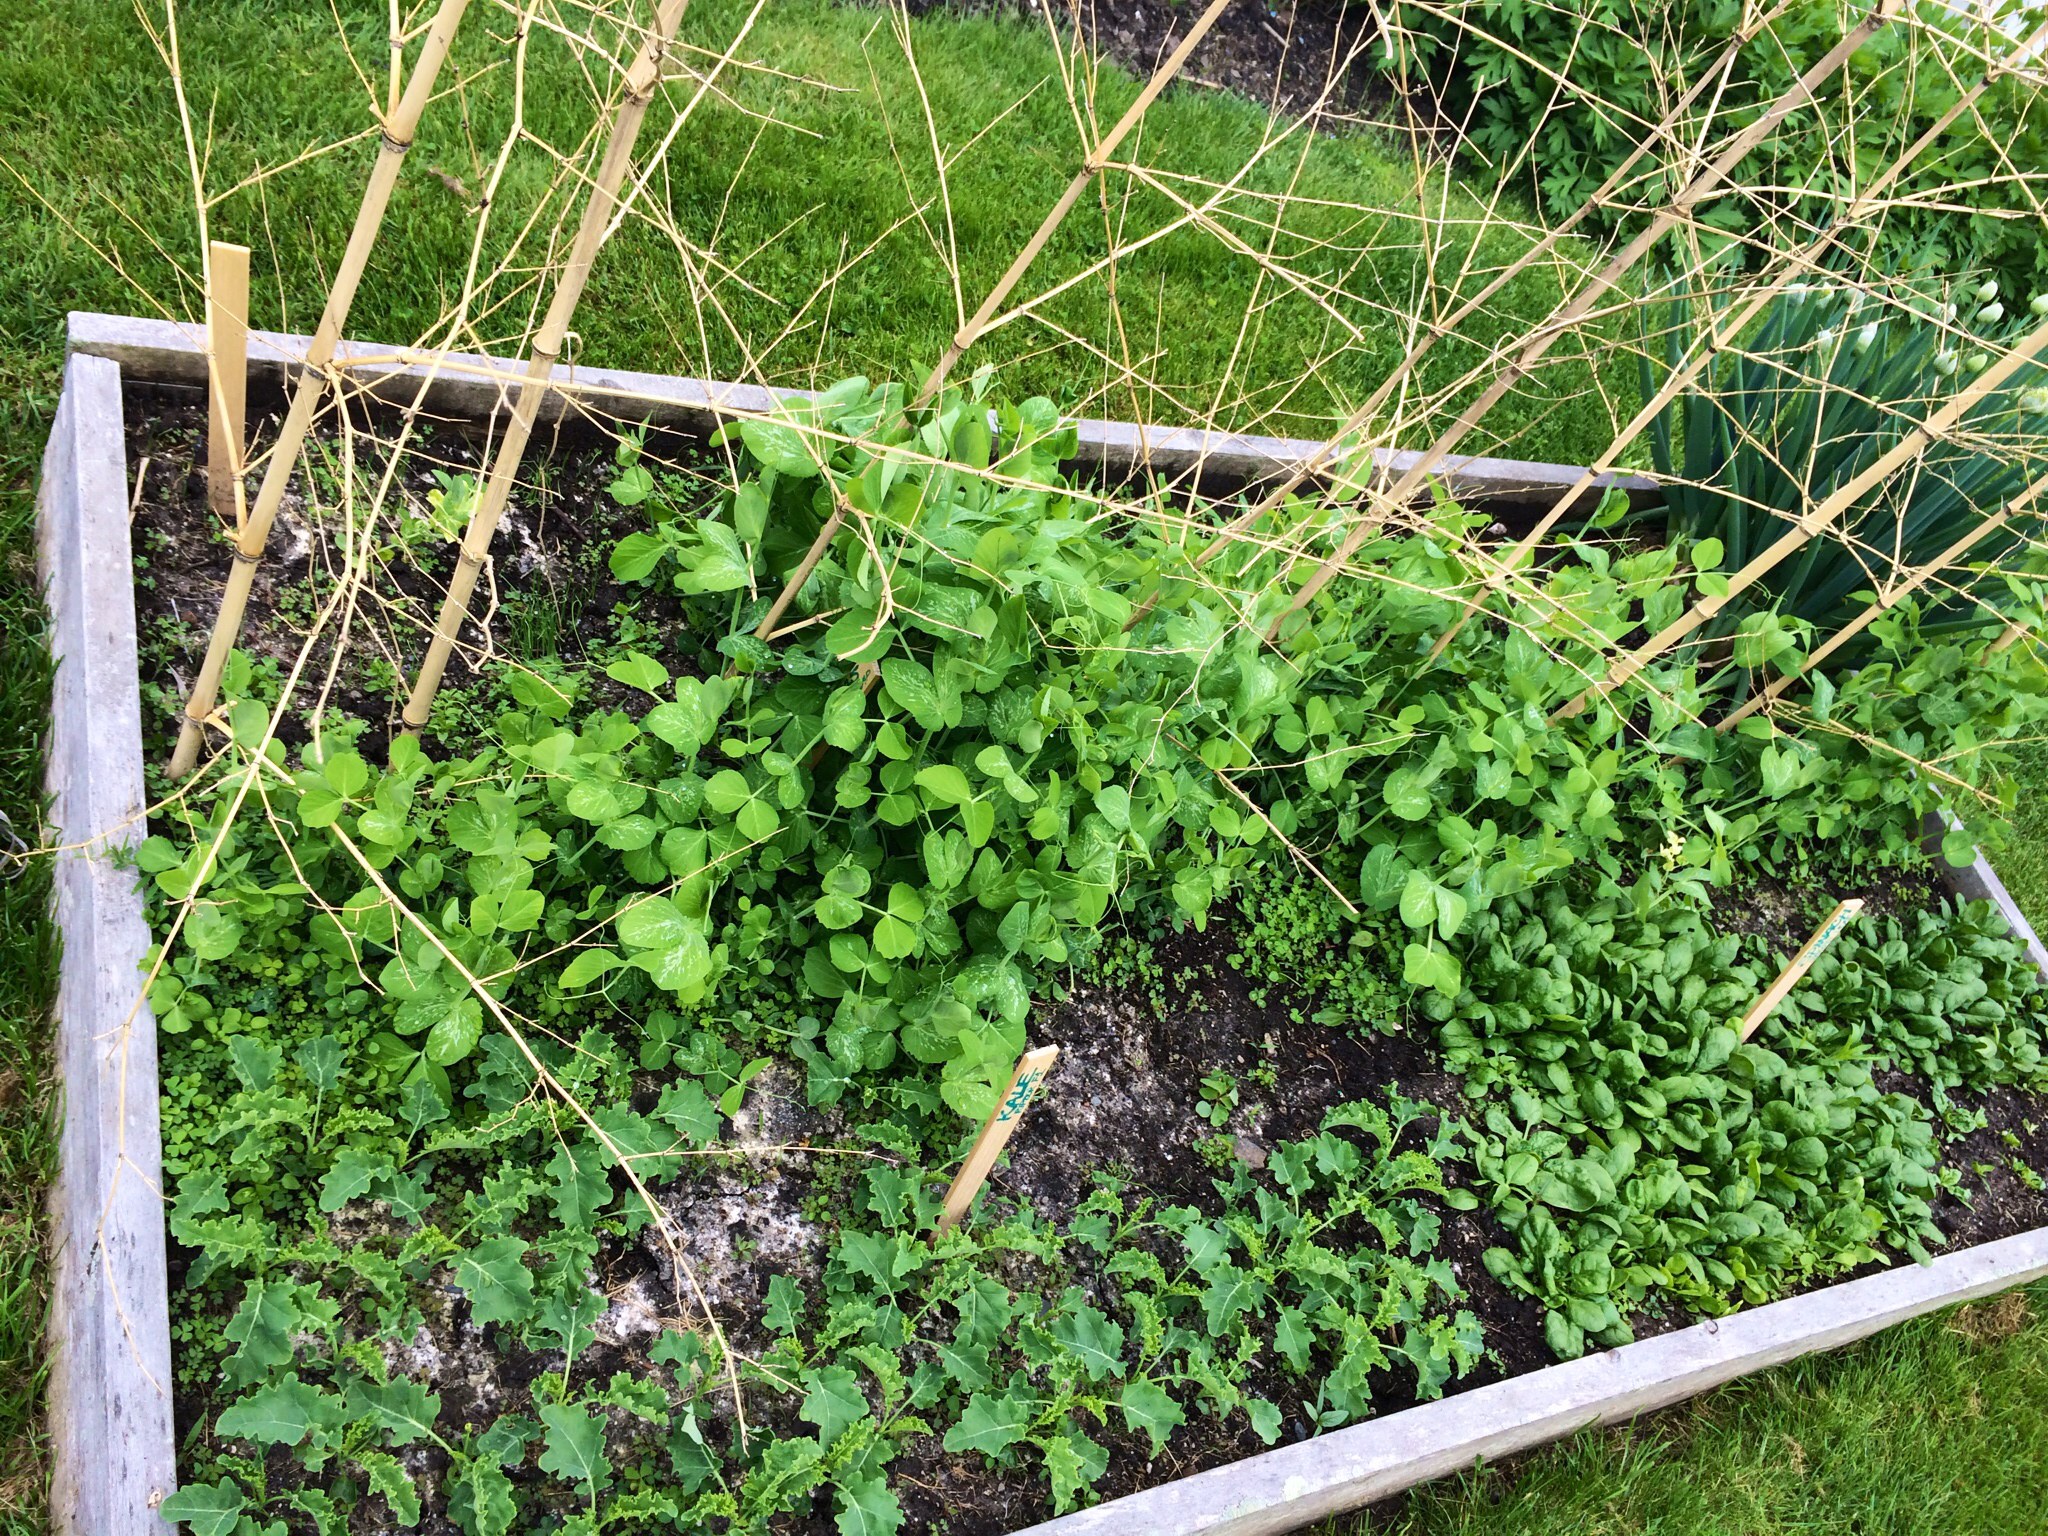
I use them as tomato stakes, supports for my cucumbers vines, and even pea brush, as shown here. For pea brush, I don’t remove the smaller side branches, which gives something for the peas to attach to. The photo above was from earlier in the season. Here’s what it looks like now: over 6 feet tall!

peas1

Another view earlier in the season…

Peas with pea brush, kale, spinach.

Peas with pea brush, kale, spinach.

…And now…

peas2

The kale and spinach have been harvested. (The weather’s too hot for them now.) And I’ve sown some lettuce mixes in their place. Since the bed of lettuce is on the north side of the peas, the lettuce will be shaded by the peas in the hot sun.

Bamboo is a great way to give my garden a more natural look, and not having rusty metal poles everywhere.

I grow two varieties of bamboo in my yard, and although they are quite invasive, I have my own methods of keeping the plants in check.

One stand of bamboo is in a corner of my yard that is overrun by brambles and other nasty vines. So I have no issues with the bamboo taking over this area at all. I’d rather have a desirable invasive than an ugly one.

The other stand of bamboo is a larger variety that grows to 25 feet tall, and it requires more maintenance to keep it in the area I want it to stay in. So, when some of the shoots get in my way, I simply cut them with a hacksaw and use them in my garden.

image

I use them as tomato stakes, supports for my cucumbers vines, and even pea brush, as shown here. For pea brush, I don’t remove the smaller side branches, which gives something for the peas to attach to.


Peas with pea brush, kale, spinach.

Peas with pea brush, kale, spinach.


A great way to give my garden a more natural look, rather than having rusty metal poles everywhere.

If you’re looking for a fast-growing vine to cover an arbor or other structure, nothing grows faster than hops…that’s right, like the hops in your beer! Hops farms in Germany grow the vines vertically, extending lines up to 30 feet in the air.

Once you’ve bought a few hops plants, they will reward you with interesting healthy vines that will spread quickly. And soon, you’ll also be able to split large plants and transplant them to other areas of your yard.

Early in the season, and the vines are already 2 feet up!

Early in the season, and the vines are already 2 feet up!

The vines are strong, the leaves are beautiful, and the hops flowers smell great and are different from anything else you may have in your garden. And if you brew your own beer, how cool is it to have one of your ingredients growing in your yard?

A bed of hostas below, the hops grow up this "umbrella" every year.

A bed of hostas below, the hops grow up this “umbrella” every year.

Hops are hardy perennials that will come back bigger and stronger every year. In the fall, the leaves die off and leave a wooden skeleton behind that looks great in the winter and also supplies birds with nesting material the following spring.

You can find hops plants on Amazon.

Clam fritters, conch fritters, lobster fritters…I suppose you could fritter anything. But the first time I had them with mussels, I knew that I would never fritter my life away with any other!

It was a fall afternoon in Newport, Rhode Island, at the Newport Yachting Center’s annual Oyster Festival. We’re gorging on freshly shucked oysters and clams, boiled shrimp, and…what have we here? I had never heard of a mussel fritter before, but Wendy, the lovely lady behind the counter, convinced me that her secret recipe would knock my socks off. I took one bite, then another, then another…There was no turning back.

They couldn’t be easier to make, but it is crucial to have the right fritter batter. And that starts with a product called Drum Rock fritter mix. If you live in New England, you can find it in just about any seafood department at Whole Foods. If you live further away, you can check out their website (http://www.drumrockproducts.com/index.php) or try your luck with a local brand of fritter mix.

fritter ingredients


If you’re using fresh mussels, be sure to clean them well and remove the beards. Steam them in a pot over a small amount of water. As they open, they will release their flavorful juices and you want to save every drop of that broth for the fritters. Here in New England, frozen mussel meats are available in some seafood stores. All you need to do is thaw them, steam them saving the broth, and you’re ready to go.


Ingredients:


1 lb Drum Rock fritter mix

2 cups cooked mussel meats

1/2 cup mussel broth (saved from steaming mussels)

1/4 to 1/2 cup good quality beer, such as Sam Adams Boston Lager

Peanut oil for frying


Be sure to let the batter rest. If you're waiting for guests to arrive, just cover the batter bowl with a moist towel and it will keep for several hours at room temperature.

Be sure to let the batter rest. If you’re waiting for guests to arrive, just cover the batter bowl with a moist towel and it will keep for several hours at room temperature.


Steam mussel meats until just cooked. Remove mussel meats, and reserve 1/2 cup of the broth. Pulse mussel meats in a food processor, but leave chunky…or chop by hand.

Put Drum Rock fritter mix in a large bowl. Add mussel meats, mussel broth, and beer. Stir gently until just mixed. Let it sit for 10 to 15 minutes and do not stir again.

Using a thermometer, heat oil to 350 degrees, and using a small spoon or scoop, drop fritters in hot oil, turning gently, cooking 3 to 4 minutes until golden.

Drain on absorbent paper, and season with salt and pepper immediately. Serve right away!

IMG_3043


The perfect dipping sauce for these mussel fritters is made from two ingredients: mayonnaise and Ponzu sauce, which is a citrus-based soy sauce. Combine both ingredients in a bowl. How much you use of each is a matter of personal preference. I usually use a ratio of 4 parts mayo to 1 part Ponzu.


Here in New England, it’s time to seriously think about what to plant in your garden. I’ve already sowed peas, arugula, radishes, broccoli raab, and turnips back on St. Patrick’s Day. They can be sown in the garden now, as soon as the soil is workable. Simply, that means you take a handful of soil and squeeze it. If it stays in a hard, wet clump, it’s too wet and not ready. If it crumbles apart, get gardening!
That doesn’t give you a green light to plant all your veggies, however. Many need to wait until temperatures get much warmer.
I’m currently taking courses at the University of Rhode Island to get my certification as a URI Master Gardener. Gardening can be as simple or as complicated as you choose to make it, and if you’re starting out, the task of deciding where to put your garden may not seem like an easy one. It varies with every home, every yard. But there are some basic things to keep in mind, and all of it is common sense. Do you have any common sense? Good. Then you should be fine…
Greenhouse greens

Greenhouse greens

You want your garden to have all the benefits possible for the best chance of success. Just remember this easy acronym: LSSDA. OK, it’s not that easy, but I couldn’t figure out how to spell anything with those letters.
Location: You need to decide if your garden is going to be something you want to see every time you look out your window, or view from your deck as you smoke your cigar at the end of a satisfying gardening day…or something that is more practical than beautiful, and therefore something that you might want to have on a side of the house where it doesn’t block an already enjoyable view.
Sun: Where you put your garden must depend on the sun. You may think you have the perfect place for a garden bed, but if it doesn’t get a full day’s sun, you can pretty much forget about growing those amazing tomatoes you drool over when you go to the local farm stand. You can always shade your garden if there’s too much sun…it’s highly unlikely you’re going to set up a bank of klieg lights if you don’t have enough.
Size: In the beginning, this may be tougher than it seems. If you’ve got an old-fashioned garden envisioned in your mind, with long rows of veggies 2 or 3 feet away from each other, you’re going to need a huge space, which means huge work. If you go with the method that I suggest: small (8-foot by 4-foot) raised beds with intensive planting, not only are you going to need a lot less space, you’ll find that you’re requiring a lot less work to get the same results. I use the Square Foot Gardening method originated by Mel Bartholomew many years ago, and I’ve never had a reason to change. I get the most food in the least amount of space. (www.squarefootgardening.com)
Distance: This means the distance from all those tools and your water source. Sure, you may be pretty damn excited about your garden in the beginning, and you’ll happily drag water 400 feet to your remote garden location…until about June. Then you’ll start making every freaking excuse under the planet to avoid watering or working in your garden…and that kind of defeats the idea. Unless you have some motorized means of hauling all of your tools and buckets out there, try to locate your garden near a garage or shed and a water source so you spend more time in your garden and less time going back and forth to your garden.

Access: Make sure you pick a place that you can easily get to. If your garden requires that you go through an archway or similar structure, you may not be able to fit certain tools, bags of peat moss, wheelbarrows, or even your own fat ass at certain times.

These are the basics to setting up properly. I have 6 raised beds that measure 8-by-4 feet, giving me a total of only 192 square feet, and yet I grow more veggies in that space that my family of 3 can possibly eat. The idea is to get more vegetables per square foot of gardening space, not per plant. When you plant things closer and more intensely, you will get better results with less work and cost. And if you can time it so that you have new plants ready to take the place of those that have been harvested, you’ve got more harvests in even the shortest of seasons. But that’s a discussion for another time.

That’s how the saying goes here in New England. I’ve sown my peas in my garden as soon as the soil can be worked in the spring for years with great success. In addition to peas, you can sow arugula, broccoli raab, radishes and onions. Sprouting the peas indoors before sowing by placing them on a moist paper towel for a days or two can speed the process, but I usually just sow them directly.

peas

I also start some seedlings early indoors, including tomatoes. These will go under grow lights for several weeks until the weather outside is warm enough for them to be transferred to my unheated greenhouse.

seedlings


Join me on Saturday, March 29th for “The Rescue,” now in its 7th year. Great drinks, tasty food bites and auctions all to help the Providence Animal Rescue League. The VIP Reception features a bourbon tasting this year. And the food bites are provided by some of the best restaurants in Rhode Island.


rescue image compressed


PARL does great work, and they need your help. All the details of the event are here:

http://www.parl.org/news-events/rescue


20121220-172330.jpg

For me, fine spirits are the best gift for the holidays. You can go with some aged rums…sipping tequilas…or classic cognacs. And then there’s the whole list of liqueurs…sweets for the end of the meal or a key ingredient in a flavorful cocktail. Here’s my list of favorite bottles…

Kelt XO Cognac: What makes this cognac special is that it leaves the Cognac region of France in barrels and gets loaded onto ships that travel the world for months at a time. The barrels of cognac mellow, as they slowly rock back and forth in the ship’s hold out in open seas, much like they did hundreds of years ago before we loaded pallets of product onto cargo planes. The ships then return to Cognac, where the spirit is unloaded and bottled. The result is an exceptionally smooth cognac that is still my favorite to date. What’s really cool is that each bottle has a summary of what ship it was on and where it traveled. The VSOP is great, but the XO is outstanding. And they say it makes a difference if the ships go around the world clockwise or counterclockwise!
Diplomatico Reserva Exclusiva Rum: If you’ve got a friend that likes sipping rum, this takes it to a whole new level. Made in Venezuela, it has a sweetness that you won’t want to mix…on the rocks is perfect. I have turned more friends on to this rum in the last couple of years than any other spirit I’ve discovered. Thanks to Jeff and Geremie, owners of Fluke restaurant in Newport, Rhode Island, for giving me my first sip of this wonderful rum years ago.

Jose Cuervo Reserva de la Familia tequila: I am not a fan of Jose Cuervo tequila in general. If all you want is a reposado or anejo, there are so many other better ones out there: Don Julio, Don Eduardo, Corazon, and Sauza Tres Generaciones just to name a few. And for silver, nothing beats Patron. But this top-of-the-line Cuervo is excellent, and you pay the price for the designer box as well as the tequila. Worth every penny.

St Germaine: a sweet liqueur crafted from hand-picked Elderflowers that grow in the Alps, and featured in an excellent house drink called The Elixir at Cooke and Brown Public House in Providence, Rhode Island, featuring Irish whisky, St Germain, honey, lemon and bitters.

Bols Genever: First made in Holland in 1575, this is the stuff the British fell in love with, tried to copy, and then shortened the name of their resulting product and called it “gin.” But it’s better than gin. Many a great cocktail starts with this key ingredient. One of my favorites is a take on the classic Negroni: combine 1.5 oz Bols Genever, 1 oz Gran Classico, and .5 oz Punt e Mes.

Coole Swan: Imagine a Bailey’s that tastes like melted vanilla ice cream, and you sort of have an idea of the flavor of this terrific cream liqueur. It’s a key ingredient in my espresso martinis. Here’s my recipe: 3 oz Belvedere vodka, 3 oz freshly brewed espresso, 1.5 oz Kahlua and 1.5 oz Coole Swan. Mix all ingredients in a shaker with ice. Shake vigorously. Makes 2 martinis. You will never drink another espresso martini as long as you live!

Rumchata: Horchata is a very popular drink in Hispanic countries. It comes from many ingredient combinations, but one of the most popular is rice, vanilla and cinnamon. Imagine a liquid version of rice pudding and you sort of get the idea. So if you add rum to it…you get a liqueur unlike anything you’ve had before. Very tasty.

Castries: This creamy liqueur takes its name from the capital city of the island of St Lucia….and it surprises me that it took this long for someone to come up with a peanut flavored liqueur. Sure, there are other nut liqueurs: almond liqueurs, like real Amaretto (not Disaronno, which is made from peach or apricot pits)…and hazel nut liqueurs like Frangelico. But this one is very different. It’s creamy, not clear, and delicious.
Sortilege: This liqueur made from Canadian whisky and maple syrup is the definition of liquid dessert. It’s hard to describe how good this stuff is. All I can say is: once you open it, it will vanish very quickly. I haven’t poured it on pancakes yet, but some hungover morning I will!
Cheers!
Gooseberries grow on a bush that can get anywhere from 3 to 10 feet tall, the branches having sharp spines on them, making picking the berries a bit of a challenge. Berry colors are usually green, though there are red and even purple varieties. They feature a skin on the outside much like a grape, and flesh with seeds on the inside. But they’re not super sweet…just sweet and tart enough.

Gooseberries are used mostly in desserts, but in some countries, like Portugal, people mix gooseberry juice with soda, water or even milk to make a popular beverage.


I’ve always enjoyed gooseberries simply straight off the vine. My Mom had several gooseberry bushes in her yard, and the early ripening fruits were a special treat in my childhood.
 
Moving to Rhode Island 20 years ago, I had hoped that I could grow my own gooseberry bushes someday. But unfortunately, a disease called white pine blister rust made that impossible. The way white pine blister rust survives is by traveling back and forth from 2 host species. One of them, obviously, is the white pine. The other is…well, the family of plants that gooseberries belong to: Ribes. (Currants belong to this family of plants as well.) So, the logic was that if you don’t plant a gooseberry near a white pine, the rust has nowhere to go and never gets past its first of 5 stages. You literally could not plant a gooseberry within a few miles of the nearest white pine, which for Rhode Island meant nowhere! And although most states got rid of this ban back in the 1960’s, Rhode Island kept it on the books for many more years. (Part of the problem is that many gardening catalogs and websites have not updated this information and still refuse to ship gooseberry plants to Rhode Island.)
 
But recently, the ban was lifted! I visited my pal Rick at Peckham’s Nursery in Little Compton, RI and I saw gooseberry bushes sitting there, just waiting to be bought. I scooped 2 up immediately and planted them in my yard. Rick explained that the ban on gooseberries had been lifted, in part because the disease was no longer a threat, and also because new varieties of gooseberries have been developed that are immune to white pine blister rust.
 
So the next time you see a local farmstand with a basket of funny-striped grapes, look again. It may just be a basket of gooseberries…a treat that we can now all enjoy again.