Archive for the ‘Southern New England’ Category

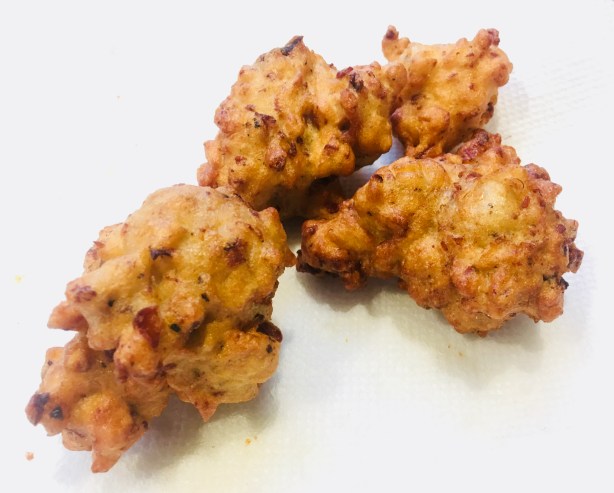
Good news if you’re on a gluten-free diet. These fritters can be made GF! And they’re delicious.

I have both recipes–gluten-free and the original–below!

They key ingredient in making a good fritter batter is beer. But until recently, there weren’t many gluten-free beers to choose from…and the ones that were out there tasted like crap. All that has changed.

Now you can pretty much find a gluten-free craft beer in every state, and there are several regional gluten-free beers as well. Easy enough to find: just go to a good beer store and ask. They almost always carry a couple of brands.

Gluten-free beers can be divided into 2 types: truly gluten-free: brewed with gluten-free ingredients and safe for Celiacs to drink…and gluten-reduced: beers that are brewed with ingredients containing gluten, then had an enzyme added to reduce  the gluten. These are fine for those that have an intolerance to gluten, but are not Celiac. Read the labels!


The beer that I used for my recipe is a beer that they say  is “crafted to remove gluten,” meaning there’s still a small amount left in there.

Ultimately, if gluten is not an issue for you, follow the recipe at the bottom of this page. It’s my original, and not only uses a tasty lager full of gluten, but also a special fritter flour, which can be found in many stores.

However, if you have to “live the gluten-free live,” and you’ve told yourself you can never have another fritter, I have good news for you: you can…and they’re delicious! This is a large batch, so feel free to reduce it if needed.


In making this recipe, I tested 3 types of gluten-free flour: Cup4Cup all-purpose flour, Bob’s Red Mill GF Baking Flour, and a Canadian brand (not available here yet.) Cup4Cup (far left) was the clear winner for taste and texture of the fritter.


1 lb. all-purpose gluten-free flour (I like Cup4Cup)
2 lbs. frozen or fresh mussels
1/2 cup (or more) gluten-reduced lager beer (I used Omission)
oil for frying (I stay away from canola, but use what you like)


Pour an inch of water in the bottom of a pot, and place a strainer on top. Pour the mussels, fresh or frozen, onto the strainer and cover the pot. Set the heat on high and steam the mussels until they’re cooked, about 5 minutes. If you’re using fresh mussels, throw out any of the ones that didn’t open. Frozen mussel meats (without the shell) are also available in many areas. They work with this method, too.


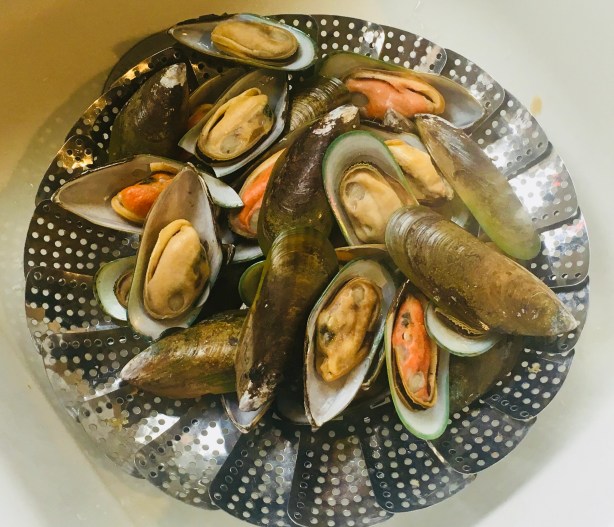
Steamed New Zealand green-lipped mussels. Available frozen in many stores. Get the plain ones, not the ones that already come with sauce.


Remove the meats from the shells, and toss them in a food processor. Give them a quick chop…not too fine, because you want to see and taste them in the fritter.

Save the “mussel juice,” the water in the bottom of the pot. It’s got lots of mussel flavor.

Place the flour in a large bowl. Add the chopped mussels. Add a 1/2 cup of the mussel juice and a 1/2 cup of the beer. Mix thoroughly, using a fork or your hands, until you get a batter that’s a bit gooey, but not really wet. You might need to keep adding small amount of broth, beer or flour to get just the right consistency. Once you’ve done that, let the batter rest for 10 or 15 minutes. Keep it at room temperature, and do not stir again! If you need to wait a while before frying, cover the bowl with a wet towel.

In a heavy pan or a fryer, heat the oil to 350 degrees.


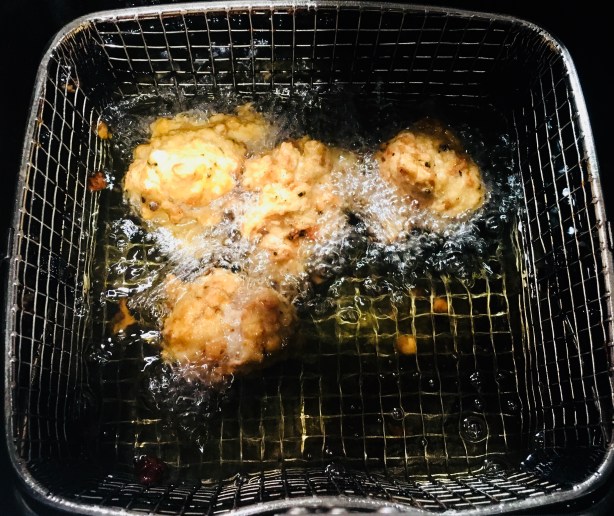
Once the oil is hot, take small meatball-sized globs in your hands and gently drop them into the oil. Don’t fry too many at once or the oil temperature will drop quickly. Fry them until they’re golden brown and cooked all the way through. Drain the fritters on paper towels, and season them immediately with salt and a little pepper.

The dipping sauce recipe I have listed at the bottom is not gluten-free. But most tartare-type sauces usually are, and are equally delicious.

Of course, you can make fritters with anything, from mussels to shrimp to lobster!


You’d never know they were gluten-free!


Here’s the original recipe, full of glorious gluten!

It was a fall afternoon in Newport, Rhode Island, at the now-defunct Newport Yachting Center’s annual Oyster Festival. We’re gorging on freshly shucked oysters and clams, boiled shrimp, and…what have we here? I never heard of a mussel fritter before, but once I took a bite, there was no turning back.

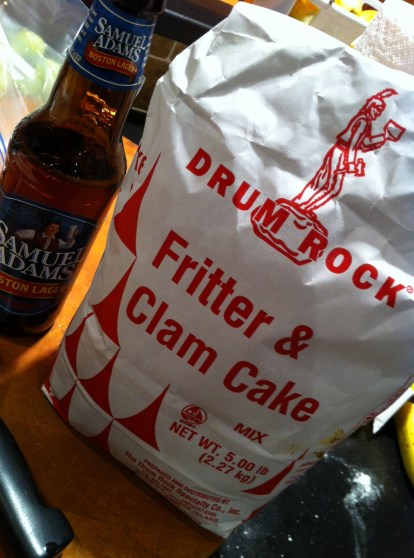
They couldn’t be easier to make, but it is crucial to have the right fritter batter. And that starts with a Rhode Island product called Drum Rock fritter mix. If you live in New England, you can find it in just about any seafood department at Whole Foods. If you live further away, you can check out their website (www.drumrockproducts.com) or try your luck with a local brand of fritter mix.


fritter ingredients


If you’re using fresh mussels, be sure to clean them well and remove the beards. Steam them in a pot over a small amount of water. As they open, they will release their flavorful juices and you want to save every drop of that broth for the fritters. Here in New England, frozen mussel meats are available in some seafood stores. All you need to do is thaw them, steam them saving the broth, and you’re ready to go.

For the fritters:
1 lb. fritter mix
2 cups cooked mussel meats
1/2 cup mussel broth (saved from steaming mussels)
1/4 to 1/2 cup good quality beer (I use Sam Adams Boston Lager)
Oil for frying


Steam the mussel meats until they’re just cooked. Remove the mussel meats, and reserve 1/2 cup of the broth. Pulse the mussel meats in a food processor, but leave ’em chunky…or chop by hand.

Put the fritter mix in a large bowl. Add the mussel meats, mussel broth, and beer. Stir gently until just mixed. Let it sit for 10 to 15 minutes and do not stir again. (If you’ve got guests coming, you can prepare up to this part ahead of time, covering the bowl with a wet towel, and leaving it at room temperature.)

Using a thermometer, heat the oil in a deep pan to 350 degrees, and using a small spoon or scoop, drop the fritters in the hot oil, turning gently, cooking 3 to 4 minutes until golden.

Drain them on paper towels, and season with salt and pepper immediately. Serve right away!


IMG_3043


An easy, delicious dipping sauce:
1 cup mayonnaise
1/4 cup Ponzu sauce

The perfect dipping sauce for these mussel fritters is made from two ingredients: mayo and Ponzu sauce, a citrus-based soy sauce. Combine both ingredients in a bowl. Keep it in the fridge until you’re ready to use it.

Chourico is as important to the Portuguese as bacon is to us Lithuanians. Here in Southern New England, they pronounce it “sha-rees,” not “chaw-reezo,” like you hear on TV!

I was joking with a friend the other day that if I won the lottery, I could buy a lifetime supply of chourico at my favorite store: Mello’s, in Fall River, Mass. His response was: “Is there such a thing as a lifetime supply of chourico?!”

Good point!

If you’ve had really great chourico, you’re always looking for new ways to include it in your cooking. Inspired by chef Chuck Hughe’s recipe, this is a great chourico appetizer that’s really easy to make. Whip up the arugula pesto ahead of time and keep it in the fridge. Then when guests come, just slice the chourico, sauté it in a pan until brown, and serve.


fullsizerender

3 cups fresh baby arugula
1/2 cup walnuts
1/2 cup olive oil
1 clove garlic
1 teaspoon salt
1/4 teaspoon pepper
1/2 cup + one tablespoon grated Parmigiano Reggiano
2 lbs. chourico, sliced into 1/2″ pieces

Combine the arugula, walnuts, olive oil, garlic, salt, pepper and the 1/2 cup of cheese in a food processor or blender and blend until smooth. Set the remaining tablespoon of cheese aside for garnishing later.


fullsizerender-1

Remove the casing from the chourico and slice it into 1/2″ thick pieces. Sauté the chourico slices in a pan until both sides are caramelized and golden.

Place the chourico on a plate, topping with some of the pesto. Sprinkle a touch of the grated cheese to garnish. Serve immediately, while the chourico is still hot!


fullsizerender-3

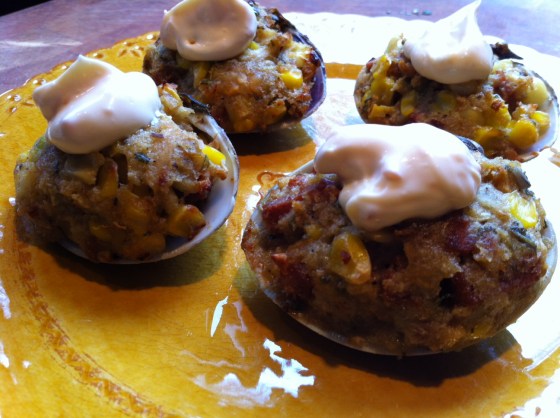
Stuffies, or stuffed clams, are a very personal matter here in Southern New England. There are as many stuffies recipes as there are chowder recipes, and everyone thinks they’ve got the best one. Most stuffies that I’ve had in restaurants, like most meatballs I’ve had, have too much bread and not enough of the good stuff.

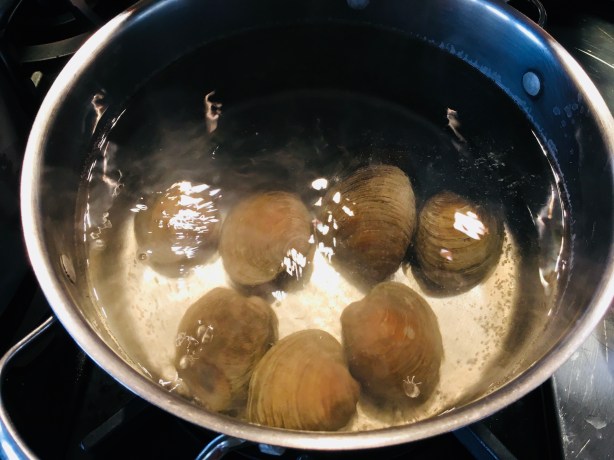
I use medium-sized clams for this recipe and not the traditional quahog, a large clam often used in chowders that I find to be too chewy. Dropping the clams in hot water in the beginning helps make opening the clams a lot easier.

Just 30 seconds in boiling water is all it takes.

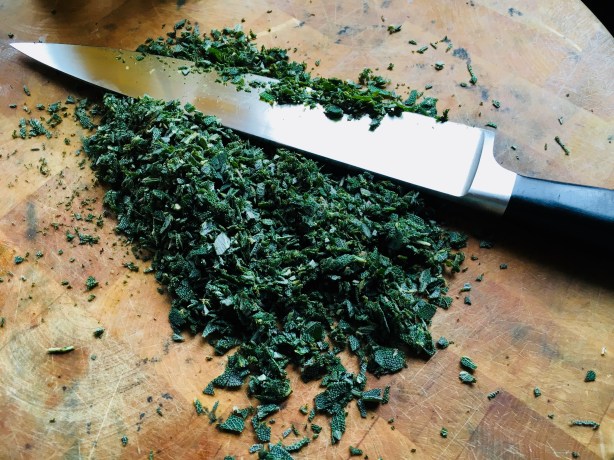
This recipe requires quite a bit of fresh sage, which can be expensive at the supermarket. So I grow sage in my garden, using it throughout the season, then snipping as much as I can at the end of the growing season to store it in freezer bags for winter use. I’ll even measure out 1 1/4 cups of fresh sage leaves (what I need for each batch of stuffies), then place that amount in the freezer bag, so I don’t need to measure later.

Freezing the sage makes it easier to chop finely later on.

I use Portuguese chourico (since I live near Fall River and New Bedford, Massachusetts, the Portuguese capitals of America), and I think their flavor is best.

This recipe makes a lot of stuffies, but they freeze well so you can have them when you want.

This recipe is gluten-free…and you’ll never be able to tell the difference! But if that doesn’t matter to you, use toasted Portuguese bread instead of gluten-free bread.

I don’t like peppers in my stuffies (or my crab cakes), so I leave them out. But if you do, feel free to add them to the recipe.

stuffies

4 dozen medium neck clams
1.5 pounds chopped chourico, skin removed (I use Mello’s from Fall River, Mass.)
3 onions, finely chopped
3 tablespoons garlic, finely chopped
3 cups frozen or fresh corn kernels
3 cups toasted and coarsely ground bread (I use Udi’s Soft & Hearty Whole Grain bread to keep it gluten-free)
3/4 cup chopped fresh oregano (or 1 tablespoon dried)
1 1/4 cups chopped fresh sage (don’t use dried)
Salt and pepper
Butter
Sambal chili paste
Mayonnaise

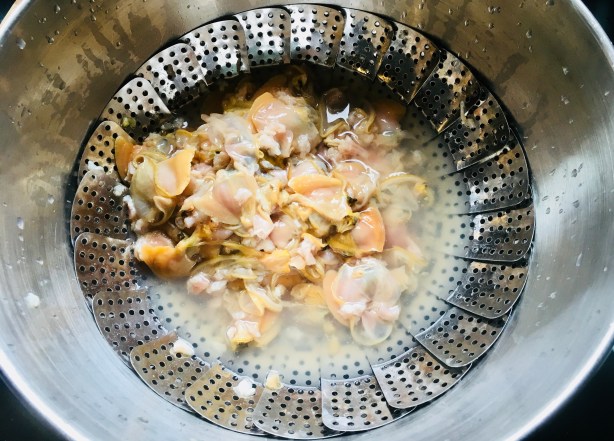
In a large pot of boiling water, drop the clams in, about a dozen at a time. Remove them after about 30 seconds, before they open. Place them in a bowl to cool. Do this with all the clams.

Open the clams with a clam knife over a bowl with a strainer, making sure you save all the liquid from the clams. Put the clam shells to the side. Throw away any broken shells, and wash the empty shell halves thoroughly, making sure there are no broken pieces.

I use a strainer to keep the sediment away from the clam meats.

Take the clam meat pieces out of the strainer, leaving the clam juice behind in the bowl. Move the clam meat to a cutting board or food processor and chop them to medium-fine. Set them aside.

I pour the clam juices carefully from the bowl to tall drinking glasses, being careful not to let the sediment get in. Then, after some time, I pour off the clam juice from the glasses, leaving even more of the sediments behind. I find that the tall glasses make it easier to see the sediments, and maximize the amount of clam juice I get.

I let the clam juices sit in their tall glasses for a while, so that even more sediments get left behind.

In a large frying pan, add the olive oil, onions, and chourico and cook them on medium heat for a few minutes. Add the oregano and sage and cook a few more minutes. Add the corn and cook a few more minutes, a little more if the corn was frozen. Add the chopped clams and stir, cooking for a few more minutes. Add the breadcrumbs a little at a time until you have a nice balance of bread and other ingredients. Add the clam juice a little at a time as well, so that you can add all the breadcrumbs, but the mix isn’t runny. There’s lots of flavor in the clam juice, so use as much as you can! Season it all with salt and pepper.

Remove the pan from the heat and fill the empty clam shells with the stuffing.

At this point, you can freeze the clams. I put them on small sheet pans in the freezer until they harden, then I wrap them 6 at a time, and put them in freezer bags. Keep them frozen!

Ready for the freezer!

To make the aioli, mix the mayonnaise and Sambal in a bowl, to taste. Sambal is hot, so a little goes a long way. Keep it covered and refrigerated.

When you’re ready to bake, remove the clams from the freezer and place them on a sheet pan in a pre-heated 350 degree oven. Top each clam with a small ¼” square piece of butter. Bake them about 15 minutes, until the clams are sizzling and light brown. Top each with a small dab of aioli.

Butter and cheese. Can anything be better?

It’s especially great when asparagus is in season, growing in my garden, like right now.

This is a great side dish with any main course like a big slab of meat, and has special meaning to me because my cousin first introduced me to asparagus with this recipe when I was just a kid. She passed away many years ago, but I think of her every time I make this simple but delicious dish.

You can use almost any grated “parmesan” cheese, but nothing beats real Parmigiano Reggiano that you freshly grate yourself. Whatever you use, please, just don’t use the junk that comes in a can.


image

1 lb. fresh asparagus spears
1 tablespoon unsalted butter
2 tablespoons extra virgin olive oil
3/4 cup grated Parmigiano Reggiano cheese
sea salt and freshly cracked black pepper


The easy way to trim an asparagus spear is to grab the thicker end between two fingers and bend it. It will snap at the point where the tough part ends and the softer, edible part begins. I toss the bottoms into my compost pile.

I heat the butter and oil together in a pan and then add the asparagus spears, cooking over medium heat for about 5 minutes, until al dente. (You don’t want them mushy.)

While the asparagus is still in the pan, I sprinkle the Parmigiano Reggiano on top, letting it melt a bit. I season with sea salt (I prefer Fleur de Sel) and freshly cracked black pepper.


I live one town over from Fall River, Massachusetts, and just down the road from New Bedford, Massachusetts, two thriving proud Portuguese communities. In middle school, my daughter had to take mandatory Portuguese language classes. We’ve got dozens of authentic Portuguese restaurants in the area, and even a well-stocked supermarket with its own bacalhau (salt cod) room: Portugalia Marketplace, in Fall River.

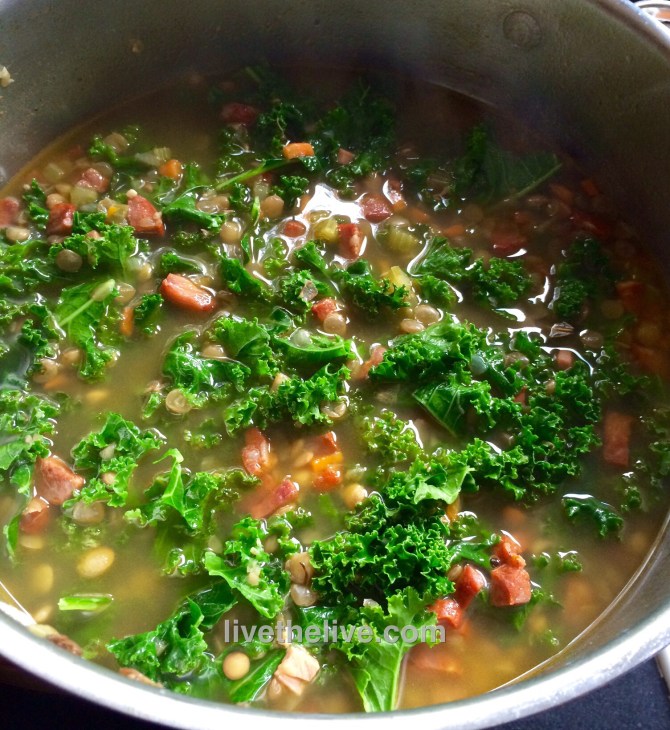
So when I first posted my recipe of Portuguese kale soup, I was told by many Portuguese friends that my soup wasn’t authentic so I couldn’t call it that. Fair enough. After all, my soup has far less carbs (no potatoes or pasta), fewer spices, and it uses homemade stock instead of water. It may not be Portuguese, but it’s full of flavor.


My version of the classic Portuguese kale soup.

My version of the classic Portuguese kale soup.


4 cups home-made chicken or beef stock
4 cups water
1 cup lentils, rinsed in cold water
1 onion, finely chopped
1 carrot, finely chopped
2 stalks celery, finely chopped
1 clove garlic, through a press
1 lb. Portuguese chourico, peeled and chopped into small cubes 
1 large bunch organic kale
salt and pepper

Add the stock and water to a large pot. Heat until boiling. Add the lentils.

In a saucepan with a little olive oil or bacon fat, sauté the onions, carrots, celery, and garlic for a few minutes. Add the chopped chourico and sauté a few minutes more. Add the contents of the sauté pan to the pot.

Wash and de-stem the kale, tearing the leaves into smaller pieces. Add the leaves to the pot and stir. The stems go in your compost pile. (You can also use them in a juicer.) Kale is always on the “dirty dozen” list of vegetables with large amounts of pesticides, so I always buy organic.

Cook the soup until the lentils are al dente. Taste and season for salt and pepper before serving.


I recently returned from a trip to New Orleans, where I had oysters every which way: Bienville, Rockefeller, char-grilled, baked, and, of course, raw. But here in New England, we’re pretty proud of our oysters, and Rhode Island alone, we’ve got a wide variety to choose from. And we don’t just buy ’em and slurp ’em down: we go out and dig our own…and we have a different buck-a-shuck oyster bar to go to for any given day of the week.


oysters

Fresh oysters deserve an amazing cocktail sauce, and my recipe kicks butt: lots of horseradish, lots of flavor, and a secret ingredient: vodka. Not only does it give it a kick, it keeps it from freezing solid, so I can keep the cocktail sauce in the freezer until I need it. Then, I just scoop it out like sorbet.

2 cups ketchup
4 tablespoons prepared horseradish
1 tablespoon fresh lemon juice
1 teaspoon Worcestershire sauce
1/2 teaspoon Frank’s Red Hot, or other hot pepper sauce
5 grinds of fresh black pepper
1/4 teaspoon salt
1 teaspoon good quality vodka, like Tito’s

Combine all the ingredients. Store in a tight plastic container in the freezer.


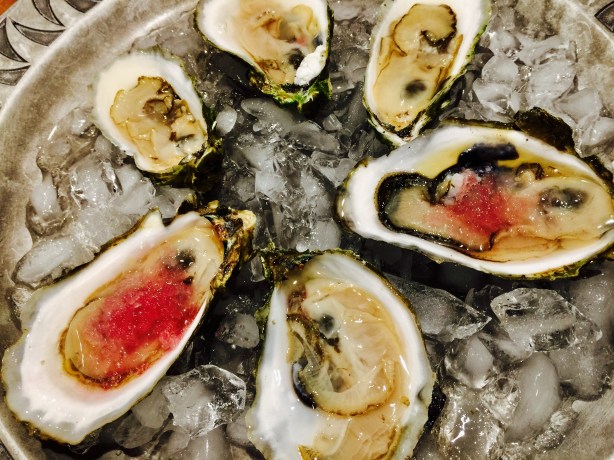
Fresh shucked oysters with pickled red onion ice.

Freshly shucked oysters with pickled red onion ice.


When I’m in Portland, Maine, I visit one of the best oyster bars in the country: Eventide. Besides some wickedly creative dishes, they consistently have a fantastic variety of fresh oysters to choose from. And they offer a variety of “accoutrements” to go with them: anything from a red wine mignonette to kimchee ice. My favorite is the pickled red onion ice. All you need is a shot glass with a freshly shucked oyster inside, a half-shot of chilled vodka on top, and some pickled red onion ice, and you’ve got the best oyster shooter on planet Earth. I even suggested the shooter to the manager at Eventide. It has yet to make it to the menu. (But I remain hopeful!)


An oyster shooter with pickled red onion shaved ice. Bottoms up!

An oyster shooter with pickled red onion ice. Bottoms up!


I’ve managed to come up with a pretty good version of the pickled red onion ice at home, and I serve it alongside my cocktail sauce.

2 large red onions
1 tablespoon sugar
3 tablespoons apple cider vinegar


Peel and quarter the onions. Drop them in a medium-sized pot and cover with about a quart of water. Bring it to a boil and cook it down until it has reduced to a cup of concentrated onion water after straining.

Bring the strained onion water back to the stove, and on medium heat, add the sugar and vinegar, stirring. When the sugar dissolves, remove it from the heat and let it cool to room temperature before pouring it into a container and placing it in the freezer.

When it’s time to eat oysters, remove the block of red onion ice from its container, and, using a fine cheese grater, shave the ice over the top of the freshly shucked oysters and devour immediately! (It melts quickly.)


fullsizerender-5


Here in Southern New England, the most popular brand of chicken salad is called Willow Tree. They’ve made it for over 50 years, and people crave it like crack. And it’s good: moist and “mayonnaisey”.

But I’ve never been a fan of “secret” ingredients, and Willow Tree is full of ’em, so my task was to make something that was as good as Willow Tree, with known ingredients. I got close…real close! As always, I use pastured chicken and organic veggies when possible. And since I use chicken breasts only, I found that boiling the breasts in stock instead of water keeps the meat more flavorful.

Another option: I like to roast a whole chicken, devouring the dark meat, then using the breast meat for the chicken salad. I use the carcass and scraps for chicken stock. Nothing goes to waste!

image

1.5 lbs boneless skinless chicken breasts
4 pints salt-free chicken stock (I use home-made)
1/2 cup mayonnaise (I live on Hellman’s)
1/4 cup finely chopped celery
2 tablespoons finely chopped Vidalia onion
1 teaspoon light brown sugar
1/2 teaspoon salt
1/8 teaspoon granulated garlic
1/8 teaspoon black pepper

Heat the chicken stock in a large pot. Bring it to a boil and add the chicken breasts. Bring it to a boil again, then simmer uncovered for about 7 minutes.

Turn the heat off, cover the pot with a lid, and let the breasts sit in the pot for 10 minutes to cool a bit. After 10 minutes, remove the breasts to a cutting board. Save the chicken stock for another use, like soup. (See below.)

Meanwhile, in a large bowl, combine the mayonnaise, celery, onion, brown sugar, granulated garlic, salt and pepper. Mix them thoroughly to combine.

When the chicken has cooled, shred or chop the breast meat into bite-sized pieces and then transfer it into the bowl with the mayonnaise mixture. Mix thoroughly and chill before serving.

I love my chicken salad on a Martin’s Long Roll.


BONUS: I don’t waste the chicken stock left over in the pot. I chop some carrots, celery and onion and throw them in there. I reserve some of the chicken breast meat–just a bit–and throw it in there, too. I add a little salt and pepper, and a pinch of dried Bouquet Garni. I bring it to a boil, then reduce the heat to a simmer and cook until the veggies are al dente. Pasta or potatoes optional. Makes an awesome chicken soup!

If you want to freeze the soup, I would leave the potatoes or pasta out, adding them only when reheating the frozen soup. That keeps them from getting mushy.

Despite almost universal opposition to the cruel way calves are treated, the Humane Society says the veal industry shows little signs of changing. That’s why many people simply refuse to eat veal. I was one of them.

The veal industry is a by-product of the dairy industry. To get the dairy cows to produce milk, they are impregnated every year. Half of their offspring are male, no use to the dairy business, and those are the calves that become veal.

I said I was one of the people who didn’t eat veal. What changed was my source. A few years ago, Sweet and Salty Farm (www.sweetandsaltyfarm.com), a dairy farm down the road from me in Little Compton, Rhode Island, began selling their own line of yogurt and cheese. And like most dairies, when calves are born, they have no use for the males. But rather than taking them away from their mothers and caging them for their short lives, they allow the calves to stay with their moms, nursing for up to four months before weaning. Then they graze in the fields by their mothers’ side, living a stress-free life. And when the time finally comes, they are dispatched humanely.

The result is incredible grass-fed veal I don’t feel guilty about eating: a rich, red in color…nothing like beef and a far better option than conventional veal. I also buy the veal bones from the farm to make a rich, flavorful veal stock, roasting the bones on a baking sheet with onions, carrots and celery…then moving them all to a large pot of water that cooks for 24 hours.

Traditionally, veal saltimbocca consists of veal medallions rolled with prosciutto and sage leaves. Often it is served with a marsala sauce. I got rid of the marsala–too sweet–and substituted a chardonnay. I added fontina cheese. And a guest’s aversion to spinach gave me the option to use kale…with bacon, of course!

By the way, if you’re not lucky enough to have a farm that humanely raises veal (or you’re still queasy about veal in general), this recipe works with chicken breasts, too.


img_0087

1 1/2 lbs. grass-fed veal, pounded thin and cut into medallions about 3″ around
1/2 lb. prosciutto, sliced paper-thin
1/2 lb. fontina cheese, sliced thin
1 cup all-purpose flour
1 teaspoon salt
1/2 teaspoon pepper
olive oil
butter
2 cups veal stock
1 cup un-oaked white wine (I like to cook with Alice White chardonnay)
1 tablespoon finely chopped fresh sage
1/2 yellow onion, finely chopped
12 oz. baby portobello mushrooms, thinly sliced
1 lb. spaghetti
2 bunches organic kale
3 strips cooked bacon, finely chopped

Place the veal cutlets on a cutting board between a few layers of plastic wrap. Pound the cutlets to about 1/8″ thickness. Cut them into pieces about 3″ around, which will make them easier to handle.

Place the flour in a bowl and add the teaspoon of salt and 1/2 teaspoon of pepper. Mix well.

Heat a couple of tablespoons of olive oil and butter in a pan. Drop the veal medallions in the flour and coat both sides of the meat, shaking off any excess. Carefully lay the veal in the pan and cook the veal until it’s just barely browned. You don’t want to cook it all the way through. When the medallions have cooked, place them on a baking sheet. Cook the medallions in batches, adding more olive oil or butter to the pan if needed.

When you’ve cooked all the medallions, use the same pan to sauté the onion until translucent. Add the mushrooms and cook them down. (You can add a little of the veal stock to help the mushrooms release their liquid.) Add the rest of the veal stock, wine and sage. Cook over medium heat until it’s reduced by half. If the sauce looks a bit thin, make a quick roux in a separate pan by heating equal parts melted butter and flour until it forms a paste. Stir this paste into the sauce, making sure there are no lumps. Set the sauce aside.

Back to the veal medallions: place a piece of prosciutto on top of each medallion, and then a slice of fontina on top of that. Keep the baking sheet with the medallions in a warm (150 degree) oven.

Boil the spaghetti in well-salted water until al dente. Strain and toss in a bowl with unsalted butter. Season with a bit more salt.

Hand-tear the kale and remove all the tough, woody stems. Wash the kale thoroughly in cold water, making sure you get all the dirt and sand that can be caught in its leaves. Heat some olive oil (and bacon fat, if you have it!) in a pan, and toss in the chopped bacon, just to warm the bits up. Working in batches, place a handful of kale in the pan, and when it wilts down a bit, place another handful in, and so on until you’ve got all the kale in. Season with salt and pepper, and keep tossing the kale until it has wilted to its desired doneness. (I like it to still have a bit of a crunch.)

When you’re ready to serve, turn the oven on broil and place the baking sheet with the veal medallions on the top rack. You want the cheese to melt, but you don’t want it to burn, so keep an eye on it!

Serve a few medallions on the plate, with spaghetti, kale and sauce on the side.

Good news if you’re on a gluten-free diet. These fritters can be made GF! And they’re delicious.

I have both recipes–gluten-free and the original–below!

They key ingredient in making a good fritter batter is beer. But until recently, there weren’t many gluten-free beers to choose from…and the ones that were out there tasted like crap. All that has changed.

Now you can pretty much find a gluten-free craft beer in every state, and there are several regional gluten-free beers as well. Easy enough to find: just go to a good beer store and ask. They almost always carry a couple of brands.

Gluten-free beers can be divided into 2 types: truly gluten-free: brewed with gluten-free ingredients and safe for Celiacs to drink…and gluten-reduced: beers that are brewed with ingredients containing gluten, then had an enzyme added to reduce  the gluten. These are fine for those that have an intolerance to gluten, but are not Celiac. Read the labels!


The beer that I used for my recipe is a beer that they say  is “crafted to remove gluten,” meaning there’s still a small amount left in there.

Ultimately, if gluten is not an issue for you, follow the recipe at the bottom of this page. It’s my original, and not only uses a tasty lager full of gluten, but also a special fritter flour, which can be found in many stores.

However, if you have to “live the gluten-free live,” and you’ve told yourself you can never have another fritter, I have good news for you: you can…and they’re delicious! This is a large batch, so feel free to reduce it if needed.


In making this recipe, I tested 3 types of gluten-free flour: Cup4Cup all-purpose flour, Bob’s Red Mill GF Baking Flour, and a Canadian brand (not available here yet.) Cup4Cup (far left) was the clear winner for taste and texture of the fritter.


1 lb. all-purpose gluten-free flour (I like Cup4Cup)
2 lbs. frozen or fresh mussels
1/2 cup (or more) gluten-reduced lager beer (I used Omission)
oil for frying (I stay away from canola, but use what you like)


Pour an inch of water in the bottom of a pot, and place a strainer on top. Pour the mussels, fresh or frozen, onto the strainer and cover the pot. Set the heat on high and steam the mussels until they’re cooked, about 5 minutes. If you’re using fresh mussels, throw out any of the ones that didn’t open. Frozen mussel meats (without the shell) are also available in many areas. They work with this method, too.


Steamed New Zealand green-lipped mussels. Available frozen in many stores. Get the plain ones, not the ones that already come with sauce.


Remove the meats from the shells, and toss them in a food processor. Give them a quick chop…not too fine, because you want to see and taste them in the fritter.

Save the “mussel juice,” the water in the bottom of the pot. It’s got lots of mussel flavor.

Place the flour in a large bowl. Add the chopped mussels. Add a 1/2 cup of the mussel juice and a 1/2 cup of the beer. Mix thoroughly, using a fork or your hands, until you get a batter that’s a bit gooey, but not really wet. You might need to keep adding small amount of broth, beer or flour to get just the right consistency. Once you’ve done that, let the batter rest for 10 or 15 minutes. Keep it at room temperature, and do not stir again! If you need to wait a while before frying, cover the bowl with a wet towel.

In a heavy pan or a fryer, heat the oil to 350 degrees.


Once the oil is hot, take small meatball-sized globs in your hands and gently drop them into the oil. Don’t fry too many at once or the oil temperature will drop quickly. Fry them until they’re golden brown and cooked all the way through. Drain the fritters on paper towels, and season them immediately with salt and a little pepper.

The dipping sauce recipe I have listed at the bottom is not gluten-free. But most tartare-type sauces usually are, and are equally delicious.

Of course, you can make fritters with anything, from mussels to shrimp to lobster!


You’d never know they were gluten-free!


Here’s the original recipe, full of glorious gluten!

It was a fall afternoon in Newport, Rhode Island, at the now-defunct Newport Yachting Center’s annual Oyster Festival. We’re gorging on freshly shucked oysters and clams, boiled shrimp, and…what have we here? I never heard of a mussel fritter before, but once I took a bite, there was no turning back.

They couldn’t be easier to make, but it is crucial to have the right fritter batter. And that starts with a Rhode Island product called Drum Rock fritter mix. If you live in New England, you can find it in just about any seafood department at Whole Foods. If you live further away, you can check out their website (www.drumrockproducts.com) or try your luck with a local brand of fritter mix.


fritter ingredients


If you’re using fresh mussels, be sure to clean them well and remove the beards. Steam them in a pot over a small amount of water. As they open, they will release their flavorful juices and you want to save every drop of that broth for the fritters. Here in New England, frozen mussel meats are available in some seafood stores. All you need to do is thaw them, steam them saving the broth, and you’re ready to go.

For the fritters:
1 lb. fritter mix
2 cups cooked mussel meats
1/2 cup mussel broth (saved from steaming mussels)
1/4 to 1/2 cup good quality beer (I use Sam Adams Boston Lager)
Oil for frying


Steam the mussel meats until they’re just cooked. Remove the mussel meats, and reserve 1/2 cup of the broth. Pulse the mussel meats in a food processor, but leave ’em chunky…or chop by hand.

Put the fritter mix in a large bowl. Add the mussel meats, mussel broth, and beer. Stir gently until just mixed. Let it sit for 10 to 15 minutes and do not stir again. (If you’ve got guests coming, you can prepare up to this part ahead of time, covering the bowl with a wet towel, and leaving it at room temperature.)

Using a thermometer, heat the oil in a deep pan to 350 degrees, and using a small spoon or scoop, drop the fritters in the hot oil, turning gently, cooking 3 to 4 minutes until golden.

Drain them on paper towels, and season with salt and pepper immediately. Serve right away!


IMG_3043


An easy, delicious dipping sauce:
1 cup mayonnaise
1/4 cup Ponzu sauce

The perfect dipping sauce for these mussel fritters is made from two ingredients: mayo and Ponzu sauce, a citrus-based soy sauce. Combine both ingredients in a bowl. Keep it in the fridge until you’re ready to use it.

Stuffies, or stuffed clams, are a very personal matter here in Southern New England. There are as many stuffies recipes as there are chowder recipes, and everyone thinks they’ve got the best one. Most stuffies that I’ve had in restaurants, like most meatballs I’ve had, have too much bread and not enough of the good stuff.

I use medium-sized clams for this recipe and not the traditional quahog, a large clam often used in chowders that I find to be too chewy. Dropping the clams in hot water in the beginning helps make opening the clams a lot easier.

Just 30 seconds in boiling water is all it takes.

This recipe requires quite a bit of fresh sage, which can be expensive at the supermarket. So I grow sage in my garden, using throughout the season, then snipping as much as I can at the end of the growing season to store it in freezer bags for winter use. I’ll even measure out 1 1/4 cups of fresh sage leaves (what I need for each batch of stuffies), then place that amount in the freezer bag, so I don’t need to measure later.

Freezing the sage makes it easier to chop finely later on.

I use Portuguese chourico (since I live near Fall River and New Bedford, Massachusetts, the Portuguese capitals of America), and I think their flavor is best.

This recipe makes a lot of stuffies, but they freeze well so you can have them when you want.

This recipe is gluten-free…and you’ll never be able to tell the difference! But if that doesn’t matter to you, use toasted Portuguese bread instead of gluten-free bread.

I don’t like peppers in my stuffies (or my crab cakes), so I leave them out. But if you do, feel free to add them to the recipe.

stuffies

4 dozen medium neck clams
1.5 pounds chopped chourico, skin removed (I use Mello’s from Fall River, Mass.)
3 onions, finely chopped
3 tablespoons garlic, finely chopped
3 cups frozen or fresh corn kernels
3 cups toasted and coarsely ground bread (I use Udi’s Soft & Hearty Whole Grain bread to keep it gluten-free)
3/4 cup chopped fresh oregano (or 1 tablespoon dried)
1 1/4 cups chopped fresh sage (don’t use dried)
Salt and pepper
Butter
Sambal chili paste
Mayonnaise

In a large pot of boiling water, drop the clams in, about a dozen at a time. Remove them after about 30 seconds, before they open. Place them in a bowl to cool. Do this with all the clams.

Open the clams with a clam knife over a bowl with a strainer, making sure you save all the liquid from the clams. Put the clam shells to the side. Throw away any broken shells, and wash the empty shell halves thoroughly, making sure there are no broken pieces.

I use a strainer to keep the sediment away from the clam meats.

Take the clam meat pieces out of the strainer, leaving the clam juice behind in the bowl. Move the clam meat to a cutting board or food processor and chop them to medium-fine. Set them aside.

I pour the clam juices carefully from the bowl to tall drinking glasses, being careful not to let the sediment get in. Then, after some time, I pour off the clam juice from the glasses, leaving even more of the sediments behind. I find that the tall glasses make it easier to see the sediments, and maximize the amount of clam juice I get.

I let the clam juices sit in their tall glasses for a while, so that even more sediments get left behind.

In a large frying pan, add the olive oil, onions, and chourico and cook them on medium heat for a few minutes. Add the oregano and sage and cook a few more minutes. Add the corn and cook a few more minutes, a little more if the corn was frozen. Add the chopped clams and stir, cooking for a few more minutes. Add the breadcrumbs a little at a time until you have a nice balance of bread and other ingredients. Add the clam juice a little at a time as well, so that you can add all the breadcrumbs, but the mix isn’t runny. There’s lots of flavor in the clam juice, so use as much as you can! Season it all with salt and pepper.

Remove the pan from the heat and fill the empty clam shells with the stuffing.

At this point, you can freeze the clams. I put them on small sheet pans in the freezer until they harden, then I wrap them 6 at a time, and put them in freezer bags. Keep them frozen!

Ready for the freezer!

To make the aioli, mix the mayonnaise and Sambal in a bowl, to taste. Sambal is hot, so a little goes a long way. Keep it covered and refrigerated.

When you’re ready to bake, remove the clams from the freezer and place them on a sheet pan in a pre-heated 350 degree oven. Top each clam with a small ¼” square piece of butter. Bake them about 15 minutes, until the clams are sizzling and light brown. Top each with a small dab of aioli.