Posts Tagged ‘recipes’

Lamb seems to be one of those meats that people either love or hate. Growing up in a home where my Mom served it pretty often, and did a pretty good job of cooking it, I happen to love it, and actually crave it now and again.


I buy much of my meats from Cooks Venture, a company that humanely raises a special breed of chickens, and also sources high quality meats from all over the world.

When I saw a New Zealand boneless lamb shoulder roast on their website, I had to buy it. Though New Zealand lamb can be a bit gamey to many people, I love that flavor, and there is no better quality of lamb than that from the land of the kiwi.


I knew I wanted to marinate the roast, and there was no way the marinade would penetrate into the meat if it was rolled and tied like it came in the package. So I decided to cut the string that wrapped the lamb roast, and unroll it, so that every inch of that lamb would make contact with the marinade.

Tied…


Untied and unrolled.


Once I marinated the lamb overnight, I rolled it back up, retied it as best I could, and cooked it in a 350 degree oven until the roast registered 120 degrees on my meat thermometer: medium rare.

I finished the lamb on my outdoor grill over hardwood charcoal to get a little smokiness and char.

The marinade I used can be used for any cut of lamb you might want to cook. (I love the small lamb chops that look like mini t-bones. Their flavor is incredible.)

1/2 cup olive oil
1/2 cup balsamic vinegar
1 tablespoon fresh rosemary, chopped
1 tablespoon fresh thyme leaves, chopped
1 tablespoon Kosher salt
1 tablespoon maple syrup
1 tablespoon Dijon mustard
1 teaspoon black pepper
1 teaspoon dried oregano
3 cloves garlic, sliced thin

Combine all the marinade ingredients in a bowl, mixing well.


Lamb and marinade ready for an overnight in the fridge.


Place the lamb in a Ziploc bag, and pour in the marinade. Seal the bag tightly, squeezing any excess air out of it, and squish it around carefully, so that the marinade makes contact with every part of the lamb.

Place the bag on a pan (to prevent accidents in the fridge) and place it in the fridge overnight. Give it a squish every few hours if you can.

The next day, remove the pan from the fridge and let the lamb come up to room temperature.

Pre-heat the oven to 350 degrees.

Carefully remove the lamb from the bag (I do this over the sink), discarding the marinade.


Marinated, seasoned, re-rolled and re-tied. Ready for the oven.

If you’re using an unrolled lamb roast, like I did, roll it our flat on a cutting board and season it with salt and pepper.

Carefully roll the roast up the way it was originally and tie it with string, as best you can.

Place the roast on a baking sheet and bake it until the meat reads 120 degrees on a meat thermometer…that’s medium-rare.

Out of the oven and onto the grill…


While the roast is in the oven, start a hardwood charcoal fire.

When the roast is out of the oven, place it on the grill and grill it on all sides until it has some nice grill marks and char.


Let the roast rest for at least 15 minutes before slicing. (Cut the strings off before you do.)


When I first told my friends that I grew up in a Lithuanian family, that we only spoke Lithuanian at the dinner table, that I went to Lithuanian Saturday school for 8 years, that I was a Lithuanian boy scout…they looked at me with a bit of disbelief. On the surface, I looked just like any other American-born kid that grew up in the suburbs. But the home life was vastly different.

Few things were stranger to my friends than the food we ate. While all my “American” friends had PB&J’s for lunch, I had a liverwurst sandwich on dark Lithuanian bread. While my friends struggled with broccoli, I was force-fed beets. And while my friends ate macaroni with jarred tomato sauce or Kraft mac & cheese, my Mom served us macaroni with sour cream and butter. (Nobody called it pasta back then.)


img_0048


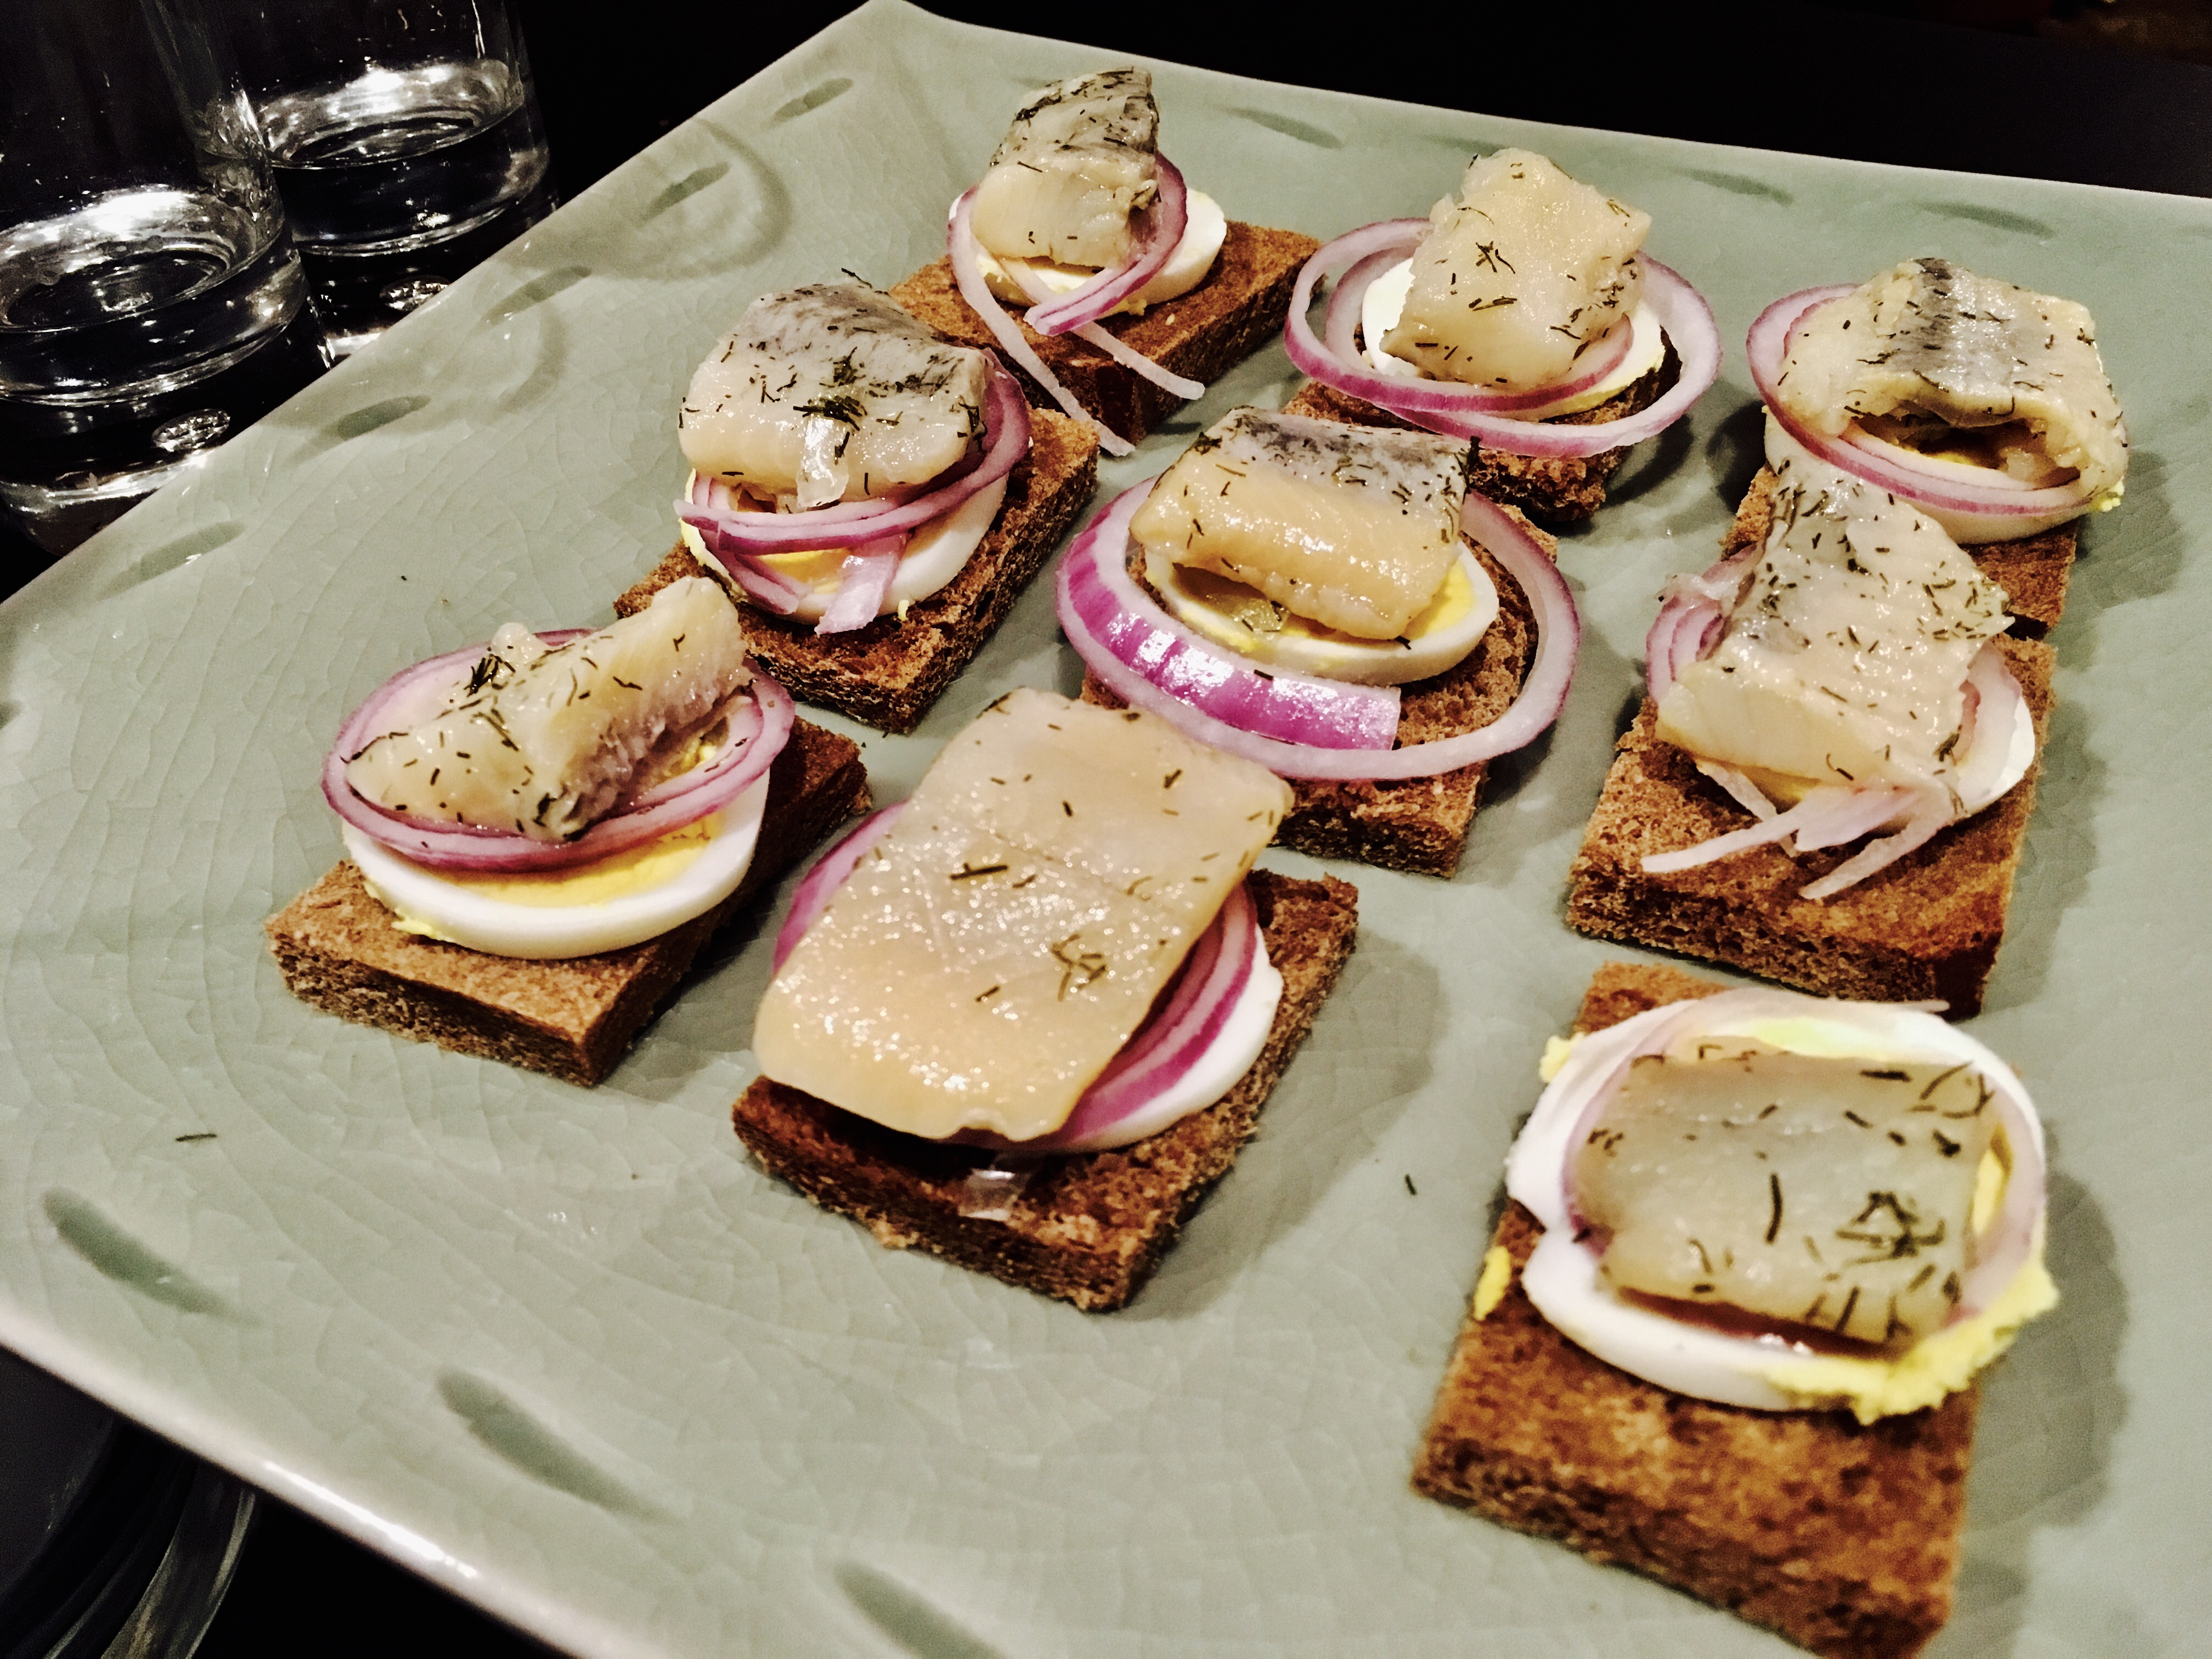
Few things prove you are a true Lithuanian more than an appetite for herring. (Silke (sil-keh) in Lithuanian.) I loved it at an early age. Didn’t matter if it was in a cream sauce with onions, in a tomato casserole with chopped boletes, or perhaps my favorite: this appetizer my Mom prepared only twice a year when my Dad’s buddies came over to play rounds of bridge all night.

Years later, when I was just out of college and in my first years of radio, I shared an apartment with my college buddy, Don. One evening, I prepared this dish for him when he came home from work. We both had the next day off (smart move, considering the vodka!) and I explained to him my family history behind this strange-looking appetizer. (I don’t think he’d ever had herring before.) Though it looked bizarre, he knew he had to trust me when it came to food, and he popped one of those bites into his mouth. I could see he wasn’t sure whether he liked it or not…a moment of many sensations hitting him all at once…confusion in his eyes…do I spit it out or swallow it?…so I poured him the vodka. He swallowed the food…took a shot of the vodka…and instantly had a moment of clarity. It all came together. It was indeed magical. I’ll never forget that look on his face!

There are a few basic ingredients that make this appetizer work…

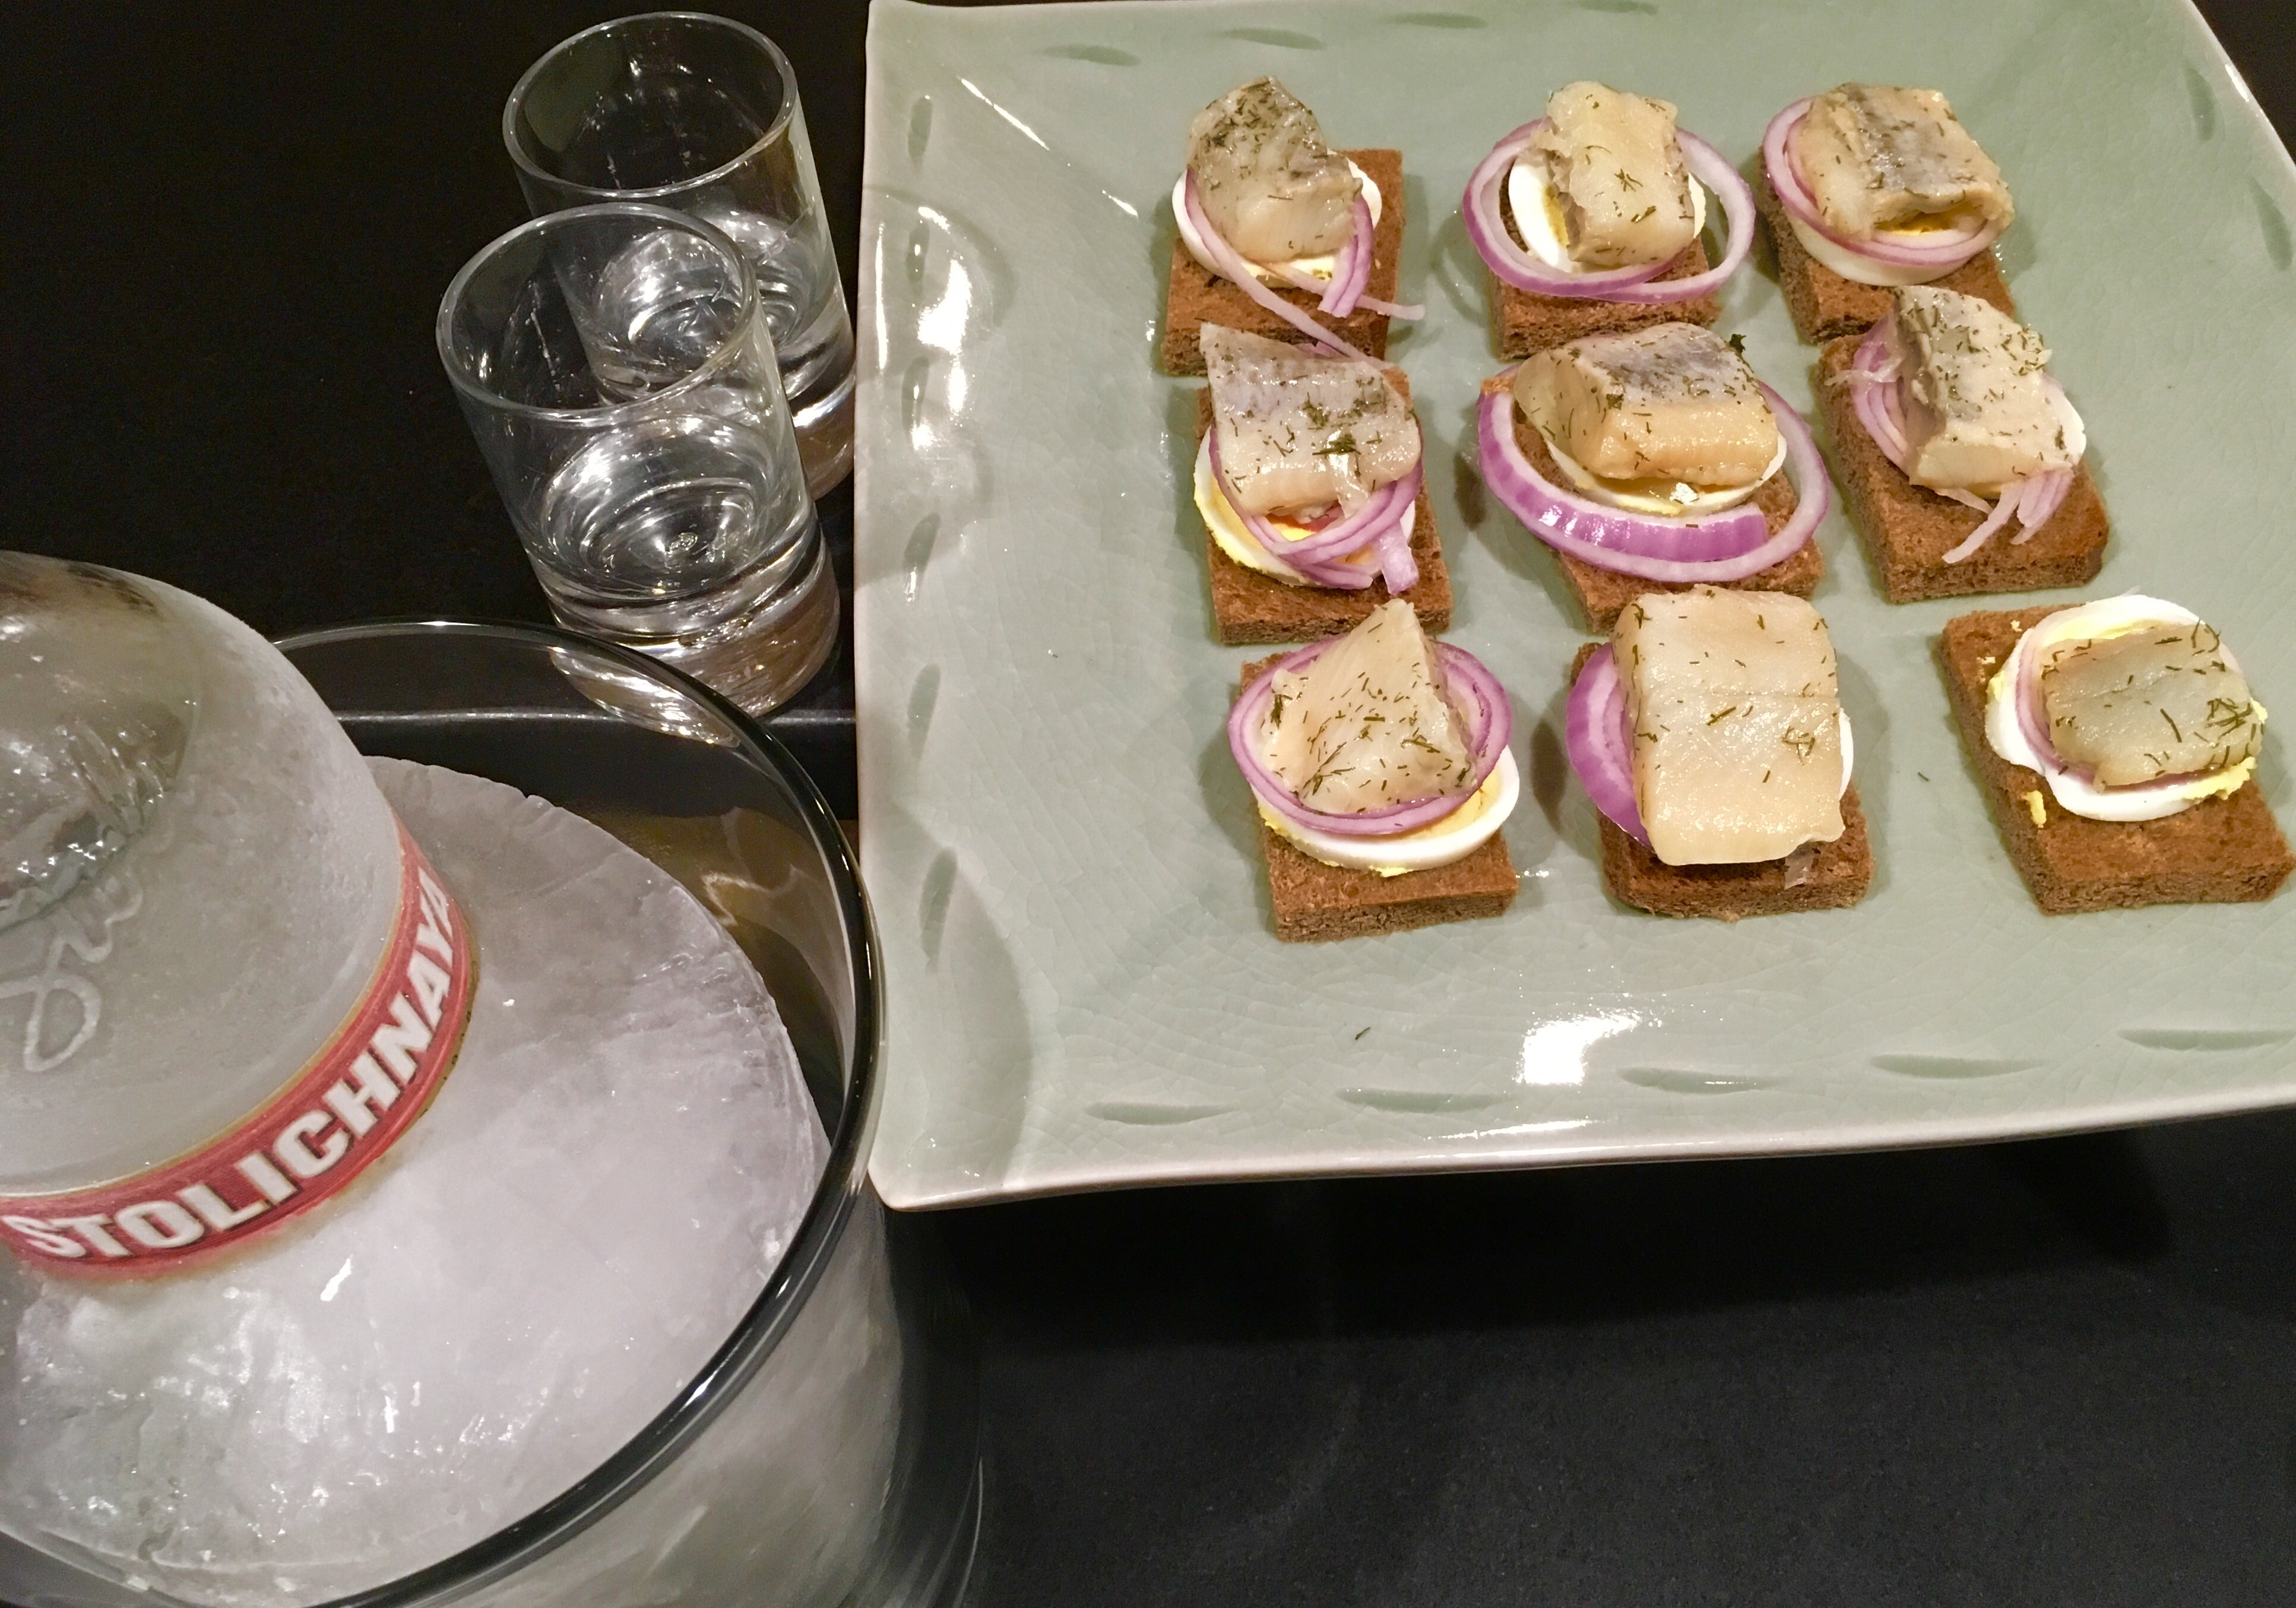
First and foremost, you need a bottle of good vodka in the freezer. Despite their lack of love for anything Russian, Lithuanians like their vodka, and Stolichnaya was my Dad’s favorite back in the day. Even now, with hundreds of vodkas to choose from, I still go to the red-labeled Stoli bottle for this dish. (Though it’s now distilled in Latvia.) I find a space in the freezer…jam that bottle in there…and let it get nice and cold.

Obviously, good quality herring is essential. Though I can get them fresh when I’m back home on Long Island, the usual choice is from a jar. For me, there’s no better quality than Acme products out of Brooklyn, NY. (If you saw the episode of “Bizarre Foods America” with Andrew Zimmern where he visited a salmon processing plant in Brooklyn, that was Acme Smoked Fish.) You can find them in many supermarkets. The excellent Blue Hill Bay herring in dill sauce is an Acme product and can be found at Whole Foods.

Next: hard-boiled eggs that have cooled in the fridge. Get out the old egg slicer that’s been sitting in the kitchen drawer for the last decade and use it for this appetizer.

Red onion, sliced thin. How much you use is up to you. But it’s gotta be red and it’s gotta be raw.

And finally, Lithuanian bread. Yes, there is such a thing. It’s easy to find in most Polish or German food stores in the New York area. I also recently discovered an Eastern European food store in Hyannis, on Cape Cod, where I can stock up . I buy a loaf and then keep it in the freezer to enjoy throughout the year. Lithuanian bread is like the lovechild of rye bread and pumpernickel, so either one of those will work in a pinch.


img_0051

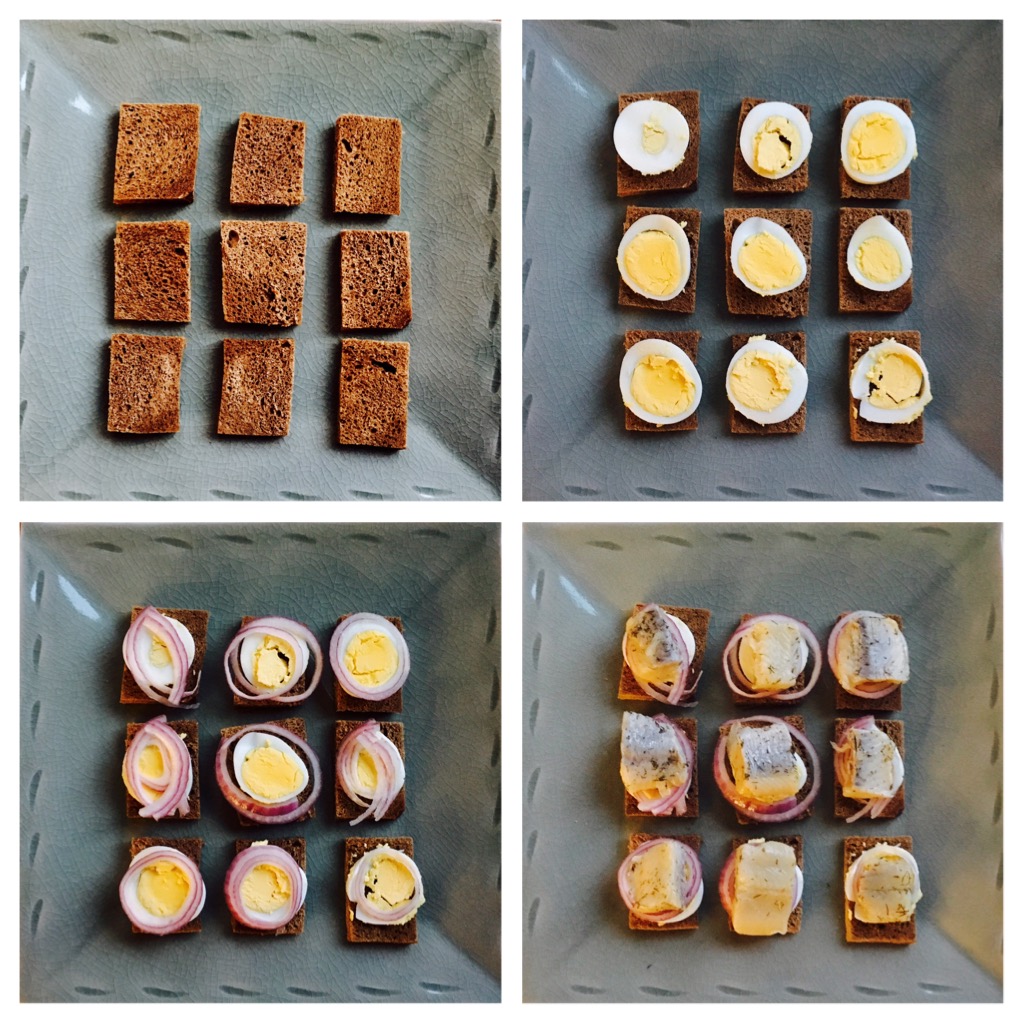
To make the appetizer, simply place a small piece of Lithuanian bread, about 1 1/2″ square, on a plate. Place a slice of hard-boiled egg on top of it. On top of that, some red onion. Then finally, a piece of herring.


img_0046


Pop the whole thing in your mouth, and wash it down with a small amount of frozen vodka. No shots–this isn’t a frat house. Besides, you won’t make it to the end of dinner. Then again, you may not care at that point!

I never learned how to play bridge, but I’m sure my Dad would be proud that I remembered this treat.

A COUPLE-A CHUCK ROASTS

Posted: April 27, 2025 in Uncategorized
Tags: , , , ,

Chuck roast is an inexpensive cut of beef, but it requires a little TLC to make it tender and tasty. I had a couple of grass-fed chuck roasts in the freezer, and decided to try two different ways of seasoning them before cooking them low and slow.

With the first, I used Asian spices…

2 lb. chuck roast, preferably grass-fed
1 tablespoon Chinese five spice
1 tablespoon Kosher salt
1 tablespoon granulated onion
1 tablespoon granulated garlic
1 teaspoon black pepper
2 tablespoons hoisin sauce
1 teaspoon sesame oil

Pre-heat the oven to 250°.

Let the chuck roast come to room temperature before cooking.

Combine the Chinese five spice, salt, onion, garlic and pepper in a bowl.

Rub the spice mixture all over the chuck roast, and then wrap the roast in aluminum foil. Place the foil in an oven-proof pan and bake the chuck roast for about 2 hours, until it’s tender. Carefully pour of the fat before the next step.

In a separate bowl, mix the hoisin sauce and sesame oil, and brush it all over the chuck roast. Put the roast back in the oven, uncovered, for about 15 minutes, until a nice glaze forms on the meat.

Let it rest for 15 minutes. Slice the chuck roast on the diagonal for maximum tenderness.

With the second chuck roast, I went with Italian style seasonings, also with tasty results.

2 lb. chuck roast, preferably grass-fed
olive oil
1 tablespoon Kosher salt
1 tablespoon granulated garlic
1 tablespoon granulated onion
1 tablespoon oregano
1 teaspoon black pepper

Pre-heat the oven to 250°.

Rub the chuck roast with olive oil, and then rub the spices all over it, placing it in the foil and wrapping it. Place the foil in an oven-proof pan and bake it for about 2 hours, until tender.

Carefully pour off the fat, and let the meat rest for 15 minutes before slicing on the diagonal.

When I gain some weight and need to go back on the diet, one of the major changes in my eating habits is to incorporate more seafood and less meat into my meals. Seafood has a lot more protein and fewer calories. In fact, shrimp, lobster and oysters are some of the most delicious low-calorie foods you can enjoy, running about 1 calorie per gram. It’s what you add to them–oils, melted butter, batter–that make them high in calories.

I’ve always loved sushi, but again, on a diet, I need to limit my intake of unnecessary calories, and rice is on that list. I’ve found that I can use a lot less rice, or maybe none at all, when I make poke…and I get all the satisfaction of sushi or sashimi.

My two favorite fishes to eat raw are ahi tuna and wild-caught Alaskan salmon, like sockeye. There are many great purveyors of this super-high quality seafood online, and I usually buy a decent amount of fish at one time–hermetically sealed and frozen in 4-ounce packages–to last me a long time. (The price is often much better when you buy in quantity, because they have to be shipped frozen overnight.)

Yes, please.


There are many ways to prepare poke, and the only limitations are what’s in your fridge. The first recipe, using salmon, is closer to a traditional poke recipe you’d find in a restaurant.


6.5 ounces wild-caught Alaskan salmon, in the refrigerator (thawed, if previously frozen)
1 tablespoon soy sauce
2 teaspoons sesame oil
1 teaspoon rice vinegar
1/2 teaspoon fresh lemon juice
1/3 cup chopped raw cashews
1 scallion, green and white parts finely chopped

Keep the thawed salmon in the refrigerator. Remove the salmon from the fridge, and remove the skin if it is still on the fish. Cut the fish into half-inch cubes. I like to place the salmon cubes on a clean paper towel to absorb excess moisture from thawing. Then I place the salmon cubes in a bowl and put it back in the fridge while I combine the other ingredients.

In another bowl, combine the soy sauce, sesame oil, rice vinegar, and lemon juice. Whisk them together.

Chop the cashews and add them to the bowl, mixing them in.

Cut the root ends off the scallions, chop the green and white parts finely, and add them to the bowl, mixing them in.

Add the salmon to the bowl, mixing gently, so that you don’t damage the fish.
Let it sit for 10 to 15 minutes, if you can wait that long, and then: eat!
My tuna poke recipes have also used similar ingredients…
More recently, I mixed up a batch of what I call my “Asian Mix,” a blend of five Asian flavors that really work well together: soy sauce, hoisin sauce, chili garlic sauce, rice vinegar, and sesame oil. I let my tuna or salmon marinate in this mix for about ten minutes before adding the other ingredients and feasting.

Tuna poke with lettuce, onion, pine nuts, black and white sesame seeds, rice and my “Asian Mix.”

But my proudest achievement was taking my favorite sandwich from my home town of New York, and making it into a bowl. The sandwich is an everything bagel with salmon and cream cheese, and my poke version uses just a bit of the bagel, yet you still get the flavor without all the calories. The secret is a seasoning you can buy already prepared.
3 oz. wild-caught Alaskan sockeye salmon, cubed
1 tablespoon capers
1/2 small Vidalia or sweet onion, sliced very thin
1/2 tomato, seeds removed, sliced thin
1/4 of a toasted plain bagel
1 tablespoon cream cheese
2 teaspoons Everything Bagel seasoning
1 chopped hard boiled egg
Cut the salmon into small 1/2″ cubes and place it in a bowl. Add the tablespoon of capers (including some of the brine), chopped onion and tomato. Mix gently.
Toast the bagel and use only 1/4 of it (I use that little for the sake of calories. But you can use more, if you like!) Spread the tablespoon of cream cheese on the toasted bagel, then carefully chop it up into small cubes. Add this to the bowl. Sprinkle in the Everything Bagel seasoning and the chopped hard-boiled egg, and give it all one last gentle toss.
Then take a forkful, close your eyes, and imagine you’re in your favorite New York deli!

ONE TON OF WONTON

Posted: April 20, 2025 in Uncategorized
Tags: , , , ,

I love wonton soup. So every once in a while, I make my own version of it in large batches at home. The great thing about wonton soup is you can put whatever you want in it. After all, it’s your recipe.

I use whatever homemade stock I happen to have in the freezer. I’ll go out and buy some veggies, but I also use whatever veggies I might happen to have in the fridge that need to be used up. And I use a LOT of them.

I always have Asian spices and seasonings in the fridge or on the shelf, so that’s never a problem. And then it’s a matter of meat or seafood, or in this case, a little bit of both.

I had homemade chicken and pork stock in the freezer, so those went into the pot. I had a couple of pork chops in the freezer, so I decided to use those. I also had some frozen shrimp. And my cheat is frozen chicken dumplings, which add great flavor and pasta to the soup.

I found these at my local store, but any dumplings you like will work.

There are no exact measurements for this, because it really is based on what you have, how much you want to make, and what flavors you like. But this is the basic rundown of how I made my last batch…

16 ounces homemade chicken stock
8 ounces homemade pork stock
24 ounces water
2 medium onions, diced
2 carrots, diced
1 medium head of broccoli, chopped
1/2 head of a medium cabbage, finely sliced
2 6-ounce boneless pork chops
soy sauce
hoisin sauce
Chinese garlic sauce
rice vinegar
sesame oil
oyster sauce
frozen peeled and deveined wild-caught American shrimp
frozen chicken and vegetable dumplings

I thawed the chicken and pork stock and poured it into a large pot along with the water. I put it on high heat.

I diced the onions and the carrots and put them in the pot. I chopped the broccoli and put it into the pot. I prefer to slice the cabbage thinly with a knife, so that it still retains some texture. I put that into the pot.

I let the pot come to a boil and let it roll until the veggies started to get tender.

Meanwhile, I thinly sliced the two pork chops into strips and placed them in a bowl. I added the soy sauce, hoisin sauce, chili, garlic sauce, rice vinegar, and sesame oil to the pork and tossed it around it to marinate.

While the veggies were boiling, in a frying pan, I added some oil and stir-fried the marinated pork. Once it was nice and caramelized, I poured it into the pot with the veggies.

It’s very easy to overdo the salt with this recipe, so I seasoned as I went, adding a little more soy sauce, hoisin, and oyster sauce, tasting all the time.

Once the veggies became tender, but still had a bite to them, and the liquid in the pot had reduced a bit, the soup was officially done. It was at this point that I decided what else I wanted to add to it.

For this particular meal, I decided I wanted the shrimp and the dumplings. So I took a handful of frozen shrimp, cutting them into smaller pieces, and put them in the bottom of a sauce pan. I also took about a dozen of the frozen dumplings and added them to the same sauce pan.

Because there is a lot of soup in the large pot, I ladled out the amount I wanted into the sauce pan with the frozen shrimp and dumplings, and brought all it to a boil over high heat. The dumplings cooked in just a few minutes, and the shrimp even more quickly than that. The soup was done.

Because the dumplings cook so quickly, as does the shrimp, I chose not to add them to the large pot, because reheating the soup would make all of that mushy. When I reheat the soup, I can add new batches of dumplings and shrimp, so that they are perfectly tender and flavorful. (Or simply leave them out altogether, depending on my mood.)

I put some of the leftover soup in containers to freeze, and some in the fridge to enjoy the next day, reheating it with whatever ingredients I chose the next time.

ASIAN-STYLE PORK CHUNX

Posted: April 12, 2025 in Uncategorized
Tags: , , , ,

These delicious “chunx” of pork are full of fantastic Asian flavors and go great with broccoli and rice…or just by themselves. Plus, I used inexpensive boneless pork sparerib meat, which saves a few bucks.

3 pounds boneless pork ribs
1/2 a large onion, diced
1/2 cup soy sauce
4 tablespoons hoisin sauce
1 teaspoon Chinese chili garlic sauce
Zest and juice of 1 lemon
2 star anise
2 cinnamon sticks
1/2 cup maple syrup
4 cups chicken broth, preferably homemade

This recipe is similar to my Asian bacon recipe, only it uses a cheaper, easier to find, cut of pork: boneless sparerib meat. You can usually find packages of this meat in a 3-pound size at most supermarkets.

The rib meat is fatty, however, and often has some gristle. So I trim as much of that away as I can to keep the tasty bites tender. 

I cut the pork into 1-inch cubes, and toss them in a bowl with the diced onion. I add the soy sauce, hoisin sauce, and Chinese chili garlic sauce to the bowl and mix everything really well.

I will let the pork marinate for 2 hours at room temperature, remixing every half-hour or so. (If the pork needs to stay out longer, I put it in the refrigerator, bringing it back to room temperature when I’m ready to cook.)

I preheat the oven to 350°.

I line a baking pan with nonstick aluminum foil and place the pork and onion pieces on it in a single layer, reserving any leftover marinade for later.

I bake the pork and onions for 30 minutes.

While the pork is in the oven, I get a large pot and place the lemon zest, lemon juice, star anise, cinnamon sticks, maple syrup, and chicken broth in the pot. I bring it to a boil, then reduce it to a simmer.

After the pork and onions have cooked for 30 minutes, I remove them from the baking pan and place them in the pot, pouring in all the juices that might be in the baking pan. At this point, I can add any leftover marinade into the pot as well.

Bringing the heat under the pot back on high, I continue cooking until the liquid in the pot starts reducing. As it reduces, I turn the heat down as well, so I don’t burn any sugars in the pot. I stir the pork pieces once in a while.

Soon, the liquid will be reduced to a glaze. I keep tossing the pork in that glaze until it looks nice and shiny and gooey and sticky. And that’s when they’re ready!

Serve the pork chunks immediately!

Somebody in marketing made a fortune when they took a product that had been around since 1945 (the convection oven), renamed it an “air fryer,” and sold millions of them. I still call my old oven a convection oven, but whatever you call yours, this recipe will work in it.

I love cauliflower roasted, boiled, baked–whatever–but my daughter does not. But when she had it air-fried at a restaurant, she suddenly fell in love with the stuff, and I knew it was time to make some at home.

Cutting a head of cauliflower into florets is an easy thing to do. But it’s even easier to buy a bag of cauliflower florets already cut up at a supermarket or membership warehouse.

If you want this recipe to be gluten-free, do what I do: buy a loaf of Udi’s frozen white bread, toast it in the oven, and then let it dry out a bit at room temperature. Place it in a food processor and whiz it up for larger crumbs. I like my breadcrumbs fine for this recipe, so I then move them to a blender and grind them fine.

Fine grind.
1 head of cauliflower, cut into florets
2 large eggs
1 cup of breadcrumbs (I like them unseasoned and finely milled)
spray can of olive or avocado oil

There are many versions of sweet and spicy Asian-inspired sauces and glazes out there. Simply choose the one that has your favorite ingredients. This one works really well with the cauliflower.

4 tablespoons honey
2 tablespoons chili garlic sauce
2 tablespoons brown sugar
1 tablespoon + 1 teaspoon soy sauce
1/4 teaspoon granulated garlic
1/4 teaspoon ground ginger

Combine these ingredients in a saucepan and bring it up to a medium heat. When it comes to a boil, take it off the heat and let it cool. (I double this recipe simply because the sauce is so good, and I’ll want to put it on other things, like chicken.)

Pre-heat the oven to 400 degrees.

Scramble the 2 eggs in a bowl.

Add the breadcrumbs to another bowl.

For the oven, set up a slotted metal tray to sit on a baking tray, so that there’s airflow underneath it. The cauliflower goes on the slotted tray, and the baking tray catches any breadcrumbs that may drop. Spray some oil on the slotted tray to keep things from sticking.

Take your cauliflower pieces and place them in batches in the egg, coating them completely. Then move them to the breadcrumb bowl, tossing them to get covered. Once they’re nicely coated, place them on the slotted tray. Do the same with the rest of the cauliflower.

Spray the cauliflower with the oil, and place them in the oven, baking for 30–45 minutes, depending on how cooked you like them.

I’ve seen restaurants that completely coat the cauliflower with the sauce, but I prefer to drizzle it on, with some extra on the side for dipping.

I love salmon in all forms. If it’s high quality wild-caught Alaskan salmon, I love it pan-sautéed, raw (as in sashimi), smoked, or cured.

The best smoked salmon uses the gentle process of cold smoking. It’s something that the average homeowner can’t really do successfully, so I simply buy cold-smoked salmon when I crave it. I’ve made hot-smoked salmon at home with some success, but the fish is so delicate, you really have to keep an eye on it. It takes no time for a juicy, perfectly smoked piece of salmon to turn into a dry, overcooked hockey puck.

Curing, which is how you get Gravlax, is really quite simple. You just need to have enough patience to wait a few days before you can eat it.

There are many gravlax recipes out there.  Some use peppercorns, fennel, caraway, even Aquavit in the curing process.  My opinion is: if you’ve got a beautiful piece of fish, why mask the flavor of it? I go with the simplest recipe possible, featuring just 3 ingredients that cure the salmon: salt, sugar and fresh dill.

The first step, of course, is to get the right piece of salmon. What you want is that beautiful, vibrant, orange wild-caught Alaskan or Pacific salmon that costs more than you thought you were going to spend. Wild-caught means the salmon has eaten the foods it loves, a balanced diet consisting of bugs, fish, shrimp, and small invertebrates. A natural diet gives the meat of the fish that beautiful color and incredible flavor. What the salmon eats is very important because you are eating the salmon! Wild-caught salmon is high in Omega-3’s…the good fats.


A beautiful piece of wild-caught salmon laying on a bed of the cure.


I avoid Atlantic salmon at all costs. Unfortunately, most restaurants on the east coast serve Atlantic salmon because it’s less expensive. There’s a reason for that. Atlantic salmon is farmed in the USA, Canada and Europe, which means the fish are kept in crowded underwater pens and are fed food pellets that contain a number of nutrients and additives. Often, farmed fish are treated to prevent sea lice, and are given antibiotics to prevent diseases caused by their tight living quarters. They’re also given pellets to color the meat orange, because the natural color of farmed salmon is actually an unappetizing gray. When you buy Atlantic salmon in the fish store, you can spot it a mile away, because it’s got that weird zebra-striped orange and white, with a tinge of gray, and its flavor is bland and lifeless. Farmed salmon is much lower in Omega-3’s.

If it doesn’t say wild-caught Alaskan or Pacific salmon, it isn’t!

Previously frozen vs. fresh fish matters less than where it came from and how it was raised.


2 lbs. wild-caught salmon, skin on, pin bones removed
1/3 cup (50g) Kosher salt (I use Diamond Crystal)
2/3 cup (160g) sugar
1 large bunch fresh dill, washed

If your fish monger hasn’t removed the pin bones from your salmon filet, you’ll need to get a pair of long-nose pliers and remove them. It’s not the worst thing in the world to leave them in there, but you really don’t want to be spitting bones out later.

The reason I mention that I use Diamond Crystal Kosher salt is because all Kosher salt does not weigh the same. Morton Kosher salt, for example, is much heavier by volume, so it weighs more even though you’re using the same cup measurement. In the case of Diamond Crystal, 1/3 cup weighs 50g. Same rules apply to the sugar.  Go by the weight, not the cup measurement. This is really important point to keep in mind when you’re curing anything, fish or meat.

Get a non-reactive tray long enough to hold the salmon filet. I prefer glass.

Mix the salt and the sugar together, and sprinkle half of it evenly on the bottom of the tray. Lay the piece of salmon down on the cure, skin side down, and cover the top of the salmon with the rest of the cure evenly.

Lay the sprigs of dill on top of the cure, covering the entire piece of fish. It might look like overkill. It’s not.


Cover everything with several layers of plastic wrap, pushing it down and tucking it into the corners for a tight fit.


Find a flat board or something similar (I used a clear plastic tray) and lay it on top of the plastic wrap.


Add heavy weights on top to press down evenly on all surfaces. I used cans of tomatoes.


Side view.


Place the tray in the fridge for 48-72 hours.

After 24 hours, remove the plastic wrap and, tilting the tray, baste the dill-covered salmon with the brine juices that have formed. Put clean plastic wrap on top, add the weights, and put it all back in the fridge for another 24 hours. Repeat that process at the 48-hour mark, if needed. If it’s cured, it’s time to eat!


You’ll know the fish is fully cured when the thickest part of the filet is firm to the touch.

Unwrap the salmon, discarding the salt and sugar brine and the dill. Rinse the filet under cold running water and pat it dry with paper towels.

I don’t like a ton of chopped dill imbedded into my gravlax as some do, but if you do, finely chop a bunch of new fresh dill, spread it out onto a board, and press the salmon into it flesh-side down.

To serve, place the gravlax skin-side down on a board. With a long, sharp narrow-bladed knife, slice the fish against the grain, on the diagonal, into thin slices. Serve with mustard-dill sauce, chopped onion, capers, hard-boiled egg, bread…whatever you like.

Refrigerate any remaining gravlax immediately, wrapped in plastic wrap, for up to 2 weeks.


It’s hard to improve on buttery, creamy mashed potatoes, but I think this recipe does just that. Like with pasta carbonara, you add pork, egg yolks, and Parmesan cheese to take this to another level.

The classic pasta carbonara uses guanciale, which is cured pork cheeks. Many recipes call for pancetta instead (which is the cured but unsmoked belly of the pig.) But since I cure my own guanciale, this was a no-brainer.

Egg yolks are stirred into the warm pasta in carbonara, and are cooked simply from the heat from the pasta. Here, I stir the egg yolks into the mashed potatoes, but then they go back in the oven to cook more.

And all too often, the phrase “Parmesan cheese” is used in recipes. That opens the floodgates to some truly horrendous cheeses, including the non-refrigerated stuff on the supermarket shelf that is 50% sawdust! There is only one King of Cheeses: Parmigiano Reggianio. Look for it, ask for it, pay the price. It’s worth every penny.

Parmigiano Reggiano
3 lbs. Yukon gold potatoes, peeled and chopped into large chunks
6 oz. guanciale, finely chopped
3/4 cup grated Parmigiano Reggiano
1/2 cup heavy cream
1/8 teaspoon freshly grated nutmeg
1 stick (8 tablespoons) unsalted butter, brought to room temperature, separated
Kosher salt and freshly ground black pepper
1 large egg
2 large egg yolks

Preheat the oven to 400 degrees.

Place the potatoes in a large pot and cover them with cold water. Bring them to a boil, and then cook them until they’re fork-tender. Drain the potatoes in a colander and let them dry out a little, about 10 minutes. Then place the potatoes back in the pot.

Cook the guanciale in a non-stick pan over medium heat, stirring often, until the bits are golden brown and crispy. Transfer the cooked guanicale bits to paper towels to absorb the excess fat.

To the pot with the potatoes, add the cheese, the cream, the nutmeg (I always have whole nutmeg around to grate into my rum drinks!), 6 tablespoons of the butter, and some salt and pepper. Get out the old potato masher and mash away until the potatoes are smooth.

In a separate small bowl, whisk together the whole egg and the 2 egg yolks, then add them to the pot with the potatoes, and stir until they are well combined.

Add in all but about 1 tablespoon of the guanciale, mixing well.

Grab your favorite baking dish, and pour in the mashed potatoes, smoothing them out to make them look nice. (We originally tried piping some of the potatoes with a pastry bag, but it kept getting clogged with the guanciale and we gave up!)

Didn’t work so well….
…but delicious anyway!

Sprinkle the remaining guanciale on top of the potatoes and place the baking dish in the oven.

Bake until the potatoes are golden around the edges, about 30 minutes.

Chop up the remaining 2 oz. of butter and scatter it over the top of the potatoes, letting the butter melt in while the potatoes cool.

I just came back from a trip to my hometown of New York City, where I saw some old radio friends. It reminded me of this awesomely simple grilled pork chop that dates back to my early years in radio on Long Island.

“Cope” chops are the creation of my radio buddy, Marc Coppola, who can be heard from Cape Cod to California. Cope and I met at WBAB on Long Island back in the early 80’s. He had the afternoon drive shift, and I was on after him from 7 to midnight. After his show, Cope would remove a hibachi grill out of the trunk of his car, light some charcoal in the radio station parking lot, and he’d grill up the most amazing pork chops I’ve ever had. They were thin, but juicy and beautifully charred. He called ’em “Cope chops,” and we’d eat them by the stack, wrapping the hot bone of the chop with a paper towel, and then just chowing down. It’s a great memory, and one that I like to re-live by grilling Cope chops at home even today.

After four decades, I’m not sure if my Cope chop recipe is the same as the original, but they are damn good and incredibly easy to make.

Ironically, for this recipe, I don’t go all out and spend big money on thick, expensive pork chops. I want them thin, fatty and with the bone in. This is not a low-and-slow process: the secret to the success of these chops is to cook them hot and fast on a charcoal grill, sealing in the juices.

Thin-cut pork chops
Dry white wine (I use an unoaked inexpensive French chardonnay)
Lawry’s seasoned salt

Place the pork chops in a casserole dish or other flat dish with sides, and pour the wine over the top, making sure you cover the chops. Let them marinate for at least an hour at room temperature, flipping them over halfway through so that all sides get covered by the wine.

Light a hot hardwood charcoal fire.

Pour off the wine from the chops and discard it. Place the chops on the hot grill and season the top with the Lawry’s seasoned salt. Once they’ve charred nicely, flip the chops over and season the other side. Grill until the chops are cooked all the way through, but not dry. Serve them immediately.

The proper way to eat a Cope chop: wrap the bone in a paper towel and chow down!