CHIMICHURRI

Posted: February 2, 2024 in beef, Food, grilling, marinade
Tags: , , , ,

Chimichurri is a garlicky, herby green sauce usually used with grilled meats. This pesto-like condiment originated in Argentina and is also commonly used in Nicaragua and Uruguay. Though some recipes include cilantro, many people insist the original is made only with parsley. To pack an extra punch, chimichurri also makes an excellent marinade for grilled meats.

My buddy, Lee, a chemist and avid chimichurri fan, is the inspiration for my version of this sauce. It’s incredibly easy to make. Just make sure to use fresh ingredients, and it’s always a good idea to wash all the veggies before using, even if you’re going organic.


chimi


1 bunch flat-leaf parsley, chopped
1/4 cup water
1 medium onion, chopped
3 cloves garlic, minced
3–4 tablespoons fresh oregano, leaves only (or 1 tablespoon dry)
1 tablespoon paprika
1 teaspoon crushed bay leaf
1 tablespoon coarse sea salt
1 teaspoon freshly ground black pepper
pinch red pepper flakes
1/4 cup red wine vinegar
1/2 cup extra virgin olive oil

Place all the parsley and the water in a food processor and begin to chop, pulsing for a second at a time. When the parsley is in small pieces, stop pulsing and add the remaining ingredients, except the vinegar and olive oil. Start the processor on a full run now, and slowly pour in the vinegar, then the olive oil. Try not to make it too smooth…leave some tasty bits. Allow it to rest for at least 30 minutes, but overnight in the fridge is best.

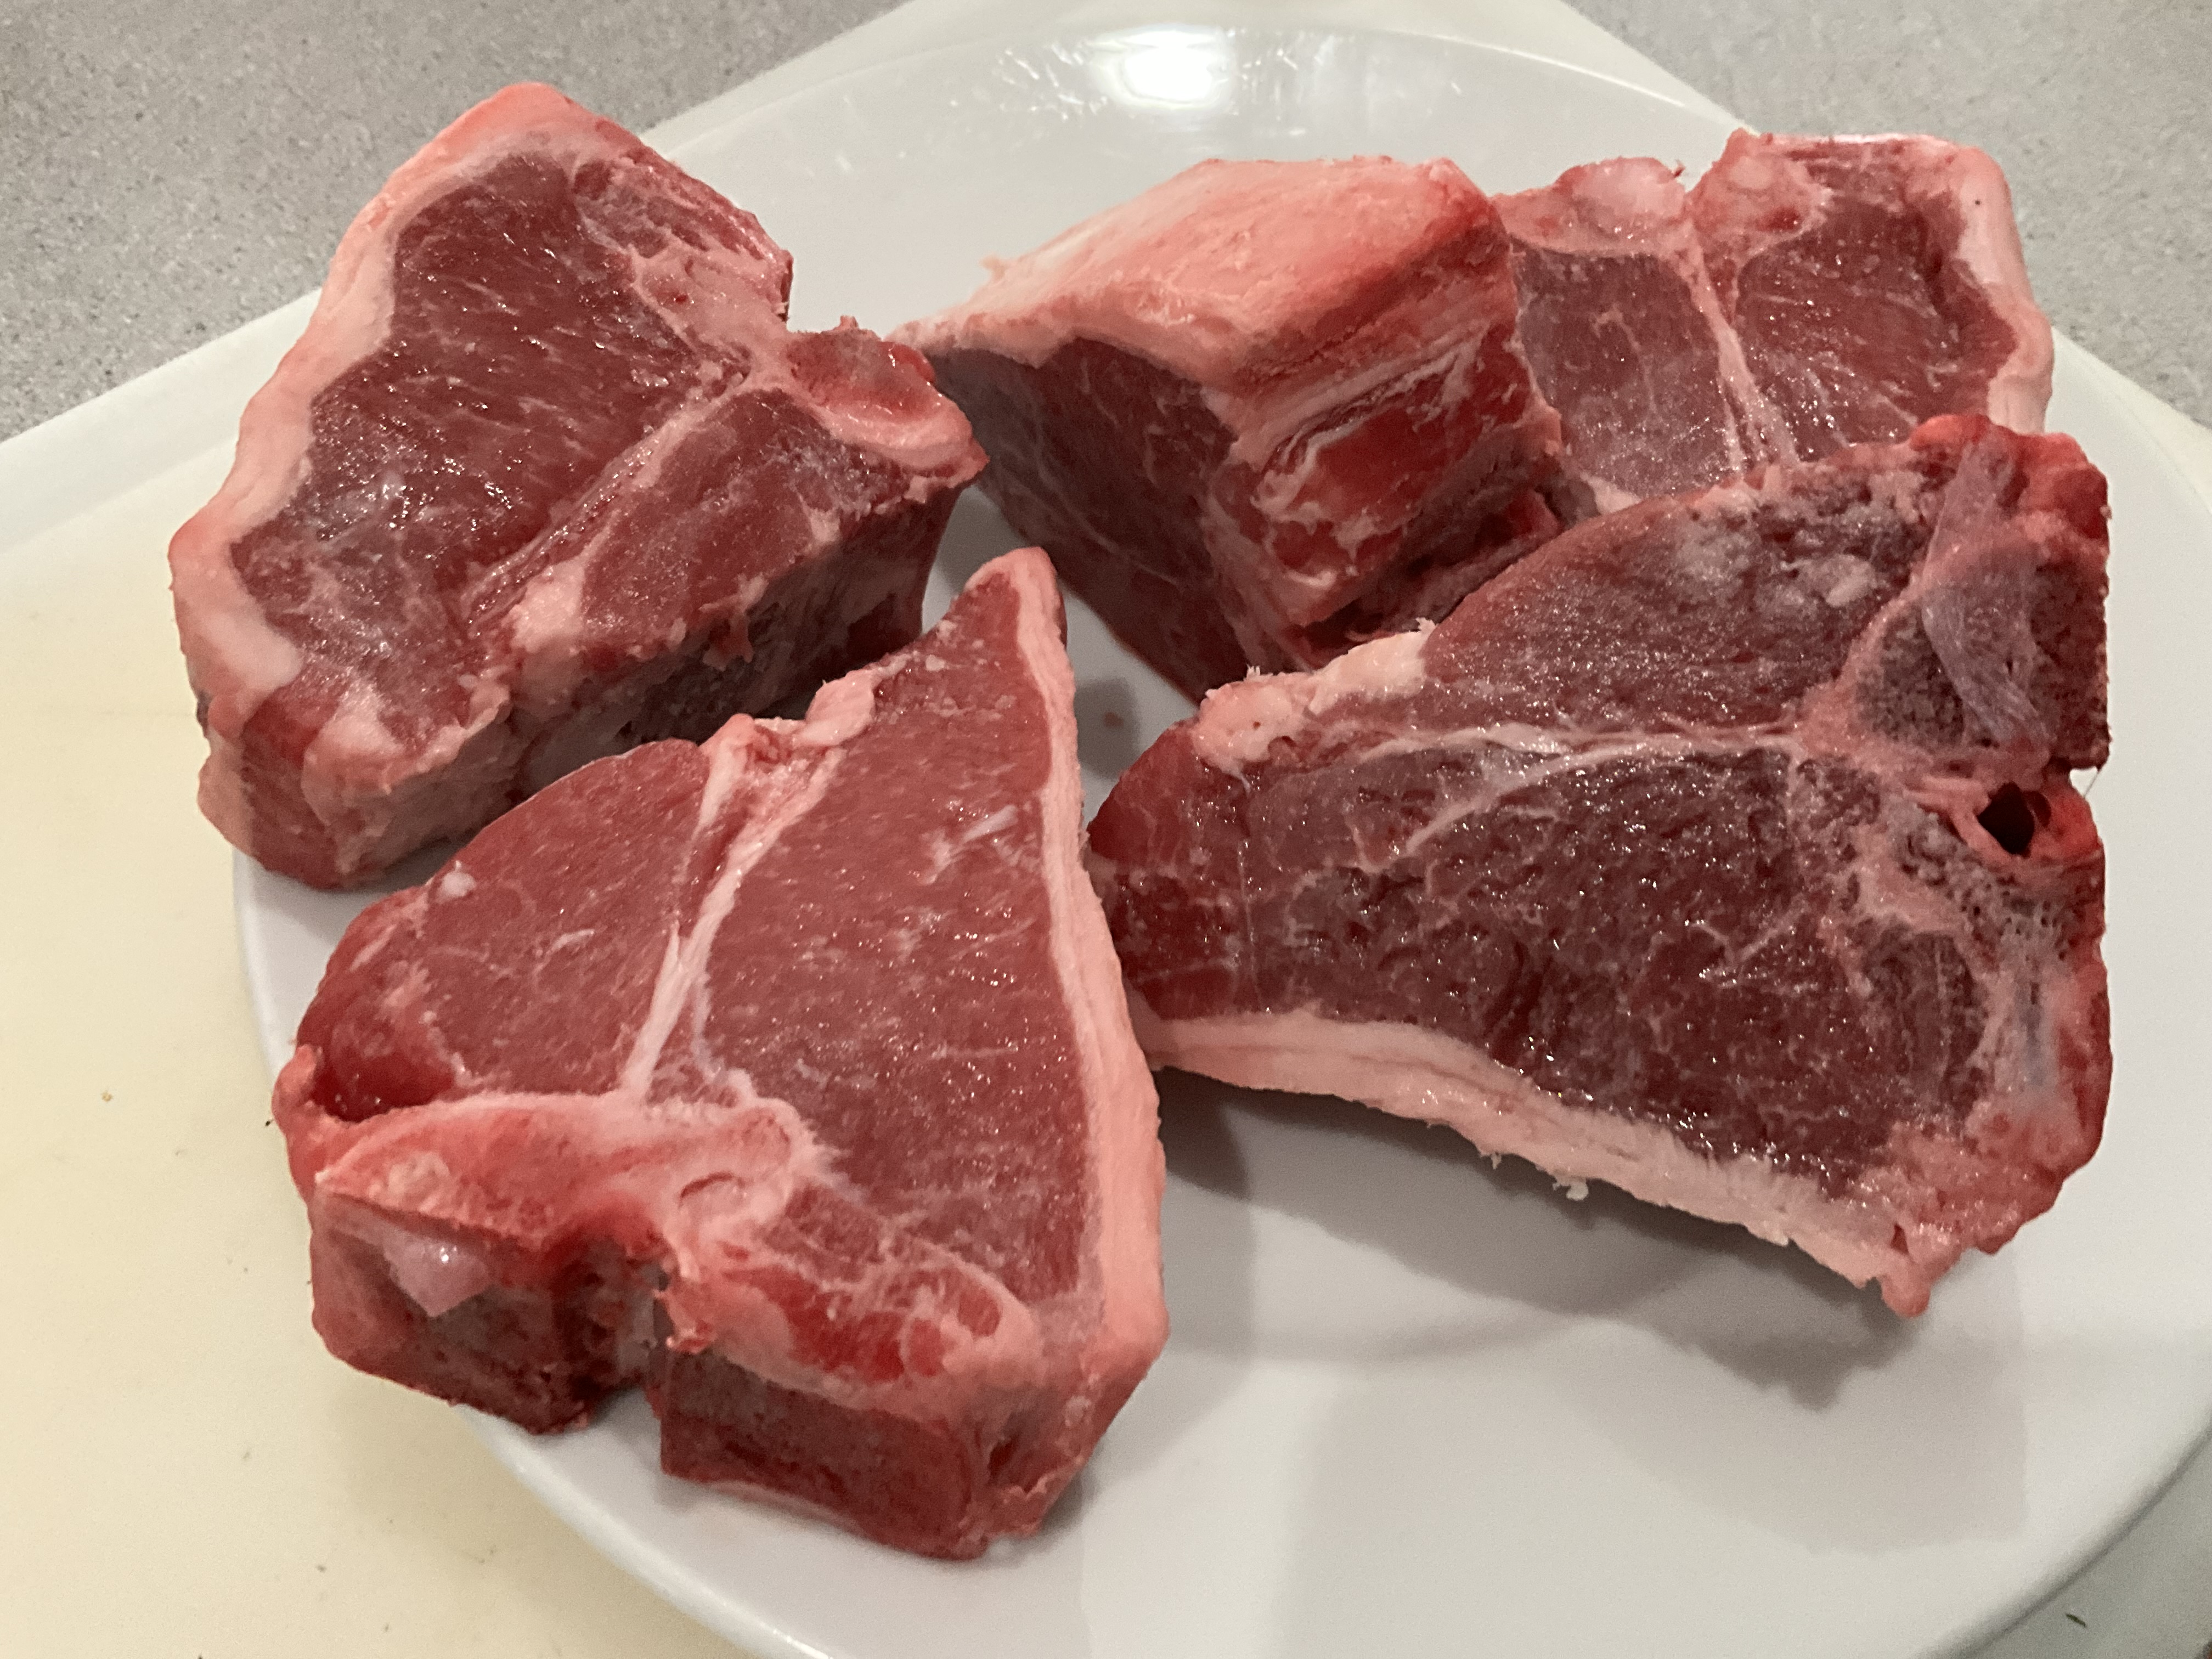
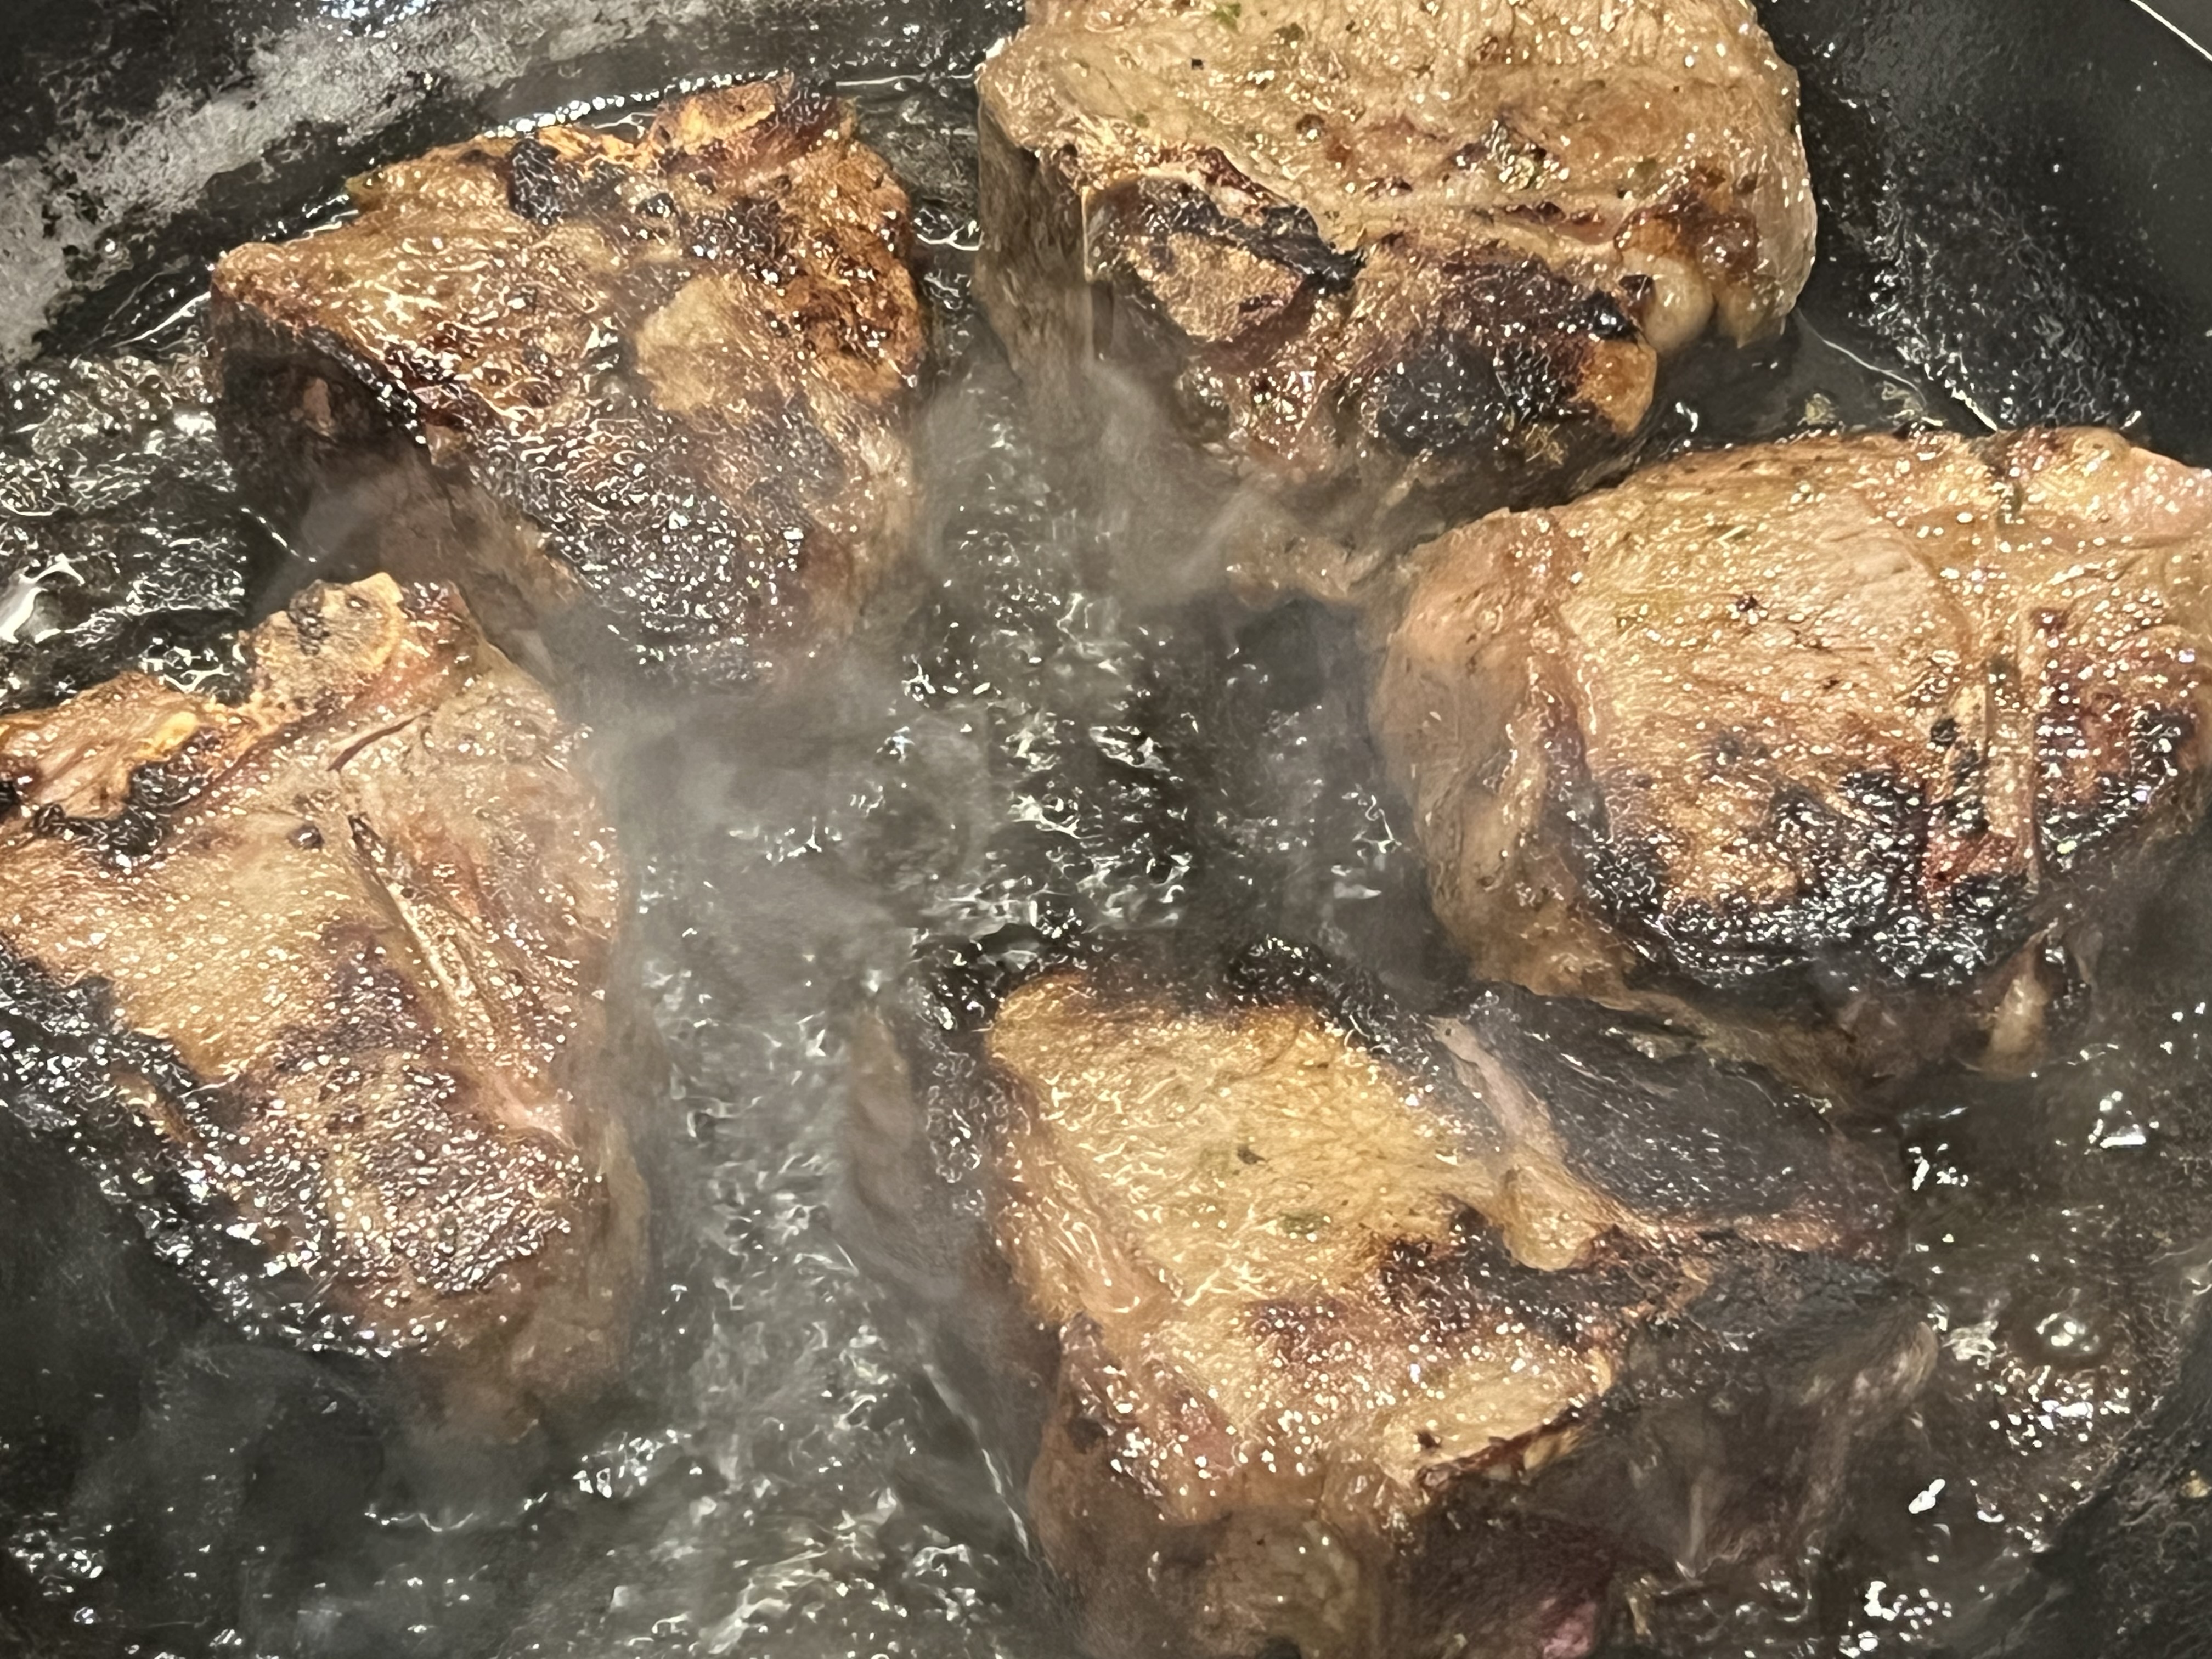
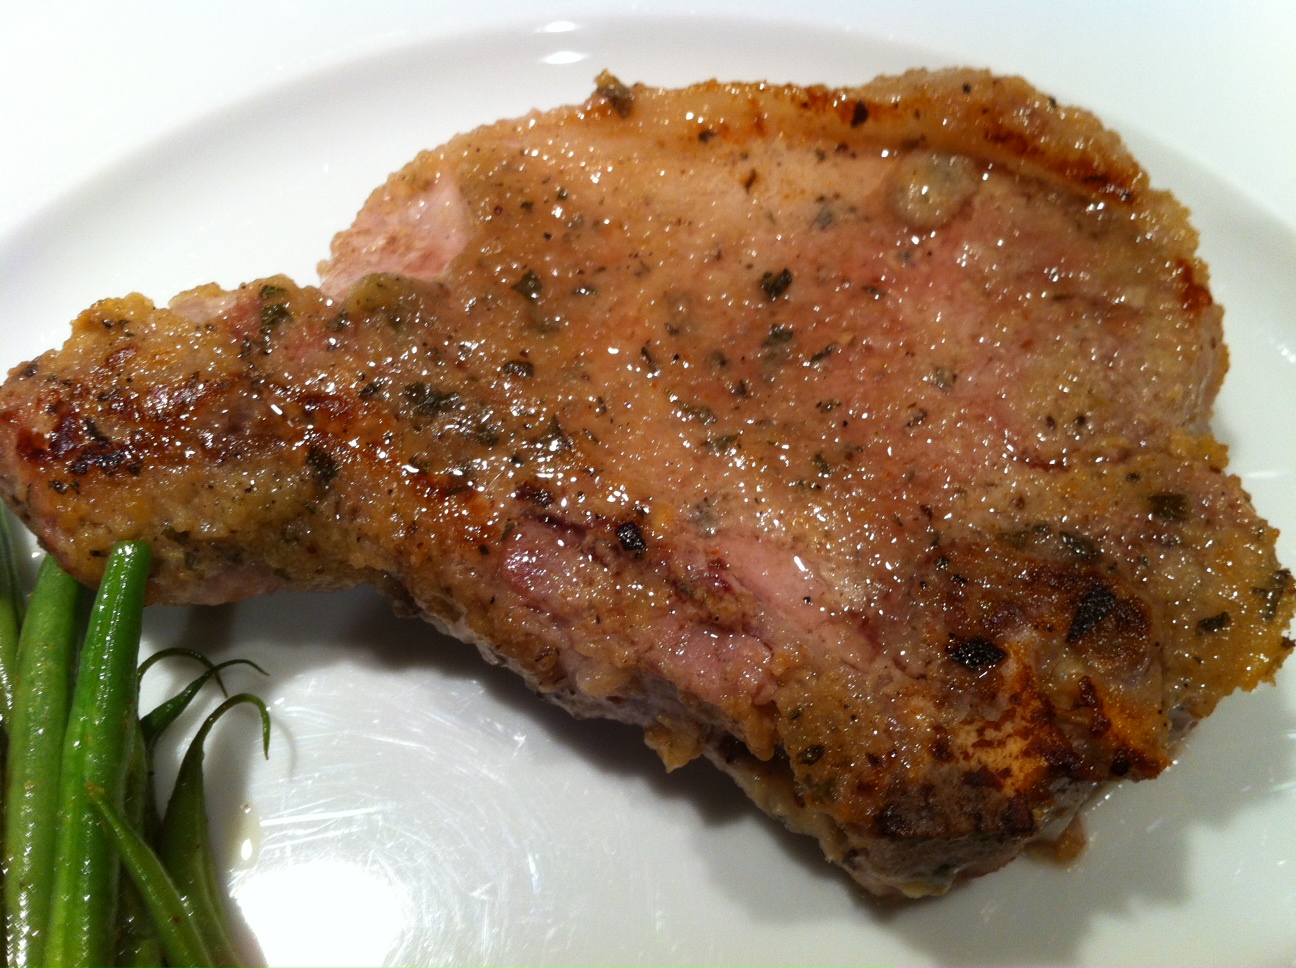
I marinated 2 grass-fed beef ribeyes in chimichurri overnight, simply smearing the meat with the sauce, and placing the ribeyes in a resealable plastic bag in the fridge. The next day, I let the beef come to room temperature and I wiped the marinade off. I discarded the marinade, then I re-seasoned the beef with a little salt and pepper and pan seared them, finishing them in a 350-degree oven until medium-rare. A little dipping of fresh chimichurri on the side.


Grass-fed beef ribeyes with chimichurri

Grass-fed beef ribeyes with chimichurri


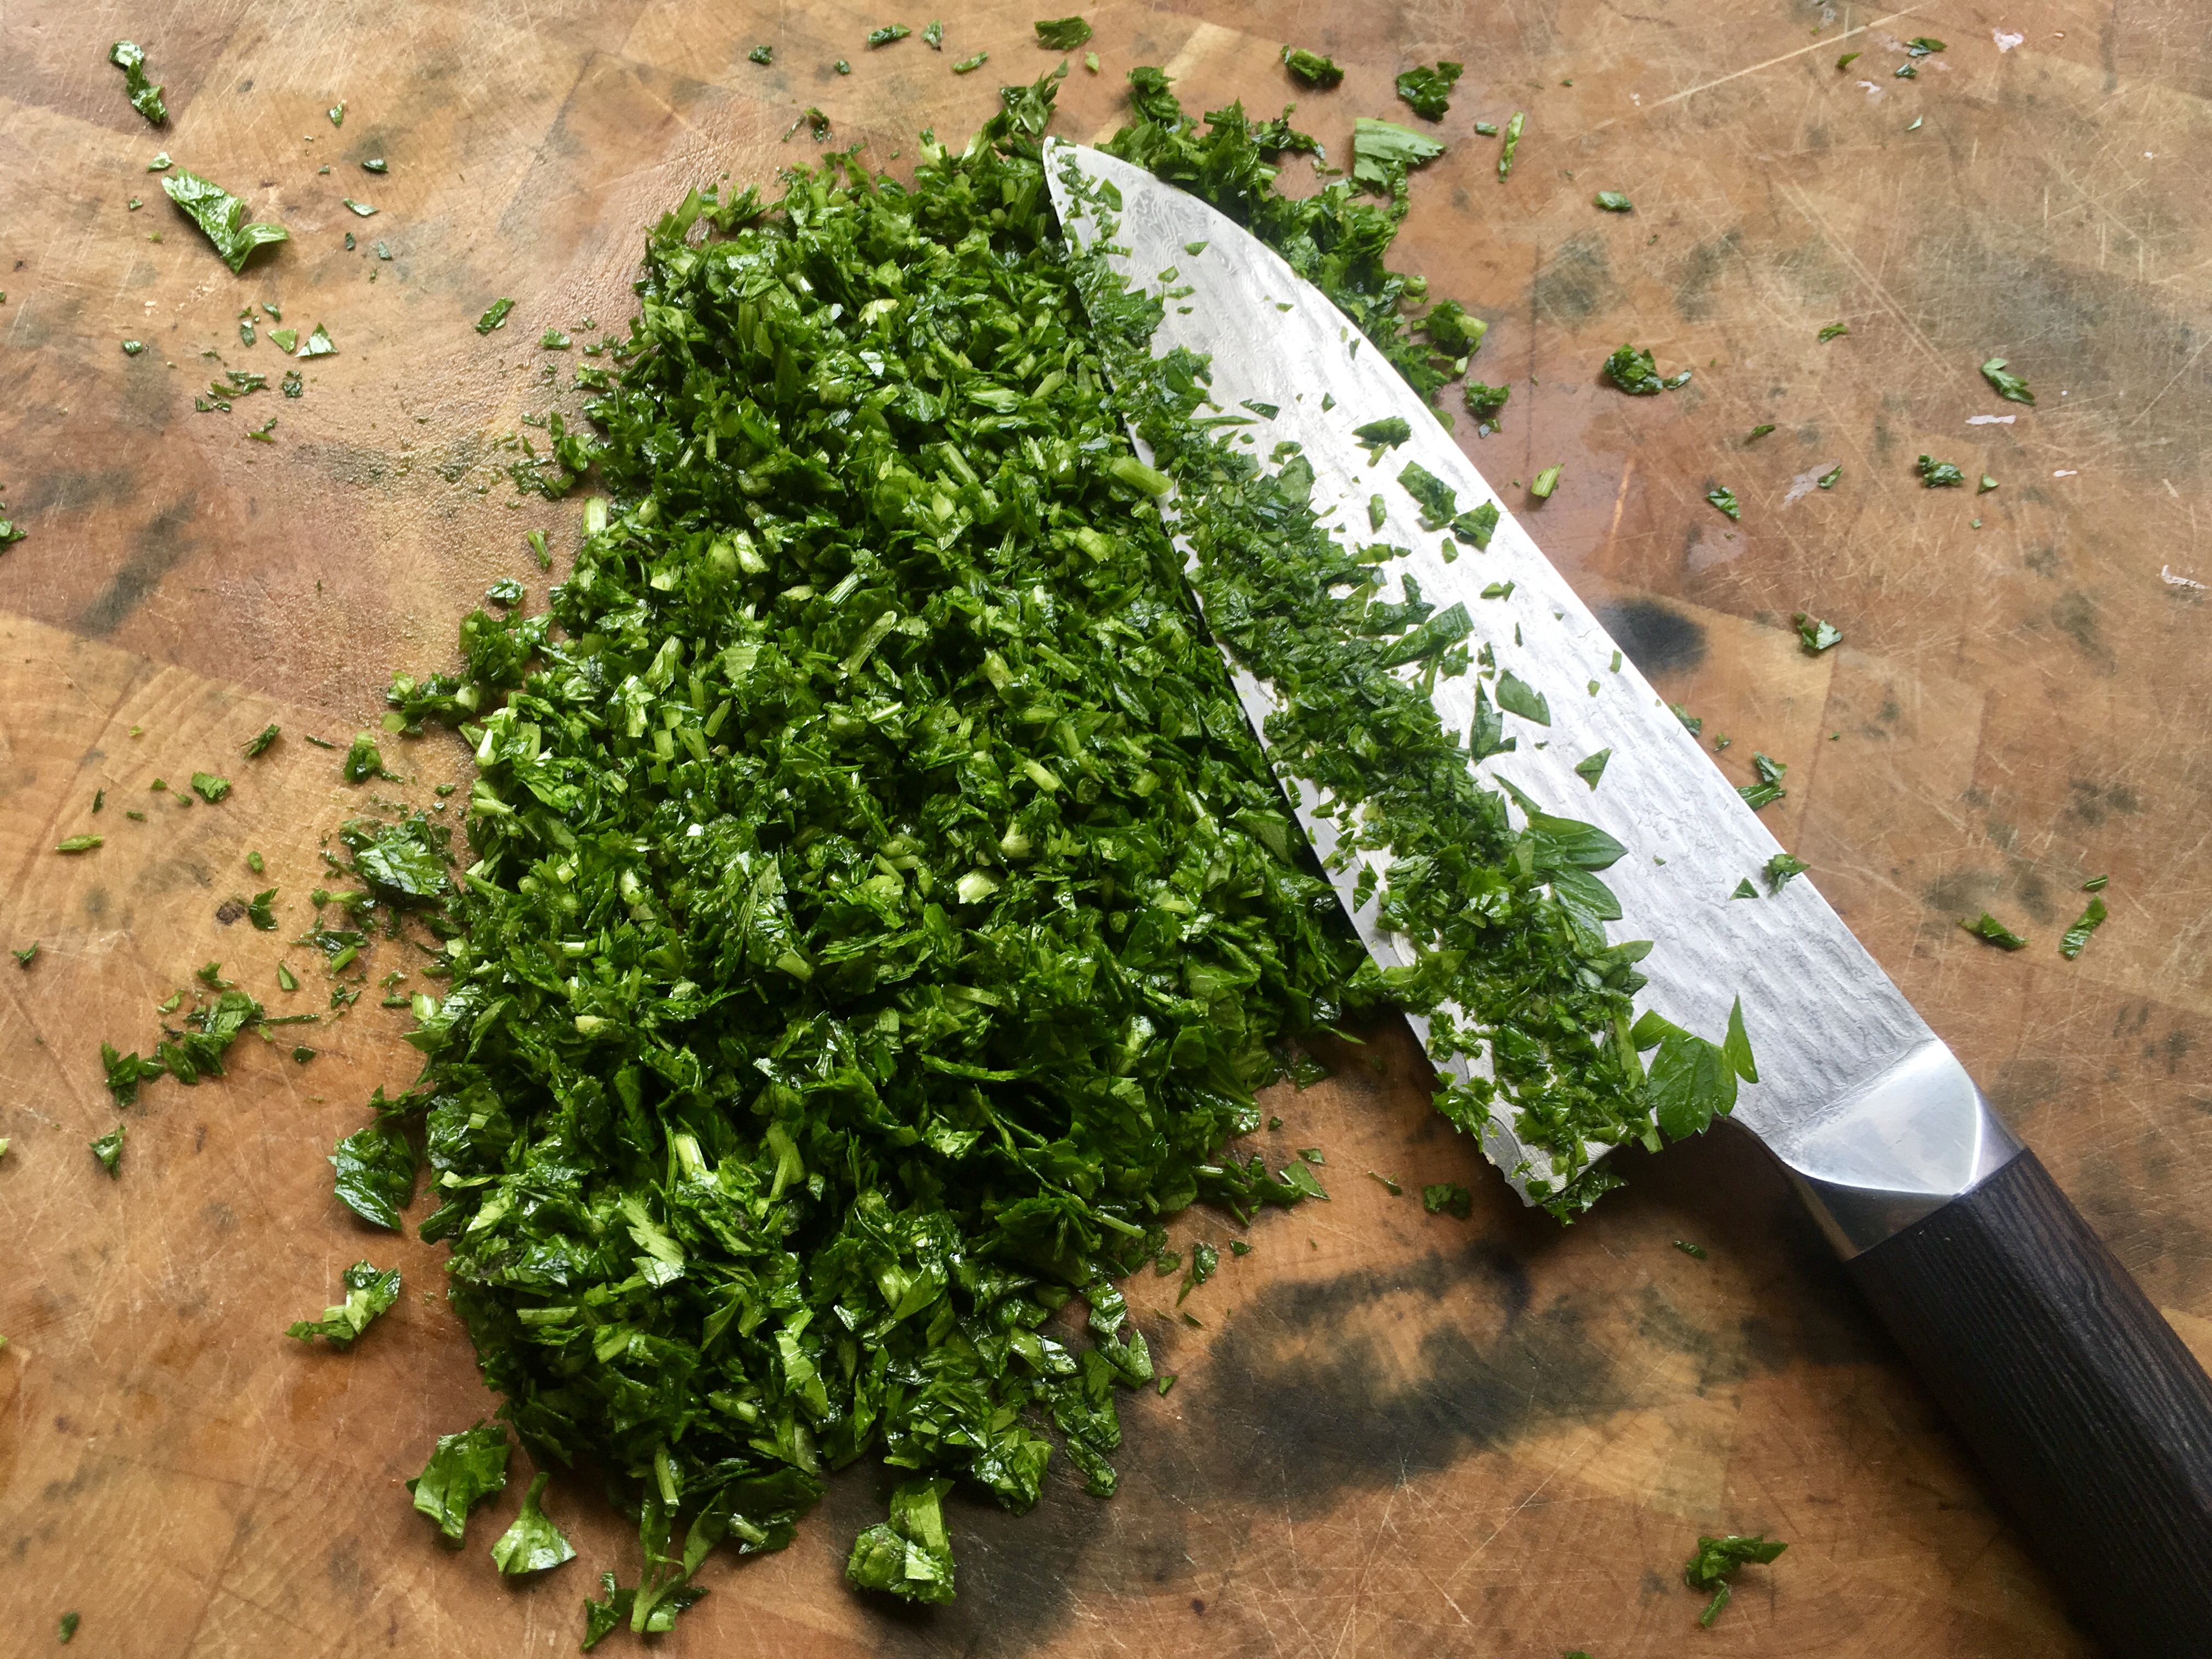
Lots of fresh parsley is key!


I recently saw a recipe that had some chimichurri ingredients but also included avocado, and thought: now that sounds tasty! It’s not the classic recipe, of course, but it is delicious! I can see this used as a dip for veggies or chips. The fresh lime juice keeps the avocado from browning.


1/3 cup extra virgin olive oil
1/4 cup fresh lime juice
1 garlic clove, minced
1 cup finely chopped parsley
1 tablespoon finely chopped oregano, or 1 teaspoon dry oregano
1 Hass avocado, peeled, pitted and diced
Kosher salt

In a medium bowl, whisk the olive oil with the lime juice, garlic and a pinch of salt. Stir in the parsley and oregano and let it stand at room temperature for 30 minutes. Fold in the avocado and season with salt.


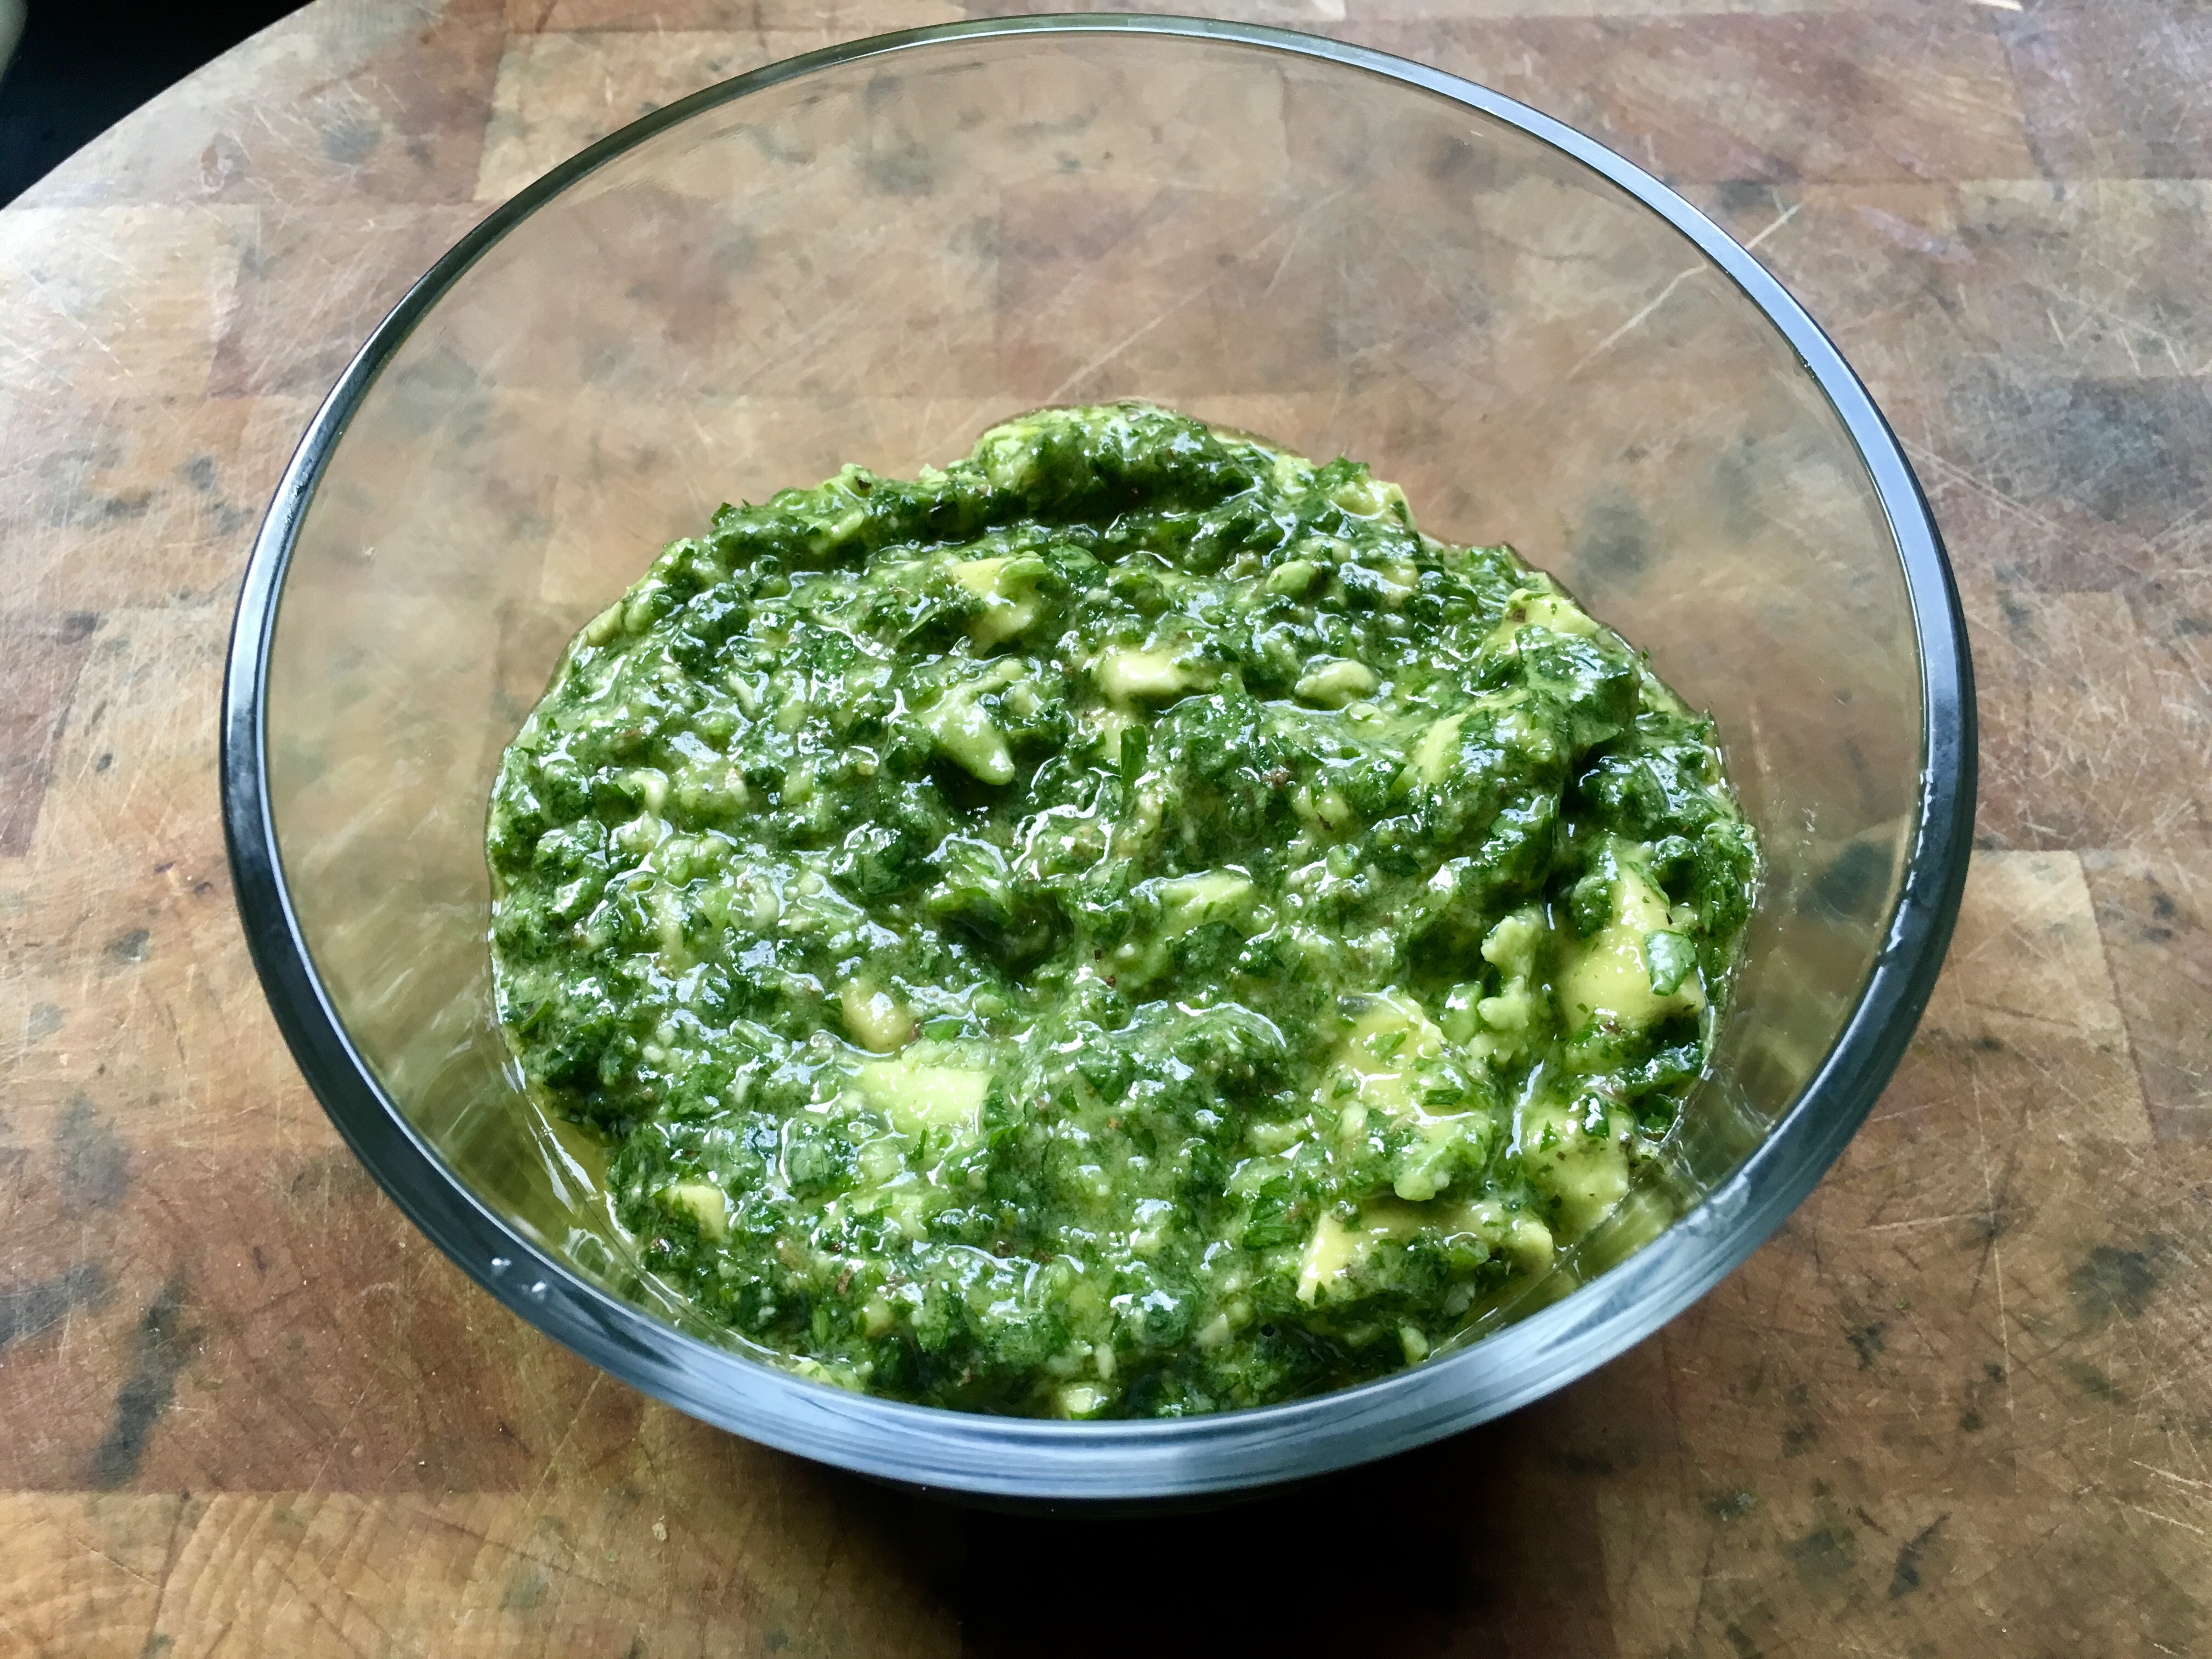
Avocado “chimi.” Chunky and tasty.


This “chimi” can be refrigerated for up to 4 hours.

ASIAN NOODLES WITH PEANUT SAUCE

Posted: January 31, 2024 in Food, Recipes
Tags: , , , ,

There’s something about Asian noodle dishes that make them incredibly addictive. They’re great hot or cold, and easy to make at home. I store an arsenal of basic Asian ingredients in my pantry, so slapping this together is no effort at all. And if you don’t have Asian noodles around, chances are you’ve got a box of pasta, which works just as well.

Next time you’ve got a bunch of people coming over, cook a batch a few hours beforehand and let it come to room temperature. It’s great with anything, really. Grab a bag of frozen egg rolls or some potstickers, and you’ve got great munchies for your guests.

Adding boiled and chilled shrimp to these noodles makes it a cool meal. I usually double the sauce recipe when I do that.

If you need to go gluten-free, use GF pasta…and you can find gluten-free hoisin sauce in the Asian food section of most supermarkets.

Asian noodles

4 tablespoons creamy peanut butter
1 tablespoon hoisin sauce
2 teaspoons sesame oil
1 teaspoon Chinese chili garlic sauce (more, if you like it spicy!)
16 oz. package Chinese noodles or pasta

Combine the peanut butter, hoisin sauce, sesame oil, and chili garlic sauce in a bowl. Set it aside. I keep my peanut butter in the fridge once the jar is open, so sometimes it’s a bit thick. So I just zap it in the microwave for about 10 seconds to soften it up.

Boil the noodles or pasta until al dente. Drain it and place it in a large bowl.

Mix the noodles with the sauce.

Devour!

When I first told my friends that I grew up in a Lithuanian family, that we only spoke Lithuanian at the dinner table, that I went to Lithuanian Saturday school for 8 years, that I was a Lithuanian boy scout…they looked at me with a bit of disbelief. On the surface, I looked just like any other American-born kid that grew up in the suburbs. But the home life was vastly different.

Few things were stranger to my friends than the food we ate. While all my “American” friends had PB&J’s for lunch, I had a liverwurst sandwich on dark Lithuanian bread. While my friends struggled with broccoli, I was force-fed beets. And while my friends ate macaroni with jarred tomato sauce or Kraft mac & cheese, my Mom served us macaroni with sour cream and butter. (Nobody called it pasta back then.)


img_0048


Few things prove you are a true Lithuanian more than an appetite for herring. (Silke (sil-keh) in Lithuanian.) I loved it at an early age. Didn’t matter if it was in a cream sauce with onions, in a tomato casserole with chopped boletes, or perhaps my favorite: this appetizer my Mom prepared only twice a year when my Dad’s buddies came over to play rounds of bridge all night.

Years later, when I was just out of college and in my first years of radio, I shared an apartment with my college buddy, Don. One evening, I prepared this dish for him when he came home from work. We both had the next day off (smart move, considering the vodka!) and I explained to him my family history behind this strange-looking appetizer. (I don’t think he’d ever had herring before.) Though it looked bizarre, he knew he had to trust me when it came to food, and he popped one of those bites into his mouth. I could see he wasn’t sure whether he liked it or not…a moment of many sensations hitting him all at once…confusion in his eyes…do I spit it out or swallow it?…so I poured him the vodka. He swallowed the food…took a shot of the vodka…and instantly had a moment of clarity. It all came together. It was indeed magical. I’ll never forget that look on his face!

There are a few basic ingredients that make this appetizer work…

First and foremost, you need a bottle of good vodka in the freezer. Despite their lack of love for anything Russian, Lithuanians like their vodka, and Stolichnaya was my Dad’s favorite back in the day. Even now, with hundreds of vodkas to choose from, I still go to the red-labeled Stoli bottle for this dish. (Though it’s now distilled in Latvia.) I find a space in the freezer…jam that bottle in there…and let it get nice and cold.

Obviously, good quality herring is essential. Though I can get them fresh when I’m back home on Long Island, the usual choice is from a jar. For me, there’s no better quality than Acme products out of Brooklyn, NY. (If you saw the episode of “Bizarre Foods America” with Andrew Zimmern where he visited a salmon processing plant in Brooklyn, that was Acme Smoked Fish.) You can find them in many supermarkets. The excellent Blue Hill Bay herring in dill sauce is an Acme product and can be found at Whole Foods.

Next: hard-boiled eggs that have cooled in the fridge. Get out the old egg slicer that’s been sitting in the kitchen drawer for the last decade and use it for this appetizer.

Red onion, sliced thin. How much you use is up to you. But it’s gotta be red and it’s gotta be raw.

And finally, Lithuanian bread. Yes, there is such a thing. It’s easy to find in most Polish or German food stores in the New York area. I also recently discovered an Eastern European food store in Hyannis, on Cape Cod, where I can stock up . I buy a loaf and then keep it in the freezer to enjoy throughout the year. Lithuanian bread is like the lovechild of rye bread and pumpernickel, so either one of those will work in a pinch.


img_0051

To make the appetizer, simply place a small piece of Lithuanian bread, about 1 1/2″ square, on a plate. Place a slice of hard-boiled egg on top of it. On top of that, some red onion. Then finally, a piece of herring.


img_0046


Pop the whole thing in your mouth, and wash it down with a small amount of frozen vodka. No shots–this isn’t a frat house. Besides, you won’t make it to the end of dinner. Then again, you may not care at that point!

I never learned how to play bridge, but I’m sure my Dad would be proud that I remembered this treat.

Few dishes scream out “comfort food” like meatloaf. My Mom’s meatloaf was awesome, and she’d cut a huge slab of it onto my plate, with fantastic butter-loaded Pennsylvania Dutch egg noodles on the side. I couldn’t stop eating it.

I never thought of making meatloaf when I moved away, because it gave my Mom something special to make for me when I came home to visit. She was thrilled that there was a dish she could make that I would devour every time, without hesitation. (The others were her roasted lamb and Lithuanian pierogis called koldūnai (kol-doon-ay).

But Mom has passed away years ago, so I’ve taken meatloaf matters into my own hands. I never got my Mom’s exact recipe. But I had an idea of what went into it, so I gave it a shot.

The standard mix for my Mom’s meatloaf was one-third each ground beef, pork and veal. I go 2/3’s beef and 1/3 pork instead, unless I can get my hands on humanely-raised veal from a farm down the road. My Mom used Lipton onion soup mix in her meatloaf. I chose to stay away from packaged ingredients which have chemicals and preservatives. And instead of layering slices of bacon on top as many people do, I fry and chop the bacon and mix it into the meat, giving my meatloaf delicious smokey bacon goodness in every bite!

To keep this dish gluten-free, I use GF breadcrumbs. I buy loaves of Udi’s frozen gluten-free bread, toast the bread slices, then put them in a food processor to make great-tasting bread crumbs that have all the flavor of regular bread crumbs, without the gluten.

image

4 strips bacon, fried and chopped
1 yellow onion, minced
1 teaspoon salt
1/2 teaspoon pepper
1/2 teaspoon granulated garlic
pork fat or olive oil
2 lbs. ground beef
1 lb. ground pork
1 cup breadcrumbs
1/2 cup ketchup
2 eggs

Fry the strips of bacon until crisp. Remove the bacon from the pan and chop it fine. Set it aside.

Keeping the rendered bacon fat in the pan, sauté the onion with it until translucent. Add the salt, pepper and garlic. Set the pan aside, letting it cool to room temperature.

In a bowl, combine the meat, bread crumbs, ketchup, bacon, eggs, and the sautéed onion mixture. Form it into a loaf and place it in a loaf pan. Bake at 350 for about an hour.

Delicious, caramelized meatloaf. Leftovers are always welcome!

I always thought that spaghetti squash was a sort of “gimmick” vegetable. But once I roasted it, I realized just how delicious it could be. Squash is a great lower-carb gluten-free substitute for pasta. But feel free to use spaghetti in this recipe if you like!


FullSizeRender


Cooking spaghetti squash is easy. I wash them, cut them in half, and remove the seeds and membrane with a spoon. I flip them onto their backs, skin side down, and drizzle some extra virgin olive oil on them. A little sea salt and pepper, and then I flip them back down, skin side up, on a sheet pan lined with non-stick aluminum foil. Into a pre-heated 350 degree oven for 30–40 minutes. When they’re soft to the touch, I remove the sheet pan from the oven, flip them back over again, and let them cool to room temperature. Then I simply scrape out the flesh with a fork, and it comes out in strands, like spaghetti.


image


While the squash roasts in the oven, I make the meatballs. After years of serious meatball research, I found that the secret to a tender meatball is adding more bread to the meat than you think you should.

2 lbs. ground grass-fed beef
1 cup breadcrumbs (at least)
2 eggs, cracked and scrambled
2 tablespoons dried parsley
2 tablespoons dried oregano
1 tablespoon dried basil
1 tablespoon granulated garlic
1 tablespoon granulated onion
1 teaspoon black pepper
2 teaspoons salt

Mix all the ingredients in a large bowl and form them into meatballs. (I like to use an ice cream scoop to make the job easier.)

Place the meatballs on a baking sheet that’s been rubbed with some olive oil. (I usually line the pan with non-stick aluminum foil as well.) Cook the meatballs for about 30 minutes at 350 degrees, until they’ve browned nicely.


Meatballs happily cooking low and slow in the rich tomato sauce.


As for the sauce…

2 cans (28 oz.) of tomatoes, pureed (preferably San Marzano tomatoes)
olive oil
1/2 onion, finely chopped
1 tablespoon dried parsley
1 tablespoon dried oregano
1 teaspoon dried basil
1 teaspoon granulated garlic
2 teaspoons salt
1/2 teaspoon fennel seeds

In a large pot, sauté the onions in a little olive oil until translucent. Add the pureed tomatoes and cook at medium heat until the foam disappears.

Add all the herbs and spices and mix well. Continue cooking on medium heat, lowering to a simmer if the sauce seems to be boiling too hard.

Add the meatballs to the sauce when they’ve finished cooking. (I like to include all the fat and juices that came out of the meatballs while cooking.)  Make sure all the meatballs are covered with the sauce. Place a lid on the pot, and simmer on low for at least an hour.


image


Scrape the spaghetti squash and place a mound of it in the center of the serving dish. Top it with the meatballs and sauce. Grate some Parmigiano-Reggiano cheese over the top, or do what I did this time, and cut a slab of mozzarella into small cubes and toss that on top. A little sprinkle of oregano and olive oil for good measure on top.


Substitutions: If you’re not in the mood for spaghetti squash, it’s safe to say your favorite pasta will work quite well.

This dish is easily made gluten-free simply by using GF breadcrumbs in the meatballs. I like to buy frozen gluten-free bread, like Udi’s, and toast the slices. Then I break them up and toss them in a food processor. In a minute, I have really tasty breadcrumbs that are as good as regular bread.

And if you’re going with pasta, then a GF pasta, like Garofalo, is a delicious gluten-free substitute.

A FABULOUS FISH BAKE

Posted: January 20, 2024 in Uncategorized

Those who say that cheese and fish don’t go together, haven’t tried shrimp scampi, a tuna melt, or even a McDonald’s filet-o-fish sandwich! Hearty and satisfying, this dish is all comfort.

As I researched this recipe, I found versions that had potatoes or pasta. I wanted a lower calorie and lower carb option, so I went with just cauliflower and broccoli. But feel free to substitute as you like. Potatoes don’t need to be pre-cooked, as long as you cut them into small cubes. Pasta needs to be cooked to the almost al dente stage—very firm—and then added to the pan.

I originally came up with this recipe when I found some tuna and salmon in my freezer, and I wanted to use them up. But this recipe works even better with any white fish, like cod or halibut.

If you use gluten-free flour and breadcrumbs (easy enough to do), this dish is gluten-free.


6 oz. cod, fresh or thawed if frozen
8 oz. mixed broccoli and cauliflower, cut into smaller pieces (you can use fresh or frozen)
1/2 small onion, finely chopped
1 tablespoon unsalted butter 
1 tablespoon all-purpose flour
1/2 cup milk
2 oz. sharp cheddar cheese, grated, separated
1/4 teaspoon granulated garlic
Salt and pepper
1 tablespoon breadcrumbs


Preheat the oven to 350 degrees.

Cut the fish into large chunks, removing any skin, and place it in a bowl. 

Pour the broccoli and cauliflower into the bowl.

Melt the butter in a saucepan over medium heat, and add the onion, sautéing it until it’s soft but not brown. Stir in the flour and cook for a minute or two. Slowly pour in the milk, stirring constantly. Season with salt, pepper, and the granulated garlic. Add all the cheddar cheese except a tablespoon, mixing well and making sure it all melts.


Pour the sauce into the bowl with the veggies and the fish, and mix everything gently, trying not to break the fish pieces up too much.


Pour the contents of the bowl into a baking dish just big enough to hold it all. You don’t want it spread out…you want it to have some depth so it doesn’t dry out.

Sprinkle the top with the remaining cheese and the breadcrumbs.


Bake for about 30 minutes, until it’s golden and bubbly.


This recipe could serve 2, but I devoured it on my own!

Instead of opening a nasty can of Manwich or other similar product, the classic Sloppy Joe sandwich is easy enough to make from scratch.

My version takes on a Mexican twist (hence the name Sloppy José), using seasoned taco meat and a great barbecue sauce. Putting them together with a sprinkling of Mexican cheese on a bun with lettuce and tomato makes for one sloppy but delicious sandwich!


sloppy jose


For the barbecue sauce…

2 cups ketchup
3/4 cup water
6 tablespoons white vinegar
6 tablespoons apple cider vinegar
6 tablespoons brown sugar
3 tablespoons Worcestershire sauce
1 tablespoon chili powder
2 teaspoons salt
2 teaspoons black pepper
1 1/2 teaspoons cumin


Mix all the ingredients in a saucepan and simmer until the flavors have blended, about 20 minutes. Remove from the heat and cool to room temp. If you store it in an airtight container in the fridge, it’ll stay good for a few months.


For the seasoned taco meat…

1 teaspoon granulated garlic
1 teaspoon onion powder
1/4 teaspoon crushed pepper flakes
1 teaspoon dried Mexican oregano
1 teaspoon paprika
2 teaspoons ground cumin
1 teaspoon sea salt
1 teaspoon black pepper
1 Spanish onion, finely chopped
olive oil
2 lbs. grass-fed ground beef


Combine all the spice ingredients in a bowl.

Sauté the onions in a bit of olive oil until translucent. Add the beef and sauté until cooked, mixing in the spice mixture a little at a time until you’ve used it all.


For the sandwich…

Take some of the taco meat and place it in a small non-stick pan and heat it on medium. Squirt in as much of the barbecue sauce as you like, mixing thoroughly. Sprinkle some grated Mexican cheese on top. (I like Cotija, which is like a Mexican feta, but a bag of mixed cheeses works great, too.) Mix thoroughly, letting it all melt together into one warm, gooey mess. Throw it on a bun. Add lettuce, tomato, avocado slices, whatever you like!


I grill outdoors year-round, but this recipe works just as well indoors.

Many people are turned off by lamb because somewhere in their past, they had a horribly overcooked piece of meat that ruined it for them. Don’t be sheepish! Try lamb again!

If you think lamb is too “gamey,” buy American lamb over New Zealand or Australian lamb. Although the animals are mostly pasture-raised, most American lamb is larger and grain finished, which results in a milder flavor. Unfortunately, like with non grass-fed American beef, this also results in a larger, fattier animal, and a less healthy cut of meat.

I prefer 100% grass-fed lamb, and most of it comes from New Zealand. Having been to the country twice now, I can tell you that the quality is unmatched and the grasslands of New Zealand are the most beautiful I’ve ever seen. New Zealand lamb is smaller and is slaughtered at a younger age than American lamb, making it very tender. In New Zealand, as well as many other countries, only an animal under 12 months of age and without incisors can be called “lamb.” No such labeling is required in the United States.

I love the baby lamb chops that look like miniature porterhouse steaks. You can find them in any supermarket. Here’s an easy recipe that I first served at a party in my home for 40 people, many of whom claimed they didn’t like lamb or never had it before. By the end of dinner, the chops were gone!


lamb LTL


8 small lamb chops
½ cup olive oil
¼ cup balsamic vinegar
2 cloves garlic, through a garlic press
1 tablespoon fresh rosemary, chopped
1 tablespoon honey
2 teaspoons Dijon mustard
1 teaspoon dried oregano
Salt and pepper


Place the lamb meat in a plastic bag. In a bowl, combine all the other ingredients to make a marinade and pour it over the lamb. Seal the bag and squish it around so that the marinade reaches every part of the chops. I leave it at room temp if marinating for a few hours…or in the fridge if overnight.

Before cooking, take the lamb out of the fridge and let it come back to room temperature.

Pre-heat the outdoor grill. Cook the lamb until you reach an internal temperature of 145. Let it rest for 10 minutes before serving.

If you’re cooking indoors…

…place the lamb chops in a hot oven-proof pan (cast iron is always best) and sear it on all sides.


Then place the pan in a 350-degree oven to cook all the way through.


HOMEMADE SPINACH PASTA

Posted: January 10, 2024 in Uncategorized

Homemade pasta is surprisingly easy to make, especially if you have a food processor. If you’re not crazy about spinach, just leave it out of this recipe.

Homemade spinach pasta with Alfredo sauce, peas and guanciale.

3 oz. fresh spinach
2 large eggs
1 1/2 teaspoons extra virgin olive oil
1/2 teaspoon Kosher salt
2 cups all-purpose flour, as needed

Get a bowl and put some cold water and ice cubes in it. Set it aside.

Preheat a pan over medium heat with a little water in it. Add the spinach and cook it for no more than a minute…just until it has wilted completely and turns bright green.

Place all the spinach in the ice bath to let it cool for a few seconds. When it gets lukewarm, remove it, and squeeze out the excess moisture with a clean dish towel or cheesecloth.

In the food processor, using the regular cutting blade (not the dough blade), combine the spinach, eggs, olive oil and salt. Blend until it’s smooth.

Add the flour and blend until the dough no longer sticks to the blades. Depending on how much moisture you have, you might have to add flour…or you might need to add some cold water.

On a lightly floured surface, roll the dough into a ball, and wrap it with plastic wrap. Let it rest for 20 minutes at room temperature.

After 20 minutes, remove the dough from the plastic and, on a floured surface, cut the dough into 4 pieces.

Roll the dough out with a rolling pin into rectangles about 1/4″ in thickness if you have a pasta machine. If you’re going to be cutting it by hand, roll it as thin as you can.

If using a pasta maker, dust it with flour and run the dough rectangles through several times, starting with the widest setting, and then reducing it with each run to the desired thickness. Spinach pasta is stickier than regular pasta, so you may not get it as thin. Then change the pasta maker’s attachment to the desired noodle shape, and cut it with the pasta maker.

If you’re hand-cutting the pasta, once you’ve rolled it as thin as you like, dust it with flour and roll it into a log shape. Then cut it into pieces as wide as you like. Unroll each cut piece and place it on a floured surface so it doesn’t stick together.

Bring a large pot of salted water to a boil. Lower the pasta into the water, using a wooden spoon to keep the noodles moving so they don’t stick together. Cook until the pasta is firm but soft, 3 to 6 minutes depending on the thickness of the noodle.

Use tongs to remove the pasta from the pot. If you pour it into a strainer, the pasta will stick together.

In this case, I put the cooked pasta in a large pan with alfredo sauce , peas, and crispy bits of guanciale. I tossed it all together until the sauce was nice and creamy.

If you want to make pasta without the spinach, start with 1 3/4 cups flour and then add as needed.

This was my most popular blog post from a decade ago. Thought I’d re-run it…

Food magazines and cooking shows are pretty obvious places to be inspired by new recipes from common ingredients. But I’ve found inspiration from some strange places, including old TV sitcoms. I had some nice thick pork chops thawed, and I was trying to think of something new to do with them. The classic “pork chops and applesauce” episode of The Brady Bunch was on TV that afternoon. I looked in the pantry, found a small container of my daughter’s applesauce, and came up with this recipe.

The applesauce and honey create a tasty crust.

pork chop 2

2 nice, thick cut pastured pork chops
1 small tub (4oz.) unsweetened apple sauce
1 tablespoon fresh sage, finely chopped
A few sprigs of fresh thyme–leaves only–finely chopped
1 teaspoon honey
1 teaspoon salt
1/2 teaspoon granulated garlic
1/4 teaspoon fresh cracked black pepper

In a small bowl, combine everything but the pork chops.

Smear this applesauce mix all over the pork chops, place them in a non-reactive covered container in the fridge, and let them marinate overnight.

The next day, make sure all the gooey applesauce mix gets re-smeared on the chops. You want it nice and thick on the meat.

Pre-heat the oven to 350 degrees.

On the stove top, heat an oven-proof pan on medium. Use a little olive oil. Place the chops in the pan gooey side down, then re-smear with any leftover applesauce on what is now the top side. Let the first side sear to a golden brown before flipping the chops over. Be careful not to let them burn from the sugars in the applesauce and honey.

Once you’ve flipped the chops, place the pan in the oven. Cook the pork chops until just pink. (It’s no longer necessary to cook pork to death like our parents used to do. The safe temp is 145 degrees.)