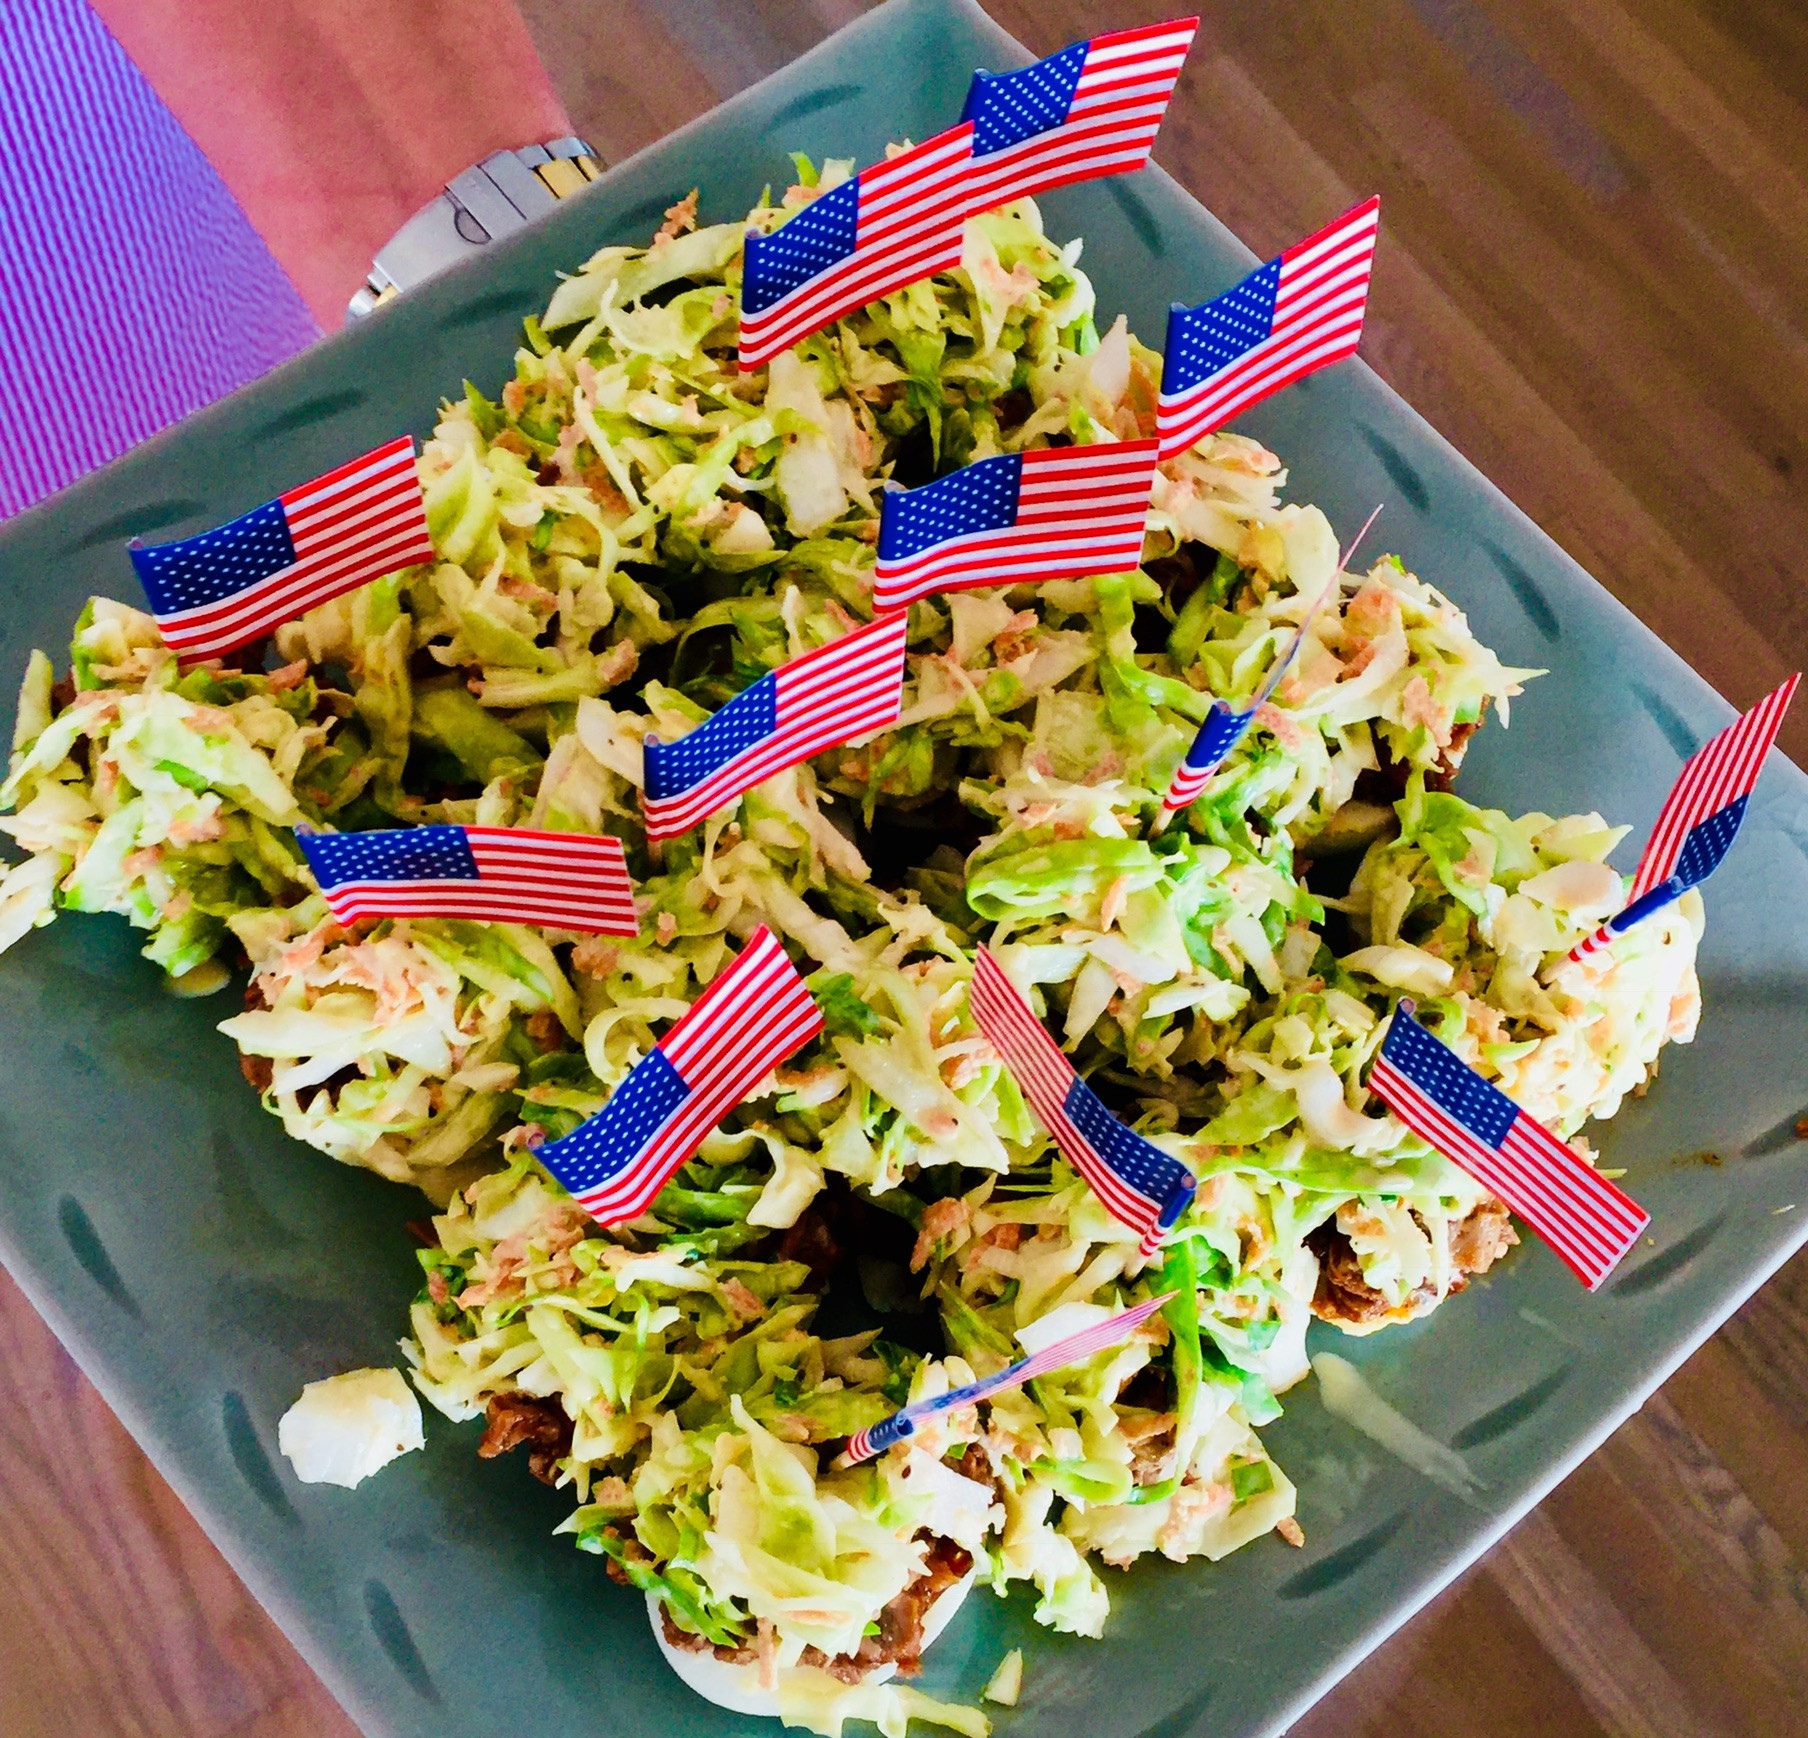
This is a huge hit wherever I bring it. I brought it to a dinner party last night to celebrate the 4th of July.

It’s easy to set up the parts at home, then put it together quickly at a party. If you know what a pulled pork sandwich North Carolina-style is all about (pulled pork on a bun with cole slaw right on top of the meat), then imagine taking away the bun and replacing with a deviled egg! It’s messy, it’s delicious, and everyone loves them.

I’ve tried this two ways now: with pulled pork and with chicken…and the big thumbs up goes to the pork. Of course, I will smoke a pork shoulder for 10 hours, pull the meat, and mix it with the barbecue sauce…all for this dish. If you don’t have a smoker, you can simply wrap a smaller piece of pork shoulder in aluminum foil (it’s good if it’s fatty), and bake it in the oven at 250 degrees for a few hours until the meat is juicy and falls apart.

Be sure to make a lot of these…they’ll go faster than the hard-boiled eggs in “Cool Hand Luke!”


For the BBQ sauce:
2 cups ketchup
3/4 cup water
6 tablespoons cider vinegar
6 tablespoons white vinegar
6 tablespoons brown sugar
3 tablespoons Worcestershire sauce
1 tablespoon chili powder
2 teaspoons salt
1 teaspoon black pepper
1 1/2 teaspoons cumin

Combine all the ingredients in a saucepan and simmer over medium heat for about 25 minutes, until the sauce has thickened. Let it cool to room temperature and then store it in the fridge. It will be good for several weeks.


For the cole slaw:
2 tablespoons mayonnaise
1 tablespoon rice wine vinegar
1/2 teaspoon sugar (I use organic cane sugar)
2 cups finely shredded cabbage

Combine all the cole slaw ingredients in a bowl, mixing well, and place it in the fridge. Making the cole slaw a day ahead of time is even better.

Always great to have a pretty helper!


For the deviled eggs:
6 hard-boiled eggs
1/4 cup mayonnaise
1 tablespoon mustard (I use Gulden’s)


Here’s my tip for perfectly hard-boiled eggs every time: place the eggs in a pot, cover them with cold water, and turn the heat on high. Just before the water starts to boil, put a lid on the pot and turn the heat off. Let the eggs sit in the hot water for 15 minutes. Perfect hard-boiled eggs every time! Once cooked, keep the eggs in the fridge.

Here’s another tip: the easiest peeling eggs are older eggs! No…that doesn’t mean you let your eggs sit out on the front porch for a week. What that means is: but them from your supermarket rather than the farm stand down the road. Super-fresh eggs still have a membrane attached to the shell that makes them difficult to peel. The membrane detaches in slightly older eggs, making them easier to peel.

Slice the eggs in half and place the yolks in a bowl with the mayonnaise and mustard. Mix it well and keep it in the fridge.


To assemble, take a teaspoon of the mayo/mustard/yolk mixture and place it in the cavity of one of the egg halves. Place a lump of pulled pork on top (I like it warm, to counter the cold of the mayo and cole slaw.) Then place a teaspoon of the cole slaw on top of the chicken.

PICKLING BEETS

Posted: July 2, 2018 in beets, Food, pickling, Recipes
Tags: , , ,

Growing up in a Lithuanian family, there was a small group of foods that I had to love to survive, since they constantly appeared on the dinner table: potatoes, cabbage, mushrooms, herring, and beets. Fortunately for me, I loved them all, despite my Mom’s desire to boil everything to death.

One of the many uses for beets, besides a cold summer soup and a hot winter soup, was pickling. Pickled beets are an excellent side dish for any hearty meat dish. (I love ’em with kielbasa!)  Store-bought pickled beets pack way too much sugar in every jar, so it was time to make my own. The addition of hard-boiled eggs to the mix is a personal one. If you don’t like ’em, leave ’em out and add more beets.

A real time saver is a product called Love Beets, which you can find in any supermarket. If you use them, you can skip the roasting of the beets altogether.

beets


4 to 8 beets, scrubbed (your favorite variety)
1 cup apple cider vinegar
1 cup water
3 garlic cloves, crushed
3 tablespoons sugar
2 teaspoons whole black peppercorns
1 tablespoon Kosher salt
1 red onion, sliced
4 hard-boiled eggs, peeled (optional)
6 fresh dill sprigs

Pre-heat the oven to 450. Wrap the beets in foil and roast for about an hour, until tender. When they’re cool enough, carefully peel and quarter them.

In a medium saucepan, combine the vinegar, water, garlic, sugar, peppercorns and salt. Bring it to a boil and simmer over moderately high heat, stirring until the sugar has dissolved. Let the pickling liquid cool to warm, about 15 minutes.

In a heat-proof glass jar or container, layer the beets, onion, eggs and dill sprigs and then cover with the pickling liquid. Let it stand at room temp for 2 hours, then place it in the fridge overnight.

They stay fresh for a week, but they won’t last that long!

When it comes to grilling, lamb is often overlooked. Some people think the taste of lamb is too gamey. The really good lamb, grass-fed Australian or New Zealand lamb, can have that taste. Most American lamb is a bit milder, so give that a try.

These lamburgers are best when grilled over hardwood charcoal. But they’re just as tasty if you pan-sear them in a cast iron skillet and finish them in the oven.

I  mix one pound of ground lamb meat with one pound of ground grass-fed beef to cut the gaminess of the lamb. The flavor is just right.


1 lb. ground lamb
1 lb. ground beef
2 tablespoons + 2 teaspoons extra Virgin olive oil
1/2 onion, minced
1 tablespoon Dijon mustard
1 teaspoon each fresh parsley, mint, and dill, finely chopped
1 teaspoon dried Greek oregano
1/2 teaspoon cumin
1 large clove garlic, squeezed through a garlic press
1 scallion, finely chopped, green part only
1/2 cup breadcrumbs
1 egg
1 teaspoon salt
1/2 teaspoon black pepper


Heat 2 tablespoons of the olive oil in a skillet over medium heat. Add the onions. Cook them until translucent, about 6 minutes. Transfer the onions to a plate and let them cool.

In a bowl, mix the onions, mustard, parsley, mint, dill, oregano, cumin, garlic, scallions, breadcrumbs, egg, and salt and pepper.

In another bowl, combine the lamb with the beef. Then add the onion mix bowl to the meat and make sure all the ingredients are combined.

Form the meat into slider-sized patties. Place them on a baking sheet covered with non-stick foil, and place the baking sheet in the fridge.

Don’t let the lamburgers get too cold in the fridge…just enough to firm the meat up a bit. If it gets too cold, give it a few minutes at room temp to warm up again.  Grill the burgers until cooked to medium.

If you’re cooking indoors, heat some lard or avocado oil in an oven-proof pan, preferably cast iron. Sear the burgers well on both sides, then place the pan in a 350-degree oven to finish cooking.

Place the burgers on slider buns with lettuce and tomato, and smear the bun with the feta cheese dressing.


My recipe for feta cheese dressing works really well with lamburgers. But it’s also great on a salad.

3/4 cup plain Greek yogurt
1  cup mayo
1 teaspoon Worcestershire sauce
1/2 teaspoon cayenne pepper sauce, like Franks Red Hot
1 teaspoon Dijon mustard
1/2 teaspoon granulated garlic
1/2 teaspoon salt
1/2 teaspoon ground black pepper
4–5 oz. crumbled feta cheese

Combine all the ingredients in a bowl. Mix well. Cover and refrigerate. If you can wait a day, it’s even better.

FullSizeRender (14)


I’m a wuss. I can’t do heat. But I’ve always been fascinated by jerk chicken: it looks amazing and smells fantastic. So I decided to try making a kinder, gentler version by eliminating the number one high-heat ingredient: Scotch bonnet peppers.

On the scale of hotness known as the Scoville scale, Scotch bonnets reach anywhere between 100,000 to 350,000 Scoville units. To give you an idea how hot that is, jalapenos only reach 2,500 to a maximum of 8,000 Scoville units! That means those suckers are 40 times hotter than jalapenos! And that’s why I left them out of my recipe.

I found that when I left the Scotch bonnets out, there was still plenty of fragrant, hot and smoky flavor in my jerk chicken.


Jerkalicious.


1 medium onion, coarsely chopped
3 medium scallions, chopped
2 garlic cloves, chopped
1 tablespoon Chinese five-spice powder
1 tablespoon allspice berries, coarsely ground
1 tablespoon black pepper, coarsely ground
1 teaspoon dried thyme
1 teaspoon freshly grated nutmeg
1 teaspoon salt
1/2 cup soy sauce
1 tablespoon olive oil
8 lbs. chicken, parts or whole birds quartered


In a food processor, combine the onion, scallions, garlic, five-spice powder, allspice, pepper, thyme, nutmeg and salt. Process it into a coarse paste.

With the machine on, add the soy sauce and olive oil in a steady stream.

Place the chicken pieces in a large Ziploc bag, and pour the marinade in. Zip the bag up and squish it around to make sure the marinade touches all parts of the chicken. Place the bag in a bowl (to prevent accidental leaks) and place the bowl in the fridge overnight.

Bring the chicken to room temperature before cooking.

Indoors: Place the chicken on a baking sheet and bake in a 350-degree oven for about 30 minutes. At the end, move the baking sheet under the broiler and cook a few minutes more, to get some caramelization going.

Outdoors: Light a grill and cook the chicken over a medium fire, turning it so it doesn’t burn. Cover the grill if you like, for smokier flavor. Make sure the chicken is cooked through before serving.


My home town of New York is the greatest city in the world. Over the years, I’ve brought my daughter to the Big Apple to experience the amazing sights it has to offer. We’ve done the museums: from the Guggenheim to the Museum of Modern Art to the Whitney…from MOMA to the Museum of Natural History and the Rose Science Center. Last year, we visited the Statue of Liberty, Ellis Island, and One World Trade Center. We decided that the Empire State Building was long overdue.


The Empire State Building is an art deco skyscraper that, at 102 stories, was the world’s tallest building for over 40 years. Over 4 million people visit it every year, so I’m going to give you a few important tips that are good to know if you’re planning a trip sometime soon…and you really should go.


The most important tip I can give you is: buy the VIP Express pass. You can only get them online here: http://www.esbnyc.com/buy-tickets. They cost more, but the time you don’t waste and stress you avoid is worth every penny.


Facing south: One World Trade Center in the distance, with a very tiny Statue of Liberty to the right of it.


It doesn’t matter how crowded it gets (and sometimes, the line for tickets to the Empire State Building goes out the door at 5th Avenue and 33rd, and around the corner all the way to Macy’s!)…if you buy the VIP tickets, you won’t be standing in that line! Of the thousands of people who were visiting on a recent Saturday evening, we were 2 of only 3 people with VIP passes!


We walked up to the door and told the security guard that we had VIP passes, and he let us right in, past everyone, to another guard who led us to an escalator to the elevators. When we reached the top of the escalator, we again mentioned we had VIP passes, and they led us to another guard who gave us wrist bands after scanning the tickets we purchased online, and told us: “Show your wristbands to everyone as often as you can.” He meant it!


The magical wristband.


One wave of the wristband, and we were the first to go on the elevator to the 80th floor, where you walk through the “Dare to Dream” exhibit, on your way to the next set of elevators that take you to the outdoor observatory on the 86th floor. Again, there was a line of hundreds of people ahead of us, and again, we waved our wristbands and were escorted to the front of the line and right onto the elevator.


The MetLife Building–which was the old Pan Am Building (left), the Chrysler Building (center) and the United Nations (right.)


From the street to the 86th floor, it took us a total of 10 minutes! Worth every penny of the $65 we paid per ticket.

The 86th floor has an enclosed area, but everyone wants to be outside, where the only thing between you and a long drop down to the street is a fence. We were there at sunset, and the city looked spectacular.


Facing west.


We chose not to go to the observatory on the 102nd floor (that would’ve required a different ticket purchase), but I had been there before, in my youth. Enclosed by glass and very small, it’s a little eerie up there as the building creaks and sways slightly from side to side in the wind. An old-style elevator takes you up from the 86th floor, and it’s something you should experience once in your life. My daughter didn’t seem too keen on going, so we passed on it this time.


Looking up from the 86th floor to the top: dizzying!


Of course, what goes up must come down, and that includes the hundreds of people at the top of the building! Once again, wristbands to the rescue: one wave, and we were put on the first elevator down to the 80th floor, where the gift shop was located. One more wave of the wristband, and we were the first on an elevator taking us back down to street level.


The VIP Express pass rocks! I will never go to the Empire State Building any other way…and neither should you!


DIY TACO SEASONING

Posted: June 20, 2018 in beets, Food, morocco, Recipes, taco
Tags: , , , ,

It’s so easy to make taco seasoning at home. So why would you buy the spice factory floor sweepings they use for packaged taco seasoning sold in supermarkets? I’m not a huge fan of Mexican cuisine, but every once in a while, I crave a good taco. My tacos don’t resemble most, but that’s OK. It’s all about making it your own.


1 teaspoon granulated garlic
1 teaspoon onion powder
1/4 teaspoon crushed pepper flakes
1 teaspoon dried Mexican oregano
1 teaspoon paprika
2 teaspoons ground cumin
1 teaspoon sea salt
1 teaspoon black pepper
1 Spanish onion, finely chopped
olive oil
2 lbs. grass-fed ground beef

Combine all the spice ingredients in a bowl.

Saute the onions in a bit of olive oil until translucent. Add the beef and saute until cooked, mixing in the spice mixture a little at a time until you’ve used it all.

You can also mix the spices with 1 cup of flour and use it to season chicken before frying…or mix the seasoning with strips of chicken breast or beef for fajitas.

My tacos are a bit unusual. Although I use a soft flour tortilla and my seasoned and cooked ground beef, I spread a little Thousand Island dressing and chop some roasted golden beets.

But this taco meat goes great with the standard beans, shredded lettuce, guac, and salsa as well.


Tacos with roasted golden beets, baby Romaine salad mix, and Awesomesauce

Tacos with roasted golden beets, baby Romaine salad mix, and Thousand Island dressing.

For the beets: I wash the beets and quarter them, cutting the top and bottom off but leaving the skin. I place them in a sheet of aluminum foil, and sprinkle with salt, pepper and olive oil. I combine the ingredients to coat the beets, wrap the foil tightly into a package, and roast in a 400-degree oven for 1 hour. After roasting and the beets have cooled a bit, I slice them into smaller pieces for the tacos.

Slices of avocado go really well with this, too!

It’s Father’s Day and it’s a hot one here in New England. Time to make a delicious cold soup that always reminds me of my Dad…

It’s interesting that an Eastern European country that is as far north as Newfoundland has one of the most refreshing cold summer soups of any country in Europe. It’s a cold beet soup called Šaltibarščiai (pronounced shul-tih barsh-chay) and it’s classic Lithuanian cooking at its best.

No summer was complete without my Mom’s Šaltibarščiai on the table, and my Dad always insisted on eating it with boiled potatoes on the side. Now residing in an assisted living facility, my Mom has not had this soup in many years, so I made her a batch when she came to visit recently.

There are many different variations of this soup. For example, many Lithuanians today use keffir instead of buttermilk. My Mom insists buttermilk tastes better, and I have to agree.

securedownload


1 quart buttermilk
4 hard-boiled eggs, peeled and chopped
3 cucumbers, peeled, seeded and chopped
8 beets, cooked, peeled and chopped
1 tablespoon finely chopped fresh dill
1 scallion, finely chopped, greens only
salt
a pile of boiled potatoes (optional)


Pour the buttermilk into a large bowl. If it’s very thick, you can dilute it a bit with fresh water.

Peel and chop the eggs and toss them in the bowl. Peel, seed and chop the cukes…then into the bowl.

I love Love Beets, hermetically sealed cooked and peeled beets, ready to use, available in most supermarkets. (In the old days, my Mom would simply use canned beets.) I open a couple of packs of Love Beets, pouring the beet juice into the bowl. I chop the beets and add them as well.

Grab some fresh dill and chop it finely. Add it to the bowl. Finely chop the greens of one or two scallions and sprinkle some salt on them. Rub the salt into the scallions, mashing them a bit, softening them. Then add the to the bowl.

Stir everything together, put a lid on the bowl, and let it chill in the fridge for a few hours.

Remove from fridge, stir, and season with more salt if needed.


This is a great side dish for any special occasion. And you can substitute to suit your needs. Goat cheese not your speed? Try Gruyère or smoked gouda. Need it to be gluten-free? Use GF breadcrumbs. Don’t like mushrooms? Okay…I can’t help you there…


image


1 package large white mushrooms
olive oil
1/2 shallot, finely chopped
1 clove garlic, through a press
1 tablespoon fresh thyme, finely chopped
pinch of red pepper flakes
salt and pepper
fresh goat cheese
bread crumbs
1 tablespoon fresh parsley, finely chopped


Pre-heat the oven to 400 degrees.

Rinse the mushrooms in cold water to clean them. Remove the stems of the mushrooms and set them aside. Rub the mushroom caps with olive oil and place them on a baking sheet, open side-down, in a 400-degree oven for a few minutes.

In a pan, sauté the shallot and garlic in a little olive oil. Chop the mushroom stems finely and add them to the pan. Add the thyme and pepper flakes.

Reduce the oven temp to 350 degrees after removing the mushroom caps. Flip the mushroom caps over so that they look like little bowls. Break off a small piece of goat cheese and place it in each mushroom. Top each with the sautéed shallot mixture. Sprinkle breadcrumbs on top and sprinkle parsley over that.

Return the baking sheet to the oven, cooking the mushrooms until they are lightly golden in color, and the cheese has melted.


image


Mushroom myth: Soaking mushrooms in cold water makes them mushy. Not true! Alton Brown, on an old episode of “Good Eats” on the Food Network, showed that mushrooms do not soak up any water when left to soak for even 30 minutes. So use your mushroom brush…use your kitchen towel…whatever you like. But I prefer to get them clean simply with cold water.


I’ve got a pizza bucket list. I’ve been to Lombardi’s. Al Forno in Providence claims the rights to the first (and some argue the best) grilled pizza. Dying to go to DiFara’s in Brooklyn…Pizzeria Bianco in Phoenix. And I’ve tried going to Frank Pepe’s original location in New Haven, CT for years. Right off Rt 95, it’s easy to get to, in New Haven’s Little Italy neighborhood on Wooster St. The problem was, every time I stopped by, the line was down the street and parking was impossible. Take-out was not an option. My first visit had to be inside, at a table.

I never gave up!

My chance finally arrived recently, when my daughter and I were returning home to Rhode Island from a weekend in New York City. It was a cloudy Sunday afternoon. I found a parking space…we were third in line at the door…could we really be going inside Frank Pepe’s? Yes!!


Our booth was literally one step in and a step to the right. Boom. We sat. We looked around. We breathed it all in. It was loud. People were happy. They were eating pizza!

Soon it was our turn to order. I had no choice but to order a white clam pizza, the stuff of legend at Frank Pepe. That had to be my first bite there. My daughter ordered a large margherita pizza…and we were off!


We started by sharing a Caesar salad. Good…but not why we came here!


Soon, the pies arrived…the margherita came first, served on a large rectangular sheet pan, not the standard round pizza pan. And it was HUGE. We didn’t have a problem with that! It looked and smelled amazing. Moments later, our server brought out a metal frame that allowed for a second level of pizza…and my white clam pie arrived!


The white clam pizza is so simple: a thin crust, fresh clams, olive oil, some cheese, oregano. But the oven…that magical oven…is as much of an important ingredient as anything on the pizza itself. A coal-fired oven that burns hot and dry, not wet like a wood fire…an oven that dates back to 1936, when Frank Pepe moved from his original bakery location to a spot right next door, where it still stands today, at 157 Wooster St. That means my pizza “touched” every other pizza made at Frank Pepe’s…perhaps even a molecule of Frank’s first pie touched mine. Whatever…my first bite was pure magic. My daughter’s reaction to the margherita was the same.


The pies were huge, so we boxed up whatever we couldn’t finish and brought it home. When I asked my daughter what she wanted for dinner that night, she simply smiled and said: “More of that pizza!” I couldn’t agree more!

Frank Pepe’s now has 10 locations in Connecticut, New York, Massachusetts, and their newest location: in my little state of Rhode Island. But for me, the only place to go is New Haven: the oven, the atmosphere…you can’t replicate that anywhere else.


That hook hanging from the ceiling holds the handle of the long pizza peel in the air so they don’t smack into it. (See the peels on the left.) The pizza oven is so deep, they can go about 4 pizzas deep at one time. It takes a real pro to keep them all cooking perfectly.


A side note: Frank Pepe originally opened a bakery in 1925 at 163 Wooster St., now doing business as Frank Pepe’s the Spot. When he got tired of baking and delivering bread, he decided he would start making pizza, so that his customers would come to him instead.

He sold that bakery to move in next door at 157 Wooster St., in 1936, and that’s been the location of Frank Pepe Pizza Napoletana ever since.

Frank’s daughters bought back the bakery years later, and so now you can visit either location for a taste of history.

And Frank’s nephew, Salvatore, opened his own pizzeria: Sally’s Apizza, a must-stop for me the next time I’m passing through New Haven.


One of the most incredible dishes I’ve had on the beautiful island of Santorini, Greece, is lobster with pasta. It’s one of those dishes that takes time to prepare, because the pasta lobster sauce they make is a labor of love…time consuming, but so spectacular.

Cooked lobster LTL

I often have friends over for dinner, but when I prepared this dish for them recently, it was the first time they all licked their plates clean!

To try to copy that lobster sauce we had in Santorini, I started with a kick-ass lobster stock. It’s simple but flavorful:


clean, empty claws, tails and bodies from two 1-1/2 lb. lobsters (use the legs, too)
12 cups water
1/2 onion
3 celery stalks
1 carrot

Place all the ingredients in a large pot and set it on high heat. Crush the lobster shells (I use a potato masher!) Cook until the stock is reduced by half.

Strain the stock, discarding the lobster shells and veggies. Bring the stock back to the heat and reduce it until all you have left is 1 cup of intense stock.


Pasta with lobster sauce

Now that you have the stock, you can make the sauce!


1/2 onion, finely chopped
1 garlic clove, finely chopped
pinch of Italian red pepper flakes
1 teaspoon parsley
extra virgin olive oil
1/2 cup lobster stock
1/4 cup San Marzano tomato sauce (see below)
splash of white wine (I use Alice white Chardonnay)
salt and pepper
1/2 lb. cooked pasta

Add some olive oil to a pan and saute the onions until translucent. Season with salt and pepper. Add the garlic and cook for 10 seconds. Add the red pepper flakes and parsley.

Add 1/4 cup of the lobster stock and let it cook, reducing by half. Add the other 1/4 cup of lobster stock and then the tomato sauce. Let it cook for a couple of minutes and add the white wine. Cook for a few minutes more.

Cook the pasta and drain it even before it reaches the al dente stage. Place the pasta in the pan with the sauce, heating and coating it thoroughly. Serve immediately, with or without the lobster meat.


For the San Marzano tomato sauce: I pour a can of San Marzano tomatoes  into a food processor or Vita-Mix and blend until I get sauce. Pour into a pan and reduce over medium heat by half, until sauce has thickened.