Years ago, I created an all-purpose sauce that worked with a variety of dishes. Because it has a base of mayo, mustard and ketchup, it’s awesome on burgers and fish…on lobster and crab salads and shrimp cocktail…and just about anything else you can think of. So…I called it Awesomesauce. And though I got tired of the name I gave it very quickly, I didn’t get tired of the sauce!
I made a batch of the sauce for taco night at the house, and decided to use the leftovers the next day to coat pieces of chicken before roasting. The chicken came out moist and delicious. And because I sprinkled some breadcrumbs on them, they had a nice added crunch.
I like to use gluten-free breadcrumbs, because some folks in my family live a GF lifestyle. But it’s easy to make them. I buy a frozen loaf of Udi’s bread, toast it, and then put the slices of bread in a food processor. Instant GF breadcrumbs that taste as good, by the way, as any bread with gluten. You’d never know the difference.
1/2 cup mayonnaise
1 tablespoon ketchup
1 tablespoon mustard (I like Gulden’s)
1 tablespoon dill pickle relish
1/4 teaspoon granulated garlic
1/4 teaspoon paprika
Pinch cayenne pepper
4 lbs. organic pastured chicken pieces
plain breadcrumbs (I use gluten-free)
In a bowl, combine the mayo, ketchup, mustard, dill pickle relish, garlic, paprika and cayenne. Mix it thoroughly and keep it in the fridge until you’re ready to use it.
Pre-heat the oven to 325°.
Rub the sauce all over the chicken pieces and lay them in a sheet pan lined with non-stick aluminum foil or parchment paper. Lightly sprinkle the breadcrumbs over the top of the chicken.
Bake until the chicken is cooked all the way through, and brown and crispy.
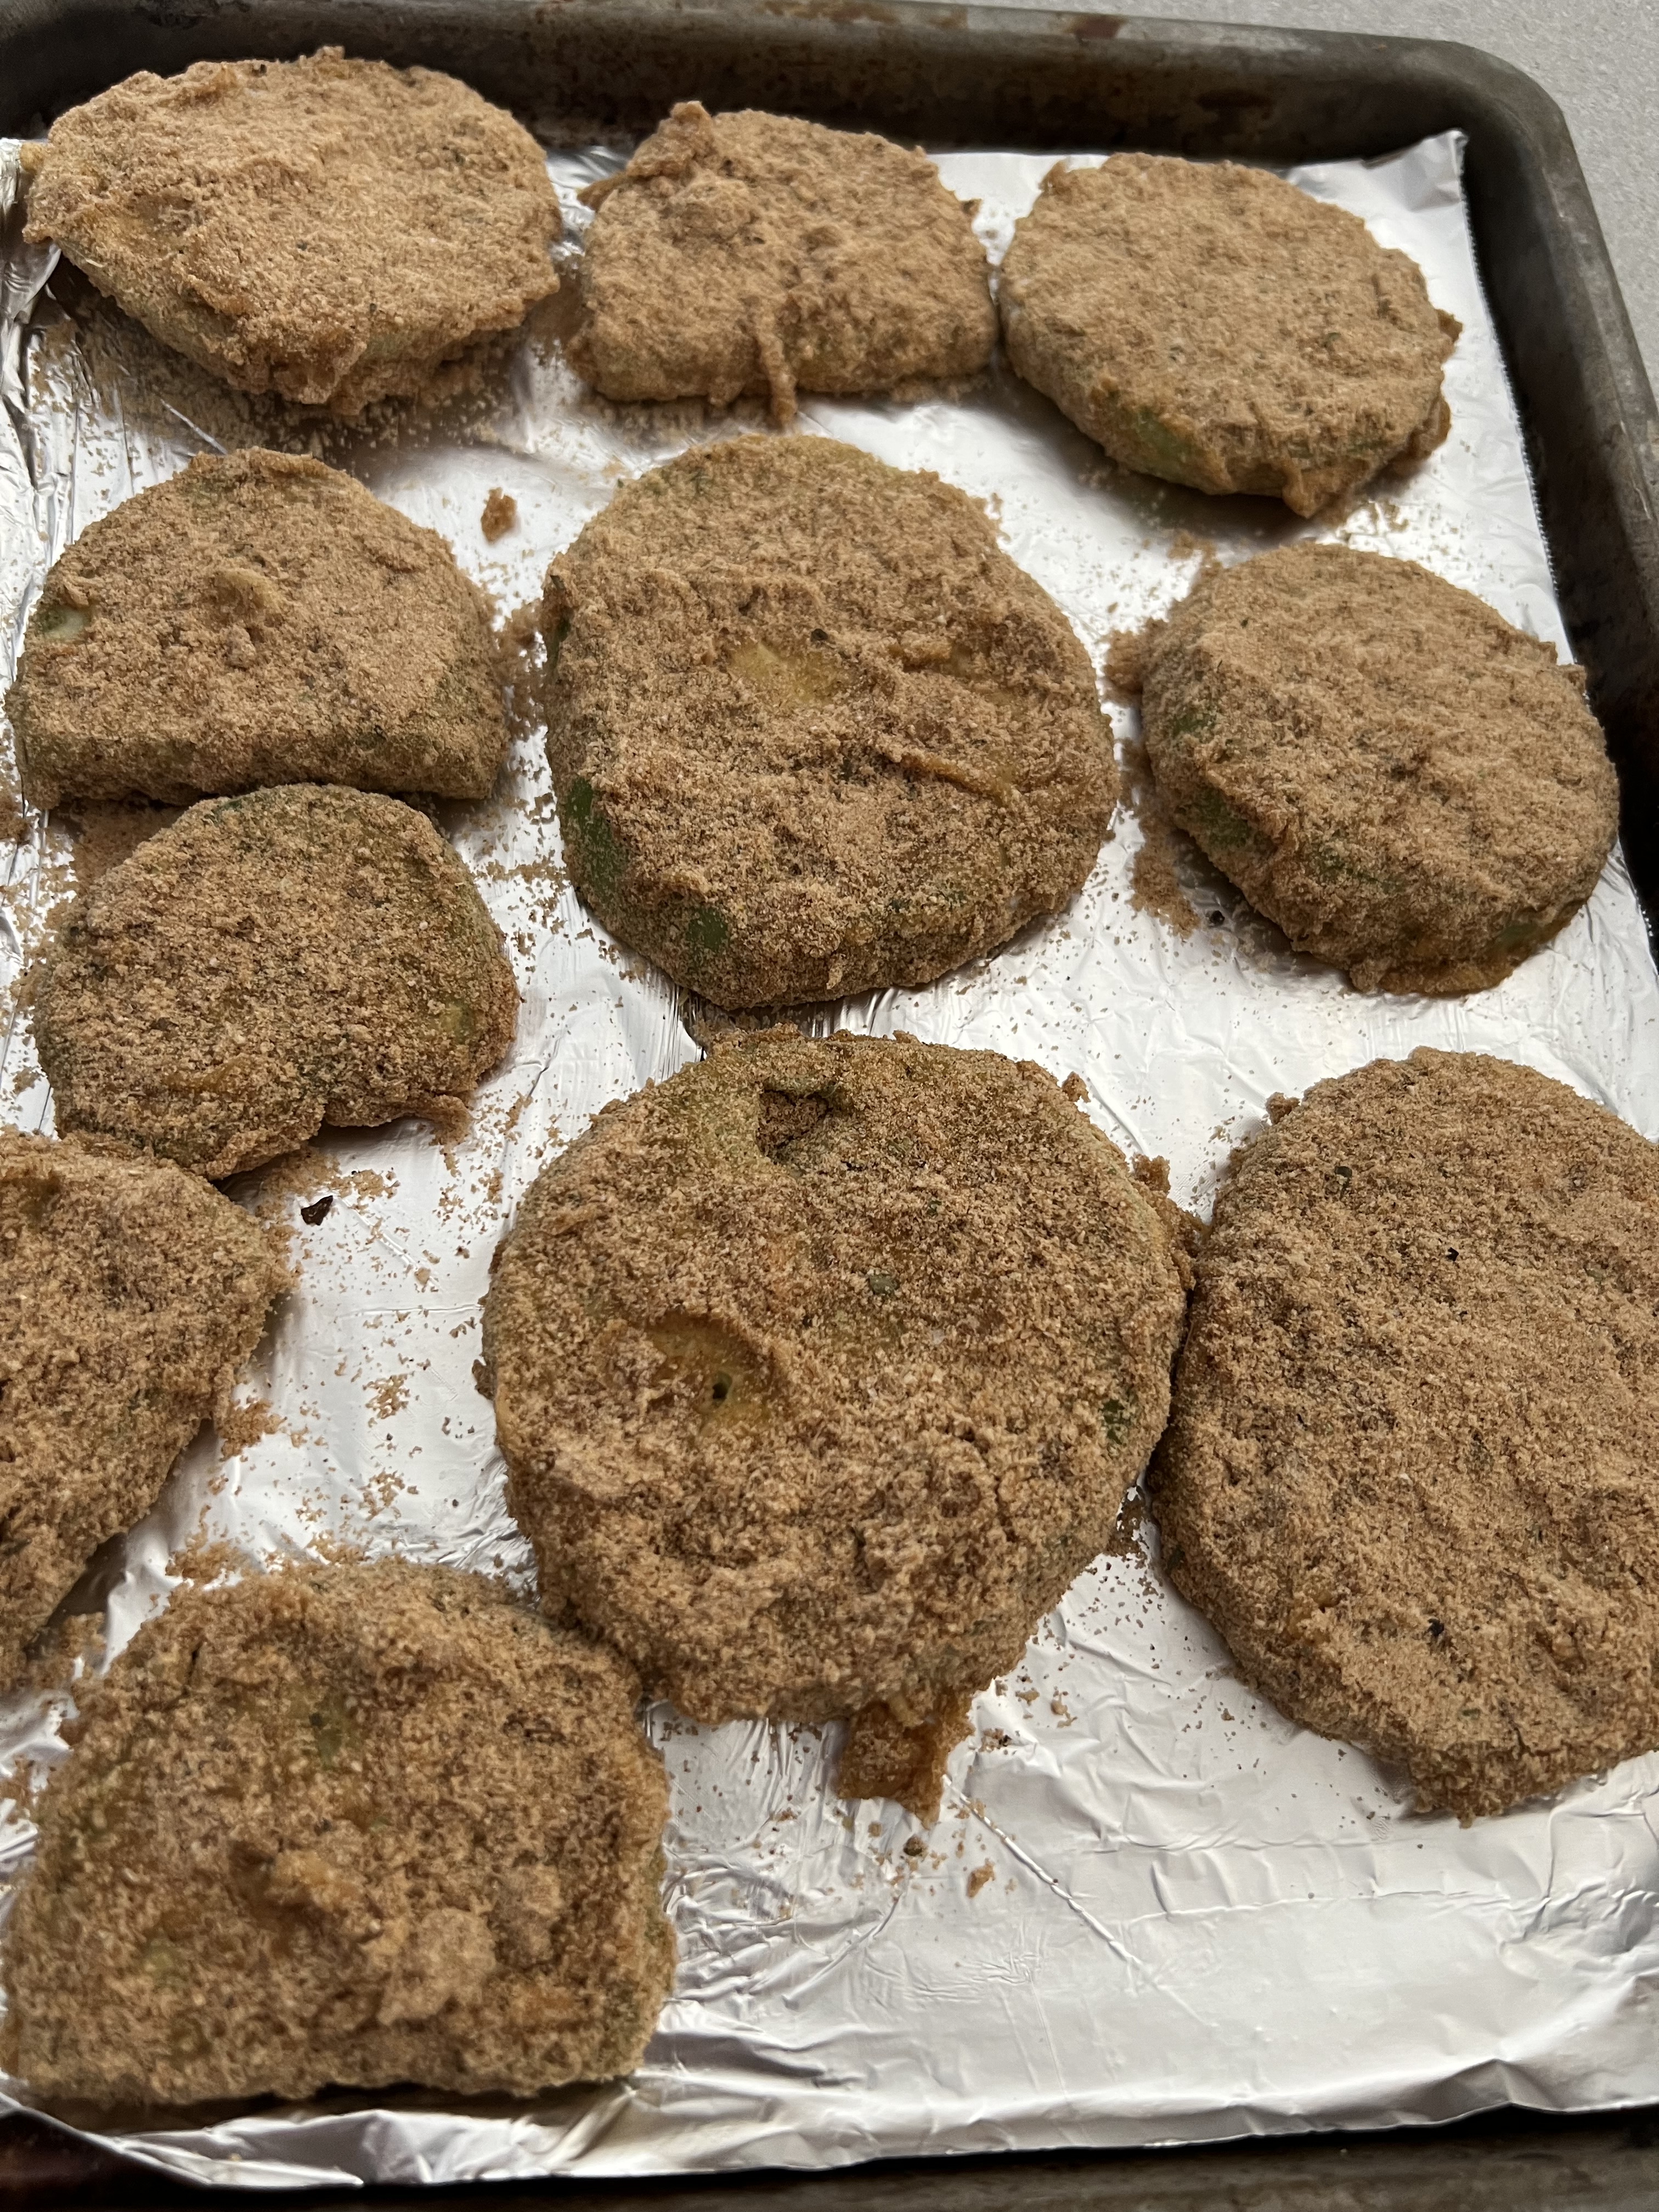
Every year, I still have a lot of green tomatoes on the vine as the summer comes to an end. Fried green tomatoes are the tasty solution to the problem.
It’s a really simple process of slicing the tomatoes, seasoning them with salt and pepper, dusting them with flour, dipping them in egg, and then rolling them in some flavored breadcrumbs before frying.
Good news for those that need it all gluten-free! It can happen if you follow my instructions below.
Green tomatoes, sliced Salt and pepper All-purpose flour (I use Bob’s Red Mill 1-to-1 Gluten-Free Baking Flour) 2 eggs, beaten Seasoned breadcrumbs (I make them gluten-free…see below)
At first, I sliced my tomatoes at about 1/4″ thick, but I found that if I could make them just a bit thinner, they would come out even crispier. So now I go with about a 1/8″ thickness.
I place the tomatoes on a cutting board, and season them with the salt and pepper.
I then set up my 3 bowls for adding the breading. In the first bowl, the all-purpose flour. (I like using the Bob’s Red Mill 1-to-1 Gluten-Free Baking Flour because it’s mostly rice flour and it makes the coating lighter.)
In the second bowl, I whisk a couple of eggs.
In the third bowl, I place my seasoned breadcrumbs. (You can buy Italian seasoned breadcrumbs, but I make my own by toasting a loaf of Udi GF bread, tossing the pieces into a blender to mill them down to a powder. I add oregano, basil, parsley, salt and pepper, granulated garlic and granulated onion, then whiz the blender for just a few seconds to combine everything. I place this in the third bowl.)
Then it’s time to do the one-handed method of dipping the tomato slices one-by-one into the egg, then dropping it into the breadcrumbs, where the other hand takes over to cover the tomato with a light layer of breadcrumb. Do the same for all the tomatoes.
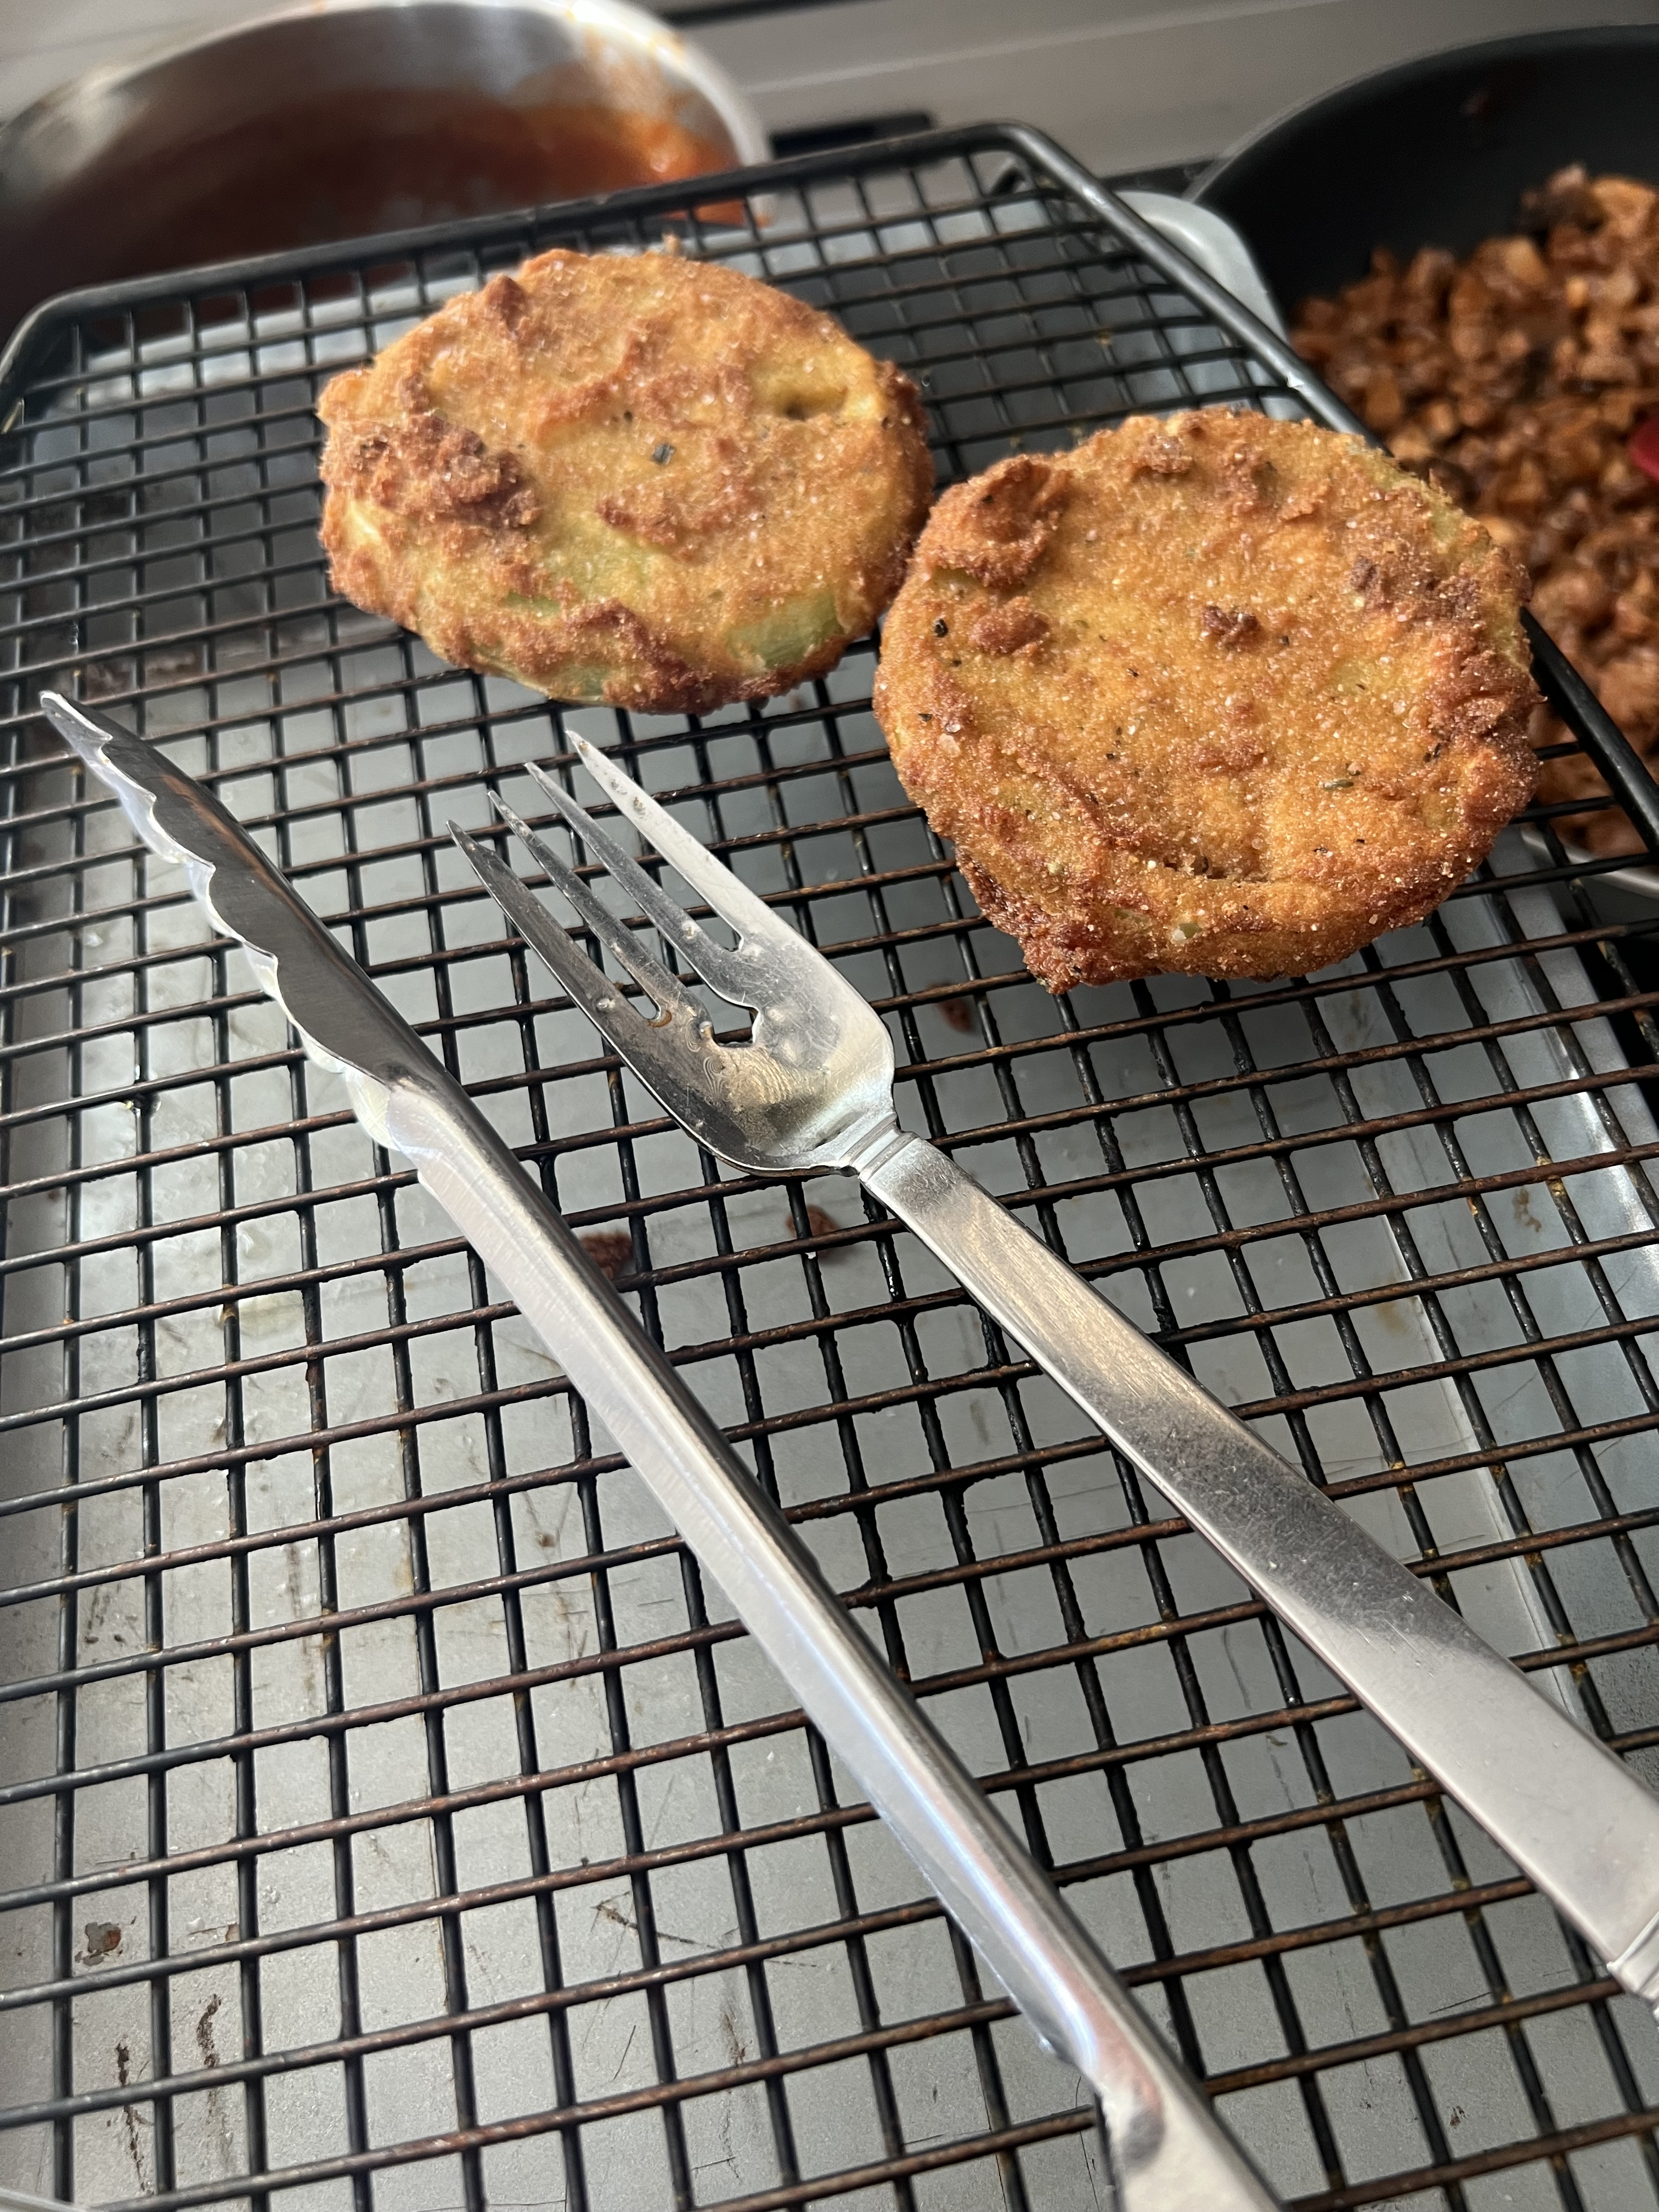
I fry the tomatoes at 350° in a non-seed oil with a high smoke point, like avocado oil, until golden.
I place the tomato slices on a wire rack to cool, seasoning them immediately out of the fryer with some sea salt.
A dipping sauce, like marinara sauce, goes well with these tasty bites!
I grill year-round. I’ll stand in 3 feet of snow to get smoked ribs just right, if I have to. Through years of tireless experimentation, I’ve come up with a barbecue sauce that I can be proud of. I prefer a slightly sweet and tangy barbecue sauce, and it works really well with pork or chicken.
What makes this sauce special is the citrus. I originally used lemon juice for this recipe and it was good. Lime juice was better. Adding lime zest: even better than that. I tried orange juice and zest, even Meyer lemon. But the Big Daddy of ’em all was grapefruit. I was craving my barbecue sauce one day and only had a grapefruit in the fridge. I thought: how bad could this be? Turned out to be the perfect foil to the sweetness of the brown sugar and ketchup.
Try this sauce on your next rack of ribs, batch of chicken wings, or even a whole bird. Cook the meat almost all the way through, brushing the sauce on for the last 20 minutes so that the sugars don’t burn. Then just try to stop eating it!
GRAPEFRUIT BARBECUE SAUCE
1 cup ketchup
1/2 cup firmly packed brown sugar
Juice and zest of 1 grapefruit
3 tablespoons unsalted butter
1 teaspoon granulated onion
1 teaspoon cayenne pepper sauce, like Frank’s Red Hot
1 teaspoon Worcestershire sauce
1 teaspoon granulated garlic
1/4 teaspoon black pepper
(no salt)
Combine all the ingredients in a sauce pan. Bring it to a boil and then simmer for about 20 minutes on low, until it’s slightly thickened.
It’s almost impossible to imagine that there would be any leftovers, but the last time I made a batch of boneless skinless barbecued chicken thighs with the sauce, we had a little bit left over. So we decided to make a barbecued chicken pizza with it the next day.
Fresh pizza dough, some of the barbecue sauce, a combination of sharp cheddar and mozzarella cheeses, and of course, the barbecued chicken thighs.
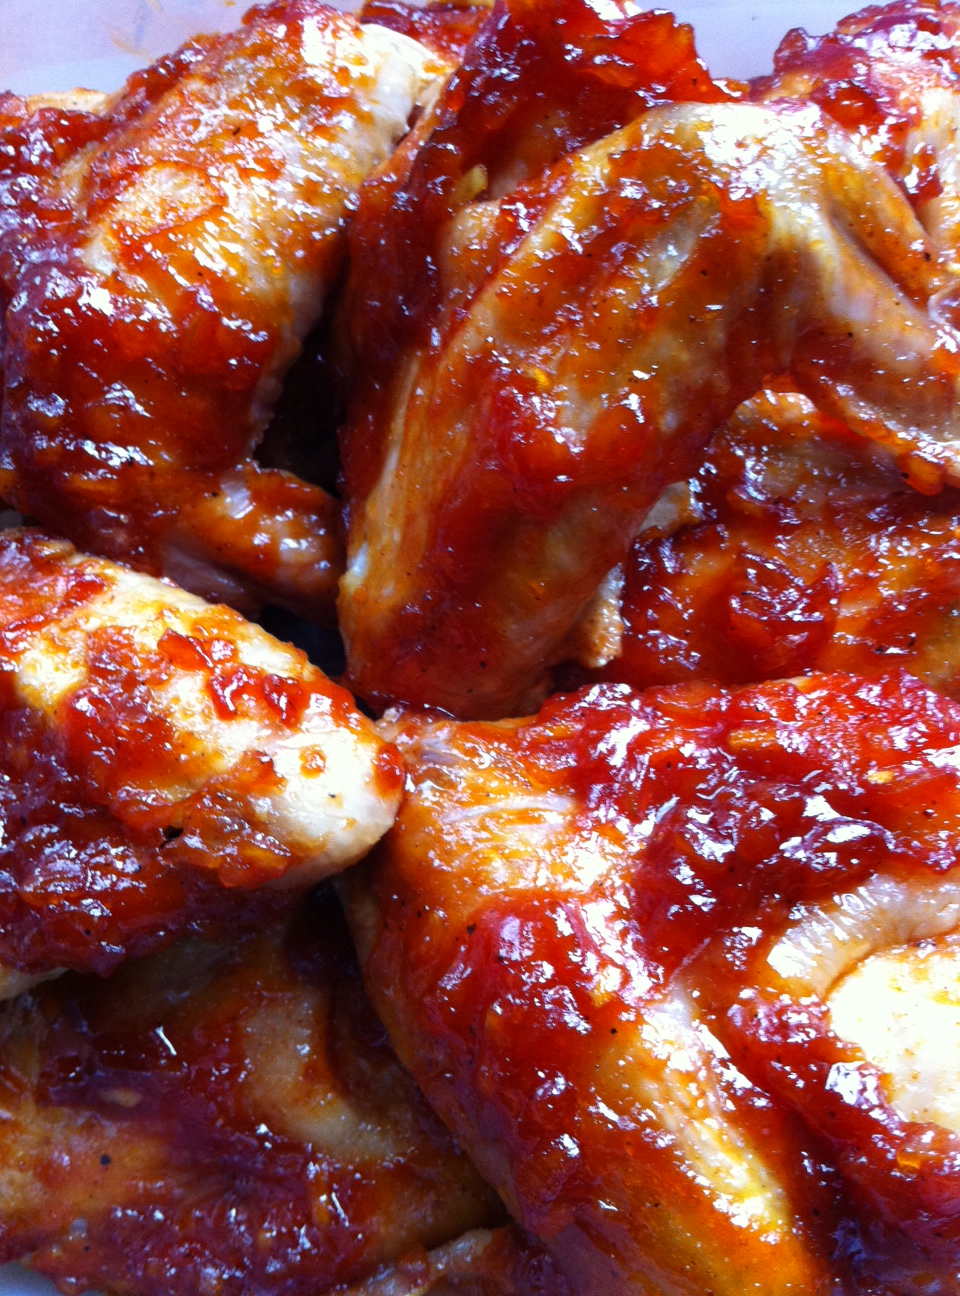
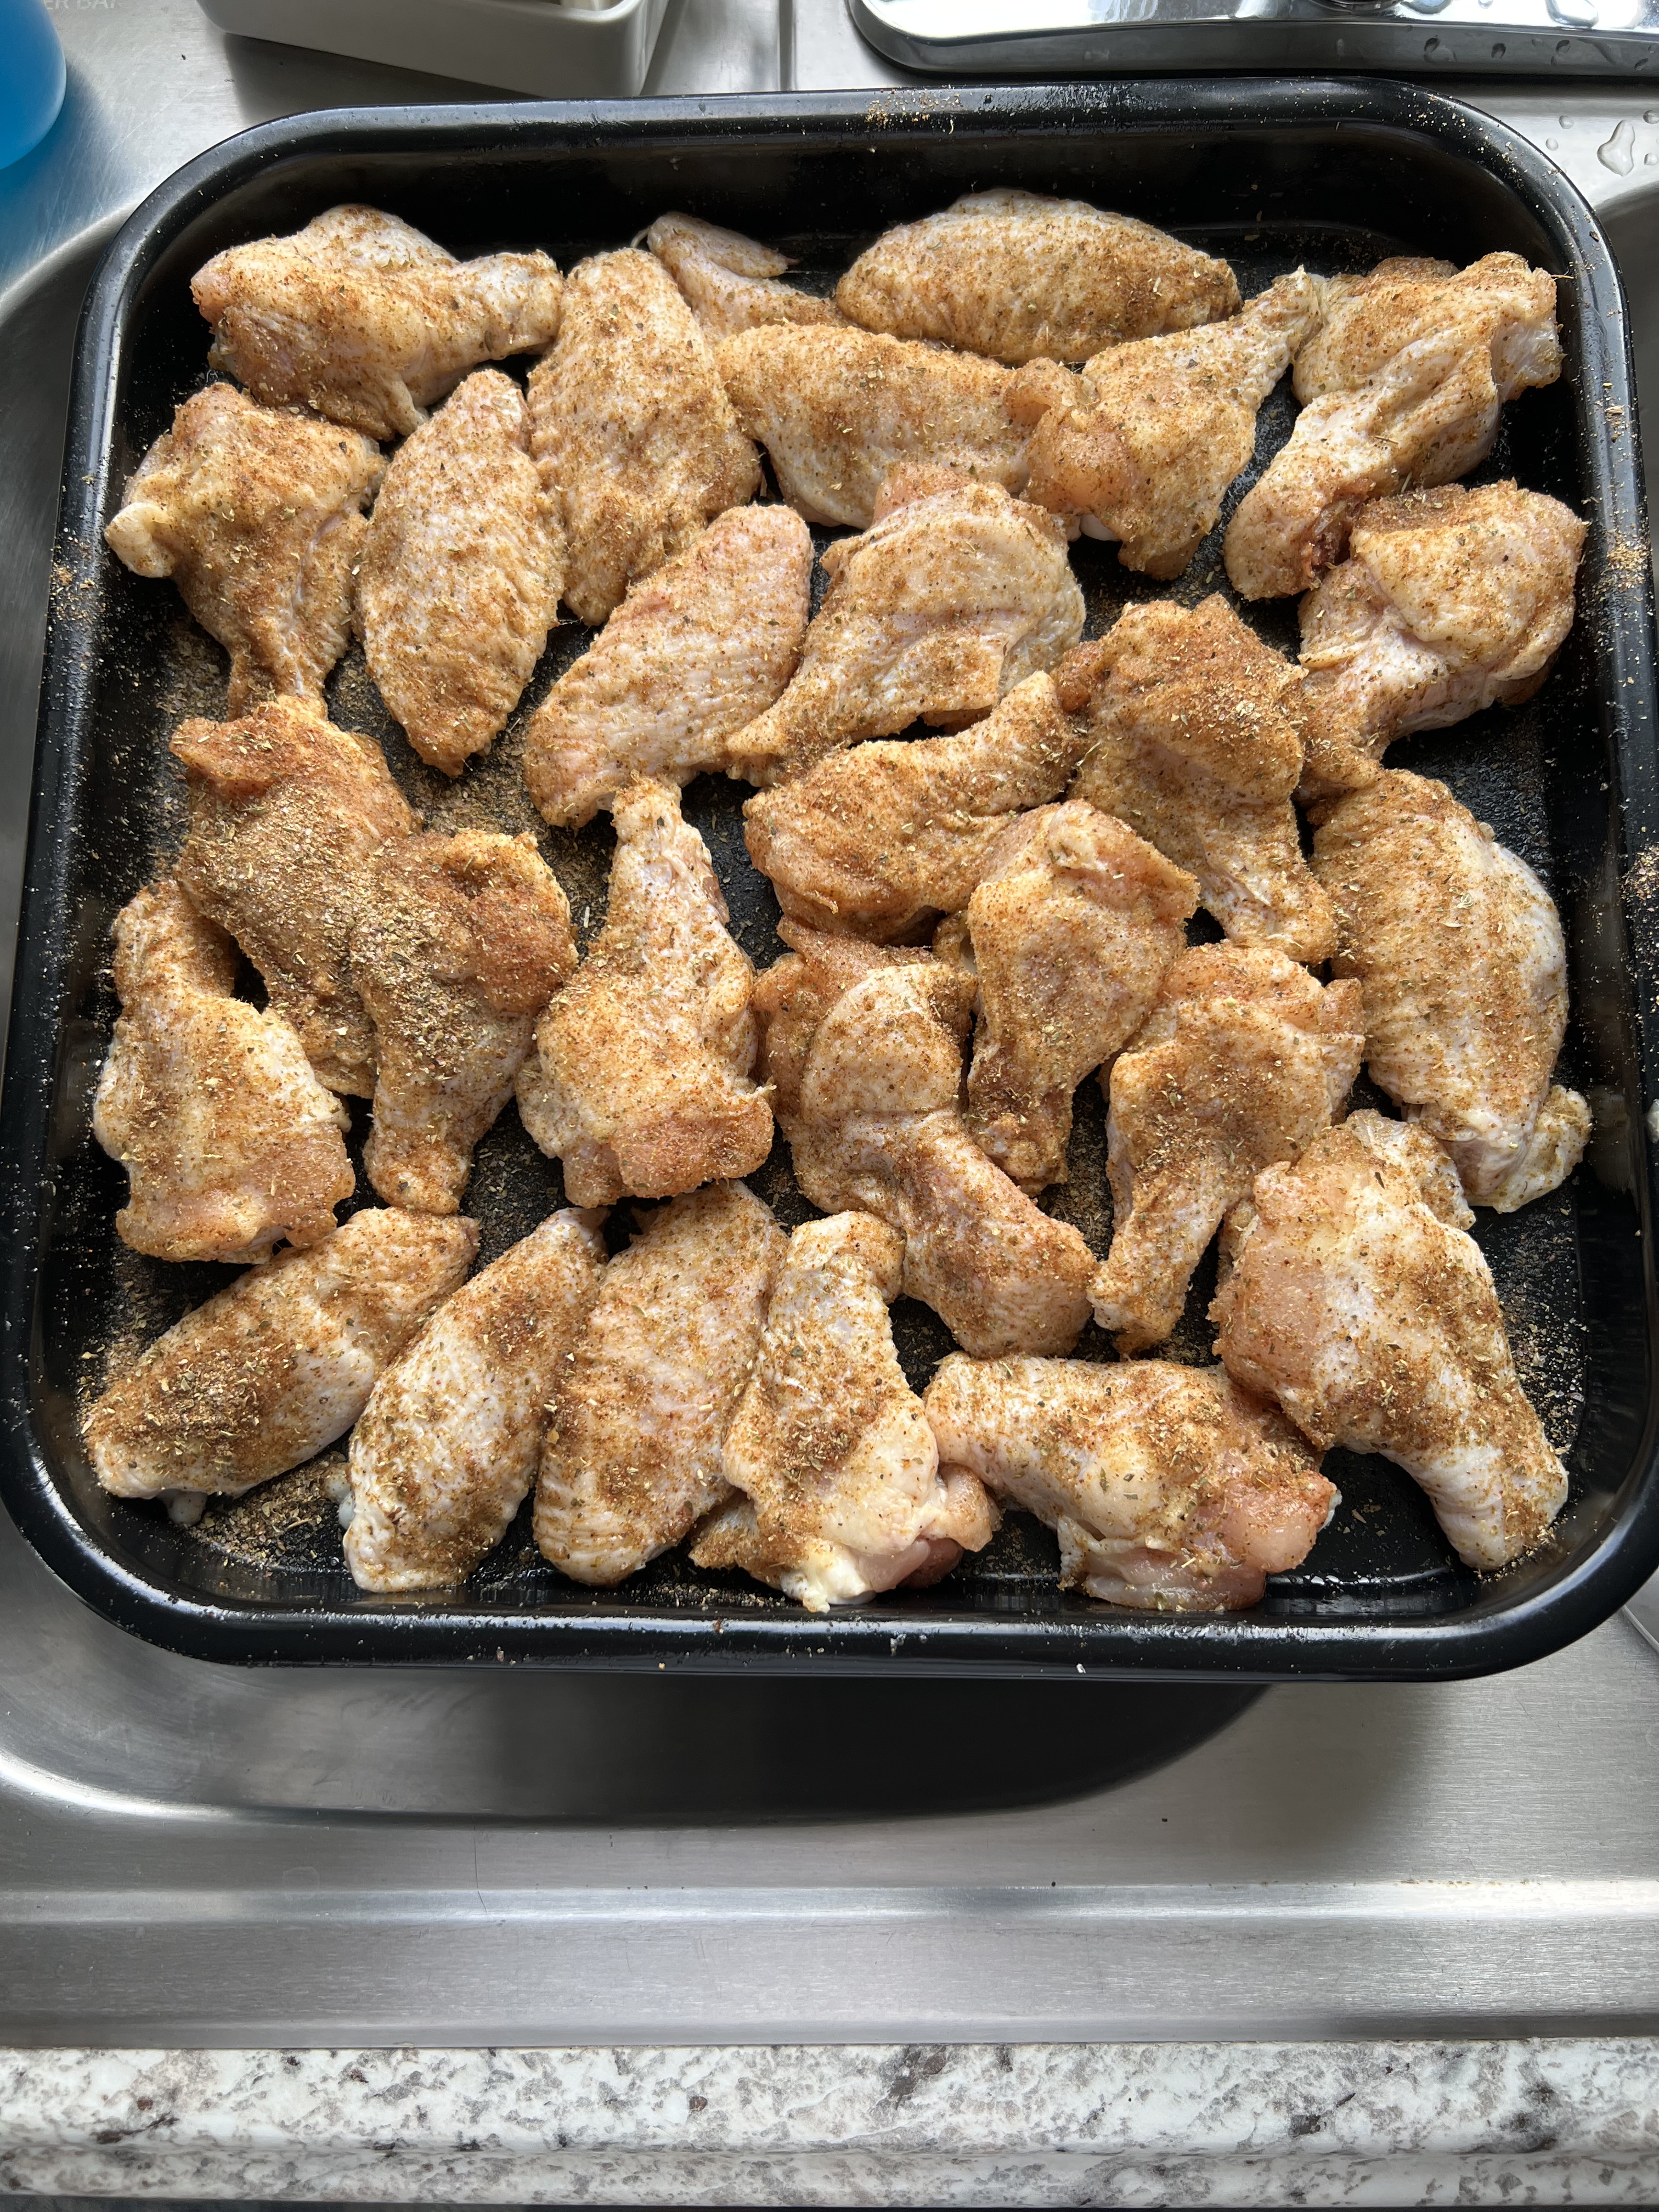
I’ve got dozens of chicken wing recipes, but even so, sometimes I just want something different. I decided to take my favorite taco seasonings recipe and adapt it to chicken wings. Caramba! One of the tastiest wings I’ve made in a long time!
This is such an easy and delicious recipe to make, even for a crowd. At your next party, or watching your favorite football team play on a Sunday afternoon, just double or triple the recipe, as needed. And it works with a whole chicken as well.
Combine the salt, cumin, oregano, paprika, onion, garlic, and pepper in a bowl. Mix well.
Cover a baking sheet with aluminum foil and spread the wings out on the sheet. Sprinkle the wings with the avocado oil and rub the oil all over the wings. This will help the wings cook evenly, and it’ll help the seasonings stick to the wings.
Turn the wings bottom-side-up and sprinkle with the seasoning mix. Flip the wings over and sprinkle them again, coating them evenly.
Place the baking sheet in the oven and bake for about 45 minutes.
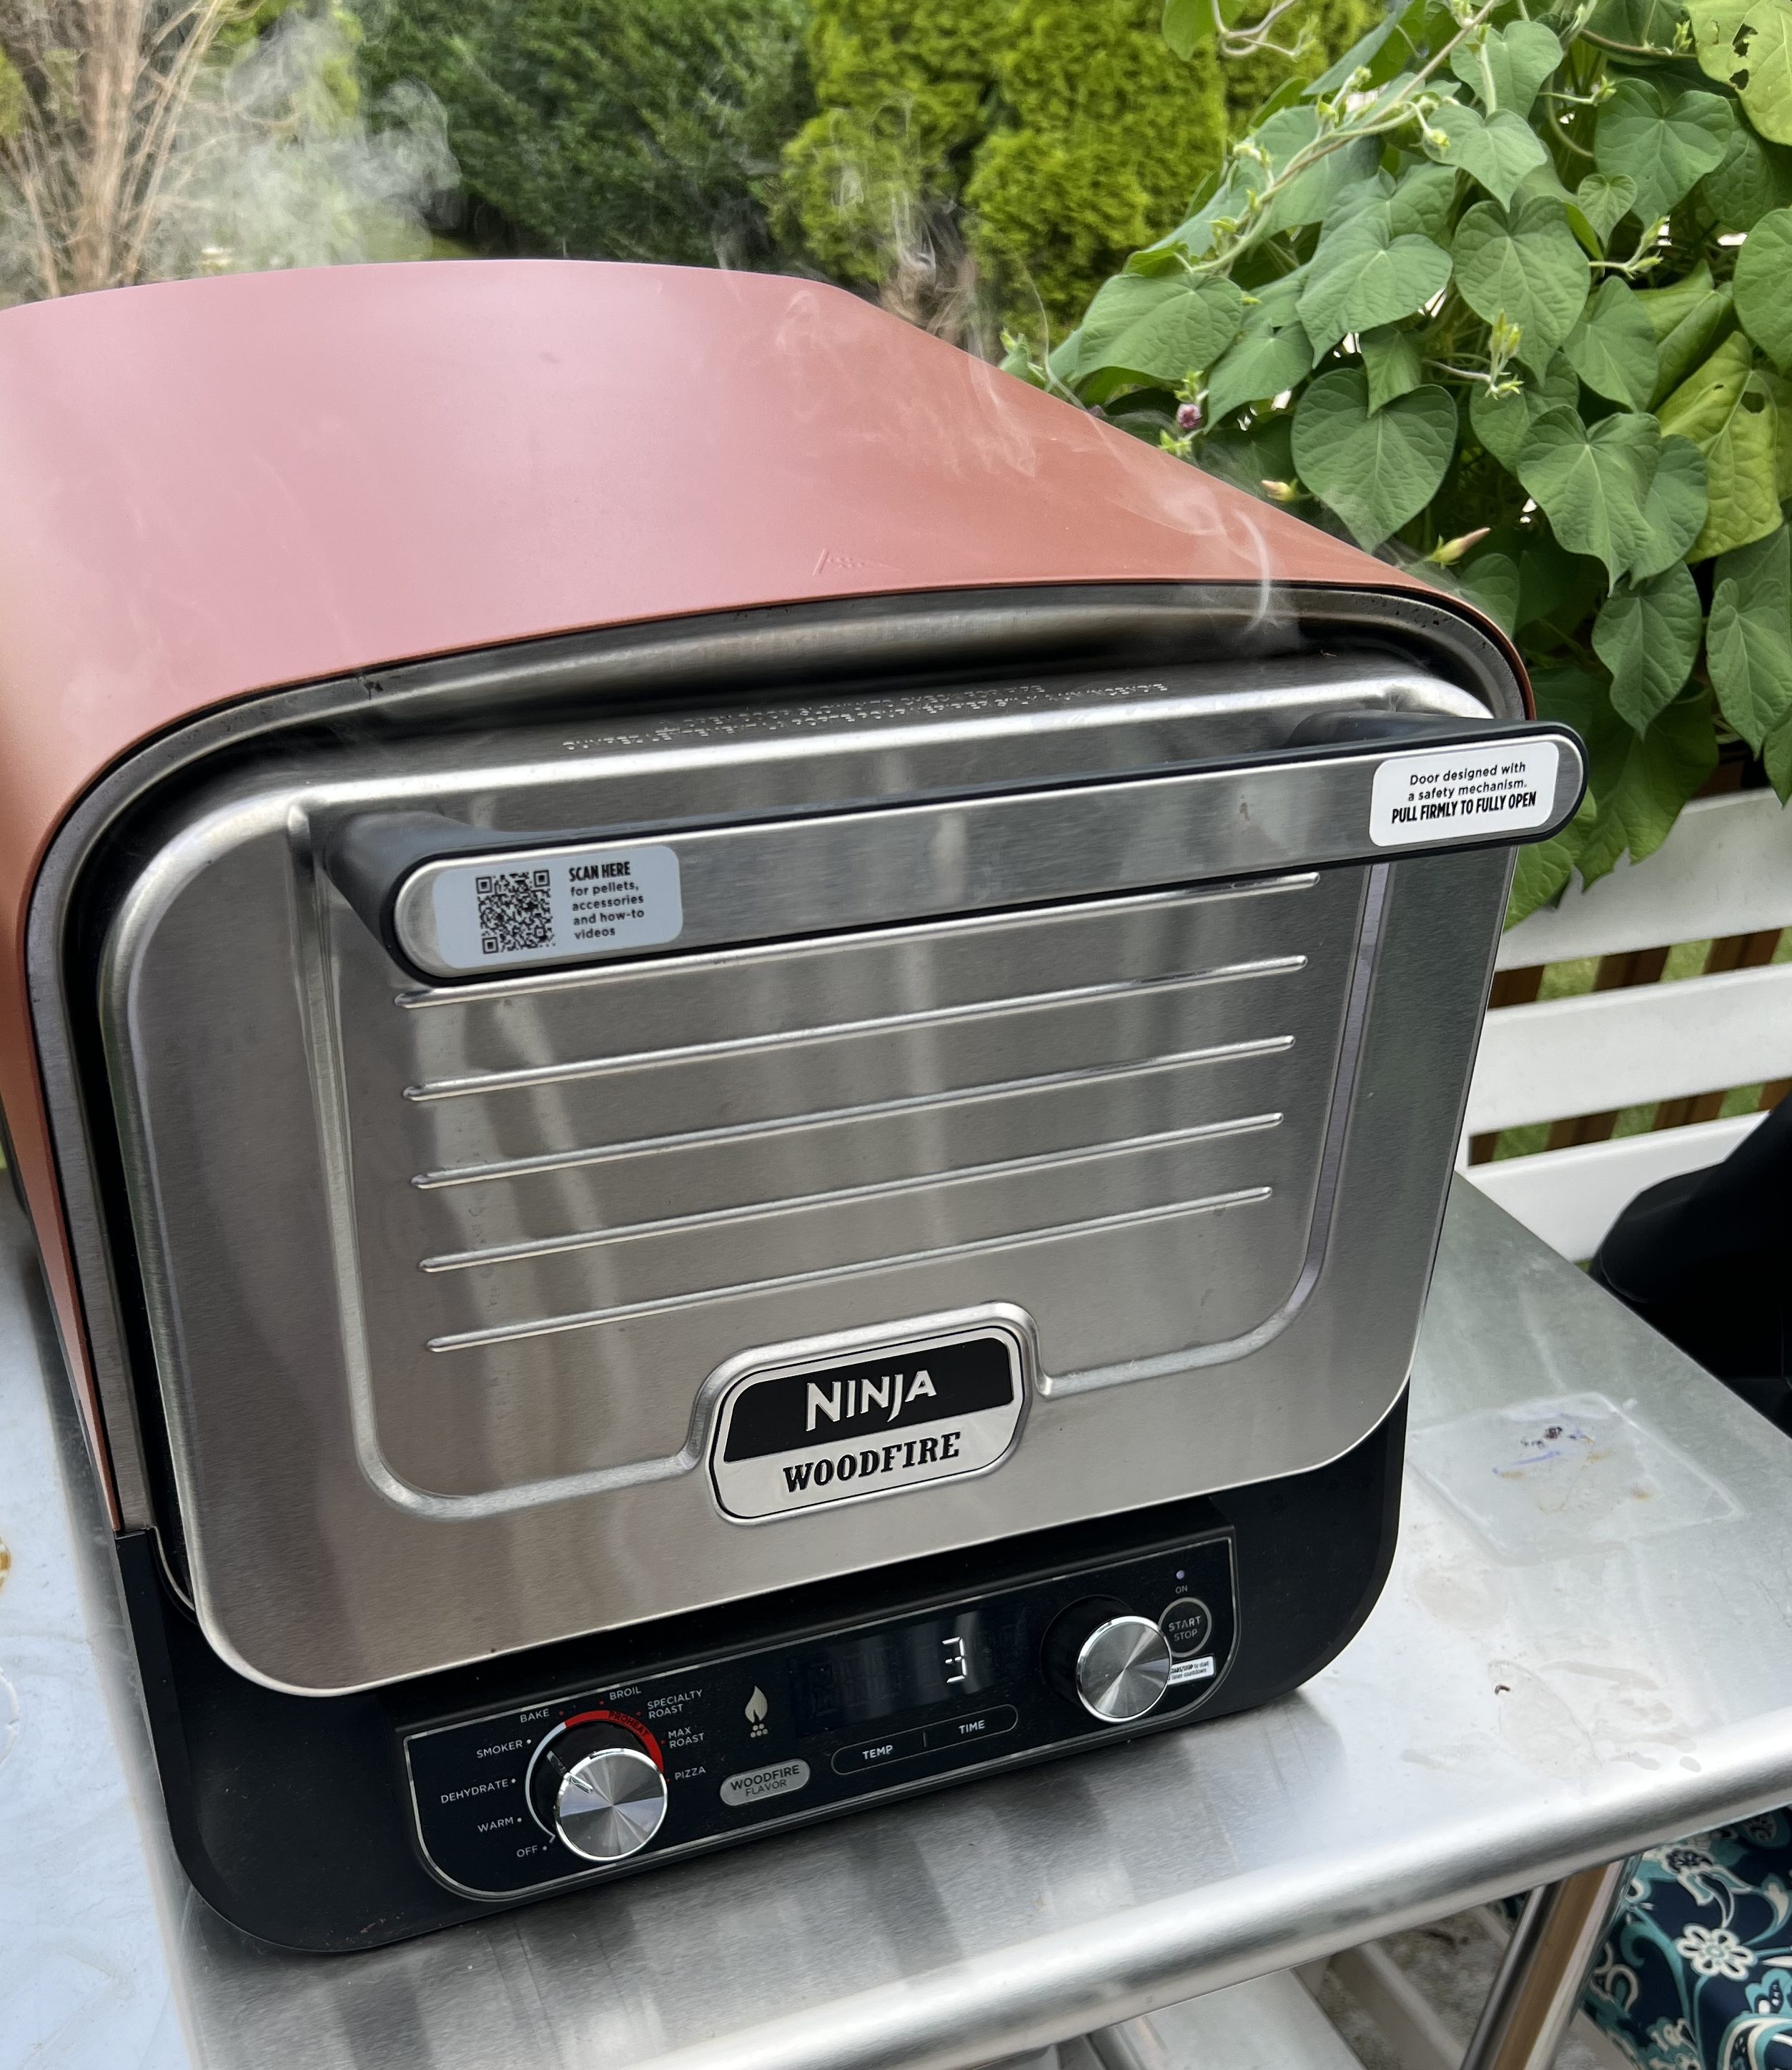
These wings are even better when they’ve been smoked. I recently bought a Ninja Woodfire oven, so it’s a bit of a cheat, since it’s an electric outdoor oven that burns smoking pellets. But the flavor I got was amazing!
Seasoned and ready to go.
After cooking/smoking at 250° for about 90 minutes using hickory pellets, they’re done!
I grill year-round. I’ll stand in 3 feet of snow to get smoked ribs just right, if I have to. Through years of tireless experimentation, I’ve come up with a barbecue sauce that I can be proud of. I prefer a slightly sweet and tangy barbecue sauce, and it works really well with pork or chicken.
What makes this sauce special is the citrus. I originally used lemon juice for this recipe and it was good. Lime juice was better. Adding lime zest: even better than that. I tried orange juice and zest, even Meyer lemon. But the Big Daddy of ’em all was grapefruit. I was craving my barbecue sauce one day and only had a grapefruit in the fridge. I thought: how bad could this be? Turned out to be the perfect foil to the sweetness of the brown sugar and ketchup.
Try this sauce on your next rack of ribs, batch of chicken wings, or even a whole bird. Cook the bird almost all the way through, brushing the sauce on for the last 20 minutes so that the sugars don’t burn. Then just try to stop eating it!
GRAPEFRUIT BARBECUE SAUCE
1 cup ketchup
1/2 cup firmly packed brown sugar
Juice and zest of 1 grapefruit
3 tablespoons unsalted butter
1 teaspoon granulated onion
1 teaspoon cayenne pepper sauce, like Frank’s Red Hot
1 teaspoon Worcestershire sauce
1 teaspoon granulated garlic
1/4 teaspoon black pepper
(no salt)
Combine all the ingredients in a sauce pan. Bring it to a boil and then simmer for about 20 minutes on low, until it’s slightly thickened.
If you like a less sweet, more vinegary style to your barbecue sauce, this is the one. How could a sauce that’s inspired by what most people claim to be the best barbecue joint in the USA, Franklin’s Barbecue in Austin, Texas, be bad? People line up early in the morning and wait as much as four hours for a slab of brisket from this place. I’ll get there one day. In the meantime, I have the sauce.
use this sauce on chicken, pork, or beef. The vinegar really cuts through the fat.
2 cups ketchup
3/4 cup water
6 tablespoons cider vinegar
6 tablespoons white vinegar
6 tablespoons brown sugar
3 tablespoons Worcestershire sauce
1 tablespoon chili powder
2 teaspoons salt
2 teaspoons black pepper
1 1/2 teaspoons cumin
Mix all the ingredients in a saucepan and simmer until the flavors have blended, about 20 minutes. Remove it from heat and cool to room temp. If you store it in an airtight container in the fridge, it’ll stay good for a couple of months.
I was away on a fantastic trip to Poland and Lithuania with my daughter for a couple of weeks, and I’ll be posting some of our food finds soon. Meanwhile, enjoy this summer favorite.
If you’re trying to think of something new and interesting to bring to the July 4th celebration, this is it. It was a huge hit when I brought it to a neighborhood party a while ago.
Imagine the best of a deviled egg and a BBQ chicken sandwich, and you’ve got this appetizer that rocks in more ways than one….and you can make it ahead of time.
I boil the eggs and make the cole slaw the day before, then keep them in the fridge. Even the chicken can be cooked the day before and then warmed through before assembling right before you need it. Be sure to make a lot of them…they’ll go faster than the hard-boiled eggs in “Cool Hand Luke!”
This recipe is gluten-free, as long as you use GF soy sauce.
For the chicken and BBQ sauce:
3 cups ketchup
1 tablespoon apple cider vinegar
2 tablespoons soy sauce
1 teaspoon hot sauce (I use Frank’s Red Hot)
1/4 cup + 2 tablespoons brown sugar
1 lb. boneless skinless chicken breasts
6 hard-boiled eggs
1/4 cup mayonnaise
1 tablespoon mustard (I use Gulden’s)
Pre-heat the oven to 250 degrees.
Combine the ketchup, apple cider vinegar, soy sauce, hot sauce, and brown sugar in a oven-proof pot with a lid. Mix well, then add the chicken breasts, making sure they’re immersed in the sauce. Cook low and slow in the oven for about 2 hours.
When the chicken is cooked through, shred the meat with 2 forks. Set it aside, but keep it warm.
Combine all the cole slaw ingredients in a bowl, mixing well, and place them in the fridge.
For perfectly hard-boiled eggs, place the eggs in a pot of cold water, and turn the heat on high. Just before the water starts to boil, put a lid on the pot and turn the heat off. Let the eggs sit in the hot water for 15 minutes. Once cooked, keep the eggs in the fridge.
Slice the eggs in half and place the yolks in a bowl with the mayonnaise and mustard. Mix well and keep in the fridge.
To assemble, take a teaspoon of the mayo/mustard/yolk mixture and place it in the cavity of one of the egg halves. Place another teaspoon of the shredded chicken on top (I like it warm, to counter the cold of the mayo and cole slaw), drizzling a little of the BBQ sauce that you cooked the chicken with on the meat. Then place a teaspoon of the cole slaw on top of the chicken.
After making a batch of this for my daughter this week, I got a bunch of requests for the recipe. So here we go!
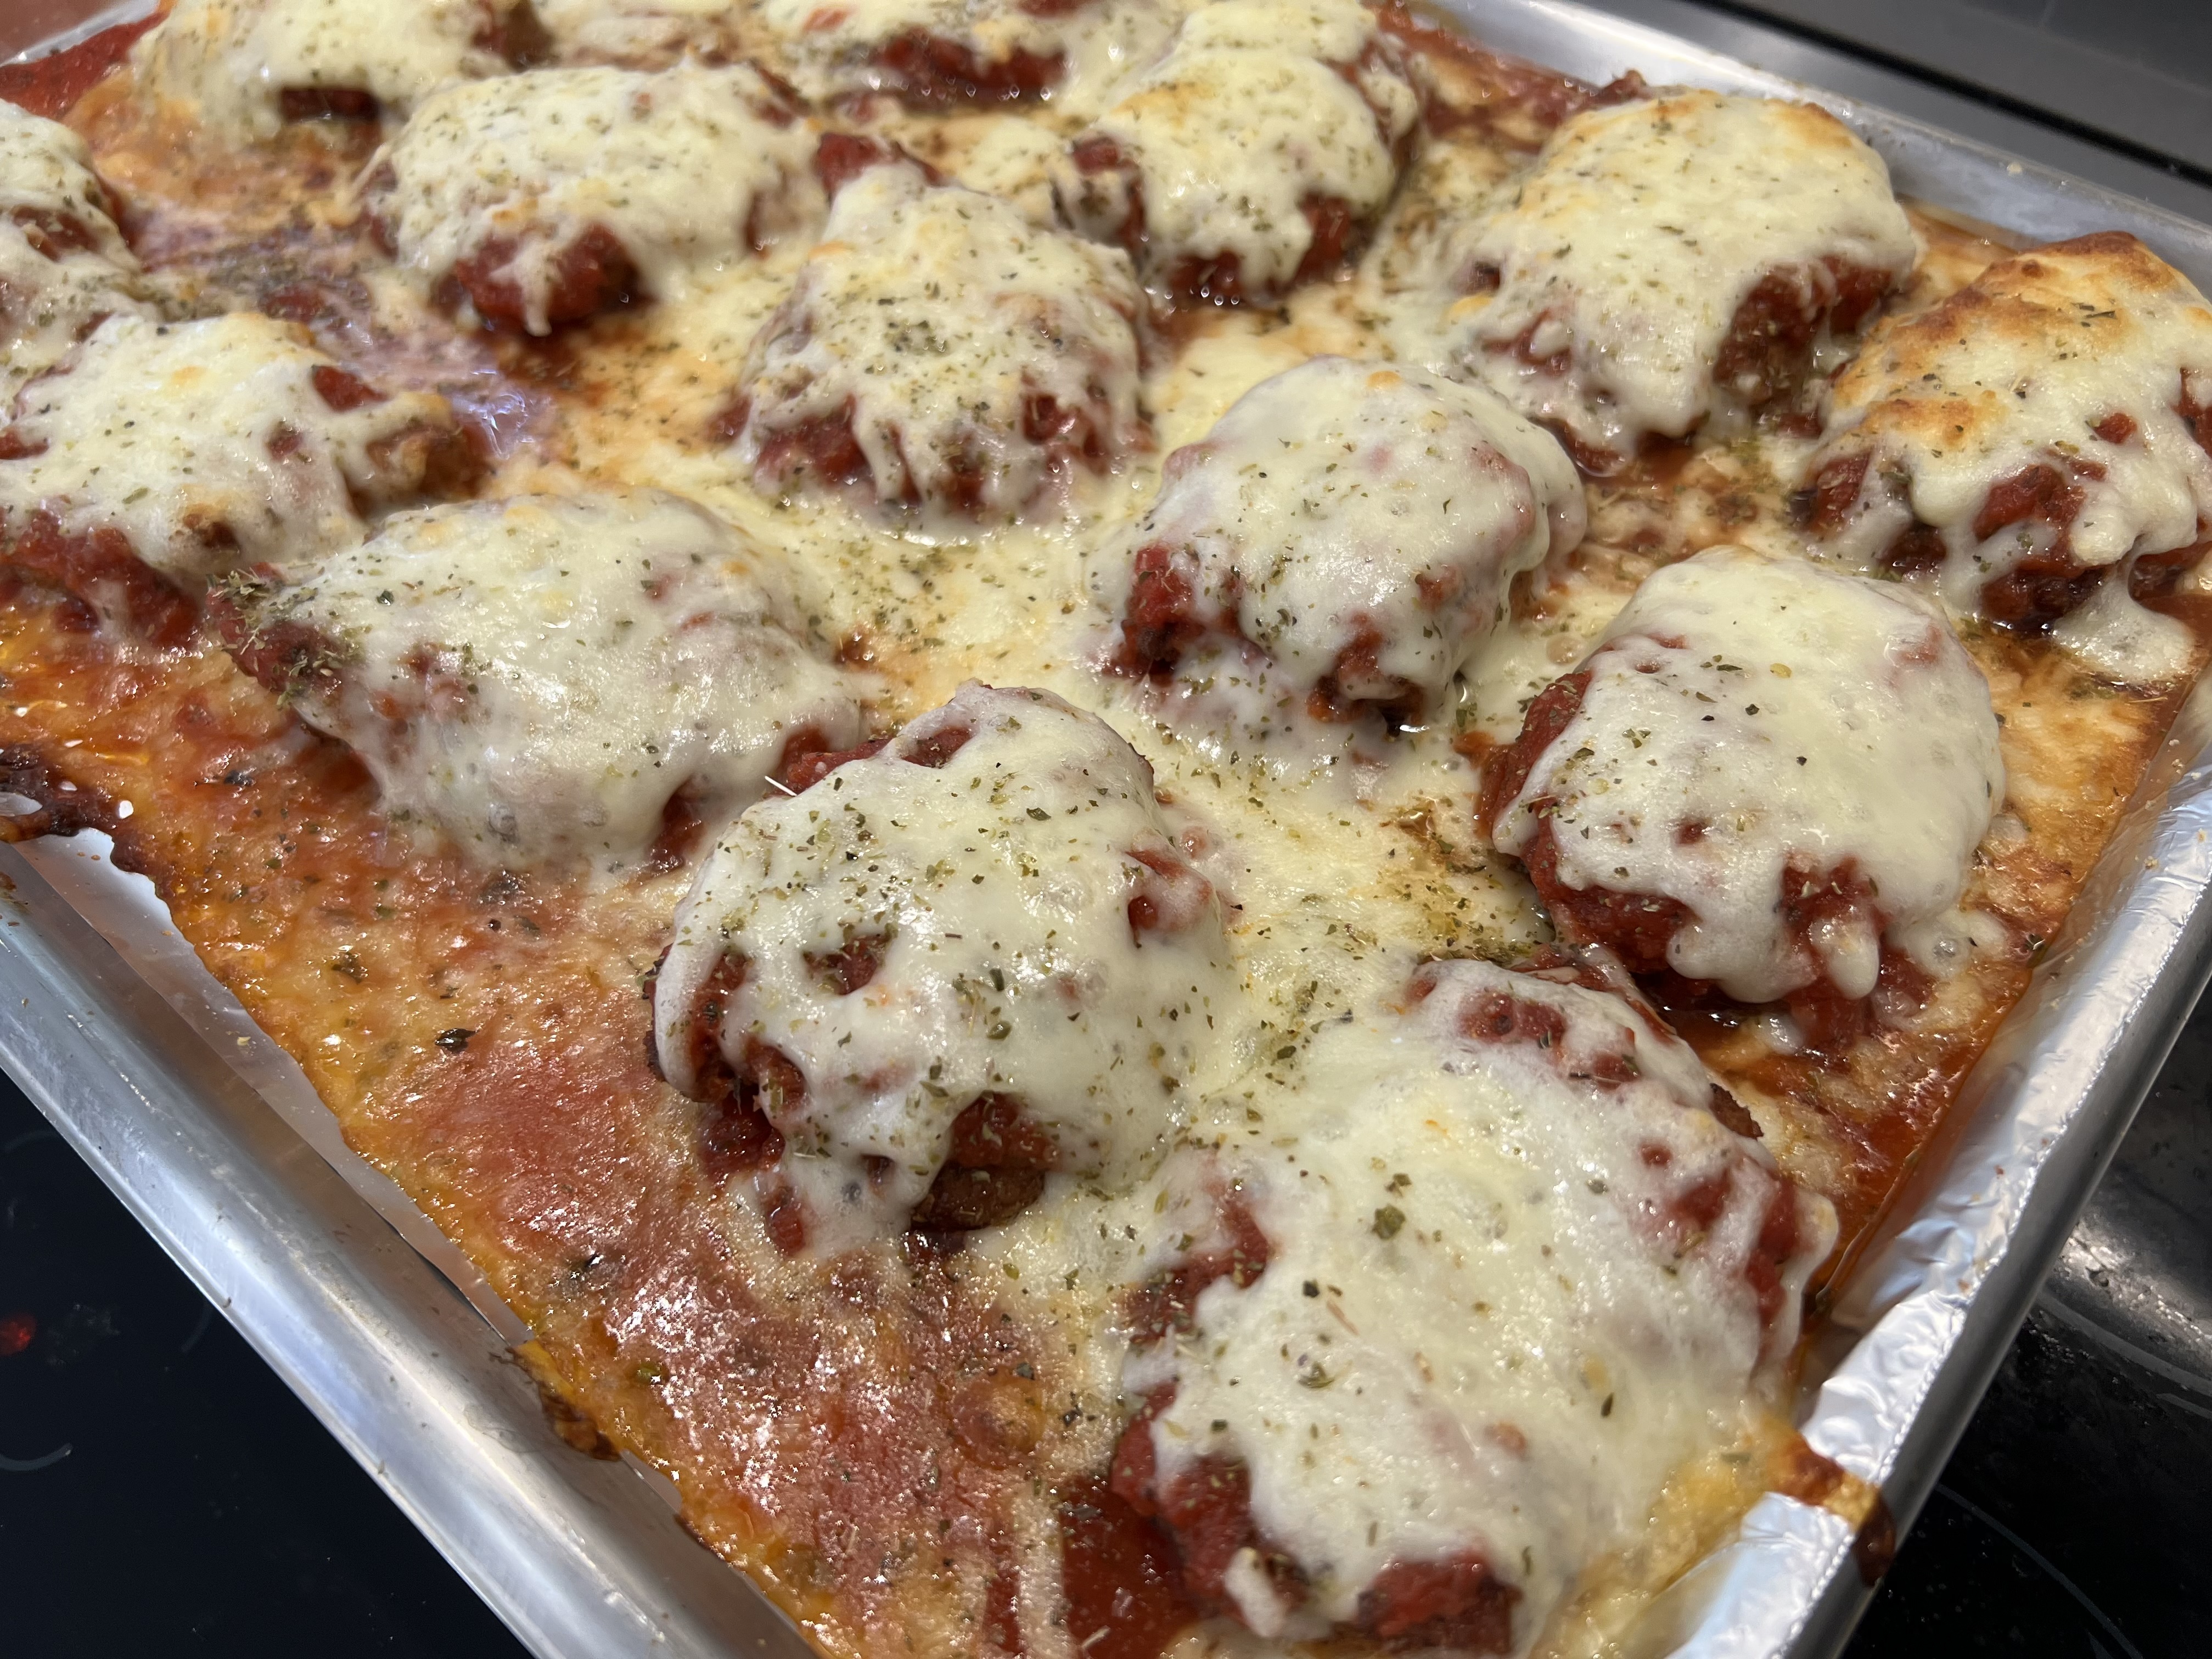
Chicken parmigiana, much like pizza, is a bit more difficult to make than you might think. Sure, there’s plenty of crappy chicken parm out there, made with processed frozen chicken cutlets, bad sauce and cheap cheese. But to make a really fantastic, mind-blowing chicken parm, that takes a little practice!
The key to this recipe is simple: don’t skimp on the quality ingredients. And my recipe makes a lot. Trust me: you will want leftovers.
The recipes for my Italian bread crumbs and my “Don’t Call It Gravy” tomato sauce are at the bottom.
Gooey, cheesy, orgasmic.
6 Chicken breasts, the best quality you can get your hands on Italian bread crumb seasoning (see recipe below) 3 eggs vegetable oil for frying “Don’t Call It Gravy” tomato sauce (see recipe below) Fresh mozzarella cheese oregano
Thaw the chicken breasts. Lay them flat on a cutting board, and you’ll see where the chicken tender is on the side of the breast. Cut the tender off and set aside, leaving the breast which is thinner at one end and thicker at the other. Slice the breast in half lengthwise at the thicker end, keeping the knife level, so that you wind up with 2 pieces of breast meat that are the same thickness, but one will be a longer piece (the bottom) and one about half its size (the top part you sliced off.) Do this with all the breasts.
By slicing the breasts lengthwise into evenly thick pieces, it will take the same amount of time for them to cook. (I prefer not to pound the hell out of the chicken breasts until they’re flat as a pancake.)
Pour the vegetable oil into a large frying pan. (I like to use corn oil or grapeseed oil.) Next to the pan, set up two bowls: one with my Italian bread crumb seasoning (recipe below) and in the other: crack the eggs and whisk them.
Now it’s your standard breading procedure: chicken meat in the egg, then in the breadcrumbs, coating well. Shake off the excess and place carefully in the pan of olive oil when the oil comes to temperature (about 350) for frying.
Fry the chicken in the oil until it’s golden brown. You want it cooked all the way through, but not overcooked. Place the fried chicken pieces on a wire rack to drain the oil. Do this with all the chicken. The fried chicken at this point is delicious all by itself: chop it and use it in a salad, or make a chicken sandwich. (By the way, if there’s breading left over, use it on the chicken tenders you cut off, and fry them up. My daughter gets these instead of store-bought chicken tenders, and she loves them.)
Cover a baking sheet with aluminum foil. Ladle out enough sauce (recipe below) to create a thin layer on the bottom of the baking sheet. Place the fried chicken breasts on top of the sauce. Cover the breasts with more sauce, then place shredded mozzarella on top. Sprinkle the top with a little oregano.
Place the baking sheet in a pre-heated 350 degree oven and bake until the cheese has melted and just starts to brown. Serve it with pasta.
MY “DON’T CALL IT GRAVY” TOMATO SAUCE
It’s not hard to make a good tomato sauce. But it takes a little work to make an amazing tomato sauce. Honed from a recipe handed down by a friend-of-a-friend’s Italian grandma, it is one very important part in two of my favorite Italian comfort food recipes: my meatballs…and my chicken parmigiana recipe.
1 medium onion, finely chopped 2 cloves garlic, finely chopped 1/2 cup extra virgin olive oil 10 cups ground and peeled tomatoes…or 3 cans (28 oz.) tomatoes (real San Marzanos preferred) 2 teaspoons each: dried oregano, basil and parsley 3/4 teaspoon each anise seed and fennel seed 1 1/2 teaspoons salt 1/2 teaspoon black pepper 2 bay leaves 1 small can (6 oz.) tomato paste 1 teaspoon sugar, optional
Heat the olive oil in a large pot and add the onions. Cook until onions are translucent, then add the garlic. Stir for about 10 seconds.
Add the tomatoes and cook until the orange foam disappears, stirring frequently.
Add the oregano, basil, parsley, anise seed, fennel seed, salt, pepper, and bay leaves. Stir to combine. Add the tomato paste, stirring well. Let the sauce just come to a boil (which helps the paste thicken the sauce), then reduce it to a simmer, and cook uncovered for at least an hour, stirring constantly, until the sauce reaches the consistency you like.
MY ITALIAN BREAD CRUMB SEASONING
This is the one part of the recipe (other than the optional pasta) that keeps this dish from being gluten-free. So I use gluten-free breadcrumbs, even if I don’t need to. I buy a loaf of Udi’s frozen gluten-free bread, toast the slices, and them put them in a food processor. I dare you to tell the difference between these and breadcrumbs with gluten!
1 Udi’s loaf, toasted and ground into breadcrumbs 2 teaspoons dried parsley 1 teaspoon dried oregano 1 teaspoon dried basil 1 teaspoon salt 1/2 teaspoon granulated garlic 1/2 teaspoon granulated onion 1/4 teaspoon black pepper
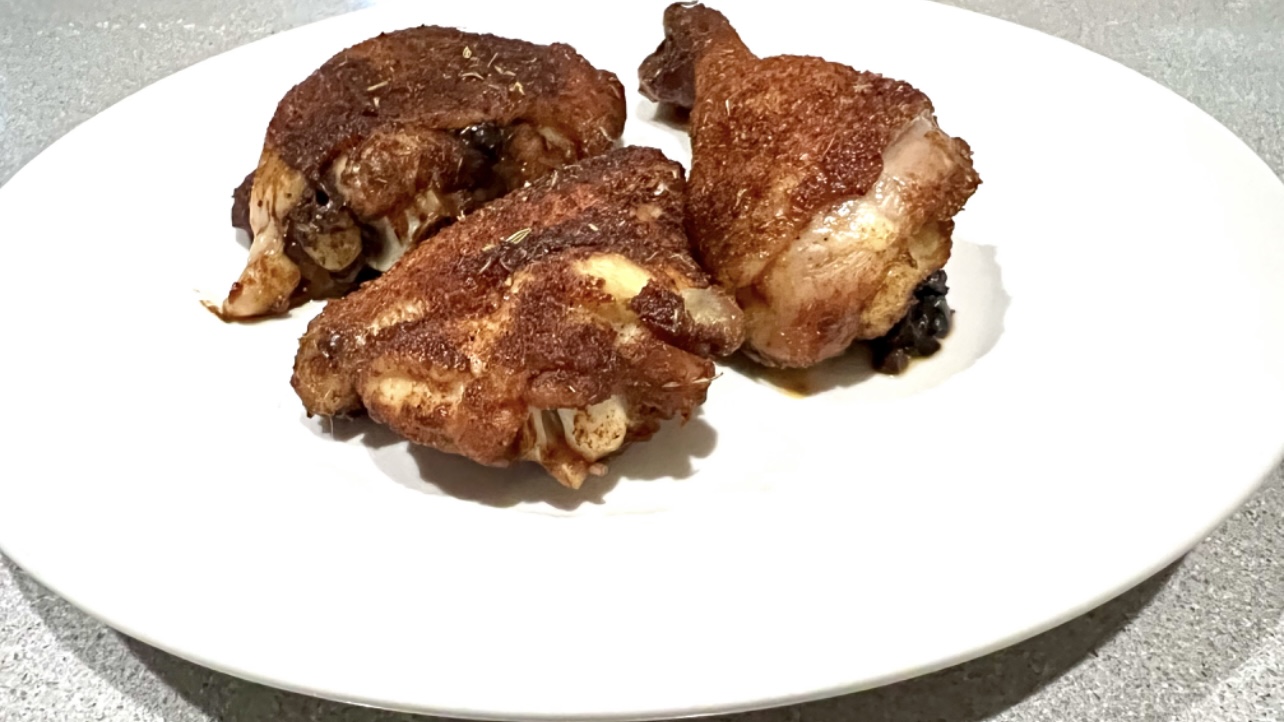
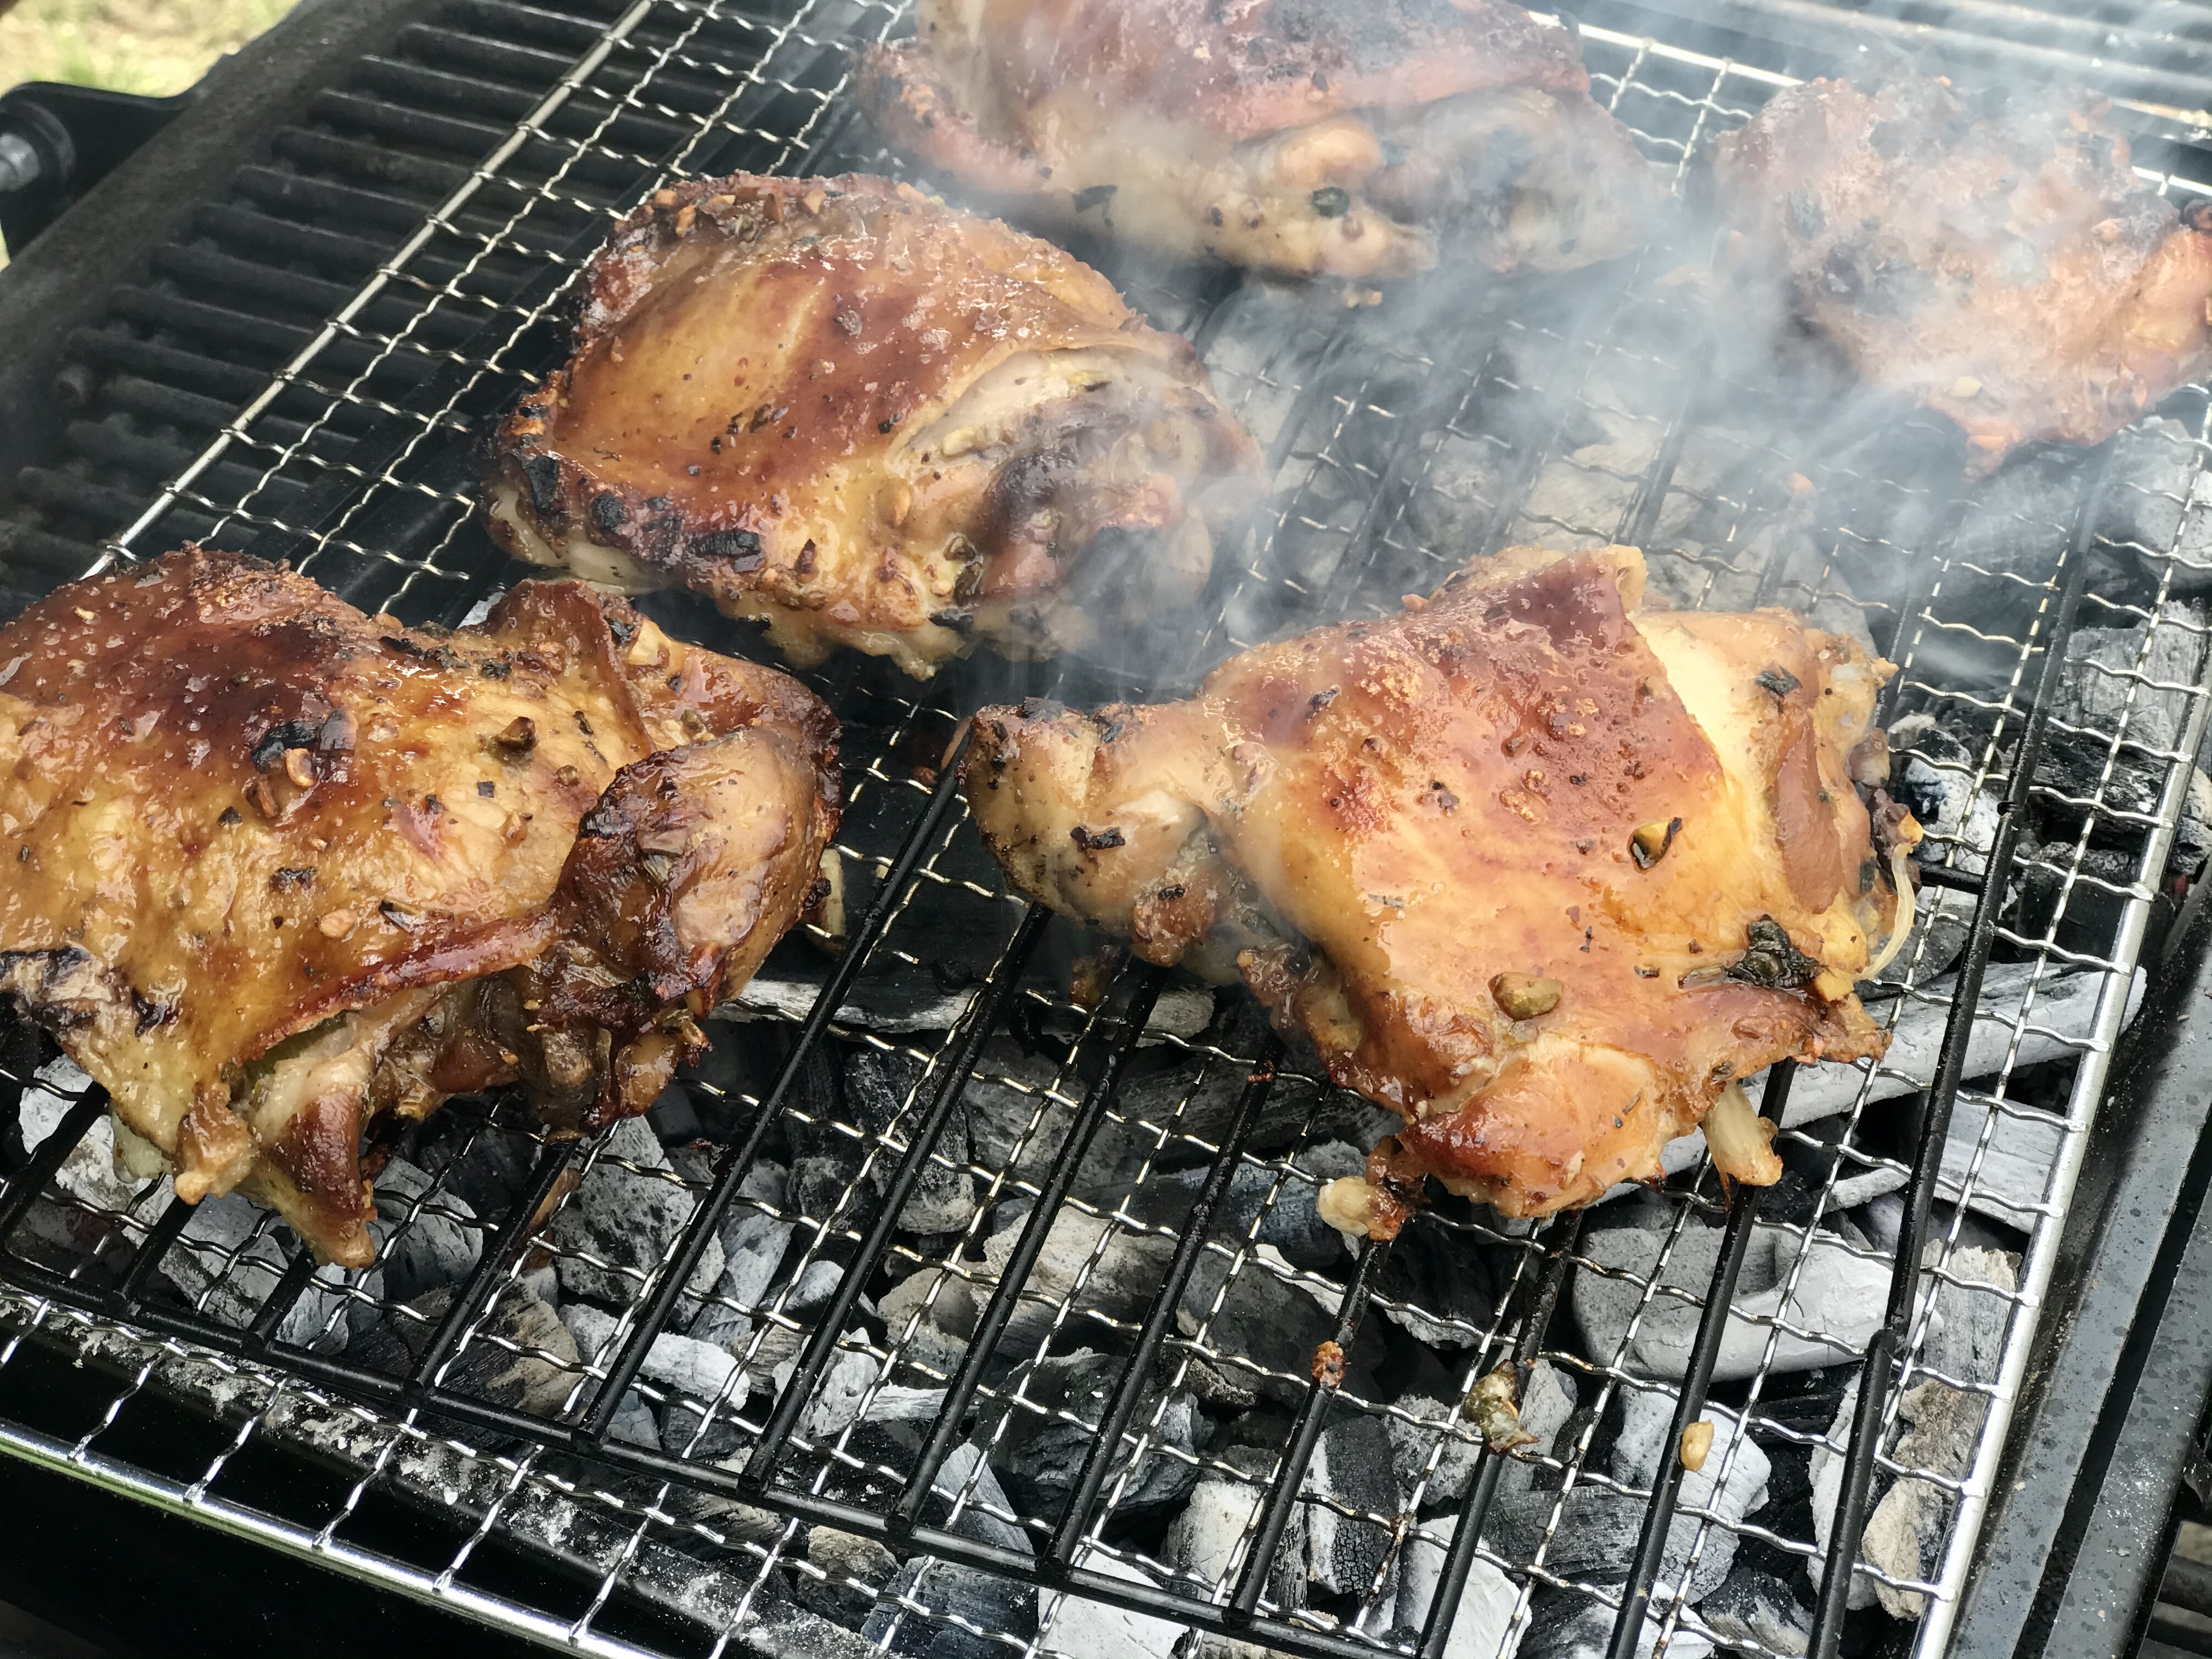
Brining, the process of letting a hunk of protein soak in a salt solution for a few hours, is a great way to add flavor and moisture to any cut of meat. I brine these wings for 3 hours before using a sweet and spicy rub. They can be grilled or roasted in the oven.
The brine…
1/2 cup Kosher salt
3 tablespoons light brown sugar
1 teaspoon whole black peppercorns
1 whole bay leaf
2 quarts water
Combine all ingredients in a saucepan and heat until the sugar and salt dissolve. Remove it from the heat, and let it cool to room temperature.
The rub…
1/4 cup light brown sugar
1/4 cup granulated sugar
1/4 cup sweet paprika
1 tablespoon Kosher salt
1 tablespoon granulated onion
2 teaspoons black pepper
1 teaspoon dried thyme
1 teaspoon dry mustard
1 teaspoon ground ginger
1 teaspoon cayenne pepper
Combine all the ingredients in a bowl.
Place 3 lbs. of chicken wings in a Ziploc bag and pour the cooled brine into the bag. Place the bag in a bowl to prevent leaks and keep it at room temp for 3 hours. I wouldn’t brine it longer than that, or it will get really salty.
After 3 hours, remove the chicken from the brine and dry the wings with paper towels. Discard the brine.
Place the chicken pieces in a large bowl and sprinkle them with 1/3 cup of the rub, tossing to coat the chicken well. Place the bowl with the chicken in the fridge until you’re ready to cook.
About 30 minutes before cooking, remove the bowl from the fridge and let the chicken come to room temperature.
Pre-heat the oven to 350 or light a grill.
Toss the chicken with some more of the rub, if you like, then place the pieces on a sheet pan lined with non-stick aluminum foil.
Bake at 350 for 30 minutes or until done. Lower the oven temperature if it starts to burn.
If you’re grilling, cook the wings over medium heat, turning them frequently to prevent burning. Cook until the wings are done.
Lamb seems to be one of those meats that people either love or hate. Growing up in a home where my Mom served it pretty often, and did a pretty good job of cooking it, I happen to love it, and actually crave it now and again.
I buy much of my meats from Cooks Venture, a company that humanely raises a special breed of chickens, and also sources high quality meats from all over the world.
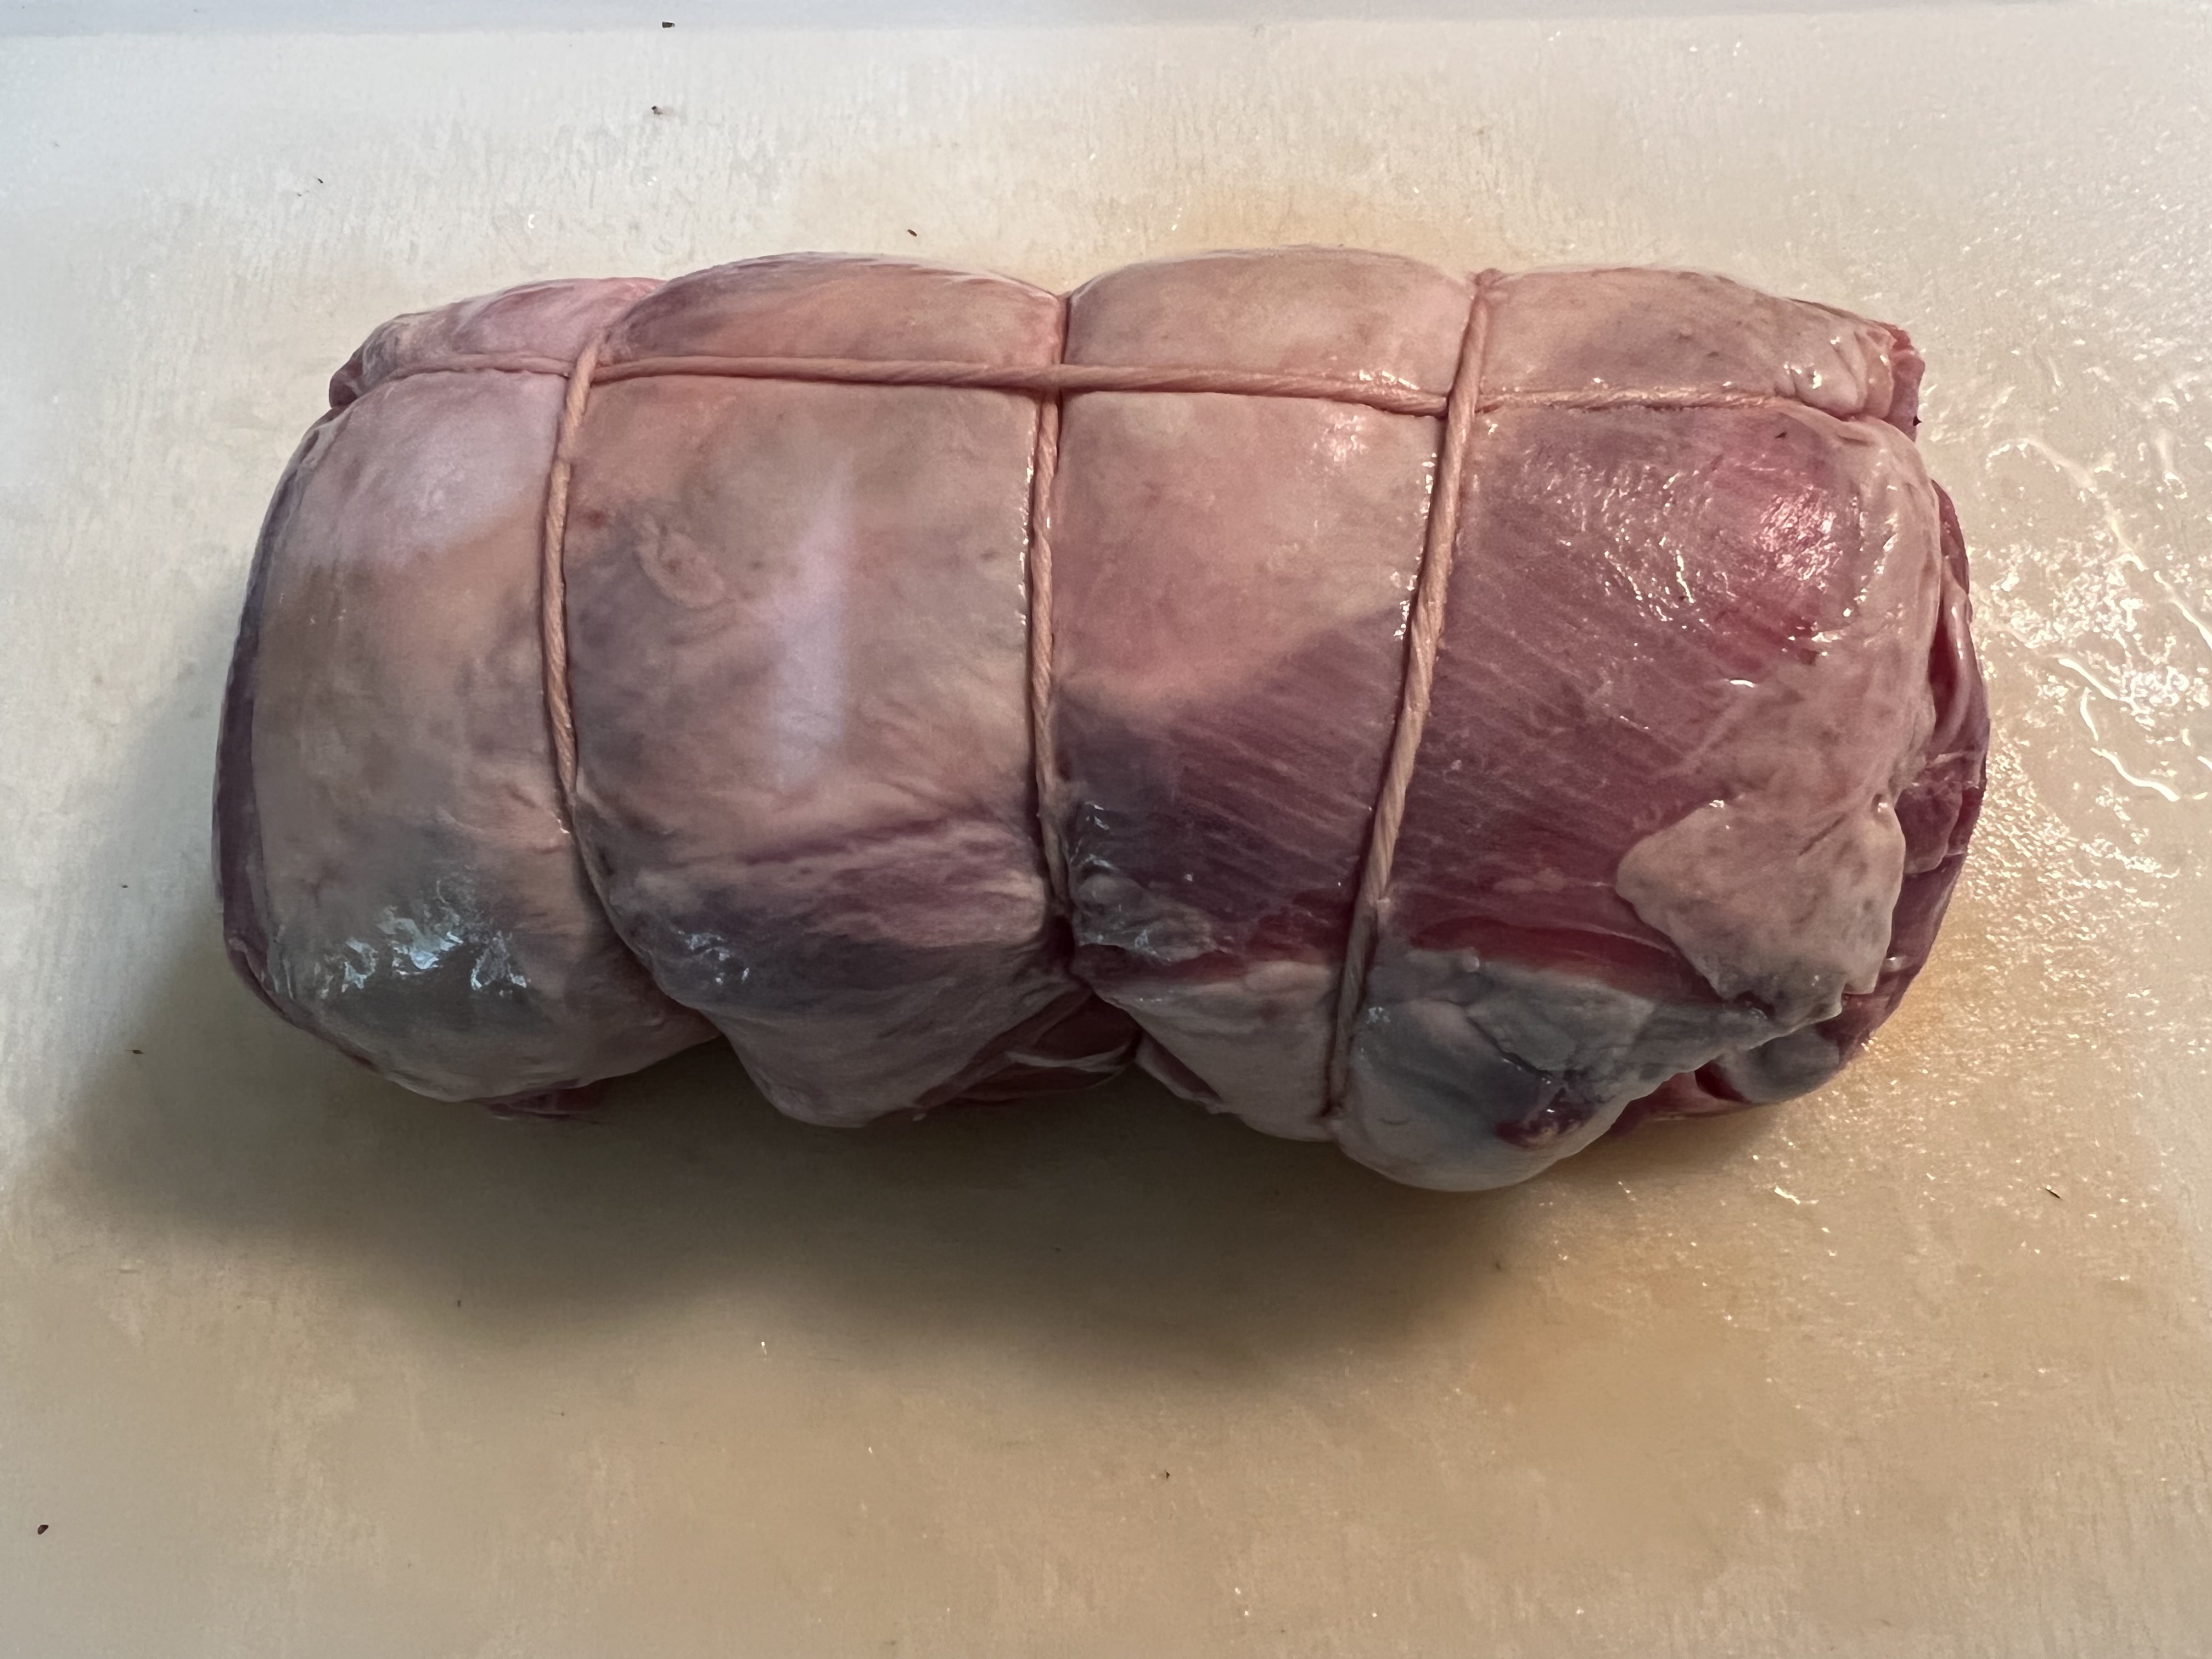
When I saw a New Zealand boneless lamb shoulder roast on their website, I had to buy it. Though New Zealand lamb can be a bit gamey to many people, I love that flavor, and there is no better quality of lamb than that from the land of the kiwi.
I knew I wanted to marinate the roast, and there was no way the marinade would penetrate into the meat if it was rolled and tied like it came in the package. So I decided to cut the string that wrapped the lamb roast, and unroll it, so that every inch of that lamb would make contact with the marinade.
Tied…
Untied and unrolled.
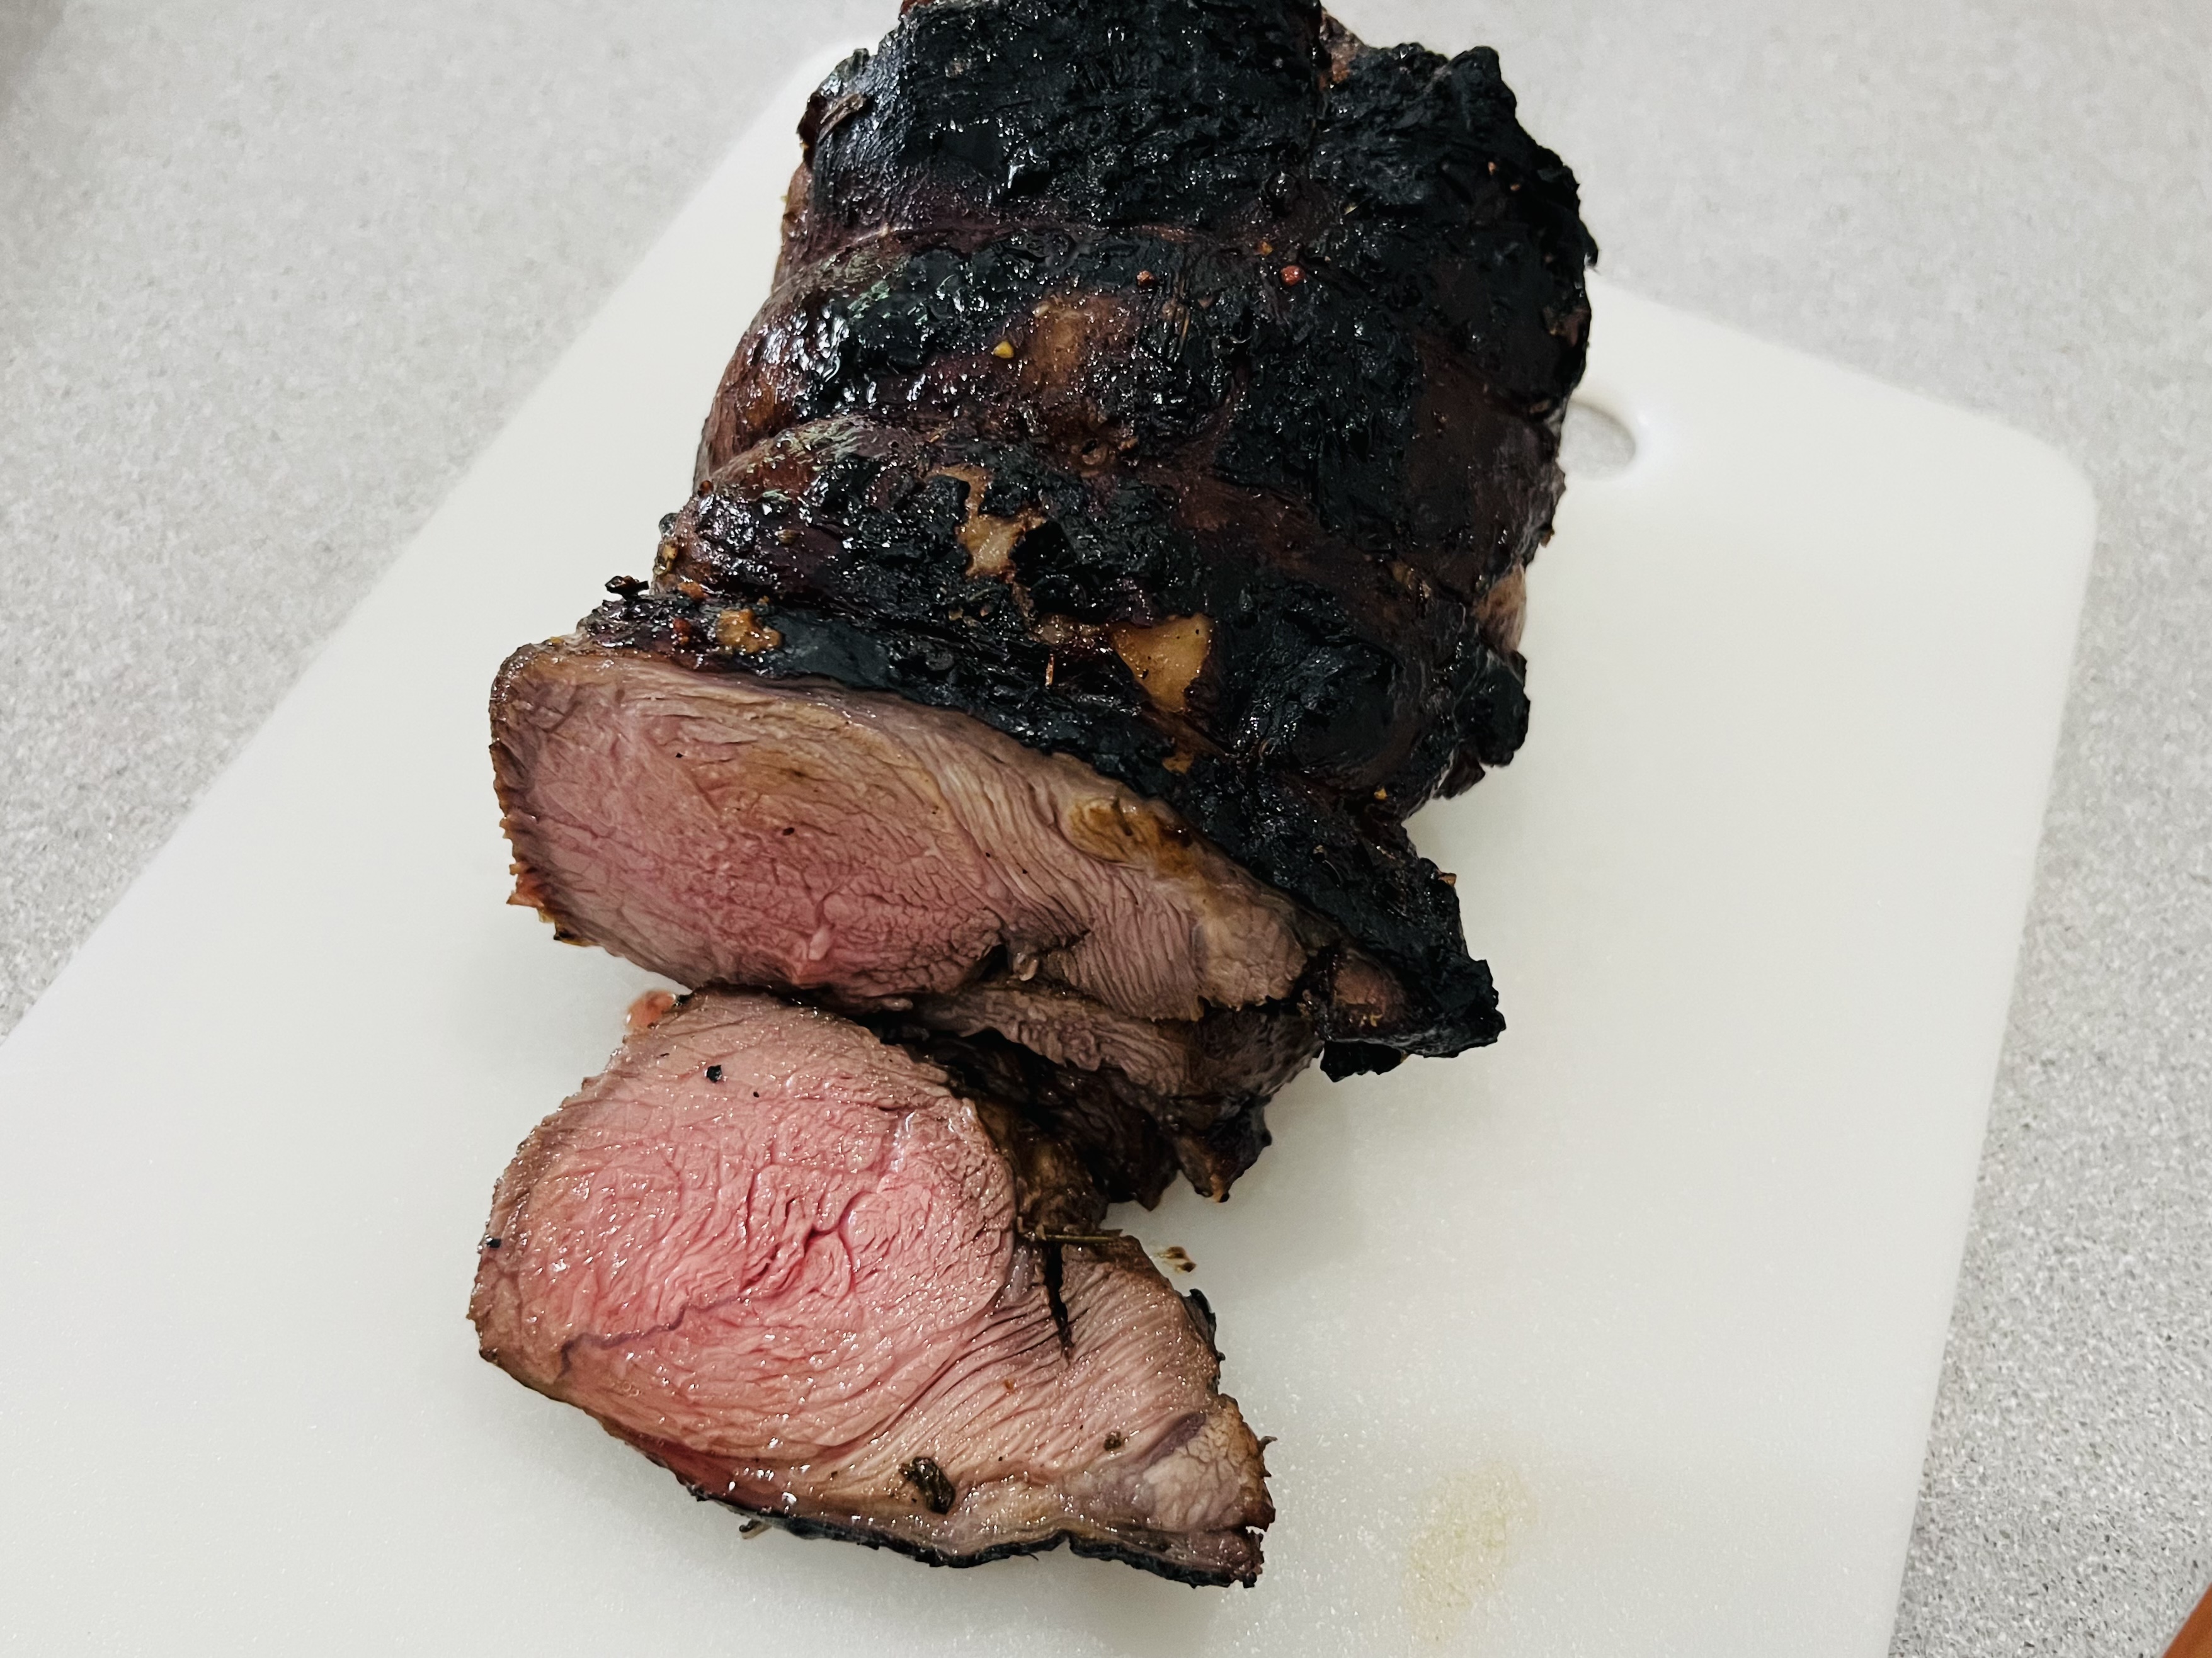
Once I marinated the lamb overnight, I rolled it back up, retied it as best I could, and cooked it in a 350 degree oven until the roast registered 120 degrees on my meat thermometer: medium rare.
I finished the lamb on my outdoor grill over hardwood charcoal to get a little smokiness and char.
The marinade I used can be used for any cut of lamb you might want to cook. (I love the small lamb chops that look like mini t-bones. Their flavor is incredible.)
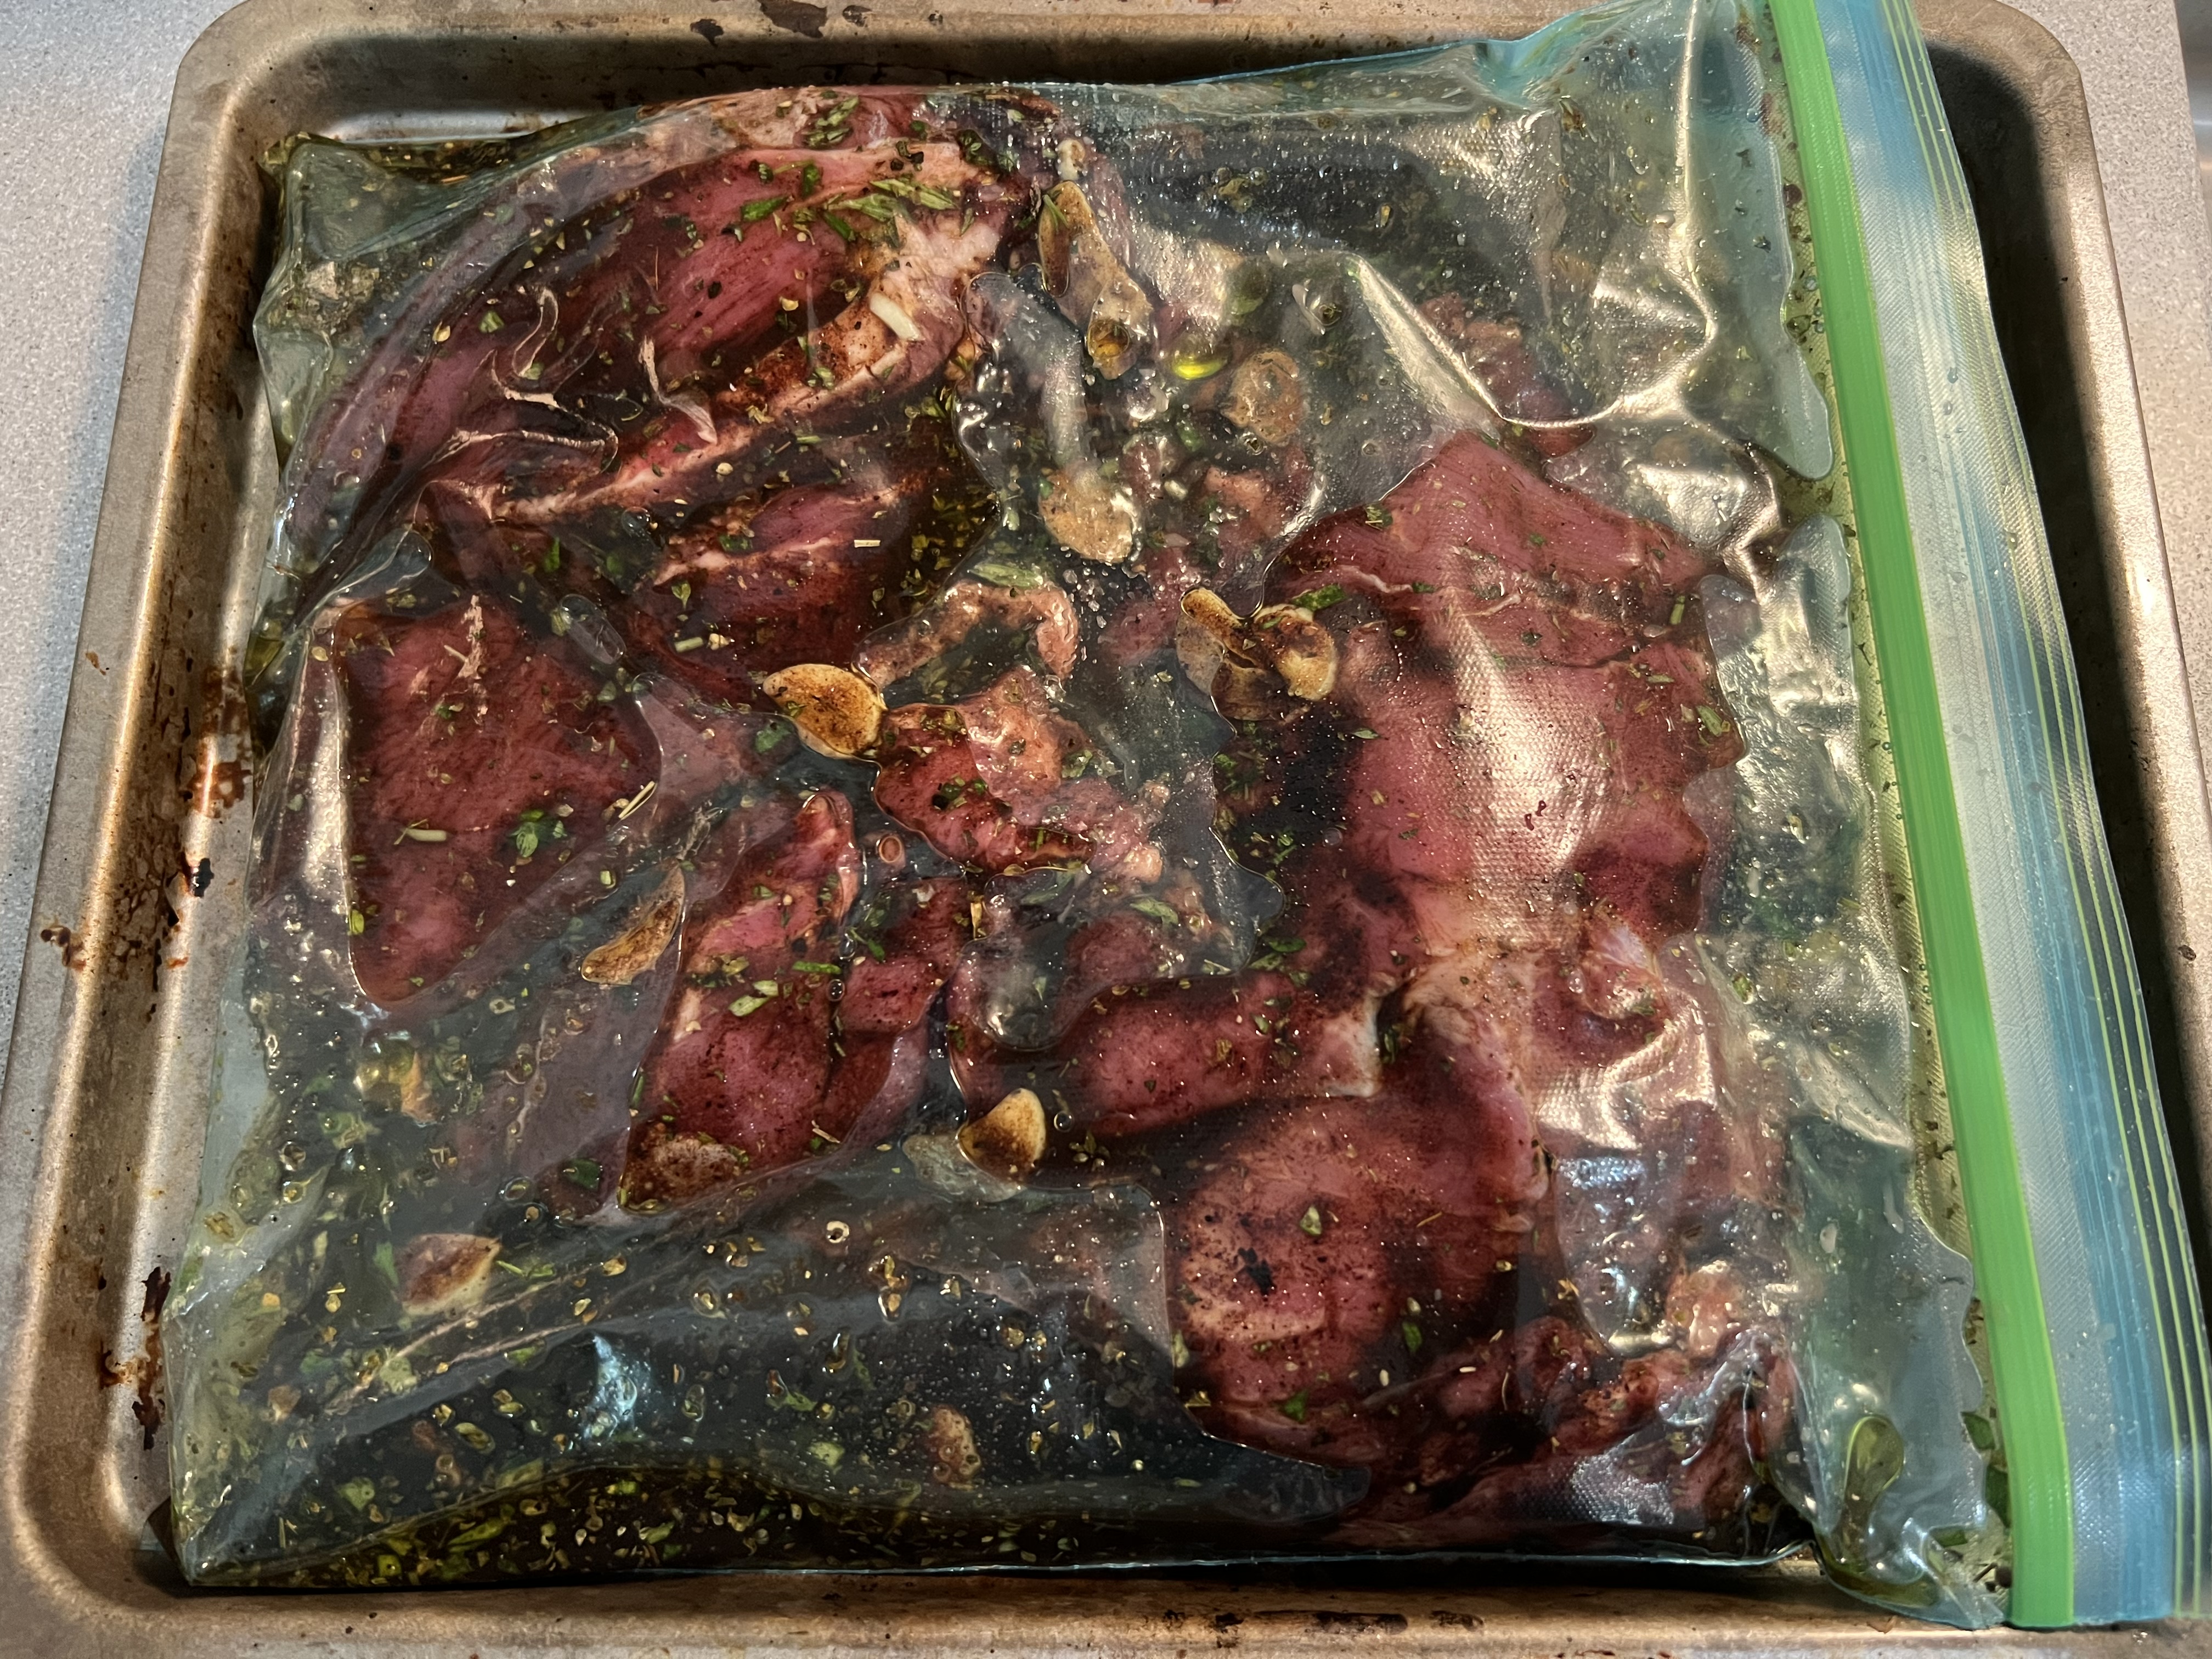
1/2 cup olive oil 1/2 cup balsamic vinegar 1 tablespoon fresh rosemary, chopped 1 tablespoon fresh thyme leaves, chopped 1 tablespoon Kosher salt 1 tablespoon maple syrup 1 tablespoon Dijon mustard 1 teaspoon black pepper 1 teaspoon dried oregano 3 cloves garlic, sliced thin
Combine all the marinade ingredients in a bowl, mixing well.
Lamb and marinade ready for an overnight in the fridge.
Place the lamb in a Ziploc bag, and pour in the marinade. Seal the bag tightly, squeezing any excess air out of it, and squish it around carefully, so that the marinade makes contact with every part of the lamb.
Place the bag on a pan (to prevent accidents in the fridge) and place it in the fridge overnight. Give it a squish every few hours if you can.
The next day, remove the pan from the fridge and let the lamb come up to room temperature.
Pre-heat the oven to 350 degrees.
Carefully remove the lamb from the bag (I do this over the sink), discarding the marinade.
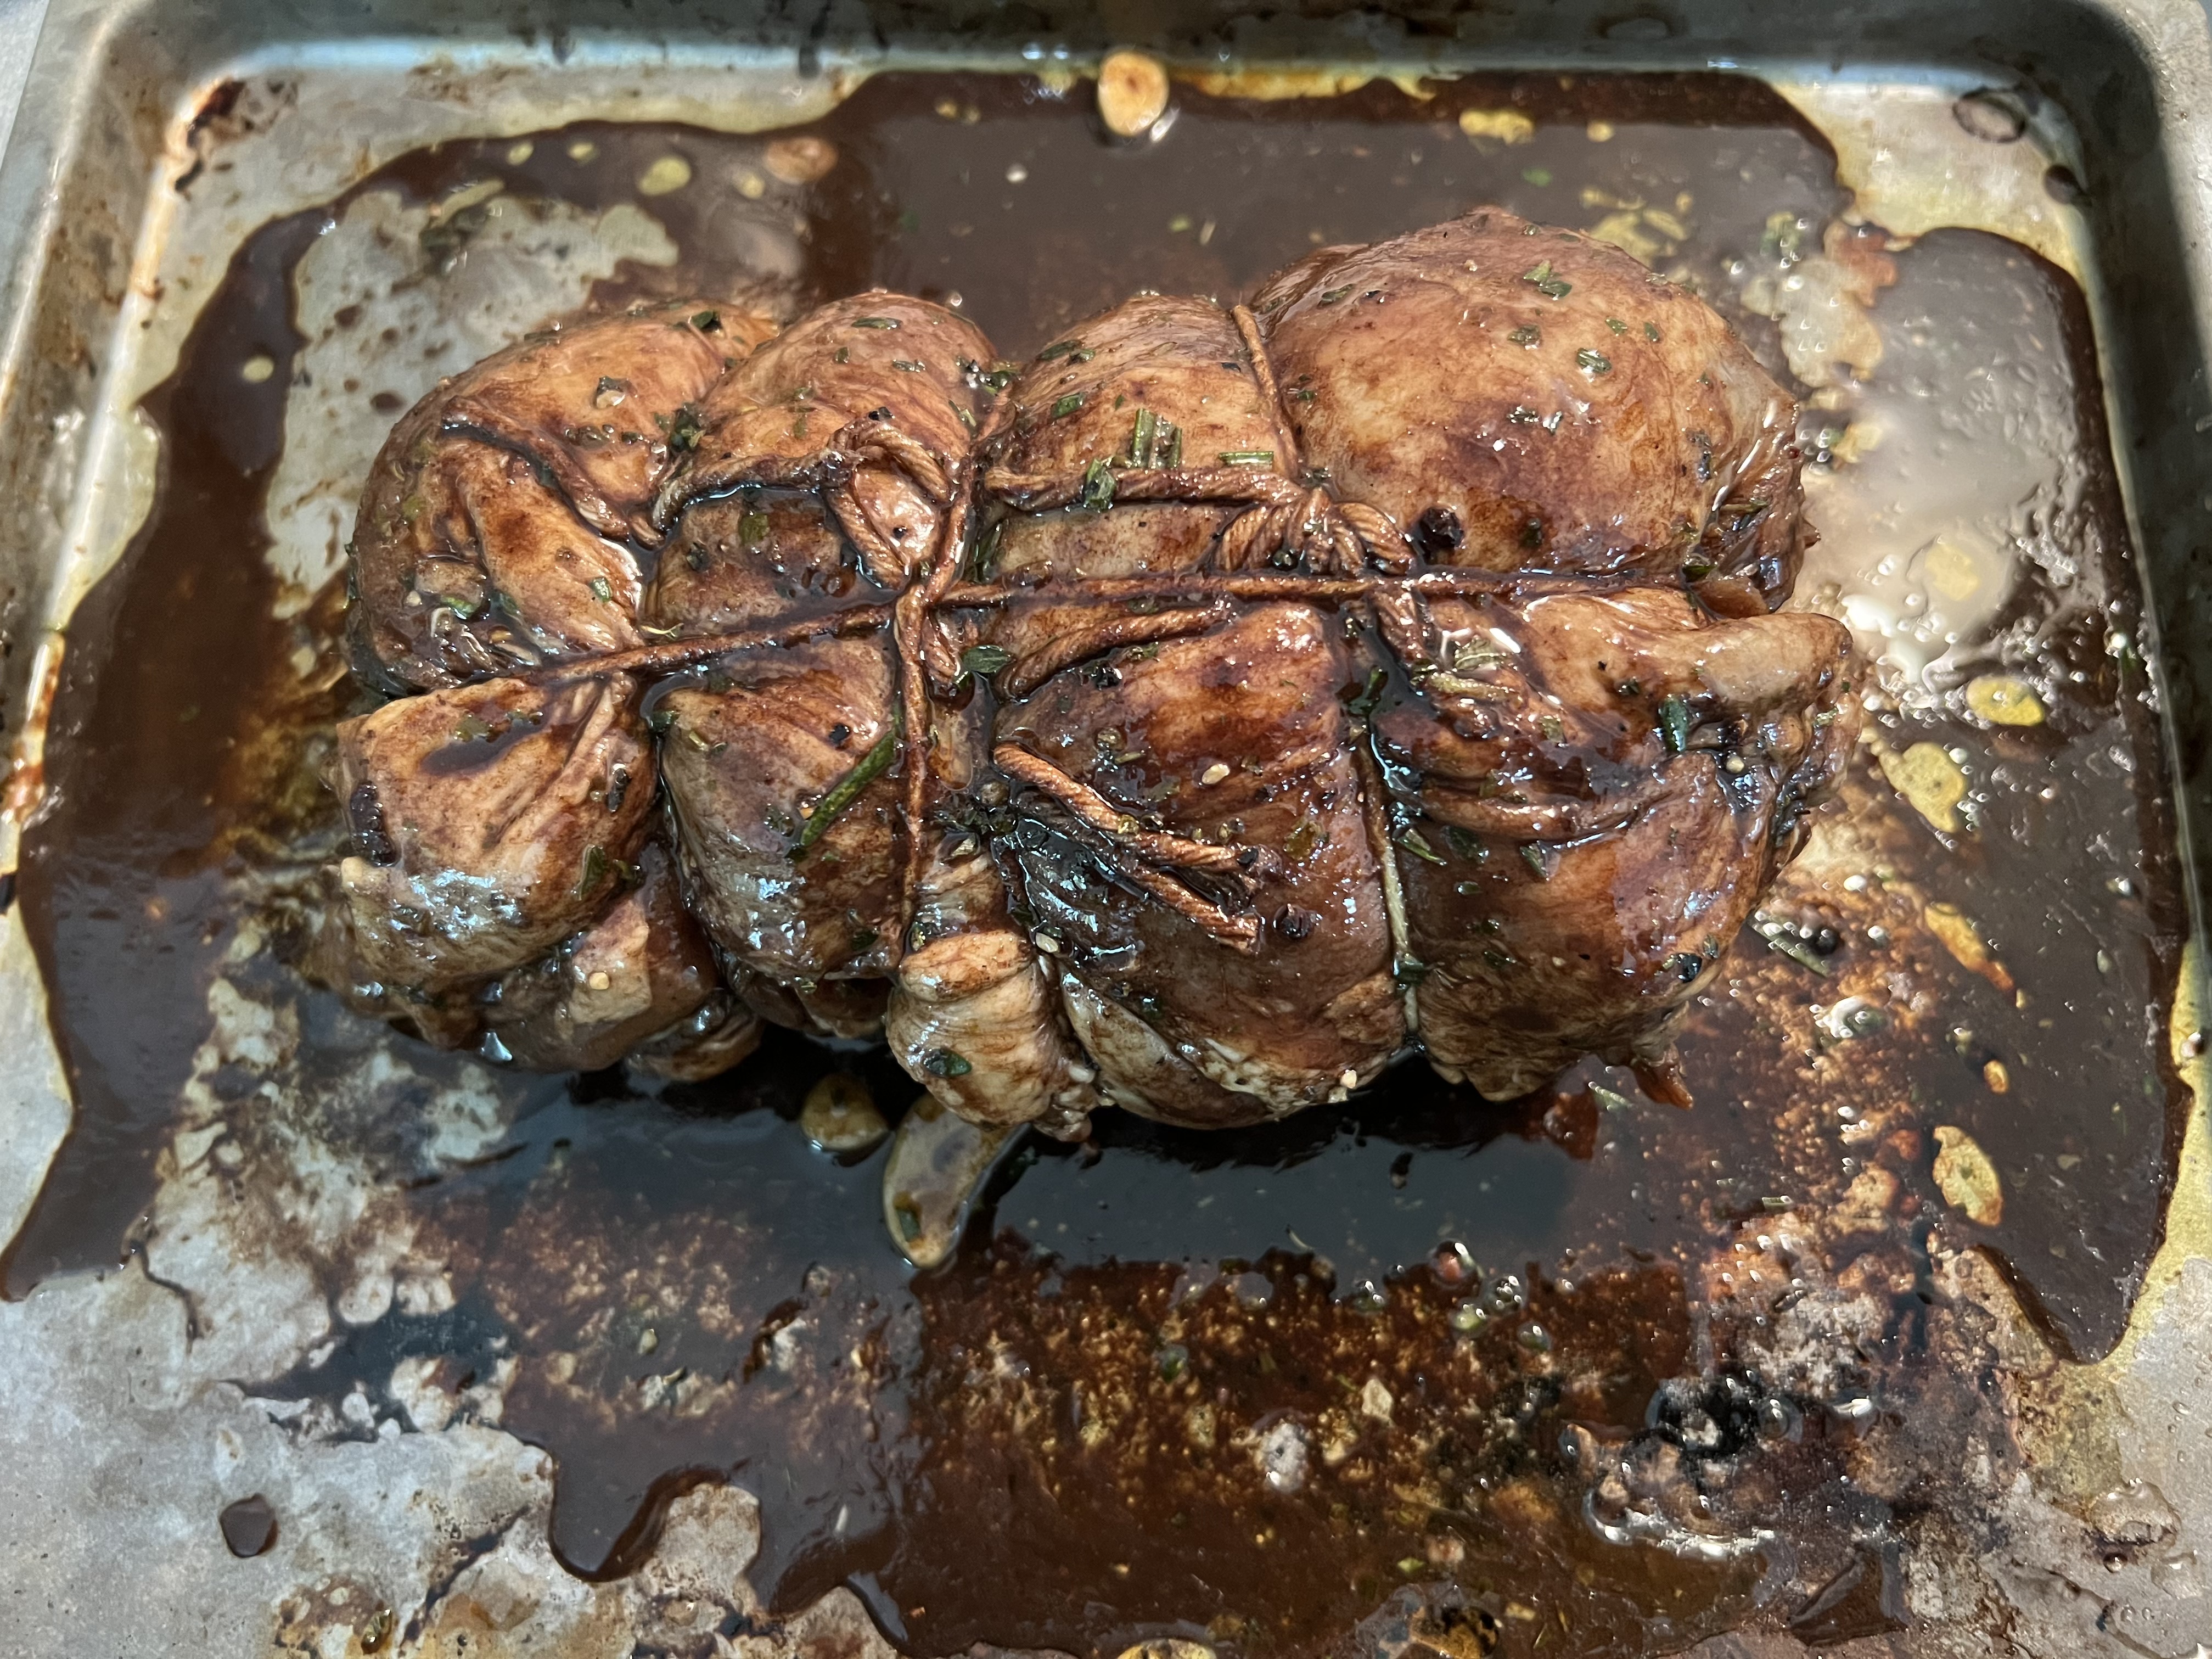
Marinated, seasoned, re-rolled and re-tied. Ready for the oven.
If you’re using an unrolled lamb roast, like I did, roll it our flat on a cutting board and season it with salt and pepper.
Carefully roll the roast up the way it was originally and tie it with string, as best you can.
Place the roast on a baking sheet and bake it until the meat reads 120 degrees on a meat thermometer…that’s medium-rare.
Out of the oven and onto the grill…
While the roast is in the oven, start a hardwood charcoal fire.
When the roast is out of the oven, place it on the grill and grill it on all sides until it has some nice grill marks and char.
Let the roast rest for at least 15 minutes before slicing. (Cut the strings off before you do.)
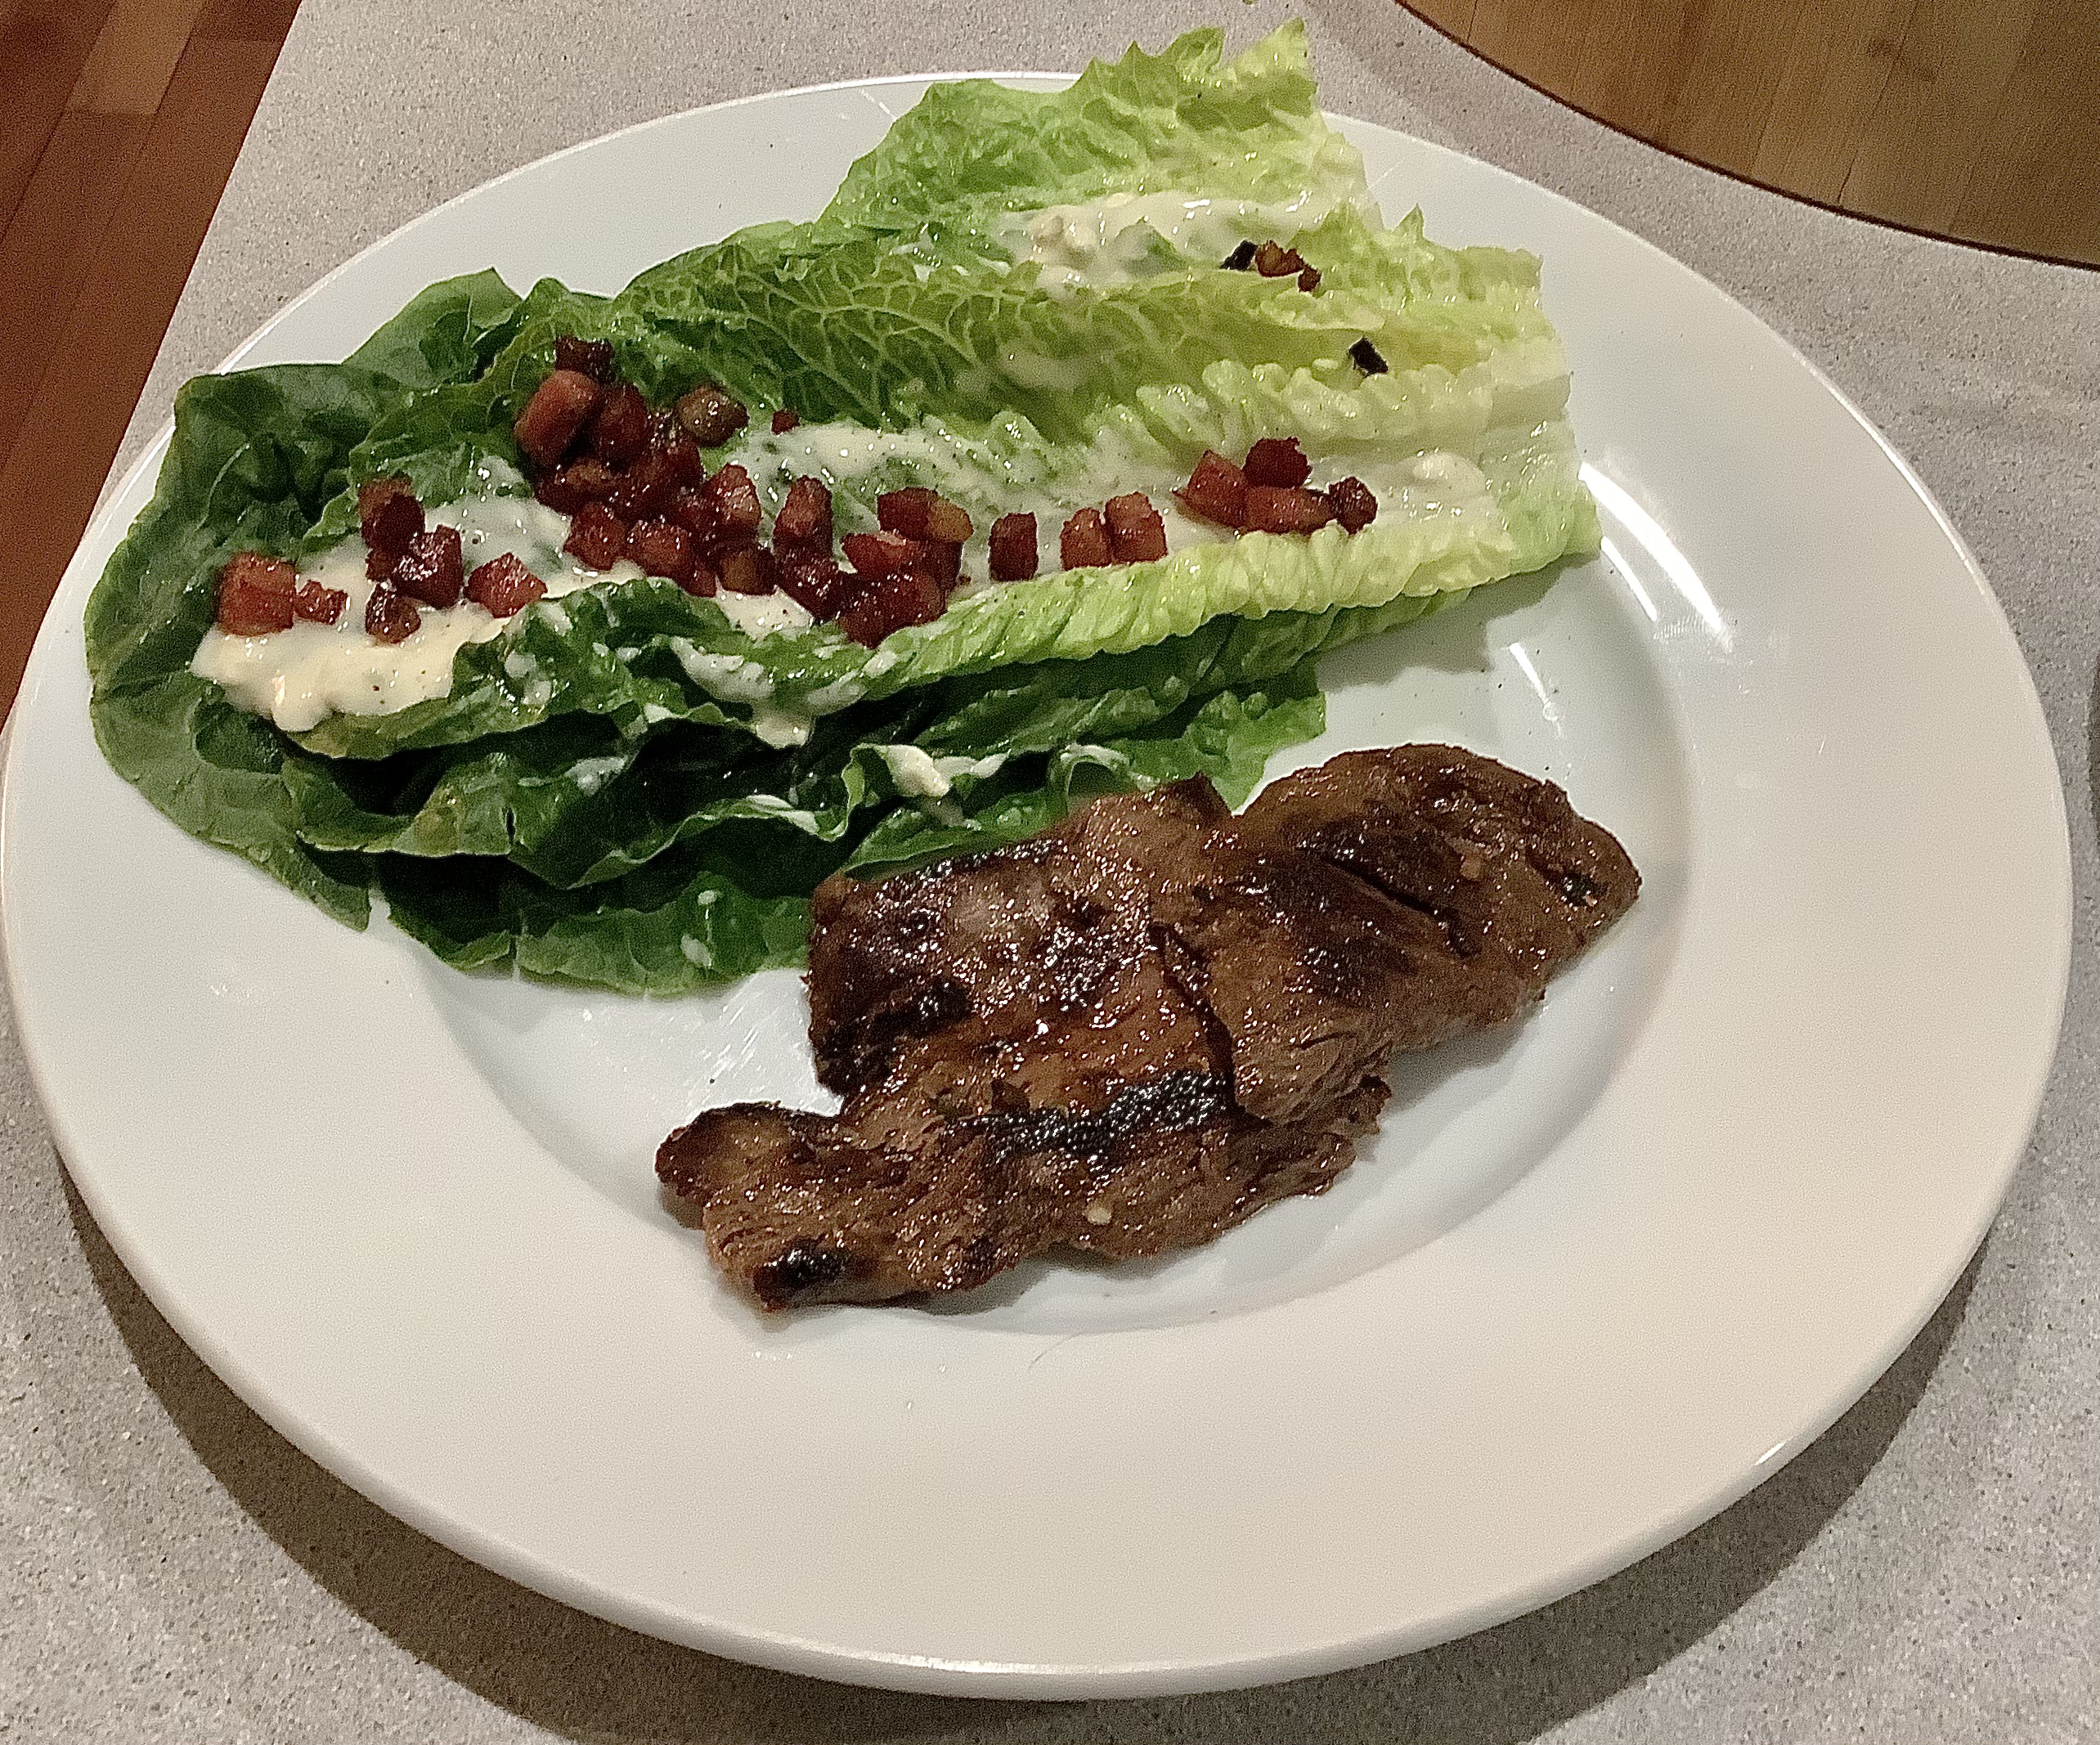
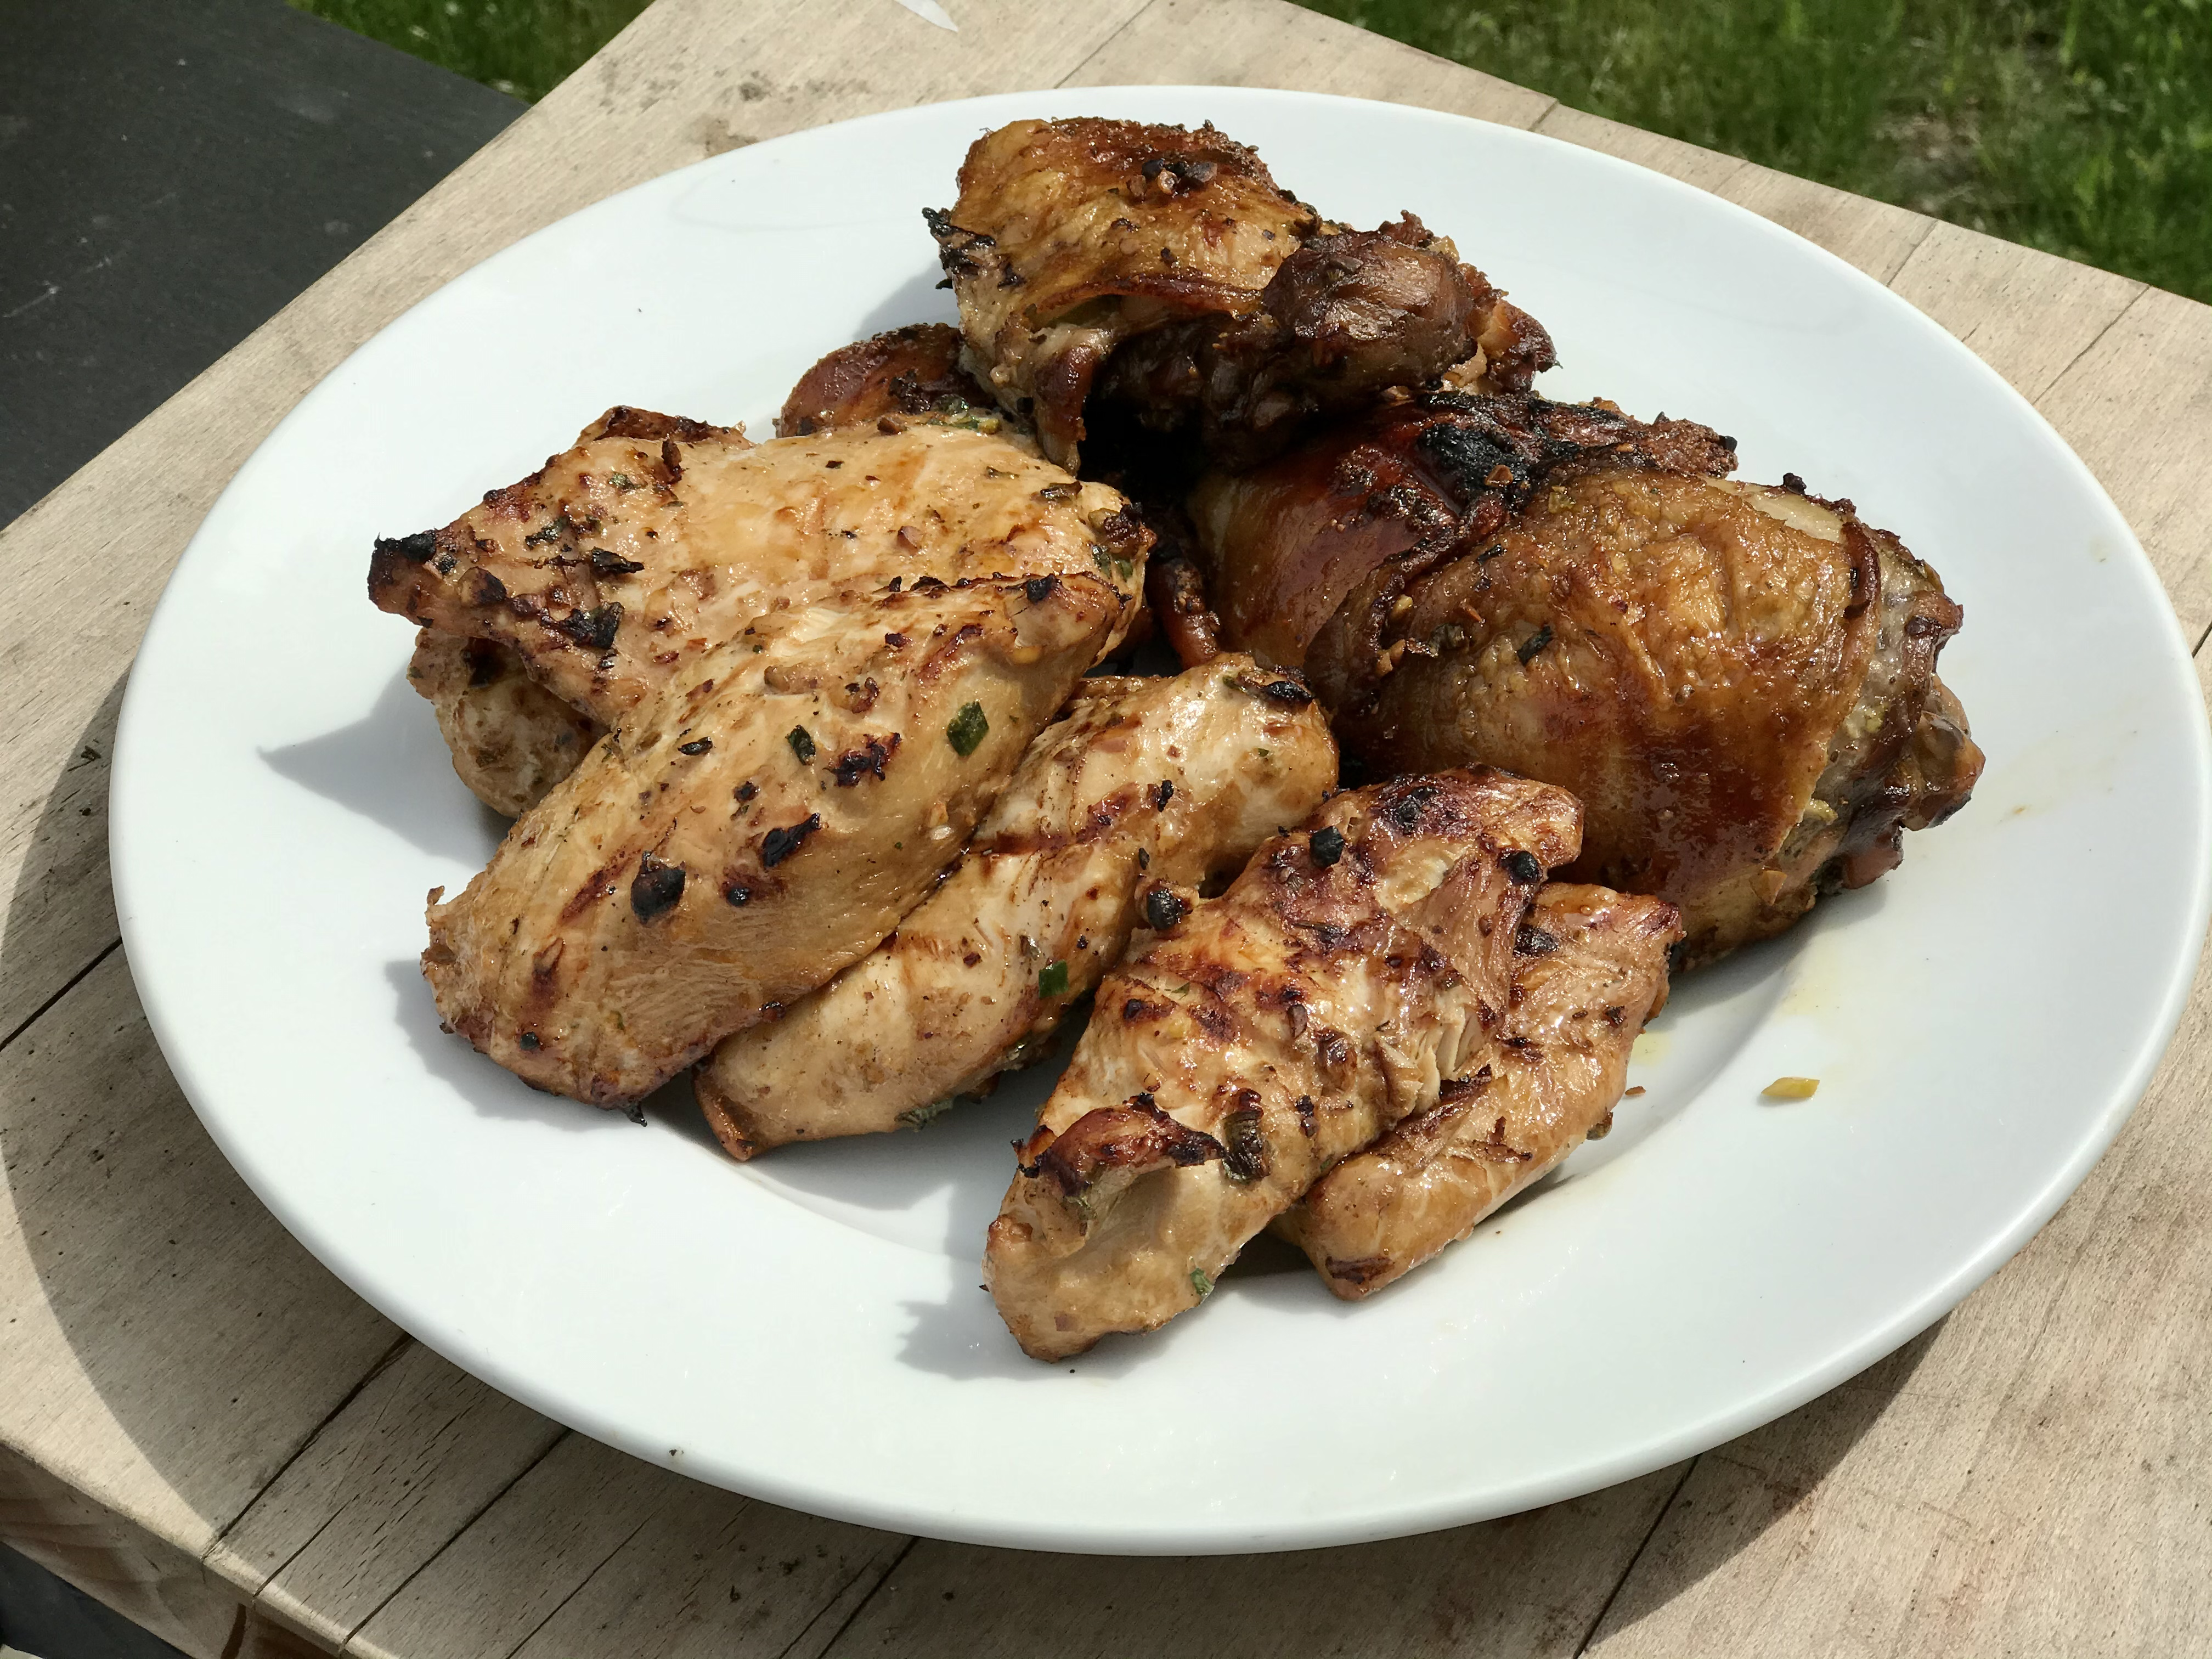
I really love the flavors of this recipe, and the great thing is that you can use it as a marinade and a dipping sauce–not just for beef–but a dipping sauce for grilled chicken, dumplings, anything. It’s that good.
Make more than you think you’ll need because you can keep it in the fridge for future dipping.
If you use gluten-free soy sauce, this recipe is GF. Chili garlic sauce can be found in the Asian foods section of most supermarkets.
A little side salad with blue cheese and home-cured and smoked bacon doesn’t hurt, either!
1/4 cup soy sauce 1/8 cup sesame oil 2 tablespoons freshly grated ginger 2 tablespoons finely chopped garlic 2 tablespoons finely chopped cilantro 2 tablespoons chopped salted pistachio nuts 2 scallions, minced 1 tablespoon light brown sugar 1 tablespoon freshly squeezed lime juice 1 teaspoon chili garlic sauce
Combine all the ingredients in a bowl and mix them together well.
Whatever cut of beef you’re using, make sure it isn’t too thick, or the marinade won’t penetrate the meat.
I like to use beef flap or flank steak, because it’s full of flavor, and I slice it crosswise to make cuts of meat that are about 1/2″ thick.
I place the beef in a bowl, and pour just a little marinade in at a time. I don’t want the meat swimming in the marinade…just enough so that it makes contact with all the surfaces of the meat.
Place the unused marinade in a sealed container in the fridge.
If you’re cooking soon, let the beef marinate at room temperature. But ideally, you want the beef to marinate in the fridge overnight–the longer the better–to really soak up the flavors of the marinade.
Before cooking, take the beef out of the fridge and let it come back to room temperature. Discard the marinade that was in the bowl with the beef.
If your beef flap is thin enough, tossing it onto a very hot cast iron skillet to sear it on both sides will bring the beef to a perfect medium-rare. Otherwise, you can sear it in a regular pan and then finish it in the oven–or–fire up the grill!
Use the remaining marinade for dipping.
Thighs finishing on the grill.
Whether you use chicken breast or chicken thighs — I used both here— the flavor is outstanding, especially if you can finish it on the grill!
Here’s great hack for fresh ginger that I learned from Liz, the owner of Wishing Stone Farm, an organic farm in Little Compton, RI, where they grow their own ginger roots. Place your ginger root in a Ziploc bag and keep it in the freezer. Whenever a recipe calls for freshly grated ginger, simply pull the frozen root out of the freezer and grate it, skin and all, while it’s frozen. Then simply place the root back in the Ziploc and back in the freezer until next time. No waste!