Archive for the ‘grilling’ Category

Although the name may not sound entirely appetizing, the beef flap or flap steak is a thin cut of meat that comes from the bottom sirloin butt cut, and it’s delicious when properly cooked. It’s not a skirt steak or a hanger steak, though they are similar.

I bought a beef flap from my friends at Simmons Organic Farm in Middletown, RI , and didn’t really know what I’d do with the cut until I started searching through my fridge for available ingredients. There were 2 beef flaps in the package I bought, one larger, one smaller, so I put the smaller one in a Ziploc bag with an olive oil/balsamic/garlic/onion/salt/pepper marinade, and left it to chill overnight in the fridge (what I did with it is in the next blog) while I worked on the larger, 2-lb. flap.

meat butterfly

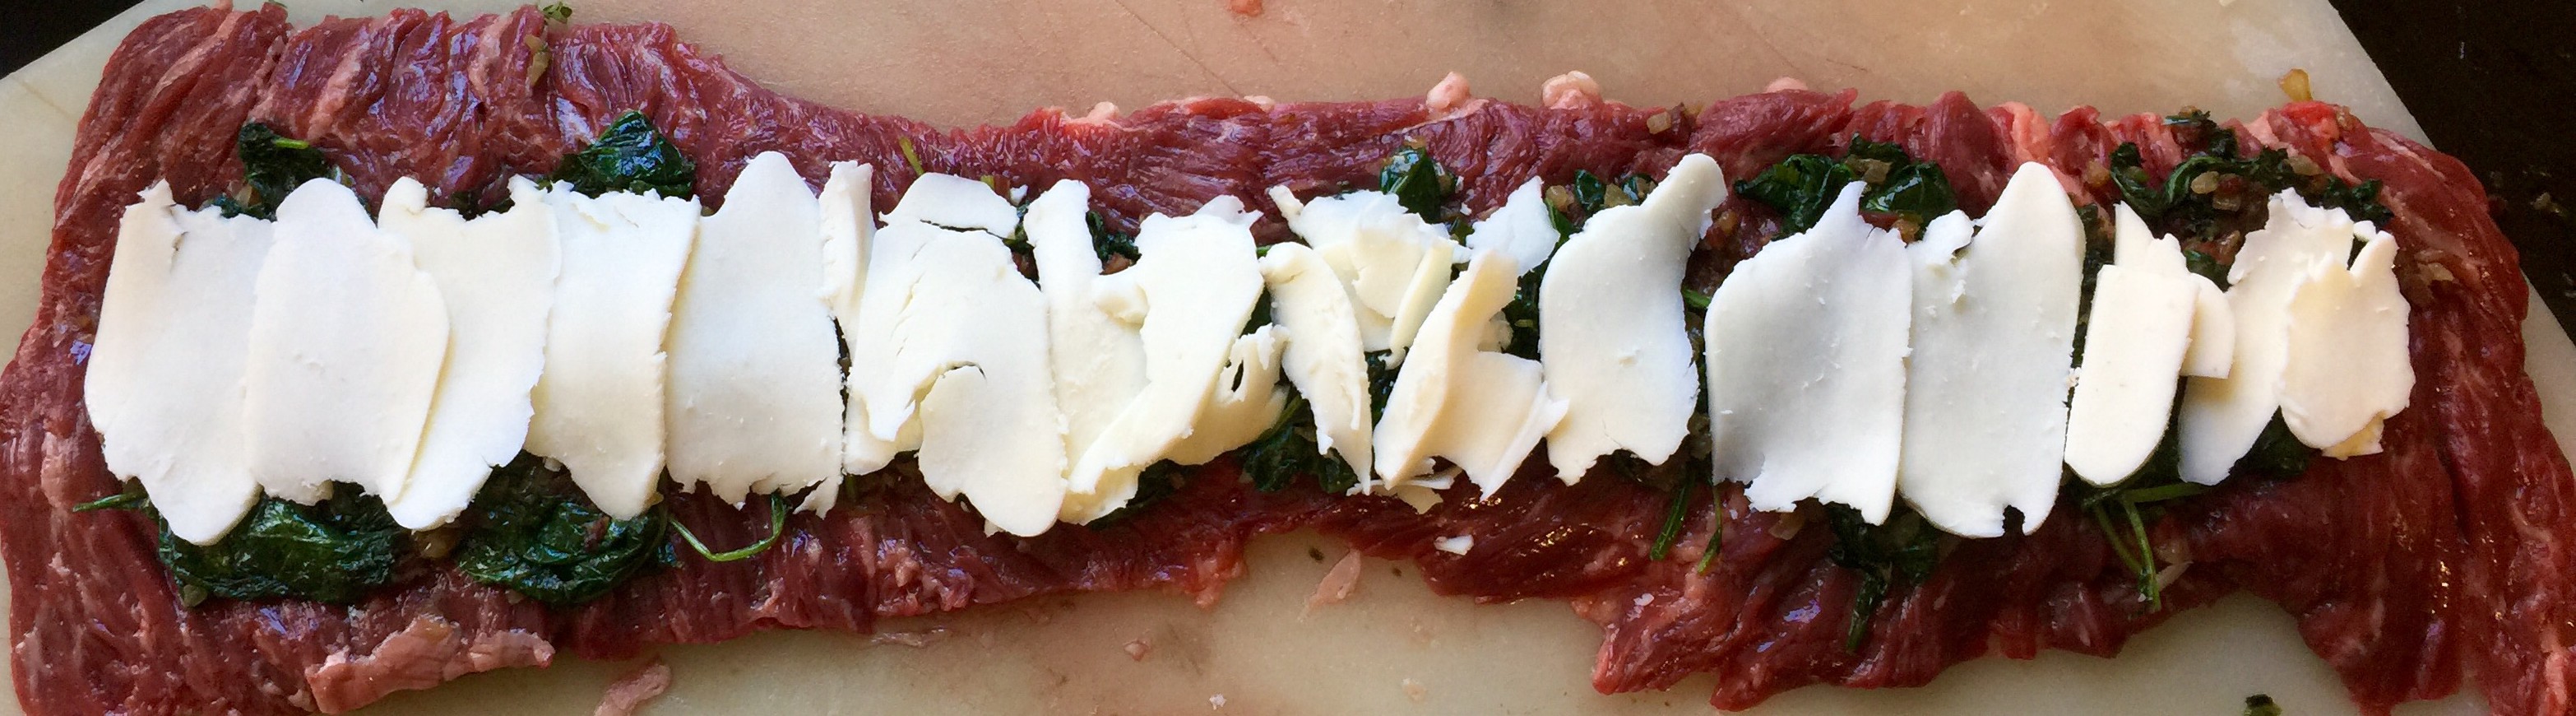
Though long and flat, if you have a sharp knife and you work carefully, you can slice the beef lengthwise and, stopping just before you cut it into 2 separate pieces, create a nicely butterflied piece of meat. Smear some tasty ingredients on the meat, then roll it up tightly and cook it.

meat cheese

2-lb. beef flap (I like grass-fed)
1/2 sweet onion, chopped (I like Vidalias)
1 clove garlic, minced
3 strips bacon, finely chopped
4 oz. container of organic spinach and kale (or whatever greens you like)
salt and pepper
8 oz. halloum-style cheese, sliced thin (provolone works, too)

meat roll 2

Take a little of the bacon fat rendered when cooking the bacon strips, and heat it in a saute pan. Add the onions and sauté until translucent. Add the garlic, and sauté for a minute. Add the chopped bacon and stir. Add the spinach and kale, and let it wilt and cook down entirely until it’s soft. Season with salt and pepper. Remove the pan from the heat and let it cool.

Butterfly the beef flap, as described above. Take the cooled mixture from the pan and smear it all along there top of the beef evenly. Add the slices of cheese on top.

Tightly roll the beef into a log shape, carefully keeping the inside ingredients from squeezing out.

I pinned the log together with toothpicks my first time around, and it did okay. But I suggest tying the roll with butchers twine in several places so that the meat stays together and cooks more evenly.

meat roll

Place the log in the fridge, removing it about an hour before cooking to bring it back to room temperature.

Rub the outside of the log with olive oil and season with salt and pepper. Place the log in a hot oven-proof pan and sear on all sides. Then place the pan in a pre-heated 350 degree oven and cook until the interior temperature of the meat is around 120, about 30 minutes.

cooked beef


A temperature of 140 is considered to be medium-rare for beef, but I like to cook it only to 120 and then let it rest, covered with a tent of foil. It will still rise in temperature for a few minutes before it starts to cool down.

Slice carefully with a sharp knife.

For most people, grilling season is still a long way away. I’m a bit of a fanatic: I’ll use my Weber grill in the wintertime, often standing in a foot of snow while I’m carefully turning my steaks over the hardwood coals below. In the spring, I put the Weber away, and unveil my larger ceramic grill. I use it to grill or smoke anything from a great steak to a whole chicken or even a pizza.

Making a great steak isn’t difficult, but like all good things, takes a little care and finesse.

It starts with the beef. I only buy grass-fed beef. I think it tastes better, and I buy it from local farms that raise the cattle humanely. Some say that grass-fed beef tastes too gamey. I understand that, because I’ve had grass-fed beef from many different sources over the years. The taste of the beef depends on the breed of cattle as well as the environment they’re raised in. The general title “grass-fed” is convenient to use, but quality varies greatly. The only answer to that is to keep trying cuts of beef until you find the one you like. For me, here in Rhode Island, Pat’s Pastured in East Greenwich has the quality and taste I’m looking for. And occasionally, my local Whole Foods will offer great cuts of grass-fed beef as well.

Grass-fed matters to me because the cows eat what is natural for them to eat: grass. The meat naturally has better fats; it’s higher in Omega-3’s. Feeding corn and grains to cattle is cheaper and fattens them up faster, which is why most American farmers switched to that method many years ago and created the factory farms we now have. But feeding them corn and grains also makes them sick, so the farmers have to pump antibiotics and hormones in them to keep disease away. Make no mistake: whatever nasty crap they put into the cow, goes into you. To me, it’s worth paying the extra bucks to support the farmers that do it right. I have beef less often, but what I have is the best I can get for my family.

If none of that matters to you, and you simply want to grab a slab of beef from your supermarket, that’s your choice. But even then, there are varying degrees of quality. Cough up a few extra bucks for better beef and it will reward you later.

A perfect medium-rare porterhouse that was simply pan-seared. It was thin enough not to even go in the oven.

A perfect medium-rare porterhouse that was simply pan-seared. It was thin enough not to even go in the oven.

The cut of beef I select is as personal as the choice to go grass-fed or not. My absolute favorite cut is the porterhouse: NY strip on one side, tenderloin on the other, bone in the middle. (Not to be confused with a T-bone, which offers almost no tenderloin.) And it needs to be thick. The thicker the cut of beef, the more control I have over the final cooking temperature I want it to be. Unfortunately, because grass-fed beef costs more, farmers often sell skinny porterhouses to keep the price down. But the end product comes out over-cooked, because the meat is so thin. I would rather pay big bucks less often and get a real slab of meat than get a scrawny cut more often.

If you want to try grass-fed beef, but are put off by the high price of the more popular cuts (tenderloins, ribeyes, etc.), go for the less popular cuts: flank, hangar, etc. They cost a lot less and they’ve got great taste. You just need to be careful not to overcook them because they’re usually thin and contain very little fat.


Many articles have been written about it being okay to cook beef from frozen, but I don’t like to do that. I always take my slab of beef out of the freezer the day before I want to cook it, and thaw it in the fridge (out of its wrapper.) Then, about an hour before I plan on cooking it, I take it out of the fridge and place it on a plate to warm to room temperature. I like to rub the beef with sea salt and fresh cracked black pepper and let it sit that way for an hour. And that’s all I season my beef with. No need to hide the flavor of amazing beef!

But although I grill year ’round, it’s not always convenient to fire it up when I crave a steak. Few methods can rival the simple steps of searing both sides of the beef in a hot cast iron skillet, and then finishing it in the oven. I use pork lard or bacon fat in the cast iron pan, heat it, sear one side, flip it over, sear the other side, and place it in a 375-degree oven. How long to cook it is a matter of practice. Eventually you learn the quirks of your oven and you get the perfect steak every time. Until then, a thermometer helps, though you don’t want to poke the hell out of your beef and let all the juices run out.

And it’s key to let the steak rest. I’ve gone to all this trouble…it would be dumb to mess it up now! This is when I take a few minutes to make myself a nice cocktail. By the time the cocktail’s made, and I’ve taken a few sips, the beef is ready to be devoured.

That's not scallions. That's garlic! And a side of fresh oregano.

That’s not scallions. That’s garlic! And a side of fresh oregano.


With the garden coming to life again this spring, I found a bunch of shoots popping out of the soil in my garlic patch. I pulled them out, and the garlic greens looked just like baby scallions, only with tiny garlic bulbs at the bottoms. I also found some fresh oregano growing in the herb garden. I washed them all, finely chopped them, and sautéed them in a pan with a little olive oil, butter, salt and pepper. I cooked them just until the garlic started to get brown and crispy, and I poured it all over my porterhouse. Fantastic!

FullSizeRender (5)

Just remember…

IMG_1521


Soy sauce, citrus and honey is always a winning combination with chicken. The addition of star anise adds that touch of licorice without overpowering it. The sugar in the honey can make these thighs burn, so keep an eye on them. Using non-stick aluminum foil saves a lot of clean-up hassles later.

FullSizeRender (8)


1 teaspoon ground star anise
2 teaspoons granulated garlic
1/4 cup fresh lime juice or lemon juice or combination
1/4 cup soy sauce (I use La Choy to keep it gluten-free)
2 tablespoons honey
8 chicken thighs (about 4 lb.), skin on

I have an old coffee grinder I use for spices, so I toss in a couple of star anise and grind them up. Then I measure out a teaspoon of that for my marinade. (If you don’t have a spice grinder, use a mortar and pestle.)


Combine the star anise, garlic, lemon or lime juice, soy sauce and honey. Pour into a large Ziploc bag and add chicken thighs. Squish around to make sure thighs are well coated. Marinate for several hours, or better: overnight.


Pre-heat the oven to 200 degrees. 


Cover a sheet pan with non-stick aluminum foil and place thighs skin-side up. Cook low and slow for about 2 hours.


The original recipe called for skirt steak, but I didn’t have any in my freezer. I did have a fat rib eye, though, so once I thawed it, I sliced it lengthwise to get two large, thin steaks which would easily suck up the marinade I was going to make. And the rib eye was nicely marbled, so it stayed juicy and tender.

image


For the marinade:
1/4 cup toasted sesame oil
1/4 cup soy sauce (I use La Choy to keep it gluten-free)
2 tablespoons each finely chopped ginger, garlic, cilantro and unsalted dry roasted peanuts
2 scallions, minced
1 tablespoon each of light brown sugar, lime juice and chile oil


2 lbs. beef rib eye
1/4 cup chicken stock

In a bowl, whisk together the sesame oil, soy sauce, ginger, garlic, cilantro, peanuts, scallions, sugar, lime juice and chile oil. Transfer half to a shallow dish.
Add the steak to the dish and turn to coat. Cover and refrigerate overnight. Refrigerate the remaining marinade.

The next day, light a grill. While it’s warming up, add the chicken stock to the reserved marinade. Heat it in a sauce pan and then let it cool. This will be the dipping sauce for the beef. (I like it at room temp.)
Bring the steak to room temp, season with salt and pepper, and grill over high heat until medium-rare, 5 minutes.

Too cold to light a grill? Heat a cast iron pan, add a few drops of avocado oil, and sear the beef on both sides before placing it in a pre-heated 375-degree oven to finish cooking.


True: the inspiration behind this dish was a conversation I had with friends, talking about our early childhood days. Someone brought up the name Shari Lewis, and her famous puppet Lamb Chop. Next thing I knew, I was grilling the critter in my yard.

This is a great grilled lamb recipe that works best if you marinate it ahead of time, but it’s not absolutely necessary. Cook it indoors or outside on the grill. I used grapefruit zest and juice in the original recipe, but since I still had a Honeybell orange left in my stash, I used that this time around. Any citrus you like will work.

American lamb is different from lamb raised in New Zealand or Australia. If you like a milder flavor, go with the American lamb. Lamb from New Zealand and Australia is entirely grass-fed, making for a stronger “gamier” flavor but a healthier cut of meat, as all grass-fed meat products are.


L2


6–8 small lamb chops
1/4 cup brown mustard (I like Gulden’s)
Zest of 1 Honeybell orange
1 tablespoon Honeybell juice
1 tablespoon honey
1 teaspoon garlic salt
1/4 teaspoon black pepper
1/4 teaspoon dried thyme


In a bowl, combine the mustard, Honeybell zest and juice, honey, garlic salt, pepper, and thyme. Mix well. At this point, you can marinate the lamb by pouring the mixture in a Ziploc bag and adding the lamb to it. Marinate at least 1 hour at room temperature, or longer in the fridge.

Pre-heat a hardwood charcoal grill…or if cooking indoors, pre-heat the oven to 350, and on the stove top, heat an oven-proof pan (cast iron is best) with a little pork fat or oil.

If you marinated the lamb, remove the meat from the bag and save the marinade to baste with while cooking. Don’t use the marinade uncooked, since it made contact with raw meat.

On the grill: Grill the lamb on all sides first, then start brushing the mixture on them, flipping them, brushing again, and grilling. Keep doing this until you’ve used up all the mixture and the lamb is cooked to proper doneness. Don’t overcook it!

In the pan: Sear the lamb on all sides, then brush all sides with the marinade. Place the lamb in the oven to finish cooking, making sure you don’t overcook it. Let it rest before serving.


image

For me, deep-fried turkey is just too much damn work: finding a safe spot in the yard to blast the propane-fueled fryer so that you don’t burn your house down, standing outside and freezing your ass off while it fries, and then disposing of gallons of used oil at the end of it all. And making sure the oil is at the right temperature so you don’t get a scorched turkey on the outside and raw turkey on the inside. Sure, they now have indoor turkey fryers, but I’m not crazy about that idea, either.

I get great results by cooking my turkey in my Weber grill. The standard Weber allows you to cook up to a 15 lb. bird–big enough for my purposes–and it comes out crispy, smokey and delicious.

The charcoal chimney with hot coals awaits.

The charcoal chimney with hot coals awaits.

Although I’m a purist and always use natural hardwood charcoal, this recipe works best with Kingsford briquettes. The idea is for the coals to cook slowly and evenly. And, unless you want your turkey to taste like gasoline,  never use lighter fluid…always start your fire with a few pieces of crumbled newspaper under a charcoal chimney.


Weber grill, with the dome top
Kingsford charcoal briquettes (don’t use Match Lite or other pre-soaked briquettes)
Heavy duty aluminum pan (disposable)


Whole turkey, up to 15 lbs, thawed and brined (see my blog about brining a turkey)
Olive oil (to rub on turkey)
2 yellow onions, chopped
4 stalks of celery, chopped
½ lb (2 sticks) of unsalted butter, melted
1 tablespoon granulated garlic
1 tablespoon granulated onion
2 tablespoons salt
1 tablespoon pepper
Spreading the coals away from the center of the grill.

Spreading the coals away from the center of the grill.

If you want stuffing, make it separately and cook it separately. (A great recipe in my next blog.)

Light 8 to 10 lbs. of charcoal in the grill…depending on the size of the turkey and how cold it is outside.

Remove the giblets from the turkey. Place the bird in the aluminum pan.

In a small bowl, mix the granulated garlic, granulated onion, salt and pepper Add any other seasonings you like.

Coarsely chop the onions and celery. Place them in a another bowl. Mix with the melted butter and 1/3 of the salt/pepper/garlic powder mixture. Place a small handful of this “stuffing” mixture in the neck cavity of the turkey. Place the rest in the body cavity (where the stuffing would usually go.) You can fasten the bird with turkey skewers if you like. This “stuffing” is strictly to flavor the turkey…you don’t eat it!

The rubbed, stuffed and seasoned bird.

The rubbed, stuffed and seasoned bird.

Rub the outside of the entire turkey with the olive oil and sprinkle the rest of the garlic/onion/salt/pepper mixture on the outside of the bird. Make sure you get the bird on the bottom as well.

When the coals in the grill have ashed over, spread them to the outside edges of the Weber equally. Put the cooking grill rack in place. Place the aluminum pan with the turkey in the center of the grill, keeping it away from the direct heat of the coals. If you’re using a meat thermometer, insert the probe into the thickest part of the breast, being careful not to hit the bone. Place the lid on the grill. (You may need to bend your pan a bit.) Open the vents on the bottom of the Weber as well as the lid. Important to get air circulating!

My meat thermometer calls me from as far as 100 feet away! Time for a cocktail!

My meat thermometer calls me from as far as 100 feet away! Time for a cocktail!

No basting is necessary.

Now here’s the tough part: DO NOT OPEN THE GRILL TO CHECK ON THE TURKEY! (If you must look, shine a flashlight into the vent holes on the lid to take a peek at the pop-up timer, if there is one.) The whole point is to keep the heat inside the kettle. You’ll know your turkey is done when no more smoke or heat rises from the grill, and the turkey inside stops making sizzling noises.

Remove the turkey and let it rest at least 15 minutes before carving.

If you pull the turkey out too early and find that it still needs cooking, or if your coals die out too soon, simply place the bird in a 350-degree oven to finish. It will still have that wonderful smokey flavor from the grill.

Beautifully grilled, and perfectly cooked in less than 2 hours!

Beautifully grilled, and perfectly cooked in less than 2 hours!

It’s Labor Day weekend, and it’s all about the grill! (Hardwood, that is…not gas.) You can make this recipe in the kitchen, but a wood fire brings it to the next level.

thai chicken LTL


3 lbs. chicken pieces (I used drumsticks for this recipe)
2/3 cup soy sauce
1/2 cup fresh cilantro
2 tablespoons canola or peanut oil
2 garlic cloves, roughly chopped
1/2 teaspoon white pepper
1/2 cup sugar
1/4 cup white vinegar
1 teaspoon red pepper flakes or crushed dried chiles
1 teaspoon salt

Marinade: Combine soy sauce, cilantro, canola oil, granulated garlic and white pepper in a food processor and let it run. Place chicken pieces in a Ziploc bag and pour half of the marinade in. Save the other half for basting later. Seal the bag and let the chicken marinate overnight, or at least a few hours, squishing the bag around so that all the chicken gets marinated.

Sauce: In a saucepan, combine sugar, white vinegar, pepper flakes and salt. Bring to a boil and make sure the sugar dissolves. Remove from heat and let it cool to room temperature.

After marinating overnight, discard the used marinade in the Ziploc bag. Place chicken pieces over a hot hardwood fire or bake in an oven at 350, basting them with the leftover marinade until fully cooked. If the coal fire gets too hot, move the chicken to a cooler part of the grill to prevent burning. If using the oven, switch to the broiler at the end to give the chicken a nice char.

Serve with the sweet pepper sauce drizzled on top.

Brining, the process of letting a hunk of protein soak in a salt solution for a few hours, is a great way to add flavor and moisture to any cut of meat. I brine these wings for 3 hours before using a sweet and spicy rub. They can be grilled or roasted in the oven.

image

The brine…

1/2 cup Kosher salt
3 tablespoons light brown sugar
1 teaspoon whole black peppercorns
1 whole bay leaf
2 quarts water

Combine all ingredients in a saucepan and heat until the sugar and salt dissolve. Remove from heat, and let it cool to room temperature.

The rub…

1/4 cup light brown sugar
1/4 cup granulated sugar
1/4 cup sweet paprika
1 tablespoon Kosher salt
1 tablespoon granulated onion
2 teaspoons black pepper
1 teaspoon dried thyme
1 teaspoon dry mustard
1 teaspoon ground ginger
1 teaspoon cayenne pepper

Combine all ingredients in a bowl.

Place 3 lbs. of chicken wings in a Ziplock bag and pour the cooled brine into the bag. Place the bag in a bowl to prevent leaks and place in the fridge for 3 hours.
After 3 hours, remove the chicken from the brine and dry with paper towels. Discard the brine.
Place the chicken pieces in a large bowl and sprinkle with 1/3 cup of the rub, tossing to coat the chicken well. Place the bowl with the chicken in the fridge until ready to cook.
About 30 minutes before cooking, remove the bowl from the fridge and let the chicken come to room temperature.
Pre-heat the oven to 350 or light a grill.
Toss the chicken with some more of the rub, if you like, then place the pieces on a sheet pan lined with non-stick aluminum foil.
Bake at 350 for 30 minutes or until done. Lower oven temperature if it starts to burn.

If grilling, cook over medium heat, turning frequently to prevent burning. Cook until the wings are done.


Skip the necktie. If your dad’s a foodie, he wants something cool this year! All of these ideas have been rigorously tested by our panel of experts (OK, just me), and get a big thumbs up. This article was originally published a few years ago, but I’d still be happy to get any of these for Father’s Day!


Masterbuilt Electric Digital Smokehouse: I’m a bit of a purist when it comes to grilling. I refuse to use a gas grill because I think there’s no difference between that and my kitchen stove. I use real hardwood charcoal, with real smoke and real flavor. But when it comes to smoking meats, basic smokers require constant maintenance so that the temperatures don’t fluctuate. With an 8-year-old daughter to take care of, that’s something I don’t have time for, especially if I’m cooking something low and slow for about 12 hours. So I have a digital smoker. I plug it in, set the time and temperature, and then periodically add wood chips through a side drawer to smoke the meat. I can literally set it and forget it. I have it cook through the night, so I wake up to a beautifully smoked slab of meat in the morning.


Cognac! How can you go wrong with booze for Father’s Day? But if you’re looking for something really special to give Dad (or your favorite blogger), it’s Kelt XO. What makes Kelt XO special is that before bottling, they place the barrels of cognac on board ships that sail the world for months at a time. During this time, the cognac gently rocks back and forth in the barrels, slowly acquiring a smoothness you can’t find in other spirits. Each bottle even comes with a tag that tells you exactly what ports around the world your cognac has been to. Worth the search at high-end liquor stores.

jack daniels


Jack Daniels smoking chips: Whether you have a smoker or not, these chips will make anything you cook taste better. Made from the old oak barrels that they use to age Jack Daniels, you get a serious hit of whiskey in every bag…and in your food. Simply toss a handful of chips you’ve soaked in water for about a half hour, and they will infuse the food on your grill with flavor. You can also use them dry, on charcoal or gas grills.


Cookbook favorites: “Jamie at Home,” by Jamie Oliver (a great combination gardening/cookbook), “Charcuterie,” by Michael Ruhlman and Brian Polcyn (the best book on how to cure and smoke meats), “Barbecued Ribs, Smoked Butts, and Other Great Feeds,” by Jeanne Voltz (my absolute barbecue Bible!), and “Martin Yan’s Feast: The Best of Yan Can Cook” by Martin Yan (the authority on Asian cooking.)


Redi-Check Remote Cooking Thermometer: Even someone who has barbecued all their lives runs the risk of burning or undercooking a roast or a large bird. Opening the grill and jabbing the meat with a thermometer several times causes the juices from the meat to run out, leaving it dry…and every time you open the grill, you lose precious heat. This is the better solution: You stick the needle into the roast or bird and leave it in there the entire time it cooks, so no juices leak out. You plug it into the monitor which then calls you when the meat is ready (from as far as 100 feet away!) You set the time or temperature, and then get to join your guests for the party.

smoking gun


Smoking Gun: There are times when you don’t need a full-on smoker. All you want to do is smoke a small piece of fish or a hunk of cheese.  You simply take some of the finely ground wood chip powder (comes with the gun) and place it in the pipe-like bowl. Light it, and the Smoking Gun will blow that smoke through a hose into the Ziploc bag where your piece of fish is waiting for its magical transformation to smoky deliciousness.


Mason jar cocktail shaker: A fun new way for Dad to make his martini. https://wandpdesign.com/search?q=mason+jar

mason jar, baking steel

If you’re looking for a fast-growing vine to cover an arbor or other structure, nothing grows faster than hops…that’s right, like the hops in your beer! Hops farms in Germany grow the vines vertically, extending lines up to 30 feet in the air.

Once you’ve bought a few hops plants, they will reward you with interesting healthy vines that will spread quickly. And soon, you’ll also be able to split large plants and transplant them to other areas of your yard.

Early in the season, and the vines are already 2 feet up!

Early in the season, and the vines are already 2 feet up!

The vines are strong, the leaves are beautiful, and the hops flowers smell great and are different from anything else you may have in your garden. And if you brew your own beer, how cool is it to have one of your ingredients growing in your yard?

A bed of hostas below, the hops grow up this "umbrella" every year.

A bed of hostas below, the hops grow up this “umbrella” every year.

Hops are hardy perennials that will come back bigger and stronger every year. In the fall, the leaves die off and leave a wooden skeleton behind that looks great in the winter and also supplies birds with nesting material the following spring.

You can find hops plants on Amazon.