Archive for the ‘Italian’ Category

My first foray into serious cooking started when I bought “The Classic Italian Cookbook,” by  Marcella Hazan.

Like many great recipes, Fettuccine Alfredo is not complicated…but very few restaurants that offer it, actually get it right. Most of the Alfredo sauces I’ve had were watery, floury, and salty and had nothing in common with the real thing.

Funny, when I posted this recipe last year, someone wrote to me to say it was an “abomination.” I have no idea who they were, and if they had any knowledge or experience in the world of Italian cuisine, but since Marcella Hazan was a legend in this field and had written six major cookbooks on the subject, I still lean toward her recipe. Besides, it’s really good!


alfredo2


1 cup heavy cream
3 tablespoons butter
Fleur de Sel or sea salt
1 lb. Fettuccine, fresh or dried
2/3 cup freshly grated Parmesan cheese
Freshly ground pepper
A very tiny grating of nutmeg

Put 2/3 cup of the cream and all the butter in a large saucepan that will later accommodate all the pasta. Simmer it over medium heat for less than a minute, until the butter and cream have thickened. Turn off the heat.

Drop the fettuccine in a big pot of boiling salted water. If the pasta is fresh, it will take just seconds. If it’s dry, it will take a few minutes. Cook the fettuccine firmer than usual, because it will finish cooking in the pan with the butter and cream. Drain the pasta, and transfer it to the pan containing the butter and cream.

Turn the heat under the pan on low, and toss the fettuccine, coating with the sauce. Add the rest of the cream, all the grated cheese, 1/2 teaspoon salt, the pepper and the nutmeg. Toss briefly until the sauce has thickened and the fettuccine is well coated. Taste and correct for salt.

Serve immediately!

Pork is magical. And though I’ve loved pork chops and store-bought bacon all my life, it’s only been in the last decade that I’ve learned to appreciate other cuts of pork and how they’re prepared. Guanciale is one of those meats, and it’s a key ingredient to a classic Italian dish: pasta carbonara.

In the beginning, I could only find huge jowls that required cutting and weighing to mix with the right amount of cure.

Looking at carbonara recipes online, many said the same thing: “Though a genuine carbonara uses a cured cut of pork called guanciale, it’s hard to find. So use pancetta or bacon.” Although both pancetta and bacon meats are delicious (both come from the belly of the pig…bacon is smoked, pancetta is not) the flavor and texture is not the same as a pork cheek, or jowl…and that’s what guanciale is made from.
Many years ago, my search for guanciale started with a local restaurant, the Back Eddy in Westport, Massachusetts. Being a buddy of the owner (and bribing him with alcohol), I asked if he’d order me some jowls. He did, and that worked well for a while. But I didn’t want to keep bothering him every time I wanted more, so I eventually found my own source on line that supplied me with massive jowls weighing many pounds each, as in the photo above. They were good, but a pain to work with. Eventually, that company went out of business.
I now shop for jowls online at http://www.heritagefoods.com. They sell a variety of pork products made from  heritage breeds like Berkshire, also called kurobuta. It’s delicious with wonderful fat that’s healthy and full of flavor.

Berkshire pork jowls with fresh thyme from the garden and the dry cure mix.

My curing process is simple: sugar, salt, peppercorns, and fresh thyme. I cure the jowls for about 3 weeks. I rinse them once they’ve cured, and pat them dry. They still need to cook, but they’re ready to use for carbonara, ragu bolognese, topping a pizza, or any other delicious recipe that comes my way…and they freeze really well.
Once I made my first batch, there was no turning back!
2 lbs. raw pork jowls
1/2 cup basic dry cure mix (recipe below)
1/2 cup brown sugar
1 teaspoon whole black peppercorns
a handful of fresh thyme sprigs
Combine the basic dry cure mix, brown sugar, and peppercorns in a bowl. We’ll call this the rub.
On a large work surface, lay down several sheets of plastic wrap, overlapping each other to keep the rub from leaking through to the counter underneath. Sprinkle half of the rub onto the plastic wrap in an area where the jowls will lay. Scatter a half-dozen thyme sprigs on top of the rub. Lay the pieces of pork jowl on top of the rub and the thyme.

I place the rub and sprigs of thyme on a long sheet of plastic wrap.


The pork jowls go on top.

Then top the jowls with the rest of the rub, covering them evenly, and top with more thyme sprigs.

Press down on the jowls to really get the rub to stick.


Fold the plastic wrap over the jowls as tightly as you can, pressing the rub into the meat. If the wrap is loose, use more wrap to really tighten it up. Then place the entire pork-wrapped package in a container that will hold the liquid that will ooze out during the curing process.

Into a container with a lid and into the fridge.


Place the container in the fridge to cure for 3 weeks.
Every couple of days, flip the plastic wrap package over, so that the top is now the bottom. Then return it to the fridge. You want the rub to get at every part of the pork. Don’t pour off any liquid that forms…it gets kind of gooey, but it will help the curing process.

3 weeks later, it has transformed…

In about 3 weeks, the pork jowls will feel firmer. This is a sign they’ve been properly cured. Remove them from the plastic wrap, rinse them thoroughly under cold clean water, then pat them dry with paper towels.

They’re perfect…they just need a rinse.


Cured, rinsed and patted dry. Cut the guanciale into smaller pieces before freezing. A little goes a long way!


At this point, cut the guanciale into smaller pieces, wrapping each well and placing them in freezer bags. They will keep in the freezer for a long time.
Many guanciale recipes tell you to hang the meat in the fridge for at least a week after curing, but I haven’t really found the need to do that if I’m keeping them frozen. The drying process keeps the meat from getting moldy, but that’s only if you keep it at room temperature, which I don’t.

Always slice off a little to fry up a test batch! It’s all about quality control!


The Basic Dry Cure Mix
This basic dry cure mix is extremely simple, and you can cure many meats with it. But it does require a special ingredient: pink salt. This is not pink Himalayan salt. This is a very special curing salt that must be used in small amounts. (You can easily find it online.) It contains nitrites which will help preserve the meat and give it a good color. Many people get bent out of shape over nitrites these days, so you need to decide whether you want to use pink salt or not. I do, because I don’t eat pounds of guanciale like a lab rat. If you don’t use it, the meat will turn a bit gray–nothing wrong with it, just not an appealing color.
1 1/2 cups Diamond Crystal Kosher Salt*
1/2 cup organic turbinado  sugar
5 teaspoons pink curing salt
Combine these ingredients and mix well. Store the basic dry cure mix in a tightly sealed plastic bag in your pantry.
*An important note: the reason I give the brand name for the salt is because all Kosher salt does not weigh the same! A cup-and-a-half of Morton Kosher Salt, for example, weighs more and will throw off the recipe.

After making a batch of this for my daughter this week, I got a bunch of requests for the recipe. So here we go!

Chicken parmigiana, much like pizza, is a bit more difficult to make than you might think. Sure, there’s plenty of crappy chicken parm out there, made with processed frozen chicken cutlets, bad sauce and cheap cheese. But to make a really fantastic, mind-blowing chicken parm, that takes a little practice!

The key to this recipe is simple: don’t skimp on the quality ingredients. And my recipe makes a lot. Trust me: you will want leftovers.

The recipes for my Italian bread crumbs and my “Don’t Call It Gravy” tomato sauce are at the bottom.


Gooey, cheesy, orgasmic.

Gooey, cheesy, orgasmic.


6 Chicken breasts, the best quality you can get your hands on
Italian bread crumb seasoning (see recipe below)
3 eggs
vegetable oil for frying
“Don’t Call It Gravy” tomato sauce (see recipe below)
Fresh mozzarella cheese
oregano

Thaw the chicken breasts. Lay them flat on a cutting board, and you’ll see where the chicken tender is on the side of the breast. Cut the tender off and set aside, leaving the breast which is thinner at one end and thicker at the other. Slice the breast in half lengthwise at the thicker end, keeping the knife level, so that you wind up with 2 pieces of breast meat that are the same thickness, but one will be a longer piece (the bottom) and one about half its size (the top part you sliced off.) Do this with all the breasts.

By slicing the breasts lengthwise into evenly thick pieces, it will take the same amount of time for them to cook. (I prefer not to pound the hell out of the chicken breasts until they’re flat as a pancake.)

Pour the vegetable oil into a large frying pan. (I like to use corn oil or grapeseed oil.) Next to the pan, set up two bowls: one with my Italian bread crumb seasoning (recipe below) and in the other: crack the eggs and whisk them.

Now it’s your standard breading procedure: chicken meat in the egg, then in the breadcrumbs, coating well. Shake off the excess and place carefully in the pan of olive oil when the oil comes to temperature (about 350) for frying.

Fry the chicken in the oil until it’s golden brown. You want it cooked all the way through, but not overcooked. Place the fried chicken pieces on a wire rack to drain the oil. Do this with all the chicken. The fried chicken at this point is delicious all by itself: chop it and use it in a salad, or make a chicken sandwich. (By the way, if there’s breading left over, use it on the chicken tenders you cut off, and fry them up. My daughter gets these instead of store-bought chicken tenders, and she loves them.)

Cover a baking sheet with aluminum foil. Ladle out enough sauce (recipe below) to create a thin layer on the bottom of the baking sheet. Place the fried chicken breasts on top of the sauce. Cover the breasts with more sauce, then place shredded mozzarella on top. Sprinkle the top with a little oregano.


Place the baking sheet in a pre-heated 350 degree oven and bake until the cheese has melted and just starts to brown. Serve it with pasta.


MY “DON’T CALL IT GRAVY” TOMATO SAUCE

It’s not hard to make a good tomato sauce. But it takes a little work to make an amazing tomato sauce. Honed from a recipe handed down by a friend-of-a-friend’s Italian grandma, it is one very important part in two of my favorite Italian comfort food recipes: my meatballs…and my chicken parmigiana recipe.


1 medium onion, finely chopped
2 cloves garlic, finely chopped
1/2 cup extra virgin olive oil
10 cups ground and peeled tomatoes…or 3 cans (28 oz.) tomatoes (real San Marzanos preferred)
2 teaspoons each: dried oregano, basil and parsley
3/4 teaspoon each anise seed and fennel seed
1 1/2 teaspoons salt
1/2 teaspoon black pepper
2 bay leaves
1 small can (6 oz.) tomato paste
1 teaspoon sugar, optional

Heat the olive oil in a large pot and add the onions. Cook until onions are translucent, then add the garlic. Stir for about 10 seconds.

Add the tomatoes and cook until the orange foam disappears, stirring frequently.

Add the oregano, basil, parsley, anise seed, fennel seed, salt, pepper, and bay leaves. Stir to combine. Add the tomato paste, stirring well. Let the sauce just come to a boil (which helps the paste thicken the sauce), then reduce it to a simmer, and cook uncovered for at least an hour, stirring constantly, until the sauce reaches the consistency you like.


MY ITALIAN BREAD CRUMB SEASONING

This is the one part of the recipe (other than the optional pasta) that keeps this dish from being gluten-free. So I use gluten-free breadcrumbs, even if I don’t need to. I buy a loaf of Udi’s frozen gluten-free bread, toast the slices, and them put them in a food processor. I dare you to tell the difference between these and breadcrumbs with gluten!


1 Udi’s loaf, toasted and ground into breadcrumbs
2 teaspoons dried parsley
1 teaspoon dried oregano
1 teaspoon dried basil
1 teaspoon salt
1/2 teaspoon granulated garlic
1/2 teaspoon granulated onion
1/4 teaspoon black pepper


Combine all the ingredients well.

An easy way to marinate beef is to simply throw the meat in a bag and dump some Italian dressing into it. As simple as that sounds, it flavors the meat really nicely. But I’ve got a problem with anything that comes from a jar and was made in a factory, especially when it’s so easy to make my own Italian seasoning.
I recently bought some sirloin beef tips and after trimming the fat and silver skin (they always leave it on the meat), I cut it up into 1 inch cubes. I put the pieces in a glass container–a plastic bag would be fine–and then made my marinade. Combine the first set of ingredients to make the marinade.

1/4 cup decent quality balsamic vinegar–not the expensive stuff
1/4 cup avocado oil
1 teaspoon dried oregano
1 teaspoon dried parsley
1 teaspoon granulated garlic
1 teaspoon granulated onion
1 teaspoon salt
1/2 teaspoon pepper
2 lbs. sirloin beef tips, trimmed and cut into 1″ cubes
avocado oil
3 onions, sliced into rings
2 sweet bell peppers, sliced into thin strips
splash of white wine

Combine the marinade ingredients and pour them into the bag or container with the meat. Mix it around so that every bit of the meat gets coated with the marinade. Seal the container and place in the fridge overnight.
Next day, remove it from the fridge and let it come to room temperature before cooking.


Marinated beef, ready to cook.

Marinated beef, ready to cook.


Heat a large cast-iron skillet until hot. You may not need to add oil, since the meat has marinated in it. Using tongs to shake off any marinade, place the beef tips in the skillet, and brown on all sides, constantly flipping them. Cook the meat until it is done: medium to medium rare. (Of course, a hardwood fire is great for cooking these, too.)

Remove the meat from the pan and put it in a bowl to the side. In the hot pan, toss in the sliced onions and peppers. Cook until the onions and peppers are caramelized, and splash a little white wine to de-glaze the pan if you like. (The alcohol cooks off.) If there’s any left over marinade in the bag or container, you can pour it into the pan at this time.

Return the beef to the pan, being sure to include all the juices that may have settled into the bottom of the bowl. Mix through until it’s all thoroughly heated and serve immediately.


I made a lot more...forgot to take the pic before devouring!

I made a lot more…forgot to take the pic before devouring!


When my daughter hangs out with me, I always ask her what she wants me to cook for her, and there are a few “Dad” recipes that are her favorites. This is one of them, especially when fresh asparagus is available. And as any parent will tell you, if your kid is craving a dish that has vegetables in it, count yourself lucky–and make it!!
Prepping asparagus is easy, and you don’t need a knife to cut off the woody bottoms of the stalks. Simply bend the stalks at the bottom and they will naturally snap off at the right point.
4 mild Italian sausages, sliced into pieces 1/2″ thick
1 lb. penne pasta
1/2 onion, finely chopped
1 cup chopped fresh trumpet mushrooms (white button mushrooms work, too), optional
2 cups fresh asparagus, sliced into 1-inch pieces
1 clove garlic, passed through a garlic press
1 cup homemade chicken broth
6 fresh sage leaves, finely chopped
1/2 cup freshly grated Parmigiano Reggiano cheese
extra virgin olive oil
salt and pepper
Have the pasta water salted and boiling, and add the pasta, cooking until just a bit more undercooked than al dente.
Heat a large pan, and drizzle in some olive oil. Sauté the sausage pieces until browned and cooked through, but not overcooked. Remove the sausages from the pan and place them in a separate bowl. Remove all but 2 tablespoons of the fat left behind in the pan.
Place the pan back on stove and sauté the onion until translucent. Add the garlic, and sauté for 10 seconds. Add the sage, and saute for 10 seconds, stirring. Add the chopped mushrooms and saute for a few minutes, then add the chicken broth, and simmer until almost all the liquid has evaporated. Pour the contents of the pan into the bowl with the sausages.
Return the pan to the stove, add a little more olive oil, and on medium heat, sauté the asparagus pieces. Cook them until they are al dente, not too soft. Once the asparagus has reached this stage, return all the contents of the sausage/mushroom bowl to the pan to heat through. Drain the pasta, and add it to the pan as well, combining all the ingredients. If it looks too dry, add a little pasta water to the pan. Season with salt and pepper.
Make sure you serve this hot, with grated Parmigiano Reggiano on top, and drizzle lightly over the top with extra virgin olive oil.

Fettucini alla Bolognese has been my daughter’s favorite Italian dish for years. The recipe isn’t difficult, but like many great dishes, it depends on the best quality ingredients you can get your hands on.

I like to use a combination of ground beef, ground veal and ground pork in my Bolognese recipe. But I don’t sweat it too much if I don’t have all three, substituting a little more of one or the other, depending on what’s in my freezer at the time. (2–1, beef to pork, is a good ratio.)

I use humanely raised grass-fed ground veal that I get down the road from a local dairy farm: Sweet & Salty Farm in Little Compton, RI. I use ground Berkshire pork, full of “good fat.” And I use grass-fed beef from local farms. Guanciale, a cured pork product that comes from the cheek (jowl) of the pig, is something that I prepare myself. I buy the Berkshire pork jowls raw and cure them at home. (That’s another blog!) If you can’t get your hands on guanciale, a nice slab of bacon or pancetta will do the trick.

The rest of the ingredients are organic, when available.

This recipe probably feeds a dozen people. I make a lot at once because it takes time to put it together and let it cook on the stove, and it freezes really well. I place leftovers in tightly sealed single-portion containers in the freezer and then re-heat them when my daughter gets the craving, adding it to freshly cooked pasta.

How much pasta you make with this dish depends on how many people you’re going to serve.


5 tablespoons extra virgin olive oil
3 tablespoons butter
1/2 cup finely chopped guanciale or bacon or pancetta
1 lb. ground veal, 1 lb. ground pork, 1 lb. beef (or any combination to make 3 lbs.)
1 large onion, finely chopped
2 carrots, finely chopped
3 stalks celery, finely chopped
2 cloves of garlic, squeezed through a garlic press or thinly sliced
1 small can (6 oz.) tomato paste
6 cups ground tomatoes
2 cups whole milk
2 cups white wine (I use an un-oaked French chardonnay)
salt and pepper
pasta, cooked (regular or gluten-free )
Freshly grated Parmigiano Reggiano


Place the olive oil and butter in a large sauce pan with a heavy bottom over high heat. Once the butter has melted, add the guanciale, letting the fat render out. When it’s almost brown, add the veal, pork, and beef, stirring constantly. Make sure the meat is broken down into small pieces and completely browned.

Add the finely chopped onion, carrots, celery and garlic, stirring well. Sweat the veggies for a few minutes, letting them get nice and soft. (Here’s a tip: rather than wasting time chopping all the veggies finely by hand, toss large pieces into a food processor–the onion, carrot, celery and garlic cloves all at the same time–and pulse until they’re finely chopped.)

Add the tomato paste, the ground tomatoes, milk and wine, stirring well. Allowing the sauce ito come to a boil will activate the tomato paste’s thickening power. Let it boil for a minute, then reduce the heat to medium-low, and let it simmer for at least a couple of hours, stirring occasionally.


Add the ingredients one step at a time until the sauce comes together: 1) guanciale, 2) meat, 3) veggies), 4) tomatoes.


You don’t want the sauce to be runny, and you definitely want to give it enough time on the stove top for the flavors to blend and for the alcohol in the wine to evaporate.

Carefully give the sauce a taste, and season it with salt and pepper.

Traditionally, ragu Bolognese is served by placing a part of the cooked pasta in a pan, and adding just enough sauce to have it cling to, not drip from, the pasta. It’s not soup!

Top it with freshly grated Parmigiano Reggiano cheese.


Despite the large Italian community we have here in southern New England, there’s no exceptional pizza to speak of. I suppose you could say “them’s fightin’ words!” but if it’s here, I haven’t found it yet. (Fellini Pizza is about the best in Providence.)

So where is the excellent pizza? New York City, of course. OK…maybe I’m prejudiced because I’m a Brooklyn boy, and worked in a variety of pizzerias in my younger days, but there’s no doubt in my mind that if you want the best pizza–or bagel, for that matter–you’ve got to go to the Big Apple. (Even “Frank Pepe’s” in New Haven, CT is a mere stop on the way to the real deal.)

Pizza in the Big Apple can be confusing, as there are many different varieties to choose from. Brick oven pizzas abound, but there are pizza lovers who won’t settle for anything less than an old-fashioned pizza baked in a coal-fired oven. The extremely high heat of a coal-fired oven cooks the pizza in just a minute, and imparts a crusty, charred flavor you can’t get any other way. There are only about a dozen coal-fired pizzerias left in New York City, and many of them have been around for a hundred years or more, so it’s definitely a matter of making a special trip to enjoy this style of pizza. (Providence now has its own coal-fired pizza, but it just can’t compare.)

There’s plenty of good, basic pizza in New York City, too: the traditional thin, round Neopolitan pie, and the thicker, square Sicilian pie, baked in that Blodgett pizza oven we all knew in our early pizza-making days.

Many years ago, when I heard through the pizza lovers’ grapevine that a “new” pizza was out there, one that was gaining a cult following, I needed to know about it. And more importantly, I needed to taste it!

It’s called Pizza Montanara, and there’s still only a few pizzerias in New York City that serve it. The one I go to without fail is PizzArte, on West 55th, and I have to say it’s the ultimate pizza.


Pizza Montanara, sitting next to me in the car, just waiting to be devoured.


What makes Pizza Montanara so spectacular, quite simply, is that the dough is fried in oil for 30 seconds, flipped and fried another 30 seconds, before they put the sauce and cheese on it, and then they cook it in a wood burning oven. It is not greasy. The frying process puffs the dough up and creates a beautiful pillow-like softness that I’ve never experienced in a pizza before. Imagine a pizza cloud and you’ve got Pizza Montanara.

Where to get Pizza Montanara.


I’ve made Pizza Montanara at home, with limited success. I poured a few inches of olive oil in a large cast iron skillet, stretched my dough into a small pie, and gently floated it into the pan. Using a spatula and tongs, I was able to flip the fried dough over after about 30 seconds, then removed it from the pan after another 30 seconds. It was golden and puffy. I quickly sauced and cheesed it and in the oven it went. But it’s a messy process that doesn’t always come out just right. I need more practice!


Frying the pizza dough. I use olive oil for better flavor, but I have to watch the temperature, because the smoking point is low (about 375 for extra virgin olive oil) and burnt oil is not what anybody wants!


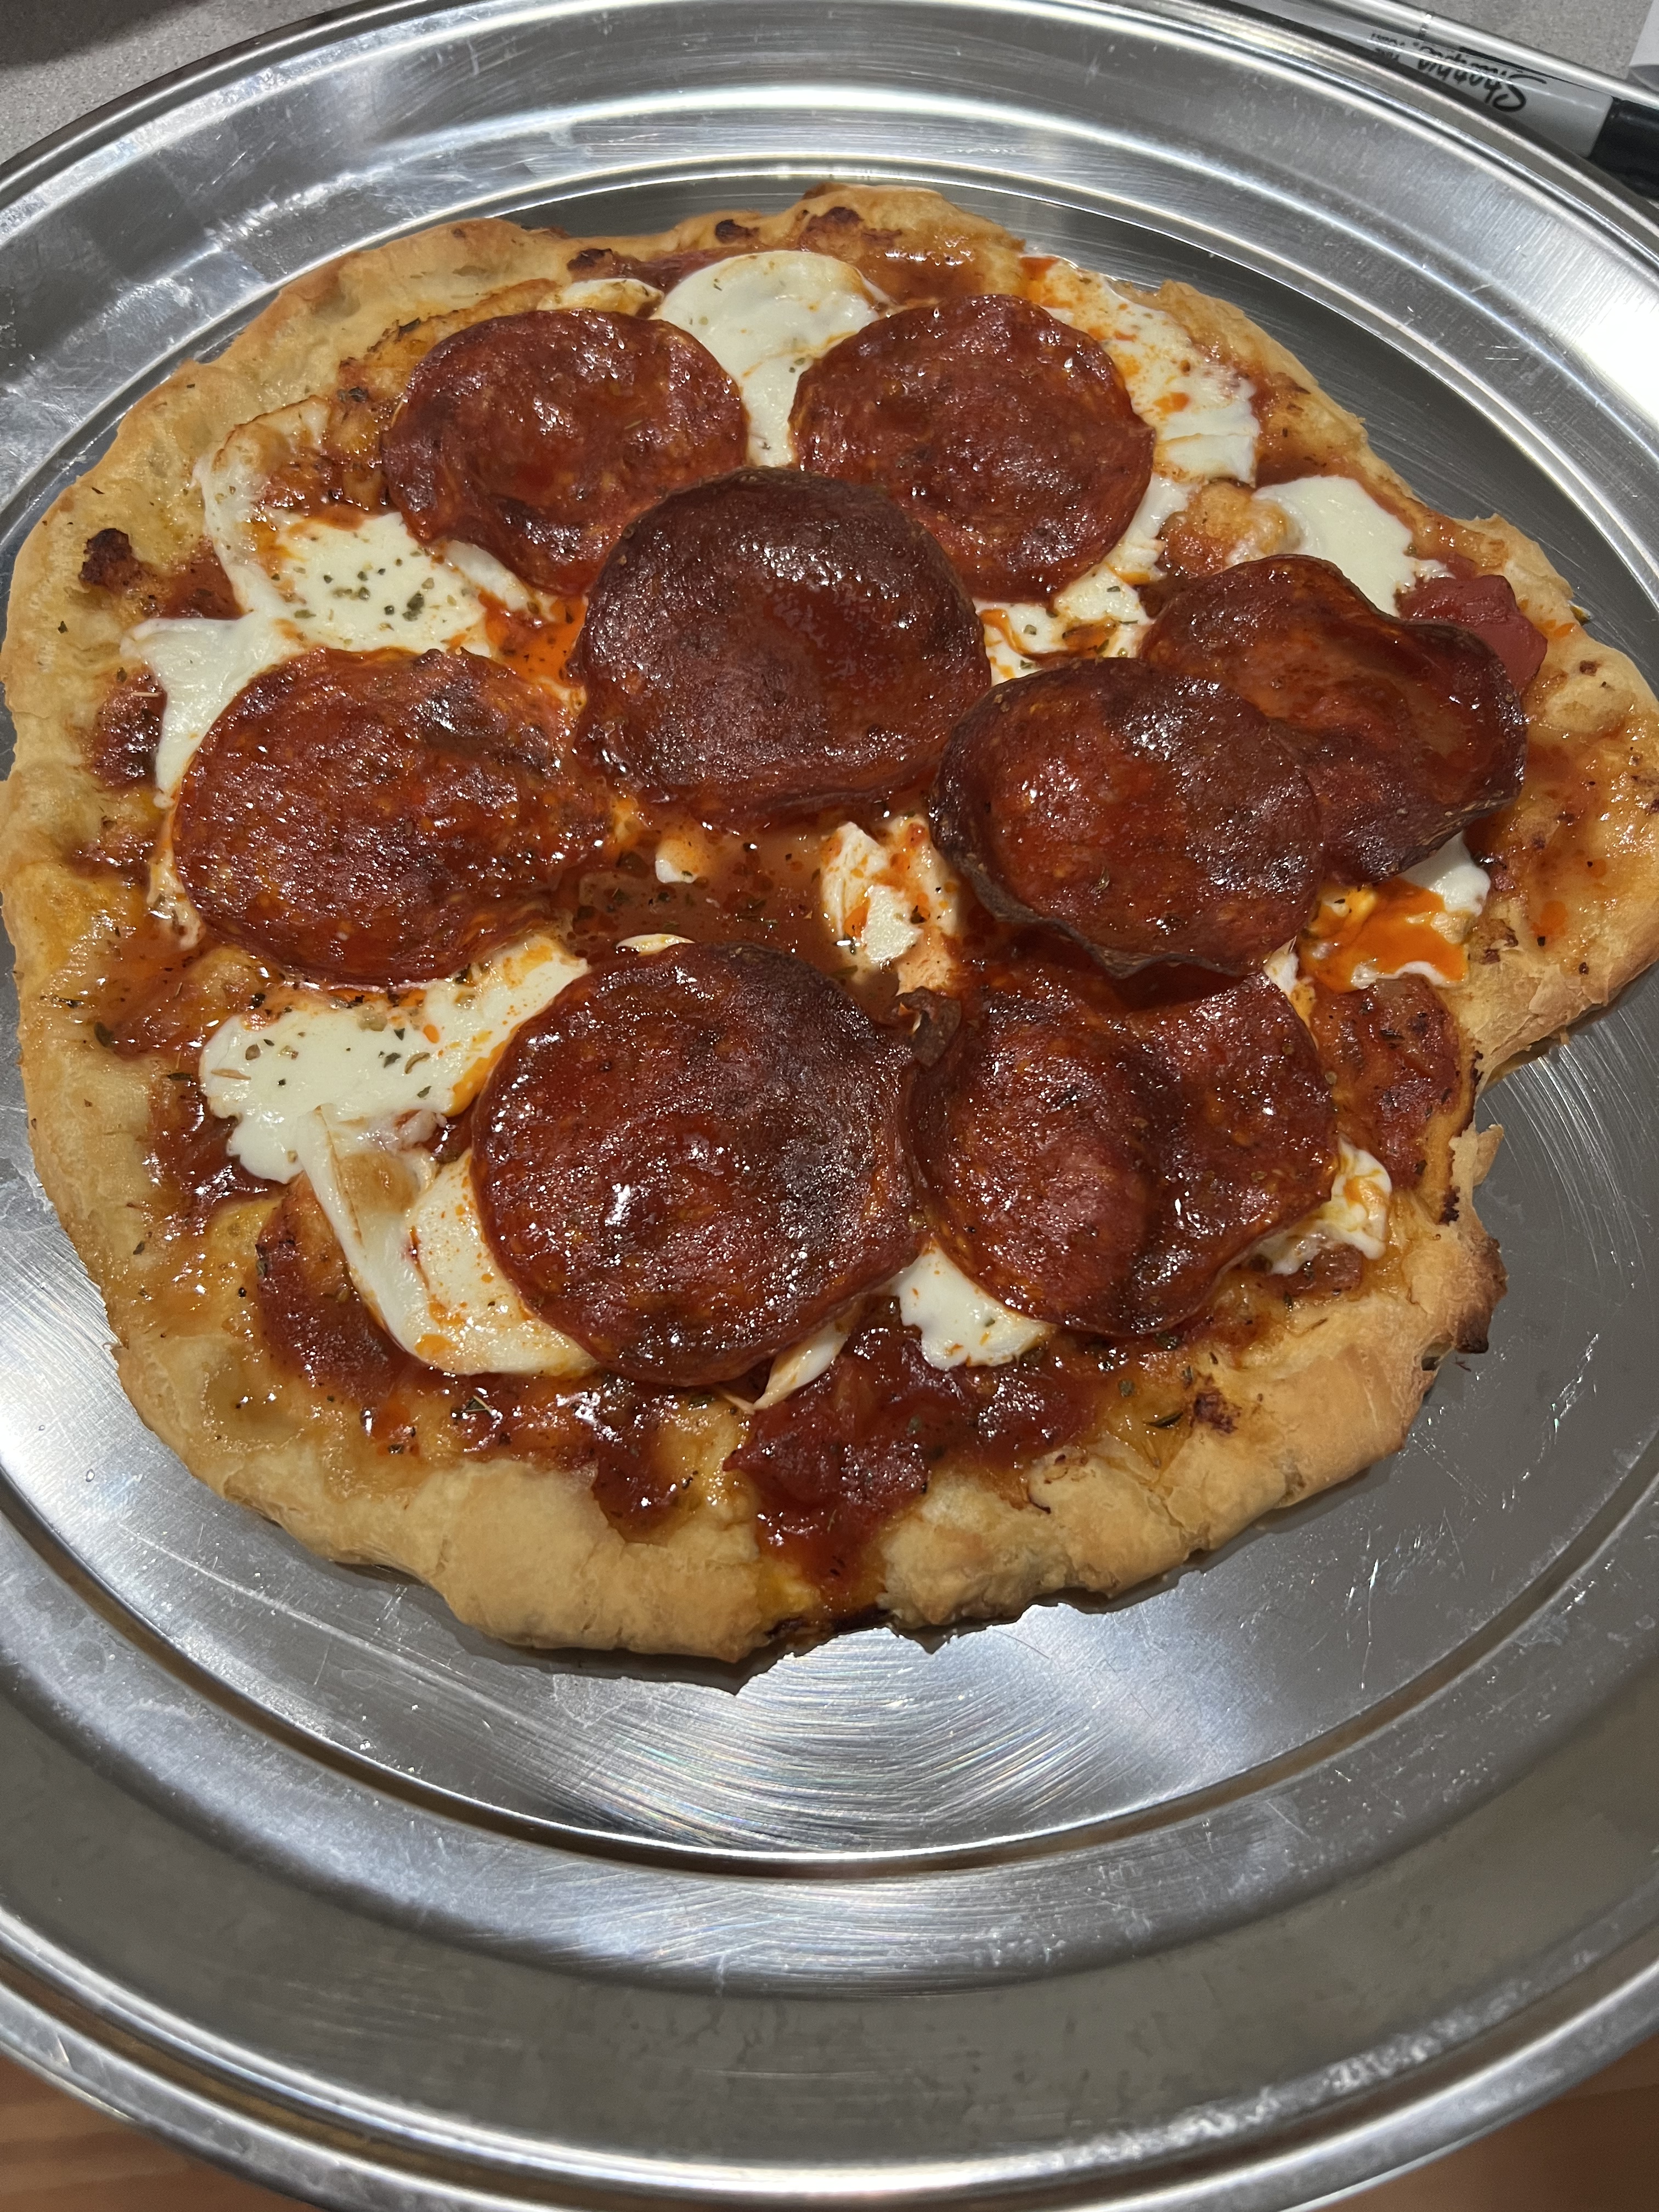
A homemade Pizza Montanara, with buffalo mozzarella and pepperoni.


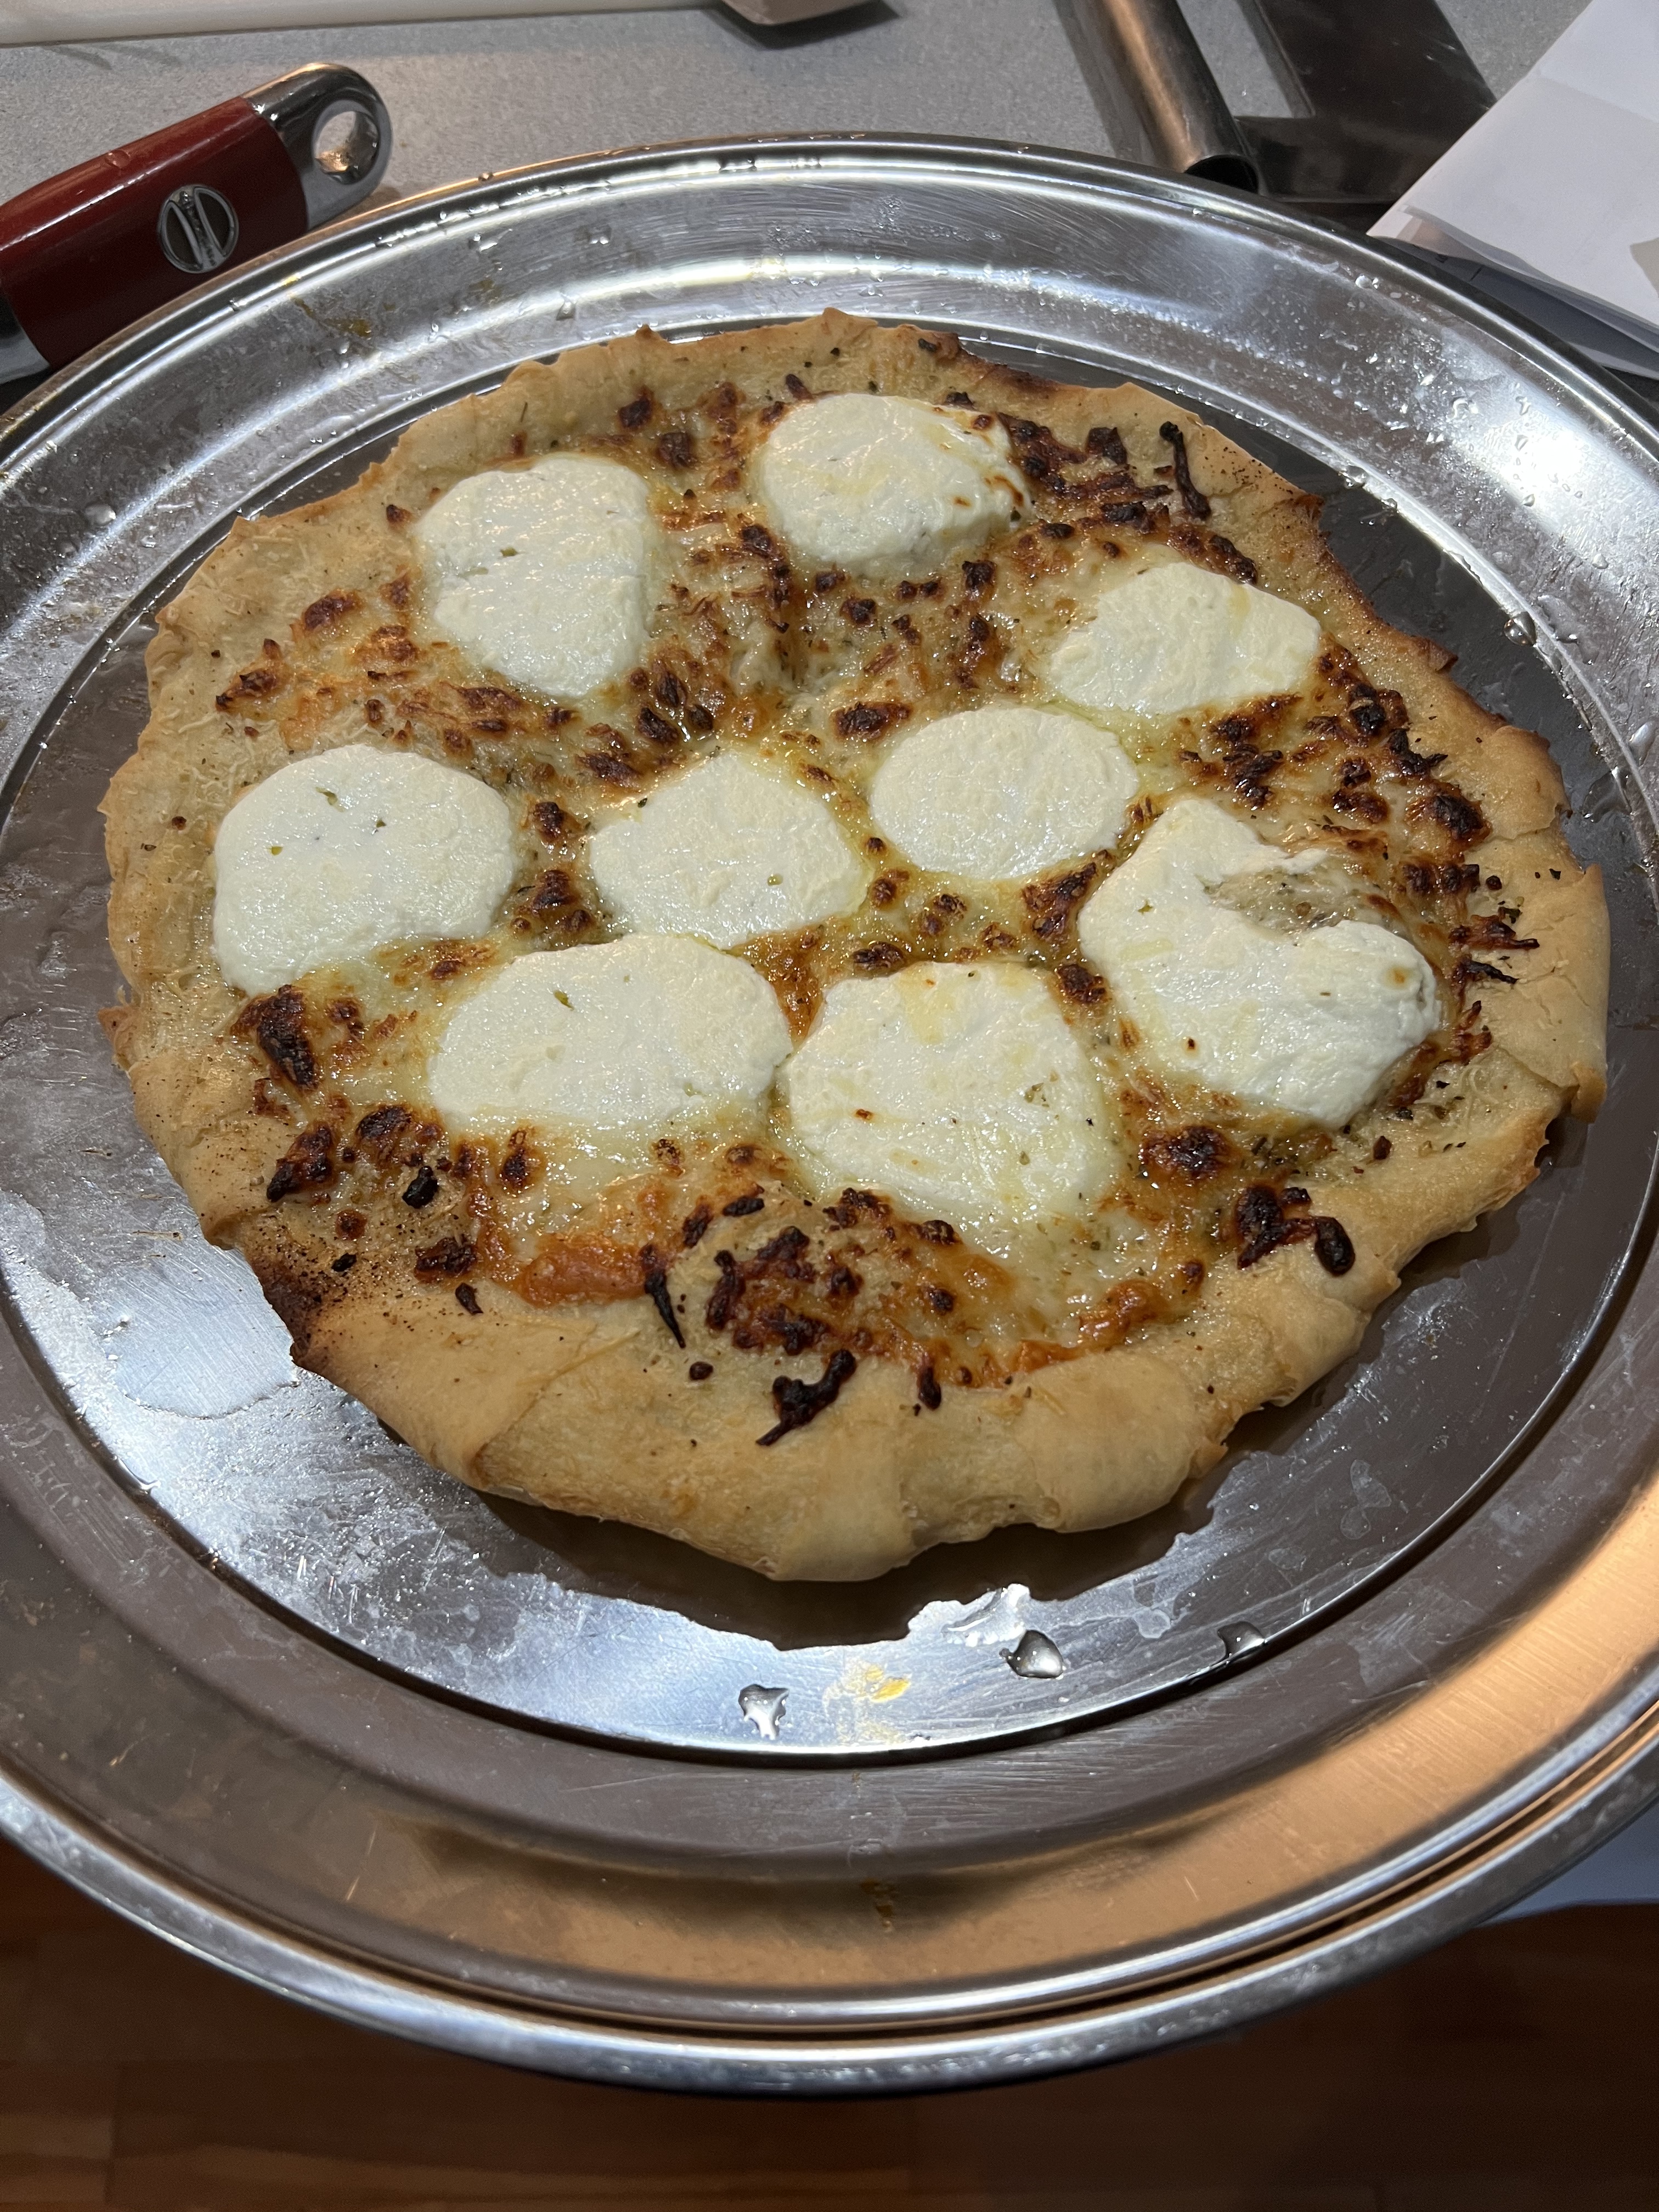
A four-cheese Montanara, with mozzarella, sharp Provolone, Parmiggiano Reggiano, and ricotta…and lots of garlic!


Every time I post a photo of Pizza Montanara on Facebook or Instagram, my friends don’t believe that this could possibly be a life-changing pizza experience. It is. After a trip to Manhattan, we’ll devour 3 pizzas on the ride home. Nothing makes New York traffic easier to bear than a Pizza Montanara in the seat next to you!

Pizza Arte also makes one helluva gluten-free pizza.


My first foray into serious cooking started when I bought “The Classic Italian Cookbook,” by  Marcella Hazan.

Like many great recipes, Fettuccine Alfredo is not complicated…but very few restaurants that offer it, actually get it right. Most of the Alfredo sauces I’ve had were watery, floury, and salty and had nothing in common with the real thing.
To this day, if I want a great Alfredo, I make it like Marcella.


alfredo2


1 cup heavy cream
3 tablespoons butter
Fleur de Sel or sea salt
1 lb. Fettuccine, fresh or dried
2/3 cup freshly grated Parmesan cheese
Freshly ground pepper
A very tiny grating of nutmeg

Put 2/3 cup of the cream and all the butter in a large saucepan that will later accommodate all the pasta. Simmer it over medium heat for less than a minute, until the butter and cream have thickened. Turn off the heat.

Drop the fettuccine in a big pot of boiling salted water. If the pasta is fresh, it will take just seconds. If it’s dry, it will take a few minutes. Cook the fettuccine firmer than usual, because it will finish cooking in the pan with the butter and cream. Drain the pasta, and transfer it to the pan containing the butter and cream.

Turn the heat under the pan on low, and toss the fettuccine, coating with the sauce. Add the rest of the cream, all the grated cheese, 1/2 teaspoon salt, the pepper and the nutmeg. Toss briefly until the sauce has thickened and the fettuccine is well coated. Taste and correct for salt.

Serve immediately!

I always thought that spaghetti squash was a sort of “gimmick” vegetable. But once I roasted it, I realized just how delicious it could be. Squash is a great lower-carb gluten-free substitute for pasta. But feel free to use spaghetti in this recipe if you like!


FullSizeRender


Cooking spaghetti squash is easy. I wash them, cut them in half, and remove the seeds and membrane with a spoon. I flip them onto their backs, skin side down, and drizzle some extra virgin olive oil on them. A little sea salt and pepper, and then I flip them back down, skin side up, on a sheet pan lined with non-stick aluminum foil. Into a pre-heated 350 degree oven for 30–40 minutes. When they’re soft to the touch, I remove the sheet pan from the oven, flip them back over again, and let them cool to room temperature. Then I simply scrape out the flesh with a fork, and it comes out in strands, like spaghetti.


image


While the squash roasts in the oven, I make the meatballs. After years of serious meatball research, I found that the secret to a tender meatball is adding more bread to the meat than you think you should.

2 lbs. ground grass-fed beef
1 cup breadcrumbs (at least)
2 eggs, cracked and scrambled
2 tablespoons dried parsley
2 tablespoons dried oregano
1 tablespoon dried basil
1 tablespoon granulated garlic
1 tablespoon granulated onion
1 teaspoon black pepper
2 teaspoons salt

Mix all the ingredients in a large bowl and form them into meatballs. (I like to use an ice cream scoop to make the job easier.)

Place the meatballs on a baking sheet that’s been rubbed with some olive oil. (I usually line the pan with non-stick aluminum foil as well.) Cook the meatballs for about 30 minutes at 350 degrees, until they’ve browned nicely.


Meatballs happily cooking low and slow in the rich tomato sauce.


As for the sauce…

2 cans (28 oz.) of tomatoes, pureed (preferably San Marzano tomatoes)
olive oil
1/2 onion, finely chopped
1 tablespoon dried parsley
1 tablespoon dried oregano
1 teaspoon dried basil
1 teaspoon granulated garlic
2 teaspoons salt
1/2 teaspoon fennel seeds

In a large pot, sauté the onions in a little olive oil until translucent. Add the pureed tomatoes and cook at medium heat until the foam disappears.

Add all the herbs and spices and mix well. Continue cooking on medium heat, lowering to a simmer if the sauce seems to be boiling too hard.

Add the meatballs to the sauce when they’ve finished cooking. (I like to include all the fat and juices that came out of the meatballs while cooking.)  Make sure all the meatballs are covered with the sauce. Place a lid on the pot, and simmer on low for at least an hour.


image


Scrape the spaghetti squash and place a mound of it in the center of the serving dish. Top it with the meatballs and sauce. Grate some Parmigiano-Reggiano cheese over the top, or do what I did this time, and cut a slab of mozzarella into small cubes and toss that on top. A little sprinkle of oregano and olive oil for good measure on top.


Substitutions: If you’re not in the mood for spaghetti squash, it’s safe to say your favorite pasta will work quite well.

This dish is easily made gluten-free simply by using GF breadcrumbs in the meatballs. I like to buy frozen gluten-free bread, like Udi’s, and toast the slices. Then I break them up and toss them in a food processor. In a minute, I have really tasty breadcrumbs that are as good as regular bread.

And if you’re going with pasta, then a GF pasta, like Garofalo, is a delicious gluten-free substitute.

If you do your share of Italian recipes, a common product found in just about any store has many people confused: San Marzano tomatoes. Most good cooks agree that San Marzano tomatoes are some of the best canned tomatoes you can buy.

But unfortunately,  the label can say “San Marzano tomatoes” even if they are not real San Marzano tomatoes.

San Marzano is a region in Italy near Naples and Mt. Vesuvius, and the special combination of climate and volcanic soil make these plum tomatoes world-famous. They have less water, fewer seeds and are picked off the vine when perfectly ripe, then processed the same day.

But San Marzano is a variety of tomato, too…and so you can have a can of San Marzano tomatoes that are not from San Marzano. And to add to the confusion, there’s actually a brand of tomatoes called San Marzano, with tomatoes grown in the United States. Bet your sweet bippy the sellers of these tomatoes are counting on you not to know the difference!

Sold everywhere, but not real San Marzanos from Italy. Grown in the USA.

The company has now changed their label, just calling it "SM."

The company has now changed their label, just calling it “SMT.”

Real San Marzano Tomatoes are a very old variety, extremely limited in quantity, grown and produced exclusively in the San Marzano region of Italy. Because production is so very limited, the Italian Government and the European Union have formed a way of protecting consumers from fraud by having San Marzano tomatoes tightly controlled. DOP, or denomination of protected origin, is the mechanism that the government is using to control the production and marketing of genuine San Marzano tomatoes. Labels for DOP products must be individually numbered and manually applied to each can in specific lots and government officials must oversee this application. So here’s the deal: unless you see “DOP” on the label with a hand-stamped number on the can, it’s not a real San Marzano tomato.

Nope. Italian, but not from the region.

Nope. Italian, and the correct variety, but not from the region.

Nope. "San Marzano region," but not necessarily the variety.

Nope. “San Marzano region,” but not necessarily the variety.

Nope. San Marzan "style."

Nope. San Marzan “style.”

Yes! Always look for D.O.P. on the can or jar.

Yes! Always look for D.O.P. on the can or jar.