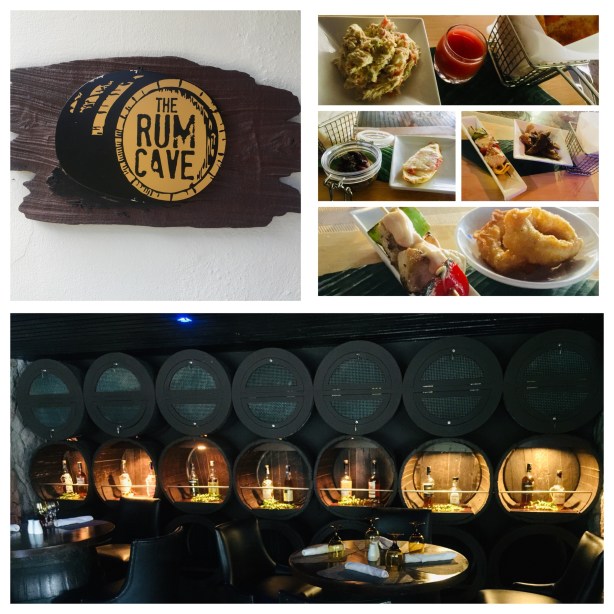
 The Rum Cave at the Marigot Bay Resort and Marina: A decent selection of rum. But many fun tapas to enjoy.
Took a taxi instead of walking the very long and steep uphill back to my hut. Worth every penny!
The Rum Cave at the Marigot Bay Resort and Marina: A decent selection of rum. But many fun tapas to enjoy.
Took a taxi instead of walking the very long and steep uphill back to my hut. Worth every penny!
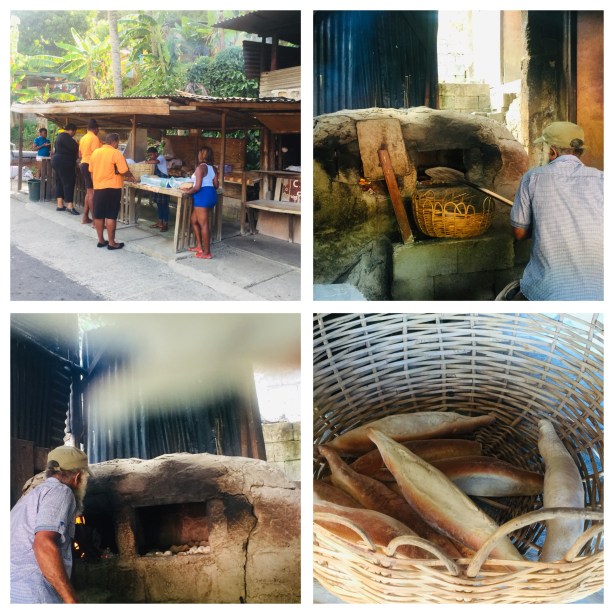
Straight from the airport, my newest best friend in St. Lucia, Anthony, my driver, took me to this roadside bakery with fantastic bread baked in a wood-fired oven. Sliced open, a little butter, and a little cheese in that still warm bread made a fantastic gooey sandwich!
The bread was so good that I literally had another bun with salted butter as my dinner!
Off on a vacation for a few days, so I’m posting this a bit early. But let’s face it: weekends are for ribs, and even if you don’t have the grill ready for the season yet, you can enjoy this recipe because the ribs bake in the oven.
The balsamic vinegar I use in this recipe is not the super-expensive stuff that should only be drizzled at the very end for a Caprese salad. I use the $9-a-bottle stuff that you can find in any supermarket. Good quality, and I try to find one from Modena, Italy, the world headquarters of balsamic vinegar.
Place the ribs in a roasting pan, cutting the racks in half if you need to, to make them fit.
In a bowl, combine the garlic, rosemary, brown sugar, balsamic vinegar and salt, and then rub the mixture evenly all over the ribs.
Let the ribs marinate for an hour at room temperature or longer in the fridge.

Marinated ribs, ready for the oven.
Place a rack in the center of the oven and pre-heat it to 425. Pour 1/2 cup of water into the roasting pan with the ribs and cover the pan tightly with aluminum foil.
Roast the ribs until the meat is very tender, about 1 1/2 hours.
While the ribs are roasting, make the barbecue sauce…
Place the balsamic vinegar in a medium saucepan over medium-high heat. Bring it to a boil, then lower the heat to medium and cook the vinegar until it is reduced by a third, about 8 minutes.
Whisk in the ketchup, apple cider vinegar, honey, mustard, molasses, Worcestershire, hot sauce and salt. Bring the sauce back to a boil, then lower the heat to a simmer until it has thickened, about 15 to 20 minutes. Stir occasionally. Remove the pan from the heat and let it cool to room temperature.

After baking, brush the ribs with the barbecue sauce.
Remove the ribs from the oven and transfer them to a baking sheet lined with non-stick aluminum foil.
Increase the oven temperature to 450 .
Brush both sides of the ribs generously with the barbecue sauce and bake them uncovered for about 10 minutes, until the sauce is browned and sizzling.

Delicious balsamic ribs!
Leftover barbecue sauce is great for dipping the ribs in!
Growing up in a Lithuanian family, there was a small group of foods that I had to love to survive, since they constantly appeared on the dinner table: potatoes, cabbage, mushrooms, herring, and beets. Fortunately for me, I loved them all, despite my Mom’s desire to boil everything to death.
One of the many uses for beets, besides a cold summer soup and a hot winter soup, was pickling. Pickled beets are an excellent side dish for any hearty meat dish. (I love ’em with kielbasa!) Store-bought pickled beets pack way too much sugar in every jar, so it was time to make my own. The addition of hard-boiled eggs to the mix is a personal one. If you don’t like ’em, leave ’em out and add more beets.
A real time saver is a product called Love Beets, which you can find in any supermarket. If you use them, you can skip the roasting of the beets altogether.

Pre-heat the oven to 450. Wrap the beets in foil and roast for about an hour, until tender. When they’re cool enough, carefully peel and quarter them. (If you’re using Love Beets, just open the package!)
In a medium saucepan, combine the vinegar, water, garlic, sugar, peppercorns and salt. Bring it to a boil and simmer over moderately high heat, stirring until the sugar has dissolved. Let the pickling liquid cool to warm, about 15 minutes.
In a heat-proof glass jar or container, layer the beets, onion, eggs and dill sprigs and then cover with the pickling liquid. Let it stand at room temp for 2 hours, then place it in the fridge overnight.
They stay fresh for a week, but they won’t last that long!
“Cope” chops are the creation of my long-time radio buddy, Marc Coppola, who can be heard from Cape Cod to California. Cope and I started in radio at WBAB on Long Island back in the early 80’s. He had the afternoon drive shift, and I was on after him from 7 to midnight. After his show, Cope would remove a hibachi grill out of the trunk of his car, light some charcoal in the radio station parking lot, and he’d grill up the most amazing pork chops I’ve ever had. They were thin, but juicy and beautifully charred, with a wonderful saltiness. He called ’em “Cope chops,” and we’d eat them by the stack, wrapping the hot bone of the chop with a paper towel, and then just chowing down. It was a great memory, and one that I regularly re-live by grilling Cope chops at home even today.
After three decades, I’m not sure if my Cope chop recipe is the same as the original, but they are damn good and incredibly easy to make.
Ironically, for this recipe, I don’t go all out and spend big money on thick, expensive pork chops. I want them thin, fatty and with the bone in. This is not a low-and-slow process: the secret to the success of these chops is to cook them hot and fast, sealing in the juices.

Place the pork chops in a flat bowl, and pour the wine over the top, making sure you cover the chops. Let them marinate for at least an hour at room temperature, flipping them over halfway through so that all sides get covered by the wine.
Light a hot hardwood charcoal fire.
Pour off the wine from the chops and discard. Place the chops on the hot grill and season the top with the Lawry’s seasoned salt. Once they’ve charred nicely, flip the chops over and season the other side. Grill until the chops are cooked all the way through, but not dry. Serve immediately.
The proper way to eat a Cope chop: wrap the bone in a paper towel and chow down!
I love foods from all over the world, but I’m pretty clueless about Indian cuisine. My one experience at an Indian restaurant was in New York City many years ago, where I was served very dry, very spicy grilled chicken. It didn’t thrill me.
Recently, I spotted a recipe that looked like something I could handle first time around: “Indian Cooking 101,” if you will. It uses the traditional 2-step tandoori process of marinating: first, with the spices and then with yogurt for tenderizing. Using chicken thighs and drumsticks (as opposed to breast meat) meant the chicken would be flavorful and juicy. And frying in oil meant a crispy skin. I was ready!
Since the pieces of chicken I used were rather large, I fried the chicken only to get a nice golden color on the outside. Then the meat went into the oven to finish cooking all the way through.
This recipe requires marinating for a full 24 hours, so plan ahead!

In a food processor or blender, combine the garlic, ginger, lemon, coriander, turmeric, cayenne, vegetable oil, 2 teaspoons of salt, and 1 teaspoon of pepper. Blend until smooth.
Place the chicken pieces in a large Ziploc bag and add the marinade, mixing well so that every bit of the chicken gets coated with the spices. (I like to use gloves for this messy job.)

Place the Ziploc in the fridge and marinate the chicken for 12 hours.
After 12 hours, add the yogurt to the bag, mixing well, and return it to the fridge for another 12 hours.
Pre-heat the oven to 325 degrees. Set a rack over a rimmed baking sheet and set aside.
In a bowl, combine the chickpea flour and 1 teaspoon of salt.
Meanwhile, in a large heavy saucepan, heat about 2″ of the oil to 325 degrees on a thermometer.

When the oil reaches the right temperature, take the pieces of chicken out of the bag one by one, letting the excess drip off back into the bag before dredging the chicken in the flour. Shake off the excess, and carefully place the chicken pieces in the hot oil, working in batches. Don’t overcrowd the pan.

Fry the chicken until golden brown, flipping once. You don’t need to cook it all the way through, just to brown it nicely. Place the browned pieces on the baking sheet with the rack.

Once all the chicken has fried, place the baking sheet in the oven and cook the chicken until each piece registers about 160 degrees.

Place the chicken on a plate, then garnish with cilantro leaves and lime wedges.

Other stuff…
Chaat masala is a spice powder mix that typically contains dried mango powder, cumin, coriander, dried ginger, salt, black pepper, chili powder and more. It’s commonly used at the end of cooking a dish like this as a sprinkling on top. Since the only jar I could find contained 1/2 lb., way too much for my needs, I chose to leave it out.
Despite that coriander is the seed of the cilantro plant, the two are not interchangeable in cooking. Coriander seed has a lemony essence when ground. Always good to have in the pantry.
This is basically my Cantonese chicken recipe, which I based on my love of Peking duck. But, for whatever reason, I never tried this recipe on duck before. Recently, I went home to Long Island to visit my Mom, and I stopped by one of the great food stores of my life: Miloski’s Poultry Farm in Calverton, NY.
I’ve been coming to Miloski’s since I was a kid. My Dad would buy his ducks there and Grandpa Miloski, the guy that started it all, would serve us. Over the years, grandpa made way for his son, and now the son is retired and the grandson has taken over the business. All along the way, one thing hasn’t changed: the excellent quality of their product.
My uncle Antanas passed away years ago, but when it came to being a true foodie, this guy put all others to shame. Besides being the only hunter in our family (my first taste of venison was at his table) he had several huge freezers in the basement of his Richmond Hill, Queens, home back in the day. He would drive to Miloski’s and buy 50 ducks at a time, and bring them home to freeze. Very often, after I finished Lithuanian school on a Saturday, my uncle would invite our family over for dinner, and we’d all sit around a massive table where no less than 5 ducks would be cooked and served, along with all the fixings. That’s just a taste of my Miloski memories.
I try to stop at Miloski’s every time I pass through. I bring cash, because Miloski’s doesn’t take credit cards! I have a long ride home, first on the Cross Sound ferry from Orient Point to New London, CT…and then an hour-and-a-half on the highway from there. I bring a cooler and I buy a bag of ice along the way.
Miloski’s sells all kinds of exotic meats, like wild boar and ostrich. But I go for their delicious kielbasa, pierogis, and now: duck!

Remove all the giblets from the bird and cook them up for your dog, like I do for my buddy, Fellow. (Leave out anything with bones, of course.)
Rub the soy sauce first all over the duck. (It will absorb the flavors better if you do it before you rub the bird with the oil.) Then rub the peanut oil all over the duck.
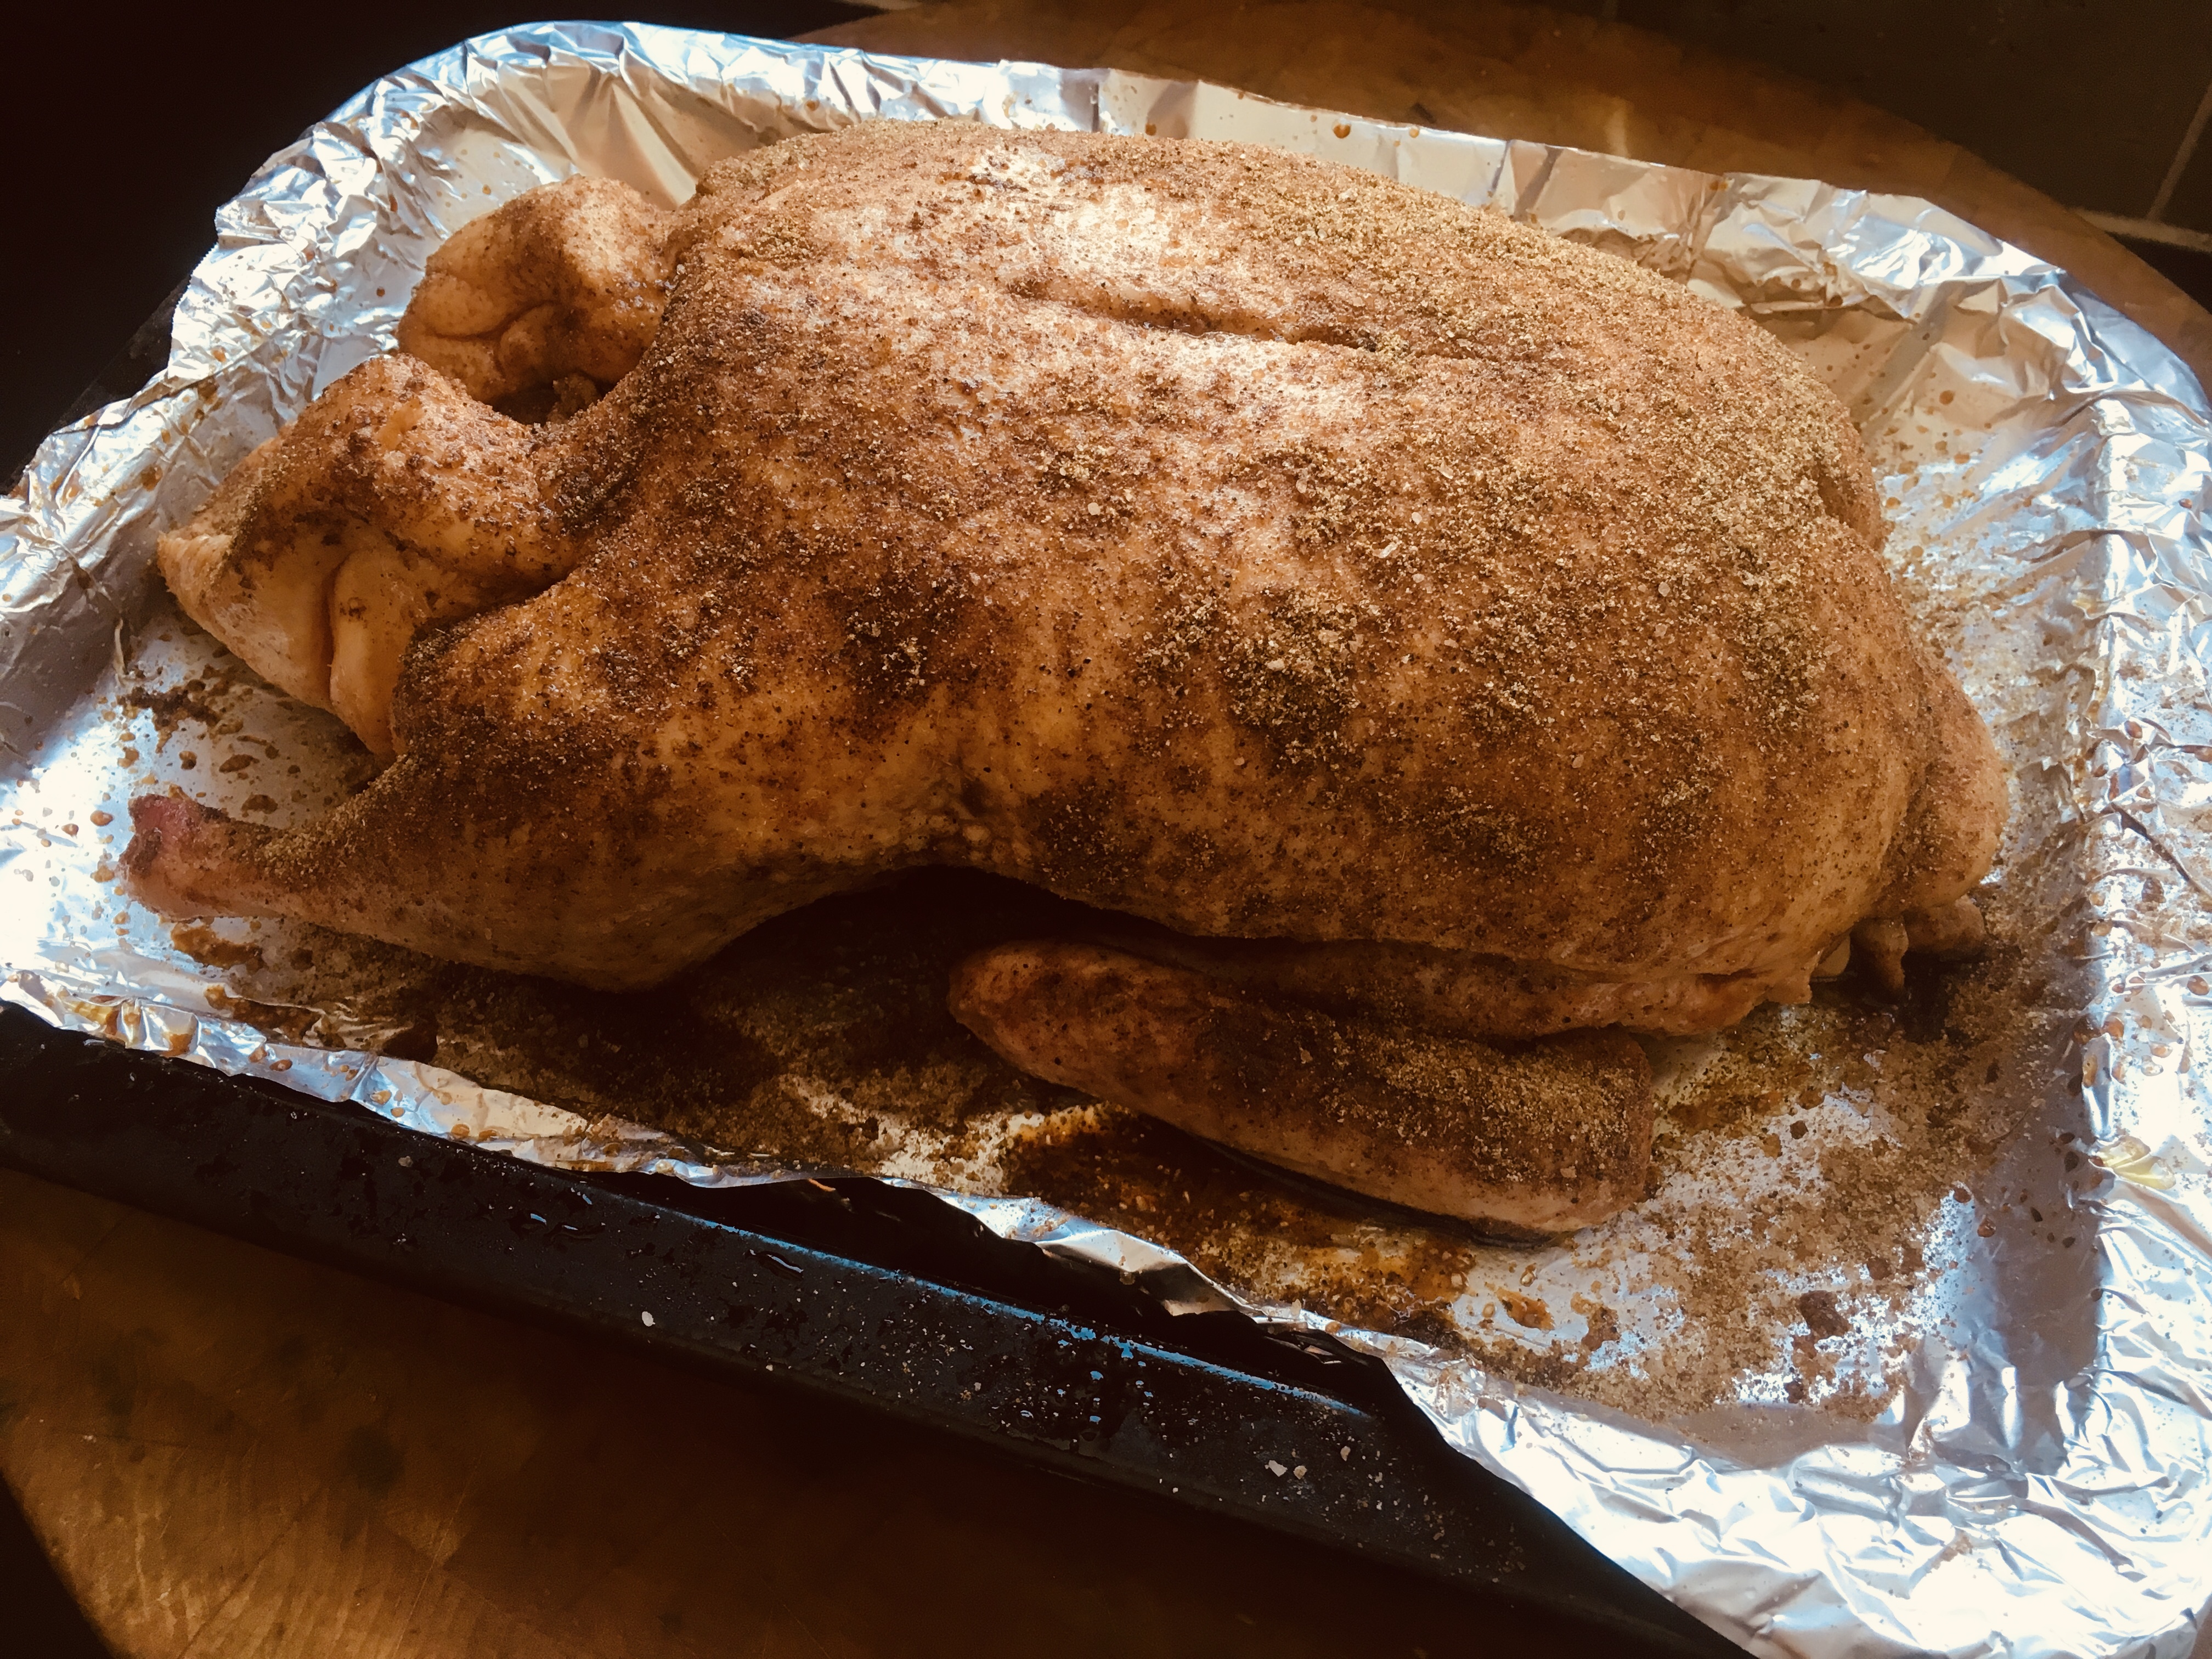
Rubbed and ready to go in the oven!
Combine the Chinese five spice, garlic, salt and pepper in a bowl. Season the entire bird, including inside the cavity, with this mixture.
Pre-heat the oven to 400 degrees. Place the duck in a pan lined with aluminum foil (cleanup will be easier.)
Reduce the oven temperature to 250 once you put the duck in the oven, and then cook it low and slow for up to 4 hours…or more.
Meanwhile, combine the hoisin sauce and sesame oil in a small bowl. When the duck is about 15 minutes away from being done, brush it with the hoisin/sesame oil mixture. Cook it another 15 minutes until the bird has a nice dark glaze.
Let the duck rest about 15 minutes before carving.

Perfectly delicious!
Can you get salmonella from duck? In a word: depends! It used to be that salmonella was only found in the intestinal tracts of chickens. But because ducks are often raised in areas where chicken live, cross-contamination is very possible. Even if the birds live totally separate lives, cross-contamination can also happen in slaughterhouses. So…despite the fact that many say you can eat duck meat that’s pink, I prefer not to. I’ll tell you this: there’s quite a bit of fat in an average duck, so even if you cook the bird to medium-well, it will be delicious and juicy….and the skin will be fantastically crispy. Be safe!
What did a girl from Michigan, with family in the Upper Peninsula, have in common with a guy who grew up on Long Island in a mostly Jewish community? Well…smoked whitefish, for one thing!
Growing up in NY, I was introduced to smoked whitefish, herring, and lox at an amazing deli just down the road from my parents’ house. My wife’s family from the U.P., meanwhile, caught the whitefish, herring and salmon and smoked it themselves.
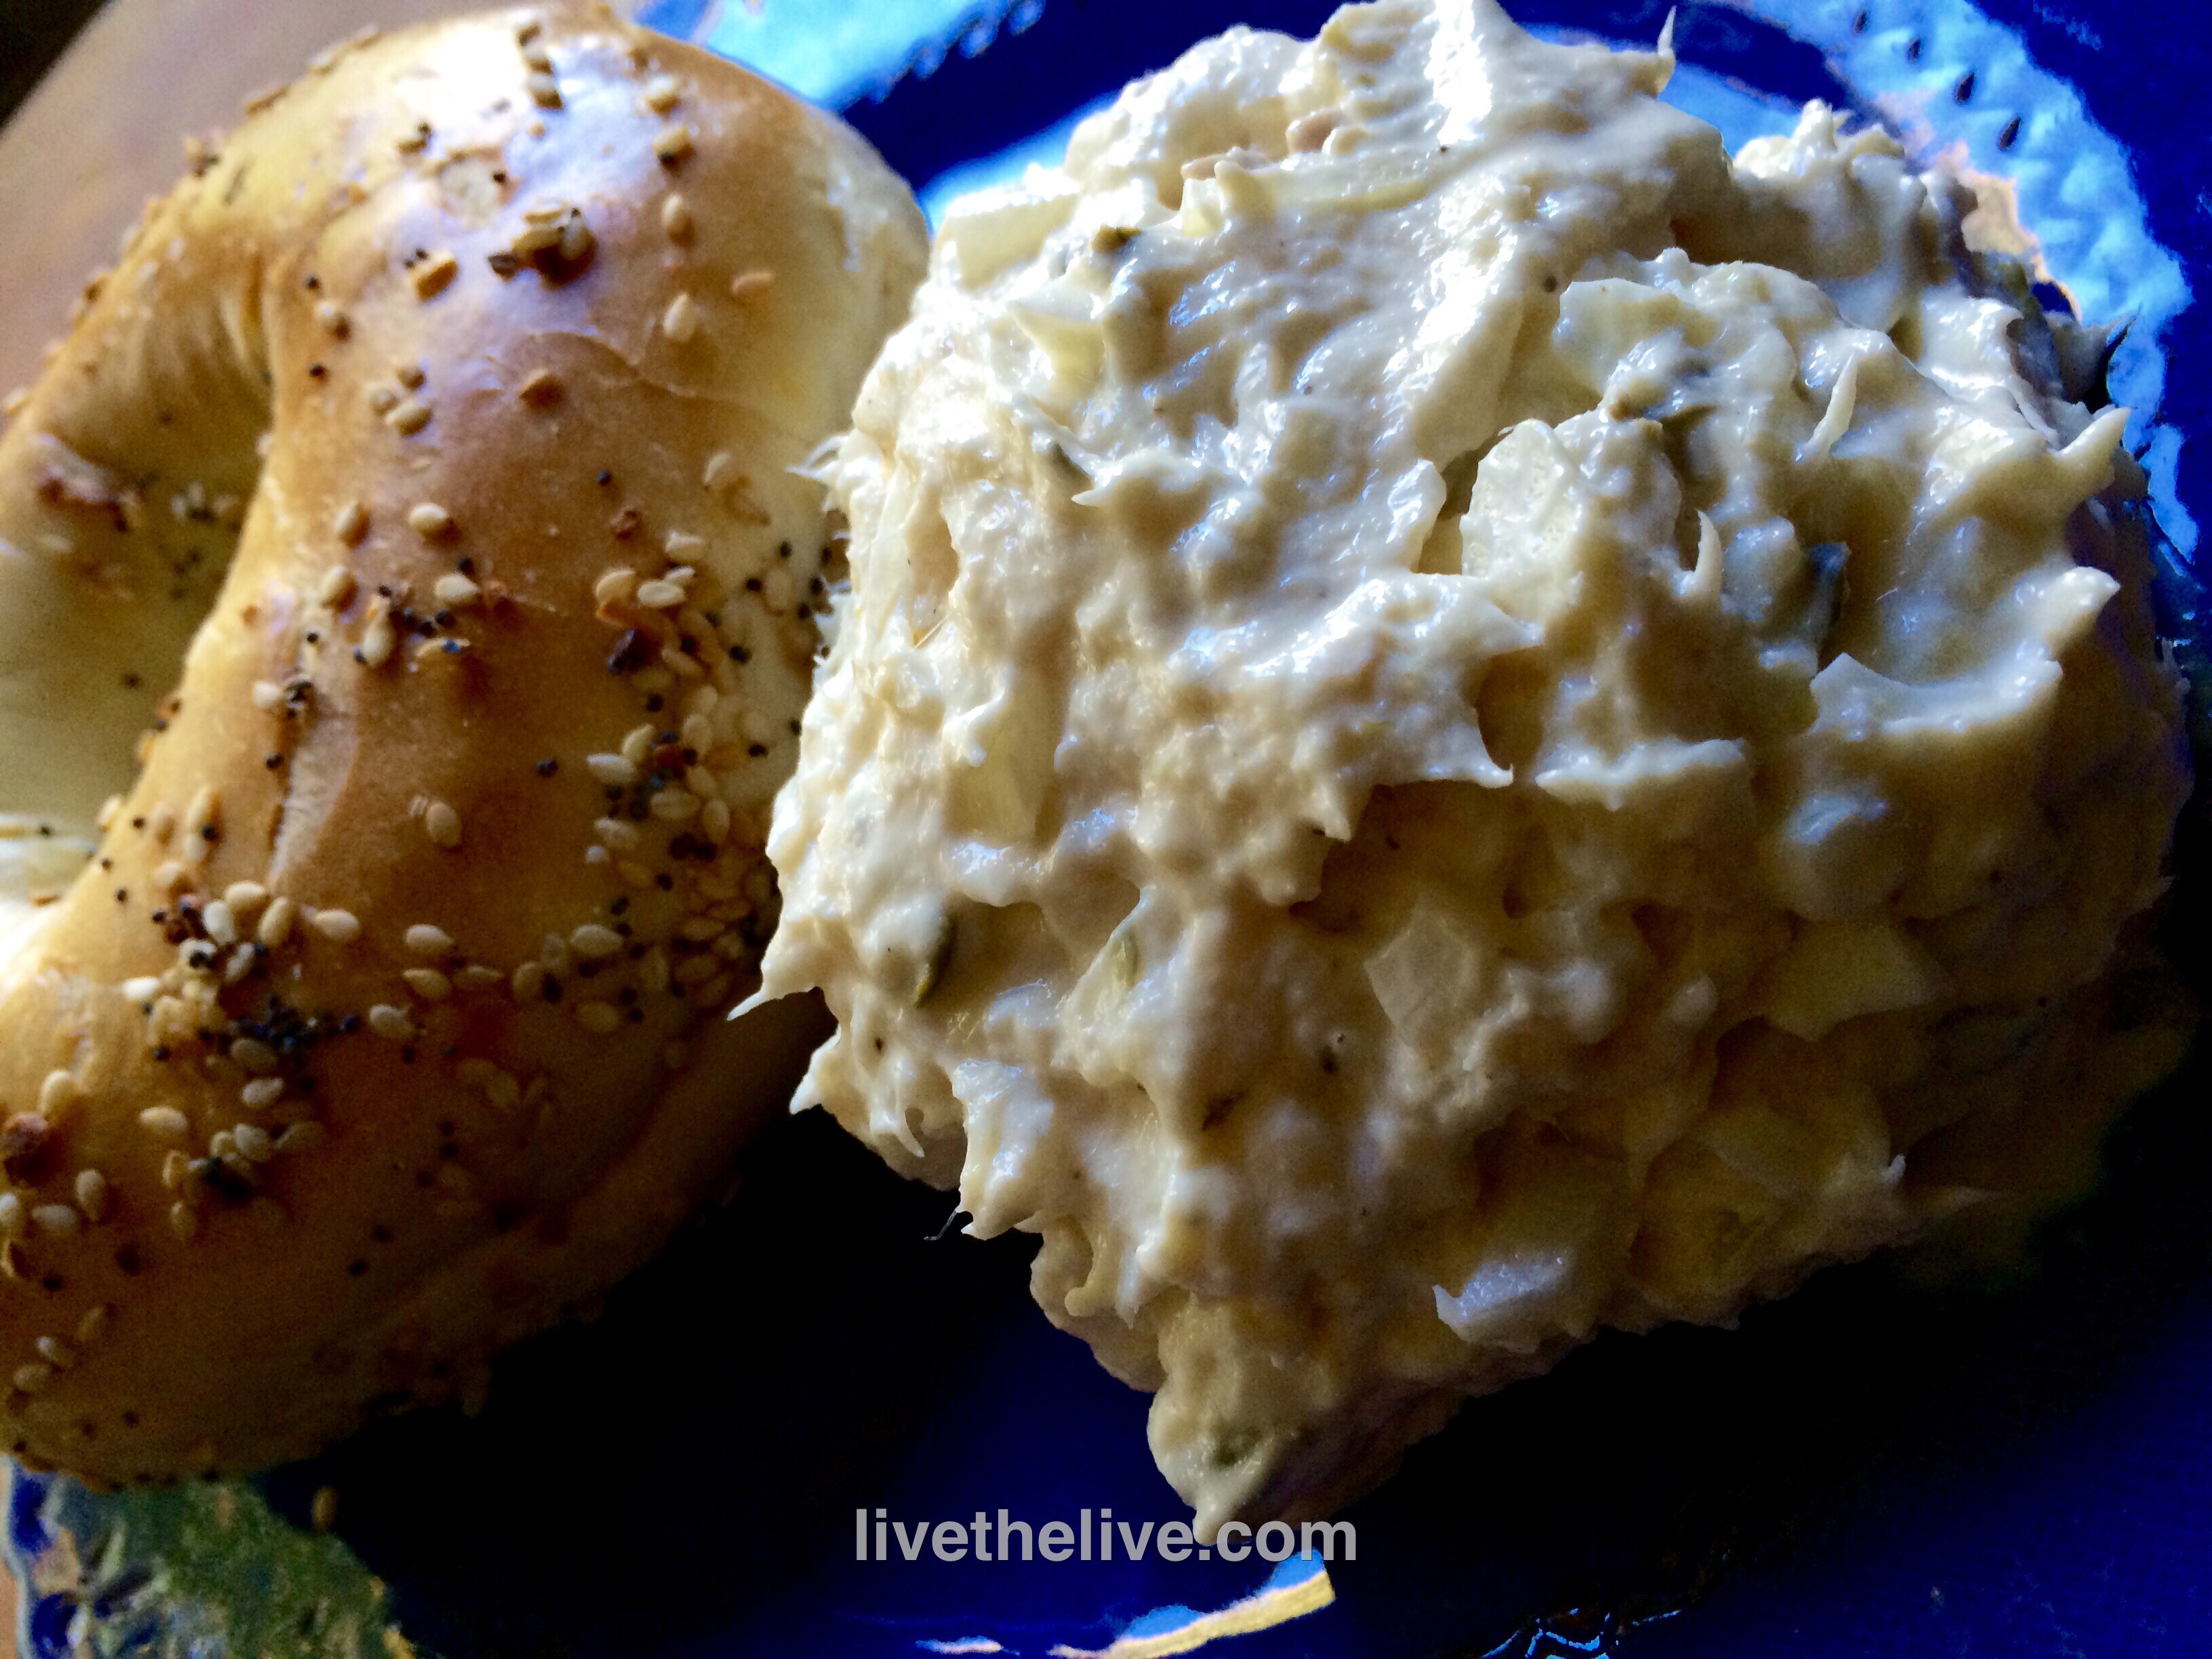
Now we share our mutual love of smoked fish at home in Rhode Island. My Yooper father-in-law showed me how to properly remove the meat cleanly from the smoked whitefish, and then, when he wasn’t looking, I took his recipe for smoked whitefish salad and I tweaked it.
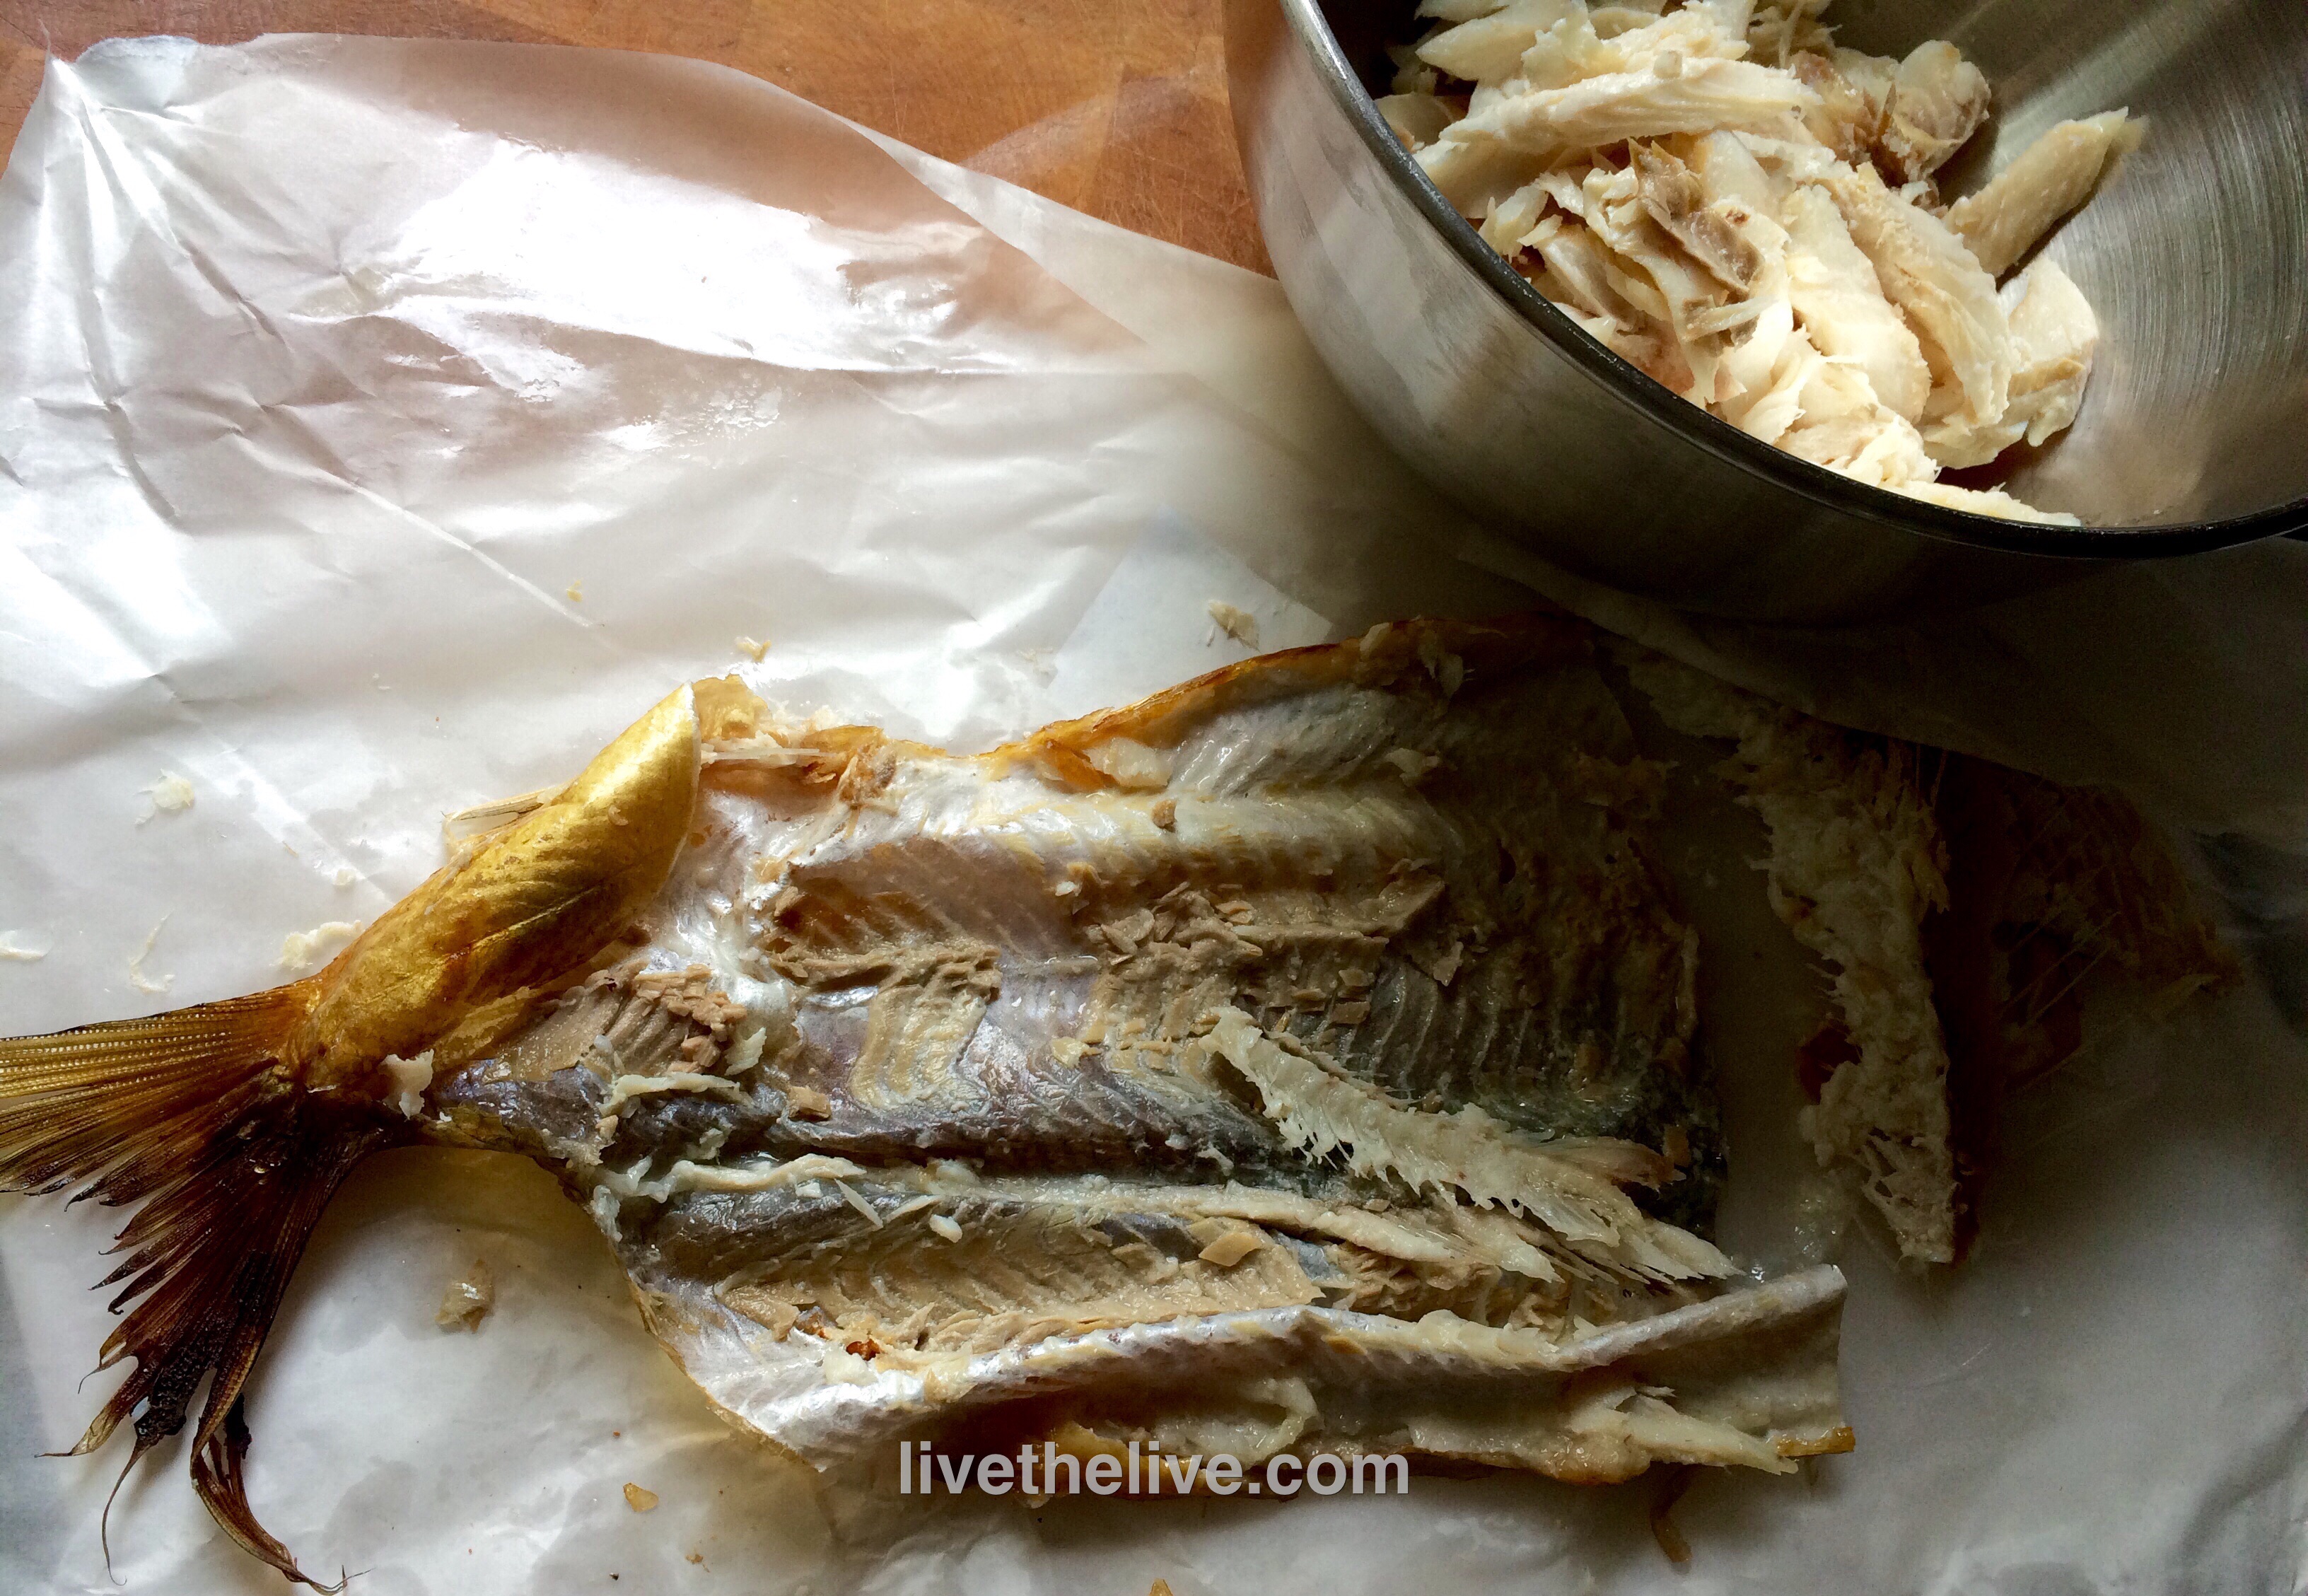
Remove every bit of meat. Double-check for bones!
Remove the meat from the smoked whitefish carefully, making sure all the small bones have been removed. Double-check to make sure you’ve done this really well. Place all the white fish meat in a bowl.

One of our favorite restaurants here in Rhode Island is Fluke Newport in…well…Newport. We’ve dined there for years, but big changes happened last summer when they hired a new chef. We met Chef Eddie Montalvo just after he had arrived at Fluke, and we were impressed with his new menu.
We came back for another visit just over a month ago, and meeting Eddie again, we thought we would invite him and his family to our home someday for a visit.
Well, that “someday” is tomorrow, and the reality that I’m going to be cooking for a real chef for the first time in my life is making me a bit nervous!
I went to Twitter for some help. Since I follow a number of chefs, I asked the question: I’m cooking for a real chef for the first time. What’s the #1 tip you can give me? Only one chef answered, but it was none other than Andrew Zimmern, and he said simply: “Be yourself.” Be myself? Yeah…I think I can fake that!!!!
So I started thinking…Chef Eddie works with seafood all day at Fluke. Skip that. He’s Italian and makes amazing homemade pasta. Skip that. What do I love to cook and do pretty well…?
Barbecue!
I have a beautiful grass-fed Angus beef New Zealand brisket in my freezer. That’s what I need to make! A simple, comfort-food meal. Barbecued brisket…twice-baked sweet potatoes…a big old salad…and as an appetizer: my no-fail recipe for Oysters Rock-a-Fellow! (OK, I had to get a little seafood in there.)
When I smoke my brisket low-and-slow in my smoker, I use a coffee steak rub that I developed a couple of years ago. It gives a deep, rich crust to the meat that is just fantastic.

Low and slow is the way to go! Deliciously smokey and juicy.
Depending on the size of the brisket, you might need to double the recipe.
If the brisket is frozen, I like to thaw it a couple of days ahead of cooking it, rubbing it down with the coffee rub, and placing it in the fridge for about 24 hours to rest. I bring it out about an hour before smoking, to let the meat come back to room temperature, and then I place it in the smoker for about 12 hours at 225 degrees, smoking it with hickory wood.
When it’s done, I remove it from the smoker, and wrap in foil and let it rest at least 30 minutes before slicing diagonally against the grain of the meat. If I’m not serving it right away, I place the wrapped brisket in the oven at the lowest setting, about 150 degrees, just to keep it warm.
When I’m ready to serve, I always slice the brisket on the bias, against the grain of the meat.
Read my blog about Chef Eddie and Fluke here: https://livethelive.com/2018/07/08/fluke-in-newport-a-new-chef-brings-new-creativity/
Check out my Oysters Rock-a-Fellow recipe here: https://livethelive.com/2018/11/01/oysters-rock-a-fellow-improved/
St. Patty’s Day is this Sunday, so supermarkets are full of packages of processed corned beef in preparation for the big celebration. Too bad corned beef isn’t an authentic Irish dish!
The phrase “corned beef” was actually coined by the British, and although the Irish were known for their corned beef throughout Europe in the 17th century, beef was far too expensive for the Irish themselves to eat and all of it was exported to other countries. Owning a cow in Ireland was a sign of wealth, and the Irish used theirs for dairy products, not beef.
The Irish ate pork, and a lot of it, because it was cheap to raise pigs, and they traditionally prepared something like Canadian bacon to celebrate St. Patrick’s Day in Ireland.
In the 1900’s, when the Irish came to America, both beef and salt were more affordable, and the Irish, who lived in poor, tight-knit communities, often next to Jewish communities, bought much of their beef from Kosher butchers. And so many of the Irish learned how to corn their beef using Jewish techniques, but adding cabbage and potatoes to the mix.
It takes about 3 weeks to make corned beef. But now that you know it’s not Irish anyway, that’s OK! (If you’re dying to have it on St Patty’s Day anyway, just buy yourself a supermarket slab this time, then make your own when the craving hits again.) Doing it yourself is not difficult. It just takes time…and you get a really delicious slab of beef.
Corned beef has nothing to do with corn. ‘Corning’ is a technique for preserving raw meats for long periods by soaking it in salt brine. This method was used in England before the days of commercial refrigeration. Back then, the large salt kernels used in the brine were called “corns.”
Brining is a time-honored way of preserving meat and it prevents bacteria from growing. Both pastrami and corned beef are made by this method. Both start with a brisket of beef. Corned beef is then cooked–usually boiled–and served. Pastrami is made when the brined meat is rubbed with more spices and then smoked to add extra flavor. So corned beef and pastrami are the same meat, just treated differently.
Saltpeter is an ingredient that has been used in brining beef for years. It adds the traditional red coloring to the corned beef and pastrami meat. But since saltpeter can also contain carcinogens, I leave it out. The meat may not be the usual bright red color, but the flavor and texture of the meat will not be affected.

Brining the beef brisket
Place the brisket in a large container made of non-reactive material, like glass or plastic.
In the 1/4 cup of warm water, dissolve the sugar, minced cloves, paprika and pickling spices.
Dissolve the 3/4 cup of salt in the 2 quarts of water. Pour in the sugar/garlic/paprika/pickling spices mix and stir everything together. Pour the mixture over the meat in the container. Make sure the meat is totally beneath the surface of the liquid. (You may need to weigh it down to do this.) Cover the container.
Refrigerate the container and its contents for 3 weeks, turning the meat once or twice per week. At the end of the third week, remove the container from the refrigerator and take out the meat. Soak the meat in several changes of fresh cold water over a period of 24 hours to remove the excess salt.
At this point, if you want corned beef, prepare and cook it using your favorite recipe. But I’m all about the pastrami!

Combine the coriander seeds, black and white peppercorns and mustard seeds in a spice grinder and grind coarsely. Place in a bowl. Add the salt, paprika, brown sugar and granulated garlic. Mix well.
Rub the mix into the brisket well, covering all sides.
Heat your smoker to 225 degrees and smoke for several hours using a less intense wood, like oak. When the internal temperature of the meat has reached 165 degrees, it’s done. It isn’t necessary to smoke pastrami as long as you would a regular brisket because the long brining time makes the meat tender.
It is very important that absolutely everything that comes in contact with the meat is very clean. (This includes your hands.) Also, make very sure that every inch of the meat reaches the 165 degrees before it is removed from the smoker. The corned beef is now pastrami.
Happy St. Patty’s Day!
