Shrimp with an orange sauce is something you see on every Chinese restaurant menu. I didn’t have oranges, but wanted a citrus kick to my sweet and spicy sauce. I went with grapefruit and I never looked back!

Although I call this recipe “Asian shrimp,” I never buy my shrimp from Asia! Only wild-caught American shrimp will ever do. When you realize just how nasty Asian shrimp can be (farmed in over-crowded conditions, swimming in their own filth and fed chemical food pellets and antibiotics) you’ll never eat it again.

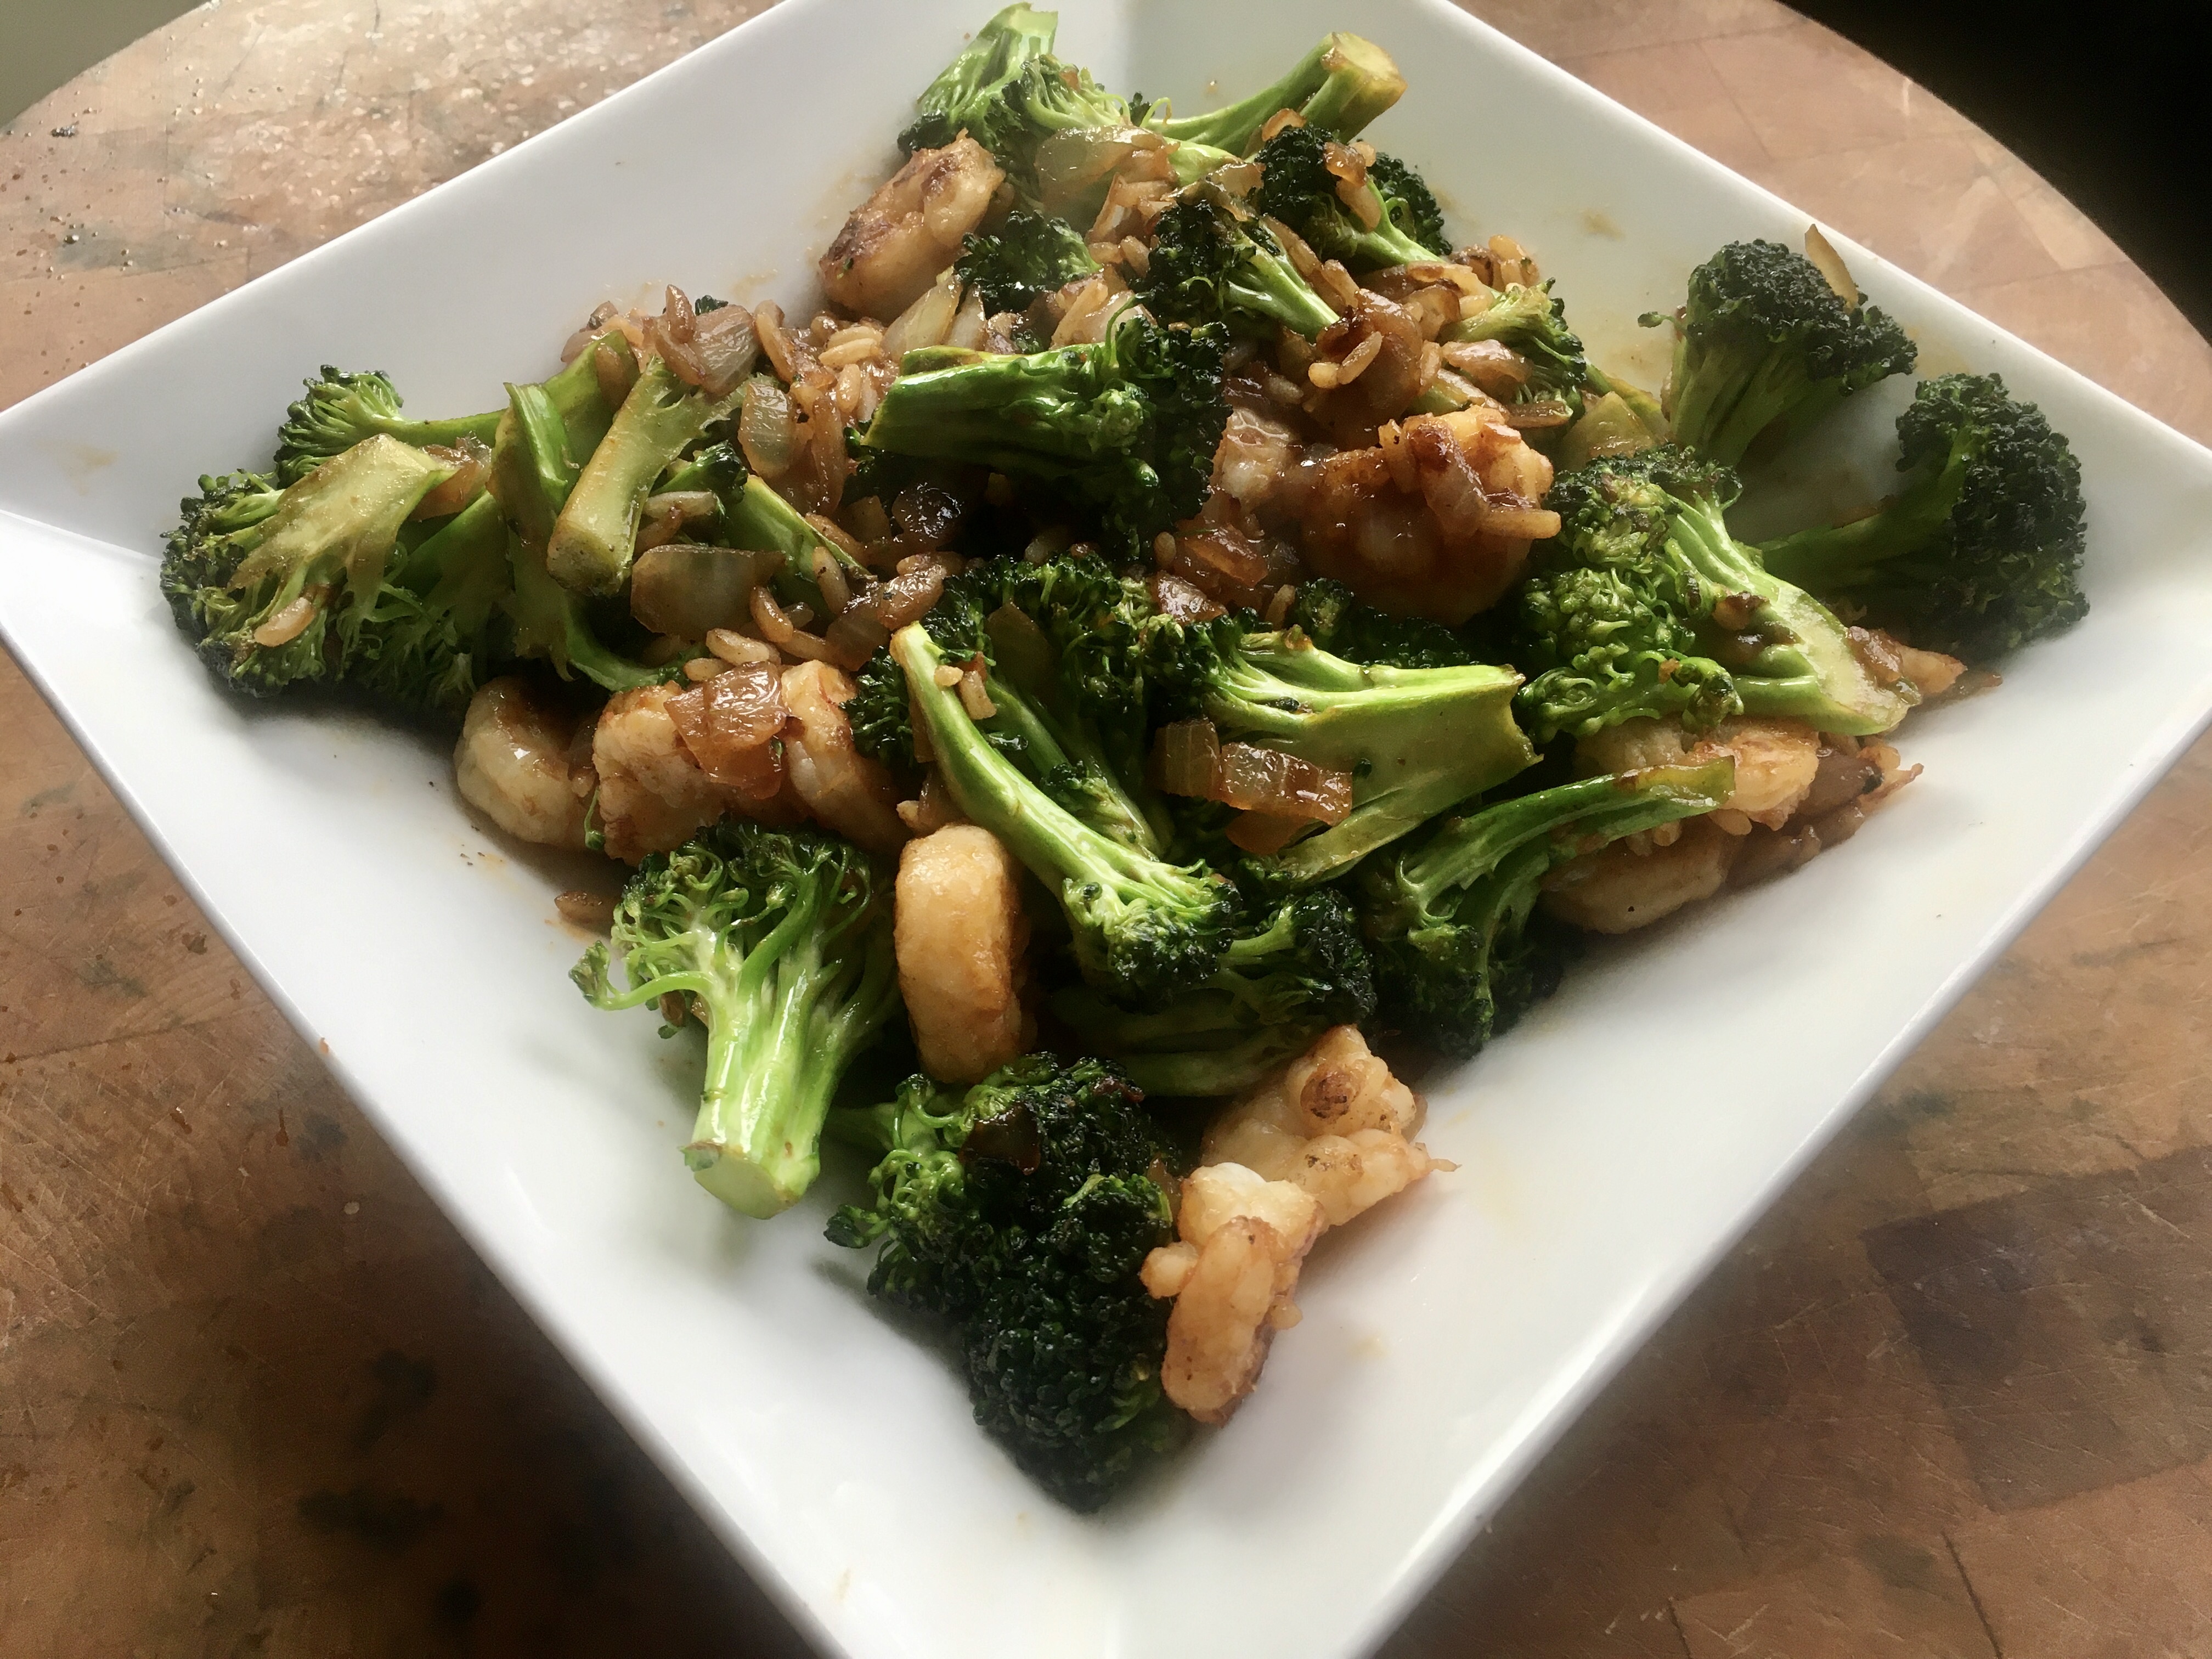
Green beans looked good in the produce aisle, so I used them, but feel free to substitute with broccoli, asparagus, or any veggies you like.

Chili garlic sauce and hoisin sauce can be found in most supermarkets, in the international foods section.

As long as you use gluten-free soy sauce and hoisin sauce (the brand La Choy is GF), this dish is gluten-free!


image


For the rice:

1 cup cooked basmati rice (I use Texmati brown rice)
2 cups seafood stock (I use homemade shrimp and fish stock, but vegetable stock will work)
1/2 teaspoon salt
2 scallions, finely chopped


For the veggies:

1/2 Vidalia onion, finely chopped
1 lb. fresh green beans, washed and cut into 1/4′ pieces
1 teaspoon soy sauce
splash of peanut oil


For the shrimp:

2 dozen thawed, peeled and de-veined wild-caught USA shrimp
1 tablespoon chili garlic sauce
3 tablespoons hoisin sauce
juice and zest of 1 grapefruit
splash of peanut oil


Making your own seafood stock is easy: just peel the shrimp you’re going to use in this recipe, and place the shells in a saucepan full of water. Let it boil until you’ve reduced it to 2 cups. Strain out the shells and discard them. Then use the stock to cook your rice, according to the package directions. Once the rice is cooked, toss in the chopped scallions, mix well, and set the rice aside.

Add peanut oil to a hot pan and sauté the onions until translucent. Add the green beans and cook them until they’re al dente. Add the soy sauce, stir, and then pour the contents of the pan into the rice. Mix well.

Using the same pan, add a little more peanut oil and sear the shrimp on both sides. Don’t overcook them! Push the shrimp to the sides of the pan so that a circle remains in the middle. Add the chili garlic sauce and hoysin sauce and stir them together, then blending in the shrimp until the shrimp are covered with the sauce. Add the grapefruit zest and juice and stir until everything is combined and the sauce has thickened just a bit.

Pour the contents of the pan into the rice mix and combine. Add more soy sauce to the rice, if you like.

Butter and cheese. Can anything be better?

It’s especially great when asparagus is in season, growing in my garden, like right now.

This is a great side dish with any main course like a big slab of meat, and has special meaning to me because my cousin first introduced me to asparagus with this recipe when I was just a kid. She passed away many years ago, but I think of her every time I make this simple but delicious dish.

You can use almost any grated “parmesan” cheese, but nothing beats real Parmigiano Reggiano that you freshly grate yourself. Whatever you use, please, just don’t use the junk that comes in a can.


image

1 lb. fresh asparagus spears
1 tablespoon unsalted butter
2 tablespoons extra virgin olive oil
3/4 cup grated Parmigiano Reggiano cheese
sea salt and freshly cracked black pepper


The easy way to trim an asparagus spear is to grab the thicker end between two fingers and bend it. It will snap at the point where the tough part ends and the softer, edible part begins. I toss the bottoms into my compost pile.

I heat the butter and oil together in a pan and then add the asparagus spears, cooking over medium heat for about 5 minutes, until al dente. (You don’t want them mushy.)

While the asparagus is still in the pan, I sprinkle the Parmigiano Reggiano on top, letting it melt a bit. I season with sea salt (I prefer Fleur de Sel) and freshly cracked black pepper.


MY HOME FRIES

Posted: May 13, 2023 in Uncategorized

The fifth almost-annual “Boys’ Weekend” at my house is coming up next weekend, and when we’re doing a lot of drinking, we need a solid breakfast the following morning! My home fries have become a staple, crucial for our recovery.

Home fries are a simple thing. But we’ve all been to a diner where the home fries they served tumbled out of a bag of frozen pre-cut potatoes, and tasted like cardboard. It’s time home fries got the respect they deserve.


Let’s get one thing out in the open from the very beginning: home fries were never meant to be low in calories! Mine are definitely not diet food! So, as you read this blog, if you’re shaking your head at the fat and calories, know that I know that you know!

3 lbs. Yukon gold or yellow potatoes, washed and cut into 1/2″ cubes
2 lbs. sweet potatoes, washed and cut into 1/2″ cubes (optional, see below)
1 lb. bacon, chopped
2 Vidalia onions, finely chopped
Lawry’s Seasoned Salt
4 tablespoons unsalted butter


I like my potatoes with the skin on, so I remove any blemishes on the skins, then cut the potatoes in approximately 1/2” cubes. Some can be larger, some smaller, and they don’t have to be perfect squares. The smaller pieces will cook and soften faster, while the larger pieces will retain their shape and texture.

Place the cut potatoes in a pot of clean, cold water over high heat on the stove. (If using sweet potatoes, boil them in a separate pot. See below.) Add a little Kosher salt to the water. Let the potatoes cook until they are a bit al dente…a bit underdone. They will cook some more later in the pan. Drain them and set the potatoes aside.


While the bacon is frying, finely chop the two onions. Add the onions to the pan when the bacon has cooked completely. Now, here’s where eyebrows are often raised: Leave all the bacon fat in the pan!

Leave the bacon fat! It’s all about flavor!

Cook the onions until they are soft and translucent.


Now add the drained potatoes to the pan, mixing well, coating the potato pieces in the bacon fat.

Lightly season the potatoes with the Lawry’s Seasoned Salt. Remember: there’s a lot of salt already in the pan from the bacon.

Cook the potatoes, mixing well, and then add the butter in small pieces, scattered around the pan. Keep mixing until the potatoes brown a little.


One option that I really like and started doing only recently: I add a pound or two of sweet potatoes to the mix. I keep the measurements of all the other ingredients exactly the same. I boil the sweet potatoes separately from the regular potatoes, because they cook more quickly. I drain them and set them aside and then mix them with the regular potatoes in the pan.

When I gain some weight and need to go back on the diet, one of the major changes in my eating habits is to incorporate more seafood and less meat into my meals. Seafood has a lot more protein and fewer calories. In fact, shrimp, lobster and oysters are some of the most delicious low-calorie foods you can enjoy, running about 1 calorie per gram. It’s what you add to them–oils, melted butter, batter–that makes them high in calories.

I’ve always loved sushi, but again, on a diet, I need to limit my intake of unnecessary calories, and rice is big on that list. I’ve found that I can use a lot less rice, or maybe none at all, when I make poke…and I get all the satisfaction of sushi or sashimi.

My two favorite fishes to eat raw are ahi tuna and wild-caught Alaskan salmon, like sockeye. There are many great purveyors of this super-high quality seafood online, and I usually buy a decent amount of fish at one time–hermetically sealed and frozen in 4-ounce packages–to last me a long time. (The price is often much better when you buy in quantity, because they have to be shipped frozen overnight.)


Yes, please.


There are many ways to prepare poke, and the only limitations are what’s in your fridge. The first recipe, using salmon, is closer to a traditional poke recipe you’d find in a restaurant.


6.5 ounces wild-caught Alaskan salmon, in the refrigerator (thawed, if previously frozen)
1 tablespoon soy sauce
2 teaspoons sesame oil
1 teaspoon rice vinegar
1/2 teaspoon fresh lemon juice
1/3 cup chopped raw cashews
1 scallion, green and white parts finely chopped

Keep the thawed salmon in the refrigerator. Remove the salmon from the fridge, and remove the skin if it is still on the fish. Cut the fish into half-inch cubes. I like to place the salmon cubes on a clean paper towel to absorb excess moisture from thawing. Then I place the salmon cubes in a bowl and put it back in the fridge while I combine the other ingredients.

In another bowl, combine the soy sauce, sesame oil, rice vinegar, and lemon juice. Whisk them together.

Chop the cashews and add them to the bowl, mixing them in.

Cut the root ends off the scallions, chop the green and white parts finely, and add them to the bowl, mixing them in.

Add the salmon to the bowl, mixing gently, so that you don’t damage the fish.
Let it sit for 10 to 15 minutes, if you can wait that long, and then: eat!
My tuna poke recipes have also used similar ingredients…
More recently, I mixed up a batch of what I call my “Asian Mix,” a blend of five Asian flavors that really work well together: soy sauce, hoisin sauce, chili garlic sauce, rice vinegar, and sesame oil. I let my tuna or salmon marinate in this mix for about ten minutes before adding the other ingredients and feasting.

Tuna poke with lettuce, onion, pine nuts, black and white sesame seeds, rice and my “Asian Mix.”

But my proudest achievement was taking my favorite sandwich from my home town of New York, and making it into a bowl. The sandwich is an everything bagel with salmon and cream cheese, and my poke version uses just a bit of the bagel, yet you still get the flavor without all the calories. The secret is a seasoning you can buy already prepared.
3 oz. wild-caught Alaskan sockeye salmon, cubed
1 tablespoon capers
1/2 small Vidalia or sweet onion, sliced very thin
1/2 tomato, seeds removed, sliced thin
1/4 of a toasted plain bagel
1 tablespoon cream cheese
2 teaspoons Everything Bagel seasoning
1 chopped hard boiled egg
Cut the salmon into small 1/2″ cubes and place it in a bowl. Add the tablespoon of capers (including some of the brine), chopped onion and tomato. Mix gently.
Toast the bagel and use only 1/4 of it (I use that little for the sake of calories. But you can use more, if you like!) Spread the tablespoon of cream cheese on the toasted bagel, then carefully chop it up into small cubes. Add this to the bowl. Sprinkle in the Everything Bagel seasoning and the chopped hard-boiled egg, and give it all one last gentle toss.
Then take a forkful, close your eyes, and imagine you’re in your favorite New York deli!

I love garlic, and I spend a lot of time trying to figure out how I can up the garlic in any particular dish. Now, this piece of chicken may look pretty harmless to you, but it is a garlic bomb…and it’s delicious. I tried to think of ways I could increase the garlic quotient without simply adding more granulated  garlic to the breading…and then it came to me: add fresh garlic to the egg wash! Brilliant!


3 lbs. chicken pieces
1 cup all-purpose flour ( I use Cup4Cup GF flour if I want this dish to be gluten-free)
2 teaspoons granulated garlic (add more if you like!)
1 teaspoon granulated onion
1 teaspoon oregano
1 teaspoon parsley
1 teaspoon basil
1 teaspoon black pepper
1 teaspoon salt
2 eggs
1 tablespoon (or more) fresh finely chopped garlic
oil for frying


I use the oven-fried method for my chicken. That means I fry the pieces until golden brown, then place them on a baking sheet and finish cooking them in the oven.

Pre-heat the oven to 350 degrees. Heat the oil in the pan to 350 degrees.

In a bowl, combine the flour, granulated garlic and onion, oregano, parsley, basil, pepper and salt. Mix well and set aside.

In another bowl, whisk the eggs together. Finely chop the fresh garlic, making it into a paste either by squishing it with the side of a chef’s knife or, my preferred method, pushing it through a garlic press. Add the garlic to the egg and mix well.

Take the chicken pieces and coat them in the egg and garlic mixture. Then place them in the flour mixture, coating well and shaking off the excess. You can place them in the hot oil at this point…or…dip them back in the egg/garlic mix again, then back into the flour, for a double-coating of crunchy garlic.

Fry the chicken pieces until they’re golden brown, but not cooked all the way through. Place them on the baking sheet. When all the pieces have been fried, place the baking sheet in a 350-degree oven to finish cooking.


The 149th running of the Kentucky Derby is Saturday, May 6th, 2023, and although I’m not a big horse racing fan, I am a huge fan of the official drink: the Mint Julep!

The Mint Julep is such a perfect, classic and historic bourbon drink, it seems silly to wait until Derby Day to have one. Of course, as any aficionado of spirits will tell you, there are as many right ways as wrong ways of making one.

The first step in my Mint Julep is making the simple syrup. Learning from one of my old radio buddies, my pal Rick O’B, I infuse mint into my simple syrup to take my cocktail to the next level. I use the standard ratio of 1 cup of clean, filtered water to 1 cup of sugar, using an organic product like Woodstock Farms Organic Pure Cane Sugar. I place the sugar and water in a saucepan and heat until just boiling. I’ve found that it needs to reach this stage for the sugar to really dissolve.

Waiting for the sugar to dissolve.

As soon as it starts to boil, I remove the saucepan from the heat, and throw in a handful of freshly picked mint leaves, stirring to make sure the mint gets in there, and then I leave the saucepan to cool to room temperature.

Once it’s at room temp, I strain the simple syrup into a bottle with a tight sealing lid, and place it in the refrigerator to cool. It will keep for about a week.

An equally important ingredient for a perfect Mint Julep is the ice: specifically, crushed ice from clean, filtered water. Don’t even think of using tap water for any cocktail much less this one. Why ruin an expensive bottle of bourbon by going cheap on the ice? I make my own ice cubes, then put them in an untreated canvas ice bag and bash them with a mallet to the perfect crushed size. Untreated canvas bags for crushing ice can be purchased online from bar supply companies for about $30. I got an untreated canvas tool bag (the exact same shape and size) at Home Depot for 3 bucks.

Da bag.

The next step is a little tougher: which bourbon to choose. The explosion of choices on the bourbon market has made it all but impossible for the average imbiber to know which bourbon is best for their tastes. If you’re a beginner, I suggest you go to a trusted bartender and explain that you’re new to the bourbon world, and could you have the tiniest of tastes and sniffs of what he’s got at his bar. Chances are, you’ll get a sampling of some of the better known brands: Maker’s Mark, Woodford Reserve, perhaps Buffalo Trace or Bulleit, and the standard Jim Beam. This is a very good start. (Also, hinting to wife and friends that “I’m trying new bourbons” around your birthday or Father’s Day inevitably gets you a few bottles as well!)

My go-to bourbon for Mint Juleps used to be Eagle Rare 10-year-old when it was around $32.99 a bottle. Now it’s up to $80! My latest go-to bourbon is 1792 Small Batch. At $29, it’s almost unbelievable, like someone made a mistake in the stock room! Very tasty on its own and great for mixing.

Finally, a Mint Julep needs a metal–not glass– Julep cup. Made of pewter or aluminum, it frosts on the outside as you stir your drink, keeping your beverage ice-cold on even the hottest of days.

3 oz. bourbon
1 oz. mint-infused simple syrup
crushed ice
Julep cup
Fresh mint for garnish

Crush the ice and pack it into the Julep cup, even letting it dome slightly over the top. Don’t worry…the alcohol will melt it.

I like to add 1.5 ounces of bourbon, then the ounce of simple syrup, another 1.5 ounces of bourbon on top, and then a quick squirt of simple syrup to top it off. Break off a few mint leaves from the stem and push them into the ice. A beautiful layer of frost will form on the outside of the cup. Add more ice, if necessary, and garnish with a sprig of mint.


A nice selection of bourbons. This is an old photo: that Pappy Van Winkle is long gone…but I saved the bottle!


So much bourbon, so little time!

I recently hosted about 15 hungry teenage friends of my daughter’s, all of whom belong to the high school theater group. They needed a place to hang out, rehearse, laugh, and, of course, eat! My baked ziti recipe is always a crowd pleaser. Ultimately, I used rigatoni pasta, because that’s what I had in the cupboard, but use whatever shape you like.

I also made it meat-free, keeping it safe for all to eat, but I usually make a meat sauce when cooking for myself.

As a teenager growing up on Long Island, I worked long hours at a local Italian restaurant called Pizza City East in Plainview. (The original Pizza City was in Ozone Park, Queens.) Though the pay sucked, I made some important friendships that have lasted to this day. I also learned many Italian cooking basics: how to open clams for red and white clam sauce, the secrets of great pizza dough, the art of a perfect espresso, and how to make massive quantities of baked ziti.

When I got older and I shared an apartment with my buddy, Don, we would regularly invite a large crowd of people over for a party, and a huge tray of baked ziti was an inexpensive and hugely popular way to feed a crowd that was doing some serious drinking.

The basic ingredients of baked ziti are the same as lasagna, the main difference being the wetness factor. If you make lasagna too wet, the thing will fall apart when you try to slice it. But baked ziti is meant to be sloppy, and it actually shines in its incredible gooiness!

My baked ziti consists of a meat sauce and 4 cheeses (ricotta, mozzarella, provolone, and Parmigiano Reggiano) using pasta that is boiled much firmer than al dente. Technically, I like to use penne, not ziti. It’s firmer, and really works well with this recipe. And there are plenty of great pasta choices out there for gluten-free diets. Our favorite brand of GF pasta is Garofalo.

I used to add a béchamel sauce to this recipe, but I’ve found that plain milk does the job just as well. Béchamel is better used in lasagna, where you want a bit of a thickening agent to keep it firm.

Gooey and delicious!

Meat Sauce…
1 small onion, finely chopped
1 small carrot, finely chopped
1 lb. grass-fed ground beef or pastured pork, or a combination of both
1 tablespoon dried parsley
2 teaspoons dried oregano
1 teaspoon dried basil
1 teaspoon salt
1 teaspoon granulated garlic
1/2 teaspoon black pepper
1 28-oz. can whole tomatoes
extra virgin olive oil for sautéing

Heat a tablespoon or 2 of olive oil in a large pan and sauté the onions until translucent. I finely chop the carrots by peeling them all the way down until there’s nothing but a pile of peeled pieces, then chopping them up so small, they almost melt into the sauce. Add the carrots and cook for 2 minutes. Add the beef (or pork) and cook the meat until it browns. Add the parsley, oregano, basil, salt, garlic and pepper and mix well.

Empty the can of tomatoes into a blender and blend it until smooth. Add this to the pan and mix well.

Cook the meat sauce for about 10 minutes, then remove it from the heat and set it aside.

Beautiful baked ziti!

4 slices provolone cheese (about 4 oz.), chopped
ricotta cheese (about 8 oz.)
mozzarella cheese, shredded (about 8 oz.)
2 tablespoons freshly grated Parmigiano Reggiano
1 cup whole milk
12 oz. small pasta, like ziti or penne

Pre-heat the oven to 350 degrees.

In a bowl, combine the provolone, ricotta, mozzarella (save a little bit to sprinkle on top at the end), Parmigiano Reggiano, and milk. Add this mixture to the meat sauce and mix well.

For baked ziti, I use a deeper pan than I would for lasagna, about 4″ deep.

Boil the pasta in a pot of salty boiling water until very firm…firmer than al dente. Drain the pasta and pour it into the pan. Add the cheese and sauce mix and mix it all really well.

Smooth the top of the ziti mix flat with the back of a large spoon, then sprinkle the remaining mozzarella evenly over the top. Sprinkle a little oregano on top, and place the pan in the oven to bake for 30 minutes, or until the mozzarella on top is a beautiful golden brown.

The best mac and cheese ever: baked ziti!

When my daughter hangs out with me, I always ask her what she wants me to cook for her, and there are a few “Dad” recipes that are her favorites. This is one of them, especially when fresh asparagus is available. And as any parent will tell you, if your kid is craving a dish that has vegetables in it, count yourself lucky–and make it!!
Prepping asparagus is easy, and you don’t need a knife to cut off the woody bottoms of the stalks. Simply bend the stalks at the bottom and they will naturally snap off at the right point.
4 mild Italian sausages, sliced into pieces 1/2″ thick
1 lb. penne pasta
1/2 onion, finely chopped
1 cup chopped fresh trumpet mushrooms (white button mushrooms work, too), optional
2 cups fresh asparagus, sliced into 1-inch pieces
1 clove garlic, passed through a garlic press
1 cup homemade chicken broth
6 fresh sage leaves, finely chopped
1/2 cup freshly grated Parmigiano Reggiano cheese
extra virgin olive oil
salt and pepper
Have the pasta water salted and boiling, and add the pasta, cooking until just a bit more undercooked than al dente.
Heat a large pan, and drizzle in some olive oil. Sauté the sausage pieces until browned and cooked through, but not overcooked. Remove the sausages from the pan and place them in a separate bowl. Remove all but 2 tablespoons of the fat left behind in the pan.
Place the pan back on stove and sauté the onion until translucent. Add the garlic, and sauté for 10 seconds. Add the sage, and saute for 10 seconds, stirring. Add the chopped mushrooms and saute for a few minutes, then add the chicken broth, and simmer until almost all the liquid has evaporated. Pour the contents of the pan into the bowl with the sausages.
Return the pan to the stove, add a little more olive oil, and on medium heat, sauté the asparagus pieces. Cook them until they are al dente, not too soft. Once the asparagus has reached this stage, return all the contents of the sausage/mushroom bowl to the pan to heat through. Drain the pasta, and add it to the pan as well, combining all the ingredients. If it looks too dry, add a little pasta water to the pan. Season with salt and pepper.
Make sure you serve this hot, with grated Parmigiano Reggiano on top, and drizzle lightly over the top with extra virgin olive oil.

There are some dishes I crave more than others, and Chinese shrimp and broccoli is one of them. But it’s really quite easy to make it at home, and it’s surprisingly low in calories if you’re really careful with the amount of oil you use. Oil is the biggest culprit when it comes to calories in Chinese cooking.

Second on the list of calorie culprits is rice. It looks innocent enough, but a cup of rice has 170 calories, and if you’re limiting yourself to a daily calorie count of 1500, like I am, that becomes pretty significant.

The good news is that shrimp is actually one of the lowest calorie foods you can buy, checking in at only 1 calorie per gram. Broccoli is also low in calories, so if you skip the rice, you can really eat your fill of this delicious dish.


I’ve come up with what I call my “Asian Mix,” which is a combination of five ingredients commonly found in the supermarket in the Asian food section. Add these to your shrimp and broccoli, and you will never need to leave home for really good Chinese food!

Asian Mix…
1 tablespoon soy sauce
1 tablespoon hoisin sauce
1 teaspoon rice vinegar (unseasoned)
1/2 teaspoon sesame oil
1/2 teaspoon chili garlic sauce

Combine these ingredients in a bowl, mixing well. Set aside.


1 small onion, chopped
2 cloves of garlic, finely chopped
1 or 2 large heads broccoli, chopped into smaller, similar-sized pieces
1 lb. wild-caught American shrimp, peeled and deveined
Asian Mix, as listed above
peanut oil

I prefer peanut oil when cooking Asian dishes.

Heat a non-stick pan and add 1 tablespoon of peanut oil to it. Add the chopped onion, and cook until translucent.

Add the chopped garlic and stir for about 10 seconds.

Add the chopped broccoli and cook until the broccoli turns bright green but stays crunchy.

Empty the pan out into a bowl and, without wiping the pan down, add the shrimp to the pan (no more oil!), returning it to the heat. Let the shrimp heat in the hot pan for 30–60 seconds on one side, then flip the shrimp over and let them heat through for 30–60 seconds on the other side. That’s all you need to cook them, unless they’re really large. Just keep flipping them until they’re pink and firm, but don’t overcook them.

Remove the pan from the heat, and add a tablespoon of the Asian Mix to the shrimp, tossing them around to coat them with it. Don’t let them burn!

Now bring back the onions, garlic, and broccoli to the shrimp in the pan, tossing everything together, and adding more of the Asian Mix until everything is nicely coated.


Serve immediately…over rice or not!


This is one of my favorites because it not only tastes amazing, it freezes really well.

My original banana bread recipe blog is featured directly below. It’s awesome. But if you follow a gluten-free lifestyle, no worries. My gluten-free version of the recipe, at the bottom of the page, is so good, you won’t miss the wheat!


A gluten-free batch.


The original recipe…

What makes this banana bread special is that it uses whole wheat flour…less sugar…and no artificial extracts that make most banana breads taste like crap. It relies on very ripe bananas to give it its wonderful natural flavor.

It’s not always easy to get bananas to ripen exactly when you’re trying to make your banana bread recipe. So I buy a large bunch of bananas and let them get very ripe at room temperature. I then take 5 at a time (for this recipe), peel them, and place the bananas in a Ziploc bag in the freezer. When it’s time to make banana bread, I just pull one of those Ziplocs out of the freezer, let it thaw, and mash with a potato masher.

Since Roundup is a very common herbicide used on wheat, and its cancer-causing characteristics are widely known by now, I always use organic wheat for my baking recipes.

I use organic cane sugar instead of regular sugar when I have it. I don’t use vegetable oils, especially not canola, so I use healthier avocado oil or olive oil. Eggs are pastured when I can get ’em. Bananas are organic. And I rub the pans with coconut oil or I use an olive oil cooking spray.


Nana bread blog


3 cups all-purpose flour
1/2 cup whole wheat flour
2 tsp baking soda
1/2 tsp salt
1 1/4 cup sugar
3/4 cup vegetable oil
2 eggs
5 medium-sized bananas, peeled and mashed
2 tsp real vanilla extract
Cooking spray

Pre-heat the oven to 350 degrees.

Combine the all-purpose flour, whole wheat flour, baking soda and salt in a medium bowl. Set it aside. (For a less rustic bread, simply substitute more all purpose flour for the whole wheat flour.)

Combine the sugar and oil in a mixing bowl and mix at medium speed for 2 minutes. (I use the whisk attachment.) Add the eggs, one at a time. Beat until the mixture is light and lemon colored.

With the mixer running at low-speed, add the flour mixture alternately with the bananas, beginning and ending with the flour mixture. Blend well after each addition. Add the vanilla extract and blend some more to mix.

Pour the batter into 2 loaf pans that have been sprayed with cooking spray. Bake for 45 minutes or until a wooden pick inserted in the center comes out clean. Cool 15 minutes in the loaf pan on a wire rack. A bundt pan works as well.

Remove the loaves from the pans and let them cool completely on the wire rack before slicing.


image


The gluten-free recipe…

My go-to gluten-free flour is the brand called Cup 4 Cup. You can find it in most supermarkets. They also offer a more rustic version they call “Wholesome Flour,” which is made mostly of rice. I found that the two combined worked really well for a rustic, chewy texture much like whole wheat.


image


3 cups Cup4Cup all-purpose gluten-free flour
1 cup Cup4Cup Wholesome Flour
2 teaspoons baking soda
1/2 teaspoon salt
1 1/4 cup cane sugar
3/4 cup avocado or olive oil
2 eggs
5 medium-sized bananas, peeled and mashed
2 teaspoons real vanilla extract
coconut oil


Pre-heat the oven to 350 degrees.

Combine the flour, baking soda and salt in a bowl. Set aside.

Combine the sugar and oil in a mixing bowl and mix at medium speed for 2 minutes. (I use the whisk attachment.) Add the eggs, one at a time. Beat until the mixture is light and lemon colored.

With the mixer running at low-speed, add the flour mixture alternately with the bananas, beginning and ending with the flour mixture. Blend well after each addition. Add the vanilla extract and blend some more to mix.

Pour the batter into 2 loaf pans or one large bundt pan that have been rubbed with the coconut oil. Bake for 45–60 minutes or until a wooden toothpick inserted in the center comes out clean. Cool 15 minutes in the pan on a wire rack.

Remove the bread from the pan and let it cool completely on the wire rack before slicing.


Gluten-free and delicious!