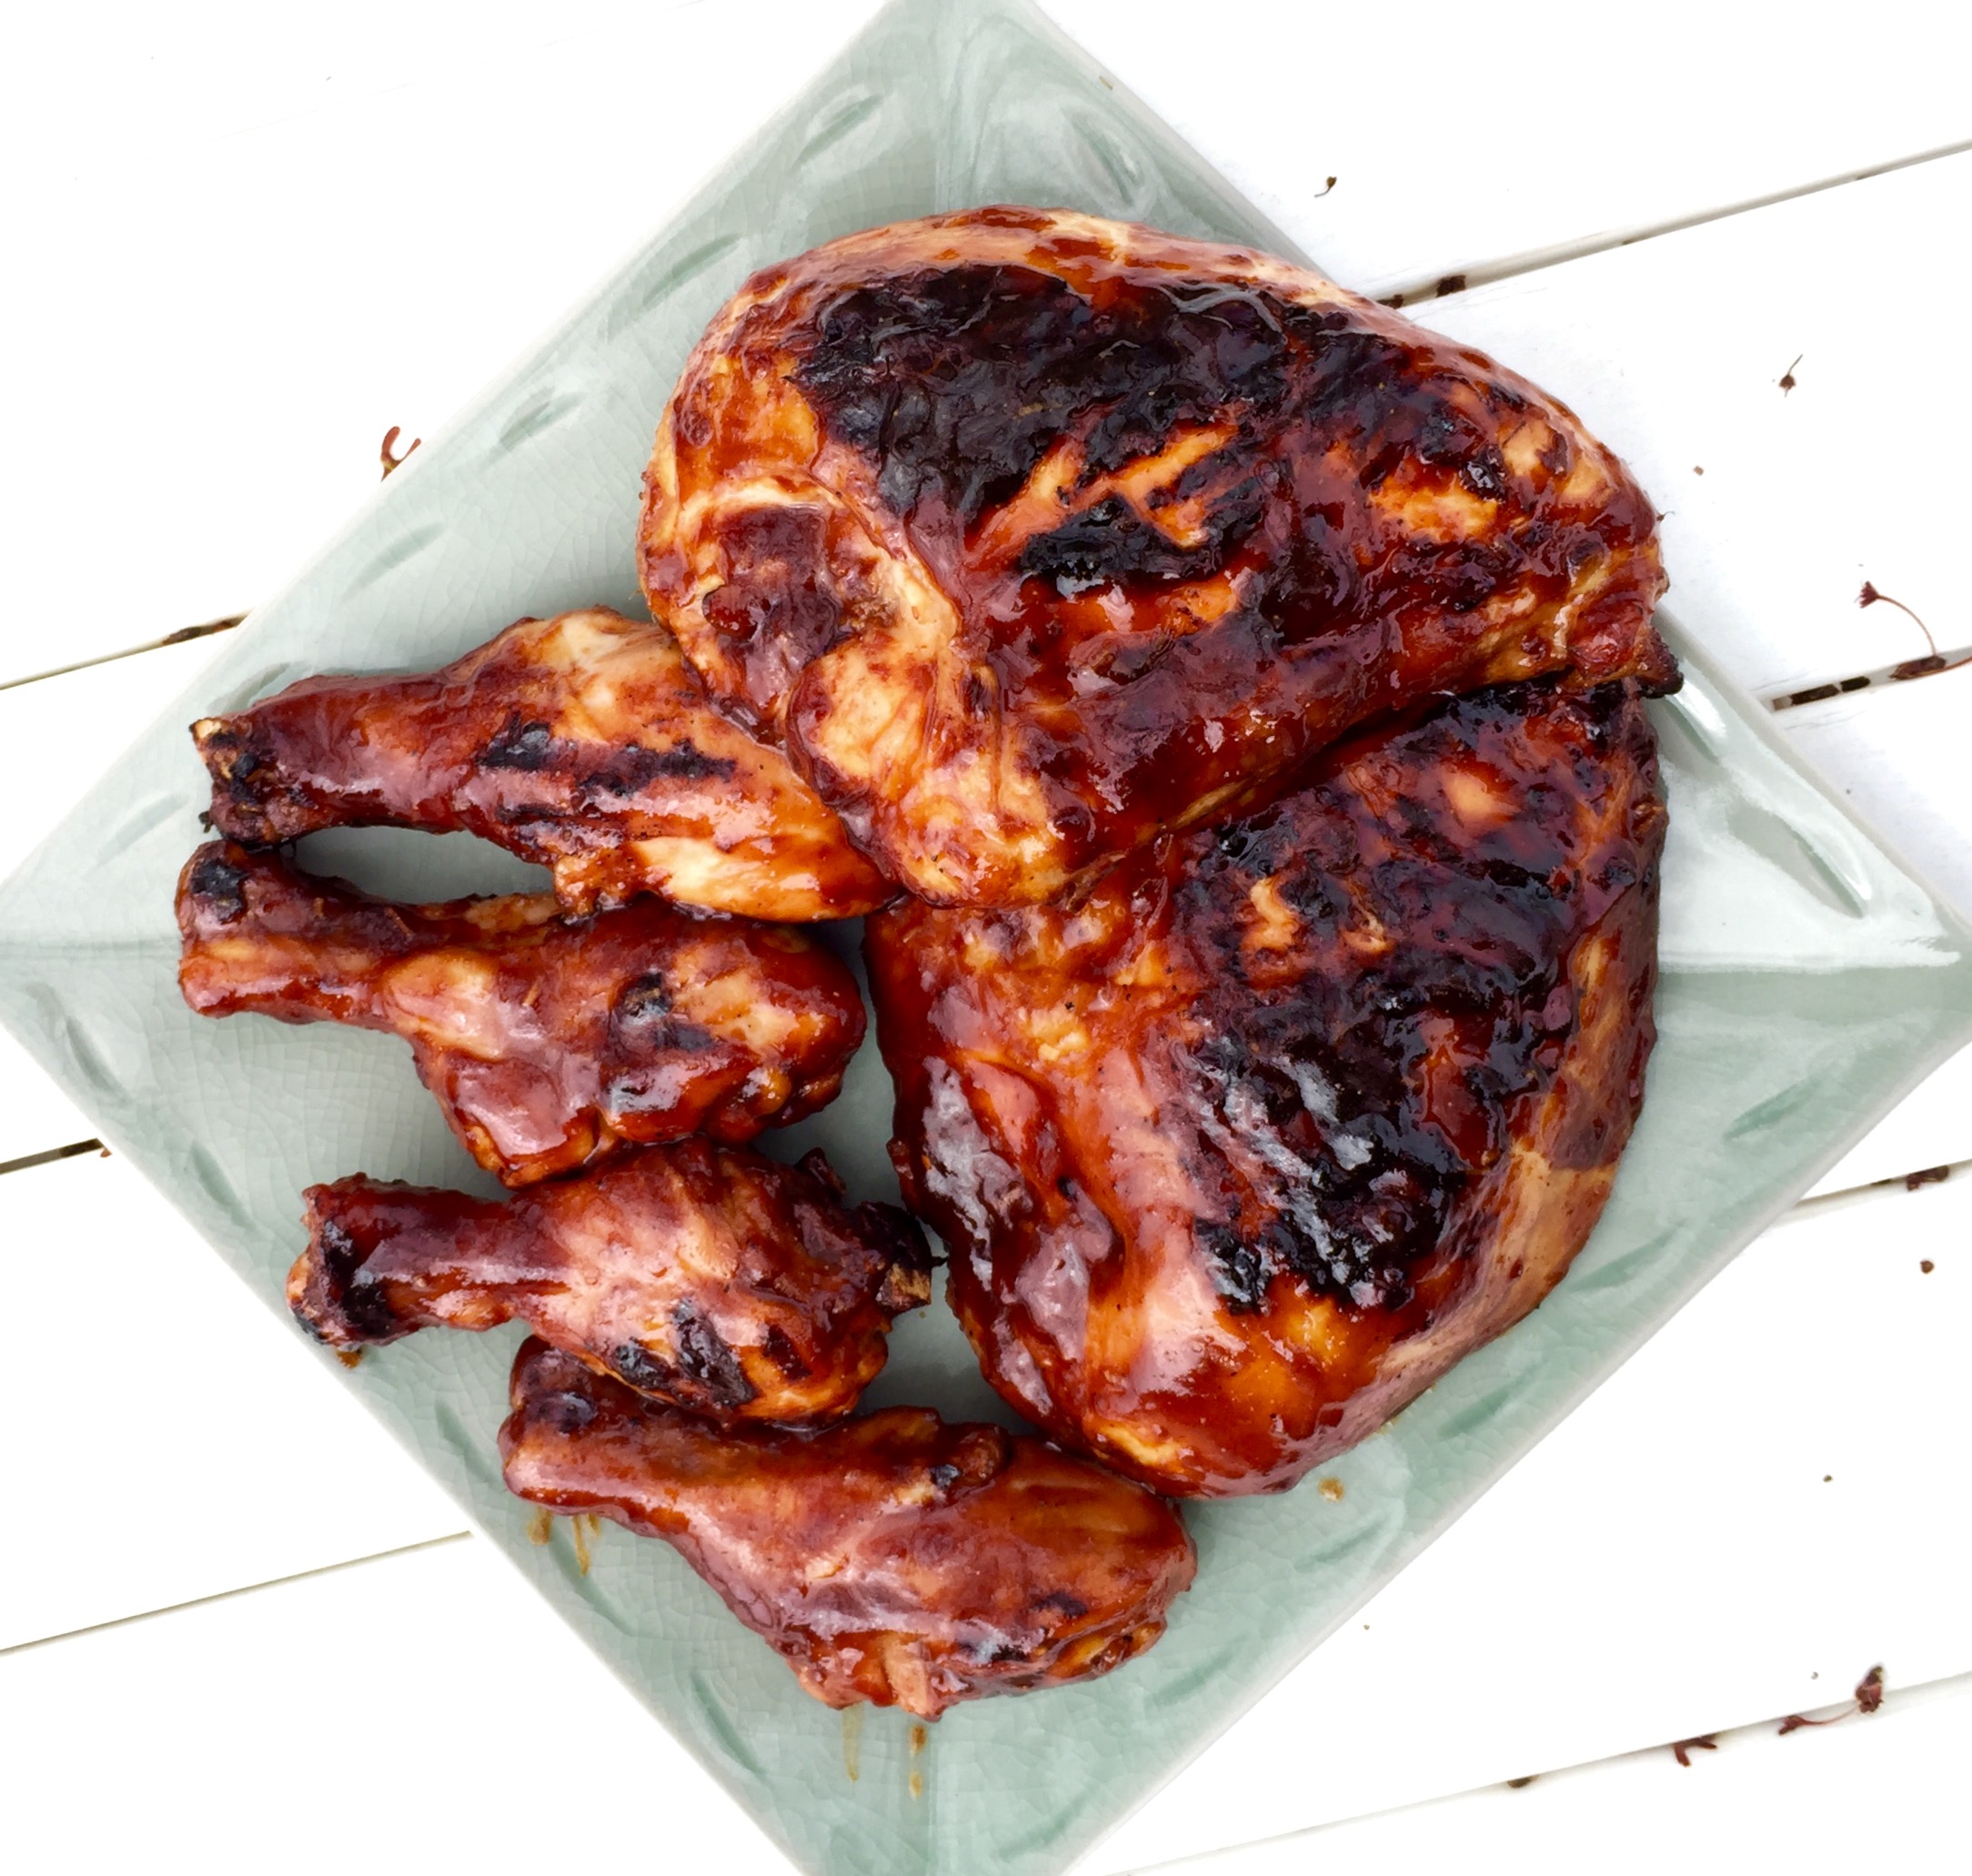
Bulgogi is the name given to the most common form of Korean barbecue. Unlike the daeji bulgogi that I cooked in a previous blog, this one is not based on a chili sauce that can take the roof of your mouth right off.

I used chicken, though this would work with pork as well, and for the best flavor, it’s best to marinate the meat in the fridge overnight.

FullSizeRender (12)

2/3 cup soy sauce
1/2 cup chopped scallions
6 tablespoons sugar (I use organic cane sugar)
5 tablespoons fresh garlic, grated or through a garlic press
5 tablespoons sesame oil
1 tablespoon sesame seeds
1 teaspoon black pepper
5 lbs. chicken pieces (skin-on thighs work best)


Combine all the ingredients except for the chicken in a bowl and mix well.

Place the chicken pieces in a large Ziploc bag and pour the marinade in. Seal the bag well and squish it around to make sure the marinade makes contact with the chicken. Place the bag in a bowl (to prevent accidental leakage) and keep it in the fridge overnight. Squish the bag around every few hours to make sure the marinade does its job.

When ready to cook the next day, pre-heat the oven to 350 and remove the bag from the fridge and let it come to room temperature. Place the chicken on a sheet pan (discard the remaining marinade) and bake for an hour.

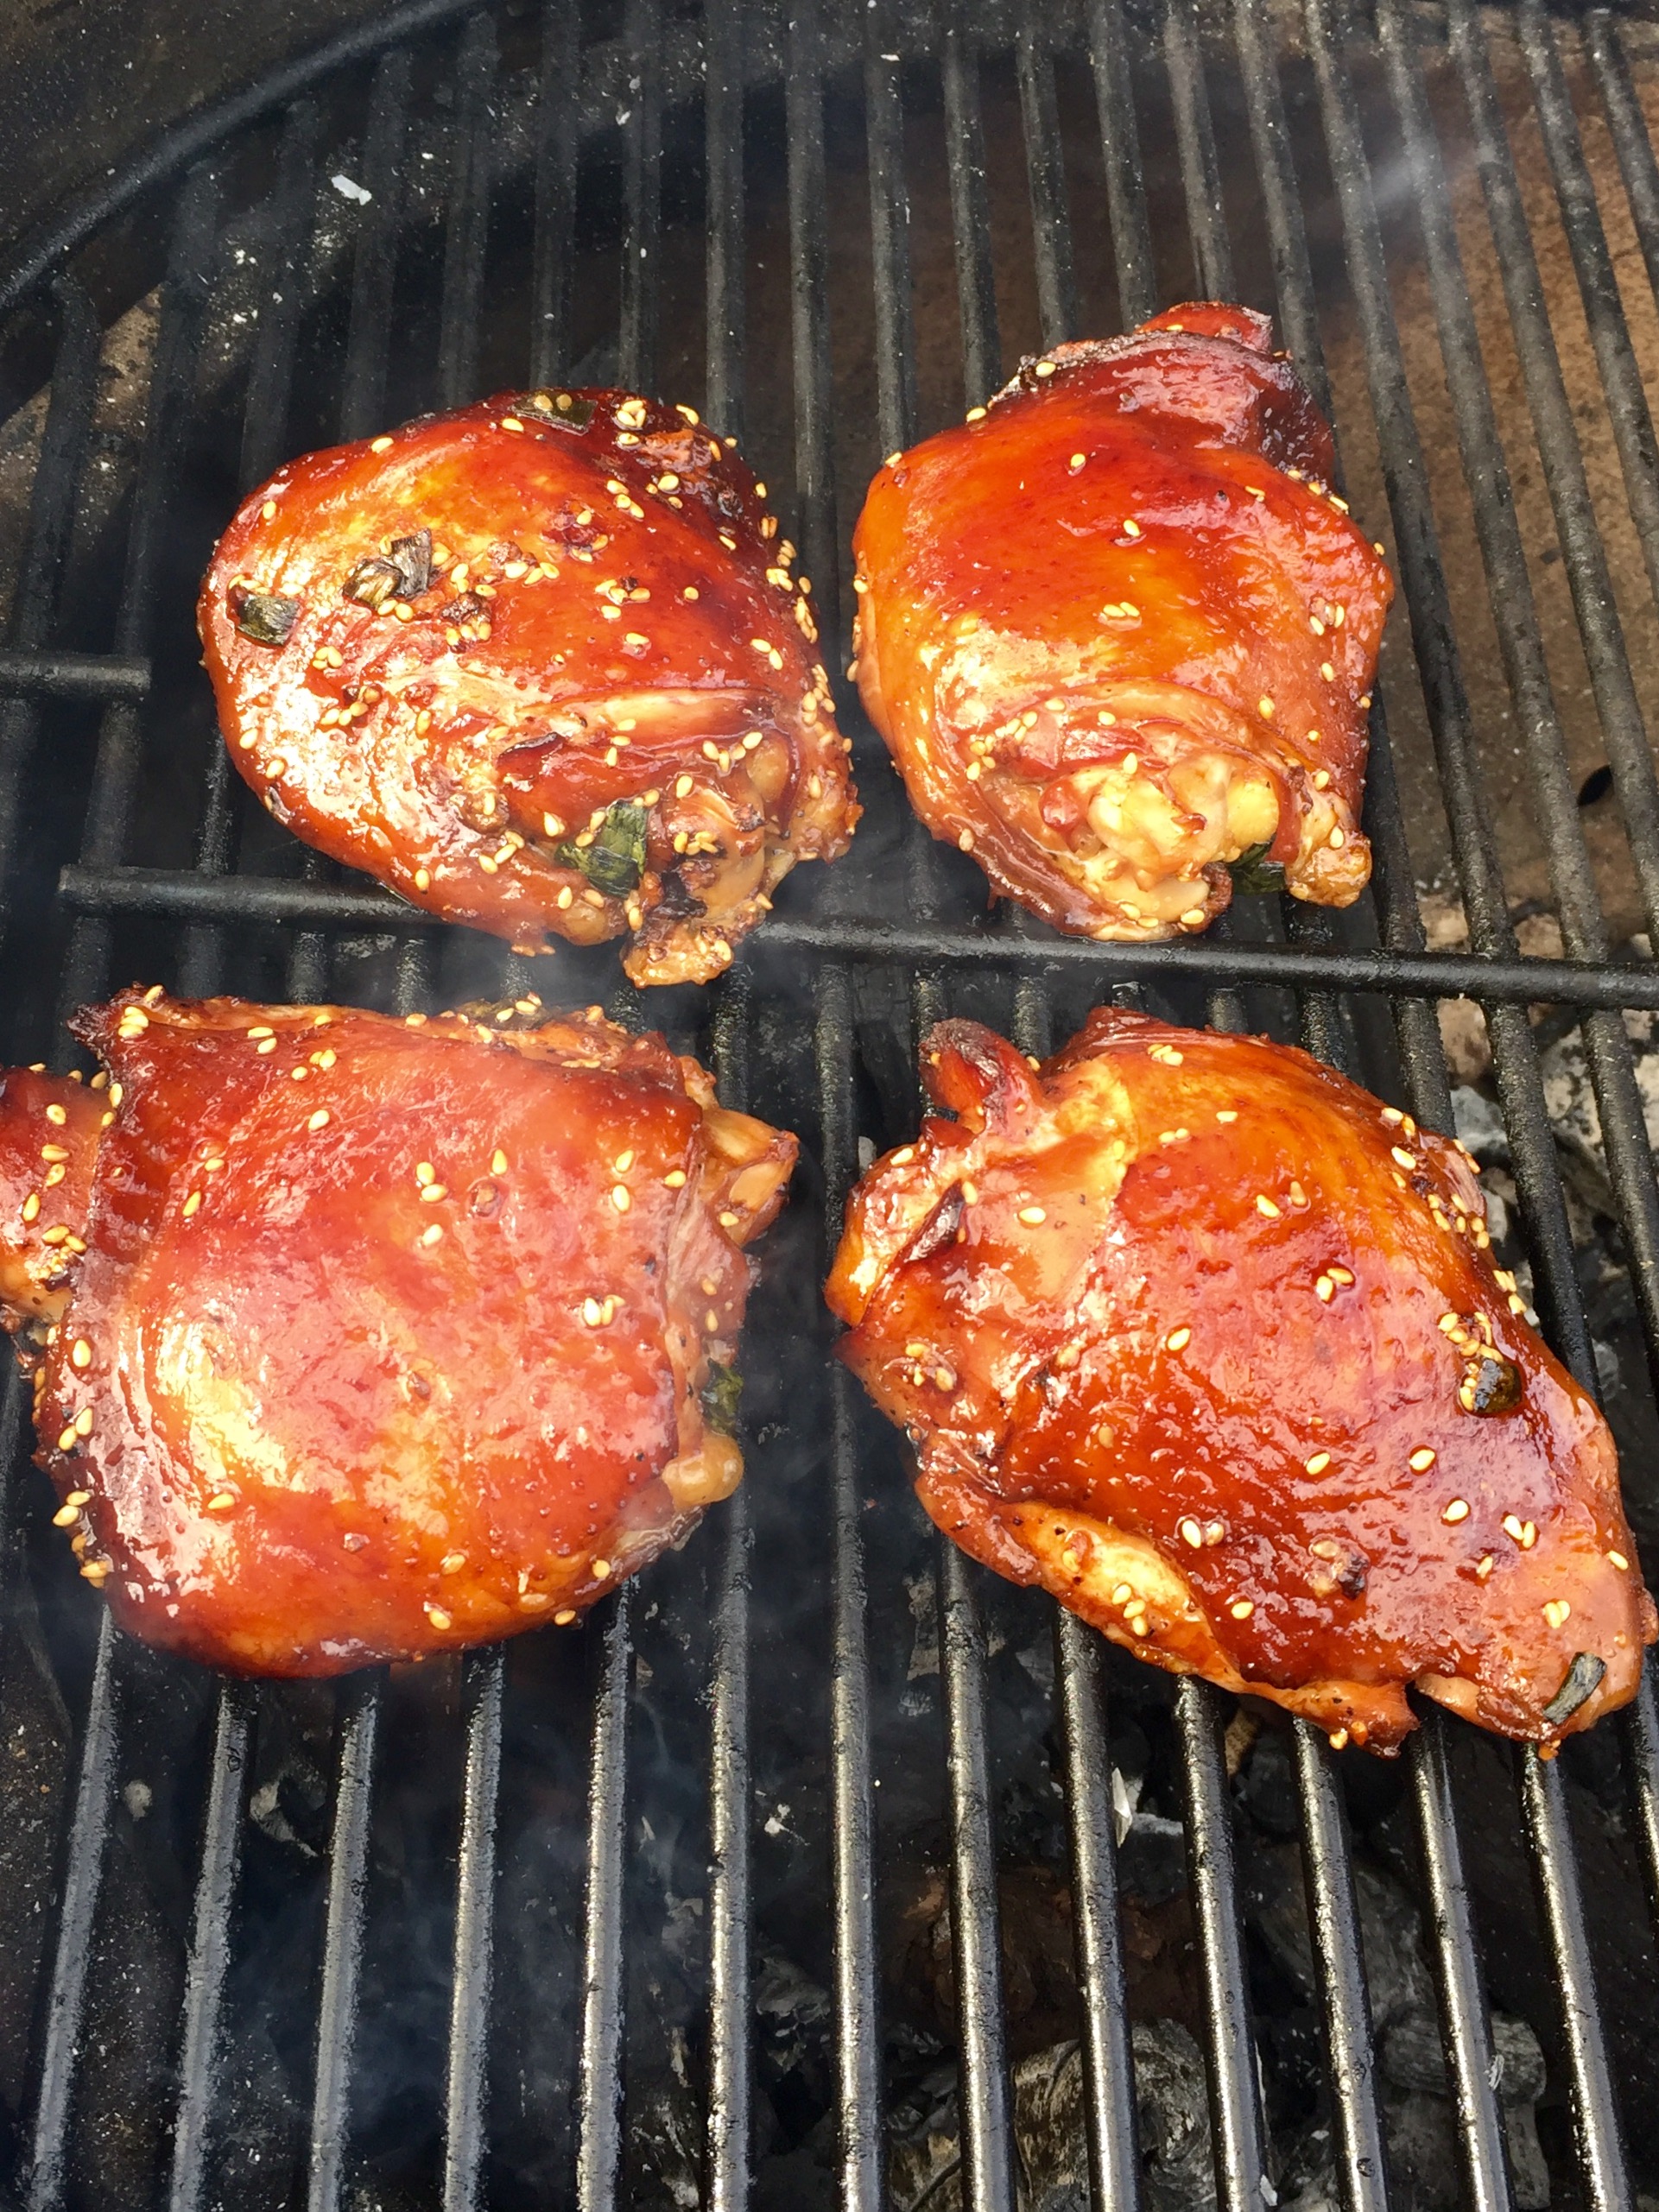
Light a hot grill and push the coals to one side of the grill. Place the chicken pieces on the cool side of the grill and close the lid, opening the vents. Every few minutes, turn the chicken pieces over so they get nice grill marks but
don’t burn.


FullSizeRender (11)

There are very few sandwiches more perfect than the BLT, and I would be a fool to try to improve on it. Freshly toasted bread, a slathering of mayo (Hellman’s only, of course), crisp lettuce, fresh juicy sliced tomato, and my own homemade bacon. What could be better?

I recently tried my hand at smoking and slow-roasting a huge slab of grass-fed beef brisket, and it came out beautifully. Rich and smoky, there was far too much of it for a mere mortal like myself to polish it off, even if I ate it for days in a row. So I cut the brisket into more manageable sized slabs, wrapped them and placed them in the freezer.


beef brisket


I took one of those slabs out of the freezer the other day, and noticed that, with the grain of the meat and fat, it resembled bacon. And then it dawned on me: I could slice it like thick-cut bacon, fry it in a pan, and make my own BLT with it: a Brisket, Lettuce and Tomato Sandwich!


steakon!


The end result was fantastic. Quite different than the infamous BLT, but a beefy winner in its own right.


Alz BLT: Brisket, Lettuce and Tomato

Alz BLT: Brisket, Lettuce and Tomato

I’ve always been fascinated by Korean barbecue. Every time I see it on TV or catch a recipe on an e-mail blast, my mouth waters and I say to myself that I’ve got to experience it some day. But the painful reality is: Korean barbecue can be really spicy…and I’m a total wuss.

Korean barbecue 101: Gogigui means “meat roast” in Korean, and it refers to the method of roasting beef, pork, chicken, and other meats. Meats can be marinated or not. Bulgogi is the name of the most common Korean barbecue. Meat is marinated with soy sauce, sugar, sesame oil, garlic and pepper, and then grilled. Galbi uses beef short ribs, and adds onions to the marinade. And the hot stuff is daeji bulgogi, because the marinade isn’t soy sauce-based, but based on the hot-n-spicy Korean chili paste known as gochujang.

All of the marinades looked delicious, but the hot one with gochujang would be my biggest challenge, so I decided to start there. I found a great recipe, and quickly realized that I would have to turn the heat way down if I was actually going to try to eat it! For example, the original recipe called for 2 tablespoons of white pepper. I totally left it out. And it called for a full cup of gochujang. Not only did I cut that part in half, I doubled many of the other non-spicy ingredients.

So is it authentic Korean barbecue? Probably not. But it’s my version of it. It’s got lots of flavor and still carries a bit of heat.

For gluten-free diets: finding GF hoisin and soy sauce is easy. Look for the La Choy brand. But I haven’t been able to find gochujang that has a GF label.


image


3/4 cup ketchup
1/2 cup gochujang
1/2 cup hoisin sauce (I use gluten-free hoisin)
1/2 cup honey
1/2 cup soy sauce
1/4 cup brown sugar
2 tablespoons freshly grated ginger
1 tablespoon freshly grated garlic (I use a garlic press)
1 tablespoon unseasoned rice vinegar
4 lbs. chicken pieces


Pre-heat the oven to 500 or its top temperature.

In a bowl, mix everything but the chicken pieces. Brush the sauce onto the chicken pieces, then wrap them in aluminum foil. (I like to tear a long piece of aluminum foil and lay it on top of a sheet pan. I place the chicken pieces on the foil, brush them with sauce on all sides, then fold the foil over the chicken, making one large pouch that holds all the meat.) Leave the pouch on the sheet pan and place it in the oven. Lower the oven temp to 350.

Cook the chicken for about an hour, making sure it’s almost completely cooked. Juices should run clear, not bloody, when you poke it with a fork.

Start a hardwood fire on your grill. Push the coals to one side of the grill so you have a hot side and a cooler side with no coals underneath it. Place the chicken pieces on the cool side of the grill (if you put it on the hot side, it will stick and burn), brush with more sauce, and put the lid on the grill, making sure you have the vents open for air circulation.

image

See those 2 black bits in the foreground? That’s where the chicken stuck to the grill because I placed them over the hot coals. Don’t do that.

After a few minutes, lift the lid, flip the chicken pieces over, brush them with sauce again, and close the lid. Keep doing this until the chicken is nice and caramelized, with tasty grill marks.

If you want to serve some of the sauce on the side, it’s important to pour some of the sauce off and set it aside in the very beginning, so you’re not using the same sauce that the basting brush touched the raw chicken with.


The asparagus bed is winding down for the season in the home garden right now. Like tomatoes, asparagus is at its very best at the peak of the season, and I don’t really want to eat it in the off-season, when it comes from South America, all dried up and tasting like twigs. So now is my last opportunity to gorge!
But that doesn’t mean that I don’t want variety! It’s great straight out of the garden, or served raw in a salad. It’s delicious pickled, or simply tossed in olive and baked in the oven. But here’s a recipe that’s one of my family’s favorites…
4 mild Italian sausages, sliced into pieces 1/2″ thick
1 lb. penne pasta
1/2 onion, finely chopped
1 cup chopped fresh trumpet mushrooms (white button mushrooms work, too)
2 cups fresh asparagus, sliced into 1-inch pieces
1 clove garlic, passed through a garlic press
1 cup homemade chicken broth
6 fresh sage leaves, finely chopped
1/2 cup freshly grated Parmigiano Reggiano cheese
extra virgin olive oil
salt and pepper
Have the pasta water boiling, and add the pasta, cooking until just a bit more undercooked than al dente.
Heat a large pan, and drizzle in some olive oil. Saute the sausage pieces until browned and cooked through, but not over cooked. Remove the sausages from the pan and place them in a separate bowl. Remove all but 2 tablespoons of the fat left behind in the pan.
Place the pan back on stove and saute the onion until translucent. Add the garlic, and saute for 10 seconds. Add the sage, and saute for 10 seconds, stirring. Add the chopped mushrooms and saute for a few minutes, then add the chicken broth, and simmer until almost all the liquid has evaporated. Pour the contents of the pan into the bowl with the sausages.
Return the pan to the stove, add a little more olive oil, and on medium heat, saute the asparagus pieces. Cook them until they are al dente, not too soft. Once the asparagus has reached this stage, return all the contents of the sausage/mushroom bowl to the pan to heat through. Drain the pasta, and add it to the pan as well, combining all the ingredients. If it looks too dry, add a little pasta water to the pan. Season with salt and pepper.
Make sure you serve this hot, with grated Parmigiano Reggiano on top, and drizzle lightly over the top with extra virgin olive oil.


CHIVE TALKIN’

Posted: May 24, 2018 in Food, garden, pizza, Uncategorized
Tags: , , , , ,

This is the time of year when the chives in my herb garden are busting out with blossoms. Before they pop, I head out every few days and snip the larger ones off the chive plants with about 3 inches of the green stem, wrap them in freezer bags and freeze them.


image


I use those blossoms over the course of the year on a variety of dishes, but they really shine on my signature marinated beef and chive blossom pizza. I just take a packet of chive blossoms out of the freezer, and sauté them lightly in olive oil and salt and pepper, then sprinkle them on the pizza before baking.


My signature marinated beef tenderloin and chive blossom pizza.

My signature marinated beef tenderloin and chive blossom pizza.


Pick 'em and freeze 'em in May!

Pick ’em and freeze ’em in May!

Chive blossoms not only add great flavor, but they look cool on the plate, too.  I’ll add them as a side to almost any meat dish, or chop them after sauteing and sprinkle them in rice or quinoa.


When asparagus is in season, it’s time to gorge. I’ve got it growing in my yard, and the patch gets bigger and happier every year with minimal maintenance…definitely one of those veggies every lazy gardener should grow.

I love it raw, chopped into salads, pickled, oven-roasted, and in pasta dishes. This is a great side dish with any main course slab of meat.


image

1 lb. fresh asparagus spears
1 tablespoon butter
2 tablespoons olive oil
3/4 cup grated Parmigiano Reggiano cheese
salt and pepper

The easy way to trim asparagus spears is to grab the thicker end between two fingers and bend it. It will snap at the point where the tough part ends and the softer, edible part begins. Toss the bottoms into your compost pile.

Heat the butter and oil in a pan and then add the asparagus spears. Cook over medium heat for about 5 minutes, until al dente. You don’t want them mushy.

While the asparagus is still in the pan, sprinkle the Parmigiano Reggiano on top, letting it melt a bit. Season with salt and pepper.

That’s it! With fresh garden asparagus, it’s all you need! I ate this batch right out of the pan!


My coffee steak rub is awesome. I wanted to take it to the next level. So, when my buddies and I gathered recently for a “boys’ weekend” at Saule, our rental home in Little Compton, RI (http://www.sauleri.com. You can find it listed at Homeaway.com), it was time to put it to the test with a low-and-slow smoked beef brisket!

Depending on the size of the brisket, you might need to double the recipe.


Low and slow is the way to go! Deliciously smokey and juicy.


3 tablespoons brown sugar
1 tablespoon Kosher salt
1 tablespoon ground coffee (use your favorite)
1 teaspoon granulated garlic
1 teaspoon granulated onion
1 teaspoon unsweetened cocoa powder

If the brisket is frozen, I like to thaw it a couple of days ahead of cooking it, rubbing it down with the coffee rub, and placing it in the fridge for about 24 hours to rest. I bring it out about an hour before smoking, to let the meat come back to room temperature, and then I place it in the smoker for about 12 hours at 225 degrees, smoking it with hickory wood.

When it’s done, remove it from the smoker, and wrap in foil and let it rest at least 30 minutes before slicing diagonally against the grain of the meat.

The home garden is already showing signs of activity. Overwintered kale and arugula plants are springing back to life, enough for a quick salad. Cool weather seeds that I’ve sown early: peas, turnips, radishes, broccoli raab, and others are sprouting. But nothing says the gardening season is here like my patch of homegrown asparagus taking off!

asparagus2013

Asparagus is really easy to grow. You just need the space, and the plants practically do the rest. Space them about a foot apart, and before you know it, you will have a vast network of tasty stalks sprouting through the soil every spring. They are so much better than anything you can buy in a supermarket.
In the start of the growing season, the stalks don’t even make it into the house. I cut them and just eat them straight out of the garden. Eventually, they make the move to the kitchen, where I love to simply place them on a baking sheet and drizzle a little olive oil over them. Salt and pepper…and then in a 400-degree oven until they’ve caramelized.

Sometimes I toss some tasty chives with blossom buds on top of the asparagus and roast.


Midway through the season, I have so much asparagus that I just don’t know what to do with them all. My friends don’t want anymore and I can’t bear to throw them into the compost pile. So I pickle them…a really easy process that ensures I’ve got delicious asparagus year-round.

PICKLED ASPARAGUS
Several bunches of asparagus spears
2 cups white vinegar
1 cup cider vinegar
1 1/2 cups sugar
3 cups water
20 peppercorns
Garlic cloves, peeled
Salt (1 teaspoon per quart-sized Mason jar. Use less for smaller jars.)
Bring the vinegar, water, sugar and peppercorns to a boil. Set it aside.
Trim the bottom of the asparagus spears so that the spears are just slightly shorter than the height of the quart-sized Mason jar you will use. Or cut them into pieces that will fit smaller jars.
Pack the jars as tightly as you can with the asparagus spears. (They will shrink when processed.) Add the garlic clove and 1 teaspoon of salt to every quart-sized Mason jar…less for smaller jars.
Fill the jars with the vinegar mixture and seal.
Process the jars for 10 minutes. Let them cool before placing them in the refrigerator.

 WHY DOES YOUR PEE SMELL WHEN YOU EAT ASPARAGUS?

Asparagus contains a sulfur compound called mercaptan. It’s also found in onions, garlic, rotten eggs, and in the secretions of skunks. The signature smell occurs when this substance is broken down in your digestive system. Not all people have the gene for the enzyme that breaks down mercaptan, so some people can eat all the asparagus they want without stinking up the place. One study published in the British Journal of Clinical Pharmacology found that only 46 percent of British people tested produced the odor while 100 percent of French people tested did. (It has to do with your DNA.)

There’s something magical about a simple plate of spaghetti and meatballs. When my parents took me to an Italian restaurant as a child, a plate of spaghetti and meatballs made me feel like the luckiest kid on the planet. And even now, when I prepare a plate of spaghetti and meatballs for my daughter, she can’t wait to sit down at the dinner table. She’s so busy shoveling the food into her mouth, she can’t even speak. I just get a quick thumbs-up between bites…and breaths!


meatballs


Great meatballs start with great meat. I always use 80/20 grass-fed beef. I don’t use a ton of breadcrumbs as filler. And the tomato sauce is homemade as well, from canned tomatoes. I start with the sauce…


B.F.I.M. SAUCE

Inspired by a lovely but large Italian lady I once knew, my Big Fat Italian Mama sauce works well with this hearty dish.


1 medium onion, finely chopped
2 cloves garlic, through a press
1/2 cup extra virgin olive oil
10 cups ground and peeled tomatoes…or 3 cans (28 oz.) tomatoes pureed in food processor
2 teaspoons each: dried oregano, basil and parsley
3/4 teaspoon each anise seed and fennel seed
1 1/2 teaspoons salt
1/2 teaspoon black pepper
2 bay leaves
1 small can (6 oz.) tomato paste
1 teaspoon sugar (optional)


Heat the olive oil in a large pot and add the onions. Cook until the onions are translucent, then add the garlic. Stir for 10 seconds.

Add the tomatoes and cook on high until the orange foam disappears, stirring frequently. Don’t let it burn.

Add the oregano, basil, parsley, anise seed, fennel seed, salt and pepper, bay leaves and tomato paste. Allow the sauce to just come to a boil so that the tomato paste reaches optimum thickening power.

Reduce the heat to a simmer and cook for at least an hour, until the sauce reaches the desired consistency. Stir often.


While the sauce is cooking, I start the meatballs…


2 lbs. grass-fed ground beef
1 cup plain breadcrumbs (gluten-free breadcrumbs work well, too)
2 tablespoons dried parsley
2 tablespoons dried oregano
1 tablespoon dried basil
1 tablespoon granulated garlic
1 tablespoon onion powder
1 teaspoon black pepper
2 teaspoons salt
2 eggs, cracked and scrambled
1/2 cup extra virgin olive oil

Mix all the ingredients, except the olive oil, thoroughly but gently in a large bowl. Don’t overwork it.

Pour some olive oil a medium-hot pan (don’t let it burn), make the meatballs, and sear them on all sides until brown.

When the meatballs are nice and brown, place them into the pot of sauce, making sure they are covered. Pour all the little bits and the olive oil from the pan into the sauce as well! Great flavor there.

Cover the pot and cook the meatballs in the sauce on low for a few hours.

Serve the meatballs and sauce over your favorite pasta, and sprinkle with freshly grated Parmigiano Reggiano.


Making this dish gluten-free is easy: use gluten-free pasta (we love the products from Garofalo) and use GF breadcrumbs in the meatballs. I prefer to buy gluten-free loaves of bread, toasting them, letting the slices cool, then tossing them in a food processor to make breadcrumbs. The flavor is as good as regular breadcrumbs!


I love onion dip, and really good onion dip is hard to find…you’ve got to make it. It’s not difficult to do, and it’s worth the effort.

I recently hosted a boys’ weekend at Saule, our rental home in Little Compton, Rhode Island, (www.sauleri.com. It’s listed at Home Away.com), and made a massive amount of this onion dip. It vanished. Great with chips or veggies.

2 tablespoons olive oil
1 1/2 cups diced sweet onions
1/4 teaspoon salt
1 1/2 cups sour cream
3/4 cup mayonnaise
1/4 teaspoon granulated garlic
1/4 teaspoon white pepper
1/2 teaspoon salt
chopped chives, to garnish


In a saute pan over medium heat, salute the onions in the olive oil and salt until they are soft and barely caramelized, about 15 minutes. Remove them from the heat and set them aside to cool to room temperature.

In a bowl, combine the rest of the ingredients except the chives, then add the cooled onions and mix well.

Refrigerate the dip and stir again before serving. Sprinkle the chopped chives on top to garnish.