Archive for the ‘Carnivore!’ Category

There’s still time to get all the ingredients that will make your Super Bowl party over the top!

Here are some links to my favorite recipes. All of them work really well when you want to feed a large group of hungry people, no matter what team they’re rooting for!

I’ve included classic chicken wing recipes, delicious ribs (without the need of a smoker or grill), classic Italian dishes, seafood and more.


CHICKEN WINGS AND DRUMSTICKS…

HONEY GLAZED CHICKEN WINGS

SPICY BRINED AND GRILLED CHICKEN WINGS

ASIAN STYLE CHICKEN WINGS

“MEXICAN” CHICKEN WINGS


PORK RIBS…

CHINESE STYLE HONEY RIBS FOR THE BIG GAME


BEEF RIBS…

KONA BEEF RIBS


SHRIMP COCKTAIL WITH SAUCE…

PERFECT SHRIMP COCKTAIL, FROM BOIL TO SAUCE


FRIED SHRIMP…

FANTASTIC FRIED SHRIMP


LASAGNA AND BAKED ZITI…

LASAGNA AND ITS COUSIN, BAKED ZITI


ASIAN NOODLES…GREAT HOT OR COLD

ASIAN NOODLES WITH PEANUT SAUCE


OYSTERS…

OYSTERS ROCK-A-FELLOW (IMPROVED!)


I really love the deep flavor of soy sauce and the sweetness of hoisin on poultry. Peking duck is the best example of this, but since I live in Rhode Island, I don’t get a chance to jump in the car and drive to Chinatown in Boston or New York at the drop of a hat. I had to come up with a plan B…and a good plan B!

I found it while looking through an old Chinese cookbook I had bought many years ago. Written by legendary NY Times food critic Craig Claiborne and Virginia Lee, “The Chinese Cookbook” has become my bible for all of my Asian dishes.

I use chicken instead of duck. It’s cheaper, easier to find, and I can easily buy a whole pasture-raised chicken from local farms here in Rhode Island. But it is just as delicious.

As long as you use gluten-free soy sauce and hoisin sauce (La Choy and Kikkoman make them and they’re found in just about any supermarket), this recipe is gluten-free.


Cantonese chicken


1 whole chicken, about 6 lbs., or 2 smaller chickens (pictured)
1 tablespoon peanut oil
1 tablespoon soy sauce
4 teaspoons Chinese five spice powder
2 teaspoons granulated garlic
2 teaspoons salt
1/2 teaspoon black pepper
6 tablespoons hoisin sauce
2 teaspoons sesame oil


Remove all the giblets from the chicken and discard. Rub the soy sauce first all over the chicken. (The chicken will absorb the flavors better if you do it before you rub the bird with the oil.) Then rub the peanut oil all over the chicken.

Combine the Chinese five spice, garlic, salt and pepper in a bowl. Season the entire chicken, including inside the cavity, with this mixture.

Pre-heat the oven to 325 degrees. Place the chicken in a pan lined with aluminum foil (cleanup will be easier) and bake.

Meanwhile, combine the hoisin sauce and sesame oil in a small bowl. When the chicken is about 15 minutes away from being done, brush it with the hoisin/sesame oil mixture. Cook it another 15 minutes until the chicken has a nice dark glaze. Don’t let it burn!

Let it rest about 15 minutes before carving.


I love pastrami. I love ribs. So why can’t the two get along? (Using my best announcer voice): Well now they can!!

I’ve seen a few recipes that use pastrami ingredients on foods other than pastrami and I thought it could work with pork ribs as well. I was right. And for these ribs, you don’t need a smoker or anything like that. They bake in the oven, then get finished under a broiler for that tasty char that you always look for in a grilled rib.

There’s a 2-step process to making these ribs. First, you combine the rub ingredients and let the ribs hang out in the fridge overnight. Then you bake them and broil them the next day, brushing a special sauce on them.

I prefer St. Louis-style ribs because they cook more evenly and have lots of meat. I prefer a heritage breed like Berkshire pork (also known as kurobuta) because of it has fantastic flavor, “good” fat, and is humanely raised.

Time to get ribbin’…


1/4 cup freshly ground black pepper
1 tablespoon ground coriander
1 tablespoon light brown sugar
1 tablespoon mustard powder
1 tablespoon paprika
1/4 teaspoon cayenne pepper
1/4 cup distilled white vinegar
2 tablespoons salt
2 racks St. Louis-style pork spare ribs (about 5 lbs.), preferably Berkshire pork

To make the rub, combine the black pepper, coriander, brown sugar, mustard powder, paprika and cayenne in a bowl. Mix well. To grind larger amounts of pepper and other spices, I use a small coffee grinder that I keep just for spices. It does the job quickly and easily.

My spice grinder.


Cut the racks of ribs into halves, removing the skin on the back of the ribs that can make it tough. Brush both sides of the ribs with the white vinegar, and then season with the salt. Pat the ribs with the spice rub, and place them on a rimmed baking sheet. Place the baking sheet in the fridge for at least an hour. Overnight is better.

Vinegar, salt and then the spice rub.


Pre-heat the oven to 325. Transfer the ribs to a large roasting pan, or you can use the rimmed baking sheet. Place the ribs fatty side up, and add 1/2 cup of water to the pan. Cover the ribs with aluminum foil and bake them for about 2 hours.

After 2 hours, remove the ribs from the oven and let them sit at room temperature, still covered by the foil, for about 30 minutes.

Out of the oven and ready to be brushed with sauce.


1/4 cup Dijon mustard
3 tablespoons apple cider vinegar
3 tablespoons honey
2 tablespoon soy sauce

In a small bowl, combine the Dijon mustard, apple cider vinegar, honey and soy sauce. If the honey’s very thick, I place the glass jar (no lid) in the microwave for a few seconds to make it flow better. (Don’t do this if it’s in a plastic container, and don’t microwave for too long–honey will foam up and make a big mess!)

Pre-heat a broiler.


Brushing the ribs with the sauce.


Take the foil off the ribs and brush them with the sauce. Then place the ribs under the broiler until lightly charred, about 3 minutes. Slice into individual ribs or devour a slab at a time!

Charred and delicious!


There are few things that make me happier than a plateful of really tasty chicken wings. If I watched football, I could easily finish a plate off within the first quarter of the game. I don’t though (watch football, that is) so let’s just say I can finish a plate off before the credits roll on the end of an episode of “Chef’s Table” on Netflix. That’s right…I’m bad.

I come from a long line of gnawers. Nothing is better than meat on a bone. A porterhouse is the ultimate steak for that very reason. So nothing bothers me more than someone who orders a plate of chicken wings and leaves all that tasty gristle and cartilage–along with some serious meat–behind. What is that? When I finish my wings, I walk my plate over to the trash can and drop a pile of surgically cleaned bones into the bag…not a bit left behind. One look at that pile of clean bones, and even my dog high-fives me.

Brining is a process where you soak a hunk of protein in a seasoned salt solution for a few hours. It’s a great way to add flavor and moisture to any cut of meat. I brined these wings for 3 hours before using a sweet and spicy rub. They can be grilled or roasted in the oven.

image

The brine…

1/2 cup Kosher salt
3 tablespoons light brown sugar
1 teaspoon whole black peppercorns
1 whole bay leaf
2 quarts water

Combine all ingredients in a saucepan and heat until the sugar and salt dissolve. Remove from heat, and let it cool to room temperature.

The rub…

1/4 cup light brown sugar
1/4 cup granulated sugar
1/4 cup sweet paprika
1 tablespoon Kosher salt
1 tablespoon granulated onion
2 teaspoons black pepper
1 teaspoon dried thyme
1 teaspoon dry mustard
1 teaspoon ground ginger
1 teaspoon cayenne pepper

Combine all the rub ingredients in a bowl.

Place 3 lbs. of chicken wings in a Ziploc bag and pour the cooled brine into the bag. Place the bag in a bowl to prevent leaks and place it in the fridge for several hours.

After a few hours, remove the chicken from the brine and dry the wings with paper towels. Discard the brine.

Place the chicken wings in a large bowl and sprinkle them with 1/3 cup of the rub, tossing to coat the chicken well. Place the bowl with the chicken in the fridge until ready to cook.

About 30 minutes before cooking, remove the bowl from the fridge and let the chicken come to room temperature.
Pre-heat the oven to 350 or light a grill.

Toss the chicken with some more of the rub, if you like, then place the pieces on a sheet pan lined with non-stick aluminum foil or a wire rack. Bake at 350 for 30 minutes or until done. Lower the oven temperature if it starts to burn.

If you’re grilling, cook the wings over medium heat, turning frequently them to prevent burning. Cook until the wings are done.

Sometimes I’ll do a combination of the two and I’ll cook the wings in the oven until they’re almost done. Then I’ll throw them on a grill to get that smokey char on them, flipping them often to prevent burning.


Maybe you saw in the news recently that KFC just sold out (in just a few hours) of a firelog that contains the 11 secret herbs and spices of their original recipe chicken. Catch the story here: https://www.dailyrecord.com/story/money/2018/12/13/kfc-firelog-smells-just-like-its-fried-chicken-but-supplies-limited/2293216002/

It was just over a year ago where the nephew of Colonel Sanders himself revealed the 11 secret herbs and spices that made KFC‘s original recipe chicken a worldwide success. He claimed he worked for his uncle for many years and had to make huge batches of the seasoning mix.

Despite what they might say when asked, let’s face it: people just can’t get enough of KFC.

For me, going to KFC is a guilty pleasure. Although I’m a big proponent of grass-fed this and pastured that, my kryptonite is KFC’s original recipe chicken. There’s a KFC right next door to a local Home Depot in my area and my car literally drives itself to the pick-up window…I can’t help it. I justify the consumption of this heavenly grease by asking for no sides–no biscuit, no nothing. I get one breast and one thigh, and I drive off, steering my car with my knees as I indulge in my dirty secret, the hot grease dripping down my chin, a roll of paper towels at my side.

Making the KFC chicken recipe at home means I do have some control over product quality. I can use pastured or organic chicken. I can use clean oil. And I can oven-fry my chicken, meaning I fry it in oil until golden brown, then finish the cooking process in the oven.

I have to say, the recipe really works! Maybe if I placed the real KFC side-by-side with my home-made chicken, I’d notice a difference. But it was pretty damn close and absolutely delicious! If I could change one thing, I would use smaller chicken pieces next time. I used large pieces and the meat-to-breading ratio was off. Though it was mighty tasty, I was craving more breading per bite.

The recipe calls for all-purpose flour, but I used Cup4Cup gluten-free flour, and the results were excellent!


2 cups all-purpose flour (I use Cup4Cup gluten-free flour)
3 tablespoons paprika
1 tablespoon celery salt
1 tablespoon dried mustard
1 tablespoon garlic salt
1 tablespoon ground ginger
2 teaspoons black pepper
1/2 teaspoon white pepper
1 1/2 teaspoons thyme
1 1/2 teaspoons basil
1 1/2 teaspoons oregano
1 teaspoon salt
1 cup milk
1 egg
5 lbs. chicken pieces…your choice
oil, for frying


Combine the flour and the “11 herbs and spices” in a bowl. Mix well.

In another bowl, whisk together the milk and the egg. Add the chicken pieces to this bowl and let the chicken soak in it for 10 minutes.

Pre-heat the oven to 350 degrees.

Pour a couple of inches of the oil into a pan with high sides and heat it to 340 degrees, using a thermometer. Don’t fill it with too much oil, because oil expands when hot and it could spill over.

Take the chicken pieces and coat them with the seasoning mix one at a time, making sure you coat them well. Carefully place the chicken in the hot oil. Don’t overcrowd the pan…work in small batches. Too much chicken could cause the oil to spill over the top.

Fry the chicken pieces just until golden…no need to cook them all the way through. Place the pieces on a baking sheet lined with non-stick aluminum foil. When all the chicken has been fried, place the baking sheet in the oven and cook until the chicken pieces reach an internal temperature of at least 160 degrees.


Make a lot! Leftovers are great, and they re-heat really well in the oven! (Don’t use a microwave…the oven is best.)

I always get asked if I deep-fry my turkey for Thanksgiving. I had deep-fried turkey when I lived in the South, and for me, it’s way too much work for mediocre results. First, you need to find a safe spot in the yard to blast the propane-fueled fryer so you don’t burn your house down. Then you need to stand outside and freeze your butt off while it fries, while your friends and family are all indoors having cocktails. Then you need to get rid of gallons of used oil, and clean up a huge mess at the end of it all. And through all this, you need to make sure the oil is at the right temperature so you don’t get a scorched turkey on the outside and a raw turkey on the inside.

No, thanks.

I get great results by cooking my turkey in my Weber grill. I’ve cooked it this way every Thanksgiving for about 25 years. The standard Weber allows me to cook up to a 15 lb. bird–big enough for my purposes–and it comes out crispy, smokey and delicious. If you’re afraid to try this for the first time at Thanksgiving when it really matters, buy a turkey on sale right after Thanksgiving and freeze it, then wait a few months and try it out.

Or be bold! Go for the gusto the first time around. I did it that way and I never looked back.


The charcoal chimney with hot coals awaits.

The charcoal chimney with hot coals awaits.


Although I’ve stopped using charcoal briquettes for basic grilling a long time ago, and now strictly use natural hardwood charcoal, this recipe works best with Kingsford briquettes. They burn slowly and evenly. I never use lighter fluid…I always start my fire with a few pieces of crumbled newspaper under a charcoal chimney.


The tools you need:
A Weber grill, with the dome top
Kingsford charcoal briquettes (do not use Match Lite or other pre-soaked briquettes)
A charcoal chimney, easily found at Home Depot or Lowe’s
A heavy-duty disposable aluminum pan


Ingredients:
Whole turkey, up to 15 lbs., thawed and brined (see my previous blog about brining a turkey)
Olive oil (to rub on the turkey)
2 yellow onions, chopped
4 stalks of celery, chopped
½ lb. (2 sticks) of unsalted butter, melted
1 tablespoon granulated garlic
1 tablespoon granulated onion
2 tablespoons salt
1 tablespoon pepper


Spreading the coals away from the center of the grill.

Spreading the coals away from the center of the grill.


If you want stuffing, it’s always wise to make it separately and cook it separately.

Light 8 to 10 lbs. of charcoal in the grill…depending on the size of the turkey and how cold it is outside.

If you brined the turkey first, you’ve already removed the giblets. If you’re not brining, go ahead remove the giblets from the thawed bird now. Place the turkey in the aluminum pan.

In a small bowl, mix the granulated garlic, granulated onion, salt, and pepper. (Definitely add any other seasonings you might like.)

Coarsely chop the onions and celery. Place them in a another bowl. Mix them with the melted butter and 1/3 of the garlic/onion/salt/pepper mixture. Place a small handful of this onion and celery “stuffing” mixture in the neck cavity of the turkey. Place the rest in the body cavity (where the stuffing would usually go.) You can fasten the bird with turkey skewers if you like. This “stuffing” is strictly to flavor the turkey…you don’t eat it!


The rubbed, stuffed and seasoned bird.

The rubbed, stuffed and seasoned bird.


Rub the outside of the entire turkey with the olive oil and sprinkle the rest of the garlic/onion/salt/pepper mixture on the outside of the bird. Make sure you get the bird on the bottom as well.

When the coals in the grill have ashed over, spread them to the outside edges of the Weber grill equally. Put the cooking grill rack in place. Place the aluminum pan with the turkey in the center of the grill, keeping it away from the direct heat of the coals. If you’re using a meat thermometer, insert the probe into the thickest part of the breast, being careful not to hit the bone. Place the lid on the grill. (You may need to bend your aluminum pan a bit.) Open the vents on the bottom of the Weber as well as the vents on the lid. It’s important to get air circulating!


My meat thermometer calls me from as far as 100 feet away! Time for a cocktail!

My meat thermometer calls me from as far as 100 feet away! Time to join family and friends for a cocktail!


No basting is necessary.

Now here’s the tough part: DO NOT OPEN THE GRILL TO CHECK ON THE TURKEY! (If you must look, shine a flashlight into the vent holes on the lid to take a peek at the pop-up timer, if there is one.) The whole point is to keep the heat inside the kettle. You’ll know your turkey is done when no more smoke or heat rises from the grill, and the turkey inside stops making sizzling noises.

And believe it or not, a 15-lb. turkey will be cooked in about 2 hours!

Remove the turkey and let it rest at least 15 minutes before carving. I like to wrap it in aluminum foil as it rests.


Beautifully grilled, and perfectly cooked in less than 2 hours!

Beautifully grilled, and perfectly cooked in less than 2 hours!


The side dishes for Thanksgiving are as important as the main course. I love serving my Oysters Rock-a-Fellow before dinner starts. (https://livethelive.com/2018/11/01/oysters-rock-a-fellow-improved/)
Next time, I’ll share my recipe for another delicious side dish: butternut squash with cranberries!

Thanksgiving is only a few weeks away. Time to talk turkey! No matter what method you prefer to cook your bird, brining it beforehand will make it tastier and juicier. And it’s easy to do.

It’s basic high school science: the brine has a greater concentration of salt and water than the molecules of the protein (in this case, a turkey) that is soaking in it. By simple diffusion, the protein molecules suck up the salty water and keep it. When you cook the meat, some of the water evaporates, but the meat still has far more moisture in it than it would have without the brine soaking, and the result is a moister, more delicious bird.

Some people use giant syringes to inject their turkeys with crazy solutions, but I think that the old way is still the best when it comes to brining. Get a big pot, fill it with the brine, and soak the bird in it. Done.

Here’s my tried-and-true turkey brining recipe. Once the brining is done, you can cook the turkey whatever way you like best. I use a method where I grill it inside a Weber grill with charcoal. It comes out smokey and absolutely amazing. I’ll have that info in my next blog.

You must brine a thawed bird, so use your favorite method to thaw your turkey so that it’s ready on Thanksgiving morning. Brining can take 4 to 6 hours, so start early!

For this recipe, you’ll need a large pot to boil the brine ingredients, and then a larger pot to hold the turkey submerged in the brine. I use a turkey no bigger than 15 lbs. for two main reasons: there are only 3 people in our family, and the Weber grill I use can’t handle anything bigger.


image

1 gallon of water
2 onions
3 carrots
3 stalks celery
1 cup kosher salt
1 tablespoon black peppercorns
1/2 cup light brown sugar
1 1/2 teaspoons whole allspice
4 bay leaves
1 gallon of ice water
14–15 lb turkey, thawed

Pour the first gallon of water in a large pot. Quarter the onions, carrots and celery (no need to peel them) and add them to the water. Add the salt, black peppercorns, brown sugar, allspice, and bay leaves.

Let the pot come to a boil for a few minutes. Remove it from the heat and let the brine cool down to room temperature.

Remove the giblets from the thawed turkey and place the bird in a container just big enough to hold it and 2 gallons of liquid.

Pour the now-cooled brine over the turkey, then pour in the gallon of ice water.


Make sure the turkey doesn’t float up by placing a plate on top. Put the turkey container in the fridge (or a cold garage or basement) for 4 to 6 hours, flipping the turkey over in the container halfway through.

Drain the turkey, rising off any spices that stuck to it, then pat it dry with paper towels. Now it’s ready to cook, using your favorite recipe.

Next time: my recipe for a fabulous turkey cooked on a Weber grill. It’s fast, requires no basting, and is absolutely delicious!


So I’m watching a video of Andrew Zimmern grilling chicken wings using an apricot-mustard glaze after he marinated them in yogurt and threw them on a hot grill. They looked amazing. But I had ribs already thawed in my fridge (Curve ball 1).  I thought: How bad could this recipe be on pork? I gave it a shot.

Apricot-mustard glaze…
1/2 cup apricot preserves
1/2 cup mustard (I used Gulden’s, but Dijon works well, too)

Combine the ingredients in a bowl, whisking them together. Set it aside.


I got a large bowl out, and cut the ribs into smaller pieces, about 3 ribs per piece. I placed them in the bowl, threw in about a 1/2 cup of plain yogurt, and mixed it around until all sides of the ribs were coated. I let the ribs stand this way at room temperature for about an hour, while I headed to the grill to set it up.


The plan was to light a decent amount of coals that would ash over and then be pushed to one side of the grill, placing the ribs over indirect heat on the other side. They would cook this way until done, with a nice grilled smokey char on the edges.


That’s the little mouse home on the left.

Unfortunately, when I opened my grill, I found that a family of mice had made themselves a happy home inside my grill, and I didn’t have the heart to toss them out, babies and all. (Curve ball 2.)  So I needed to find another way to cook the ribs. I headed to my smoker.

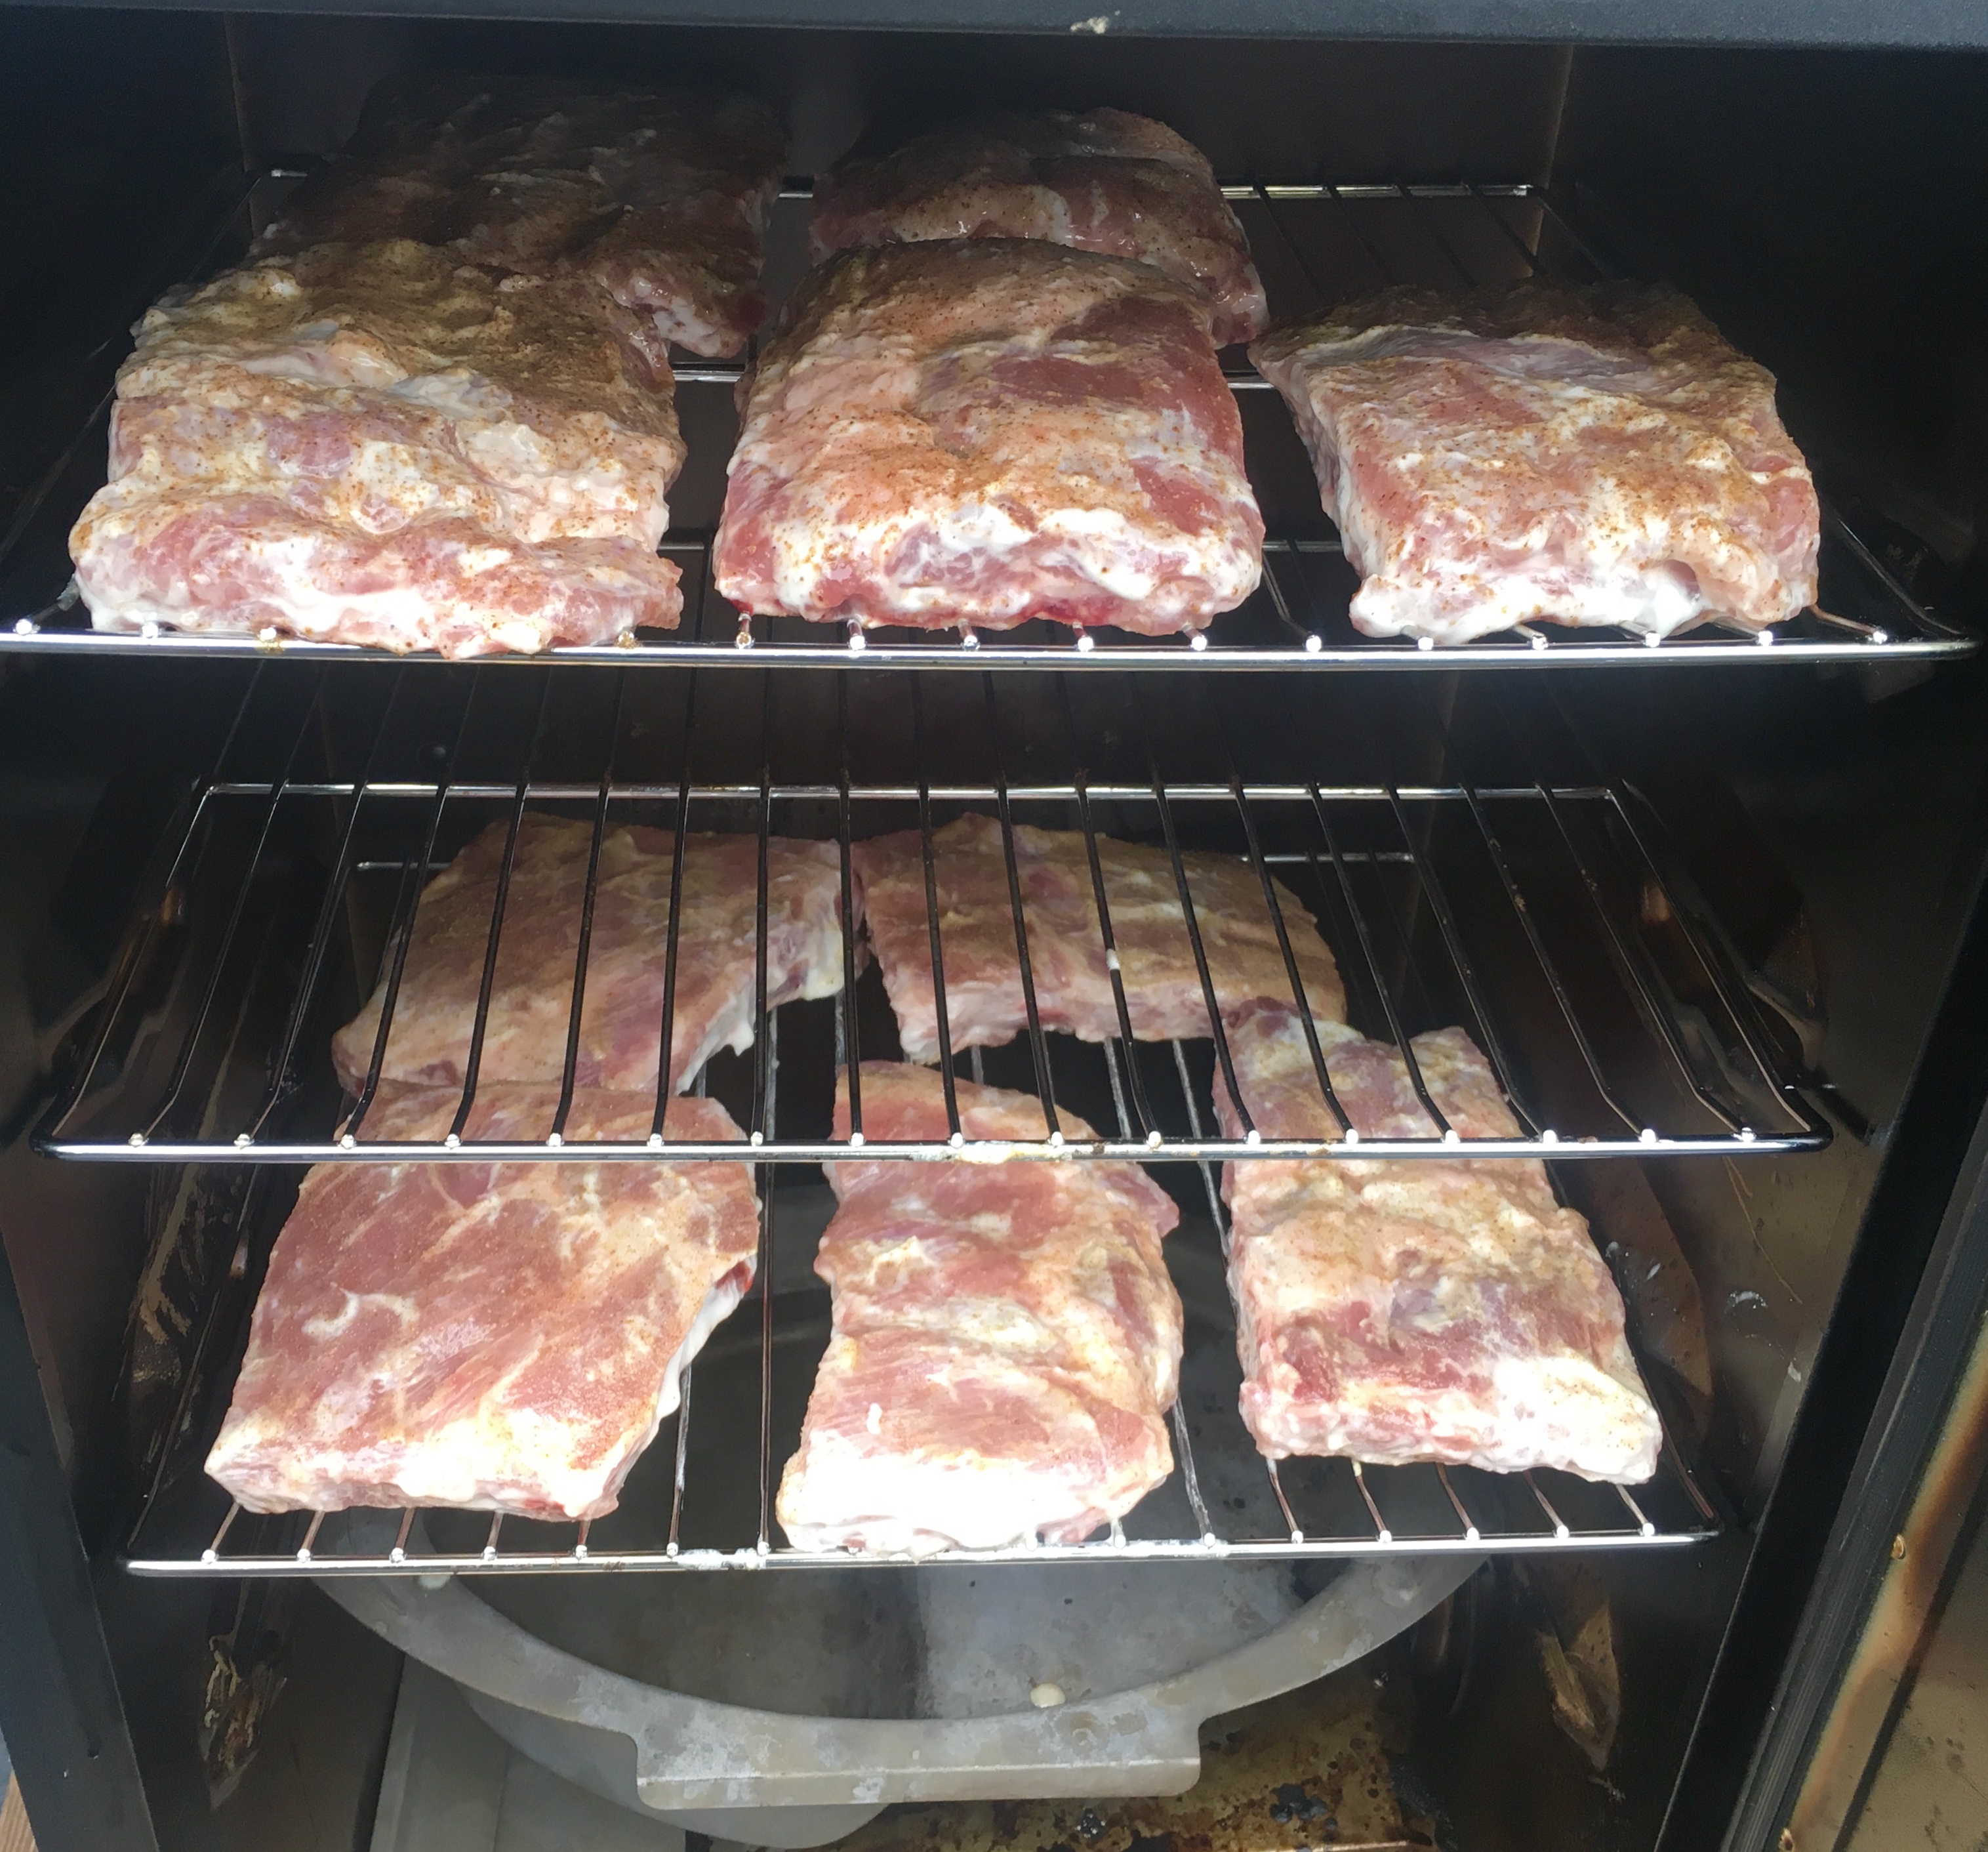
I have an electric digital smoker, which allows me to set the temperature and basically walk away, only returning to add smoking chips every hour so. I set the temperature to 275 degrees.


I removed the ribs from the bowl, placing them on a cutting board, sprinkling one seasoning on half the ribs, and another seasoning on the other half. The first half got my favorite basic seasoning: Lawry’s Seasoned Salt. The second half received my favorite Cajun seasoning: Tony Chachere’s Original Creole Seasoning. The ribs went into the smoker for about 2 hours.


I thought I would smoke the ribs longer than 2 hours, but then I realized it would soon be time to pick my daughter up from school and take her to guitar lessons. (Curve ball 3.)
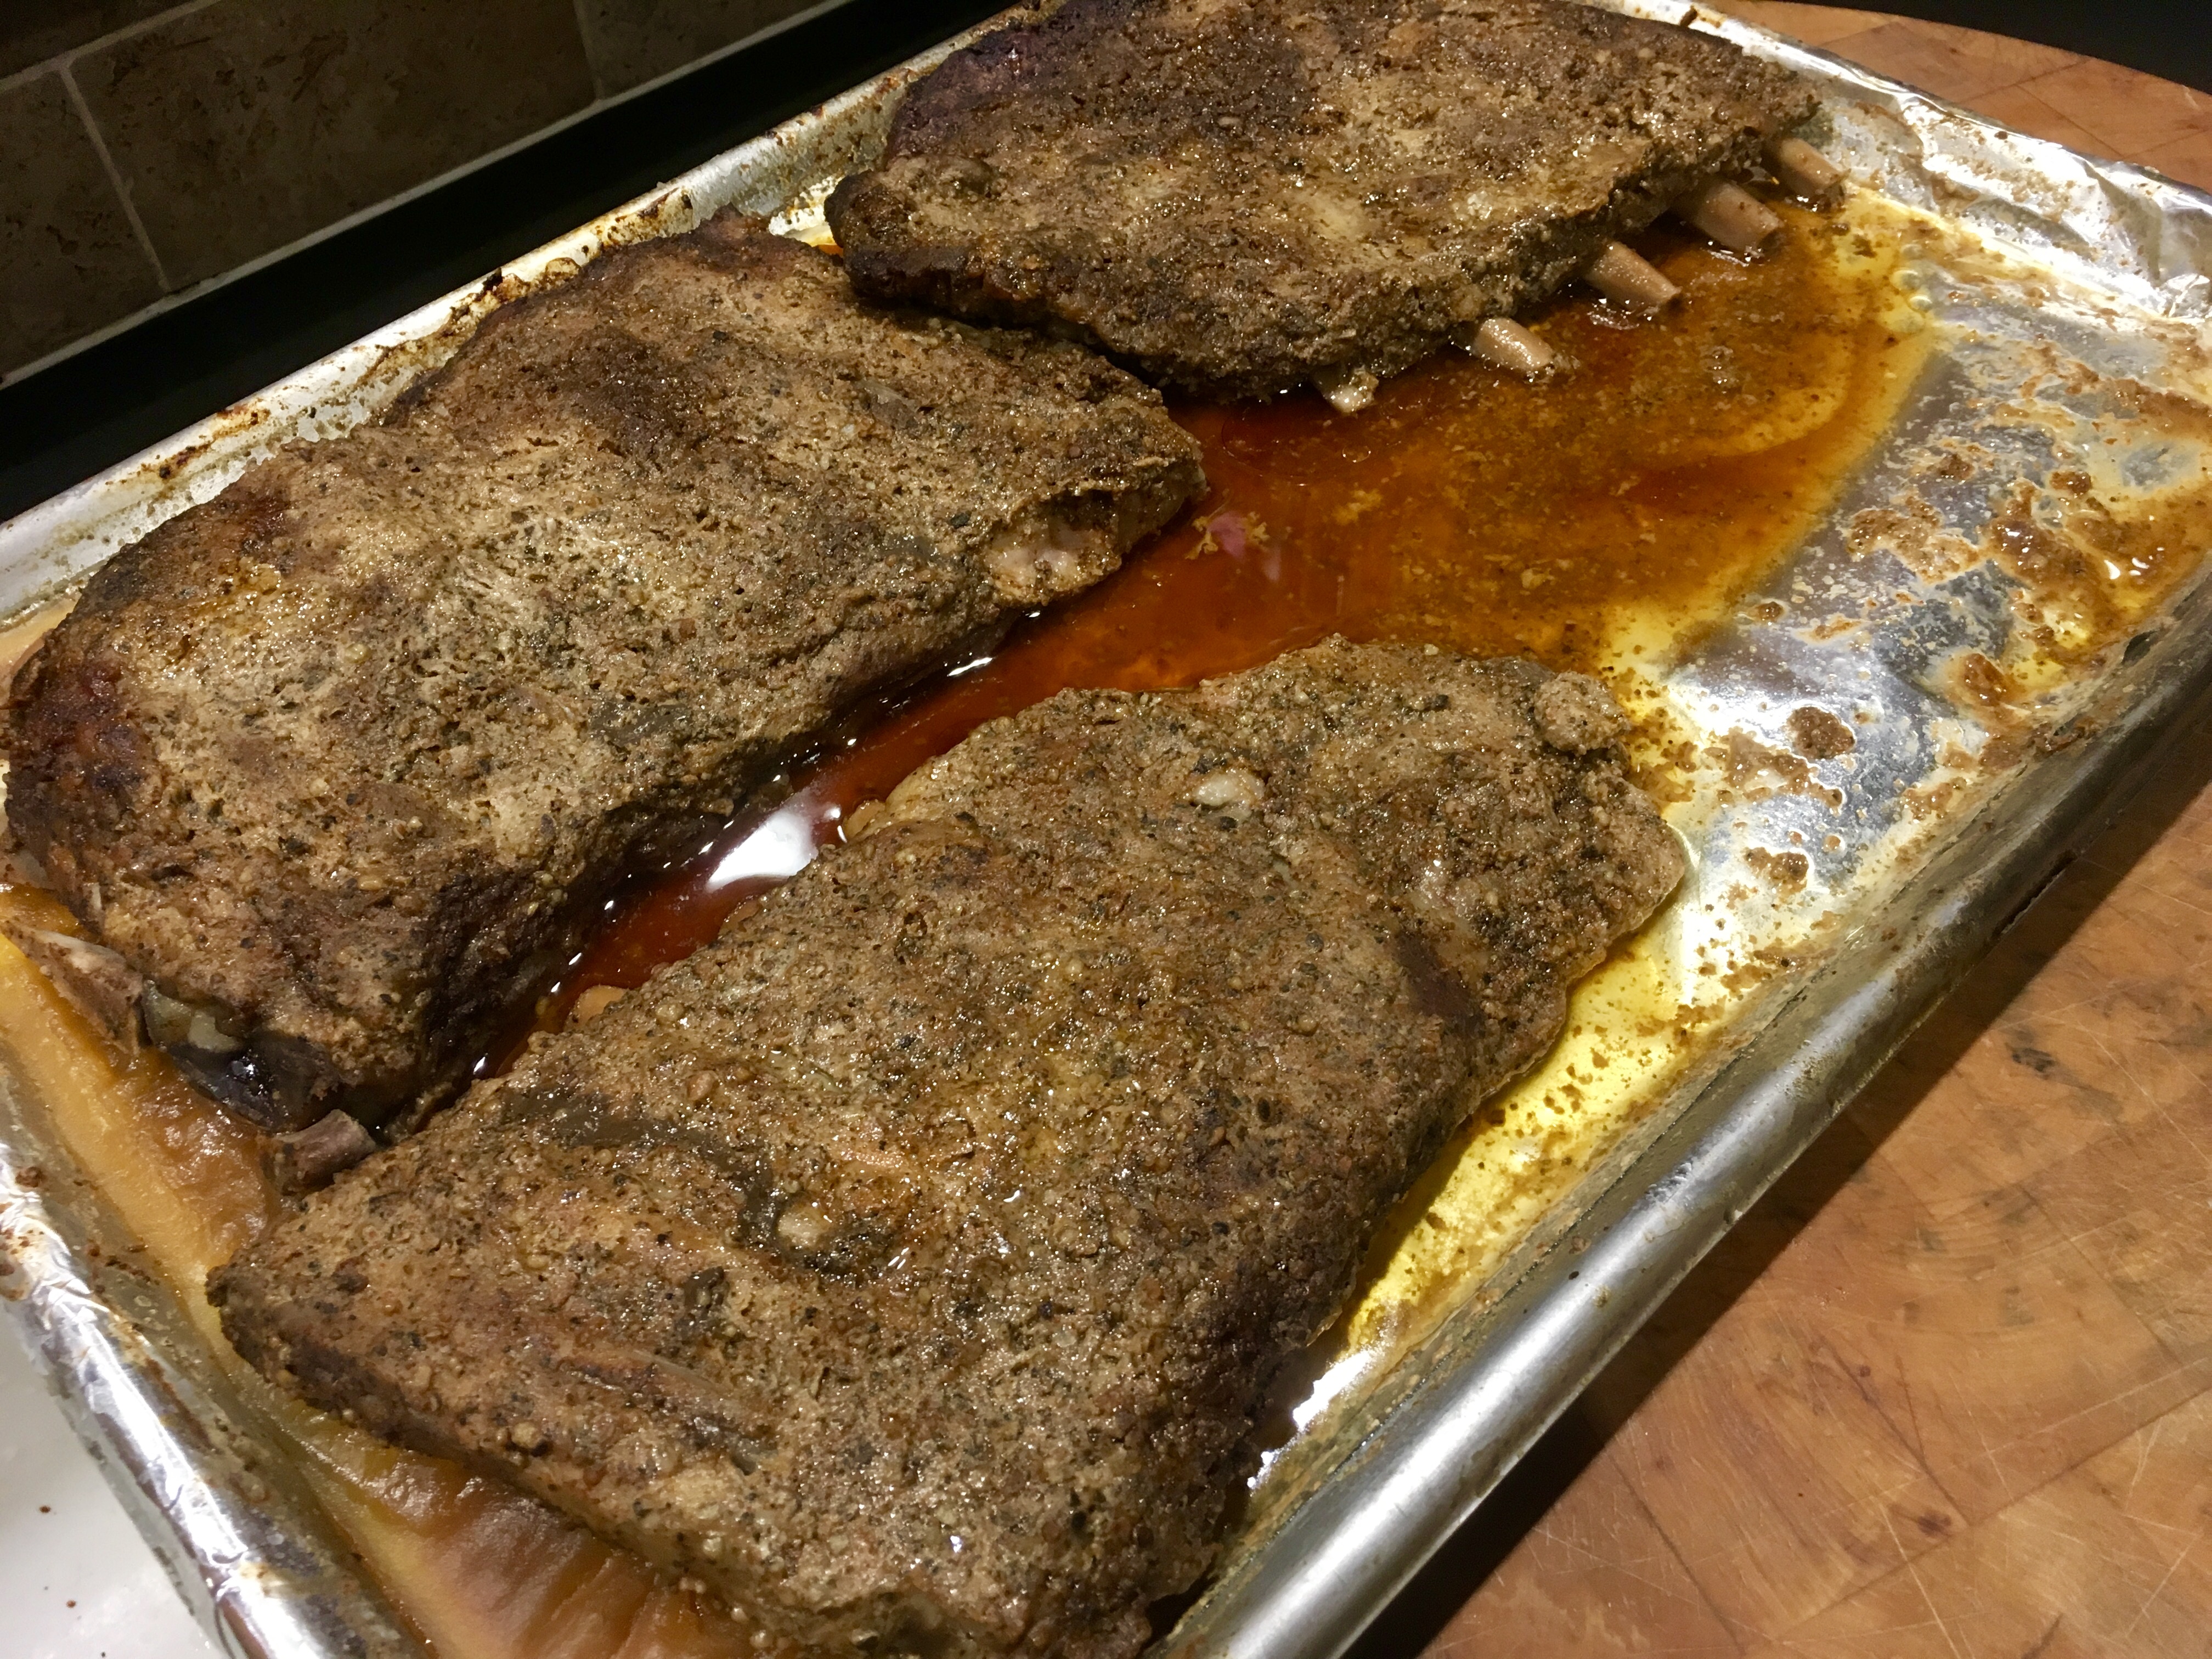
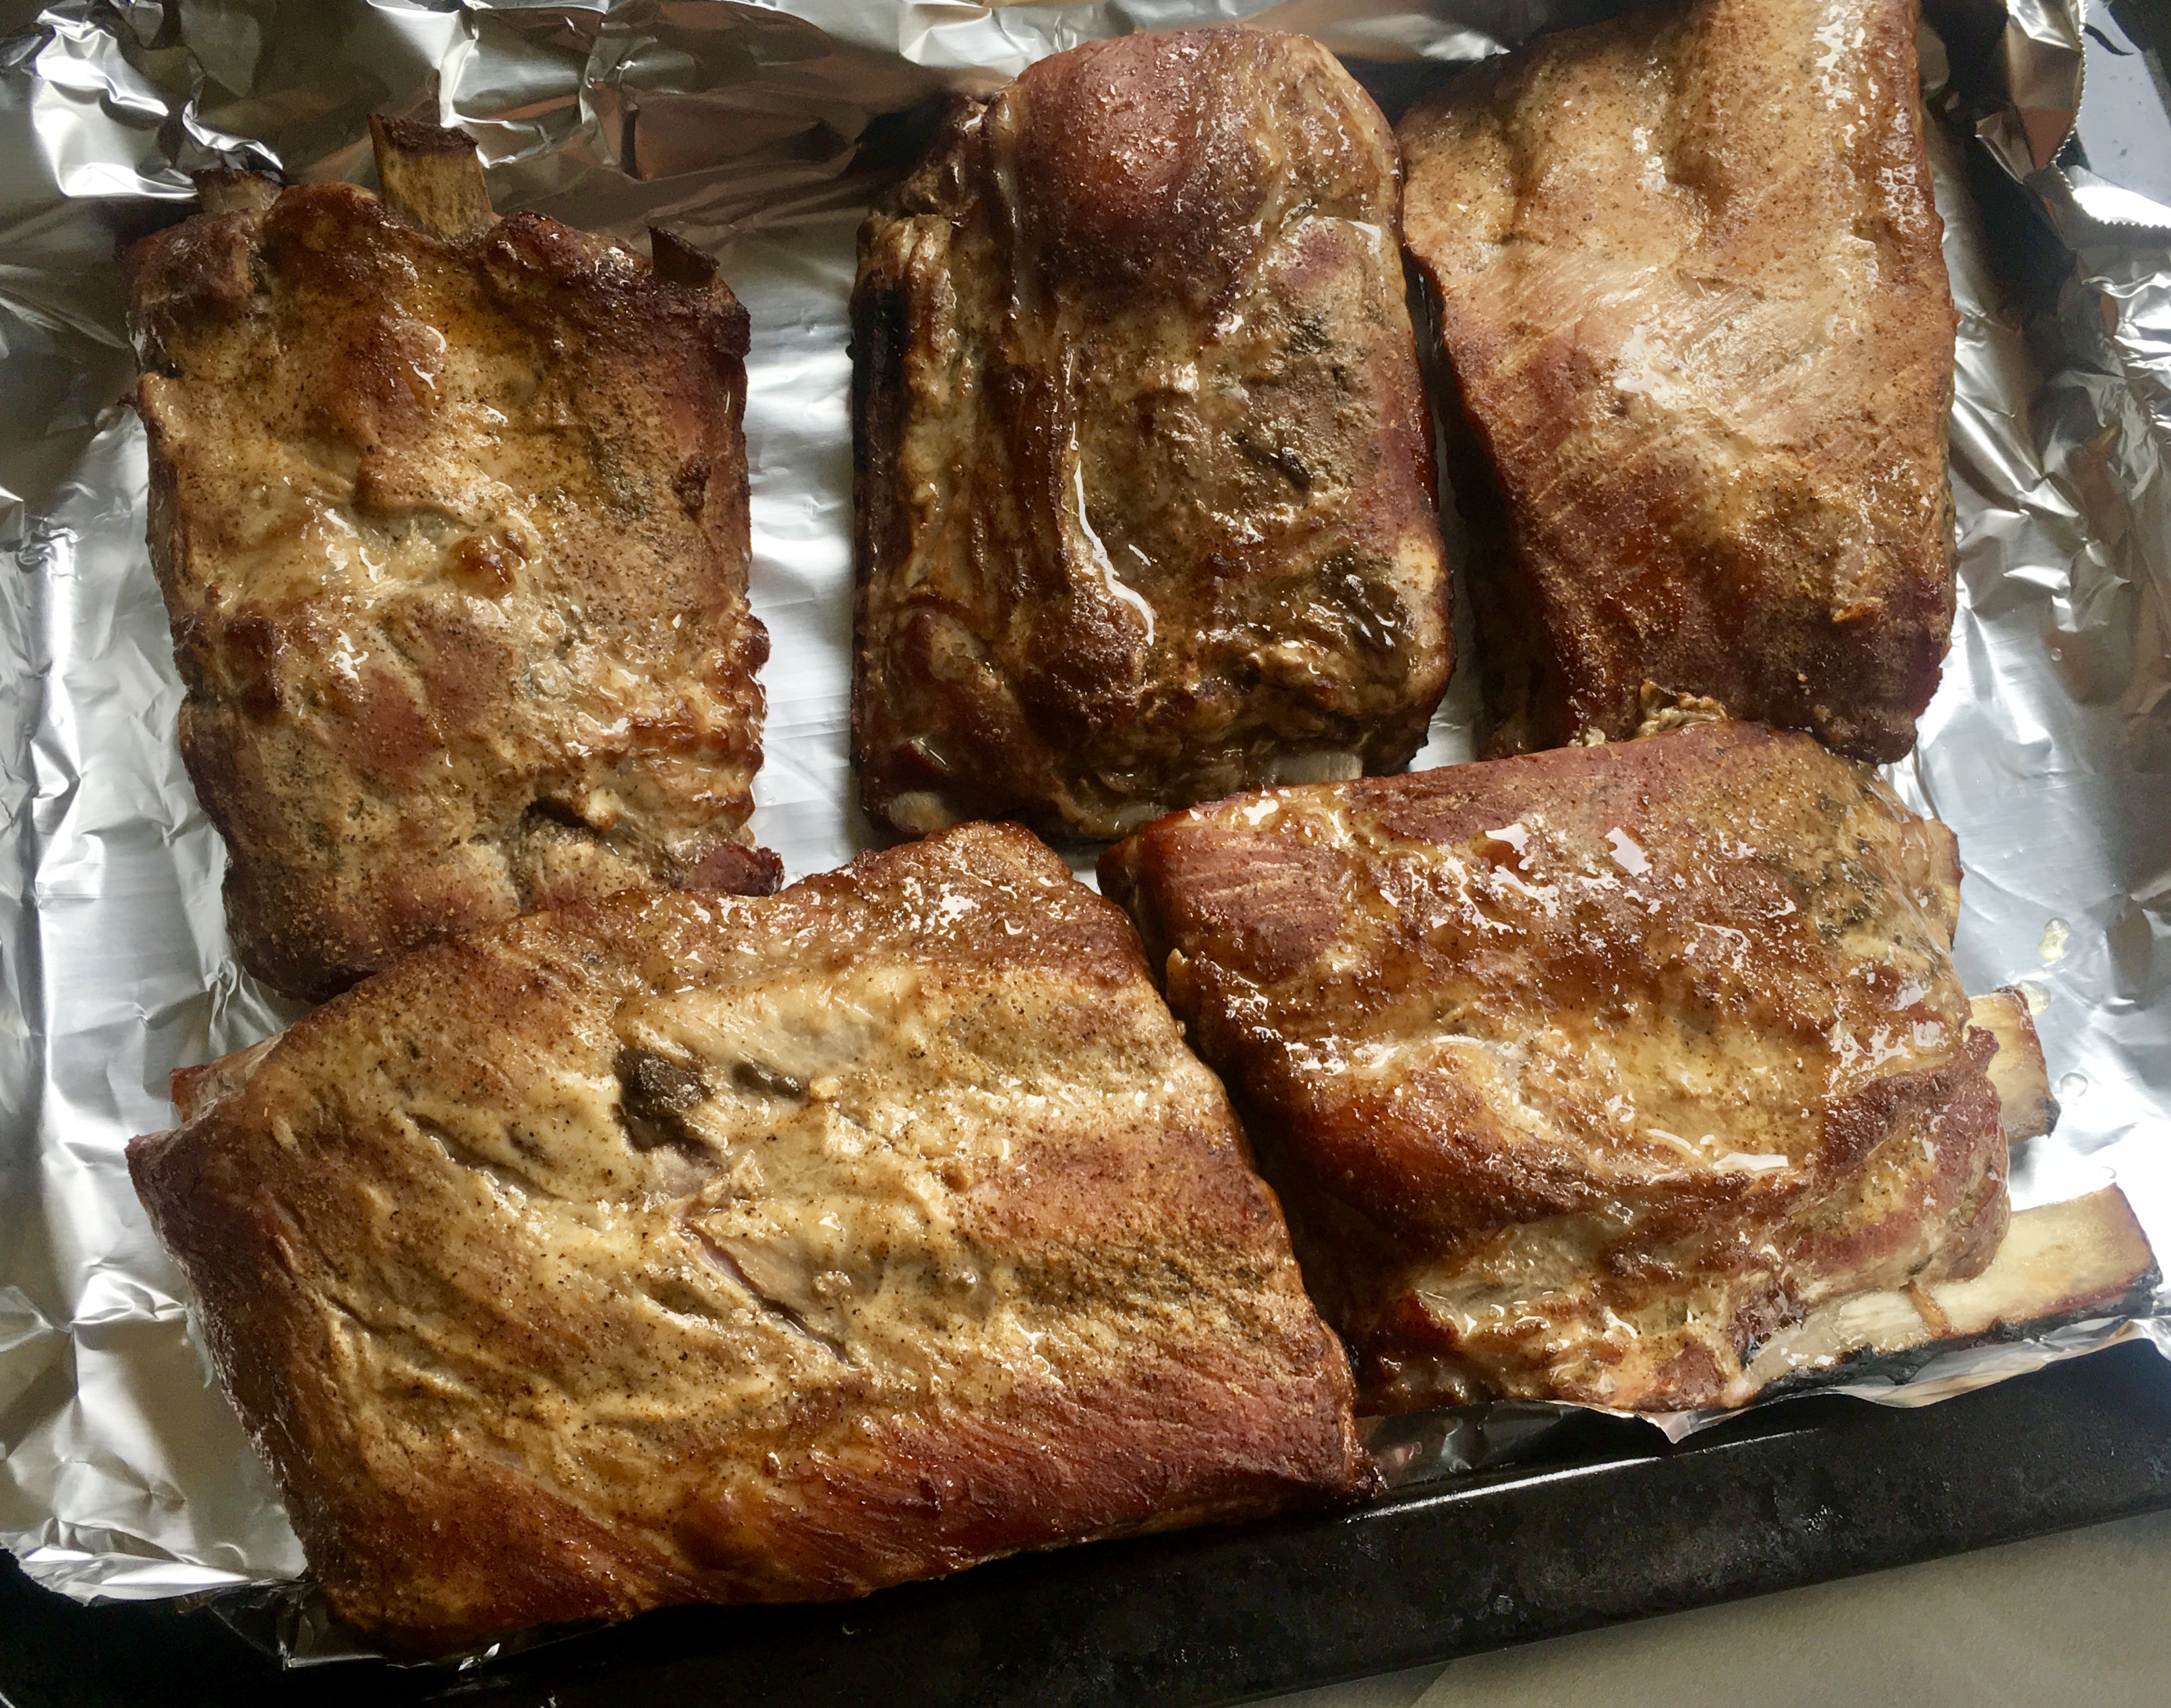
 

Out of the smoker.

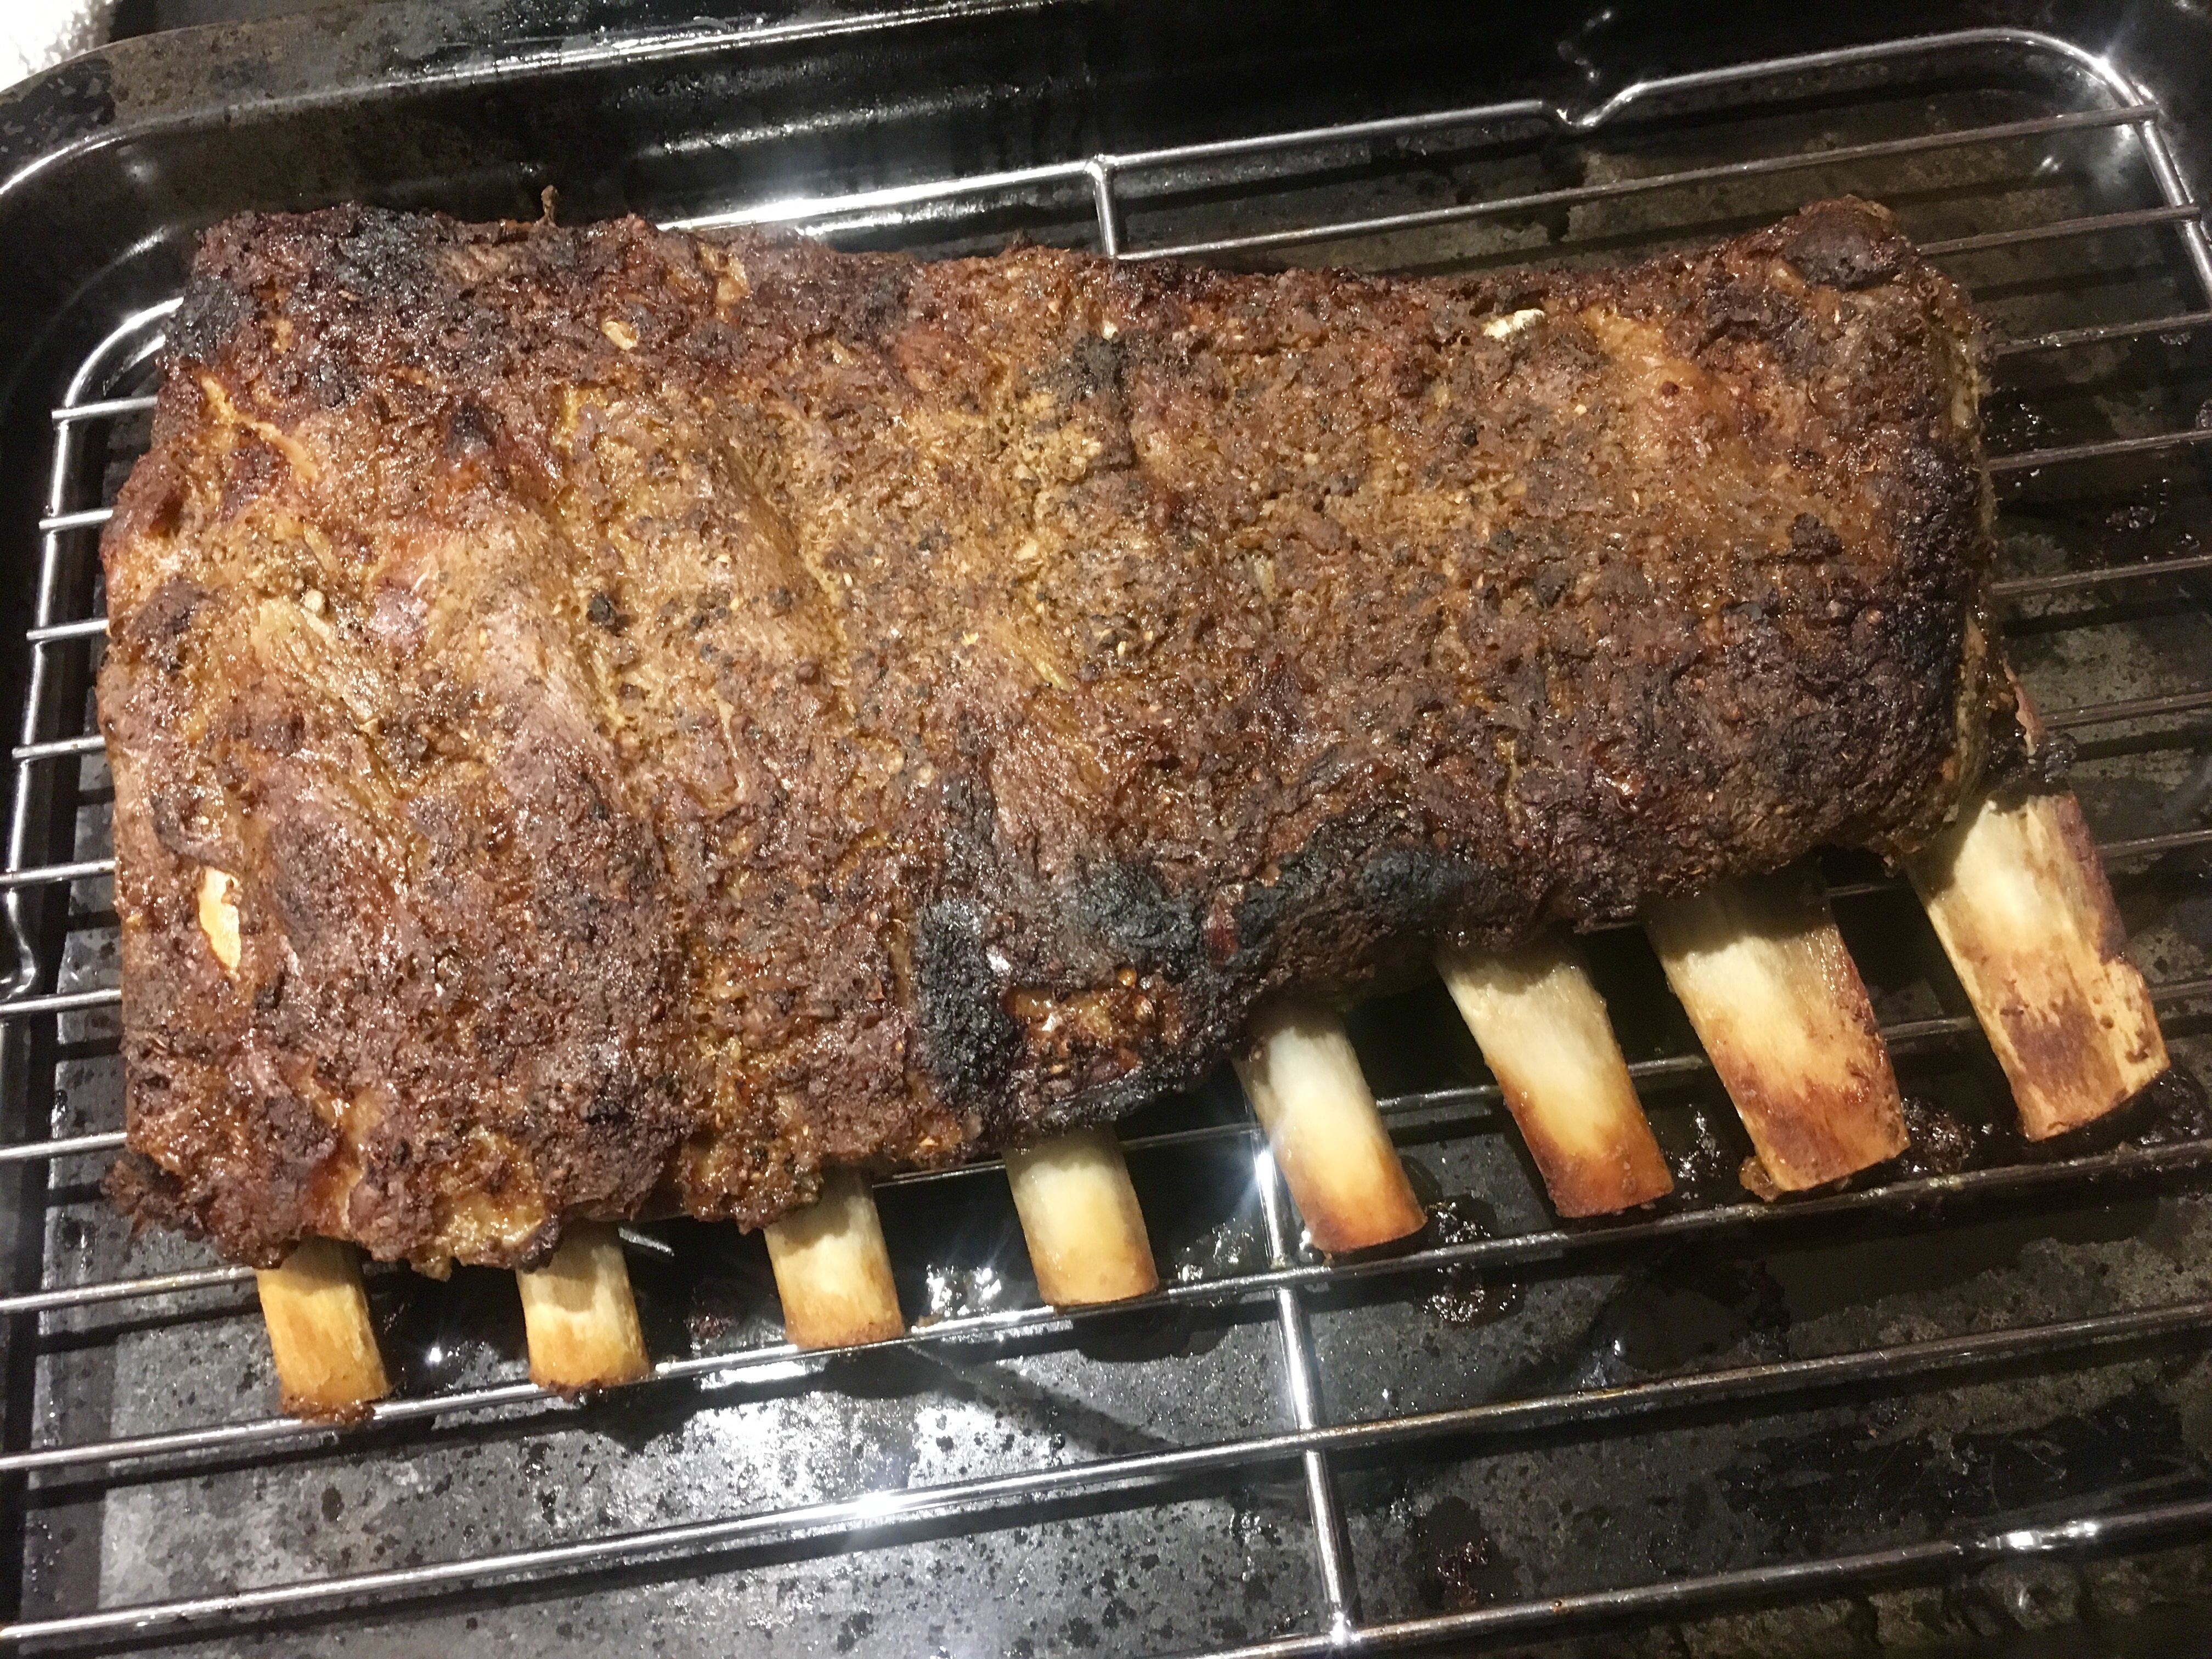
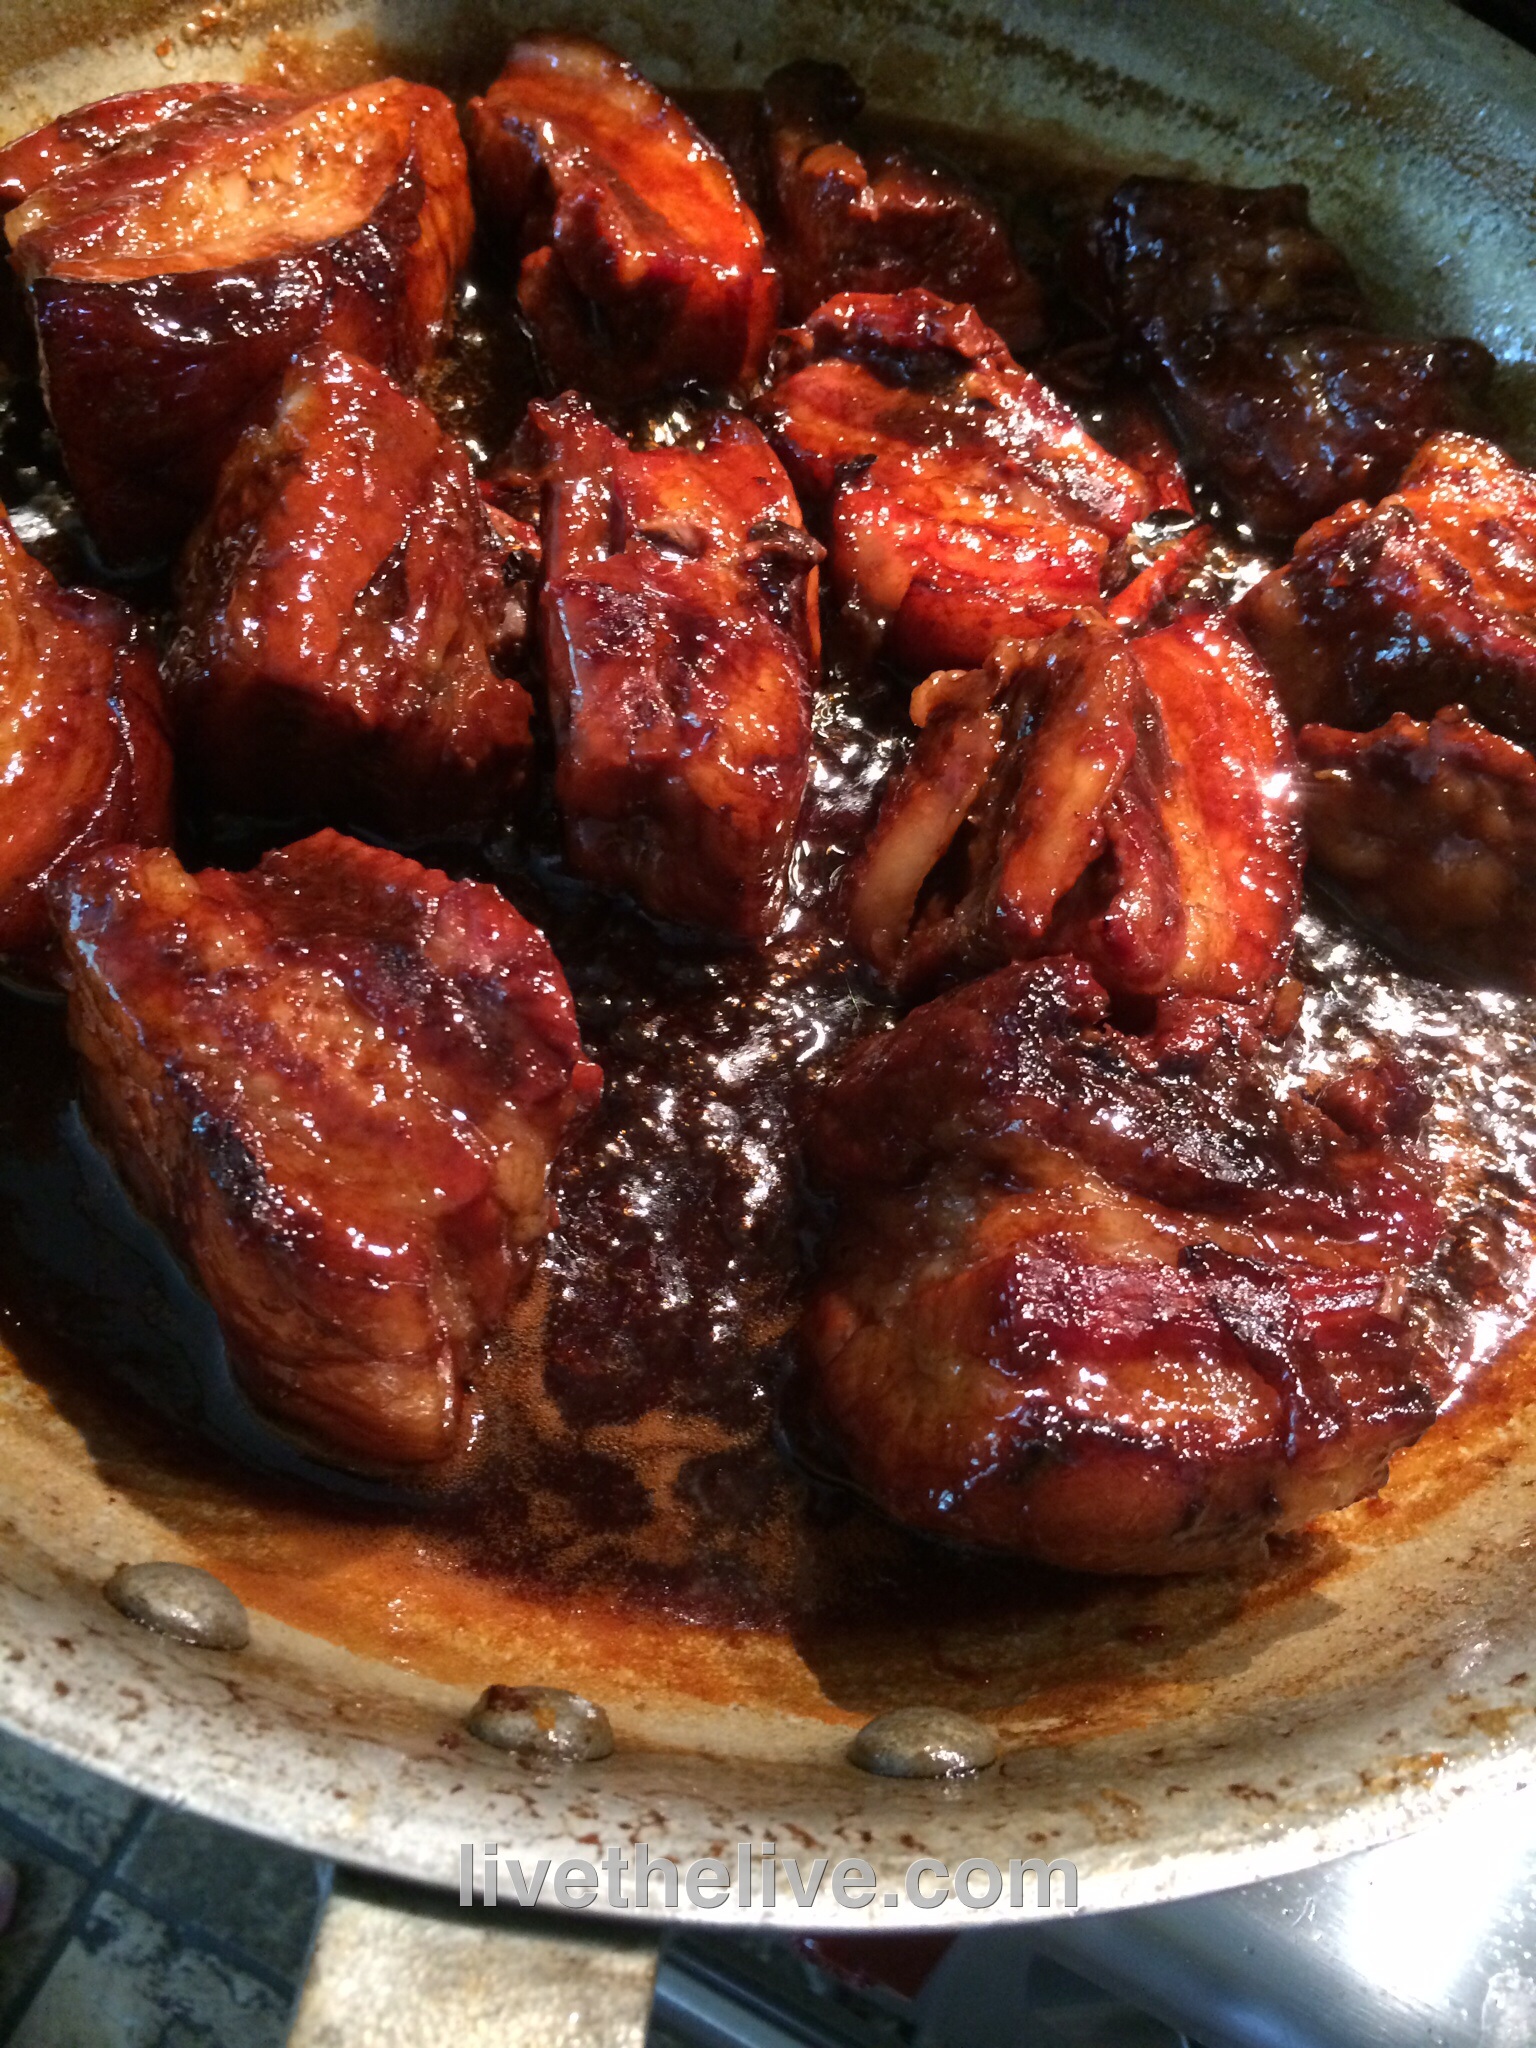
I took the ribs out of the smoker, one half batch at a time, and placed them under the broiler of my toaster oven, flipping them over once I saw the edges of the ribs get nice and dark. This gave them a bit of that char I was looking for that the grill would’ve given me…had I not had a family of mice in my way!


After a few minutes under the broiler.

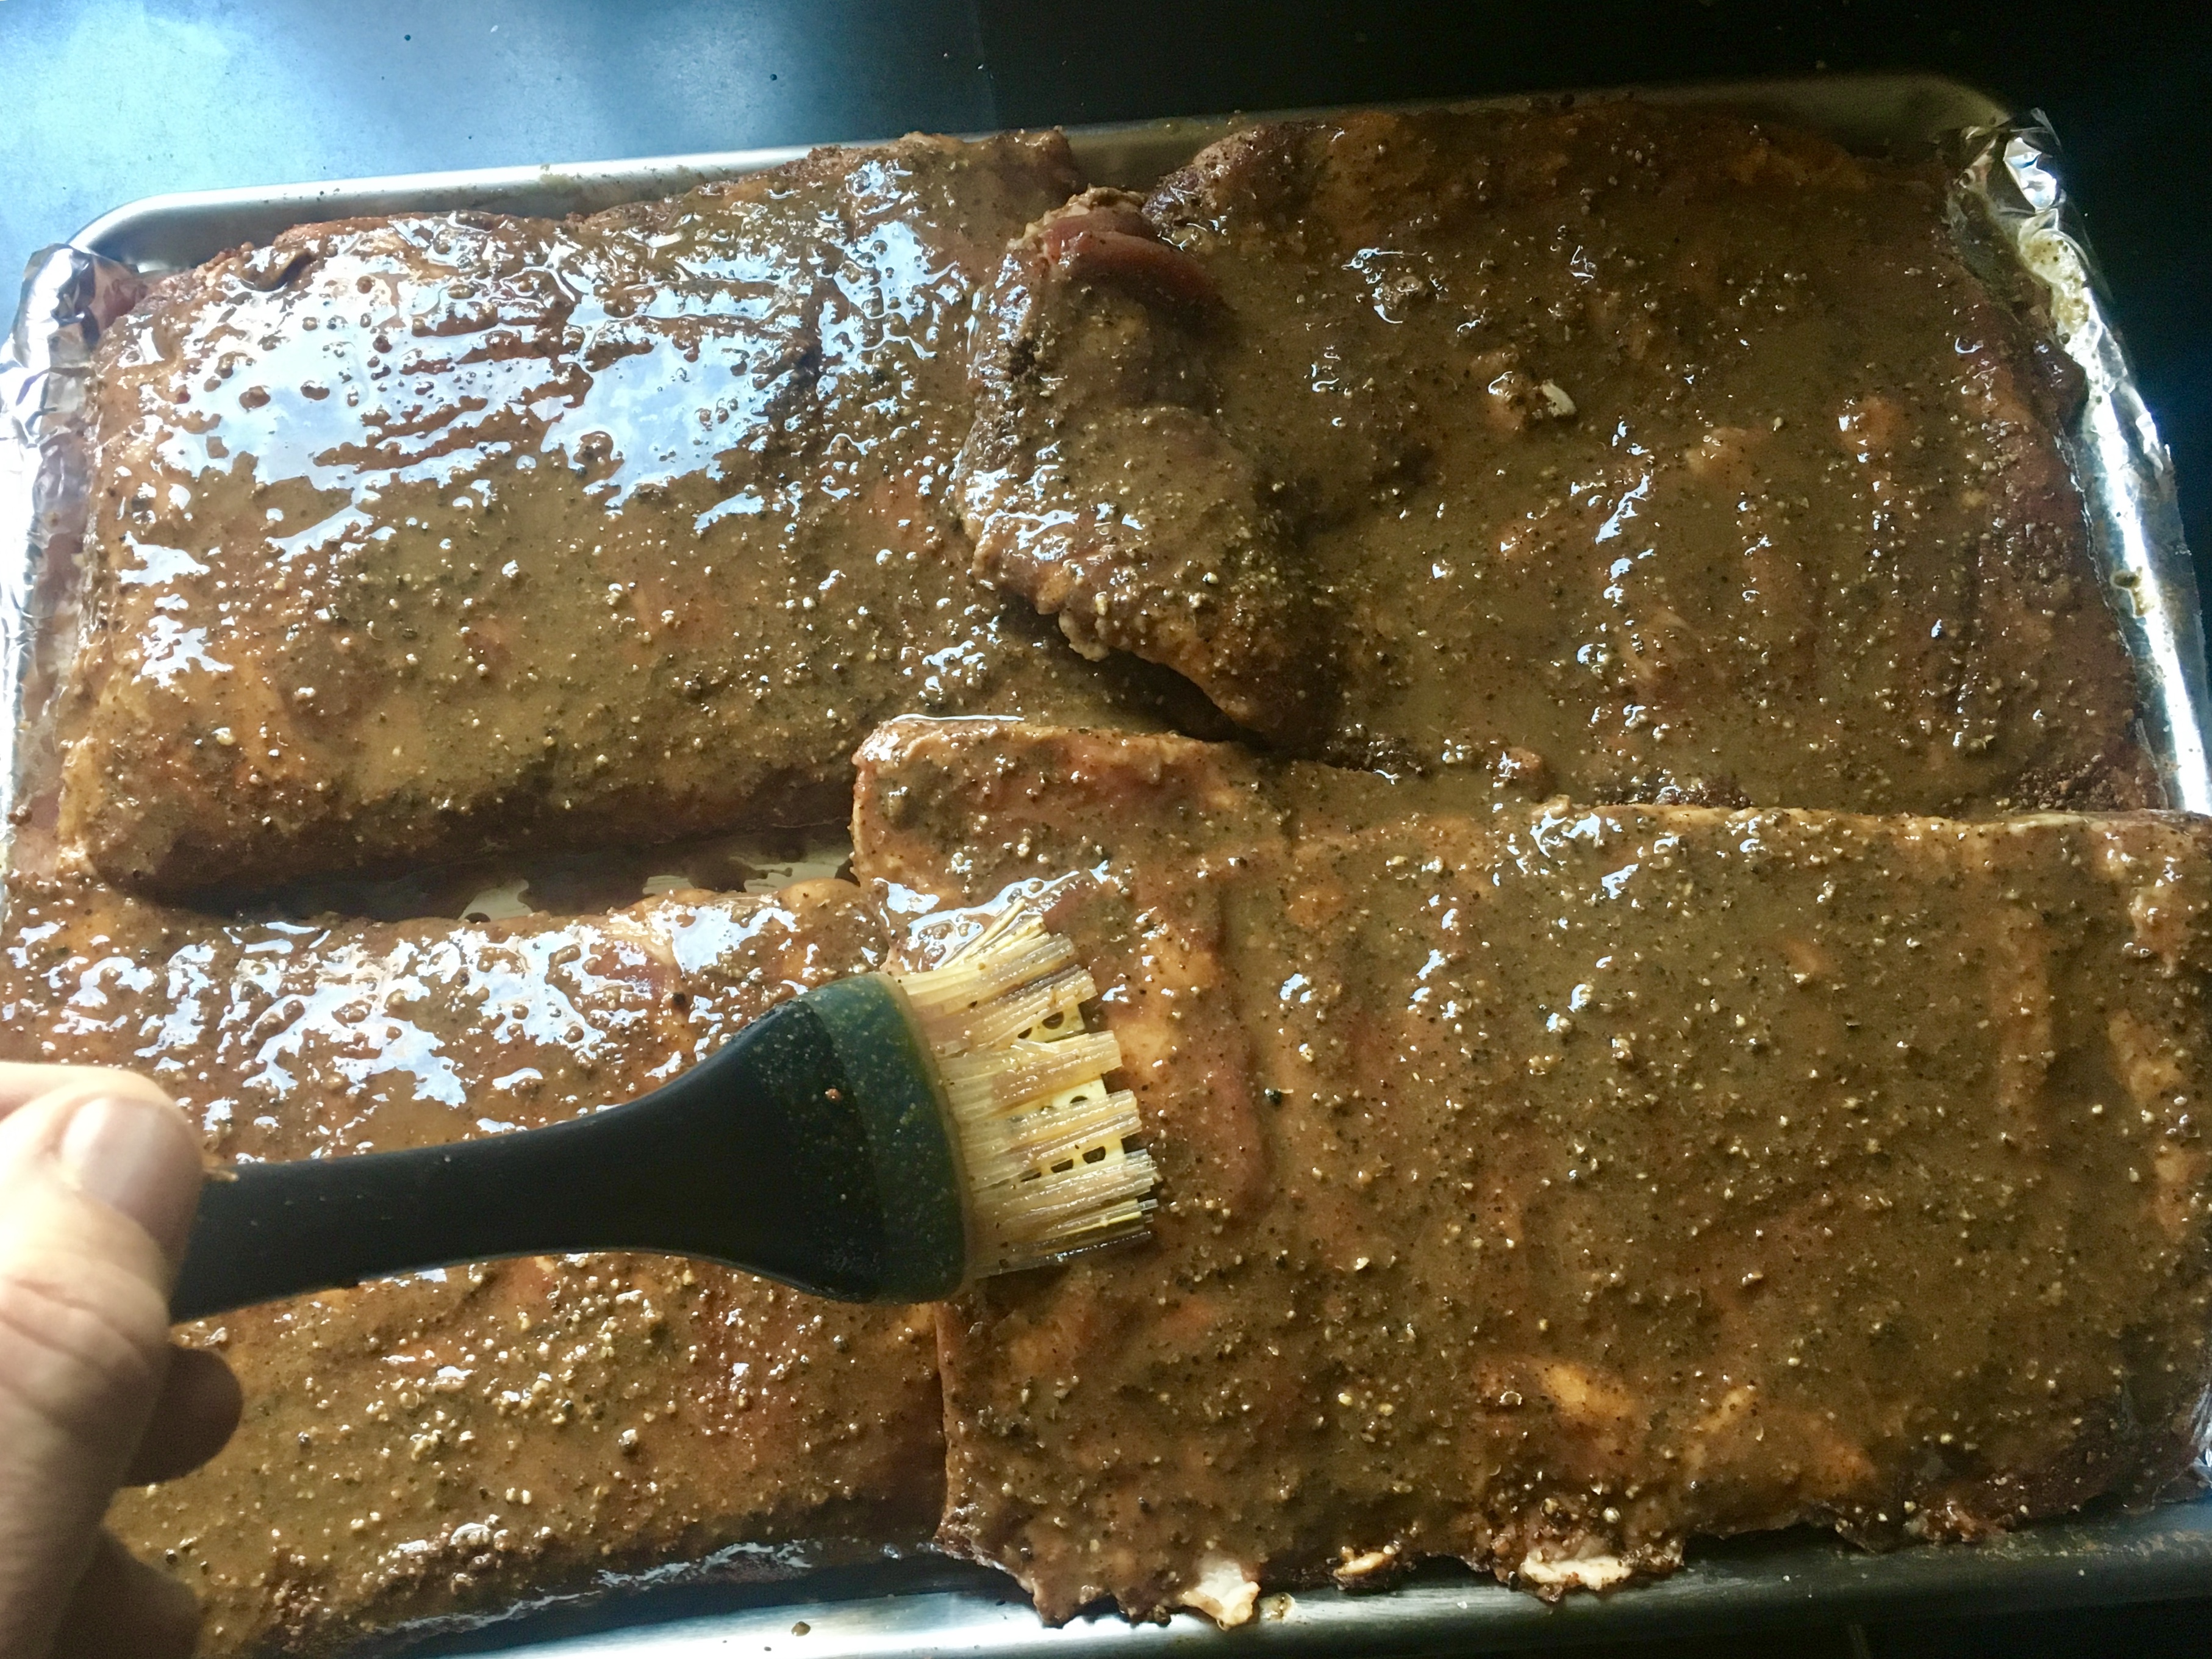
After broiling the ribs on both sides, I placed them in aluminum foil, brushing them on both sides with the apricot-mustard glaze, wrapping the aluminum tightly around them in 2 packages. I placed them on a baking sheet and into a pre-heated 175-degree oven.


Tightly wrapped and into the oven they go.

The low temperature in the oven would continue to cook the ribs low and slow, and the glaze would add a little steam to make them tender, and hopefully, delicious. Off to school and guitar lessons I went.


Unwrapping the ribs after a few hours.

We returned a few hours later, and I placed the sheet pan with the ribs on the top of the stove to cool for a bit, allowing the ribs to rest.


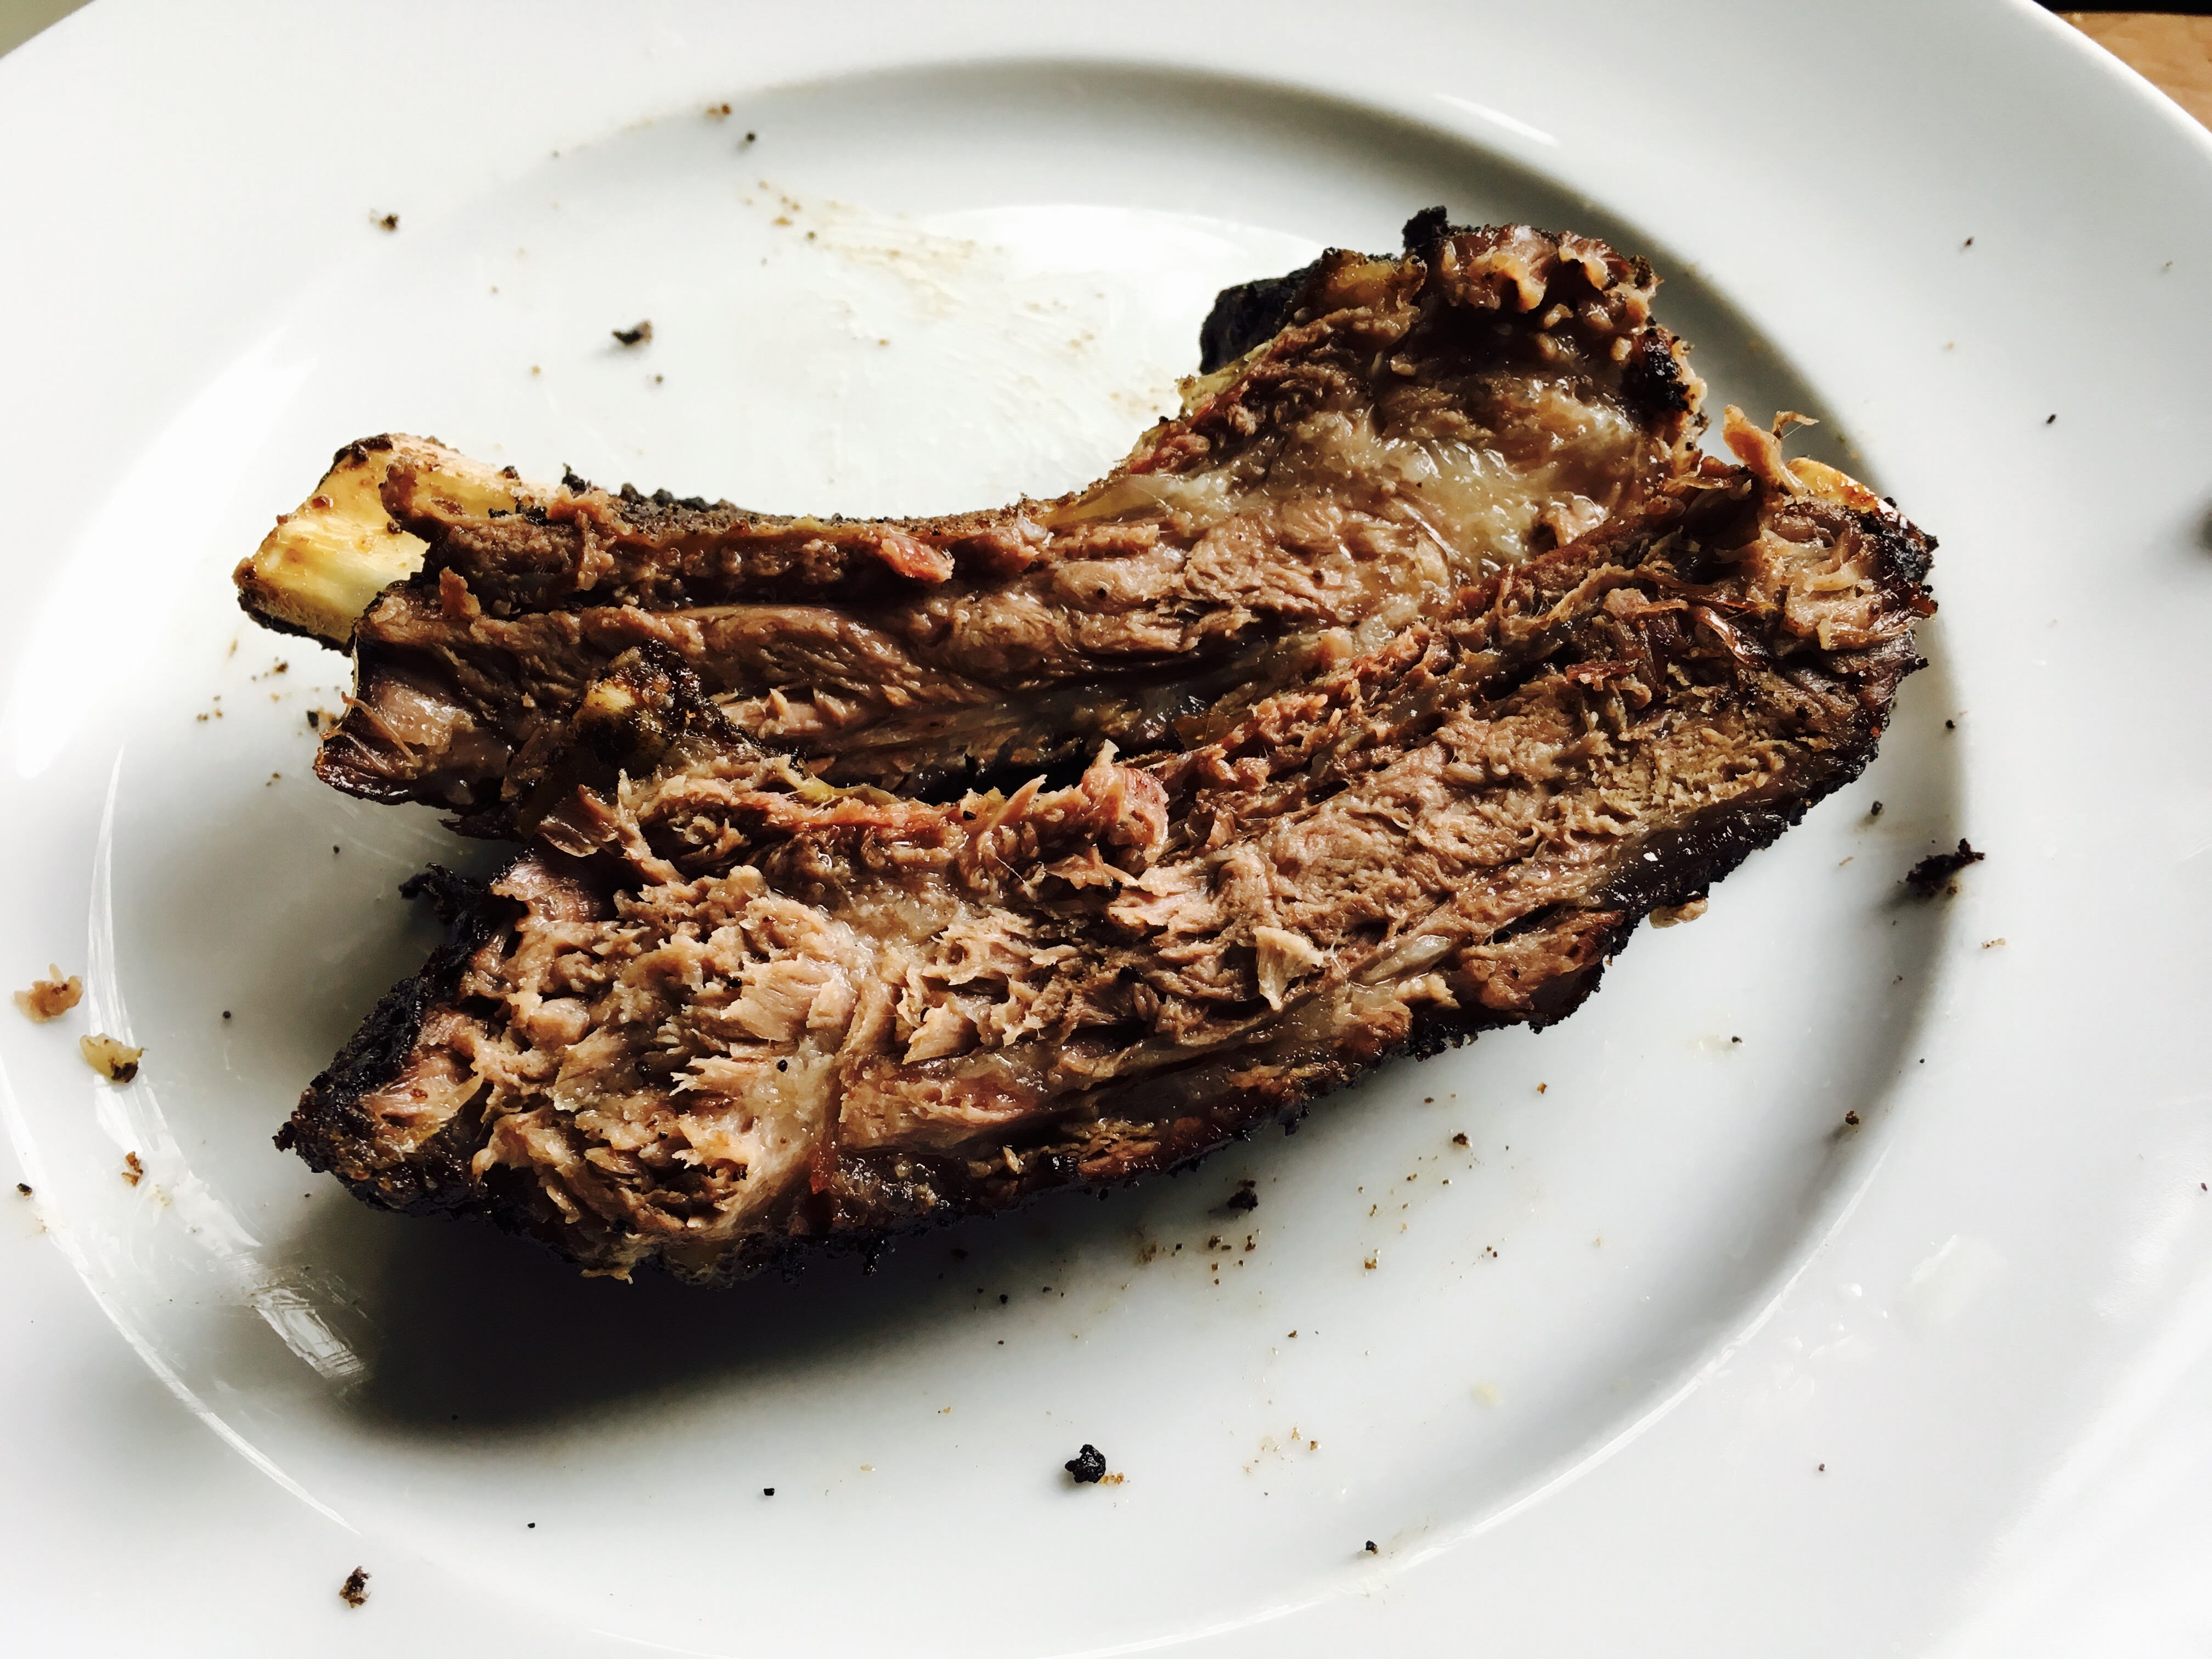
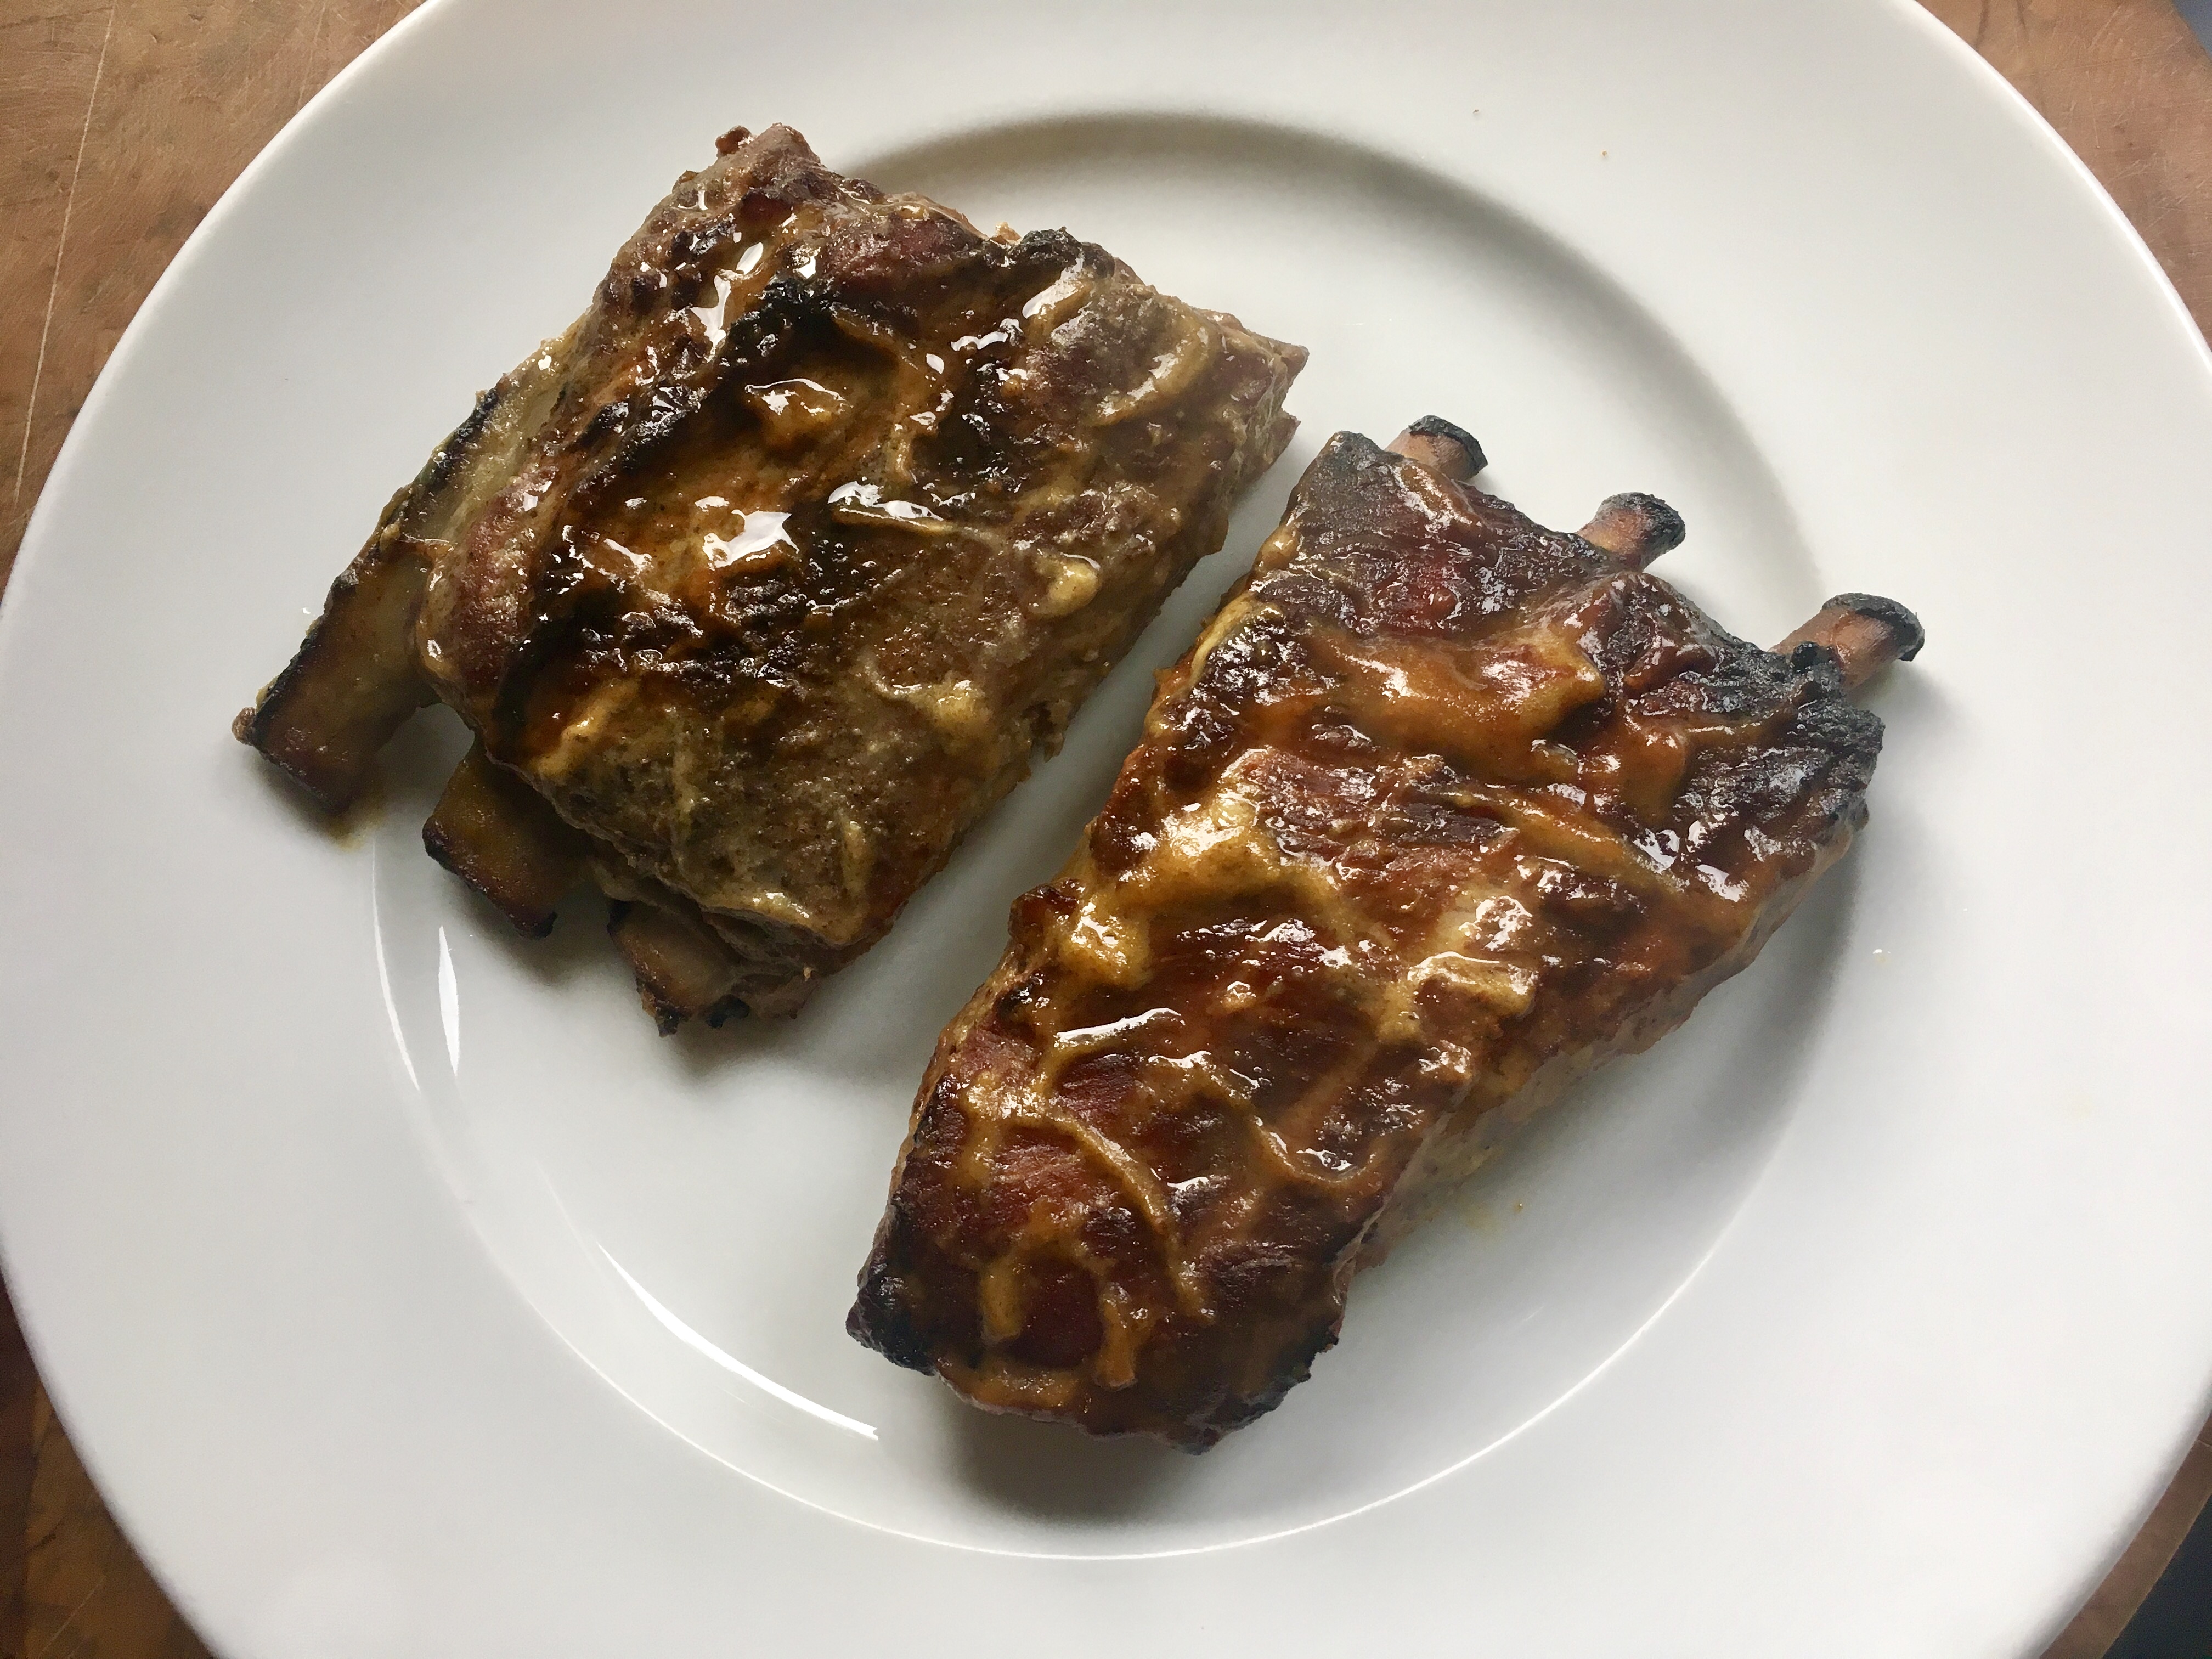
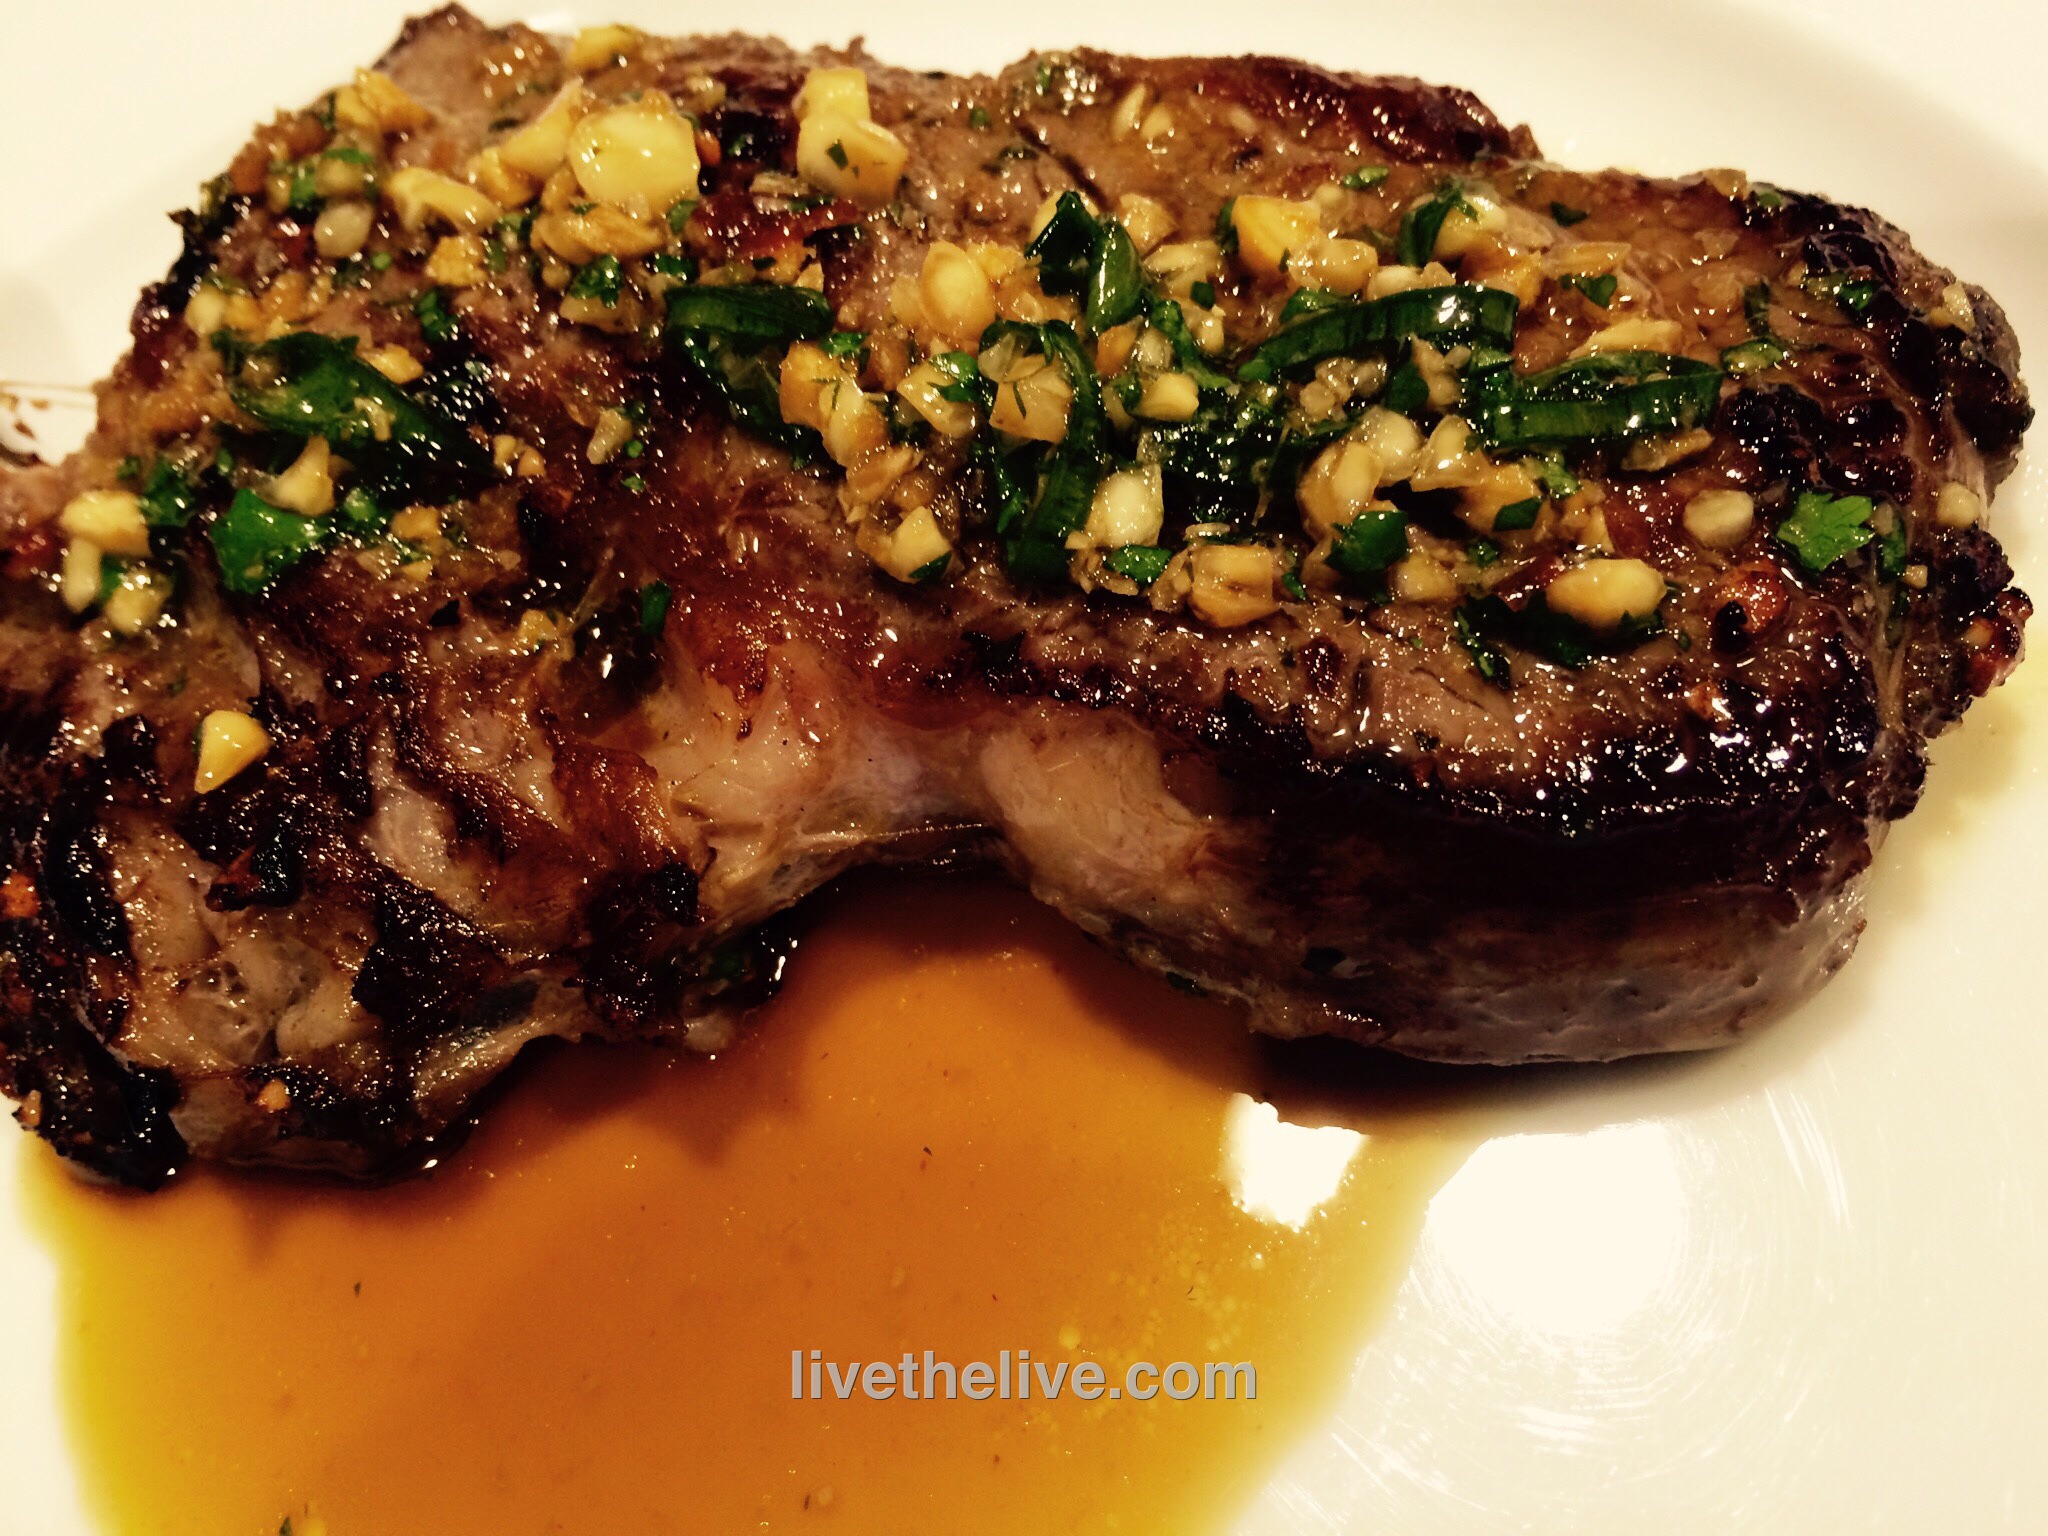
One of each: with Lawry’s and Tony Chachere’s.

Using a bit more of the apricot-mustard glaze, I brushed the ribs one more time and placed them under the broiler one last time before feasting. It was worth that extra effort to get them nice and caramelized.

The final verdict: They came out great, but I preferred the ribs seasoned with Tony Cachere’s better. The Cajun seasoning added a nice kick of heat to counterbalance the sweetness of the apricot-mustard glaze.

The original recipe called for skirt steak, but I didn’t have any in my freezer. I did have a fat ribeye, though, so once I thawed it, I sliced it lengthwise to get two large, thin steaks which would easily suck up the marinade I was going to make. And the ribeye was nicely marbled, so it stayed juicy and tender.


image


1/4 cup toasted sesame oil
1/4 cup soy sauce
2 tablespoons grated ginger
2 tablespoons finely chopped garlic
2 tablespoons finely chopped cilantro
2 tablespoons chopped dry roasted unsalted peanuts
2 scallions, minced
1 tablespoon light brown sugar
1 tablespoon fresh squeezed lime juice
1 tablespoon chile oil
2 lbs. beef ribeye (or skirt steak or beef flap)
1/4 cup chicken stock (homemade is best)

In a bowl, whisk together the sesame oil, soy sauce, ginger, garlic, cilantro, peanuts, scallions, sugar, lime juice and chile oil. Transfer half of it to a shallow dish.
Add the steak to the dish and turn the meat to coat it well. Cover and refrigerate the beef overnight. Refrigerate the remaining marinade.

The next day, light a grill. While it’s warming up, add the chicken stock to the reserved marinade. I like to heat it to combine it well, not letting it reach a boil,  then remove it from the heat and let it come to room temperature. This will be the dipping sauce for the beef.

Bring the steak to room temp, season with salt and pepper, and grill it over high heat until medium-rare, about 5 minutes. If it’s too cold to light a grill, or if you just want to use the oven, heat a cast iron pan, add a few drops of avocado oil, and sear the beef on both sides before placing it in a pre-heated 375-degree oven to finish cooking.

Devour the beef with the dipping sauce!


Sometimes the happiest of cooking accidents happen with bacon. My original plan was to make Chinese-style honey ribs for dinner. But instead of pulling a nice rack of ribs out of the freezer, I accidentally took out a slab of pork belly. I only realized my mistake when I thawed it and started cooking it, so I decided to continue the process with the pork belly instead. The results were pretty damn tasty.


image


Marinade:
¾ cup light soy sauce
6 Tablespoons hoisin sauce
5 lbs. pork belly
Zest and juice of 1 lemon
2 whole star anise
2 cinnamon sticks (3”)
1/2 cup honey
4 cups chicken broth
image
Mix the marinade ingredients. Set aside.
Cut the pork belly into pieces that are about 3 inches square. Place them in a large pot. Cover them with water and bring it to a boil. Boil for 5 minutes. Drain.
Place the pork belly pieces on a sheet pan lined with non-stick aluminum foil. Coat them with marinade while they’re still hot. Let them sit for 10 minutes.
Pre-heat the oven to 350 degrees. Bake the pork belly pieces on the sheet pan for 30 minutes.
While the pork belly is baking, start the sauce in a large non-stick pan or pot: combine the lemon zest and juice, star anise, cinnamon sticks, honey and chicken broth. Bring it all to a boil, then reduce to a simmer.
When the pork belly pieces have finished baking, add them (and any fat or liquid in the pan) to the sauce pot and simmer (covered) for at least 15 minutes or until the meat is tender.
Turn the heat on high, uncover the pot and cook until the sauce is reduced to a glaze that coats the ribs. Reduce the heat as the sauce thickens to avoid the sugars in the honey from burning. When the pieces are sticky and gooey, they are ready!
Let a piece of pork belly cool…then slice the to the desired thickness and fry it like regular bacon….or just pop it in your mouth like pork candy!
Makes an amazing omelet!
image