Archive for the ‘frying’ Category

Pork chops were a favorite of mine growing up, but my Mom cooked them only one way: breaded and fried in a pan full of oil. They were good, but they were greasy, and my Mom was not big on seasonings. And she cooked the hell out of it. It was time to improve on the original.

Using the best quality pork I can get, like Berkshire pork, makes a real difference in flavor. It also matters to me that the animals are humanely treated while they’re on the farm. No factory-farmed meats.

chop 1


2 Berkshire pork chops
1 egg
1/2 cup plain bread crumbs (I use gluten-free)
1 teaspoon salt
1/4 teaspoon pepper
1 teaspoon dried oregano
1 teaspoon dried parsley
1/2 teaspoon granulated garlic
1/2 teaspoon granulated onion
olive oil


Pre-heat the oven to 350 degrees.

Set up 2 bowls. In one, crack and scramble the egg. In the other, combine the bread crumbs, salt, pepper, oregano, parsley, granulated garlic and granulated onion.

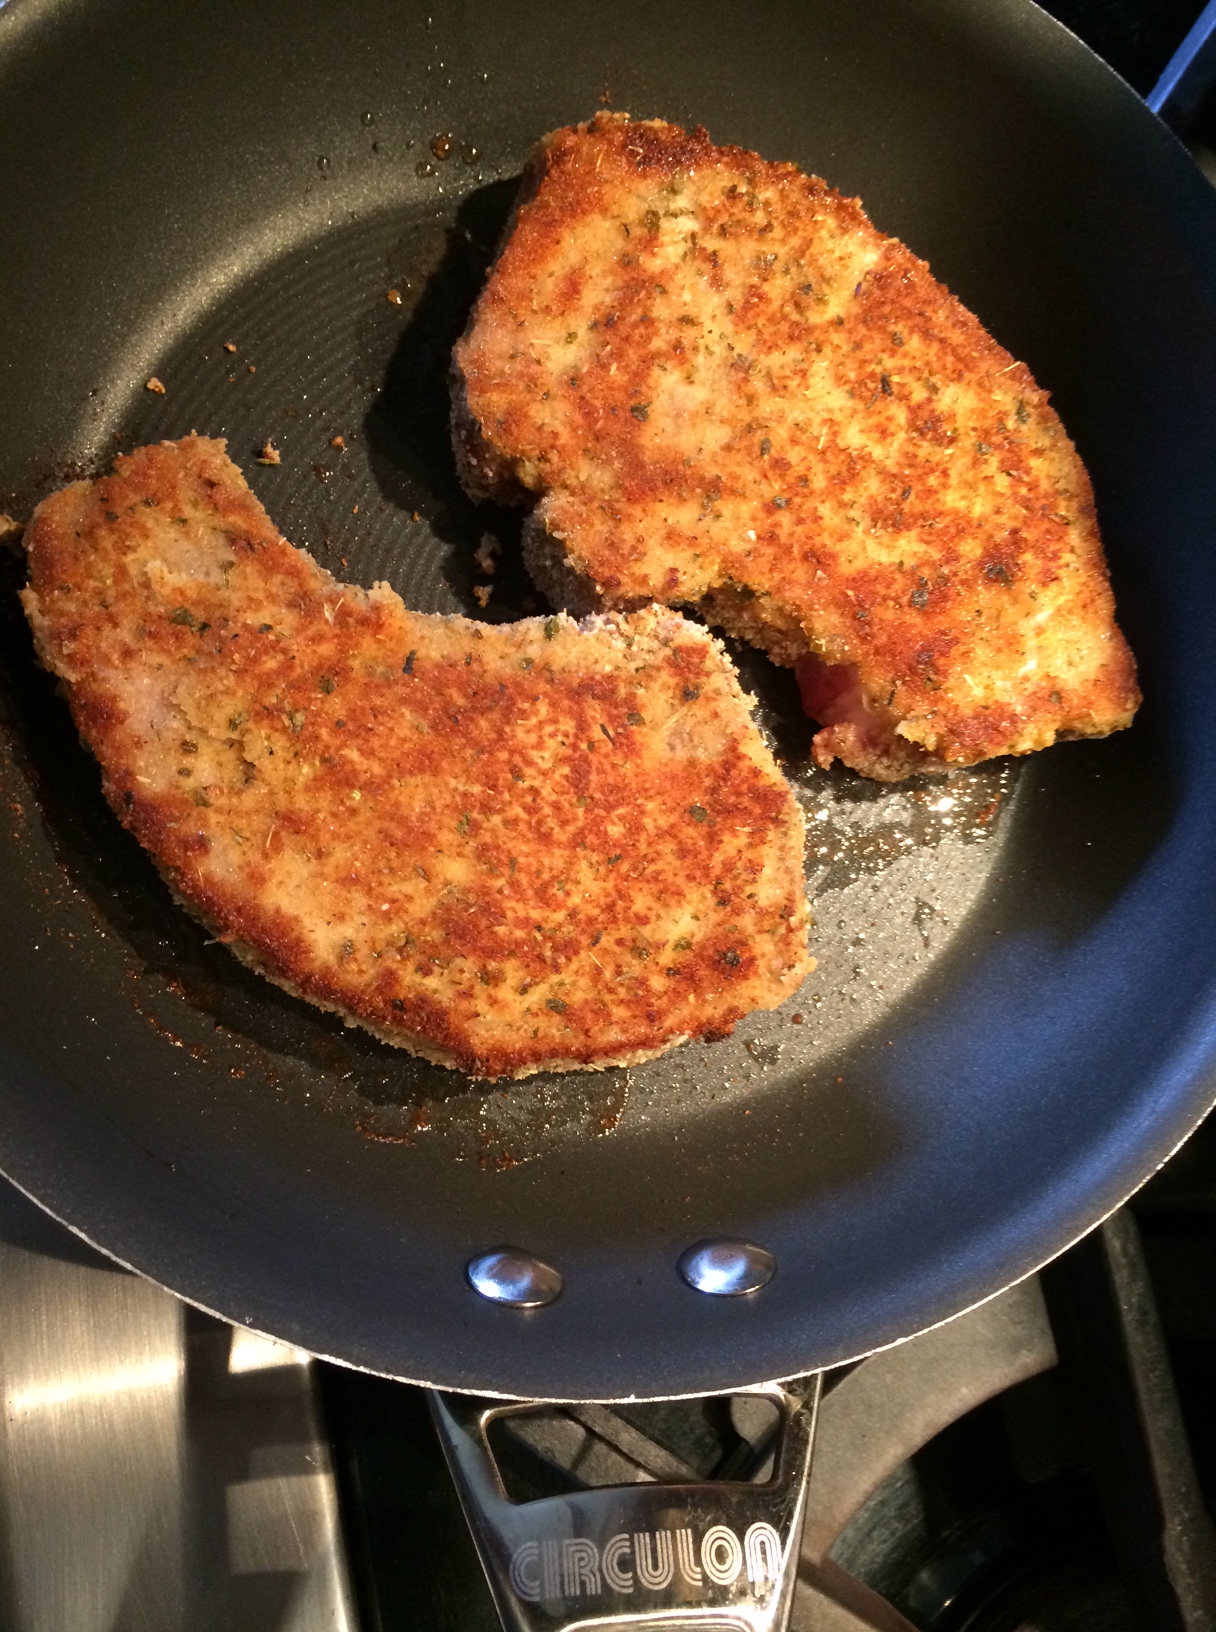
Place an oven-proof pan on medium-high heat and add a little olive oil. Once the oil is hot, cover the pork chops in the egg wash and then coat with the bread crumb mixture. Place in the hot pan to brown and sear. Do this with both chops.

After a few minutes, flip the chops over in the pan and place the pan in the oven to finish cooking.

chop 2

Remember, good pork does not need to be cooked until well done!


There’s no problem with your bird, she said to me
Just go low and slow to cook it perfectly
A few choice seasonings end up deliciously
There must be 50 ways to roast your chicken…
There’s nothing better than a whole roasted chicken. Simply season it, pop it in the oven and go low and slow. No maintenance, and you’ve got a great bird in a couple of hours. 
Once you go with humanely raised pastured chicken, you’ll never go back to supermarket chicken again. The flavor is fantastic, and you’ll devour it right down to the bones, which you can use to make the best home-made chicken stock or soup you’ve ever had. Nothing goes to waste.
I roast at least one chicken every week, so to change it up, I’ve come up with many different rubs and sauces over the years. All of the rubs are sugar and gluten-free preparations. The sauces may have one or both.
Chicken with Rosemary and Lemon
 IMG_9146
The lemon serves double-duty in this dish. You use the zest to season the outside skin, then you place the remaining cut up pieces inside the carcass to flavor from the inside out.
1 tablespoon finely chopped fresh rosemary
1 teaspoon granulated garlic
2 teaspoons salt
zest from 2 lemons, using a micro plane zester, the leftover lemons quartered
1/2 teaspoon black pepper
In a bowl, combine the rosemary, garlic, salt, lemon zest, and pepper. 
Thaw a bird, remove the giblets, and rub it all over with olive oil. Shove the quartered lemon pieces into the carcass of the bird. Season the bird inside and out with the rosemary seasoning mix.
Place the bird on a pan lined with non-stick aluminum foil in a pre-heated 450-degree oven. Cook for 10 minutes at this temperature, then reduce to 275 degrees and cook low and slow until done.
Tarragon Chicken
I love the taste of chicken seasoned with tarragon. Careful with this, or you will accidentally devour your fingers!
1 tablespoon dried tarragon, crumbled into a powder
1 teaspoon garlic salt
1 teaspoon salt
1/2 teaspoon black pepper
olive oil
In a bowl, combine the tarragon, garlic salt, salt and pepper.
Thaw a bird, remove the giblets, and rub it all over with olive oil. Season the bird inside and out with the seasoning mix.
Place the bird on a pan lined with non-stick aluminum foil in a pre-heated 450-degree oven. Cook for 10 minutes at this temperature, then reduce to 275 degrees and cook low and slow until done.
Italian Chicken
FullSizeRender
The darker color of the bird comes from rubbing it first with balsamic vinegar, then olive oil, before coating it with Italian seasonings. Don’t use the fancy, expensive balsamic. The bottles that go for about 9 bucks in the supermarket work well for this recipe.
Balsamic vinegar
Olive oil
1 tablespoon salt
1 tablespoon parsley
1 teaspoon oregano
1 teaspoon pepper
1 teaspoon granulated onion
1/2 teaspoon granulated garlic
Thaw a bird, remove the giblets, and rub it all over with the balsamic vinegar. Then rub it all over with the olive oil. Season the bird inside and out with the seasoning mix.
Place the bird on a pan lined with non-stick aluminum foil in a pre-heated 450-degree oven. Cook for 10 minutes at this temperature, then reduce to 275 degrees and cook low and slow until done.
My Grandma’s Chicken
My grandmother would cook chicken thighs low and slow all Saturday morning, knowing that I was coming over for lunch after Lithuanian school. The meat just fell off the bone, and I couldn’t stop eating it. This recipe is so simple and works just as well for a whole bird. Every time I make this, I think about those days at my grandmother’s house.
Lawry’s Seasoned salt
Olive oil
Thaw a bird, remove the giblets, and rub it all over with olive oil. Season the bird inside and out with the Lawry’s Seasoned salt.
Place the bird on a pan lined with non-stick aluminum foil in a pre-heated 450-degree oven. Cook for 10 minutes at this temperature, then reduce to 275 degrees and cook until done.
If you’re using chicken thighs, like my grandmother did, make sure they have the skin on and the bone in.

I love avocado, but I never thought of cooking with it until I saw this recipe. It was a very simple burger that had only a handful of ingredients, and so I thought: “Oh, I don’t need to write this down!” After I made the burger patties and put them in the fridge to chill, I took a look at the recipe on line and realized I forgot one of the ingredients! The original recipe called for a 1/2 cup of Panko breadcrumbs mixed in. My burger tastes fantastic without it…plus now it’s low-carb and gluten-free (as long as you skip the bun!).

chicken2

1 lb. ground chicken
1 ripe avocado, sliced into small cubes
1/2 teaspoon salt
1/4 teaspoon black pepper
pinch granulated garlic

chicken1

Combine the ingredients in a bowl and mix thoroughly but carefully so that you don’t squash the cubes of avocado. Form the meat into burger patties. It will be a bit sticky, but just make sure you get the avocado evenly distributed. Chill the patties in the freezer for about 10 minutes before cooking to firm them up.

Pre-heat the oven to 350 degrees.

Heat a little oil in an oven-proof pan, and place burgers in it when hot. Let the burgers sear on one side, then flip them. Place the pan in the oven to finish cooking.

Serve with a slice of bacon and my Awesomesauce:

1/2 cup mayonnaise
1 tablespoon ketchup
1 tablespoon yellow mustard
1 tablespoon dill pickle relish
1/4 teaspoon garlic powder
1/4 teaspoon paprika
Pinch cayenne pepper

Combine all the ingredients in a bowl. Mix well. Refrigerate covered for a few hours to blend the flavors.


Not a very complex idea. I just put the stuff that’s usually on the outside, on the inside of my burgers. Why? Why not?

Instead of dealing with a package of bacon and a package of cheese and a stack of burgers, I’ve got all the ingredients conveniently inside the patties. And as the burgers cook, the fat from the bacon and the gooey cheese melt and combine with the burger meat to make a really tasty and moist burger.

I cook these on the grill, but the cast-iron skillet method, described below, works really well,  too.

I make 2 lbs. of burgers at a time, using humanely-raised local grass-fed beef, from my friends at Simmons Organic Farm in Middletown, RI.  Support your local farmers when you can!

image

2 lbs. ground grass-fed beef
1/2 cup sharp cheddar cheese, cut into 1/4″ cubes
1/2 lb. bacon, cooked crisp, cooled and crumbled
garlic salt
avocado oil or pork fat


In a bowl, combine the beef, the cheese and the bacon, mixing well so that all the ingredients are evenly incorporated.

Form the beef into 1/4 lb. patties or larger. Refrigerate them until you’re ready to cook to firm them up.

Heat a cast iron skillet and add a drop of oil or pork fat. Place the burgers in the hot skillet to sear and sprinkle with the garlic salt. When browned, flip the burgers and place the skillet in a 350-degree oven to finish cooking.

image


On our trip to Spain in 2014, croquettes were served in just about every restaurant we went to. My daughter fell in love with them, and they became the “chicken nugget” of our trip: the go-to kid food we knew we’d always rely on.

image

Once we got home, I could only find them on-line, not in stores. And since they ship frozen, it required a large purchase.

Luckily, I found a great recipe in Saveur magazine, and decided to try it out. I was a bit clumsy at making them at first–they do need a bit of finesse–but by the end of the batch, I got the hang of it. And to make them gluten-free, I simply substituted GF flour and breadcrumbs for the all-purpose flour and Panko.

image


2 lbs. potatoes, peeled and cut into 1″ cubes
4 tablespoons unsalted butter
1 onion, minced
1/4 to 1/2 cup heavy cream
6 oz. cheddar cheese, grated
6 oz. ham, finely chopped
salt and pepper
1 cup all-purpose flour (or gluten-free flour like Cup4Cup)
2 eggs
2 cups Panko breadcrumbs (or gluten-free breadcrumbs)
avocado oil for frying


image

Peel the potatoes, cut them into 1″ cubes and boil them in salted water until tender. Drain and set them aside.

Melt the butter in the same pot the potatoes were in, then add the onions and saute until translucent. Put the potatoes back in the pot and add 1/4 cup of the heavy cream. Mash the potatoes with a potato masher until smooth. Add more cream, if needed.

Add the cheese and mix until it has melted in. Add the ham and mix again. Season with salt and pepper.

Pour the contents of the pot into a metal bowl and place in the freezer to cool, stirring every 10 minutes until the mashed potato mix is cold, but not frozen.

Line up three bowls: flour (or GF flour) in the first bowl, eggs (scrambled) in the second bowl, Panko (or GF breadcrumbs) in the third.

Remove the mashed potato mix from the freezer, and with floured hands, grab enough to gently roll a small meatball in your hands. (I’ve found that starting with a round shape makes it easier to work with.)

Roll the ball in the flour, then the egg, then drop in the Panko and roll again. With the ball in your hand, gently squeeze into a tubular shape, and then place it on a sheet pan lined with non-stick aluminum foil. Continue with the rest of the potato mixture. (You may need to add another egg or two if you run out.)

Once you’ve rolled all the croquettes, place them back in the freezer for 20 minutes to firm up. (I use a sheet pan lined with non-stick aluminum foil.)

Heat a pan with 2″ of oil to 350 degrees. Remove the croquettes from the freezer, and working in small batches, fry them until golden brown. Place on paper towels, and quickly season lightly with salt while hot, if desired.

image


The croquettes freeze really well, so this batch goes a long way. Once they’ve been fried, let them cool completely to room temp. Place them in Ziploc freezer bags and store in the freezer. When it’s time to cook them, let them thaw for about 15 minutes, then place in a pre-heated 325 degree oven for another 15 minutes.


I learned most of my Cajun dishes from the cookbooks of one of the masters: chef Paul Prudhomme. Sometimes, I’d use some of his great seasoning ideas in my own dishes. This was one of them. I would cook huge batches of these chicken breasts for my Mardi Gras parties and there would never be any leftovers! Don’t wait for Fat Tuesday to come around again to make these yourself.

Double-dipping in the seasoning mix is a messy step, but it makes them extra crunchy and flavorful.

Single-dipped breasts are at the top. The extra crunchy double-dipped are at the bottom.

Single-dipped breasts are at the top. The extra crunchy double-dipped are at the bottom.


1 cup all-purpose flour
1 tablespoon salt
1 1/2 teaspoons sweet paprika
1 teaspoon granulated onion
1 teaspoon granulated garlic
1 teaspoon basil
1/2 teaspoon white pepper
1/2 teaspoon cayenne pepper
1/2 teaspoon black pepper
1/2 teaspoon dried thyme
1/2 teaspoon gumbo file (file powder), optional
2 pounds boneless, skinless chicken tenders or breasts
3 eggs
oil for frying (I like using avocado oil and some pork fat for flavor)


Cut the chicken breasts into manageable pieces. If they’re thick, slice them horizontally to make two thinner breasts. A thick piece of chicken won’t cook all the way through.

Combine the flour, salt, paprika, onion, garlic, basil, white pepper, cayenne, black pepper, thyme and gumbo file in a bowl. Mix well.

In another bowl, crack and scramble the eggs.

Single dip: Dip the chicken in the egg and then the flour mixture. Shake off an excess and place in a pan with oil that has been heated to 350 degrees on a thermometer.  Fry until it’s cooked all the way through. Drain on paper towels.

Double-dip: Dip the chicken pieces in the egg, then the seasoning mix, then the egg, then back in the seasoning mix and place directly in a pan with oil heated to 350 degrees on a thermometer. Fry the chicken until it’s cooked all the way through and golden brown. Drain on paper towels.


If you need to feed a crowd, just double or triple the recipe. I used to make a 10x batch for my Mardi Gras parties!

This recipe is gluten-free if you substitute GF flour for the all-purpose flour.


Clam fritters, conch fritters, lobster fritters…I suppose you could fritter anything. But the first time I had them with mussels, I knew that I would never fritter my life away with any other!

It was a fall afternoon in Newport, Rhode Island, at the Newport Yachting Center’s annual Oyster Festival. We’re gorging on freshly shucked oysters and clams, boiled shrimp, and…what have we here? I had never heard of a mussel fritter before, but once I took a bite, there was no turning back.

They couldn’t be easier to make, but it is crucial to have the right fritter batter. And that starts with a Rhode Island product called Drum Rock fritter mix. If you live in New England, you can find it in just about any seafood department at Whole Foods. If you live further away, you can check out their website (www.drumrockproducts.com) or try your luck with a local brand of fritter mix.

fritter ingredients


If you’re using fresh mussels, be sure to clean them well and remove the beards. Steam them in a pot over a small amount of water. As they open, they will release their flavorful juices and you want to save every drop of that broth for the fritters. Here in New England, frozen mussel meats are available in some seafood stores. All you need to do is thaw them, steam them saving the broth, and you’re ready to go.

For the fritters:
1 lb. fritter mix
2 cups cooked mussel meats
1/2 cup mussel broth (saved from steaming mussels)
1/4 to 1/2 cup good quality beer (I use Sam Adams Boston Lager)
Avocado oil for frying (I don’t use canola or vegetable oils)


Steam the mussel meats until they’re just cooked. Remove the mussel meats, and reserve 1/2 cup of the broth. Pulse the mussel meats in a food processor, but leave ’em chunky…or chop by hand.

Put the fritter mix in a large bowl. Add the mussel meats, mussel broth, and beer. Stir gently until just mixed. Let it sit for 10 to 15 minutes and do not stir again. (If you’ve got guests coming, you can prepare up to this part ahead of time, covering the bowl with a wet towel, and leaving at room temperature.)

Using a thermometer, heat the oil to 350 degrees, and using a small spoon or scoop, drop fritters in the hot oil, turning gently, cooking 3 to 4 minutes until golden.

Drain on absorbent paper, and season with salt and pepper immediately. Serve right away!

IMG_3043


For the dipping sauce:
1 cup mayonnaise
1/4 cup Ponzu sauce

The perfect dipping sauce for these mussel fritters is made from two ingredients: mayo and Ponzu sauce, a citrus-based soy sauce. Combine both ingredients in a bowl. Keep in the fridge until you’re ready to use it.

I love fried chicken. And despite what most people think, fried food is really not that bad for you if you fry it properly. I use clean avocado oil every time, sometimes adding bacon fat or pork fat if I have it. And I get the oil to the right temperature: two key factors that will result in crispy chicken that isn’t bogged down with grease. What makes this recipe great is that I get all the benefits of crispy fried chicken without all the grease and without standing watch over it the whole time.

You can use any chicken parts for this recipe. Fry the chicken until it just turns golden brown and then finish it in the oven.


10 lbs. large chicken wings or chicken pieces
Avocado oil, for frying

For soaking:

1 quart buttermilk
1 tablespoon hot sauce (I use Frank’s Red Hot)

For the seasoned flour:

2 cups all purpose flour (I use gluten-free flour)
1 tablespoon sea salt
1 teaspoon freshly ground black pepper
1 teaspoon paprika
1 teaspoon granulated garlic
1 teaspoon onion powder
1 teaspoon basil
1 teaspoon oregano

Open the bottle or carton of buttermilk and add 2 teaspoons of hot sauce. Close the container and shake to combine. Place the chicken pieces in a Ziploc bag, cover with the buttermilk, and seal the bag, letting the chicken soak in it for at least several hours. Overnight is best.

image


Pre-heat the oven to 350 degrees.

In a bowl, combine the flour, salt, pepper, paprika, granulated garlic, onion powder, basil and oregano. Mix well.

After the chicken has soaked in the buttermilk, remove the pieces one at a time, leaving the buttermilk on them as you toss the pieces into the seasoned flour. Shake off the excess flour, and then set the pieces aside on a metal baking rack placed on a sheet pan.

Pour the oil into a large heavy-bottomed stock pot to a depth of 1-inch. Heat the oil to 360 degrees on a thermometer.

image

Working in batches, place the chicken pieces in the oil, being careful not to overcrowd them. Fry the chicken until it is golden brown on both sides, then place each piece back on the metal baking rack set on the sheet pan.

Once all the chicken has been fried, place the sheet pan in the oven for 30 to 40 minutes, until it’s fully cooked and crispy.

image


Feast!

What can I say? I was craving both dishes, so I combined them. I figured: if I love each one of them, I’d be crazy over both together! Just make sure, like I had to do, that your spouse isn’t around that night if they don’t like a lot of garlic. You’ll reek for a week! But damn, it was crazy-good!

image


Pasta
1/4 lb. bacon, finely chopped
1 onion, finely chopped
18 small clams, washed and purged*
1 teaspoon fresh oregano, finely chopped
1/4 cup white wine
Good quality olive oil
6 large garlic cloves, finely chopped
1/4 cup fresh parsley, finely chopped


In a large pot, salt some water and bring to a boil. Cook the pasta until al dente.

In another large pot on medium-high heat, fry the bacon until it’s crisp. Add the onions and saute until they’re translucent. Add the clams, oregano and wine, and cover the pot with a lid. Reduce heat to medium. The clams are cooked when they open. Discard any unopened clams.

In a frying pan, heat the olive oil to medium. Add the chopped garlic and fry until just crispy. Toss in the parsley and stir to combine.

Place the pasta in a bowl or plate. Pour clams and juice over the pasta. Pour the fried garlic and oil all over the clams.


*Purging clams: Clams can be pretty sandy and gritty, so it’s important not only to scrub the outside of the shell, but to purge them as well. Clams should be stored in a bowl in the fridge with a wet dish towel over them, never in water. Once you’re ready to use them, fill a bowl with water and add salt (think salty like ocean water) and a tablespoon of corn meal. Mix this around, then add the clams and let them sit in this solution in the fridge for a couple of hours. The clams will purge (clean themselves) out. Discard the liquid and rinse the clams before cooking.

Hoisin sauce goes great with every Asian-inspired dish I make. But since my wife needs to eat only gluten-free products, finding GF hoisin is not easy. And when I did find it online, it was ridiculously expensive. So it was time to make it myself. The recipe requires gluten-free soy sauce, which is easily found in any supermarket under the La Choy brand. You can also use Japanese Tamari sauce instead of soy sauce, but read the label: some tamari sauces do contain wheat. (The San-J brand is gluten-free.)

If you do a side-by-side taste test with jarred hoisin, you’ll find that this tastes quite different. But if you use it in your favorite Asian recipe, you’ll see that it works beautifully.

image

4 tablespoons GF soy sauce
2 teaspoons natural creamy peanut butter
1 tablespoon honey
2 teaspoons rice vinegar
1/4 teaspoon granulated garlic
2 teaspoon sesame oil
1/4 teaspoon Sambal chili paste


Combine all the ingredients in a food processor and mix thoroughly, stopping and scraping down the sides of the bowl to incorporate all the ingredients. Keep it in a tightly sealed container, refrigerated.

image

For the dish above…

1 1/2 lbs. boneless country-style pork ribs, cut into pieces
2 tablespoons corn starch
coconut oil
1 onion, peeled and diced
1 summer squash, diced
2 scallions, chopped (green and white parts)
2 heads of broccoli, washed and chopped into individual florets
hoisin recipe (above)

Once you’ve cut the pork into inch-long pieces, place it in a bowl and toss with the corn starch until it’s coated.

Heat a pan til hot. Add a tablespoon or 2 of the coconut oil and then the pork. Cook until the pork has browned on all sides and has cooked through. Scrape the pork out into a bowl and put the pan back on the stove, setting the heat to medium. Add another tablespoon of the coconut oil and saute the onions until translucent. Add the squash and saute for a few minutes until softened. Add the scallions and saute a couple of minutes more. Add the broccoli, tossing the pan ingredients to combine, and then spoon out about 2 tablespoons of the hoisin sauce into the pan, mixing well.

Add the pork and any juices in the bowl back into the pan and toss to combine. Taste carefully to check for seasoning. Add more hoisin if needed. Don’t add too much or it will be too salty.

Serve over rice, if desired.