Archive for the ‘Recipes’ Category

Pork chops were a favorite of mine growing up, but my Mom cooked them only one way: breaded and fried in a pan full of oil. They were good, but they were greasy, and my Mom was not big on seasonings. And she cooked the hell out of it. It was time to improve on the original.

Using the best quality pork I can get, like Berkshire pork, makes a real difference in flavor. It also matters to me that the animals are humanely treated while they’re on the farm. No factory-farmed meats.

chop 1


2 Berkshire pork chops
1 egg
1/2 cup plain bread crumbs (I use gluten-free)
1 teaspoon salt
1/4 teaspoon pepper
1 teaspoon dried oregano
1 teaspoon dried parsley
1/2 teaspoon granulated garlic
1/2 teaspoon granulated onion
olive oil


Pre-heat the oven to 350 degrees.

Set up 2 bowls. In one, crack and scramble the egg. In the other, combine the bread crumbs, salt, pepper, oregano, parsley, granulated garlic and granulated onion.

Place an oven-proof pan on medium-high heat and add a little olive oil. Once the oil is hot, cover the pork chops in the egg wash and then coat with the bread crumb mixture. Place in the hot pan to brown and sear. Do this with both chops.

After a few minutes, flip the chops over in the pan and place the pan in the oven to finish cooking.

chop 2

Remember, good pork does not need to be cooked until well done!


When it’s Vidalia onion season, I find every excuse in the world to include them in my meals. I slice them thinly and use them raw in salads and saute them in any dish that hits a frying pan. But my favorite way to eat them is right off the grill.

FullSizeRender (6)

I take a couple of Vidalias and I cut the tops off them, leaving the bottom, or root, intact. That holds the onion together. I peel off the outer layer, then carefully quarter the onions, see-sawing my knife down into the bulb until I get to the root, being careful not to cut all the way through.

In a separate bowl, I mix a combination of garlic salt, pepper, paprika, and a bit of brown sugar.

FullSizeRender (4)

I take each onion, and carefully pull the quarters apart and drip some olive oil inside. Then I take some of the seasoning mix and jam it in there, as far down as I can. I coat the outside of the onion with olive oil and seasoning, too.

I light a hardwood charcoal fire and roast the onions over high heat at first to caramelize them, then I move them to a part of the grill away from direct heat, close the lid, and let them cook for a few minutes. Once they’ve cooked enough, I give them one last blast over the hot fire before serving.

FullSizeRender (7)


There’s no problem with your bird, she said to me
Just go low and slow to cook it perfectly
A few choice seasonings end up deliciously
There must be 50 ways to roast your chicken…
There’s nothing better than a whole roasted chicken. Simply season it, pop it in the oven and go low and slow. No maintenance, and you’ve got a great bird in a couple of hours. 
Once you go with humanely raised pastured chicken, you’ll never go back to supermarket chicken again. The flavor is fantastic, and you’ll devour it right down to the bones, which you can use to make the best home-made chicken stock or soup you’ve ever had. Nothing goes to waste.
I roast at least one chicken every week, so to change it up, I’ve come up with many different rubs and sauces over the years. All of the rubs are sugar and gluten-free preparations. The sauces may have one or both.
Chicken with Rosemary and Lemon
 IMG_9146
The lemon serves double-duty in this dish. You use the zest to season the outside skin, then you place the remaining cut up pieces inside the carcass to flavor from the inside out.
1 tablespoon finely chopped fresh rosemary
1 teaspoon granulated garlic
2 teaspoons salt
zest from 2 lemons, using a micro plane zester, the leftover lemons quartered
1/2 teaspoon black pepper
In a bowl, combine the rosemary, garlic, salt, lemon zest, and pepper. 
Thaw a bird, remove the giblets, and rub it all over with olive oil. Shove the quartered lemon pieces into the carcass of the bird. Season the bird inside and out with the rosemary seasoning mix.
Place the bird on a pan lined with non-stick aluminum foil in a pre-heated 450-degree oven. Cook for 10 minutes at this temperature, then reduce to 275 degrees and cook low and slow until done.
Tarragon Chicken
I love the taste of chicken seasoned with tarragon. Careful with this, or you will accidentally devour your fingers!
1 tablespoon dried tarragon, crumbled into a powder
1 teaspoon garlic salt
1 teaspoon salt
1/2 teaspoon black pepper
olive oil
In a bowl, combine the tarragon, garlic salt, salt and pepper.
Thaw a bird, remove the giblets, and rub it all over with olive oil. Season the bird inside and out with the seasoning mix.
Place the bird on a pan lined with non-stick aluminum foil in a pre-heated 450-degree oven. Cook for 10 minutes at this temperature, then reduce to 275 degrees and cook low and slow until done.
Italian Chicken
FullSizeRender
The darker color of the bird comes from rubbing it first with balsamic vinegar, then olive oil, before coating it with Italian seasonings. Don’t use the fancy, expensive balsamic. The bottles that go for about 9 bucks in the supermarket work well for this recipe.
Balsamic vinegar
Olive oil
1 tablespoon salt
1 tablespoon parsley
1 teaspoon oregano
1 teaspoon pepper
1 teaspoon granulated onion
1/2 teaspoon granulated garlic
Thaw a bird, remove the giblets, and rub it all over with the balsamic vinegar. Then rub it all over with the olive oil. Season the bird inside and out with the seasoning mix.
Place the bird on a pan lined with non-stick aluminum foil in a pre-heated 450-degree oven. Cook for 10 minutes at this temperature, then reduce to 275 degrees and cook low and slow until done.
My Grandma’s Chicken
My grandmother would cook chicken thighs low and slow all Saturday morning, knowing that I was coming over for lunch after Lithuanian school. The meat just fell off the bone, and I couldn’t stop eating it. This recipe is so simple and works just as well for a whole bird. Every time I make this, I think about those days at my grandmother’s house.
Lawry’s Seasoned salt
Olive oil
Thaw a bird, remove the giblets, and rub it all over with olive oil. Season the bird inside and out with the Lawry’s Seasoned salt.
Place the bird on a pan lined with non-stick aluminum foil in a pre-heated 450-degree oven. Cook for 10 minutes at this temperature, then reduce to 275 degrees and cook until done.
If you’re using chicken thighs, like my grandmother did, make sure they have the skin on and the bone in.

My first foray into serious cooking started when I bought “The Classic Italian Cookbook,” written by the legendary Marcella Hazan.

Like many great recipes, Fettuccine Alfredo is not complicated…but few restaurants that offer it get it right. Most of the Alfredo sauces I’ve had were watery, floury, and salty and had nothing in common with the real deal.
To this day, if I want a great Alfredo, I make it like Marcella.

alfredo2


1 cup heavy cream
3 tablespoons butter
Fleur de Sel or sea salt
1 lb. Fettuccine, fresh or dried
2/3 cup freshly grated Parmesan cheese
Freshly ground pepper
A very tiny grating of nutmeg

Put 2/3 cup of the cream and all the butter in a large saucepan that will later accommodate all the pasta. Simmer over medium heat for less than a minute, until the butter and cream have thickened. Turn off the heat.

Drop the fettuccine in a big pot of boiling salted water. If the pasta is fresh, it will take just seconds. If it’s dry, it will take a few minutes. Cook the fettuccine firmer than usual, because it will finish cooking in the pan with the butter and cream. Drain the pasta immediately and thoroughly when it’s done and transfer to the pan containing the butter and cream.

Turn the heat under the pan on low, and toss the fettuccine, coating them with the sauce. Add the rest of the cream, all the grated cheese, 1/2 teaspoon salt, the pepper and the nutmeg. Toss briefly until the sauce has thickened and the fettuccine are well coated. Taste and correct for salt.

Serve immediately!

It’s Negroni week! And an aged Negroni is even better.

Used to be that only the big distilleries were able to age their finest spirits in charred oak barrels. But now, there’s a movement goin’ on…and hand-crafted oak barrels are available to aficionados at home.

Companies like Redhead Barrels (http://www.redheadoakbarrels.com) are offering oak barrels for aging that range in size from 1 liter to 20 liters. And that’s where this enthusiast comes in: with a 1-liter barrel, I’m able to age my favorite spirit–vodka, rum, whiskey, bourbon, anything–in just a few weeks, elevating the flavors to levels previously unknown.

wood

My  1-liter barrel arrived with the spigot and bung separately. Curing the barrel is necessary before using it. You do this by rinsing the barrel out a few times to remove any loose pieces of wood chips or splinters that may still be inside. Hand-turn the spigot into the barrel until it fits snugly and place the barrel in the sink on the included stand. Fill the barrel with very hot water…and watch. Some barrels are totally watertight and will not leak. Others may take literally a few days of repeated fillings with hot water before it thoroughly seeps into the wood, expanding it to seal the barrel.

Once there are no leaks, it’s ready to go. Empty the water out of the barrel and fill it with your favorite spirit. Because there is more wood surface area to less liquid (as compared to the large barrels companies like Jack Daniels use), your alcohol will age faster…in weeks instead of years. Once you’ve aged it as much as you want, you simply pour it into a bottle to stop the aging process. Rinse the barrel out thoroughly, and you are ready to age yet another spirit.

I chose to age a cocktail that I first savored at the Greenhouse Tavern in Cleveland, Ohio, the brainchild of talented chef Jonathon Sawyer. The call it a Negroski, their take on a Negroni. It features equal parts Campari, Cocchi sweet vermouth, and OYO stone fruit vodka. They make large batches of it and keep it in a barrel until they serve it. So enamoured my wife and I were with this drink, that I begged the bartender to give me the recipe.

Doing the math, equal parts of each ingredient meant 1 1/3 cups of each to make a quart…which fit perfectly in my 1-liter barrel. Once I corked the top with the bung, it was time to let it age.

A slight daily rotation of the barrel gently rocks the liquid inside, exposing it to the barrel’s charred wood interior, giving it more flavor. And at the end of   a week, I was ready for my first tasting: the wood had a subtle influence, rounding out the flavors. I wanted a little more, so I waited another week.: even better, but not quite there. It took a total of three weeks before the drink reached its flavorful peak.

I poured some of the drink into a cocktail shaker with ice, stirred briskly with a spoon, and strained it into a martini glass, garnishing with a twist of blood orange peel. Delicious!

cask

Just recently, I purchased a 3-liter barrel. After all, 3 times the booze means 3 times the fun!

I love avocado, but I never thought of cooking with it until I saw this recipe. It was a very simple burger that had only a handful of ingredients, and so I thought: “Oh, I don’t need to write this down!” After I made the burger patties and put them in the fridge to chill, I took a look at the recipe on line and realized I forgot one of the ingredients! The original recipe called for a 1/2 cup of Panko breadcrumbs mixed in. My burger tastes fantastic without it…plus now it’s low-carb and gluten-free (as long as you skip the bun!).

chicken2

1 lb. ground chicken
1 ripe avocado, sliced into small cubes
1/2 teaspoon salt
1/4 teaspoon black pepper
pinch granulated garlic

chicken1

Combine the ingredients in a bowl and mix thoroughly but carefully so that you don’t squash the cubes of avocado. Form the meat into burger patties. It will be a bit sticky, but just make sure you get the avocado evenly distributed. Chill the patties in the freezer for about 10 minutes before cooking to firm them up.

Pre-heat the oven to 350 degrees.

Heat a little oil in an oven-proof pan, and place burgers in it when hot. Let the burgers sear on one side, then flip them. Place the pan in the oven to finish cooking.

Serve with a slice of bacon and my Awesomesauce:

1/2 cup mayonnaise
1 tablespoon ketchup
1 tablespoon yellow mustard
1 tablespoon dill pickle relish
1/4 teaspoon garlic powder
1/4 teaspoon paprika
Pinch cayenne pepper

Combine all the ingredients in a bowl. Mix well. Refrigerate covered for a few hours to blend the flavors.


Sure, most people will be grilling this weekend. But this is a great dish for those that want to pass on the beef. This is a delicious salad that you can serve warm or cool. You can make this the day before. Wrap it in plastic, and keep it in the fridge. Then, when your guests arrive, let it warm to room temperature. Taste for seasoning before serving. If you’re not a fan of quinoa, brown basmati rice works well, too.

FullSizeRender (8)


1 1/3 cup dry quinoa (or 1 cup basmati rice)
Chicken stock
Juice of 1 lemon
2 pounds wild-caught American shrimp, peeled and de-veined (16 to 18 count)
1 cup of asparagus stalks, cut into 1″ lengths
1/2 cup minced scallions, green part only
1 cup chopped fresh dill
1 cup chopped fresh flat-leaf parsley
1 English cucumber, peeled, seeded and medium-diced
1/4 cup red onion, small diced
1/2 cup seeded and chopped tomatoes
3/4 pound good feta cheese, crumbled
Extra virgin olive oil
Salt and pepper


Prepare the quinoa according to the package directions, using chicken stock instead of water. Once it’s cooked, place it in a large bowl.

Place the shrimp on a sheet pan, drizzle with olive oil, and sprinkle with salt and pepper. Toss to combine and spread out in a single layer. Roast for 5 to 6 minutes in a pre-heated 350 degree oven, until the shrimp are cooked through. Don’t overcook!

Add the shrimp to the quinoa, then add the lemon juice, scallions, dill, parsley, cucumber, onion, tomatoes, 2 teaspoons salt, and 1 teaspoon pepper. Add the feta and stir carefully. Set aside at room temperature for 1 hour to allow flavors to blend.


Instead of opening a nasty can of Manwich or other similar product, the classic Sloppy Joe sandwich is easy enough to make from scratch.

My version takes on a Mexican twist (hence the name Sloppy José), using seasoned taco meat and a great barbecue sauce. Putting them together with a sprinkling of Mexican cheese on a bun with lettuce and tomato makes for one sloppy but delicious sandwich!

sloppy jose


For the barbecue sauce…

2 cups ketchup
3/4 cup water
6 tablespoons white vinegar
6 tablespoons apple cider vinegar
6 tablespoons brown sugar
3 tablespoons Worcestershire sauce
1 tablespoon chili powder
2 teaspoons salt
2 teaspoons black pepper
1 1/2 teaspoons cumin


Mix all the ingredients in a saucepan and simmer until the flavors have blended, about 20 minutes. Remove from heat and cool to room temp. If you store it in an airtight container in the fridge, it’ll stay good for a few months.


For the seasoned taco meat…

1 teaspoon granulated garlic
1 teaspoon onion powder
1/4 teaspoon crushed pepper flakes
1 teaspoon dried Mexican oregano
1 teaspoon paprika
2 teaspoons ground cumin
1 teaspoon sea salt
1 teaspoon black pepper
1 Spanish onion, finely chopped
olive oil
2 lbs. grass-fed ground beef


Combine all the spice ingredients in a bowl.

Saute the onions in a bit of olive oil until translucent. Add the beef and saute until cooked, mixing in the spice mixture a little at a time until you’ve used it all.


For the sandwich…

Take some of the taco meat and place it in a small non-stick pan and heat on medium. Squirt in as much of the barbecue sauce as you like, mixing thoroughly. Sprinkle some grated Mexican cheese on top. (I like Cotija, which is like a Mexican feta, but a bag of mixed cheeses works great, too.) Mix thoroughly, letting it all melt together into one warm, gooey mess. Throw it on a bun. Add lettuce, tomato, avocado slices, whatever you like!


Bulgogi is the name given to the most common form of Korean barbecue. Unlike the daeji bulgogi that I cooked in my earlier blog, this one is not based on a chili sauce that can take the roof of your mouth right off.

I used chicken, though this would work with pork as well, and for the best flavor, it’s best to marinate the meat in the fridge overnight.

FullSizeRender (12)

2/3 cup soy sauce
1/2 cup chopped scallions
6 tablespoons sugar (I use organic cane sugar)
5 tablespoons fresh garlic, grated or through a garlic press
5 tablespoons sesame oil
1 tablespoon sesame seeds
1 teaspoon black pepper
5 lbs. chicken pieces (skin-on thighs work best)


Combine all the ingredients except for the chicken in a bowl and mix well.

Place the chicken pieces in a large Ziploc bag and pour the marinade in. Seal the bag well and squish it around to make sure the marinade makes contact with the chicken. Place the bag in a bowl (to prevent accidental leakage) and keep it in the fridge overnight. Squish the bag around every few hours to make sure the marinade does its job.

When ready to cook the next day, pre-heat the oven to 350 and remove the bag from the fridge and let it come to room temperature. Place the chicken on a sheet pan (discard the remaining marinade) and bake for an hour.

Light a hot grill and push the coals to one side of the grill. Place the chicken pieces on the cool side of the grill and close the lid, opening the vents. Every few minutes, turn the chicken pieces over so they get nice grill marks but don’t burn.FullSizeRender (11)

I’ve always been fascinated by Korean barbecue. Every time I see it on TV or catch a recipe on an e-mail blast, my mouth waters and I say to myself that I’ve got to experience it some day. But the painful reality is: Korean barbecue can be really spicy…and I’m a total wuss.

Korean barbecue 101: Gogigui means “meat roast” in Korean, and it refers to the method of roasting beef, pork, chicken, and other meats. Meats can be marinated or not. Bulgogi is the name of the most common Korean barbecue. Meat is marinated with soy sauce, sugar, sesame oil, garlic and pepper, and then grilled. Galbi uses beef short ribs, and adds onions to the marinade. And the hot stuff is daeji bulgogi, because the marinade isn’t soy sauce-based, but based on the hot-n-spicy Korean chili paste known as gochujang.

All of the marinades looked delicious, but the hot one with gochujang would be my biggest challenge, so I decided to start there. I found a great recipe, and quickly realized that I would have to turn the heat way down if I was actually going to try to eat it! For example, the original recipe called for 2 tablespoons of white pepper. I totally left it out. And it called for a full cup of gochujang. Not only did I cut that part in half, I doubled many of the other non-spicy ingredients.

So is it authentic Korean barbecue? Probably not. But it’s my version of it. It’s got lots a flavor and still carries a bit of heat.

For gluten-free diets: finding GF hoisin and soy sauce is easy. Look for the La Choy brand. But I haven’t been able to find gochujang that has a GF label.


image


3/4 cup ketchup
1/2 cup gochujang
1/2 cup hoisin sauce (I use gluten-free hoisin)
1/2 cup honey
1/2 cup soy sauce
1/4 cup brown sugar
2 tablespoons freshly grated ginger
1 tablespoon freshly grated garlic (I use a garlic press)
1 tablespoon unseasoned rice vinegar
4 lbs. chicken pieces


Pre-heat the oven to 500 or its top temperature.

In a bowl, mix everything but the chicken pieces. Brush the sauce onto the chicken pieces, then wrap them in aluminum foil. (I like to tear a long piece of aluminum foil and lay it on top of a sheet pan. I place the chicken pieces on the foil, brush them with sauce on all sides, then fold the foil over the chicken, making one large pouch that holds all the meat.) Leave the pouch on the sheet pan and place it in the oven. Lower the oven temp to 350.

Cook the chicken for about an hour, making sure it’s almost completely cooked. Juices should run clear, not bloody, when you poke it with a fork.

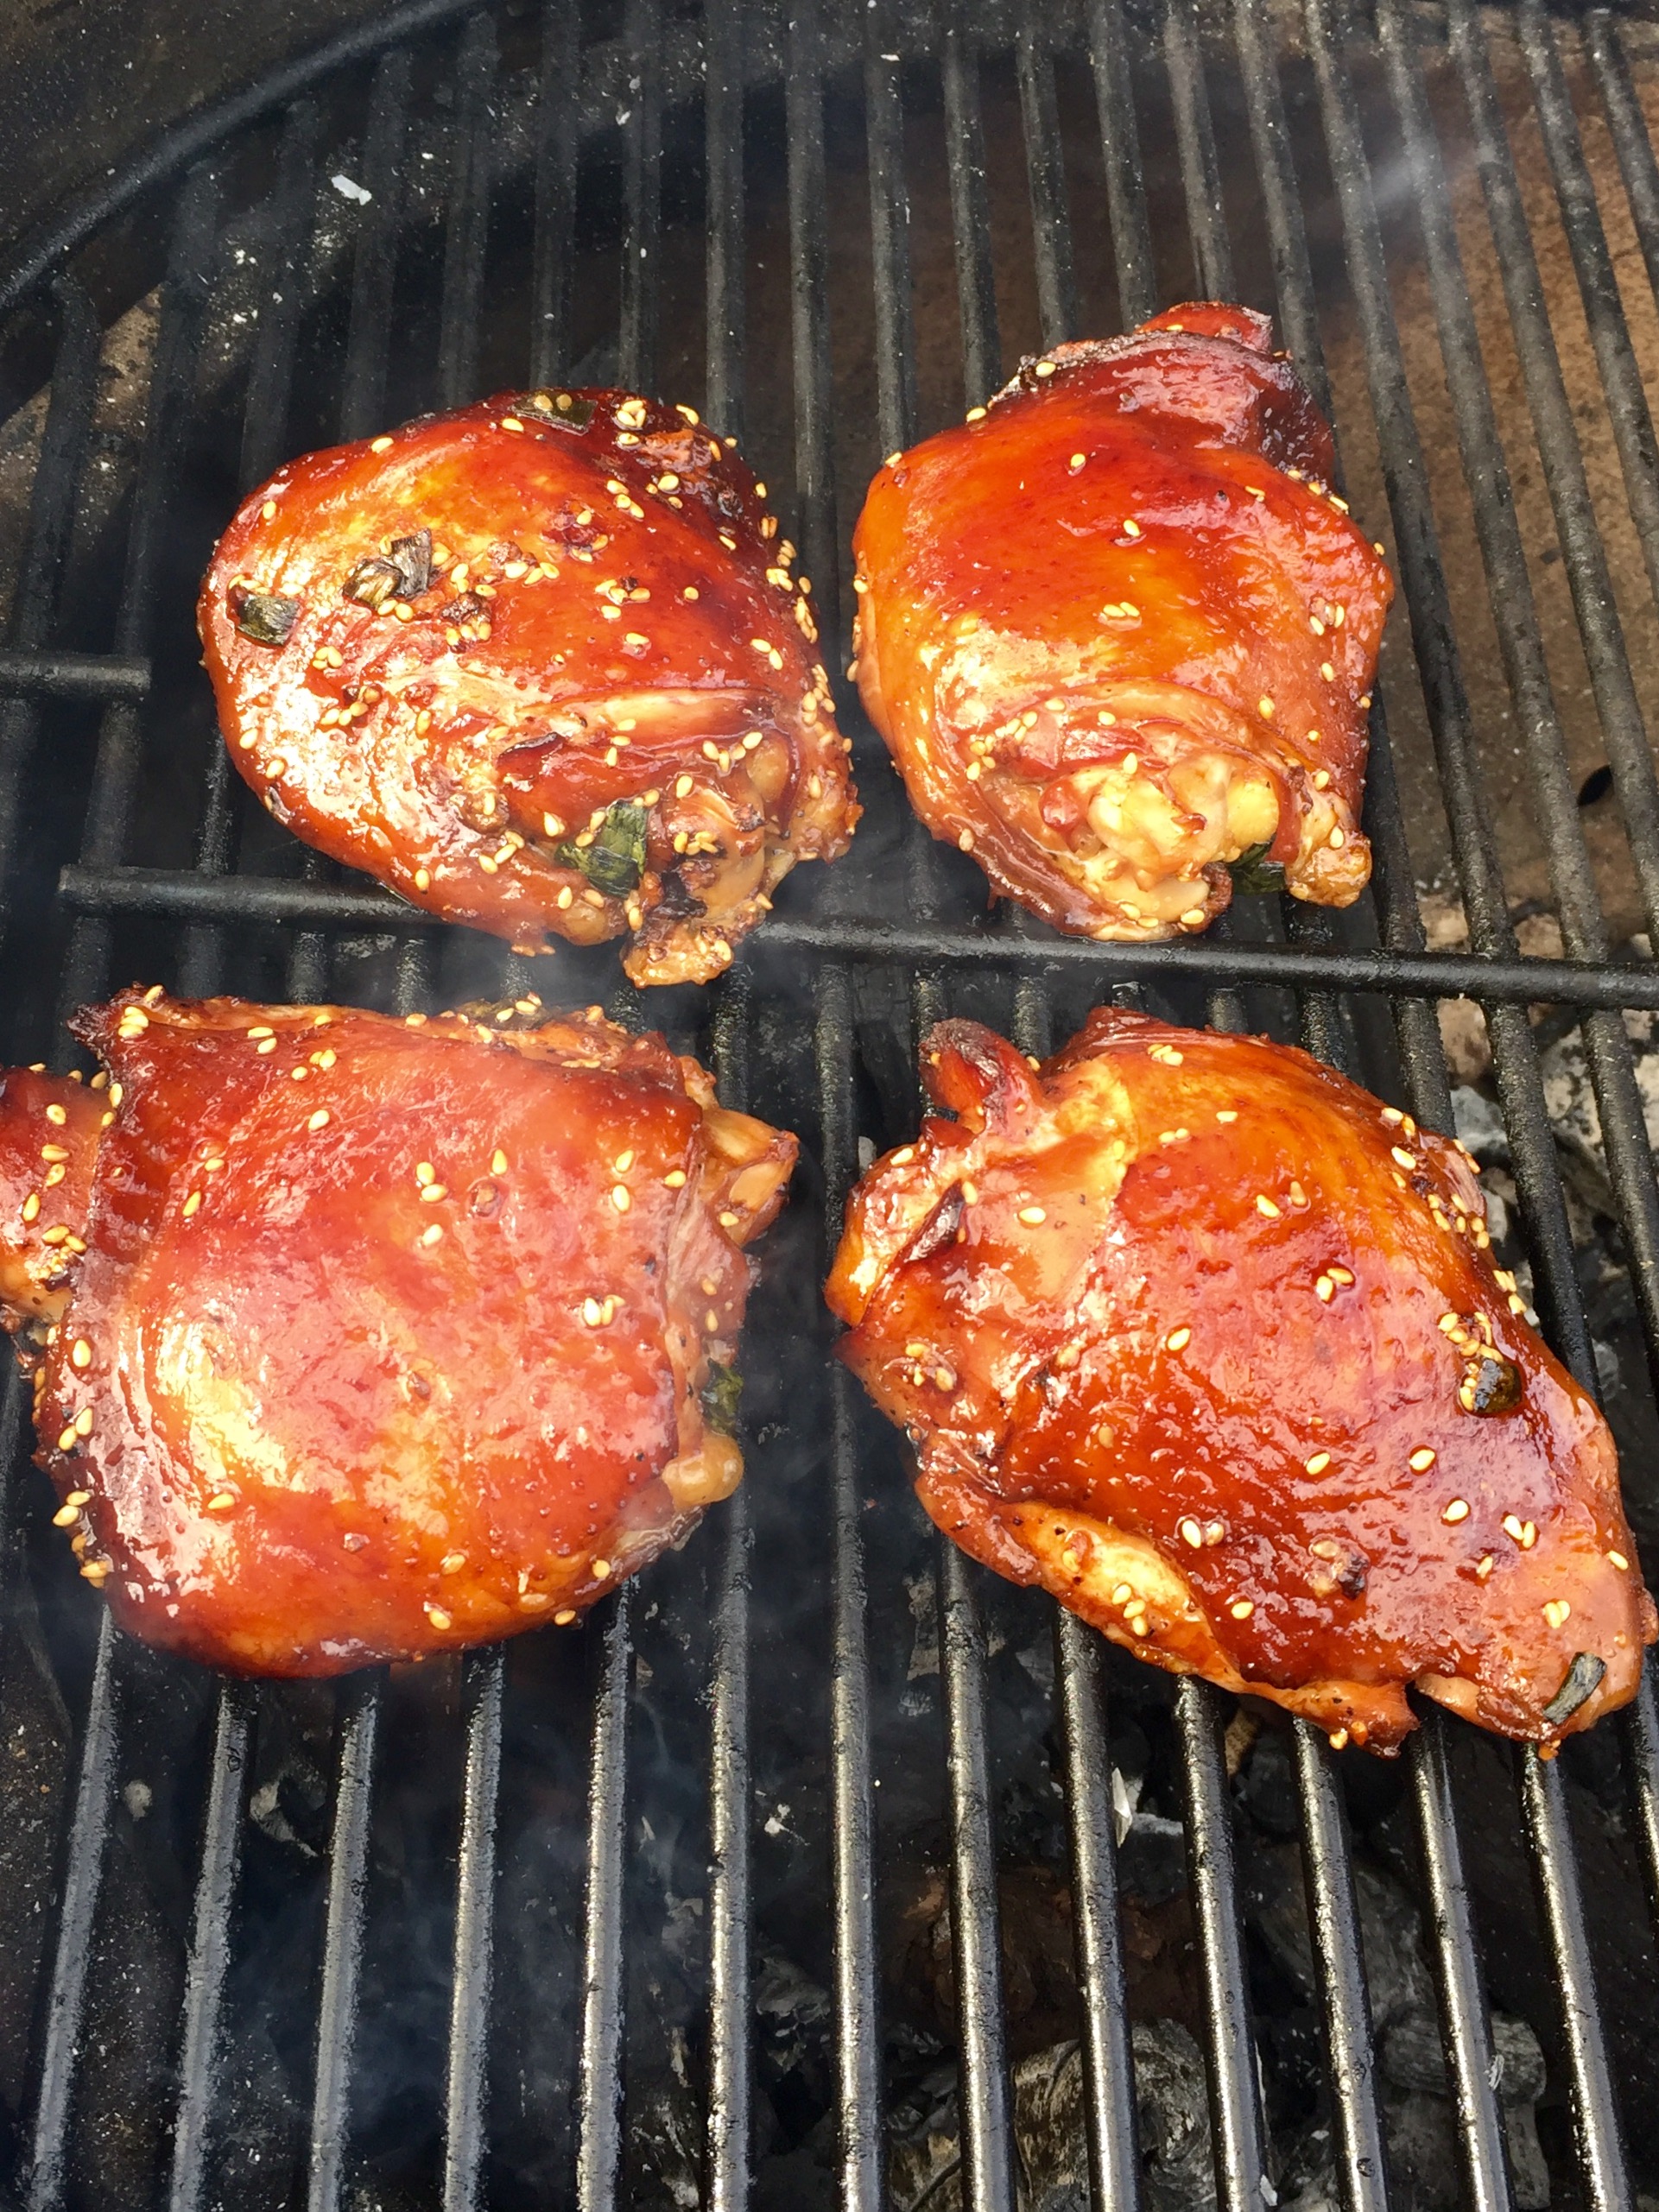
Start a hardwood fire on your grill. Push the coals to one side of the grill so you have a hot side and a cooler side with no coals underneath it. Place the chicken pieces on the cool side of the grill (if you put it on the hot side, it will stick and burn), brush with more sauce, and put the lid on the grill, making sure you have the vents open for air circulation.

image

See those 2 black bits in the foreground? That’s where the chicken stuck to the grill because I placed them over the hot coals. Don’t do that.

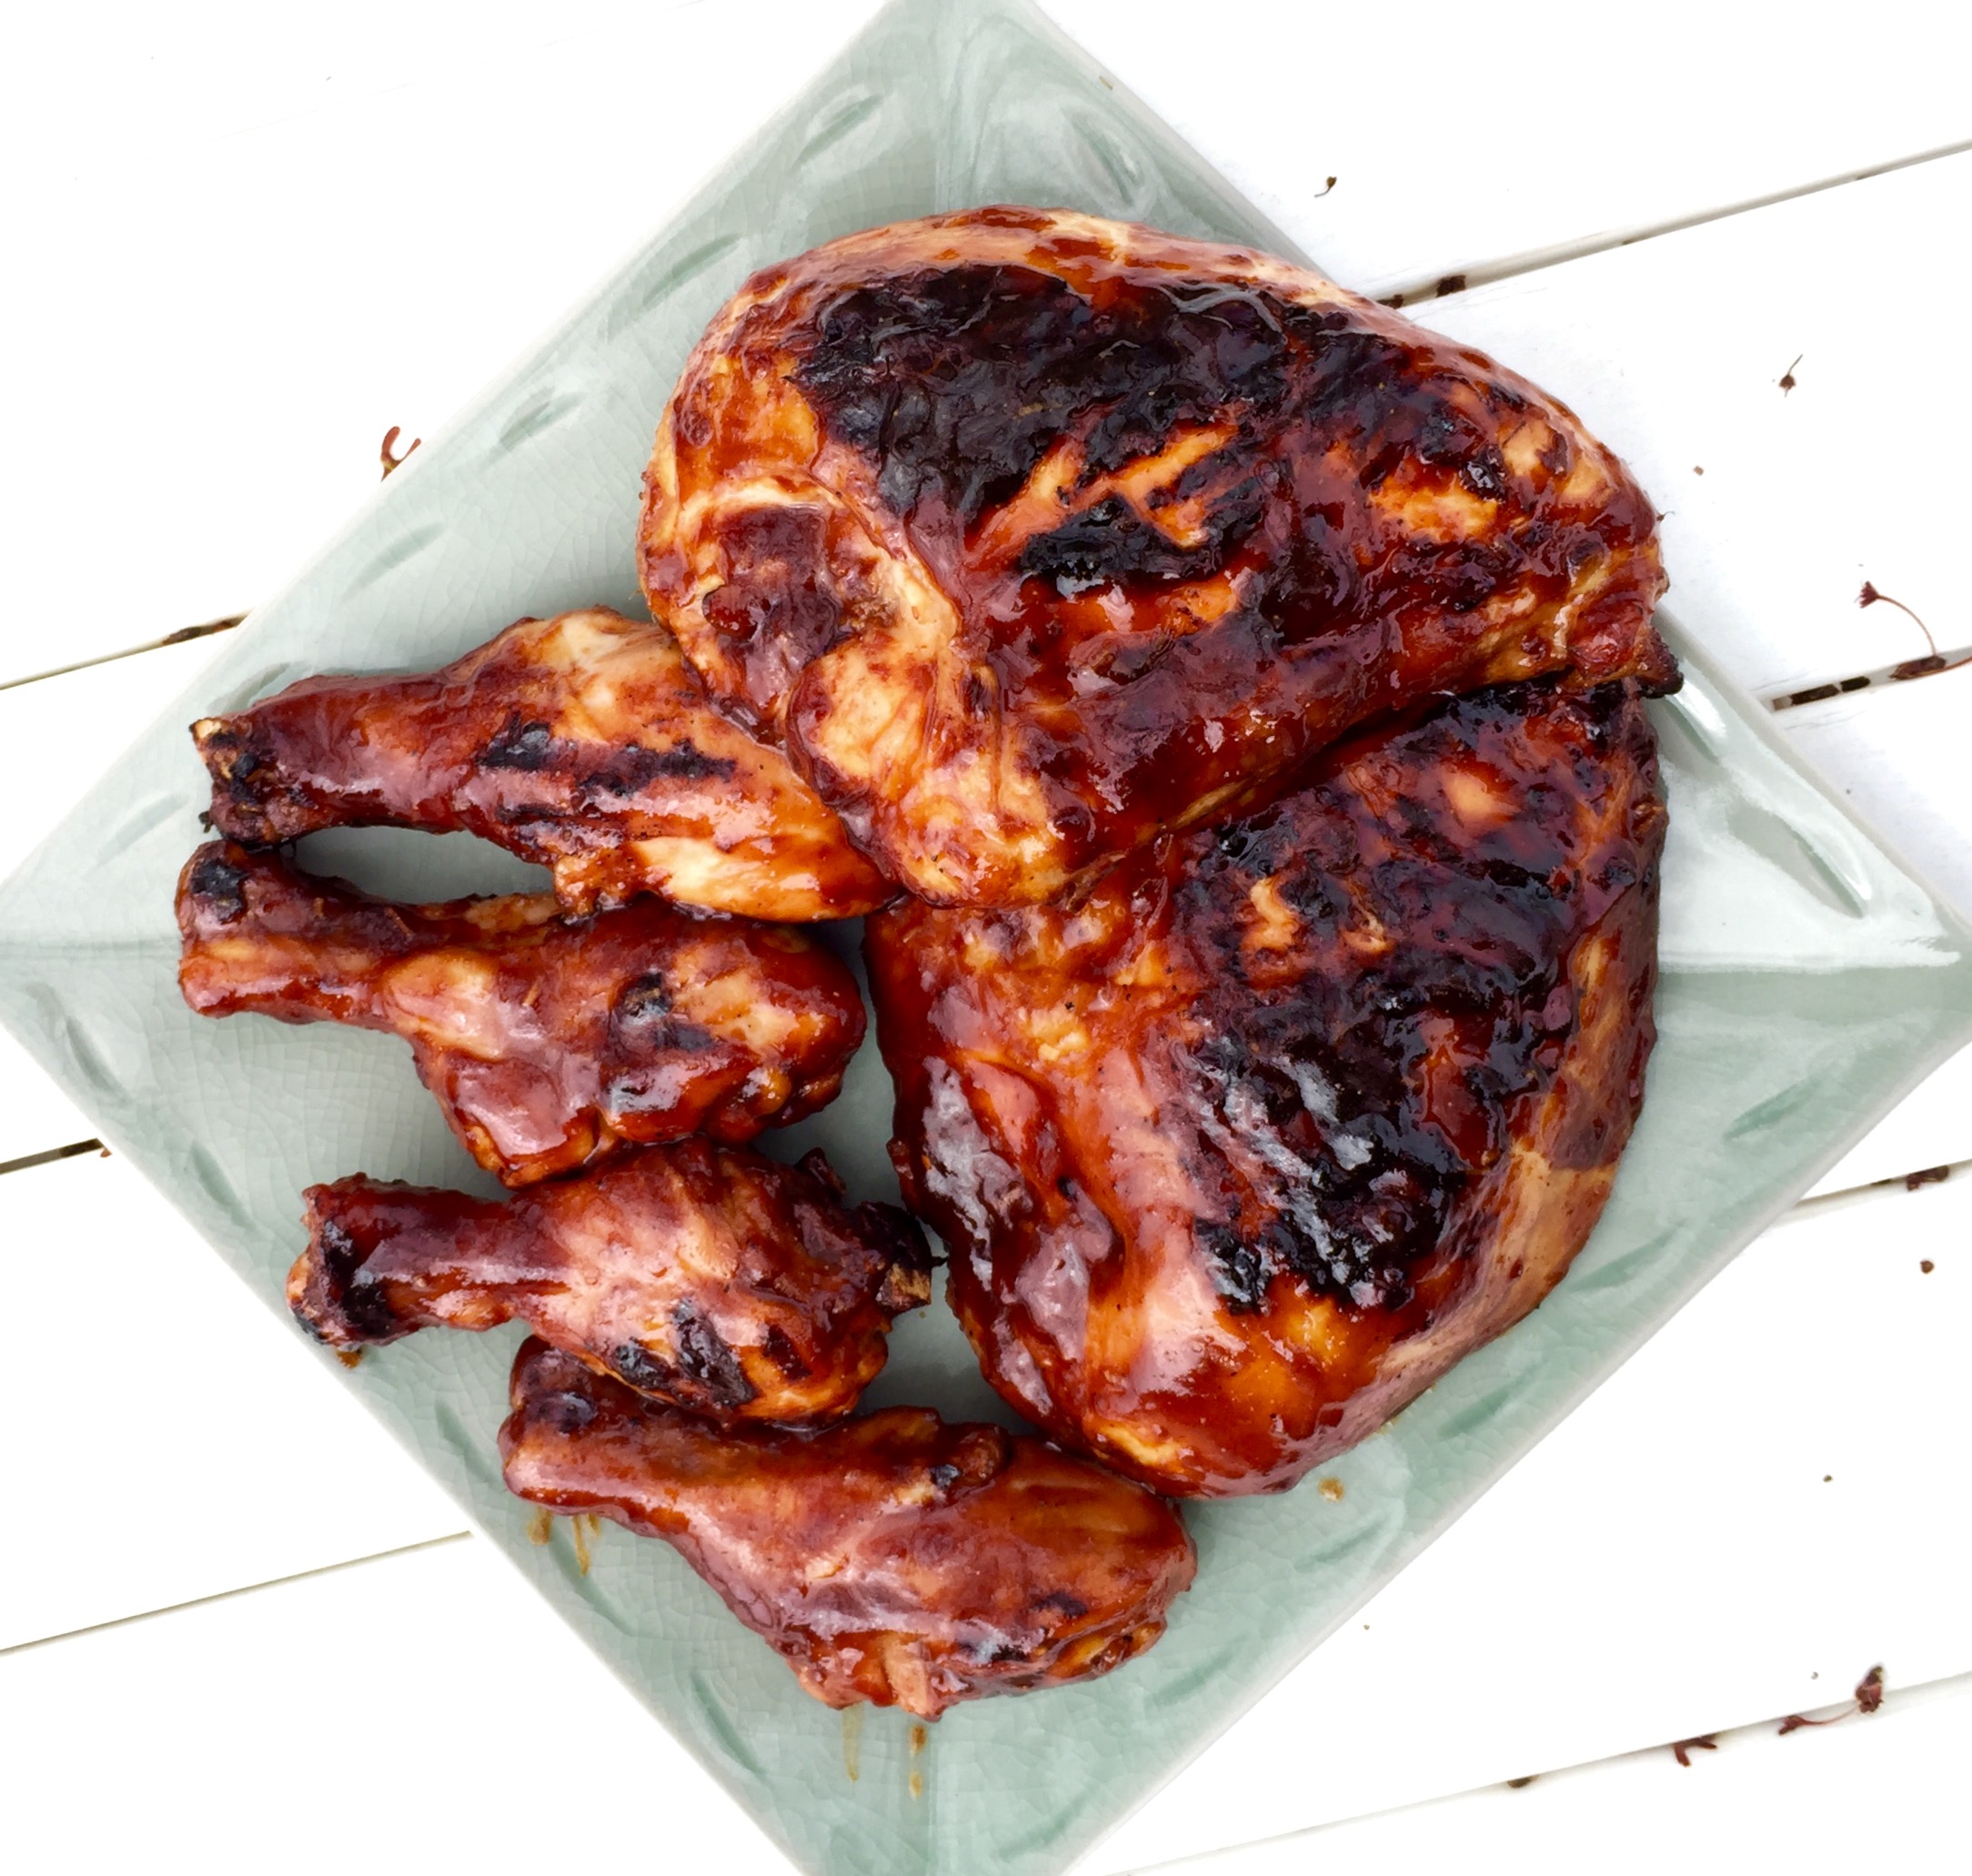
After a few minutes, lift the lid, flip the chicken pieces over, brush them with sauce again, and close the lid. Keep doing this until the chicken is nice and caramelized, with tasty grill marks.

If you want to serve some of the sauce on the side, it’s important to pour some of the sauce off and set it aside in the very beginning, so you’re not using the same sauce that the basting brush touched the raw chicken with.