OVERNIGHT OATS

Posted: February 4, 2019 in breakfast, Food, Recipes
Tags: , , , , , ,

The popularity of overnight oats seems to come and go. Now I’m finding more and more articles about it again. I suppose cooler weather makes us think of oatmeal, but to be honest, I’m not a fan of hot cereals. I wake up at 4AM for work every day, so to have something tasty and healthy already waiting for me, next to my carafe of iced coffee in my fridge, is awesome. This is my favorite way to get my oat fiber, and it’s absolutely delicious and simple to make.

Doing some research, I noticed that many overnight oats recipes contained almond milk, which some people think is a healthy alternative to regular milk. The reality of it is: it’s not…unless you make it yourself. (See how at the bottom of this blog.) Store-bought almond milk has little or no nutritional value–or almonds, for that matter. The same goes for soy milk: non-organic soy is often grown with Monsanto’s Roundup-ready products.

I happened to grow up as a kid that loved, and still loves, dairy, so I go for organic grass-fed milk. (The amount of fat in the milk is up to you. I use whole milk and add some water to it.) The chia seeds in the recipe add anti-oxidants and omega-3’s, but they’re optional if you don’t like their slippery texture. Cinnamon has some health benefits, too, but it’s mainly here for flavor. And I use frozen organic blueberries in this recipe, but any frozen or fresh organic berries (or sliced organic apples!) will work.


IMG_7103


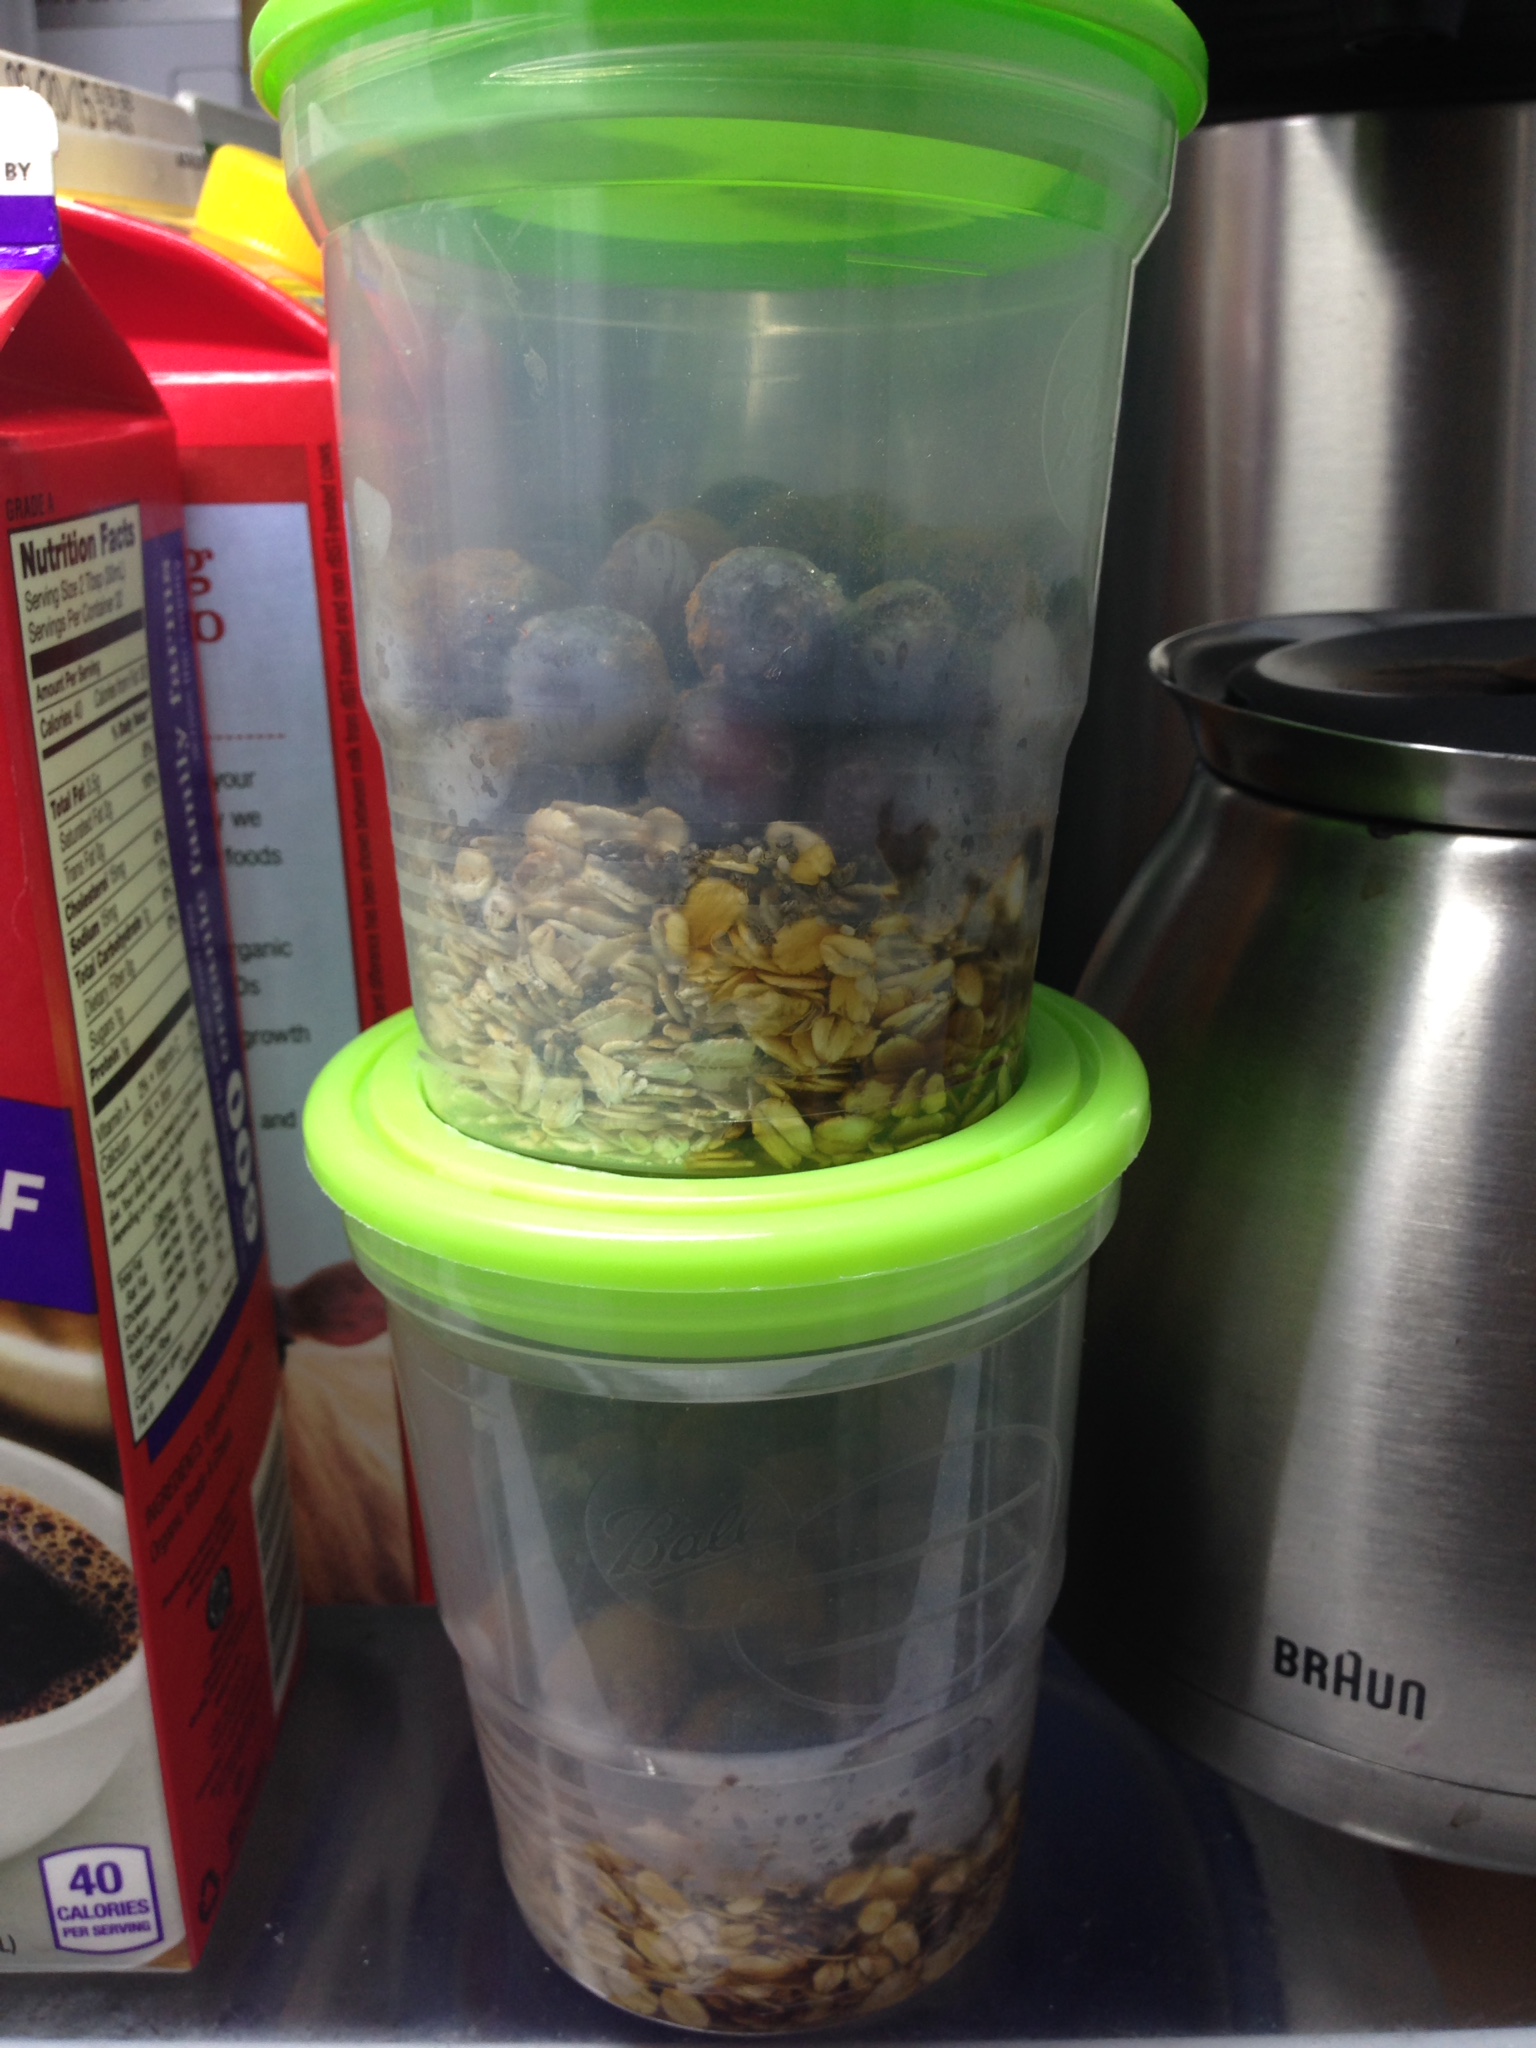
1/2 cup rolled organic oats
1/2 cup organic blueberries, apples or other fruit
3/4 cup organic grass-fed milk (I use 1/2 cup whole milk and 1/4 cup water)
1 teaspoon chia seeds
2 teaspoons maple syrup (because…yum)
1/4 teaspoon cinnamon

Combine the ingredients in a container that seals tightly. Give it a good shake and refrigerate it overnight. Eat it the next morning.


How to make your own almond milk…

Start with raw, organic almonds. Take 1 cup of the almonds and place them in a Mason jar (no lid). Cover the almonds with water and let them soak overnight.

The next day, pour the water off, and place the almonds in a food processor. Add 2 cups fresh water and process the almonds on high for 2 minutes.

Strain the liquid through some cheese cloth, squeezing out as much liquid as you can, and you’ve got real almond milk! (Throw the solids into your compost pile.) Sweeten it, if you like.

It doesn’t keep for a long time, so make small batches, and keep them sealed in the fridge.

There’s still time to get all the ingredients that will make your Super Bowl party over the top!

Here are some links to my favorite recipes. All of them work really well when you want to feed a large group of hungry people, no matter what team they’re rooting for!

I’ve included classic chicken wing recipes, delicious ribs (without the need of a smoker or grill), classic Italian dishes, seafood and more.


CHICKEN WINGS AND DRUMSTICKS…

HONEY GLAZED CHICKEN WINGS

SPICY BRINED AND GRILLED CHICKEN WINGS

ASIAN STYLE CHICKEN WINGS

“MEXICAN” CHICKEN WINGS


PORK RIBS…

CHINESE STYLE HONEY RIBS FOR THE BIG GAME


BEEF RIBS…

KONA BEEF RIBS


SHRIMP COCKTAIL WITH SAUCE…

PERFECT SHRIMP COCKTAIL, FROM BOIL TO SAUCE


FRIED SHRIMP…

FANTASTIC FRIED SHRIMP


LASAGNA AND BAKED ZITI…

LASAGNA AND ITS COUSIN, BAKED ZITI


ASIAN NOODLES…GREAT HOT OR COLD

ASIAN NOODLES WITH PEANUT SAUCE


OYSTERS…

OYSTERS ROCK-A-FELLOW (IMPROVED!)


I really love the deep flavor of soy sauce and the sweetness of hoisin on poultry. Peking duck is the best example of this, but since I live in Rhode Island, I don’t get a chance to jump in the car and drive to Chinatown in Boston or New York at the drop of a hat. I had to come up with a plan B…and a good plan B!

I found it while looking through an old Chinese cookbook I had bought many years ago. Written by legendary NY Times food critic Craig Claiborne and Virginia Lee, “The Chinese Cookbook” has become my bible for all of my Asian dishes.

I use chicken instead of duck. It’s cheaper, easier to find, and I can easily buy a whole pasture-raised chicken from local farms here in Rhode Island. But it is just as delicious.

As long as you use gluten-free soy sauce and hoisin sauce (La Choy and Kikkoman make them and they’re found in just about any supermarket), this recipe is gluten-free.


Cantonese chicken


1 whole chicken, about 6 lbs., or 2 smaller chickens (pictured)
1 tablespoon peanut oil
1 tablespoon soy sauce
4 teaspoons Chinese five spice powder
2 teaspoons granulated garlic
2 teaspoons salt
1/2 teaspoon black pepper
6 tablespoons hoisin sauce
2 teaspoons sesame oil


Remove all the giblets from the chicken and discard. Rub the soy sauce first all over the chicken. (The chicken will absorb the flavors better if you do it before you rub the bird with the oil.) Then rub the peanut oil all over the chicken.

Combine the Chinese five spice, garlic, salt and pepper in a bowl. Season the entire chicken, including inside the cavity, with this mixture.

Pre-heat the oven to 325 degrees. Place the chicken in a pan lined with aluminum foil (cleanup will be easier) and bake.

Meanwhile, combine the hoisin sauce and sesame oil in a small bowl. When the chicken is about 15 minutes away from being done, brush it with the hoisin/sesame oil mixture. Cook it another 15 minutes until the chicken has a nice dark glaze. Don’t let it burn!

Let it rest about 15 minutes before carving.


Despite what many of the labels on the bottles say, there are really only two kinds of balsamic vinegar: the highly prized, DOP-regulated, aceto balsamico tradizionale (or traditional balsamic vinegar)—and everything else.


balsamic1


Much like the olive oil market, the world of balsamic vinegar has been so messed up and confused that what most of us consider to be balsamic vinegar really has nothing to do with the genuine article.

Aceto balsamico tradizionale is the pinnacle of all vinegars: produced by hand in small quantities using methods that are hundreds of years old, it has the consistency of maple syrup, and costs anywhere from $150 to $400 for a 3.4 ounce bottle.

That doesn’t mean there aren’t any good (even excellent) balsamic vinegars out there. It just means you have to do a lot of label reading to make sure you’re getting a good thing.

DOP stands for Denominazione de Origine Protetta, meaning food products whose origins are identifiable in the taste, texture or “perfume” of the product and produced in a specific region with all the ingredients coming from that region. This is all carefully overseen by the Italian government and it is a big deal when it comes to quality.

In order to bear the name aceto balsamico tradizionale, every aspect of its creation, from grape to bottle, is carefully regulated by DOP standards. The vinegar undergoes a lengthy transformation that takes a minimum of 12 years. To keep competition fair, each producer is allotted a specific number of bottles he can sell, which is indicated by a numbered tag on the bottle’s neck. Bottles from Modena are usually bulb-shaped, while bottles from Reggio nell’Emilia are bell-shaped. A red cap means the vinegar is at least 12 years old, while a vinegar that is 25 years of age or more has a gold cap.

Back in the 1980’s, when the balsamic vinegar craze hit the United States, many chefs looking for exotic ingredients in their dishes started using balsamic vinegar. It became an overnight sensation, and the demand was too great for these small handmade batch producers to handle. And so the market for inexpensive balsamic vinegars was born: vinegars that bear little resemblance to the real thing, using ingredients like cider or red wine vinegar, sugar and artificial coloring.

So can you buy a good vinegar if you don’t have wads of money to spend?

Well, the next step down from the top-shelf stuff is called aceto balsamico condimento—what we see in the stores as Balsamic Vinegar of Modena (although some are produced outside of Modena) and they average in price from $20 to $60 a bottle. They’re kept in less expensive wood barrels, and are aged less than 12 years.

And then there’s everything else.

Some simple tips on what to look for on the ingredients label: Since the really good stuff is very expensive and should never be cooked or reduced, look for high quality non-DOP balsamic vinegars. Look for those from Modena and Reggio nell’Emilia with Consorzio di Balsamico Condimento on the label to guarantee the age. Even if this stuff is too expensive for you, at the very least, make sure that “grape must” is the first ingredient on the label and that its acidity is not above 7 percent.

I recently found a bottle of balsamic vinegar under the brand name Modenaceti. A 16.9 oz. bottle goes for about 15 bucks on Amazon. Is it the good stuff? No, but  it’s great in a salad dressing or a marinade. The only ingredient listed is balsamic vinegar of Modena, and its acidity is 6%.


Here’s a really good and simple recipe you can make with this inexpensive vinegar…


PORT WINE/BALSAMIC VINEGAR STEAK SAUCE

½ cup port wine
½ cup balsamic vinegar
¼ cup red grapes, sliced lengthwise (optional)

Place the ingredients in a small sauce pan over medium-high heat and reduce by half. Use this sauce on steaks, burgers, etc.


Balsamic pork ribs are fantastic. I’ll have the recipe in my next blog.

Before our daughter was born, my wife and I traveled the world. We got engaged in Paris. We honeymooned in Thailand. We swam with dolphins in Moorea. We rode camels along the Mediterranean in Morocco. So when our daughter was born, many of our friends thought our traveling days would be over.

At the Kaikoura Lavender Farm, South Island, New Zealand


One of the biggest sources of inspiration for me, personally, was a moment on our honeymoon in Thailand. We left our luxurious resort on Koh Samui to spend a few days on a remote island called Koh Nang Yuan, a destination for adventurers and serious scuba divers.

While waiting for our ferry to arrive, a bunch of us were packed like sardines in a small area. Around the corner came a young man, carrying 2 very large duffel bags–clearly a scuba diver with all his gear. But a moment later, his wife appeared from around the corner, and she was pushing a baby in a stroller. She whispered something to her husband, and he unzipped one of the large duffel bags to reveal a huge stash of diapers! He pulled one out, handed it to his wife, and she headed toward the restroom.

In that moment I realized: you can travel with a kid…and you can still have the adventure of a lifetime! It changed my attitude toward travel forever.

Snorkeling in St. John, USVI


It’s understood that not everyone can do this. Traveling is expensive. We gladly trade material things (that fancy SUV will have to wait) so that we can share some amazing memories.

In the crown of the Statue of Liberty, NYC


By the age of 12, my daughter had traveled to France, Italy, Spain, Greece, Lithuania, England, New Zealand, Iceland, Canada and the Caribbean.

London, England


The first time our daughter’s feet touched salt water, it was as an infant in the Adriatic Sea in Puglia, Italy. The first time she had a steak, it was steak frites in Paris.

Mercado de San Miguel in Madrid, Spain


Though she didn’t always realize it, her travels gave her an incredible education. The people she met, the foods she (sometimes) ate, the places she saw that her friends would only read about. It has made her wise in ways we never could have expected.

A mountain top view of San Sebastian, Spain


Swimming with stingrays at Stingray City in the Cayman Islands


Sure, once in a while my wife and I still travel alone for a romantic getaway. But to see the world through our daughter’s eyes has been a real joy for us, especially now when I can share my love for music with her.

Hard Rock Cafe, Paris


Hot dogs in Reykjavik, Iceland


We have friends that tell us they can’t afford to travel the way we do. Then they blow thousands on a Disney vacation or cruise.

Washington, DC


Everyone needs to make that choice on their own, but we decided a long time ago that we’d skip places like Disney World for the real world.

Sharing an artsy moment with Mom in Santorini, Greece


…and a silly moment with Dad in Vilnius, Lithuania


Even local trips can make a tremendous difference in a child’s life.

Block Island, RI


Fishing off the coast of Cape Cod, Massachusetts.


Camping in the Berkshires, Massachusetts.


Rafting on the Kennebec River in The Forks, Maine


Never underestimate the power of travel! It’s not just great for the kid…it’s great for the whole family!


I love pastrami. I love ribs. So why can’t the two get along? (Using my best announcer voice): Well now they can!!

I’ve seen a few recipes that use pastrami ingredients on foods other than pastrami and I thought it could work with pork ribs as well. I was right. And for these ribs, you don’t need a smoker or anything like that. They bake in the oven, then get finished under a broiler for that tasty char that you always look for in a grilled rib.

There’s a 2-step process to making these ribs. First, you combine the rub ingredients and let the ribs hang out in the fridge overnight. Then you bake them and broil them the next day, brushing a special sauce on them.

I prefer St. Louis-style ribs because they cook more evenly and have lots of meat. I prefer a heritage breed like Berkshire pork (also known as kurobuta) because of it has fantastic flavor, “good” fat, and is humanely raised.

Time to get ribbin’…


1/4 cup freshly ground black pepper
1 tablespoon ground coriander
1 tablespoon light brown sugar
1 tablespoon mustard powder
1 tablespoon paprika
1/4 teaspoon cayenne pepper
1/4 cup distilled white vinegar
2 tablespoons salt
2 racks St. Louis-style pork spare ribs (about 5 lbs.), preferably Berkshire pork

To make the rub, combine the black pepper, coriander, brown sugar, mustard powder, paprika and cayenne in a bowl. Mix well. To grind larger amounts of pepper and other spices, I use a small coffee grinder that I keep just for spices. It does the job quickly and easily.

My spice grinder.


Cut the racks of ribs into halves, removing the skin on the back of the ribs that can make it tough. Brush both sides of the ribs with the white vinegar, and then season with the salt. Pat the ribs with the spice rub, and place them on a rimmed baking sheet. Place the baking sheet in the fridge for at least an hour. Overnight is better.

Vinegar, salt and then the spice rub.


Pre-heat the oven to 325. Transfer the ribs to a large roasting pan, or you can use the rimmed baking sheet. Place the ribs fatty side up, and add 1/2 cup of water to the pan. Cover the ribs with aluminum foil and bake them for about 2 hours.

After 2 hours, remove the ribs from the oven and let them sit at room temperature, still covered by the foil, for about 30 minutes.

Out of the oven and ready to be brushed with sauce.


1/4 cup Dijon mustard
3 tablespoons apple cider vinegar
3 tablespoons honey
2 tablespoon soy sauce

In a small bowl, combine the Dijon mustard, apple cider vinegar, honey and soy sauce. If the honey’s very thick, I place the glass jar (no lid) in the microwave for a few seconds to make it flow better. (Don’t do this if it’s in a plastic container, and don’t microwave for too long–honey will foam up and make a big mess!)

Pre-heat a broiler.


Brushing the ribs with the sauce.


Take the foil off the ribs and brush them with the sauce. Then place the ribs under the broiler until lightly charred, about 3 minutes. Slice into individual ribs or devour a slab at a time!

Charred and delicious!


It’s Wednesday. You’ve got time to go to the supermarket and buy what you need to make this recipe and the be the hero of the weekend. Seriously, it’s that good!
This is not only our family’s favorite pancake recipe, but it’s the one I always make when guests are spending the night. They are absolutely delicious–the pancakes, not the guests– (throw some bacon on the side and it’s great for hangovers!) and unlike any other pancakes you’ve had.
My wife maintains a gluten-free diet, so I needed to make changes in my original recipe, but my favorite go-to all-purpose GF flour, “Cup 4 Cup,” worked so well in this recipe, there was no difference in taste or texture. Now this is the only way we make ’em and no one notices the difference!
 image
1 cup all-purpose flour (or Cup 4 Cup original multi-purpose flour)
1 1/2 cups stone-ground yellow cornmeal
2 tablespoons organic cane sugar
2 teaspoons baking powder
1/2 teaspoon baking soda
1/2 teaspoon salt
2 cups buttermilk (or 1 1/2 cups milk and the juice of 1 large lemon)
zest of 1 organic lemon
1 large egg
3 tablespoons melted unsalted butter, slightly cooled
1–2 teaspoons avocado oil
1 cup fresh or frozen blueberries, preferably wild, rinsed and dried
Whisk the flour, corn meal, sugar, baking powder, baking soda, and salt in a medium bowl
to combine.
In a separate bowl, whisk the egg, lemon zest, and melted butter into the buttermilk to combine.
Make a well in the center of the dry ingredients in the bowl. Pour in the milk mixture and
whisk very gently until just combined. Do not over mix. A few lumps are OK.
Heat non-stick skillet over medium heat. Add 1 teaspoon of oil and use a brush to coat the skillet
bottom evenly. Pour 1/4 cup of the batter into 3 spots on the skillet. Sprinkle 1 tablespoon of the
blueberries over each pancake. Cook the pancakes until large bubbles begin to appear,
about 1 1/2 to 2 minutes. Using a thin, wide spatula, flip the pancakes and cook until they’re golden
brown on the other side, 1 to 1 1/2 minutes longer.
Chow down immediately!
image

Iceland is a land of extremes. In recent years, its remote, untouched beauty has lured tourists in vast numbers. But this tourism, which is the lifeblood of the country, is also the very thing that’s destroying it.

Back in late 2008, Iceland suffered a major financial crisis, the largest experienced by any country in economic history. To add to the damage, two years later, in 2010, the eruption of the volcano Eyjafjallajökull ejected so much smoke and ash into the atmosphere that the airspace around Iceland and Europe was closed to air traffic for an 8-day period, accounting for 48% of the world’s total air traffic and about 10 million displaced passengers.

This devastating combination caused prices in Iceland to plummet and word got out that it was an inexpensive, somewhat unexplored, destination for adventurers.
Fast forward a few years later: Icelandair announced cheap airfares and no charge for layovers in Reykjavík, making travel to Iceland more attractive than ever. However, as the economy recovered, prices in Iceland started skyrocketing. Despite this, tourism has increased from 200,000 people a year 10 years ago to 3 million a year currently. Quite a huge change for a country with a population of only 300,000!
There is no way this beautiful country, and the small city of Reykjavík, can handle this onslaught of tourism for very long. In fact, the Icelandic government has now started reducing new construction and putting a tax on hotels in downtown Reykjavík, trying to get people to do use lodgings that are outside of the city limits.

But it’s going to take a lot more than that to slow down the massive number of people who are finding Iceland the new “in place” to go.

The Sun Voyager. On the Reykjavik waterfront.

My wife and I first visited Iceland 16 years ago, and to say that things have changed is a huge understatement. Everything was so different, so built up; it was completely unrecognizable.
Our recent 3-day, 4-night trip to Iceland happened in between Christmas and New Year’s, where the winter weather remained in the 30s and 40s during the day, with on and off rain. We only had 4 hours of sunlight: the sun rose at 11:30AM and set at 3:30PM!
Despite that this is the prime season to see the aurora borealis, the lack of clear skies made it impossible for us to see it on our trip. In fact, there are very few clear nights in the winter months, so it’s a chance every traveler takes. The aurora borealis is usually visible between the months of September through mid-April. A good idea is to download a free app that lets you know when visibility will be at its best. You may not get to see the aurora, but at least you won’t lose money reserving a spot on a trip that ends up a disappointment…like I did!

Hallgrimskirkja, a Lutheran church, and one of the highest points in all of Iceland. Take the elevator up to catch the view!


Reykjavík is a great walking city, and for the longer jaunts, there are plenty of taxis to take you where you need to go. There is no Uber in Iceland…yet! Locals will tell you that the Reykjavík bus system is spotty at best. We found that walking was a great way to work off some of the calories of the very rich foods we were eating.

This is what you get if you’re trying to get an Uber ride in Reykjavik.


Like all of our travels, we came for the food…

Restaurants in Reykjavik feature mostly Icelandic menus. That means a lot of lamb dishes and lamb soups. After all, there are three sheep roaming the grassy fields of Iceland for every one of the 300,000 people living in this country. Beef can be found on just about every menu, but, like everything else that is imported, it comes at a very steep price. Icelandic seafood is spectacular, but just because it’s local, it doesn’t mean it’s a cheaper alternative.
Alcoholic beverages are another huge expense in Iceland. For example, my Hendrick’s gin and tonic cost $25 US, and all I got was 1 ounce of gin in my glass! Hard to get a good buzz at that price! My advice is: if you can buy a bottle at the duty-free shop at the airport…do it! Then have a cocktail in your hotel room or apartment.

An expensive–and rare–treat: A Hendrick’s and tonic at Sushi Social in Reykjavik.


The homemade solution to high alcohol prices: buy it and mix it yourself!


Although some restaurants do have vegetarian menus, vegetables in general are hard to come by in Iceland, and all fruits must be imported. Root vegetables can be found on some dishes: carrots, parsnips and potatoes. If you’re craving a salad, greenhouses in Iceland grow the cooler weather greens like arugula and spinach. You’ll also find small greenhouse tomatoes in some dishes. (Electricity is the one thing that’s cheap in Iceland, thanks to geothermal power, so greenhouses can make a profit here.)
Reykjavík does offer sushi restaurants as well as noodle shops. You can also find Italian restaurants and pizza joints.
And if you’re craving a hot dog, nothing beats a lamb hotdog with “the works” at the world-famous Reykjavík hotdog stand, that has been in operation for over 80 years. “The works” means: ketchup, mustard, fried onions, raw onions, and their special remoulade.


The famous hot dog stand in Reykjavik. That’s my daughter’s hot dog: ketchup only!


Other than KFC and Taco Bell out in the suburbs, we didn’t find any fast-food restaurants in Reykjavik, which was fine by us.
For finer dining, the general rule is this: whatever you think an expensive dinner should cost in the US, triple that price and you’re pretty close to what you’ll pay in Reykjavik! It’s important to keep this in mind when budgeting for a trip, especially if you’re a food nut like my wife and me, and you want to eat everything.

Lamb soup, a staple in Icelandic cooking, and our first taste on our food tour.


If you want to learn about local foods, I highly recommend you sign up for the food tour as one of your first things to do in Reykjavík. We went with a company called Wake Up Reykjavík, and they are full of wonderful information about the food and history of Iceland. It’s a walking tour, and you get to sample all kinds of interesting Icelandic foods, from lamb soup to skyr (their version of yogurt), from cheeses to cured meats, and homemade seafood dishes as well. Of course, the famous lamb hot dog stand is on the tour as well. Do the food tour on your first day, and you will already be ahead of the game as far as knowing the lay of the land in this wonderful town.

Our food tour guide was Eyglo, from Wake Up Reykjavik. Here she’s giving us samples of Icelandic cheeses, and cured lamb, horse (yes, horse!) and goose.


Icelandic comfort food: a baked cod dish on our food tour.


Where and what we ate in Reykjavik…

Staff Kitchen & Bar: a local gastropub on Hverfisgata, one of the main roads in town, with small shops and restaurants. Great burgers, craft beers. Had a wonderful duck risotto with mushrooms and excellent leg of lamb. www.facebook.com/staffkitchenandbar

Duck risotto with mushrooms at Staff Kitchen & Bar.


Hofnin: On the waterfront, this homey seafood-based restaurant also has many satisfying meat dishes. Burgers, open-faced roast beef sandwiches, shrimp cocktail with Icelandic shrimp, naan pizza with langoustines. Good solid comfort food. www.hofnin.is

Hofnin, on the waterfront in Reykjavik.


Bad lighting, but great open-faced roast beef sandwich at Hofnin.


Delicious Icelandic shrimp cocktail at Hofnin.


Apotek: Keeping the theme of the former apothecary that previously occupied the building, this hip dining establishment is a great place to stop in for a cocktail. But dinner is also a good move: beef tenderloin, Icelandic langoustines and shrimp, minke whale (if you dare), duck and waffles, and an excellent trio of waffles with cured sea trout, lamb and duck. Though the service was a bit lacking, it was still one of our favorite meals in Reykjavik. http://www.apotekrestaurant.is

A beautiful plate of langoustines and shrimp at Apotek.


Sushi Social: This is where the beautiful young people hang out. Loud and fun, it’s less about the food and more about who you’re with. A full cocktail bar and sushi that’s fresh, but just OK. And though the prices are high (as everywhere in Iceland) you don’t get a whole lot of fish on your sushi rolls. Still, a fun place that’s packed every night. http://www.sushisocial.is

A front-row seat at Sushi Social.


The Icelandic sushi plate at Sushi Social. (See? It’s on a cut-out of Iceland.)


Ramen Momo: the original ramen in Iceland and excellent. Great stop for lunch. www.facebook.com/ramenmomoreykjavik

Hard Rock Cafe: There was a Hard Rock in Reykjavik many years ago, and then they shut it down. But as the tourists started coming, it was a wise move to open a newer, bigger and better one. The menus at all Hard Rocks are about the same, so if you’re craving a cheeseburger, mac and cheese, a Caesar salad, ribs, or any other American dish, this is the place to go…with a side of rock and roll. Given that salads are hard to come by in Iceland, it was a welcome change.


Jomfruin Scandinavian Kitchen: This was my best meal in Iceland by far. It was also my last meal! Had I known about it sooner, I would’ve eaten there every day. Growing up in a Lithuanian family, herring and smoked eel are in my blood. So when my wife told me there’s a restaurant serving this and more right next door to the Hard Rock, I had to go in. The herring is from Iceland, and marinated in-house. The smoked eel, imported from Denmark, is fatty and absolutely delicious. Washing it down with a shot of Icelandic aquavit…it was like paradise!

Right next door to the Hard Rock…and so good!


This meal was so good, it deserves a close-up! House-marinated herring, smoked eel, and Icelandic aquavit: it doesn’t get any better than this!


…and don’t forget the original hot dog stand: on Tryggvagata, near Kolaportio. http://www.bbp.is


Getting around Iceland…

Because it was winter time and we were basically staying in Reykjavík, we found no need to rent a car. I hired a car service online that took us from the airport in Keflavík to our rental apartment in Reykjavík…and then back again at the end of our vacation. (It’s about a 1-hour drive each way.) There is an airport in Reykjavik, but it’s for domestic flights and helicopter trips.
There are buses that will take you to Reykjavik as well, but if you pack as heavily as we do when you travel, having a private driver will be worth every penny–I mean–kronur!

The Harpa concert hall in Reykjavik. Many tours use this location as a meeting place.


We chose to do the Golden Circle tour, which includes the famous Blue Lagoon. Again, we hired a company to drive us on a very comfortable small bus to all the sites: Þingvellir National Park, Haukadalur Geothermal Area (home of the famous Geysir hot spring) and Gullfoss (the Golden Waterfall.) We also had a nice meet-and-greet with Icelandic horses, a stop at Kerið Volcanic Crater, and of course, the Blue Lagoon.

Icelandic horse were brought over by the Vikings and have never interbred, making them the purest breed of horses in the world.


We went with Nice Travel, and our driver, Marek, was courteous, knowledgeable, and very skilled in winter Icelandic driving, where the weather can and will change every 15 minutes. We went from rain to snow to sleet to hail to sunshine, and back again in every combination possible.

Just before sunrise…and the only time we saw the moon all week!

The Golden Circle is a 190-mile road, not counting the extra drive to the Blue Lagoon, and if you take the tour, you’ll meet your bus around 8:30AM, and you’ll return around 9PM. It’s a long trip that is really worth a full day of your time.

Gulfoss Waterfall.


Our tour stopped for lunch at Geysir, where (besides the geyser!) they have a very large souvenir shop and several restaurants with a variety of food choices…none of which was there when we first visited 16 years ago.

Yes, they even allow dorks like me on this trip!


Reykjavik has many museums, some ridiculously small, others substantial. My wife, being an artist, checked out all the art museums in town in one day. My daughter and I, less interested in all that, spent our time at the Hard Rock and Perlan, a futuristic-looking museum and planetarium, with amazing panoramic views of Reykjavík. The outdoor observation deck on the fourth floor of this massive dome is breathtaking, as is the enclosed fifth floor restaurant, offering even better views.

The dome at Perlan.


Scultpures outside of Perlan. The dome sits on top of massive, repurposed water tanks. You can see them in the background.


So is Iceland worth the trip, even in the winter? Absolutely. Will you pay through the nose (or other orifice) for everything? Yes…yes, you will.

Our first trip 16 years ago was in the summer, when we had barely 3 hours of darkness every day. This time, we had 3 hours of sunlight. It was a totally different experience, and one we won’t forget.

Next time–and there will be a next time–we’ll visit in the fall, and take a few remote excursions far outside Reykjavik city limits. There’s much more beauty to see.

There are few things that make me happier than a plateful of really tasty chicken wings. If I watched football, I could easily finish a plate off within the first quarter of the game. I don’t though (watch football, that is) so let’s just say I can finish a plate off before the credits roll on the end of an episode of “Chef’s Table” on Netflix. That’s right…I’m bad.

I come from a long line of gnawers. Nothing is better than meat on a bone. A porterhouse is the ultimate steak for that very reason. So nothing bothers me more than someone who orders a plate of chicken wings and leaves all that tasty gristle and cartilage–along with some serious meat–behind. What is that? When I finish my wings, I walk my plate over to the trash can and drop a pile of surgically cleaned bones into the bag…not a bit left behind. One look at that pile of clean bones, and even my dog high-fives me.

Brining is a process where you soak a hunk of protein in a seasoned salt solution for a few hours. It’s a great way to add flavor and moisture to any cut of meat. I brined these wings for 3 hours before using a sweet and spicy rub. They can be grilled or roasted in the oven.

image

The brine…

1/2 cup Kosher salt
3 tablespoons light brown sugar
1 teaspoon whole black peppercorns
1 whole bay leaf
2 quarts water

Combine all ingredients in a saucepan and heat until the sugar and salt dissolve. Remove from heat, and let it cool to room temperature.

The rub…

1/4 cup light brown sugar
1/4 cup granulated sugar
1/4 cup sweet paprika
1 tablespoon Kosher salt
1 tablespoon granulated onion
2 teaspoons black pepper
1 teaspoon dried thyme
1 teaspoon dry mustard
1 teaspoon ground ginger
1 teaspoon cayenne pepper

Combine all the rub ingredients in a bowl.

Place 3 lbs. of chicken wings in a Ziploc bag and pour the cooled brine into the bag. Place the bag in a bowl to prevent leaks and place it in the fridge for several hours.

After a few hours, remove the chicken from the brine and dry the wings with paper towels. Discard the brine.

Place the chicken wings in a large bowl and sprinkle them with 1/3 cup of the rub, tossing to coat the chicken well. Place the bowl with the chicken in the fridge until ready to cook.

About 30 minutes before cooking, remove the bowl from the fridge and let the chicken come to room temperature.
Pre-heat the oven to 350 or light a grill.

Toss the chicken with some more of the rub, if you like, then place the pieces on a sheet pan lined with non-stick aluminum foil or a wire rack. Bake at 350 for 30 minutes or until done. Lower the oven temperature if it starts to burn.

If you’re grilling, cook the wings over medium heat, turning frequently them to prevent burning. Cook until the wings are done.

Sometimes I’ll do a combination of the two and I’ll cook the wings in the oven until they’re almost done. Then I’ll throw them on a grill to get that smokey char on them, flipping them often to prevent burning.


Though it may sound Japanese, the word “saganaki” refers to a small frying pan used in Greek cooking. The most famous of these dishes, simply called saganaki, is a fried cheese, often flamed at the end with a little ouzo.

Shrimp saganaki is one of my favorite Greek dishes, and it usually involves cooking shrimp in a tomato-based sauce with plenty of feta cheese sprinkled in. It’s simple yet fantastic if the ingredients are fresh. Doesn’t hurt to be sitting in a taverna on the beautiful island of Santorini while eating it, either!


You can find Graviera cheese in most supermarkets.


I found a slab of Graviera cheese at a local supermarket, and decided to recreate shrimp saganaki using that instead of feta. It was pretty damn amazing.

I like using 24–30 shrimp, because larger shrimp don’t always cook through. These smaller shrimp will be bite-sized and delicious.

Melty, gooey, delicious!

Melty, gooey, delicious!


200g package (7 oz.) grated Graviera cheese
1 can (28 oz.) whole tomatoes
1 lb. (about 24) shrimp, peeled and deveined
1 medium onion, chopped
juice of 1/2 lemon
1/4 cup olive oil
2 cloves garlic, through a press
pinch red pepper flakes
1 1/2 tablespoons fresh dill, finely chopped
1 tablespoon fresh oregano, finely chopped
1 1/2 tablespoons Ouzo
salt and pepper


Peel and de-vein the shrimp (or you can buy them that way already.) Squeeze the juice of  1/2 of a lemon on to the shrimp and toss. Set aside.

In a large pan, saute the onions in the olive oil until translucent. Add the garlic and cook for a few seconds more.

Crush or puree the tomatoes and add to the pan. Add the red pepper flakes, dill and oregano, and salt and pepper. Add the Ouzo.

Let this sauce cook down for a bit until all the flavors have blended together.

Pour a layer of the sauce on the bottom of a metal broiler-proof pan. Lay the raw shrimp in a single layer into the sauce. Cover the shrimp with the rest of the sauce and sprinkle the grated Graviera on top.

Place the pan in a pre-heated 350-degree oven and bake until the cheese is golden brown and bubbly and the shrimp have cooked through.

shrimp saganaki