Archive for the ‘chicken’ Category

It’s Fat Tuesday! Laissez les bon temps roulez!

I lived in Mobile, Alabama back in the late 80’s, and if you asked the locals, they’d quickly tell you that Mardi Gras originated in Mobile, not New Orleans.

Joe Caine paraded through the streets of Mobile dressed in a Native American costume in 1868, and is credited for our current way of observing the Mardi Gras celebration. Of course, it’s hard not to think of New Orleans when you hear the phrase “Mardi Gras,” and I spent many a weekend on the streets and bars of the Crescent City back in the day.

It was then that I fell in love with Cajun food, and needed to learn how to cook it myself. I bought cookbooks by two of the greats: Justin Wilson and Paul Prudhomme. I learned about layers of seasoning, and often I’d use those ideas in my own dishes.

When I moved to Rhode Island in 1990, I had yearly Mardi Gras parties at my house, and I cooked massive batches of these Cajun chicken breasts, using a spice mix I learned from my cooking experiments. They’re so good, my daughter asks for them all the time.

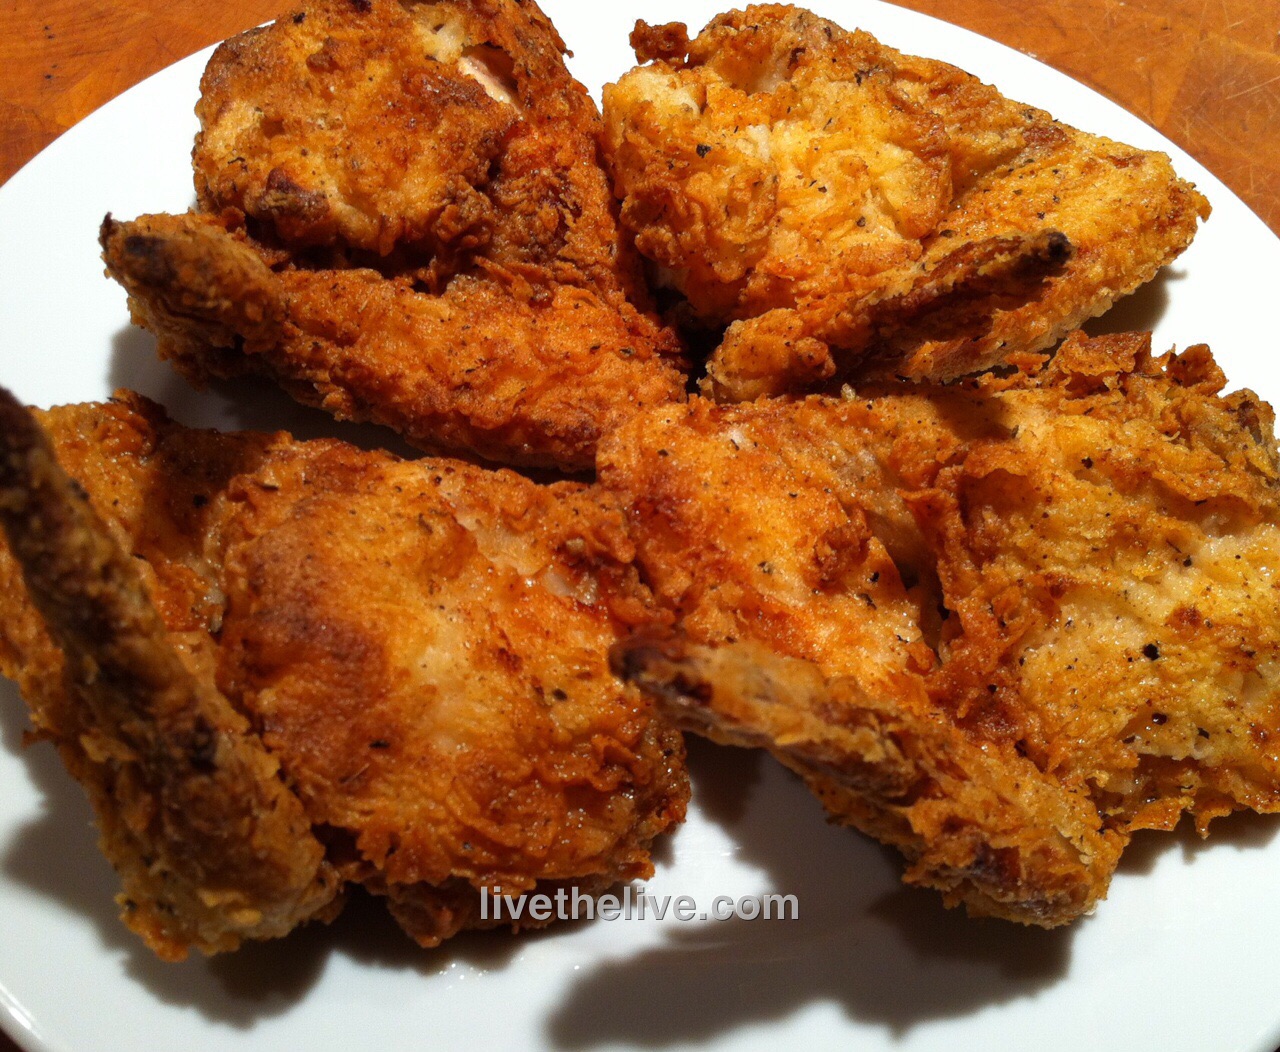
Double-dipping in the seasoned flour is a messy step, but it makes them extra crunchy and flavorful.


fullsizerender-8


1 cup all-purpose flour
1 tablespoon salt
1 1/2 teaspoons sweet paprika
1 teaspoon granulated onion
1 teaspoon granulated garlic
1 teaspoon basil
1/4 teaspoon white pepper
1/4 teaspoon cayenne pepper
1/2 teaspoon black pepper
1/2 teaspoon dried thyme
1/2 teaspoon gumbo file (file powder), optional
2 pounds boneless, skinless chicken tenders or breasts
4 eggs
oil for frying (I like using avocado oil and some pork fat for flavor)


Cut the chicken breasts into manageable pieces. If they’re thick, slice them horizontally to make two thinner breasts. A thick piece of chicken won’t cook all the way through.

Combine the flour, salt, paprika, onion, garlic, basil, white pepper, cayenne, black pepper, thyme and gumbo file in a bowl. Mix well.

I like to separate the 4 eggs, placing 2 eggs in 2 separate bowls. This keeps the first bowl “clean” and not gummed up with flour. You’ll see what I mean once you start, because it’s a bit messy. So, crack 2 eggs in the first bowl and the other 2 eggs in the second bowl. Scramble them up and put the bowls on either side of the seasoned flour bowl.

Pre-heat a pan of oil or a fryer to 350 degrees.

Dip the chicken in the first egg bowl and then the seasoned flour mixture. Shake off the excess flour and dip the chicken in the second egg bowl, making sure the flour is covered by egg. Then dip the chicken back into the flour for a second coat. Carefully place the chicken in the pan. Fry the chicken until it’s cooked all the way through and golden brown. Drain on paper towels.


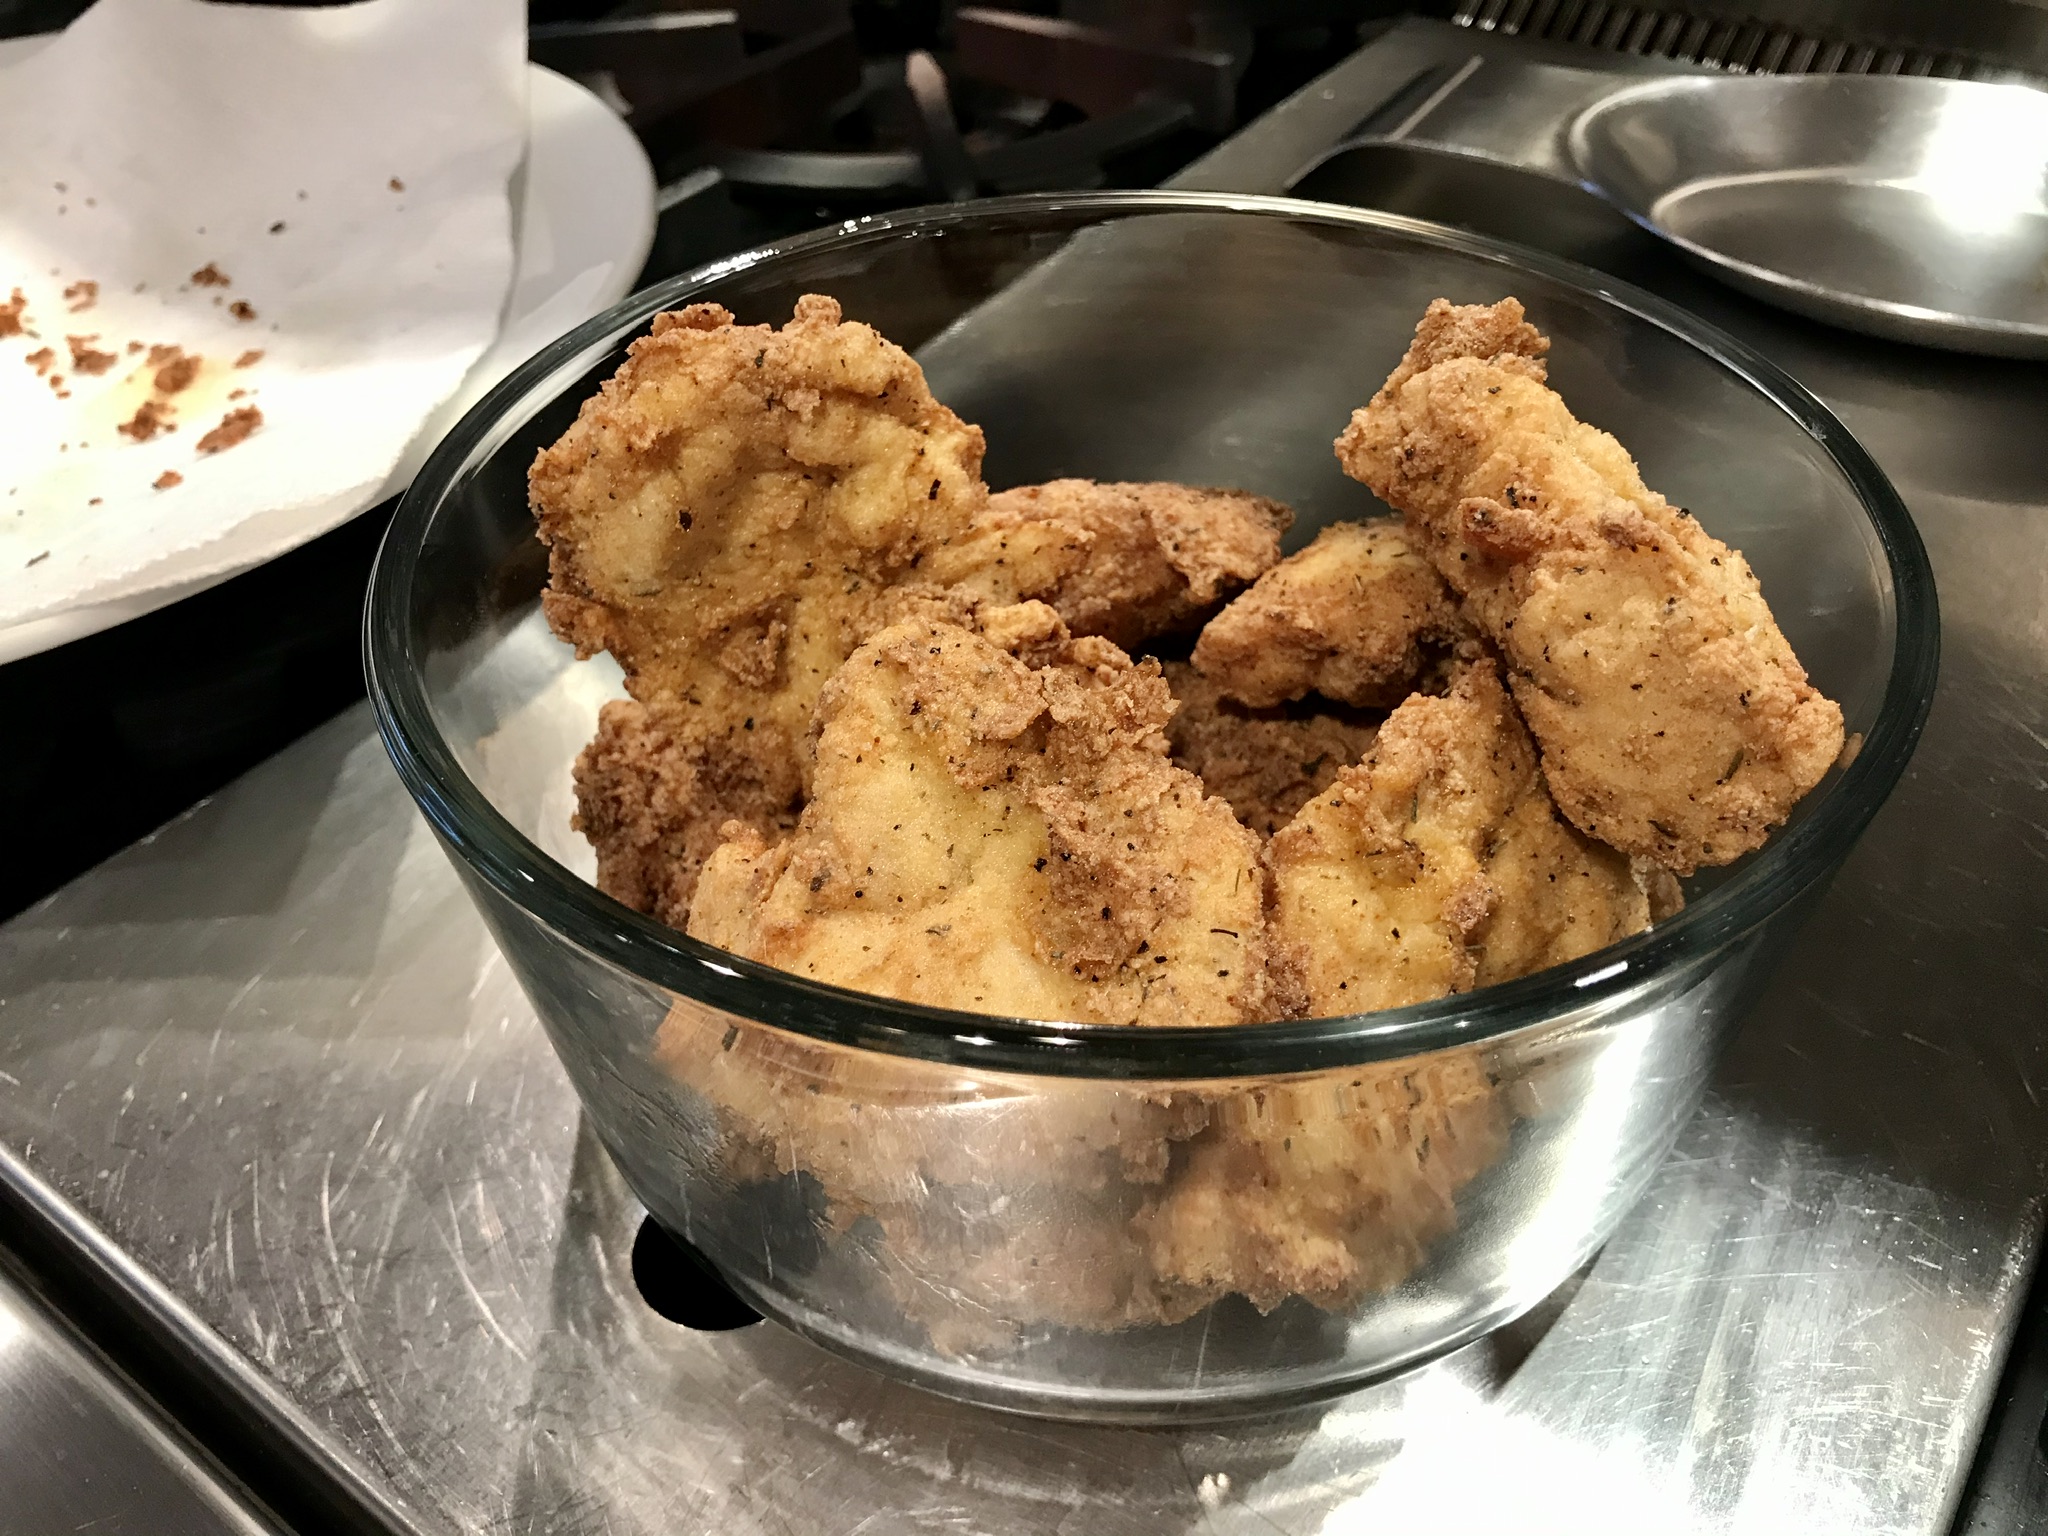
Nothing like a hot, fresh batch!


If you need to feed a crowd, just double or triple the recipe. I used to make a 10x batch for my Mardi Gras parties!


Through years of tireless experimentation, I’ve come up with a barbecue sauce that I feel is the best I’ve ever made. Granted, everybody has their favorites, but I prefer a slightly sweet and tangy barbecue sauce. Unless I’m making a classic pulled pork sandwich, I usually avoid vinegar-based sauces.

What makes this sauce special is the citrus. I originally used lemon juice for this recipe and it was good. Lime juice with lime zest was better. I also tried oranges, tangerines, even Meyer lemons. But my breakthrough happened on a day when I was craving barbecued chicken and all I had in my fridge was a grapefruit. I thought: how bad could it be? Turned out to be the perfect foil to the sweetness of the brown sugar and ketchup.

My favorite chicken pieces are the leg quarters: thigh and drumstick all in one. Chicken breasts, even on pastured birds, are pretty flavorless and dry, so I pass on them for the darker meat that’s juicy and fatty. (Honestly, I find it hard to trust anyone that won’t eat meat off a bone.)

Cooking chicken in the oven before putting it on the grill has several advantages. I don’t have to stand over the grill, constantly worrying about the meat burning or the fire going out. I can simply set a timer when I need to brush on the barbecue sauce or remove the chicken pieces. And the chicken cooks evenly…one piece won’t be burned while another piece is undercooked. Cooking them low and slow in the oven keeps the chicken juicy and tender. And I’m assured that my chicken is thoroughly cooked…no worries about salmonella.

I pre-heat the oven to 350 just to get it nice and hot. I line a sheet pan with non-stick aluminum foil, placing the chicken pieces on it. I rub each piece with a little olive oil, and season them lightly with Lawry’s Seasoned Salt. The chicken goes into the oven and I immediately lower the temperature to 200 degrees.

While the chicken is cooking, I combine all the barbecue sauce ingredients in a sauce pan, bring it to a boil, then reduce it to a simmer, letting it cook for about 20 minutes, until it has thickened. Then I turn the heat off and set the pan aside.

I’ll bake the chicken for about an hour, taking the sheet pan out of the oven to brush the barbecue sauce on the pieces before returning to the oven again, now bringing the temperature up to 300 degrees. (Because there’s sugar in the barbecue sauce, I don’t want to crank the heat or it will burn.)

Taking the chicken out of the oven and brushing it with sauce.


In 30 minutes, I take the sheet pan out a second time, and brush the sauce on the chicken pieces again…then back in the 300-degree oven for another 30 minutes.

Once the chicken’s back in the oven, it’s time to start the grill. For projects like this, I like to use a small grill I bought for our family camping trips. It’s like a mini-Weber, and it grills enough food for 4 people easily, without wasting charcoal like a larger grill would.

These small grills are just 20 bucks, and they save you a ton of otherwise wasted, unused charcoal.


I use a smaller charcoal chimney for this project, and I use charcoal briquets, not hardwood, because I want an even fire. The coals are ashed over in just 10 minutes.

Out of the oven and onto the fire! The grill grate was nasty and rusty, so I just grabbed a clean one I had handy and popped it right on top. (I hate scrubbing grills!)


Once the chicken has cooked its total of 2 low-and-slow hours in the oven, I bring the pieces outside. I spread the coals evenly on my little grill, and place the chicken pieces on it, flipping the pieces so that both sides get nice and smokey with a little bit of char…about 5 or 10 minutes per side will do the trick.

Getting that char on the chicken is key to making it taste like it’s been on the grill all the time.


The chicken goes back to the kitchen, and while it’s still hot, I brush with the barbecue sauce one last time before serving.


Perfectly done…perfectly delicious!


Here is the magical barbecue sauce recipe…

1 cup ketchup
1/2 cup firmly packed brown sugar
Juice and zest of 1 grapefruit
3 tablespoons unsalted butter
1 teaspoon cayenne pepper sauce, like Frank’s Red Hot
1 teaspoon Worcestershire sauce
1 teaspoon granulated garlic
1 teaspoon granulated onion
1/4 teaspoon black pepper
(no salt)

Combine all the ingredients in a sauce pan. Bring it to a boil and then turn it down low, and let it simmer for about 20 minutes, or until slightly thickened.


I like to brine large hunks of meat that I’m going to roast, because brining not only gives it flavor, it adds moisture…so my pork loin, Thanksgiving turkey, or in this case, whole chicken, doesn’t dry out.

Brining usually means you take a lot of water and you add salt and other spices to it, then drop the bird into that liquid for several hours, so the meat can suck up the salty water, releasing it slowly as it cooks, but retaining much of the moisture and flavor.

Recently, I started reading about “dry-brining,” (aka curing)…and I thought that would be a fun thing to try. I created a spice rub that I rubbed all over a spatchcocked chicken, placed it on a sheet pan, and popped it in the fridge to dry age for several days before cooking.

Spatchcocked? Sounds like a dirty word, but it means that the backbone of the bird has been removed, allowing the bird to be flattened and cooked more evenly. As you know, very often the breast meat of a bird is overcooked if the dark meat is perfect. Spatchcocking a bird allows all the parts of the bird to cook more evenly.

All you need to spatchcock a chicken is a good pair of poultry scissors. Cut all the way down on either side of the backbone of the bird (saving the backbone for future stock, of course.) Now you can open the bird up, season it on both sides, and lay it flat on a sheet pan to cure.


Spatchcocked and rubbed. I put the bird skin-side down for a day and a half, then flipped it over for another day and a half.


My preferences leaned toward Asian flavors this time, so here’s my dry brine recipe:

3 tablespoons Kosher salt (I use Diamond Crystal…the brand matters. See why below.)
1 1/2 tablespoons (1 tablespoon + 1 1/2 teaspoons) granulated garlic
1 1/2 tablespoons (1 tablespoon + 1 1/2 teaspoons) granulated onion
1 tablespoon brown sugar
1 tablespoon Chinese Five Spice
1 1/2 teaspoons black pepper

I combined all the ingredients in a bowl.


The reason why the brand of Kosher salt matters is the weight. But salt is salt, right? Well…different brands weigh different amounts. For example, Morton Kosher salt is more dense than Diamond Crystal. If you use equal amounts of each, you’ll get different results. That’s why most recipes tell you the weight of the salt, not the volume. In this case, 3 tablespoons of Diamond Crystal Kosher salt (according to my little kitchen scale) weighs 1.09 ounces.

Once I spatchcocked the bird, I rubbed it really well on both sides with the spice rub.

I lined a sheet pan with non-stick aluminum foil (to be used again later), and placed the bird, skin-side down, on it. I didn’t wrap the bird. I simply moved it to a refrigerator just like that, and let it stay there, dry-aging, for 1 1/2 days. I then flipped the bird (pardon my language) skin-side up and let it cure another 1 1/2 days, for a total of 3 days for a 4-pound bird.


Dry-aged after 3 days.


Once the bird dry-aged for 3 days, I removed it from the fridge, and let it sit for an hour, allowing it to reach room temperature. I pre-heated my oven to 400 degrees.

I set my oven up so that the bird would lie flat skin-side up (without the sheet pan) directly on the middle oven rack, and the sheet pan (with the non-stick aluminum foil still on it) on the rack underneath it, to catch the drippings. This allowed air to circulate completely around the bird as it cooked, and the pan caught any splatters. (The foil, still on the pan, made clean-up later much easier.)

Once the oven reached 400, I placed the bird on the middle rack, the sheet pan below it, closed the oven door, and turned the temperature down to 275.


Although it’s 161, that’s the breast meat temp. The thighs were higher. And the temperature will still rise while the bird is resting.


Chicken is done when it reaches an internal temperature of 165. Using an instant-read thermometer, I inserted it into the thigh, without touching the bone. I also inserted into the breast. Although the temperature was just a touch low, it rose a few degrees while resting under the foil.

My 4-pound chicken took about 90 minutes to cook.


Out of the oven to rest. I covered it with foil to rest about 15 minutes before carving.


Juicy and delicious!


I usually post on Sundays, but we’re heading out on our annual 94HJY rafting trip with a busload of listeners tomorrow. (We’re a classic rock station out of Providence, RI. Find us at: http://www.94hjy.com.)

We raft on the mighty Kennebec River in The Forks, Maine, with Crab Apple Whitewater.

The folks at Crab Apple are truly my friends, as I’ve rafted with them since 1990 on over 50 trips in Maine, Massachusetts and Vermont! We started a radio station rafting trip about 12 years ago, and our listeners look forward to it every year.

If you want a fun rafting experience, the folks at Crab Apple do it better than anyone else….whether you sign up with Jen and Frank in Massachusetts, or with Carrie and Rob in Maine.

There’s still about a month of the season left! So sign up for your trip right now: http://www.crabapplewhitewater.com!


This was a huge hit when I brought them to a recent neighborhood party. Imagine the best of a deviled egg and a BBQ chicken sandwich, and you’ve got this appetizer that rocks in more ways than one. This is a great appetizer you can make ahead of time. I boil the eggs and make the cole slaw the day before, then keep them in the fridge. Even the chicken can be cooked the day before and then warmed through before assembling right before your guests arrive. Be sure to make a lot of them…they’ll go faster than the hard-boiled eggs in “Cool Hand Luke!”

This recipe is gluten-free, as long as you use GF soy sauce.

_DSC6511


For the chicken and BBQ sauce:
3 cups ketchup (I use Heinz organic)
1 tablespoon apple cider vinegar
2 tablespoons soy sauce (I use La Choy: it’s gluten-free)
1 teaspoon hot sauce (I use Frank’s Red Hot)
1/4 cup + 2 tablespoons brown sugar
1 lb. boneless skinless chicken breasts


For the cole slaw:
2 tablespoons mayonnaise (always Hellman’s)
1 tablespoon rice wine vinegar
1/2 teaspoon sugar (I use organic cane sugar)
2 cups finely shredded cabbage
For the deviled eggs:
6 hard-boiled eggs
1/4 cup mayonnaise
1 tablespoon mustard (I use Gulden’s)


Pre-heat the oven to 250 degrees.

Combine the ketchup, apple cider vinegar, soy sauce, hot sauce, and brown sugar in a oven-proof pot with a lid. Mix well, then add the chicken breasts, making sure they’re immersed in the sauce. Cook low and slow in the oven for about 3–4 hours.

When the chicken is cooked through, shred the meat with 2 forks. Set it aside, but keep it warm.

Combine all the cole slaw ingredients in a bowl, mixing well, and place them in the fridge.

For perfectly hard-boiled eggs, place the eggs in a pot of cold water, and turn the heat on high. Just before the water starts to boil, put a lid on the pot and turn the heat off. Let the eggs sit in the hot water for 15 minutes. Once cooked, keep the eggs in the fridge.

Slice the eggs in half and place the yolks in a bowl with the mayonnaise and mustard. Mix well and keep in the fridge.

To assemble, take a teaspoon of the mayo/mustard/yolk mixture and place it in the cavity of one of the egg halves. Place another teaspoon of the shredded chicken on top (I like it warm, to counter the cold of the mayo and cole slaw), drizzling a little of the BBQ sauce that you cooked the chicken with on the meat. Then place a teaspoon of the cole slaw on top of the chicken.

Serve immediately!

I’ve got dozens of chicken wing recipes,  but even so, sometimes I just want something different. I decided to take my favorite taco seasonings recipe and adapt it to chicken wings. Caramba! One of the tastiest wings I’ve made in a long time!

This is such an easy and delicious recipe to make, even for a crowd. At your next party, just double or triple the recipe, as needed.

2 teaspoons salt
2 teaspoons cumin
2 teaspoons oregano
1 teaspoon paprika
1 teaspoon granulated onion
1/2 teaspoon granulated garlic
1/2 teaspoon pepper
avocado oil
4–5 lbs. chicken wings


Preheat the oven to 375.

Combine the salt, cumin, oregano, paprika, onion, garlic, and pepper in a bowl. Mix well.

Cover a baking sheet with aluminum foil and spread the wings out on the sheet. Sprinkle the wings with the avocado oil and rub the oil all over the wings. This will help the wings cook evenly,  and it’ll help the seasonings stick to the wings.

Turn the wings bottom-side-up and sprinkle with the seasoning mix. Flip the wings over and sprinkle them again, coating them evenly.

Place the baking sheet in the oven and bake for about 45 minutes.


Soy sauce, citrus and honey is always a winning combination with chicken. The addition of star anise adds that touch of licorice without overpowering it. The sugar in the honey can make these thighs burn, so keep an eye on them. Using non-stick aluminum foil saves a lot of clean-up hassles later.

In the summertime, I like to cook these almost all the way through in the oven, then move them to the grill to give them that nice char and smokey taste right at the end.

FullSizeRender (8)


1 teaspoon ground star anise
2 teaspoons granulated garlic
1/4 cup fresh lime juice or lemon juice or combination
1/4 cup soy sauce (I use La Choy when I want it gluten-free)
2 tablespoons honey
8 chicken thighs (about 4 lb.), skin on

I have an old coffee grinder I use for spices, so I toss in a couple of star anise and grind them up. Then I measure out a teaspoon of that for my marinade. (If you don’t have a spice grinder, you can use a mortar and pestle.)


Combine the star anise, garlic, lemon or lime juice, soy sauce and honey. Pour it into a large Ziploc bag and add the chicken thighs. Squish it around to make sure the thighs are well coated. Marinate the chicken thighs for several hours, or even better: overnight.


Preheat the oven to 200 degrees. 


Cover a sheet pan with non-stick aluminum foil and place thighs skin-side up. Cook them low and slow for about 2 hours. Finish them on the grill or pop ’em under the broiler to get that tasty char. But be careful! They can burn quickly!


There’s no problem with your bird, she said to me
Just go low and slow to cook it perfectly
A few choice seasonings end up deliciously
There must be 50 ways to roast your chicken…
There’s nothing better than a whole roasted chicken. Simply season it, pop it in the oven and go low and slow. No maintenance, and you’ve got a great bird in a couple of hours. 
Once you go with humanely raised pastured chicken, you’ll never go back to supermarket chicken again. The flavor is fantastic, and you’ll devour it right down to the bones, which you can use to make the best home-made chicken stock or soup you’ve ever had. Nothing goes to waste.
I roast at least one chicken every week, so to change it up, I’ve come up with many different rubs and sauces over the years. All of the rubs are sugar and gluten-free preparations. 
Chicken with Rosemary and Lemon
 IMG_9146
The lemon serves double-duty in this dish. You use the zest to season the outside skin, then you place the remaining cut up pieces inside the carcass to flavor from the inside out.
1 tablespoon finely chopped fresh rosemary
1 teaspoon granulated garlic
2 teaspoons salt
zest from 2 lemons, using a micro plane zester, the leftover lemons quartered
1/2 teaspoon black pepper
In a bowl, combine the rosemary, garlic, salt, lemon zest, and pepper. 
Thaw a bird, remove the giblets, and rub it all over with olive oil. Shove the quartered lemon pieces into the carcass of the bird. Season the bird inside and out with the rosemary seasoning mix.
Place the bird on a pan lined with non-stick aluminum foil in a pre-heated 450-degree oven. Cook for 10 minutes at this temperature, then reduce to 275 degrees and cook low and slow until done.
Tarragon Chicken
I love the taste of chicken seasoned with tarragon. Careful with this, or you will accidentally devour your fingers!
1 tablespoon dried tarragon, crumbled into a powder
1 teaspoon garlic salt
1 teaspoon salt
1/2 teaspoon black pepper
olive oil
In a bowl, combine the tarragon, garlic salt, salt and pepper.
Thaw a bird, remove the giblets, and rub it all over with olive oil. Season the bird inside and out with the seasoning mix.
Place the bird on a pan lined with non-stick aluminum foil in a pre-heated 450-degree oven. Cook for 10 minutes at this temperature, then reduce to 275 degrees and cook low and slow until done.
Italian Chicken
FullSizeRender
The darker color of the bird comes from rubbing it first with balsamic vinegar, then olive oil, before coating it with Italian seasonings. Don’t use the fancy, expensive balsamic. The bottles that go for about 9 bucks in the supermarket work well for this recipe.
Balsamic vinegar
Olive oil
1 tablespoon salt
1 tablespoon parsley
1 teaspoon oregano
1 teaspoon pepper
1 teaspoon granulated onion
1/2 teaspoon granulated garlic
Thaw a bird, remove the giblets, and rub it all over with the balsamic vinegar. Then rub it all over with the olive oil. Season the bird inside and out with the seasoning mix.
Place the bird on a pan lined with non-stick aluminum foil in a pre-heated 450-degree oven. Cook for 10 minutes at this temperature, then reduce to 275 degrees and cook low and slow until done.
My Grandma’s Chicken
My grandmother would cook chicken thighs low and slow all Saturday morning, knowing that I was coming over for lunch after Lithuanian school. The meat just fell off the bone, and I couldn’t stop eating it. This recipe is so simple and works just as well for a whole bird. Every time I make this, I think about those days at my grandmother’s house.
Lawry’s Seasoned salt
Olive oil
Thaw a bird, remove the giblets, and rub it all over with olive oil. Season the bird inside and out with the Lawry’s Seasoned salt.
Place the bird on a pan lined with non-stick aluminum foil in a pre-heated 450-degree oven. Cook for 10 minutes at this temperature, then reduce to 275 degrees and cook until done.
If you’re using chicken thighs, like my grandmother did, make sure they have the skin on and the bone in.

I love fried chicken. And despite what most people think, fried food is really not that bad for you if you fry it properly. I use clean avocado oil every time, sometimes adding bacon fat or pork fat if I have it. And I get the oil to the right temperature: two key factors that will result in crispy chicken that isn’t bogged down with grease. What makes this recipe great is that I get all the benefits of crispy fried chicken without all the grease and without standing watch over it the whole time.

You can use any chicken parts for this recipe. Fry the chicken until it just turns golden brown and then finish it in the oven.

I use gluten-free flour (Cup4Cup is my favorite) for this recipe, and it works perfectly. If you’ve got someone you love who hasn’t had real fried chicken because they’re on a gluten-free diet, they will love this. If you’re not on a GF diet, feel free to use regular all-purpose flour.


10 lbs. large chicken wings or chicken pieces
Avocado oil, for frying

For soaking:

1 quart buttermilk
1 tablespoon hot sauce (I use Frank’s Red Hot)

For the seasoned flour:

2 cups all-purpose flour
1 tablespoon sea salt
1 teaspoon freshly ground black pepper
1 teaspoon paprika
1 teaspoon granulated garlic
1 teaspoon granulated onion
1 teaspoon basil
1 teaspoon oregano

Open the bottle or carton of buttermilk and add 2 teaspoons of hot sauce. Close the container and shake to combine. Place the chicken pieces in a Ziploc bag, cover with the buttermilk, and seal the bag, letting the chicken soak in it for at least several hours. Overnight is best.

image


Pre-heat the oven to 350 degrees.

In a bowl, combine the flour, salt, pepper, paprika, granulated garlic, onion powder, basil and oregano. Mix well.

After the chicken has soaked in the buttermilk, remove the pieces one at a time, leaving the buttermilk on them as you toss the pieces into the seasoned flour. Shake off the excess flour, and then set the pieces aside on a metal baking rack placed on a sheet pan.

If you’ve got the time, and want to make the chicken extra crispy, let the chicken pieces sit for an hour, then re-flour them before frying. If not, go right to the next step.

Pour the oil into a large heavy-bottomed stock pot to a depth of 1-inch. Heat the oil to 360 degrees on a thermometer.

image

Working in batches, place the chicken pieces in the oil, being careful not to overcrowd them. Fry the chicken until it is golden brown on both sides, then place each piece back on the metal baking rack set on the sheet pan.

Once all the chicken has been fried, place the sheet pan in the oven for 30 to 40 minutes, until it’s fully cooked and crispy.

image


Feast!

I love avocado, and using it in this chicken burger recipe gives each bite a creamy, fatty richness the chicken needs.  It’s a simple burger, with just a handful of ingredients, but it’s really full of flavor. And if you use my Awesomesauce on it (recipe below), it’s even better.

If you want to go lo-carb, you can skip the breadcrumbs (and the bun for that matter.) If you’re going gluten-free, simply use GF breadcrumbs and buns and you’re all set to go.

If you don’t like avocado, leave it out. There’s still plenty of flavor.

Wanna add cheese? Go for it.

The bacon is optional, but what burger isn’t better with bacon?


chicken2

1 lb. ground chicken
1/4 cup breadcrumbs
1 ripe avocado, sliced into small cubes
1/2 teaspoon salt
1/4 teaspoon black pepper
pinch granulated garlic
slices of bacon, cooked
Awesomesauce (recipe below)

chicken1

Combine the chicken, breadcrumbs, chopped avocado, salt and pepper, and garlic in a bowl and mix them thoroughly but carefully so that you don’t squash the cubes of avocado. I like to put the meat in the freezer for about 10 minutes to firm up a bit.

Form the meat into burger patties. It will be a bit sticky, but just make sure you get the avocado evenly distributed. (I find that using gloves and lightly spraying my hand with avocado oil helps me make the patties without sticking.) Chill the patties again in the freezer for about 10 minutes to firm them up some more before cooking.

Pre-heat the oven to 350 degrees.

Heat a little avocado oil (or bacon fat!) in an oven-proof pan, and place the burgers in it when it’s hot. Let the burgers sear on one side, then flip them. (Make sure they sear well, or they’ll fall apart when you try to flip them.) Place the pan in the oven to finish cooking. It’s chicken…so you don’t want to undercook your burgers!

When they’re ready to serve, place the patties on a bun and with a slice of or 2 of bacon and slather with my Awesomesauce:

1/2 cup mayonnaise
1 tablespoon ketchup
1 tablespoon yellow mustard
1 tablespoon dill pickle relish
1/4 teaspoon garlic powder
1/4 teaspoon paprika
Pinch cayenne pepper

Combine all the ingredients in a bowl. Mix well. Refrigerate covered for a few hours to blend the flavors.


There’s still time to get all the ingredients that will make your Super Bowl party over the top!

Here are some links to my favorite recipes. All of them work really well when you want to feed a large group of hungry people, no matter what team they’re rooting for!

I’ve included classic chicken wing recipes, delicious ribs (without the need of a smoker or grill), classic Italian dishes, seafood and more.


CHICKEN WINGS AND DRUMSTICKS…

HONEY GLAZED CHICKEN WINGS

SPICY BRINED AND GRILLED CHICKEN WINGS

ASIAN STYLE CHICKEN WINGS

“MEXICAN” CHICKEN WINGS


PORK RIBS…

CHINESE STYLE HONEY RIBS FOR THE BIG GAME


BEEF RIBS…

KONA BEEF RIBS


SHRIMP COCKTAIL WITH SAUCE…

PERFECT SHRIMP COCKTAIL, FROM BOIL TO SAUCE


FRIED SHRIMP…

FANTASTIC FRIED SHRIMP


LASAGNA AND BAKED ZITI…

LASAGNA AND ITS COUSIN, BAKED ZITI


ASIAN NOODLES…GREAT HOT OR COLD

ASIAN NOODLES WITH PEANUT SAUCE


OYSTERS…

OYSTERS ROCK-A-FELLOW (IMPROVED!)