Archive for the ‘Food’ Category

I’ve always loved Manhattans and Negronis…two different cocktails, yet similar in certain respects. Both use sweet vermouth. Both have a touch of bitterness: Manhattans will often include a few dashes of angostura bitters, where a Negroni gets its bitterness from Campari. So when I visited Food Network chef Geoffrey Zakarian’s The Lambs Club restaurant in NYC many years ago, and tasted my first Boulevardier, I was instantly hooked.

Loosely translated, a boulevardier is a “man about town.”

The cocktail was created by Erskine Gwynne, the publisher of “Boulevardier,” a magazine for expats living in Paris in the 1920s. It’s basically a Negroni with whiskey instead of gin.

My personal preference for whiskey is bourbon, and one of my favorite bourbons to mix with is the very affordable 1792 Small Batch, though Buffalo Trace is another great choice. And for sweet vermouth, nothing beats the grandaddy of them all: Carpano’s Antica Formula.

I was just reading an interview with food blogger and cocktail expert, David Lebovitz, in the Wall Street Journal, and he mentioned the Boulevardier as one of his favorite cocktails. I hadn’t had one in ages, and started digging in my bar inventory. Bourbon is something I always have…but I also found Campari and an unopened small bottle of Antica Formula. I was all set!

Be very careful, especially with the vermouth. If you stray and buy some cheap brand, the drink will resemble nothing even close to what it could truly be!


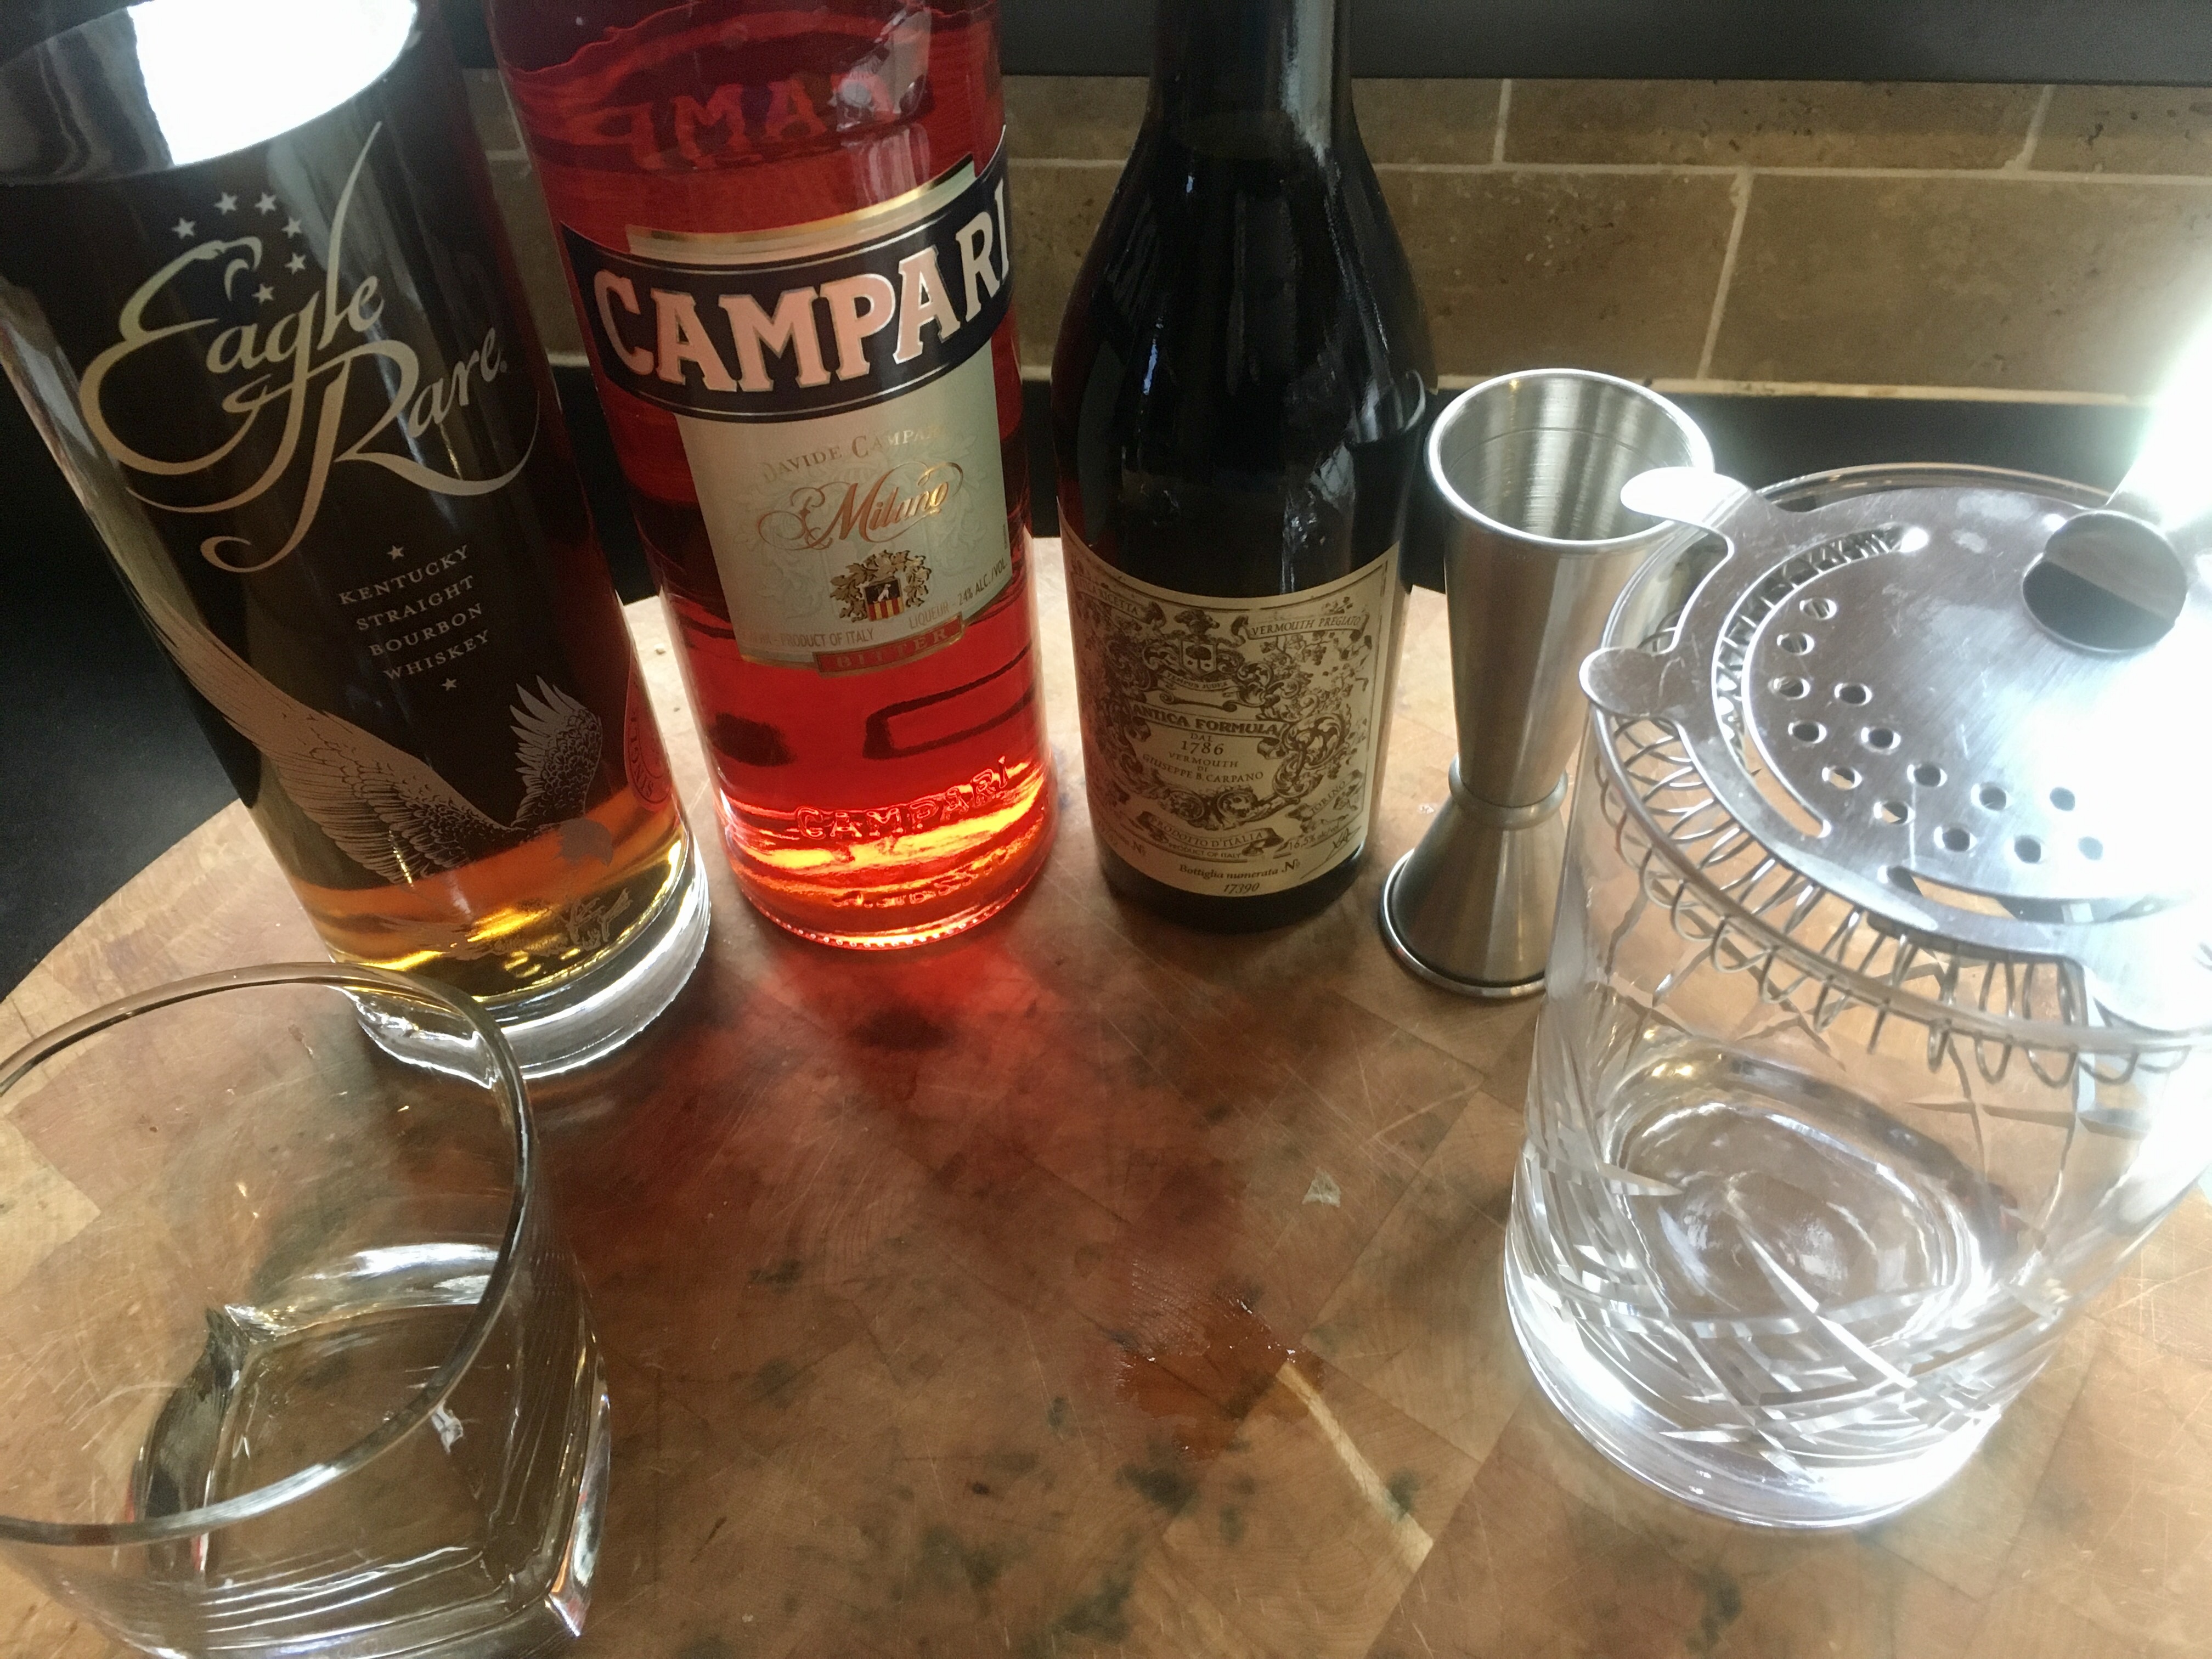
Eagle Rare is a great choice for bourbon as well, but its prices have skyrocketed recently.

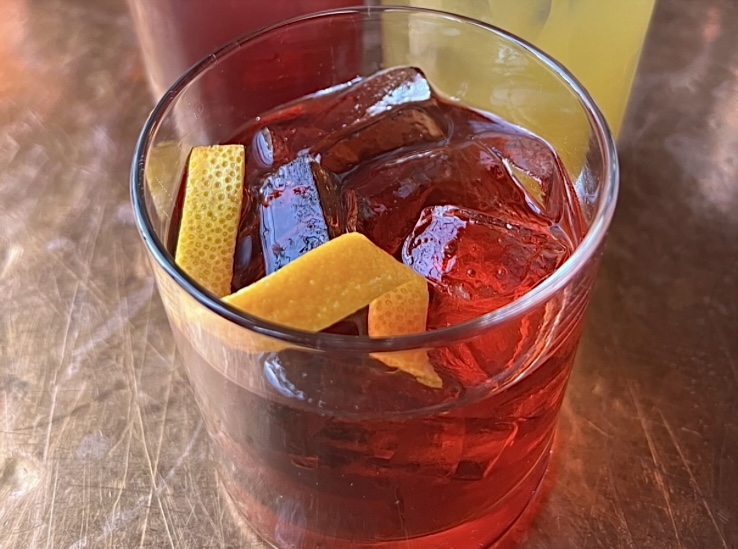
Many recipes go for the classic 1:1:1 ratio, like you’d find in a Negroni. Others boost the bourbon to 1.5 ounces. But I actually prefer a 2:1:1 ratio.

2 oz. bourbon, whiskey, or rye
1 oz. Campari
1 oz. sweet vermouth (Antica Formula preferred)


Add some ice to a cocktail shaker. Add the ingredients and stir. Strain into a rocks glass with a large cube.

Some add a twist of lemon or orange. Others, a maraschino cherry. I like it as is.


Perfection.


1792 Small Batch bourbon: Everyone has their favorite bourbon, and I really enjoy this one, because it mixes well and, at about $40 a bottle, is very affordable. Made by the Buffalo Trace distillery, who can pretty much do no wrong. (Which is why I also recommend Buffalo Trace bourbon itself.)

Campari: A liqueur, invented in 1860 by Gaspare Campari, considered an aperitif. Its alcohol content depends on the country it’s sold in. It’s unique bitter flavor is obtained from the infusion of herbs and fruit in alcohol and water.

Carpano Antica Formula: First invented in 1786 in Turin by Antonio Benedetto Carpano, it has survived in its original recipe thanks to the Fratelli Branca Distillerie. It costs more than the typical 5-buck bottle of vermouth, because it’s simply the best you can get. Buy it once and you’ll never buy another sweet vermouth again.


Butter and cheese. Can anything be better?

It’s especially great when asparagus is in season, growing in my garden, like right now.

This is a great side dish with any main course like a big slab of meat, and has special meaning to me because my cousin first introduced me to asparagus with this recipe when I was just a kid. She passed away many years ago, but I think of her every time I make this simple but delicious dish.

You can use almost any grated “parmesan” cheese, but nothing beats real Parmigiano Reggiano that you freshly grate yourself. Whatever you use, please, just don’t use the junk that comes in a plastic container on the store shelf.


image

1 lb. fresh asparagus spears
1 tablespoon unsalted butter
2 tablespoons extra virgin olive oil
3/4 cup grated Parmigiano Reggiano cheese
sea salt and freshly cracked black pepper


The easy way to trim an asparagus spear is to grab the thicker end between two fingers and bend it. It will snap at the point where the tough part ends and the softer, edible part begins. I toss the bottoms into my compost pile.

I heat the butter and oil together in a pan and then add the asparagus spears, cooking over medium heat for about 5 minutes, until al dente. (You don’t want them mushy.)

While the asparagus is still in the pan, I sprinkle the Parmigiano Reggiano on top, letting it melt a bit. I season with sea salt (I prefer Fleur de Sel) and freshly cracked black pepper.


When it comes to grilling, lamb is often overlooked. Some folks think it tastes too gamey, which can be true with grass-fed lamb that comes from New Zealand or Australia. Although you can’t beat their strict quality standards, the flavor can be intense.

I don’t mind that intense lamb flavor in a chop, but when I make lamburgers, I like to mix ground beef with ground lamb to give it a milder flavor. And when I cook them over hardwood charcoal, the flavor is outstanding! Even seared in a cast iron skillet and finished in the oven, these burgers are awesome.

1 lb. ground lamb
1 lb. ground beef
1/2 onion, minced
1 tablespoon Dijon mustard
1 teaspoon each fresh parsley, mint, and dill, finely chopped
1 teaspoon dried Greek oregano
1/2 teaspoon cumin
1 large clove garlic, squeezed through a garlic press
1 scallion, finely chopped, green part only
1/2 cup breadcrumbs
1 egg
1 teaspoon salt
1/2 teaspoon black pepper


Fresh herbs make the difference!


Heat the olive oil in a skillet over medium heat. Add the onion. Cook it until it’s translucent, about 6 minutes. Transfer the onion to a plate to cool.

In a bowl, mix the cooled onion, mustard, parsley, mint, dill, oregano, cumin, garlic, scallion, and salt and pepper.

In another bowl, combine the lamb with the beef, so they are mixed well. Then add the onion mix bowl to the meat and make sure all the ingredients are combined. Add the breadcrumbs and mix again. Then add the egg and mix one more time.

Form the meat into patties. Place them on a baking sheet covered with non-stick foil, and place the baking sheet in the fridge.


The indentation in the center of the patty keeps it from swelling up while cooking.


Don’t let the lamburgers get too cold in the fridge…just enough to firm the meat up a bit. If it gets too cold, give it a few minutes at room temp to warm up again.  Grill the burgers over hardwood charcoal until they are cooked to medium.

If you’re cooking indoors, heat some avocado oil in an oven-proof pan, preferably cast iron. Sear the burgers well on both sides, then place the pan in a 350-degree oven to finish cooking.


Extra meat is great for meatballs! Just freeze them for another time.


Place the burgers on buns, and smear the bun with the feta cheese dressing.

If the food is good, someone’s always watching!


My recipe for feta cheese dressing works really well with lamburgers. But it’s also great on a salad.

3/4 cup plain Greek yogurt
1  cup mayo
1 teaspoon Worcestershire sauce
1/2 teaspoon cayenne pepper sauce, like Franks Red Hot
1 teaspoon Dijon mustard
1/2 teaspoon granulated garlic
1/2 teaspoon salt
1/2 teaspoon ground black pepper
4–5 oz. crumbled feta cheese

Combine all the ingredients in a bowl. Mix well. Cover and refrigerate. If you can wait a day, it’s even better.

FullSizeRender (14)

Who says you have to only cook burgers and steaks on the grill? This is one of my favorite ways to enjoy clams…and without the clam knife! I always use hardwood charcoal.

image

A couple of dozen (or more) little neck clams, washed and purged
1 stick (8 oz.) of unsalted butter
1/4 cup extra virgin olive oil
1/4 cup chopped parsley
1 teaspoon dried oregano
1 teaspoon minced garlic
1/2 teaspoon dried basil
1/2 teaspoon sea salt

image

The clams should be stored in the fridge until ready to use…not in water, not on ice. Place the clams in a bowl and cover them with a wet dish towel.

About an hour before cooking, I like to purge my clams to remove as much grit as possible. I fill a large bowl with cold water, add sea salt and some corn meal to it, and mix it around. Then I add the clams to this bowl and let them sit in this liquid for an hour. They will suck up the corn meal and spit out sand and grit. After an hour, I pour off the water/salt/meal/grit mix, and thoroughly wash the clams. Now they’re ready to grill!

I start my hardwood charcoal grill and divide it in half: coals on one side, no coals on the other.

While the coals are heating up, I grab a disposable aluminum foil tray and place it on a burner on my kitchen stovetop over medium heat. I add the butter, olive oil, parsley, oregano, basil, garlic and salt, and stir it all to combine. Once the butter has melted and everything has blended, I bring the tray over to the charcoal grill and place on the side of the grill without coals. It will stay warm.

Once the coals are hot, just place the clams directly on the grill. (Use tongs, unless you want to remove all of your knuckle hair.) They’re done as soon as they open, but you can cook them as long as you like, from raw to more thoroughly cooked. As each one reaches its desired doneness, place it carefully in the aluminum tray, making sure you don’t lose any of that precious liquid inside the clam shell. Give it a swish in the butter and herb mix.

When all the clams have been cooked and are in the tray, serve them with that herby butter sauce on top of pasta…or simply eat them with a fresh baguette. A glass of great white wine is a must.

image

Really easy and really delicious!

When my daughter hangs out with me, I always ask her what she wants me to cook for her, and there are a few “Dad” recipes that are her favorites. This is one of them, especially when fresh asparagus is available. And as any parent will tell you, if your kid is craving a dish that has vegetables in it, count yourself lucky–and make it!!
Prepping asparagus is easy, and you don’t need a knife to cut off the woody bottoms of the stalks. Simply bend the stalks at the bottom and they will naturally snap off at the right point.
4 mild Italian sausages, sliced into pieces 1/2″ thick
1 lb. penne pasta
1/2 onion, finely chopped
1 cup chopped fresh trumpet mushrooms (white button mushrooms work, too), optional
2 cups fresh asparagus, sliced into 1-inch pieces
1 clove garlic, passed through a garlic press
1 cup homemade chicken broth
6 fresh sage leaves, finely chopped
1/2 cup freshly grated Parmigiano Reggiano cheese
extra virgin olive oil
salt and pepper
Have the pasta water salted and boiling, and add the pasta, cooking until just a bit more undercooked than al dente.
Heat a large pan, and drizzle in some olive oil. Sauté the sausage pieces until browned and cooked through, but not overcooked. Remove the sausages from the pan and place them in a separate bowl. Remove all but 2 tablespoons of the fat left behind in the pan.
Place the pan back on stove and sauté the onion until translucent. Add the garlic, and sauté for 10 seconds. Add the sage, and saute for 10 seconds, stirring. Add the chopped mushrooms and saute for a few minutes, then add the chicken broth, and simmer until almost all the liquid has evaporated. Pour the contents of the pan into the bowl with the sausages.
Return the pan to the stove, add a little more olive oil, and on medium heat, sauté the asparagus pieces. Cook them until they are al dente, not too soft. Once the asparagus has reached this stage, return all the contents of the sausage/mushroom bowl to the pan to heat through. Drain the pasta, and add it to the pan as well, combining all the ingredients. If it looks too dry, add a little pasta water to the pan. Season with salt and pepper.
Make sure you serve this hot, with grated Parmigiano Reggiano on top, and drizzle lightly over the top with extra virgin olive oil.

There’s something about Asian noodle dishes that make them incredibly addictive. They’re great hot or cold, and easy to make at home. I store an arsenal of basic Asian ingredients in my pantry, so slapping this together is no effort at all. And if you don’t have Asian noodles around, chances are you’ve got a box of pasta, which works just as well.

Next time you’ve got a bunch of people coming over, cook a batch a few hours beforehand and let it come to room temperature. It’s great with anything, really. Grab a bag of frozen egg rolls or some potstickers, and you’ve got great munchies for your guests.

Adding boiled and chilled shrimp to these noodles makes it a cool meal. I usually double the sauce recipe when I do that.

If you need to go gluten-free, use GF pasta or rice noodles…and you can find gluten-free hoisin sauce in the Asian food section of many supermarkets.

Asian noodles

4 tablespoons creamy peanut butter
1 tablespoon hoisin sauce
2 teaspoons sesame oil
1 teaspoon Chinese chili garlic sauce (more, if you like it spicy!)
16 oz. package Chinese noodles or pasta

Combine the peanut butter, hoisin sauce, sesame oil, and chili garlic sauce in a bowl. Set it aside. I keep my peanut butter in the fridge once the jar is open, so sometimes it’s a bit thick. So I just zap it in the microwave for about 10 seconds to soften it up.

Boil the noodles or pasta until al dente. Drain it and place it in a large bowl.

Mix the noodles with the sauce.

It’s easy to make this recipe a meal by adding meat and veggies, which is what I did recently.

I took about a pound of chicken breasts, and sliced them thin, into strips, placing them in a bowl. I added a little soy sauce (go gluten-free soy sauce if you need to…La Choy is the brand I use) and a little rice vinegar, and I let the chicken marinate in the fridge for a few hours.

Meanwhile, I chopped up some broccoli and blanched it in boiling water, just to cook it a little. I drained the water and set the broccoli aside.

I chopped some sugar snap peas on the bias, and set them aside. And I had a bag of mung bean sprouts purchased, ready to go.

This time, I used Udan noodles for this dish (by my daughter’s request) and I found a brand that simply needed to be microwaved for 90 seconds before using.

So once we were ready to eat, I put a little avocado oil in a hot pan and seared the chicken that was marinating, getting some nice caramelization on the meat. Toward the end, I threw in the snap peas and broccoli just to heat them up. I tossed it all into a large bowl.

I heated the Udon noodles in the microwave and tossed them in the bowl.

I added the bean sprouts to the bowl, and then a generous supply of the peanut sauce mixture, as above.

I really gave it all a good mix before serving it in bowls, with a garnish of fresh cilantro on top.

Brining, the process of letting a hunk of protein soak in a salt solution for a few hours, is a great way to add flavor and moisture to any cut of meat. I brine these wings for 3 hours before using a sweet and spicy rub. They can be grilled or roasted in the oven.


image

The brine…

1/2 cup Kosher salt
3 tablespoons light brown sugar
1 teaspoon whole black peppercorns
1 whole bay leaf
2 quarts water

Combine all ingredients in a saucepan and heat until the sugar and salt dissolve. Remove it from the heat, and let it cool to room temperature.

The rub…

1/4 cup light brown sugar
1/4 cup granulated sugar
1/4 cup sweet paprika
1 tablespoon Kosher salt
1 tablespoon granulated onion
2 teaspoons black pepper
1 teaspoon dried thyme
1 teaspoon dry mustard
1 teaspoon ground ginger
1 teaspoon cayenne pepper

Combine all the ingredients in a bowl.

Place 3 lbs. of chicken wings in a Ziploc bag and pour the cooled brine into the bag. Place the bag in a bowl to prevent leaks and keep it at room temp for 3 hours. I wouldn’t brine it longer than that, or it will get really salty.


After 3 hours, remove the chicken from the brine and dry the wings with paper towels. Discard the brine.

Place the chicken pieces in a large bowl and sprinkle them with 1/3 cup of the rub, tossing to coat the chicken well. Place the bowl with the chicken in the fridge until you’re ready to cook.


About 30 minutes before cooking, remove the bowl from the fridge and let the chicken come to room temperature.

Pre-heat the oven to 350 or light a grill.

Toss the chicken with some more of the rub, if you like, then place the pieces on a sheet pan lined with non-stick aluminum foil.

Bake at 350 for 30 minutes or until done. Lower the oven temperature if it starts to burn.

If you’re grilling, cook the wings over medium heat, turning them frequently to prevent burning. Cook until the wings are done.


When I first told my friends that I grew up in a Lithuanian family, that we only spoke Lithuanian at the dinner table, that I went to Lithuanian Saturday school for 8 years, that I was a Lithuanian boy scout…they looked at me with a bit of disbelief. On the surface, I looked just like any other American-born kid that grew up in the suburbs. But the home life was vastly different.

Few things were stranger to my friends than the food we ate. While all my “American” friends had PB&J’s for lunch, I had a liverwurst sandwich on dark Lithuanian bread. While my friends struggled with broccoli, I was force-fed beets. And while my friends ate macaroni with jarred tomato sauce or Kraft mac & cheese, my Mom served us macaroni with sour cream and butter. (Nobody called it pasta back then.)


img_0048


Few things prove you are a true Lithuanian more than an appetite for herring. (Silke (sil-keh) in Lithuanian.) I loved it at an early age. Didn’t matter if it was in a cream sauce with onions, in a tomato casserole with chopped boletes, or perhaps my favorite: this appetizer my Mom prepared only twice a year when my Dad’s buddies came over to play rounds of bridge all night.

Years later, when I was just out of college and in my first years of radio, I shared an apartment with my college buddy, Don. One evening, I prepared this dish for him when he came home from work. We both had the next day off (smart move, considering the vodka!) and I explained to him my family history behind this strange-looking appetizer. (I don’t think he’d ever had herring before.) Though it looked bizarre, he knew he had to trust me when it came to food, and he popped one of those bites into his mouth. I could see he wasn’t sure whether he liked it or not…a moment of many sensations hitting him all at once…confusion in his eyes…do I spit it out or swallow it?…so I poured him the vodka. He swallowed the food…took a shot of the vodka…and instantly had a moment of clarity. It all came together. It was indeed magical. I’ll never forget that look on his face!

There are a few basic ingredients that make this appetizer work…

First and foremost, you need a bottle of good vodka in the freezer. Despite their lack of love for anything Russian, Lithuanians like their vodka, and Stolichnaya was my Dad’s favorite back in the day. Even now, with hundreds of vodkas to choose from, I still go to the red-labeled Stoli bottle for this dish. (Though it’s now distilled in Latvia.) I find a space in the freezer…jam that bottle in there…and let it get nice and cold.

Obviously, good quality herring is essential. Though I can get them fresh when I’m back home on Long Island, the usual choice is from a jar. For me, there’s no better quality than Acme products out of Brooklyn, NY. (If you saw the episode of “Bizarre Foods America” with Andrew Zimmern where he visited a salmon processing plant in Brooklyn, that was Acme Smoked Fish.) You can find them in many supermarkets. The excellent Blue Hill Bay herring in dill sauce is an Acme product and can be found at Whole Foods.

Next: hard-boiled eggs that have cooled in the fridge. Get out the old egg slicer that’s been sitting in the kitchen drawer for the last decade and use it for this appetizer.

Red onion, sliced thin. How much you use is up to you. But it’s gotta be red and it’s gotta be raw.

And finally, Lithuanian bread. Yes, there is such a thing. It’s easy to find in most Polish or German food stores in the New York area. I also recently discovered an Eastern European food store in Hyannis, on Cape Cod, where I can stock up . I buy a loaf and then keep it in the freezer to enjoy throughout the year. Lithuanian bread is like the lovechild of rye bread and pumpernickel, so either one of those will work in a pinch.


img_0051

To make the appetizer, simply place a small piece of Lithuanian bread, about 1 1/2″ square, on a plate. Place a slice of hard-boiled egg on top of it. On top of that, some red onion. Then finally, a piece of herring.


img_0046


Pop the whole thing in your mouth, and wash it down with a small amount of frozen vodka. No shots–this isn’t a frat house. Besides, you won’t make it to the end of dinner. Then again, you may not care at that point!

I never learned how to play bridge, but I’m sure my Dad would be proud that I remembered this treat.

When I gain some weight and need to go back on the diet, one of the major changes in my eating habits is to incorporate more seafood and less meat into my meals. Seafood has a lot more protein and fewer calories. In fact, shrimp, lobster and oysters are some of the most delicious low-calorie foods you can enjoy, running about 1 calorie per gram. It’s what you add to them–oils, melted butter, batter–that make them high in calories.

I’ve always loved sushi, but again, on a diet, I need to limit my intake of unnecessary calories, and rice is on that list. I’ve found that I can use a lot less rice, or maybe none at all, when I make poke…and I get all the satisfaction of sushi or sashimi.

My two favorite fishes to eat raw are ahi tuna and wild-caught Alaskan salmon, like sockeye. There are many great purveyors of this super-high quality seafood online, and I usually buy a decent amount of fish at one time–hermetically sealed and frozen in 4-ounce packages–to last me a long time. (The price is often much better when you buy in quantity, because they have to be shipped frozen overnight.)

Yes, please.


There are many ways to prepare poke, and the only limitations are what’s in your fridge. The first recipe, using salmon, is closer to a traditional poke recipe you’d find in a restaurant.


6.5 ounces wild-caught Alaskan salmon, in the refrigerator (thawed, if previously frozen)
1 tablespoon soy sauce
2 teaspoons sesame oil
1 teaspoon rice vinegar
1/2 teaspoon fresh lemon juice
1/3 cup chopped raw cashews
1 scallion, green and white parts finely chopped

Keep the thawed salmon in the refrigerator. Remove the salmon from the fridge, and remove the skin if it is still on the fish. Cut the fish into half-inch cubes. I like to place the salmon cubes on a clean paper towel to absorb excess moisture from thawing. Then I place the salmon cubes in a bowl and put it back in the fridge while I combine the other ingredients.

In another bowl, combine the soy sauce, sesame oil, rice vinegar, and lemon juice. Whisk them together.

Chop the cashews and add them to the bowl, mixing them in.

Cut the root ends off the scallions, chop the green and white parts finely, and add them to the bowl, mixing them in.

Add the salmon to the bowl, mixing gently, so that you don’t damage the fish.
Let it sit for 10 to 15 minutes, if you can wait that long, and then: eat!
My tuna poke recipes have also used similar ingredients…
More recently, I mixed up a batch of what I call my “Asian Mix,” a blend of five Asian flavors that really work well together: soy sauce, hoisin sauce, chili garlic sauce, rice vinegar, and sesame oil. I let my tuna or salmon marinate in this mix for about ten minutes before adding the other ingredients and feasting.

Tuna poke with lettuce, onion, pine nuts, black and white sesame seeds, rice and my “Asian Mix.”

But my proudest achievement was taking my favorite sandwich from my home town of New York, and making it into a bowl. The sandwich is an everything bagel with salmon and cream cheese, and my poke version uses just a bit of the bagel, yet you still get the flavor without all the calories. The secret is a seasoning you can buy already prepared.
3 oz. wild-caught Alaskan sockeye salmon, cubed
1 tablespoon capers
1/2 small Vidalia or sweet onion, sliced very thin
1/2 tomato, seeds removed, sliced thin
1/4 of a toasted plain bagel
1 tablespoon cream cheese
2 teaspoons Everything Bagel seasoning
1 chopped hard boiled egg
Cut the salmon into small 1/2″ cubes and place it in a bowl. Add the tablespoon of capers (including some of the brine), chopped onion and tomato. Mix gently.
Toast the bagel and use only 1/4 of it (I use that little for the sake of calories. But you can use more, if you like!) Spread the tablespoon of cream cheese on the toasted bagel, then carefully chop it up into small cubes. Add this to the bowl. Sprinkle in the Everything Bagel seasoning and the chopped hard-boiled egg, and give it all one last gentle toss.
Then take a forkful, close your eyes, and imagine you’re in your favorite New York deli!

I love salmon in all forms. If it’s high quality wild-caught Alaskan salmon, I love it pan-sautéed, raw (as in sashimi), smoked, or cured.

The best smoked salmon uses the gentle process of cold smoking. It’s something that the average homeowner can’t really do successfully, so I simply buy cold-smoked salmon when I crave it. I’ve made hot-smoked salmon at home with some success, but the fish is so delicate, you really have to keep an eye on it. It takes no time for a juicy, perfectly smoked piece of salmon to turn into a dry, overcooked hockey puck.

Curing, which is how you get Gravlax, is really quite simple. You just need to have enough patience to wait a few days before you can eat it.

There are many gravlax recipes out there.  Some use peppercorns, fennel, caraway, even Aquavit in the curing process.  My opinion is: if you’ve got a beautiful piece of fish, why mask the flavor of it? I go with the simplest recipe possible, featuring just 3 ingredients that cure the salmon: salt, sugar and fresh dill.

The first step, of course, is to get the right piece of salmon. What you want is that beautiful, vibrant, orange wild-caught Alaskan or Pacific salmon that costs more than you thought you were going to spend. Wild-caught means the salmon has eaten the foods it loves, a balanced diet consisting of bugs, fish, shrimp, and small invertebrates. A natural diet gives the meat of the fish that beautiful color and incredible flavor. What the salmon eats is very important because you are eating the salmon! Wild-caught salmon is high in Omega-3’s…the good fats.


A beautiful piece of wild-caught salmon laying on a bed of the cure.


I avoid Atlantic salmon at all costs. Unfortunately, most restaurants on the east coast serve Atlantic salmon because it’s less expensive. There’s a reason for that. Atlantic salmon is farmed in the USA, Canada and Europe, which means the fish are kept in crowded underwater pens and are fed food pellets that contain a number of nutrients and additives. Often, farmed fish are treated to prevent sea lice, and are given antibiotics to prevent diseases caused by their tight living quarters. They’re also given pellets to color the meat orange, because the natural color of farmed salmon is actually an unappetizing gray. When you buy Atlantic salmon in the fish store, you can spot it a mile away, because it’s got that weird zebra-striped orange and white, with a tinge of gray, and its flavor is bland and lifeless. Farmed salmon is much lower in Omega-3’s.

If it doesn’t say wild-caught Alaskan or Pacific salmon, it isn’t!

Previously frozen vs. fresh fish matters less than where it came from and how it was raised.


2 lbs. wild-caught salmon, skin on, pin bones removed
1/3 cup (50g) Kosher salt (I use Diamond Crystal)
2/3 cup (160g) sugar
1 large bunch fresh dill, washed

If your fish monger hasn’t removed the pin bones from your salmon filet, you’ll need to get a pair of long-nose pliers and remove them. It’s not the worst thing in the world to leave them in there, but you really don’t want to be spitting bones out later.

The reason I mention that I use Diamond Crystal Kosher salt is because all Kosher salt does not weigh the same. Morton Kosher salt, for example, is much heavier by volume, so it weighs more even though you’re using the same cup measurement. In the case of Diamond Crystal, 1/3 cup weighs 50g. Same rules apply to the sugar.  Go by the weight, not the cup measurement. This is really important point to keep in mind when you’re curing anything, fish or meat.

Get a non-reactive tray long enough to hold the salmon filet. I prefer glass.

Mix the salt and the sugar together, and sprinkle half of it evenly on the bottom of the tray. Lay the piece of salmon down on the cure, skin side down, and cover the top of the salmon with the rest of the cure evenly.

Lay the sprigs of dill on top of the cure, covering the entire piece of fish. It might look like overkill. It’s not.


Cover everything with several layers of plastic wrap, pushing it down and tucking it into the corners for a tight fit.


Find a flat board or something similar (I used a clear plastic tray) and lay it on top of the plastic wrap.


Add heavy weights on top to press down evenly on all surfaces. I used cans of tomatoes.


Side view.


Place the tray in the fridge for 48-72 hours.

After 24 hours, remove the plastic wrap and, tilting the tray, baste the dill-covered salmon with the brine juices that have formed. Put clean plastic wrap on top, add the weights, and put it all back in the fridge for another 24 hours. Repeat that process at the 48-hour mark, if needed. If it’s cured, it’s time to eat!


You’ll know the fish is fully cured when the thickest part of the filet is firm to the touch.

Unwrap the salmon, discarding the salt and sugar brine and the dill. Rinse the filet under cold running water and pat it dry with paper towels.

I don’t like a ton of chopped dill imbedded into my gravlax as some do, but if you do, finely chop a bunch of new fresh dill, spread it out onto a board, and press the salmon into it flesh-side down.

To serve, place the gravlax skin-side down on a board. With a long, sharp narrow-bladed knife, slice the fish against the grain, on the diagonal, into thin slices. Serve with mustard-dill sauce, chopped onion, capers, hard-boiled egg, bread…whatever you like.

Refrigerate any remaining gravlax immediately, wrapped in plastic wrap, for up to 2 weeks.