I’m not a jealous guy. But when, just the other day, I saw my friends post that they’re on their way to one of my favorite islands in the world, St. John in the USVI, I got jealous.

I thought about the many trips I’ve taken there, alone and with friends, and the mandatory catamaran trip we took to sip Painkillers at my all-time favorite beach bar, the Soggy Dollar on the island of Jost Van Dyke in the British Virgin Islands.

For a while during Covid, the BVI was closed to Americans, but now, happily, we’re allowed back!

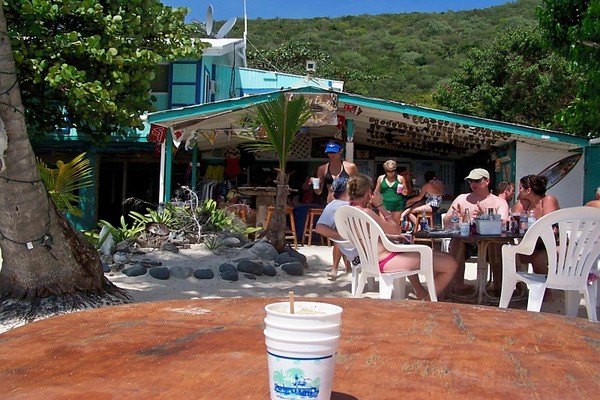
The Painkiller is one of the tastiest rum drinks you can make, and one that certainly brings you back to the Caribbean. And it was invented at the Soggy Dollar. Located on White Bay, a stretch of the whitest most beautiful sand in the Caribbean, surrounded by beautiful turquoise waters, there is no dock. You have to anchor your boat offshore and swim…hence the name: the Soggy Dollar.

Daphne Henderson was the owner of the Soggy Dollar years ago, and she is credited for inventing the Painkiller, which used Pusser’s rum, a British rum that is readily available here in the United States. Charles Tobias, a businessman that received permission from the British Royal Navy to commercialize Pusser’s rum in 1980, tasted the Painkiller and realized the potential of this amazing drink. He took some Painkillers home to the island of Tortola, where he experimented in recreating that drink, coming up with what he thought was something that was as good as—if not better than—the original. He called it the Pusser’s Painkiller.

Tobias never found out what Daphne Henderson’s original recipe was, but when he brought his own Pusser’s Painkillers back to the Soggy Dollar, and had a tasting battle between the two recipes, legend has it that his recipe won 10 out of 10 times. With 4 Pusser’s bars and restaurants in the Caribbean and 2 more in the states, Tobias quickly made the Pusser’s Painkiller the signature drink of these now-famous establishments…and perhaps the most popular drink among the sailing community in the US, Caribbean and West Indies.

The drink itself is simple…

PUSSER’S PAINKILLER
4 parts pineapple juice
1 part cream of coconut
1 part orange juice

Combine these 3 ingredients, with lots of fresh grated nutmeg in a glass with ice. How much Pusser’s rum you use depends on how hammered you want to get! A Pusser’s #2 uses 2 parts rum…a Pusser’s #3 uses 3 parts rum…and a Pusser’s #4 uses 4 parts rum!

I’ve had several Pusser’s #4’s back in the day when there was a Pusser’s bar on St. John in the USVI many years ago. I’ve also sampled them in the BVI at the 2 Pusser’s locations on Tortola.  But I still prefer going back to Jost Van Dyke and knocking back a few at the place where the Painkiller was born, the greatest beach bar on planet Earth: the Soggy Dollar Bar.

I don’t know when I’ll get a chance to go back. But my bathing suit is already packed. Me, below, in happier days…

Sailing away many years ago…

Cauliflower seems to be the veggie of choice these days. You’ll find it riced to take the place of rice or mashed potatoes, in a crust for pizza, and now, the dish du jour is a cauliflower steak. All you need to do is to slice the cauliflower into thick, steak-like pieces, and then bake them. The thicker cut gives the cauliflower a more meaty texture. Of course, with a meat sauce, I’m using cauliflower as a pasta substitute in this dish.

The marinade I use for the cauliflower is pretty simple, with my favorite Italian flavors. With the garden now growing happily, I use fresh herbs, but you can use dry as well.

1/4 cup extra virgin olive oil
1/2 cups chopped scallions
2 garlic cloves, finely chopped
chopped fresh parsley and oregano to taste
salt and pepper

Combine these ingredients in a bowl.

Slice the head of cauliflower across the whole head into 1 1/2-inch steak-like pieces. Place them on a baking pan covered with non-stick aluminum foil. Brush the cauliflower on both sides with the marinade. Use it all up!

Place the baking pan in a pre-heated 400-degree oven and bake it for about an hour, until the cauliflower is golden brown on the edges. Flip the cauliflower steaks over after the first 30 minutes.

It’s OK if your cauliflower steaks break apart a bit. They’ll still taste great!

The meat sauce I use is one that I make all the time with simple ingredients…

1 lb. grass-fed ground beef
1 medium onion, finely chopped
1 28-oz. can of whole San Marzano tomatoes
dried oregano, basil and parsley
granulated garlic
extra virgin olive oil
salt and pepper

Heat the olive oil in a pan and add the onions. Sauté them until they’re translucent, then add the ground beef. Cook the beef until it has browned completely. Add the can of tomatoes, chopping the whole tomatoes up with a spatula (or squeezing them with your hands), breaking up the big pieces into smaller chunks. (I like my sauce a little chunky.) Add the oregano, basil, parsley, garlic, salt and pepper to taste.

Let the sauce cook down until it has thickened.

When the cauliflower steaks are ready, place them on a plate and pour the awesome meat sauce on them. Garnish with some freshly grated Parmigiano Reggiano.

This dish was a huge hit when I brought it to a neighborhood party a while ago. Imagine the best of a deviled egg and a BBQ chicken sandwich, and you’ve got this appetizer that rocks in more ways than one….and you can make it ahead of time.

I boil the eggs and make the cole slaw the day before, then keep them in the fridge. Even the chicken can be cooked the day before and then warmed through before assembling right before your guests arrive. Be sure to make a lot of them…they’ll go faster than the hard-boiled eggs in “Cool Hand Luke!”

This recipe is gluten-free, as long as you use GF soy sauce.

_DSC6511

For the chicken and BBQ sauce:
3 cups ketchup
1 tablespoon apple cider vinegar
2 tablespoons soy sauce
1 teaspoon hot sauce (I use Frank’s Red Hot)
1/4 cup + 2 tablespoons brown sugar
1 lb. boneless skinless chicken breasts
For the cole slaw:
2 tablespoons mayonnaise
1 tablespoon rice wine vinegar
1/2 teaspoon sugar
2 cups finely shredded cabbage
For the deviled eggs:
6 hard-boiled eggs
1/4 cup mayonnaise
1 tablespoon mustard (I use Gulden’s)

Pre-heat the oven to 250 degrees.

Combine the ketchup, apple cider vinegar, soy sauce, hot sauce, and brown sugar in a oven-proof pot with a lid. Mix well, then add the chicken breasts, making sure they’re immersed in the sauce. Cook low and slow in the oven for about 2 hours.

When the chicken is cooked through, shred the meat with 2 forks. Set it aside, but keep it warm.

Combine all the cole slaw ingredients in a bowl, mixing well, and place them in the fridge.

For perfectly hard-boiled eggs, place the eggs in a pot of cold water, and turn the heat on high. Just before the water starts to boil, put a lid on the pot and turn the heat off. Let the eggs sit in the hot water for 15 minutes. Once cooked, keep the eggs in the fridge.

Slice the eggs in half and place the yolks in a bowl with the mayonnaise and mustard. Mix well and keep in the fridge.

To assemble, take a teaspoon of the mayo/mustard/yolk mixture and place it in the cavity of one of the egg halves. Place another teaspoon of the shredded chicken on top (I like it warm, to counter the cold of the mayo and cole slaw), drizzling a little of the BBQ sauce that you cooked the chicken with on the meat. Then place a teaspoon of the cole slaw on top of the chicken.

Serve immediately!

SCALLION “PESTOCHURRI”

Posted: May 30, 2021 in Uncategorized

I love chimichurri and I love pesto. And although both are similar, with many of the same ingredients, they are definitely not the same.

Chimichurri is found in Argentinian, Paraguayan, and Uruguayan cuisines, and features parsley as the main green ingredient. People from those countries will tell you that cilantro has no place in a true chimichurri recipe. It is used as a marinade as well as a side dressing to grilled meats, and often contains vinegar, which pesto does not.

Pesto, on the other hand, is less strict in its ingredients. I’ve made pesto with the classic basil, but also with spinach or arugula. Pesto also features nuts, like the classic pine nuts, but also pistachios, walnuts, or even macadamia nuts. (There are no nuts in chimichurri.) Pesto often features cheese as well.


So when my garden had an abundance of scallions, I decided I would make a chimichurri/pesto hybrid using whatever ingredients I had in my cupboard. What I came up with was absolutely delicious as both a marinade and side dressing. This time, I tried it on chicken.


1 cup chopped scallions, tightly packed
2 large garlic cloves, coarsely chopped
1/4 salted pistachio nuts, shelled
1 teaspoon salt
1/2 teaspoon black pepper
1/4 cup (plus more) extra virgin olive oil


Place the scallions, garlic, pistachios, salt, and pepper in the bowl of a food processor.


Start the processor and slowly drizzle in the olive oil, until you get the consistency of a loose paste.

How thick you want your pesto is a personal choice. You might need more than 1/4 cup of olive oil.


I used chicken leg quarters, and I brushed them on both sides with the pesto, and let them sit for an hour before baking them in a pre-heated 350° oven. They baked for one hour.


A bad weather day prevented me from finishing them on the grill, but they still came out flavorful, with a crispy skin.

I ate the chicken using the extra pesto as a dipping sauce on the side.


Note: For safety, I take a small amount of the pesto and put it in a separate bowl when I brush it on the meat. I don’t want to have raw chicken contaminating the rest of the pesto I will want to use later to serve on the side!

Chourico is as important to the Portuguese as bacon is to us Lithuanians. Here in Southern New England, they pronounce it “sha-rees,” not “chaw-reezo,” like you hear on the Food Network.

I was joking with a friend the other day that if I won the lottery, I could buy a lifetime supply of chourico at my favorite store: Mello’s, in Fall River, Mass. His response was: “Is there such a thing as a lifetime supply of chourico?!”

Good point!

If you’ve had really great chourico, you’re always looking for new ways to include it in your cooking. Inspired by chef Chuck Hughe’s recipe, this is a great chourico appetizer that’s really easy to make. Whip up the arugula pesto ahead of time and keep it in the fridge. Then when guests come, just slice the chourico, sauté it in a pan until brown, and serve.

fullsizerender

3 cups fresh baby arugula
1/2 cup walnuts
1/2 cup olive oil
1 clove garlic
1 teaspoon salt
1/4 teaspoon pepper
1/2 cup + one tablespoon grated Parmigiano Reggiano or other good quality parmesan cheese
2 lbs. chourico, sliced into 1/2″ pieces

Combine the arugula, walnuts, olive oil, garlic, salt, pepper and the 1/2 cup of cheese in a food processor or blender and blend until smooth. Set the tablespoon of cheese aside for garnishing later.

fullsizerender-1

Remove the casing from the chourico and slice it into 1/2″ thick pieces. Sauté the chourico slices in a pan until both sides are caramelized and golden.

Place the chourico on a plate, topping with some of the pesto. Sprinkle a touch of the grated cheese to garnish. Serve immediately, while the chourico is still hot!

fullsizerender-3

This is a really delicious grilled steak full of wonderful Thai flavors. You do need to marinate it overnight, so keep that in mind. The overnight marinating is key to the intense and unbelievable flavor of the beef.

The original recipe called for skirt steak, but I didn’t have any in my freezer. I did have a fat ribeye, though, so once I thawed it, I sliced it lengthwise to get two large, thin steaks which would easily suck up the marinade I was going to make. And the ribeye was nicely marbled, so it stayed juicy and tender. Beef flap is another favorite cut that would work well with this recipe.

image

1/4 cup toasted sesame oil
1/4 cup soy sauce
2 tablespoons grated ginger
2 tablespoons finely chopped garlic
2 tablespoons finely chopped cilantro
2 tablespoons chopped dry roasted unsalted peanuts
2 scallions, minced
1 tablespoon light brown sugar
1 tablespoon fresh squeezed lime juice
1 tablespoon chile oil
2 lbs. beef ribeye (or skirt steak or beef flap)
1/4 cup chicken stock (homemade is best)

In a bowl, whisk together the sesame oil, soy sauce, ginger, garlic, cilantro, peanuts, scallions, sugar, lime juice and chile oil. Transfer half of it to a shallow dish.

Add the steak to the dish and turn the meat to coat it well. Cover and refrigerate the beef overnight. Refrigerate the other half of the marinade in a separate container.

The next day, light a grill. While it’s warming up, get out a sauce pan and pour the chicken stock in along with the reserved marinade. Heat it to combine it well, but not letting it reach a boil. Remove it from the heat and let it come to room temperature. This will be the dipping sauce for the beef.

About 30 minutes before cooking, take the marinated steak out of the fridge and let it come to room temperature. Season it with salt and pepper, and grill it over high heat until it’s medium-rare, about 5 minutes.

If it’s too cold to light a grill, or if you just want to use the oven, heat a cast iron pan on the stovetop, add a few drops of avocado oil or pork fat, and sear the beef on both sides before placing it in a pre-heated 375-degree oven to finish cooking.

Devour the beef with the dipping sauce!

When my daughter hangs out with me, I always ask her what she wants me to cook for her, and there are a few “Dad” recipes that are her favorites. This is one of them, especially when fresh asparagus is available. And as any parent will tell you, if your kid is craving a dish that has vegetables in it, count yourself lucky–and make it!!
Prepping asparagus is easy, and you don’t need a knife to cut off the woody bottoms of the stalks. Simply bend the stalks at the bottom and they will naturally snap off at the right point.
4 mild Italian sausages, sliced into pieces 1/2″ thick
1 lb. penne pasta
1/2 onion, finely chopped
1 cup chopped fresh trumpet mushrooms (white button mushrooms work, too)
2 cups fresh asparagus, sliced into 1-inch pieces
1 clove garlic, passed through a garlic press
1 cup homemade chicken broth
6 fresh sage leaves, finely chopped
1/2 cup freshly grated Parmigiano Reggiano cheese
extra virgin olive oil
salt and pepper
Have the pasta water salted and boiling, and add the pasta, cooking until just a bit more undercooked than al dente.
Heat a large pan, and drizzle in some olive oil. Sauté the sausage pieces until browned and cooked through, but not overcooked. Remove the sausages from the pan and place them in a separate bowl. Remove all but 2 tablespoons of the fat left behind in the pan.
Place the pan back on stove and sauté the onion until translucent. Add the garlic, and sauté for 10 seconds. Add the sage, and saute for 10 seconds, stirring. Add the chopped mushrooms and saute for a few minutes, then add the chicken broth, and simmer until almost all the liquid has evaporated. Pour the contents of the pan into the bowl with the sausages.
Return the pan to the stove, add a little more olive oil, and on medium heat, sauté the asparagus pieces. Cook them until they are al dente, not too soft. Once the asparagus has reached this stage, return all the contents of the sausage/mushroom bowl to the pan to heat through. Drain the pasta, and add it to the pan as well, combining all the ingredients. If it looks too dry, add a little pasta water to the pan. Season with salt and pepper.
Make sure you serve this hot, with grated Parmigiano Reggiano on top, and drizzle lightly over the top with extra virgin olive oil.

RADISH GREENS PESTO

Posted: May 18, 2021 in Uncategorized

We had an unusually cool spring here in Southern New England, and although my radish plants thrived, the sudden spike in temperature means the end of the radish season. What’s left in my “vedge ledge” garden are lots of radish plants that never formed bulbs…just the tops.

The “Vedge Ledge”


Lots of greens…not many bulbs.

Radish tops are too rough and chewy for salads. But can I save them for something a little more adventurous than simply steaming or sautéing them? The answer is yes: pesto!

I found a few more bulbs along the way.

I harvested all of my radishes, finding a few lovely little bulbs along the way, and washed the greens thoroughly. Then they took a ride in the salad spinner to dry off. I measured out 4 packed cups…giving them a squeeze down into the measuring cup. The rest of the ingredients were pretty standard for pesto, with a few exceptions.

A beautiful bowl of greens.

4 tightly packed cups radish greens, washed

3 cloves garlic, chopped

Juice of 1/2 a juicy lemon

1/2 cup salted pistachios, shelled

1/2 cup freshly grated Parmigiano Reggiano

1/3 cup extra virgin olive oil

Sea salt

Ready to go for a spin!

Add the radish greens, garlic, lemon juice, pistachios, grated cheese and olive oil to a bowl of a food processor. Run the processor for a minute, then check the pesto.

Scrape down anything that crawled up the sides of the bowl. Give the pesto a taste. Does it have enough salt? Is it too dry? Does it need more olive oil or tartness from the lemon juice? Add what you like to tweak it and make it your own.

Great color!

I’ve found that despite using salted pistachios and grated cheese, it still needed more salt. After all, a little pesto goes a long way, so the flavor needs to be intense.

I’ve made basic pesto using basil and pine nuts, and it’s delicious. I’ve also made pesto with arugula, and I’ll feature that recipe in an upcoming blog. Now I’ve added radish greens to my repertoire, and I’m really glad I did.

A dab of radish greens pesto on top of some sweet Italian sausage is a delicious treat!

I rarely order beef at a restaurant, because I can usually make a better steak at home. For one thing, I use humanely raised grass-fed beef, something few restaurants offer. And I can cook it for less than a third of the price of a steakhouse. Granted, most steakhouses dry-age their beef, a time-consuming process of taking slabs of beef and keeping them in a fridge for weeks until a certain amount of moisture is sucked out of the meat, intensifying the flavor. I can do that at home in my fridge, but it takes a lot of time and effort.

There is one steak that I couldn’t match for the longest time, and that was the Capital Grille’s bone-in Kona crusted dry-aged NY strip. I would have dreams about that steak! It was time to find a way to make something that would satisfy my craving for that amazing steak at home.

Looking at a variety of coffee rub recipes on-line, I started the slow and steady process of combining ingredients in just the right proportions, tasting as I went. What I came up with really accentuated the flavor of the beef I was cooking, better than I had imagined!

img_0100

3 tablespoons brown sugar
1 tablespoon Kosher salt
1 tablespoon ground coffee (use your favorite)
1 teaspoon granulated garlic
1 teaspoon granulated onion
1 teaspoon unsweetened cocoa powder

Combine the ingredients, mixing well, and keep them in a tightly sealed container at room temperature.

The secret ingredients are the brown sugar and the cocoa. The brown sugar gives the steak a caramelized crust when cooking, and the cocoa rounds out the flavors and gives the beef an extra “umph!”

When using, sprinkle the seasoning liberally on both sides of the steak before cooking. I like to add bacon fat to a cast iron skillet, searing the steak on all sides and then finishing it in the oven. But let’s face it: nothing beats the grill!

img_0104

I moved to a new place last fall. One of the toughest things to say goodbye to in my previous garden was my asparagus patch. Over the years, I had grown loads and loads of delicious asparagus, but sadly, there was no good way to transport that patch to my new place.

I’ve got a much smaller garden space in my new home, but asparagus is too important of a crop to leave out. So I bought a bunch of plants this spring and planted them. I wasn’t get anything this year, except maybe some beautiful asparagus ferns at the end of the season, but I’m hoping the plants settle in and get happy enough to produce even a small crop next year.

In the meantime, I have to look back at my previous success with asparagus…

The home garden is already showing signs of activity. Overwintered kale and arugula plants are springing back to life, enough for a quick salad. Cool weather seeds that I’ve sown early: peas, turnips, radishes, broccoli raab, and others are sprouting. But nothing says the gardening season is here like my patch of homegrown asparagus taking off!

asparagus2013

Asparagus is really easy to grow. You just need the space, and the plants practically do the rest.
Space them about a foot apart, and before you know it, you will have a vast network of tasty stalks sprouting through the soil every spring. They are so much better than anything you can buy in a supermarket.
In the start of the growing season, the stalks don’t even make it into the house. I cut them and just eat them straight out of the garden. Eventually, they make the move to the kitchen, where I love to simply place them on a baking sheet and drizzle a little olive oil over them. Salt and pepper…and then in a 400-degree oven until they’ve caramelized.

Sometimes I toss some tasty chives with blossom buds on top of the asparagus and roast.

Midway through the season, I have so much asparagus that I just don’t know what to do with them all. My friends don’t want anymore and I can’t bear to throw them into the compost pile. So I pickle them…a really easy process that ensures I’ve got delicious asparagus year-round.

PICKLED ASPARAGUS
Several bunches of asparagus spears
2 cups white vinegar
1 cup cider vinegar
1 1/2 cups sugar
3 cups water
20 peppercorns
Garlic cloves, peeled
Salt (1 teaspoon per quart-sized Mason jar. Use less for smaller jars.)
Bring the vinegar, water, sugar and peppercorns to a boil. Set it aside.
Trim the bottom of the asparagus spears so that the spears are just slightly shorter than the height of the quart-sized Mason jar you will use. Or cut them into pieces that will fit smaller jars.
Pack the jars as tightly as you can with the asparagus spears. (They will shrink when processed.) Add the garlic clove and 1 teaspoon of salt to every quart-sized Mason jar…less for smaller jars.
Fill the jars with the vinegar mixture and seal.
Process the jars for 10 minutes. Let them cool before placing them in the refrigerator.

DOES YOUR PEE SMELL WHEN YOU EAT ASPARAGUS?

Asparagus has a sulfur-containing compound identified by scientists as methyl mercaptan. A colorless gas, this compound is also found in blood, feces, garlic, eggs, cheese and even skunk secretions. Another ingredient found in asparagus is asparagine. Present in foods like dairy products, seafood, poultry, fish and nuts, this amino acid is known to have a distinctive smell when heated. To metabolize both methyl mercaptan and asparagine, your body needs to break these compounds down and it’s this breakdown that’s responsible for your urine’s strange smell.

Since both methyl mercaptan and asparagine are associated with the sense of smell, there is debate over which ingredient is actually responsible for the asparagus-urine phenomenon. It could be one, or both.

Many people claim that, regardless of asparagus consumption, their urine does not smell. There are multiple theories about that as well. The first claims that everyone’s urine is in fact affected by asparagus, but only about half of the population have the specific gene that is required to smell the change. On the other hand, the second theory states that only half of the world’s population has the gene that’s required to break down the compounds found in asparagus and, if the body doesn’t break them down, no smell is emitted. In fact, one study published in the British Journal of Clinical Pharmacology found that only 46 percent of British people tested produced the odor while 100 percent of French people tested did. So whatever the reason, asparagus will forever be known as the vegetable that makes your urine smell strange.