Posts Tagged ‘food’

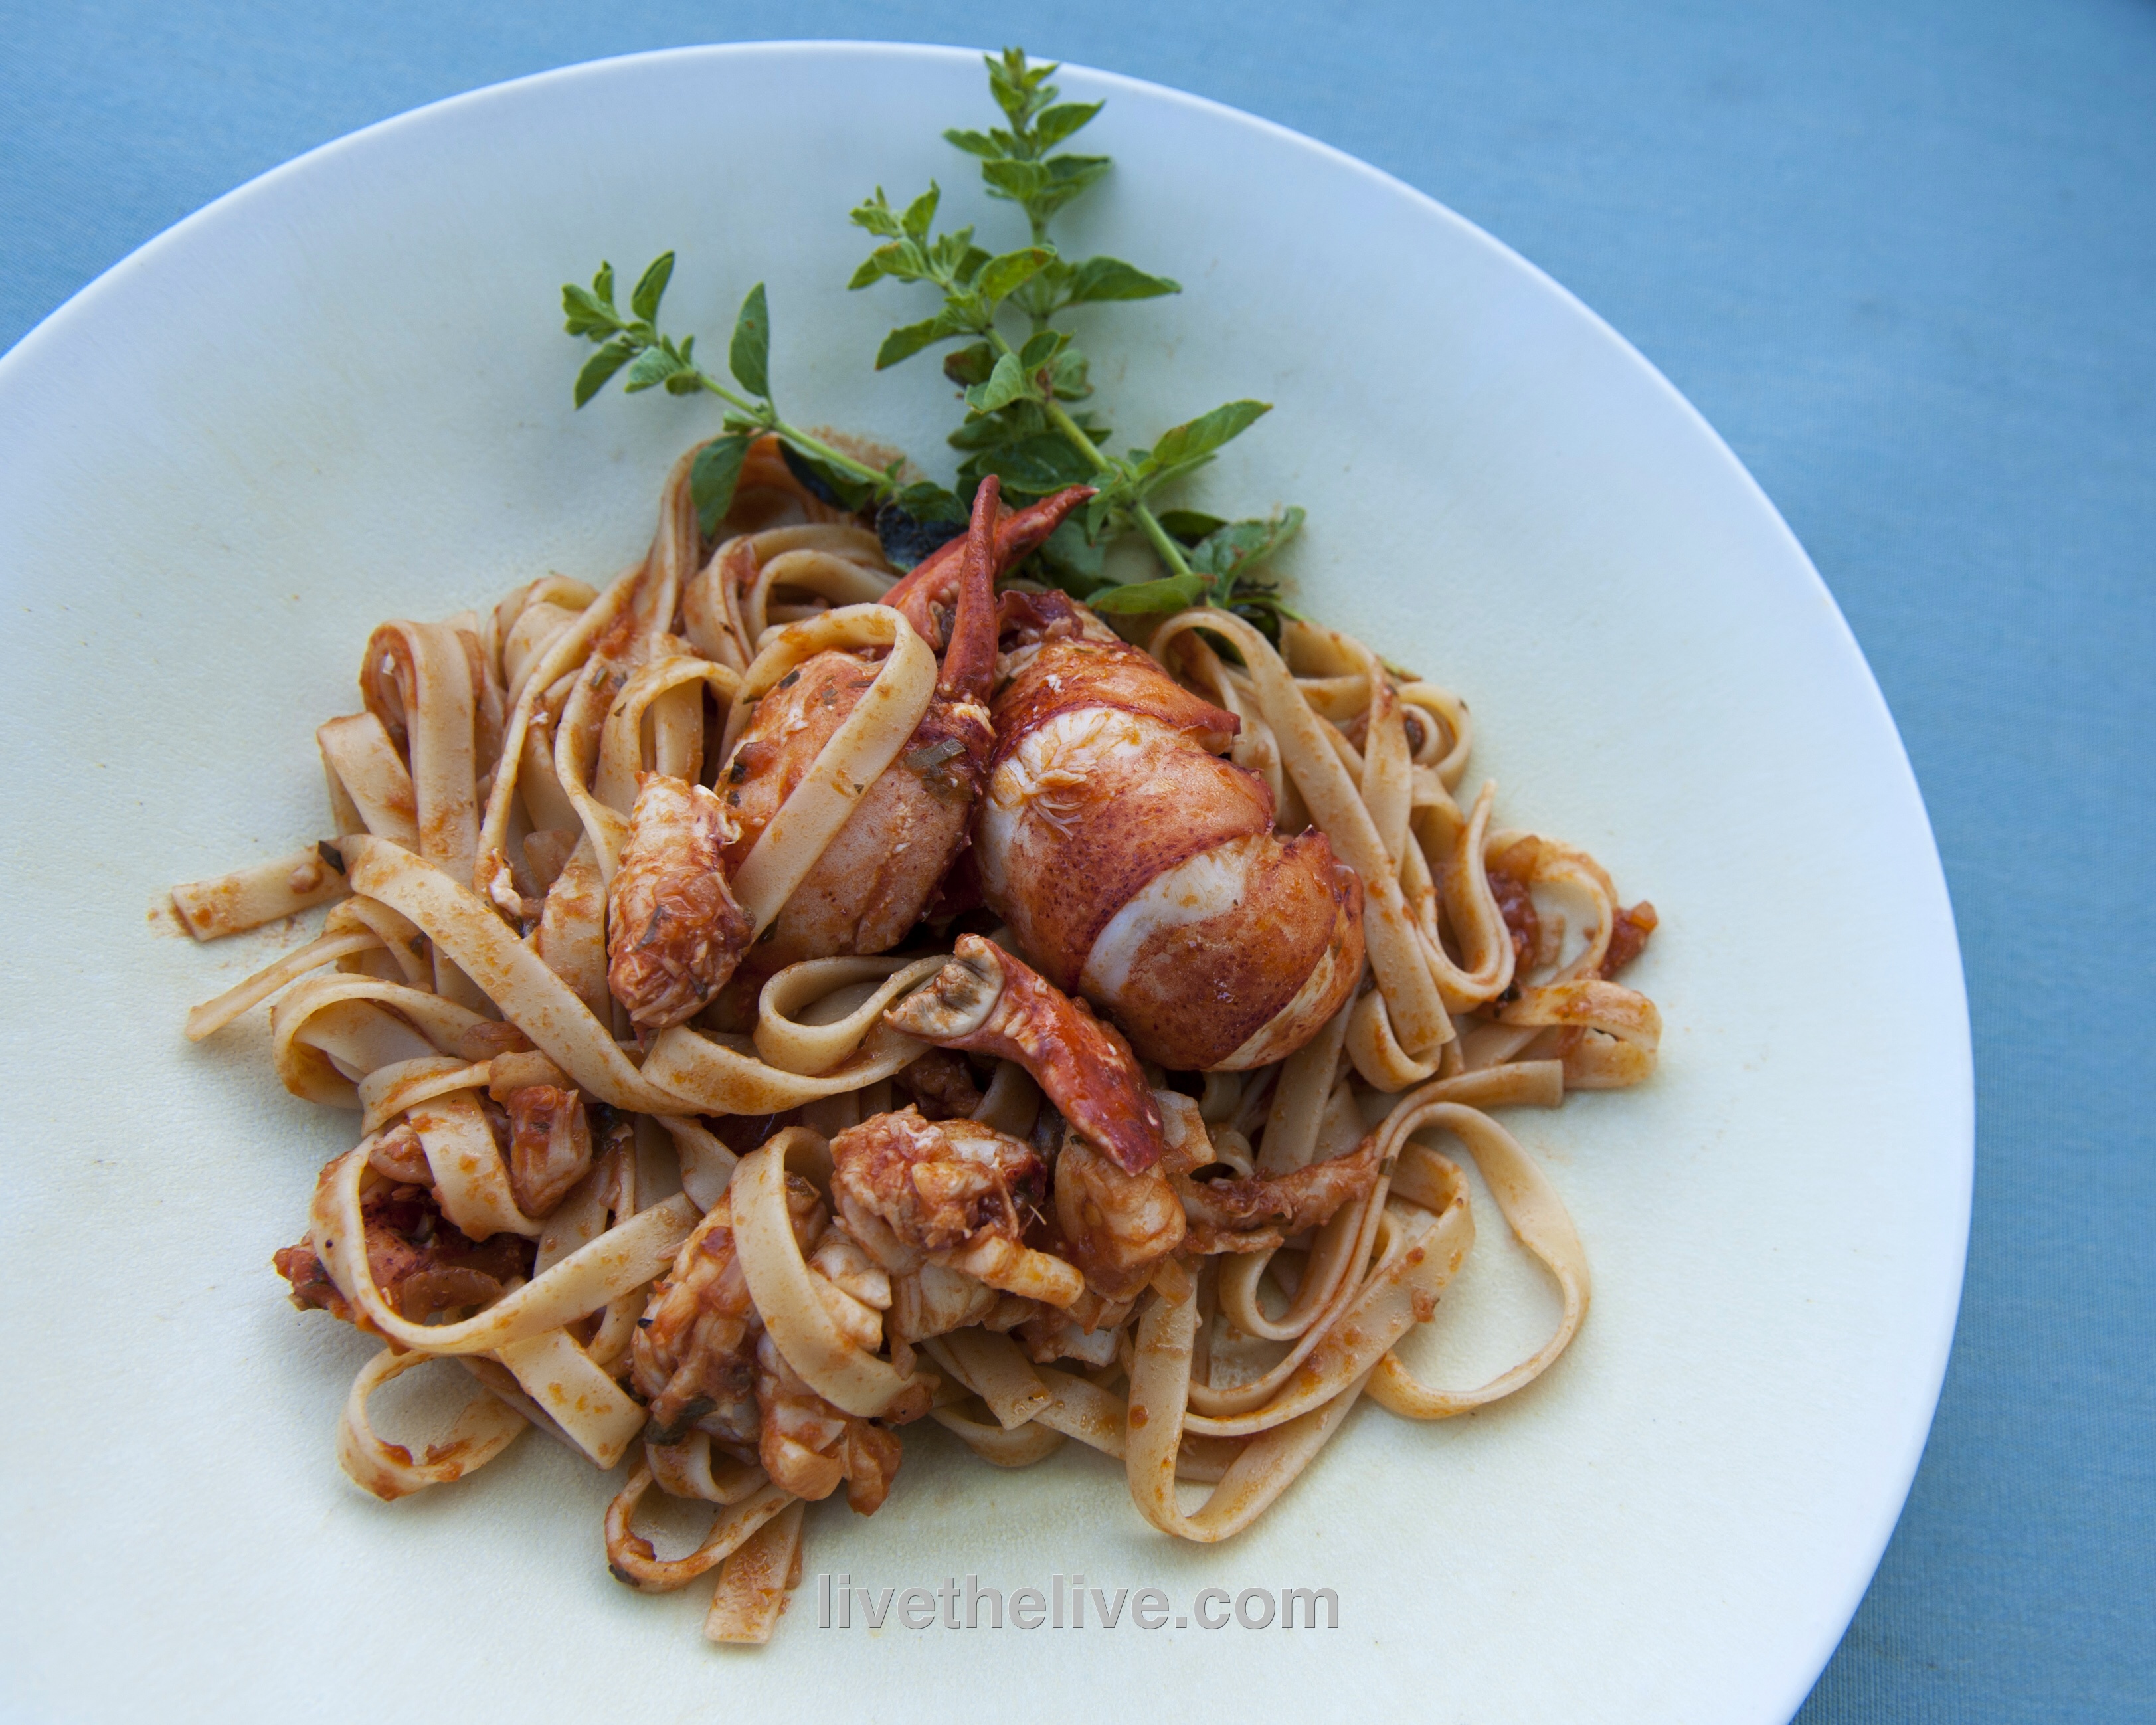
One of the most incredible dishes I’ve had on the beautiful island of Santorini, Greece, is lobster with pasta. It’s one of those dishes that takes time to prepare, because the pasta lobster sauce they make is a labor of love…time consuming, but so spectacular.

Cooked lobster LTL

I often have friends over for dinner, but when I prepared this dish for them recently, it was the first time they all licked their plates clean!

To try to copy that lobster sauce we had in Santorini, I started with a kick-ass lobster stock. It’s simple but flavorful:


clean, empty claws, tails and bodies from two 1-1/2 lb. lobsters (use the legs, too)
12 cups water
1/2 onion
3 celery stalks
1 carrot

Place all the ingredients in a large pot and set it on high heat. Crush the lobster shells (I use a potato masher!) Cook until the stock is reduced by half.

Strain the stock, discarding the lobster shells and veggies. Bring the stock back to the heat and reduce it until all you have left is 1 cup of intense stock.


Pasta with lobster sauce

Now that you have the stock, you can make the sauce!


1/2 onion, finely chopped
1 garlic clove, finely chopped
pinch of Italian red pepper flakes
1 teaspoon parsley
extra virgin olive oil
1/2 cup lobster stock
1/4 cup San Marzano tomato sauce (see below)
splash of white wine (I use Alice white Chardonnay)
salt and pepper
1/2 lb. cooked pasta

Add some olive oil to a pan and saute the onions until translucent. Season with salt and pepper. Add the garlic and cook for 10 seconds. Add the red pepper flakes and parsley.

Add 1/4 cup of the lobster stock and let it cook, reducing by half. Add the other 1/4 cup of lobster stock and then the tomato sauce. Let it cook for a couple of minutes and add the white wine. Cook for a few minutes more.

Cook the pasta and drain it even before it reaches the al dente stage. Place the pasta in the pan with the sauce, heating and coating it thoroughly. Serve immediately, with or without the lobster meat.


For the San Marzano tomato sauce: I pour a can of San Marzano tomatoes  into a food processor or Vita-Mix and blend until I get sauce. Pour into a pan and reduce over medium heat by half, until sauce has thickened.

Bulgogi is the name given to the most common form of Korean barbecue. Unlike the daeji bulgogi that I cooked in a previous blog, this one is not based on a chili sauce that can take the roof of your mouth right off.

I used chicken, though this would work with pork as well, and for the best flavor, it’s best to marinate the meat in the fridge overnight.

FullSizeRender (12)

2/3 cup soy sauce
1/2 cup chopped scallions
6 tablespoons sugar (I use organic cane sugar)
5 tablespoons fresh garlic, grated or through a garlic press
5 tablespoons sesame oil
1 tablespoon sesame seeds
1 teaspoon black pepper
5 lbs. chicken pieces (skin-on thighs work best)


Combine all the ingredients except for the chicken in a bowl and mix well.

Place the chicken pieces in a large Ziploc bag and pour the marinade in. Seal the bag well and squish it around to make sure the marinade makes contact with the chicken. Place the bag in a bowl (to prevent accidental leakage) and keep it in the fridge overnight. Squish the bag around every few hours to make sure the marinade does its job.

When ready to cook the next day, pre-heat the oven to 350 and remove the bag from the fridge and let it come to room temperature. Place the chicken on a sheet pan (discard the remaining marinade) and bake for an hour.

Light a hot grill and push the coals to one side of the grill. Place the chicken pieces on the cool side of the grill and close the lid, opening the vents. Every few minutes, turn the chicken pieces over so they get nice grill marks but
don’t burn.


FullSizeRender (11)

There are very few sandwiches more perfect than the BLT, and I would be a fool to try to improve on it. Freshly toasted bread, a slathering of mayo (Hellman’s only, of course), crisp lettuce, fresh juicy sliced tomato, and my own homemade bacon. What could be better?

I recently tried my hand at smoking and slow-roasting a huge slab of grass-fed beef brisket, and it came out beautifully. Rich and smoky, there was far too much of it for a mere mortal like myself to polish it off, even if I ate it for days in a row. So I cut the brisket into more manageable sized slabs, wrapped them and placed them in the freezer.


beef brisket


I took one of those slabs out of the freezer the other day, and noticed that, with the grain of the meat and fat, it resembled bacon. And then it dawned on me: I could slice it like thick-cut bacon, fry it in a pan, and make my own BLT with it: a Brisket, Lettuce and Tomato Sandwich!


steakon!


The end result was fantastic. Quite different than the infamous BLT, but a beefy winner in its own right.


Alz BLT: Brisket, Lettuce and Tomato

Alz BLT: Brisket, Lettuce and Tomato

I’ve always been fascinated by Korean barbecue. Every time I see it on TV or catch a recipe on an e-mail blast, my mouth waters and I say to myself that I’ve got to experience it some day. But the painful reality is: Korean barbecue can be really spicy…and I’m a total wuss.

Korean barbecue 101: Gogigui means “meat roast” in Korean, and it refers to the method of roasting beef, pork, chicken, and other meats. Meats can be marinated or not. Bulgogi is the name of the most common Korean barbecue. Meat is marinated with soy sauce, sugar, sesame oil, garlic and pepper, and then grilled. Galbi uses beef short ribs, and adds onions to the marinade. And the hot stuff is daeji bulgogi, because the marinade isn’t soy sauce-based, but based on the hot-n-spicy Korean chili paste known as gochujang.

All of the marinades looked delicious, but the hot one with gochujang would be my biggest challenge, so I decided to start there. I found a great recipe, and quickly realized that I would have to turn the heat way down if I was actually going to try to eat it! For example, the original recipe called for 2 tablespoons of white pepper. I totally left it out. And it called for a full cup of gochujang. Not only did I cut that part in half, I doubled many of the other non-spicy ingredients.

So is it authentic Korean barbecue? Probably not. But it’s my version of it. It’s got lots of flavor and still carries a bit of heat.

For gluten-free diets: finding GF hoisin and soy sauce is easy. Look for the La Choy brand. But I haven’t been able to find gochujang that has a GF label.


image


3/4 cup ketchup
1/2 cup gochujang
1/2 cup hoisin sauce (I use gluten-free hoisin)
1/2 cup honey
1/2 cup soy sauce
1/4 cup brown sugar
2 tablespoons freshly grated ginger
1 tablespoon freshly grated garlic (I use a garlic press)
1 tablespoon unseasoned rice vinegar
4 lbs. chicken pieces


Pre-heat the oven to 500 or its top temperature.

In a bowl, mix everything but the chicken pieces. Brush the sauce onto the chicken pieces, then wrap them in aluminum foil. (I like to tear a long piece of aluminum foil and lay it on top of a sheet pan. I place the chicken pieces on the foil, brush them with sauce on all sides, then fold the foil over the chicken, making one large pouch that holds all the meat.) Leave the pouch on the sheet pan and place it in the oven. Lower the oven temp to 350.

Cook the chicken for about an hour, making sure it’s almost completely cooked. Juices should run clear, not bloody, when you poke it with a fork.

Start a hardwood fire on your grill. Push the coals to one side of the grill so you have a hot side and a cooler side with no coals underneath it. Place the chicken pieces on the cool side of the grill (if you put it on the hot side, it will stick and burn), brush with more sauce, and put the lid on the grill, making sure you have the vents open for air circulation.

image

See those 2 black bits in the foreground? That’s where the chicken stuck to the grill because I placed them over the hot coals. Don’t do that.

After a few minutes, lift the lid, flip the chicken pieces over, brush them with sauce again, and close the lid. Keep doing this until the chicken is nice and caramelized, with tasty grill marks.

If you want to serve some of the sauce on the side, it’s important to pour some of the sauce off and set it aside in the very beginning, so you’re not using the same sauce that the basting brush touched the raw chicken with.


The asparagus bed is winding down for the season in the home garden right now. Like tomatoes, asparagus is at its very best at the peak of the season, and I don’t really want to eat it in the off-season, when it comes from South America, all dried up and tasting like twigs. So now is my last opportunity to gorge!
But that doesn’t mean that I don’t want variety! It’s great straight out of the garden, or served raw in a salad. It’s delicious pickled, or simply tossed in olive and baked in the oven. But here’s a recipe that’s one of my family’s favorites…
4 mild Italian sausages, sliced into pieces 1/2″ thick
1 lb. penne pasta
1/2 onion, finely chopped
1 cup chopped fresh trumpet mushrooms (white button mushrooms work, too)
2 cups fresh asparagus, sliced into 1-inch pieces
1 clove garlic, passed through a garlic press
1 cup homemade chicken broth
6 fresh sage leaves, finely chopped
1/2 cup freshly grated Parmigiano Reggiano cheese
extra virgin olive oil
salt and pepper
Have the pasta water boiling, and add the pasta, cooking until just a bit more undercooked than al dente.
Heat a large pan, and drizzle in some olive oil. Saute the sausage pieces until browned and cooked through, but not over cooked. Remove the sausages from the pan and place them in a separate bowl. Remove all but 2 tablespoons of the fat left behind in the pan.
Place the pan back on stove and saute the onion until translucent. Add the garlic, and saute for 10 seconds. Add the sage, and saute for 10 seconds, stirring. Add the chopped mushrooms and saute for a few minutes, then add the chicken broth, and simmer until almost all the liquid has evaporated. Pour the contents of the pan into the bowl with the sausages.
Return the pan to the stove, add a little more olive oil, and on medium heat, saute the asparagus pieces. Cook them until they are al dente, not too soft. Once the asparagus has reached this stage, return all the contents of the sausage/mushroom bowl to the pan to heat through. Drain the pasta, and add it to the pan as well, combining all the ingredients. If it looks too dry, add a little pasta water to the pan. Season with salt and pepper.
Make sure you serve this hot, with grated Parmigiano Reggiano on top, and drizzle lightly over the top with extra virgin olive oil.


CHIVE TALKIN’

Posted: May 24, 2018 in Food, garden, pizza, Uncategorized
Tags: , , , , ,

This is the time of year when the chives in my herb garden are busting out with blossoms. Before they pop, I head out every few days and snip the larger ones off the chive plants with about 3 inches of the green stem, wrap them in freezer bags and freeze them.


image


I use those blossoms over the course of the year on a variety of dishes, but they really shine on my signature marinated beef and chive blossom pizza. I just take a packet of chive blossoms out of the freezer, and sauté them lightly in olive oil and salt and pepper, then sprinkle them on the pizza before baking.


My signature marinated beef tenderloin and chive blossom pizza.

My signature marinated beef tenderloin and chive blossom pizza.


Pick 'em and freeze 'em in May!

Pick ’em and freeze ’em in May!

Chive blossoms not only add great flavor, but they look cool on the plate, too.  I’ll add them as a side to almost any meat dish, or chop them after sauteing and sprinkle them in rice or quinoa.


When asparagus is in season, it’s time to gorge. I’ve got it growing in my yard, and the patch gets bigger and happier every year with minimal maintenance…definitely one of those veggies every lazy gardener should grow.

I love it raw, chopped into salads, pickled, oven-roasted, and in pasta dishes. This is a great side dish with any main course slab of meat.


image

1 lb. fresh asparagus spears
1 tablespoon butter
2 tablespoons olive oil
3/4 cup grated Parmigiano Reggiano cheese
salt and pepper

The easy way to trim asparagus spears is to grab the thicker end between two fingers and bend it. It will snap at the point where the tough part ends and the softer, edible part begins. Toss the bottoms into your compost pile.

Heat the butter and oil in a pan and then add the asparagus spears. Cook over medium heat for about 5 minutes, until al dente. You don’t want them mushy.

While the asparagus is still in the pan, sprinkle the Parmigiano Reggiano on top, letting it melt a bit. Season with salt and pepper.

That’s it! With fresh garden asparagus, it’s all you need! I ate this batch right out of the pan!


My coffee steak rub is awesome. I wanted to take it to the next level. So, when my buddies and I gathered recently for a “boys’ weekend” at Saule, our rental home in Little Compton, RI (http://www.sauleri.com. You can find it listed at Homeaway.com), it was time to put it to the test with a low-and-slow smoked beef brisket!

Depending on the size of the brisket, you might need to double the recipe.


Low and slow is the way to go! Deliciously smokey and juicy.


3 tablespoons brown sugar
1 tablespoon Kosher salt
1 tablespoon ground coffee (use your favorite)
1 teaspoon granulated garlic
1 teaspoon granulated onion
1 teaspoon unsweetened cocoa powder

If the brisket is frozen, I like to thaw it a couple of days ahead of cooking it, rubbing it down with the coffee rub, and placing it in the fridge for about 24 hours to rest. I bring it out about an hour before smoking, to let the meat come back to room temperature, and then I place it in the smoker for about 12 hours at 225 degrees, smoking it with hickory wood.

When it’s done, remove it from the smoker, and wrap in foil and let it rest at least 30 minutes before slicing diagonally against the grain of the meat.

There’s something magical about a simple plate of spaghetti and meatballs. When my parents took me to an Italian restaurant as a child, a plate of spaghetti and meatballs made me feel like the luckiest kid on the planet. And even now, when I prepare a plate of spaghetti and meatballs for my daughter, she can’t wait to sit down at the dinner table. She’s so busy shoveling the food into her mouth, she can’t even speak. I just get a quick thumbs-up between bites…and breaths!


meatballs


Great meatballs start with great meat. I always use 80/20 grass-fed beef. I don’t use a ton of breadcrumbs as filler. And the tomato sauce is homemade as well, from canned tomatoes. I start with the sauce…


B.F.I.M. SAUCE

Inspired by a lovely but large Italian lady I once knew, my Big Fat Italian Mama sauce works well with this hearty dish.


1 medium onion, finely chopped
2 cloves garlic, through a press
1/2 cup extra virgin olive oil
10 cups ground and peeled tomatoes…or 3 cans (28 oz.) tomatoes pureed in food processor
2 teaspoons each: dried oregano, basil and parsley
3/4 teaspoon each anise seed and fennel seed
1 1/2 teaspoons salt
1/2 teaspoon black pepper
2 bay leaves
1 small can (6 oz.) tomato paste
1 teaspoon sugar (optional)


Heat the olive oil in a large pot and add the onions. Cook until the onions are translucent, then add the garlic. Stir for 10 seconds.

Add the tomatoes and cook on high until the orange foam disappears, stirring frequently. Don’t let it burn.

Add the oregano, basil, parsley, anise seed, fennel seed, salt and pepper, bay leaves and tomato paste. Allow the sauce to just come to a boil so that the tomato paste reaches optimum thickening power.

Reduce the heat to a simmer and cook for at least an hour, until the sauce reaches the desired consistency. Stir often.


While the sauce is cooking, I start the meatballs…


2 lbs. grass-fed ground beef
1 cup plain breadcrumbs (gluten-free breadcrumbs work well, too)
2 tablespoons dried parsley
2 tablespoons dried oregano
1 tablespoon dried basil
1 tablespoon granulated garlic
1 tablespoon onion powder
1 teaspoon black pepper
2 teaspoons salt
2 eggs, cracked and scrambled
1/2 cup extra virgin olive oil

Mix all the ingredients, except the olive oil, thoroughly but gently in a large bowl. Don’t overwork it.

Pour some olive oil a medium-hot pan (don’t let it burn), make the meatballs, and sear them on all sides until brown.

When the meatballs are nice and brown, place them into the pot of sauce, making sure they are covered. Pour all the little bits and the olive oil from the pan into the sauce as well! Great flavor there.

Cover the pot and cook the meatballs in the sauce on low for a few hours.

Serve the meatballs and sauce over your favorite pasta, and sprinkle with freshly grated Parmigiano Reggiano.


Making this dish gluten-free is easy: use gluten-free pasta (we love the products from Garofalo) and use GF breadcrumbs in the meatballs. I prefer to buy gluten-free loaves of bread, toasting them, letting the slices cool, then tossing them in a food processor to make breadcrumbs. The flavor is as good as regular breadcrumbs!


I recently hosted a “boys’ weekend” at Saule, our rental home in Little Compton, Rhode Island (http://www.sauleri.com. We’re listed at Homeaway.com.) Among the many meats I served, I cooked up a massive plate of these sweet, spicy and sticky Thai-inspired chicken wings and drumsticks.


6 lbs. chicken pieces
1 1/3 cups soy sauce
1 cup fresh cilantro
4 tablespoons canola or peanut oil
5 garlic cloves, roughly chopped
1 teaspoon white pepper
1 cup sugar
1/2 cup white vinegar
2 teaspoons red pepper flakes or crushed dried chiles
2 teaspoons salt

For the marinade, combine the soy sauce, cilantro, canola oil, garlic and white pepper in a food processor and let it run. Place the chicken pieces in a Ziploc bag and pour half of the marinade in. Save the other half for basting later. Seal the bag and let the chicken marinate overnight, or at least a few hours, squishing the bag around so that all the chicken gets marinated.

For the sauce: In a saucepan, combine the sugar, white vinegar, pepper flakes and salt. Bring it to a boil and make sure the sugar dissolves. Remove it from the heat and let it cool to room temperature.

After marinating overnight, discard the used marinade in the Ziploc bag. Place the chicken pieces over a hot hardwood fire or bake them in an oven at 350, basting them with the leftover marinade until fully cooked. If the coal fire gets too hot, move the chicken to a cooler part of the grill to prevent burning. If using the oven, switch to the broiler at the end to give the chicken a nice char.

Serve the chicken pieces with the sweet pepper sauce drizzled on top.

thai chicken LTL