Author Archive

Quarantining now, of course, but whenever I used to serve these tuna tacos to friends, I always got requests for the recipe. It requires a bit of setting up, but you can put it together right before serving to your guests…or yourself.

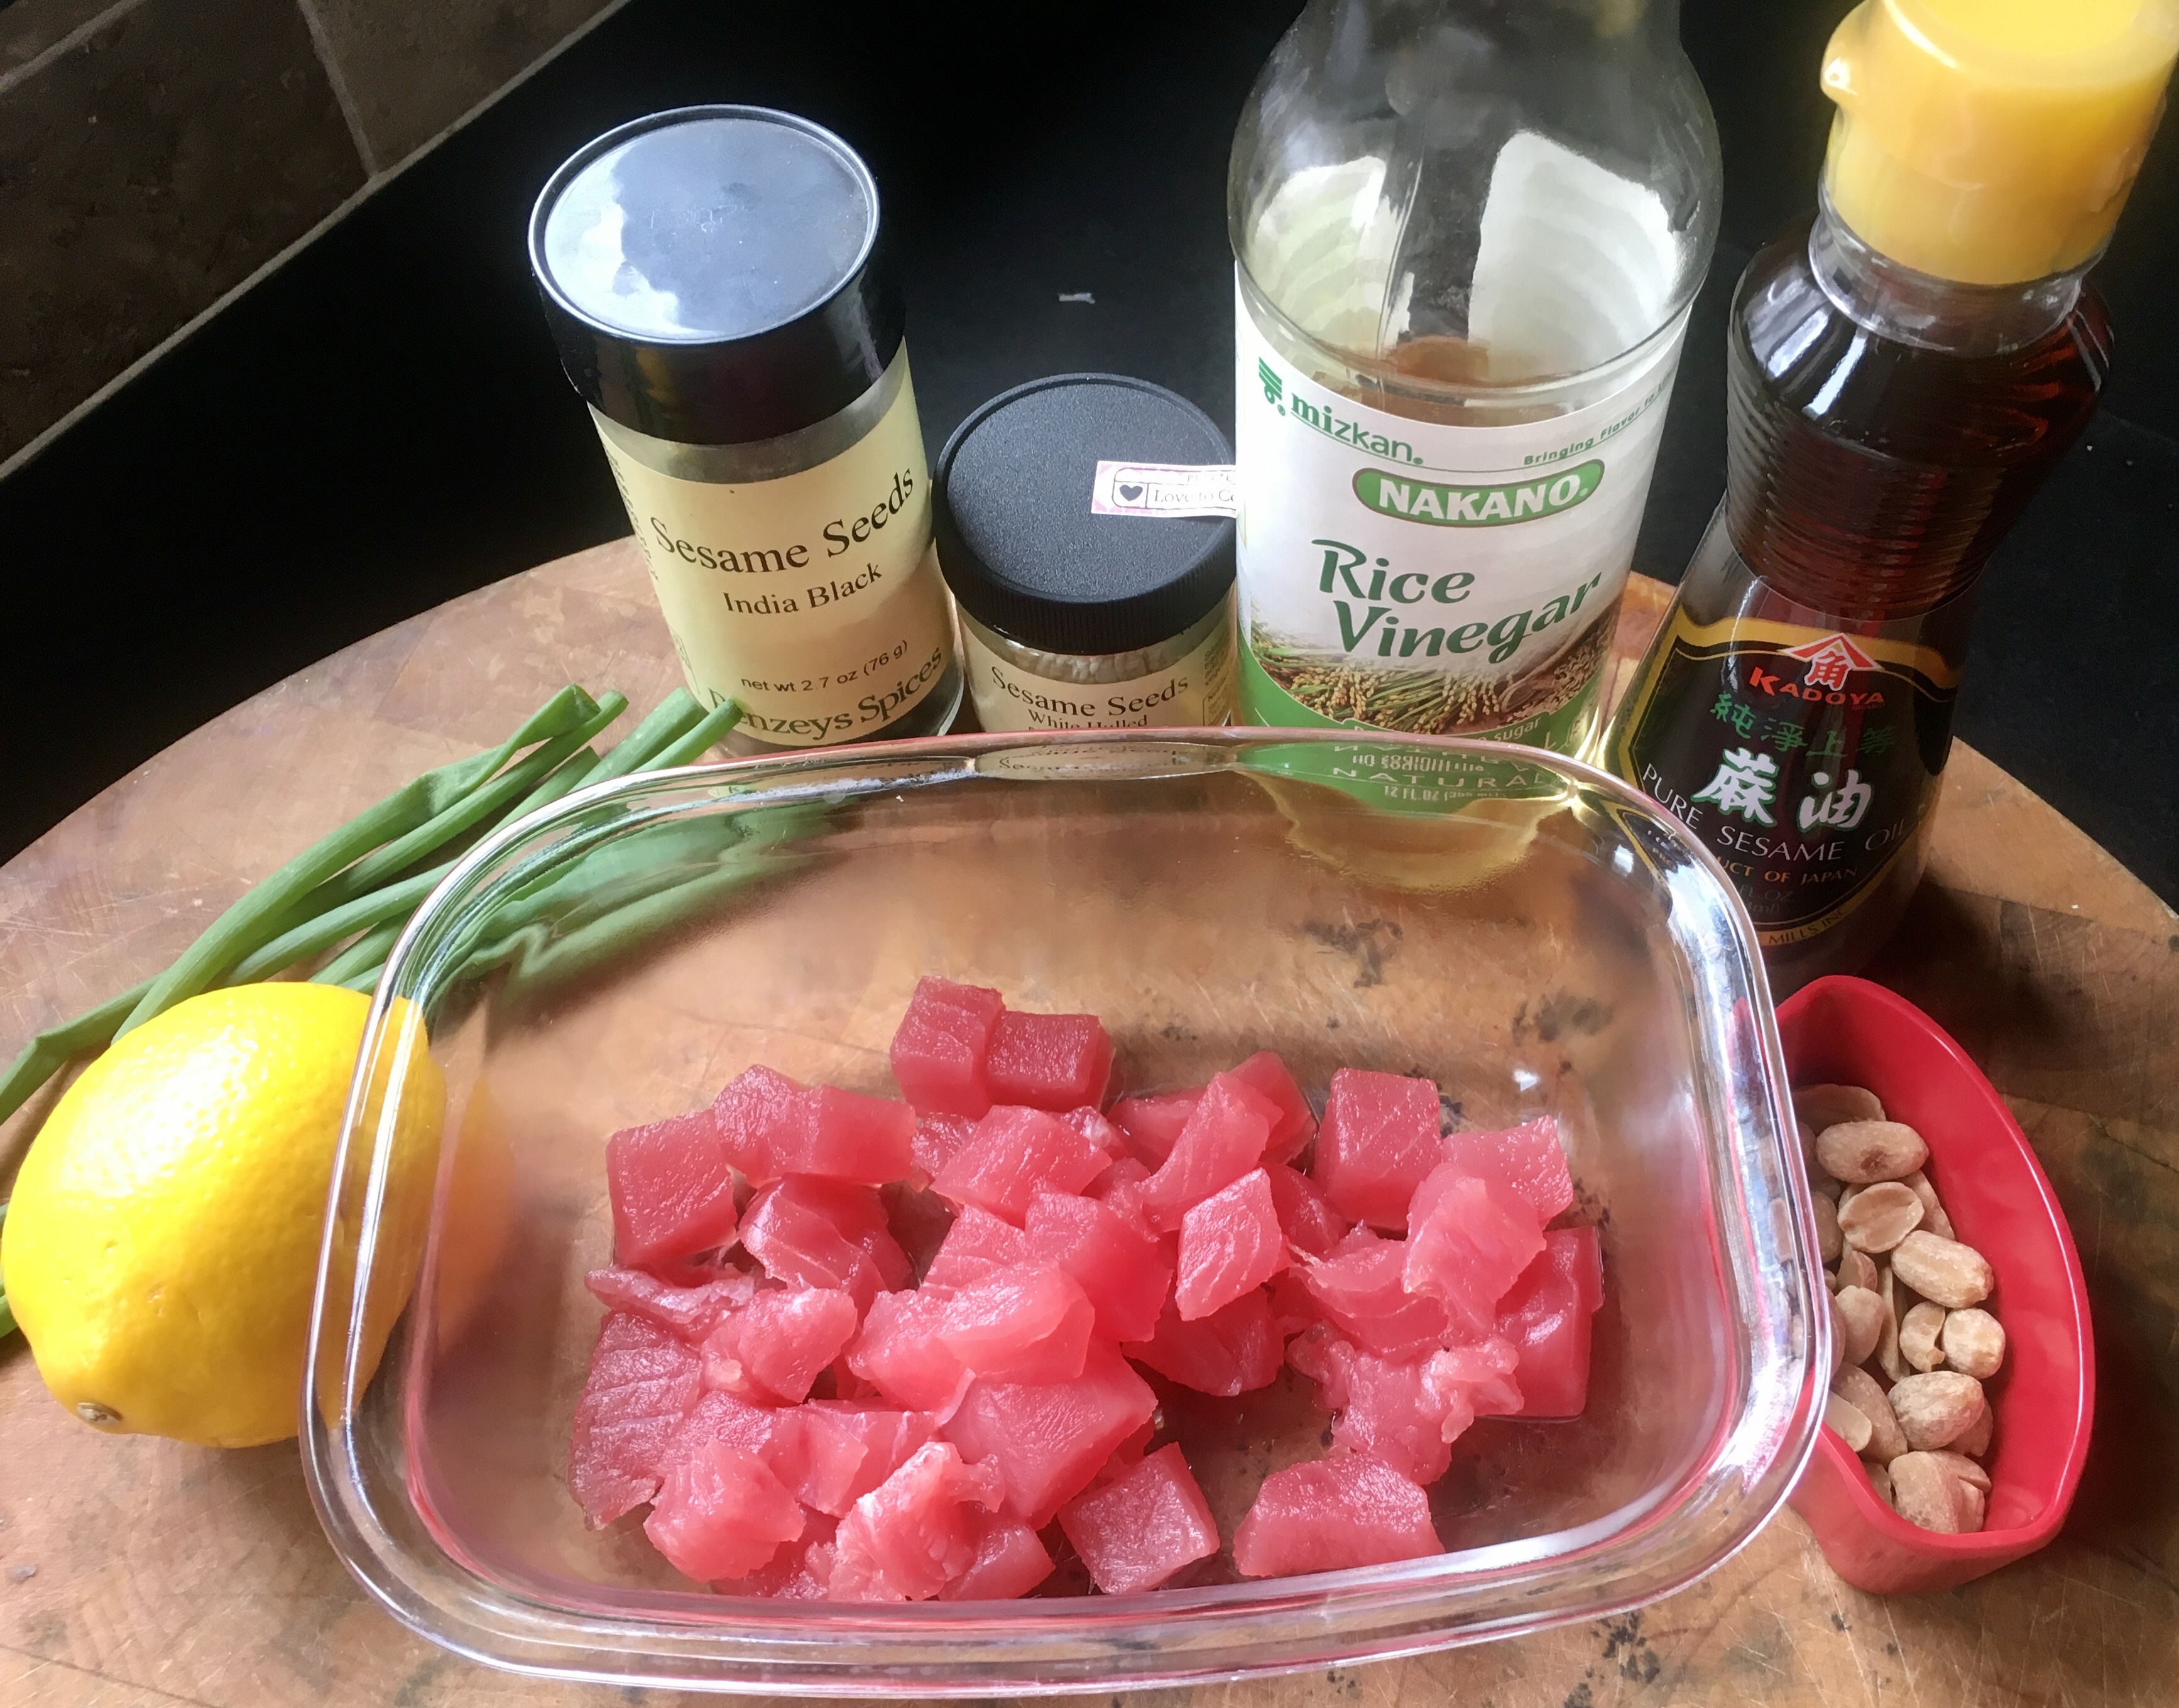
I use sushi-grade tuna for this dish, which is easily found online. It comes in 4-ounce packages, which is the perfect size for a single recipe. I buy them in quantity (it’s cheaper that way), and keep them in the freezer. You can also find tuna in small frozen “bricks” at Whole Foods or similar higher-end supermarkets. They might even have some fresh, in season.

If you’re worried about parasites in raw fish, sure, there’s always a chance something like that could happen. I’m willing to roll the dice when I eat raw meat when I make beef tartare, or use raw eggs in my Caesar salad dressing. To me, it’s worth the gamble. You have to decide what’s right for you.

It’s important you know where your tuna comes from, and if it was handled properly. If you go to a reputable seafood market, that shouldn’t be a problem.

The best way to get rid of parasites is by cooking or freezing. Cooking is not the answer for this particular recipe. But if you buy the frozen bricks, they’ve been in the deep-freeze long enough to kill any parasites. Also, when it comes to mercury, the smaller the fish, the better. So if this is a concern, opt for ahi (also called yellowfin) tuna.


The topping…
¼ cup sour cream
1 tablespoon fresh squeezed lime juice


The marinade…
6 tablespoons soy sauce
1/2 teaspoon chili garlic sauce
Other Ingredients…
½ lb. sushi grade raw tuna, chopped into ¼-inch cubes
Tortilla chips, regular or the little bowls
Finely chopped scallions

Combine the topping ingredients in a bowl, and place it in the fridge.

Mix the marinade ingredients in a separate bowl and set aside.

Chop the tuna into ¼-inch cubes, and if it looks wet, place it on some paper towels to absorb the excess moisture. (It can release quite a bit of moisture if it was frozen…you don’t want it watery before you marinate it.)

Marinate the tuna in the soy/chili garlic mix for just 10 minutes, then pour off the excess. (It will be really salty if you let marinate any longer.) Keep it in the fridge as well.

Finely chop the scallions.

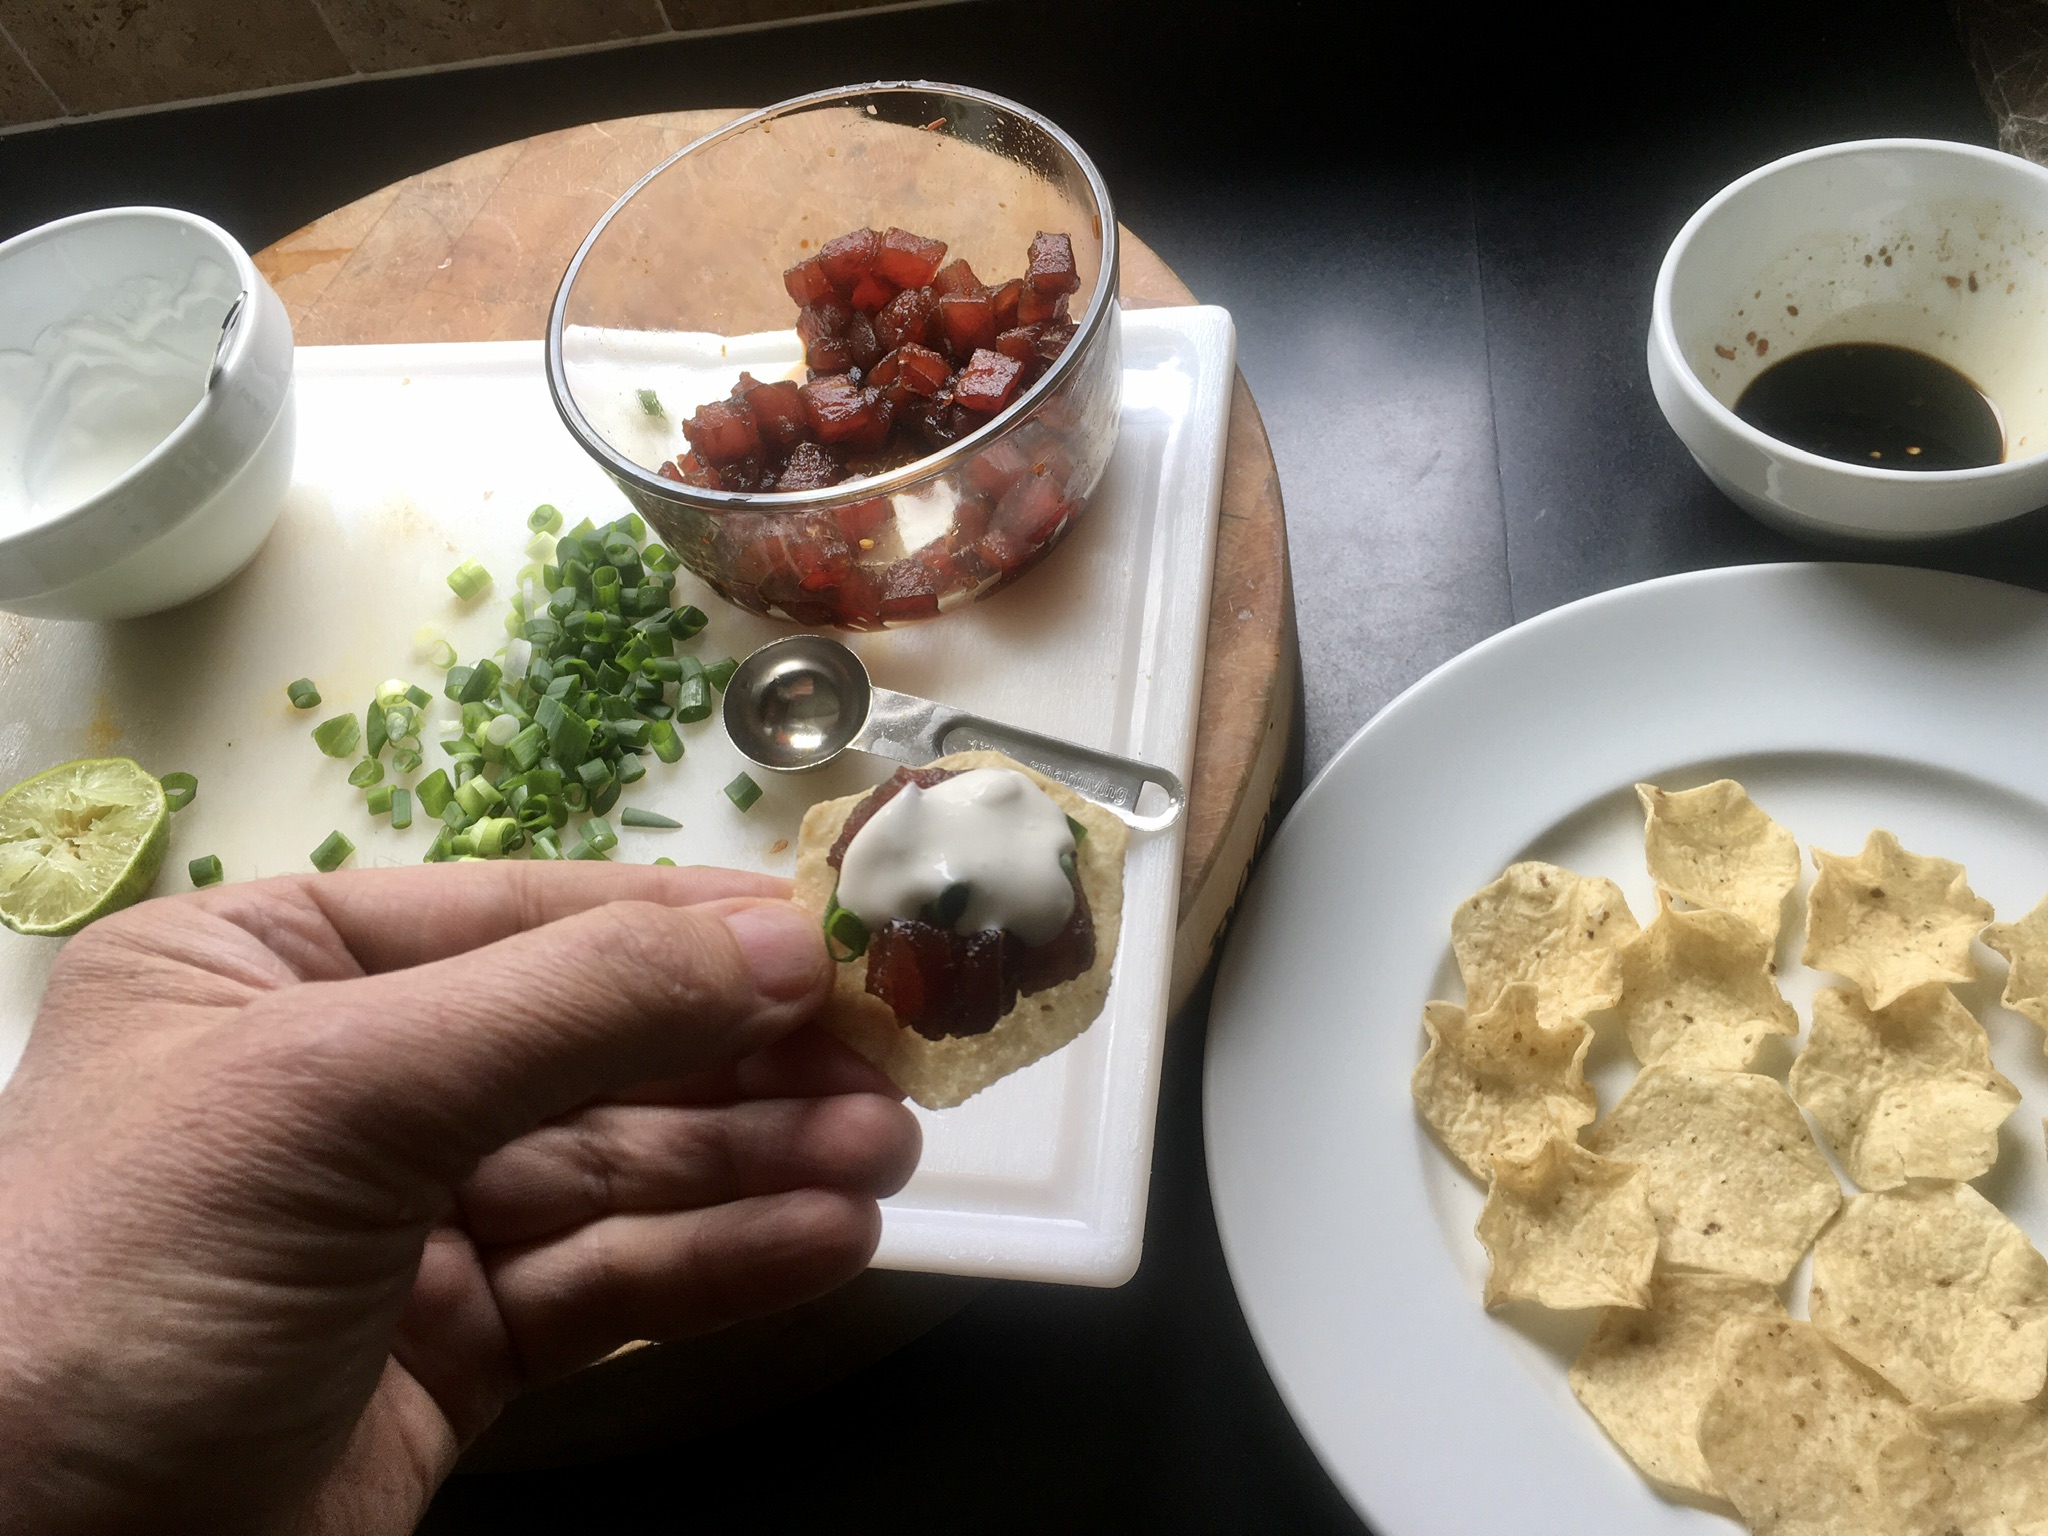
Just before serving, take a tortilla chip or little bowl, place 1 tablespoon of the tuna on top, top this with ½ teaspoon of the sour cream mixture, and then garnish it with the finely chopped scallions.


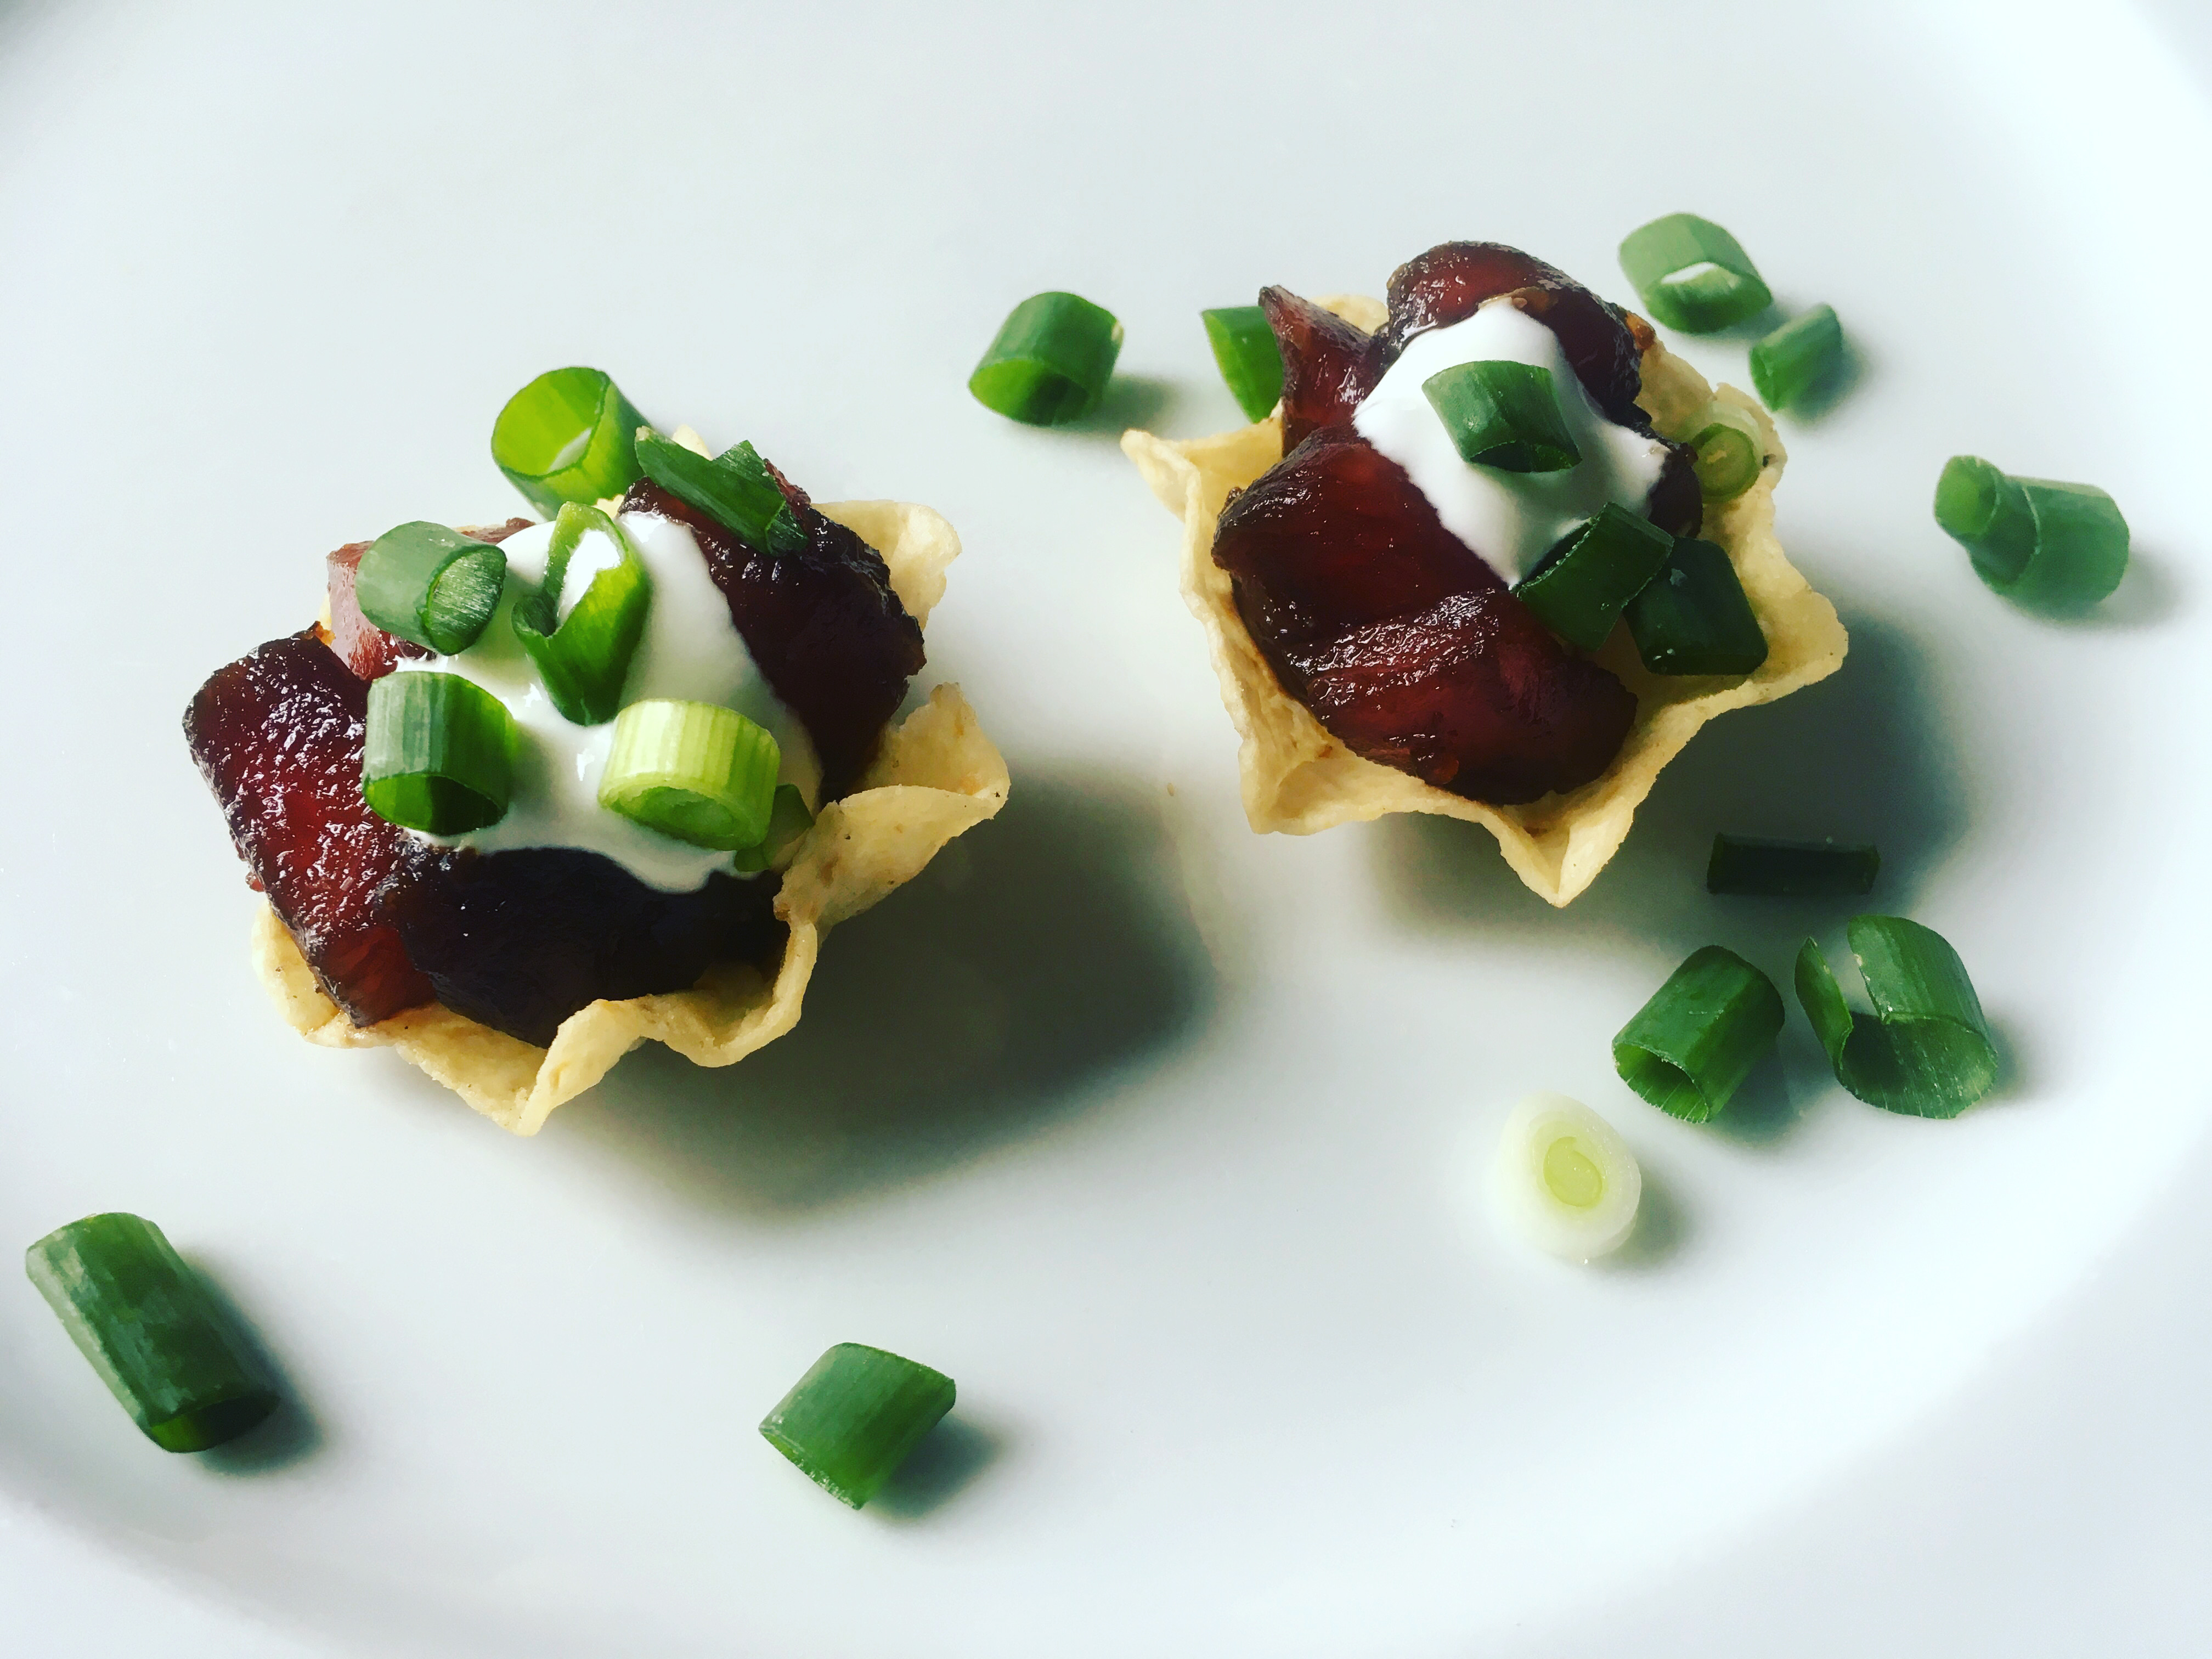
Serve them immediately, and eat these quickly, before the tuna makes the tortilla soggy!


The home garden is already showing signs of activity. Overwintered kale and arugula plants are springing back to life, enough for a quick salad. Cool weather seeds that I’ve sown early: peas, turnips, radishes, broccoli raab, and others are sprouting. But nothing says the gardening season is here like my patch of homegrown asparagus taking off!


asparagus2013

Asparagus is really easy to grow. You just need the space, and the plants practically do the rest. Space them about a foot apart, and before you know it, you will have a vast network of tasty stalks sprouting through the soil every spring. They are so much better than anything you can buy in a supermarket.
In the start of the growing season, the stalks don’t even make it into the house. I cut them and just eat them straight out of the garden. Eventually, they make the move to the kitchen, where I love to simply place them on a baking sheet and drizzle a little olive oil over them. Salt and pepper…and then in a 400-degree oven until they’ve caramelized.

Sometimes I toss some tasty chives with blossom buds on top of the asparagus and roast.


Midway through the season, I have so much asparagus that I just don’t know what to do with them all. My friends don’t want anymore and I can’t bear to throw them into the compost pile. So I pickle them…a really easy process that ensures I’ve got delicious asparagus year-round.

PICKLED ASPARAGUS
Several bunches of asparagus spears
2 cups white vinegar
1 cup cider vinegar
1 1/2 cups sugar
3 cups water
20 peppercorns
Garlic cloves, peeled
Salt (1 teaspoon per quart-sized Mason jar. Use less for smaller jars.)
Bring the vinegar, water, sugar and peppercorns to a boil. Set it aside.
Trim the bottom of the asparagus spears so that the spears are just slightly shorter than the height of the quart-sized Mason jar you will use. Or cut them into pieces that will fit smaller jars.
Pack the jars as tightly as you can with the asparagus spears. (They will shrink when processed.) Add the garlic clove and 1 teaspoon of salt to every quart-sized Mason jar…less for smaller jars.
Fill the jars with the vinegar mixture and seal.
Process the jars for 10 minutes. Let them cool before placing them in the refrigerator.


DOES YOUR PEE SMELL WHEN YOU EAT ASPARAGUS?

Asparagus has a sulfur-containing compound identified by scientists as methyl mercaptan. A colorless gas, this compound is also found in blood, feces, garlic, eggs, cheese and even skunk secretions. Another ingredient found in asparagus is asparagine. Present in foods like dairy products, seafood, poultry, fish and nuts, this amino acid is known to have a distinctive smell when heated. To metabolize both methyl mercaptan and asparagine, your body needs to break these compounds down and it’s this breakdown that’s responsible for your urine’s strange smell.

Since both methyl mercaptan and asparagine are associated with the sense of smell, there is debate over which ingredient is actually responsible for the asparagus-urine phenomenon. It could be one, or both.

Many people claim that, regardless of asparagus consumption, their urine does not smell. There are multiple theories about that as well. The first claims that everyone’s urine is in fact affected by asparagus, but only about half of the population have the specific gene that is required to smell the change. On the other hand, the second theory states that only half of the world’s population has the gene that’s required to break down the compounds found in asparagus and, if the body doesn’t break them down, no smell is emitted. In fact, one study published in the British Journal of Clinical Pharmacology found that only 46 percent of British people tested produced the odor while 100 percent of French people tested did. So whatever the reason, asparagus will forever be known as the vegetable that makes your urine smell strange.


Being quarantined can get you down…or get you to go creative. I’ve decided to recreate some of the cocktails I’ve had at my favorite restaurants, using ingredients that I probably already have at home. When I did go out to the supermarket last time, I grabbed a couple of pineapples along with the rest of my groceries. I already had the bottle of Stoli Vanil in my EBSF (Emergency Booze Storage Facility).


Every major city in the United states has a Capital Grille, and it’s a great place to grab a solid dinner if you’re traveling. And right now, during quarantine, many locations are offering steaks and dinners to go. (Check with your local Capital Grille.) Although the Capital Grille in my town of Providence, RI, has moved from its original location, we can still boast that we had the very first one in the USA.

They don’t do crazy-trendy drinks at the Capital Grille. They keep a very well-stocked bar with high-end booze and they make solid cocktails. But there is one signature drink you can find there, and that’s the Stoli Doli. A Stoli Doli is simply Stoli vodka that has been infused with fresh pineapple. If you sit at the bar at the Capital Grille, you won’t be able to miss the very large jar of freshly-cut pineapple pieces swimming in vodka. They literally pour it “from the tap,” and serve it straight up, like a martini, or on the rocks. It’s delicious, and I’ve certainly had my share of them.

I decided to make my own at home one day, to serve to my friends at an upcoming party. But to my disappointment, I didn’t have any Stoli vodka in the house. (An embarrassment to most Lithuanians.) But…I found a bottle of Stoli Vanil, the vanilla-flavored vodka, and it was a real game-changer! I used that instead of regular Stoli and I came up with a sweeter, smoother drink that is now legendary among my friends. I call it…


VELVET ELVIS

2 ripe, sweet pineapples, peeled, cored, and sliced
1.75ml Stoli Vanil

Find a gallon-sized glass jar with a lid. Peel, core and slice the pineapples and drop the pieces in the jar. Pour the vodka in, mix well, and seal the jar. Keep it at room temperature for 7–10 days, giving it a gentle shake every day.

After 7–10 days (don’t worry…a little longer won’t hurt anything), strain it, squeezing the pineapple pieces to get every bit of liquid out. Discard the pineapple pieces. (As much as you might think they would be fun to munch, they’ve given up all their flavor to the cocktail, and taste terrible!)

Keep the Velvet Elvis refrigerated. Serve with rocks (or 1 big rock!), or shaken and poured into a martini glass.


As a martini, or on the rocks!


Spaghetti alla Carbonara and Fettuccine Alfredo are my daughter’s two favorite pasta dishes. When she couldn’t decide which one she wanted for dinner one night, I decided that she’d get both! (Yes, I spoil her rotten!)


The addition of chicken and peas made for a more balanced plate. This is now one of my go-to dishes when guests arrive, since many parts can be prepared ahead of time.


fullsizerender-4


Start with the chicken…

The breading for the chicken is bread that I’ve toasted, crumbled and put into a food processor to make breadcrumbs. I get a lot more flavor this way than using store-bought breadcrumbs from a can. I add flour to it to lighten it up.

If you’re on a gluten-free diet, simply use GF breadcrumbs and GF all-purpose flour in the same proportions.

1/2 lb. chicken breasts, cut into 1″ pieces
1 egg, scrambled
1/2 cup breadcrumbs
1/2 cup all-purpose flour
3 teaspoons dried parsley
2 teaspoons dried oregano
1 teaspoon dried basil
1/2 teaspoon granulated garlic
1/2 teaspoon granulated onion
1 1/2 teaspoons salt
1/4 teaspoon pepper
olive oil, for frying

Scramble the egg in a bowl. Cut the chicken into pieces, and add them to the egg, making sure they get evenly coated. Set aside.

In another bowl, combine the bread crumbs, flour, parsley, oregano, basil, garlic, onion, salt and pepper. Set aside.

Fill a pan with about an inch of olive oil. Heat to medium-high, for frying.

In batches not to overcrowd the pan, take the chicken pieces out of the egg and toss them in the bread crumb mixture, shaking off the excess. Place them carefully in the hot oil and fry on both sides until golden. Since they’re small pieces, they should cook all the way through easily. Drain on a plate covered with paper towels. Do this with all the chicken and set it aside. Try not to eat it all before you make the rest of the dish! (This chicken can also be eaten as is–these are my daughter’s favorite nuggets–or used with tomato sauce and mozzarella cheese to make a delicious chicken parmigiana.)


fullsizerender-6


The carbonara factor…

Many recipes for Spaghetti alla Carbonara use pancetta or bacon. But the original recipe calls for guanciale: cured (but not smoked) pig jowls, or cheeks. It’s easy enough to find in a good Italian food store, but I cure my own. I buy raw heritage Berkshire pork jowls from a farm that raises the pigs humanely, and cure the jowls for about 3 weeks in a combination of salt, pepper and fresh thyme leaves. Then I rinse them, pat them dry, and cut them into portion-sized pieces, wrapping them individually and freezing until I need them. It’s a lot of work, but to me, totally worth it.

3 oz. guanciale

If the guanciale is frozen, let it thaw just a little, then cut it into the smallest cubes you can manage. Place it in a pan and cook them until they’ve browned and crisped beautifully. Keep an eye on the pan, as guanciale can burn easily. Use the fried meat bits for this recipe and save the fat for flavoring a future dish! Set aside.


The Alfredo sauce…

Despite what you get in crappy restaurants like Olive Garden, Alfredo sauce should not be runny or soupy. It should cling to the pasta and be rich in flavor. My Alfredo sauce is based on a recipe from the legendary Italian cookbook author, Marcella Hazan.

1 cup heavy cream
3 tablespoons butter
Fleur de Sel or sea salt
1 lb. pasta, fresh or dried
2/3 cup freshly grated Parmigiano Reggiano cheese
freshly ground black pepper


Put 2/3 of the cream and all the butter in a large saucepan that will later accommodate all the pasta. Simmer over medium heat for less than a minute, until the butter and cream have thickened a bit. Turn off the heat.

Drop the pasta in a bowl of boiling salted water. If the pasta is fresh, it will take just seconds. If it’s dry, it will take a few minutes. (Gluten-free pasta takes a little longer.) Either way, you want to cook the pasta even firmer than al dente, because it will finish cooking in the pan with the butter and cream. Drain the pasta immediately when it reaches that firm stage, and transfer it to the pan with the butter and cream, tossing the pasta gently for a few seconds to coat.


Turn the heat under the saucepan with the pasta on low, and add the rest of the cream, all the Parmigiano Reggiano, and a bit of pepper (no salt because there’s plenty in the guanciale and cheese.) Toss briefly until the sauce has thickened and the pasta is well-coated.


At this point, you don’t want the pasta to get to dry, so you add…

1 cup of frozen peas

…tossing gently to warm them through. Also add the cooked guanciale at this time.


With or without chicken, it’s delicious!


Plate the pasta in a bowl or dish and serve the chicken alongside.


Quarantine time is a time to try new recipes. So when I got a couple of pounds of ground venison from my buddy, Bruce, an avid hunter here in my town, I started thinking about what I could make with it.


I didn’t want to go with a venison burger right out of the gate. After all, venison is very lean, containing half the fat of beef, but with more protein. In fact, venison even challenges chicken in the protein department. But being really lean, it would dry out as a burger, so I decided to go with the safer option of making a taco with it.

Well, somewhere in the process of taco making, I thought of pork and beans and said: “Yeah, what if I made something like venison pork and beans? How bad could that be?”

Well, venison and beans can almost be called chili (depending on what rules you have about beans in chili), and I thought: “But I don’t really like chili.” But then I thought: “It’s not chili if I don’t call it chili.” Problem solved!


I used small red beans, but you can use what you like.


So what I finally came up with is a venison pork-and-bean chili taco…or something like that.

Whatever…it tastes pretty good!

And obviously, if you don’t have venison, you can use lean (like 93%) beef for this recipe.


1 tablespoon avocado oil
1 small onion, finely chopped
4 strips (about 40g) pre-cooked bacon, finely chopped
1 lb. ground venison
Taco seasoning (see the recipe below)
20 grape tomatoes (100g), chopped
1/2 cup ketchup
2 tablespoons spicy brown mustard (I like Gulden’s)
2 tablespoons Worcestershire sauce (Only Lea & Perrins will do)
4 tablespoons brown sugar
2 cans (15.5 oz. each) of small red beans, not drained


Pre-heat your oven to 350 degrees.

Spray a baking pan with oil spray (I use avocado) and set aside.

In a large pan, heat the avocado oil and add the chopped onion. Sauté the onion until it’s translucent.

Add the chopped bacon, and sauté until some of the fat starts rendering out of it.

Add the pound of venison, and cook until the meat has browned nicely, adding the taco seasoning to the meat as it cooks, little by little, until you’ve used all the taco seasoning up.

Add the chopped grape tomatoes, and stirring after each addition, add the ketchup, mustard, Worcestershire, and brown sugar.

Pour in the two cans of beans, liquid and all, and stir gently, letting it all come to a boil.


Pour the contents of the sauté pan into the baking pan, cover it with foil, and place it in the 350-degree oven to cook for 40 minutes.

After 40 minutes, remove the foil off the pan and cook another 10 minutes.


The Taco Seasoning…
2 teaspoons cumin
1 teaspoon salt
1 teaspoon black pepper
1 teaspoon oregano
1 teaspoon granulated garlic
1 teaspoon granulated onion
1 teaspoon paprika

Combine all the ingredients in a bowl, and set it aside.


Once the venison pork-and-bean chili taco meat has finished cooking, I like to use it in a flour tortilla, with shredded lettuce and a little shredded cheese on top.


Shredded lettuce, grated cheddar cheese, some raw Vidalia onion, and a touch of 1000 Island dressing!


As much as I want to support my local restaurants, quarantining has kept me away more than usual. There are some dishes I crave more than others, and Chinese shrimp and broccoli is one of them. But it’s really quite easy to make it at home, and it’s surprisingly low in calories if you’re really careful with the amount of oil you use. Oil is the biggest culprit when it comes to calories in Chinese cooking.

Second on the list of calorie culprits is rice. It looks innocent enough, but a cup of rice has 170 calories, and if you’re limiting yourself to a daily calorie count of 1500, like I am, that becomes pretty significant.

The good news is that shrimp is actually one of the lowest calorie foods you can buy, checking in at only 1 calorie per gram. Broccoli is also low in calories, so if you skip the rice, you can really eat your fill of this delicious dish.


I’ve come up with what I call my “Asian Mix,” which is a combination of five ingredients commonly found in the supermarket in the Asian food section. Add these to your shrimp and broccoli, and you will never need to leave home for really good Chinese food!

Asian Mix…
1 tablespoon soy sauce
1 tablespoon hoisin sauce
1 teaspoon rice vinegar (unseasoned)
1/2 teaspoon sesame oil
1/2 teaspoon chili garlic sauce

Combine these ingredients in a bowl, mixing well. Set aside.


1 small onion, chopped
2 cloves of garlic, finely chopped
1 or 2 large heads broccoli, chopped into smaller, similar-sized pieces
1 lb. wild-caught American shrimp, peeled and deveined
Asian Mix, as listed above
peanut oil

I prefer peanut oil when cooking Asian dishes.

Heat a nonstick pan and add 1 tablespoon of peanut oil to it. Add the chopped onion, and cook until translucent.

Add the chopped garlic and stir for about 10 seconds.

Add the chopped broccoli and cook until the broccoli turns bright green but stays crunchy.

Empty the pan out into a bowl and, without wiping the pan down, add the shrimp to the pan (no more oil!), returning it to the heat. Let the shrimp heat in the hot pan for 30–60 seconds on one side, then flip the shrimp over and let them heat through for 30–60 seconds on the other side.That’s all you need to cook them, unless they’re really large. Just keep flipping them until they’re pink and firm, but don’t overcook them.

Remove the pan from the heat, and add a tablespoon of the Asian Mix to the shrimp, tossing them around to coat them with it. Don’t let them burn!

Now bring back the onions, garlic, and broccoli to the shrimp in the pan, tossing everything together, and adding more of the Asian Mix until everything is nicely coated.


Serve immediately…over rice or not!


I started a diet a few months ago, and one of the major changes in my eating habits was to incorporate more seafood and less meat into my diet. Seafood has a lot more protein and fewer calories. In fact, shrimp, lobster and oysters are some of the most delicious low-calorie foods you can enjoy, running about 1 calorie per gram. It’s what you add to them–oils, melted butter, batter–that makes them high in calories.

I’ve always loved sushi, but again, on a diet, I need to limit my intake of unnecessary calories, and rice is big on that list. I’ve found that I can use a lot less rice, or maybe none at all, when I make poke…and I get all the satisfaction of sushi or sashimi.

My two favorite fishes to eat raw are ahi tuna and wild-caught Alaskan salmon, like sockeye. There are many great purveyors of this super-high quality seafood online, and I usually buy a decent amount of fish at one time–hermetically sealed and frozen in 4-ounce packages–to last me a long time. (The price is often much better when you buy in quantity, because they have to be shipped frozen overnight.)


Yes, please.


There are many ways to prepare poke, and the only limitations are what’s in your fridge. The first recipe, using salmon, is closer to a traditional poke recipe you’d find in a restaurant.


6.5 ounces wild-caught Alaskan salmon, in the refrigerator (thawed, if previously frozen)
1 tablespoon soy sauce
2 teaspoons sesame oil
1 teaspoon rice vinegar
1/2 teaspoon fresh lemon juice
1/3 cup chopped raw cashews
1 scallion, green and white parts finely chopped
Keep the thawed salmon in the refrigerator. Remove the salmon from the fridge, and remove the skin if it is still on the fish. Cut the fish into half-inch cubes. I like t place the salmon cubes on a clean paper towel to absorb excess moisture from thawing. Then I place the salmon cubes in a bowl and put it back in the fridge while I combine the other ingredients.
In another bowl, combine the soy sauce, sesame oil, rice vinegar, and lemon juice. Whisk them together.
Chop the cashews and add them to the bowl, mixing them in.
Cut the root ends off the scallions, chop the green and white parts finely, and add them to the bowl, mixing them in.
Add the salmon to the bowl, mixing gently, so that you don’t damage the fish.
Let it sit for 10 to 15 minutes, if you can wait that long, and then: eat!
My tuna poke recipes have also used similar ingredients…
More recently, I mixed up a batch of what I call my “Asian Mix,” a blend of five Asian flavors that really work well together: soy sauce, hoisin sauce, chili garlic sauce, rice vinegar, and sesame oil. I let my tuna or salmon marinate in this mix for about ten minutes before adding the other ingredients and feasting.

Tuna poke with lettuce, onion, pine nuts, black and white sesame seeds, rice and my “Asian Mix.”


But my proudest achievement was taking my favorite sandwich from my home town of New York, and making it into a bowl. The sandwich is an everything bagel with salmon and cream cheese, and my poke version uses just a bit of the bagel, yet you still get the flavor without all the calories. The secret is a seasoning you can buy already prepared.
3 oz. wild-caught Alaskan sockeye salmon, cubed
1 tablespoon capers
1/2 small Vidalia or sweet onion, sliced very thin
1/2 tomato, seeds removed, sliced thin
1/4 of a toasted plain bagel
1 tablespoon cream cheese
2 teaspoons Everything Bagel seasoning
1 chopped hard boiled egg
Cut the salmon into small 1/2″ cubes and place it in a bowl. Add the tablespoon of capers (including some of the brine), chopped onion and tomato. Mix gently.
Toast the bagel and use only 1/4 of it (I use that little for the sake of calories. But you can use more, if you like!) Spread the tablespoon of cream cheese on the toasted bagel, then carefully chop it up into small cubes. Add this to the bowl. Sprinkle in the Everything Bagel seasoning and the chopped hard-boiled egg, and give it all one last gentle toss.
Then take a forkful, close your eyes, and imagine you’re in your favorite New York deli!

Did you have to go to work? Quarantined at home? either way, TGIF! Let’s make some drinks!

I’ve decided to look back at some of the more interesting cocktails I’ve had in my travels, and chances are, I still have most of the ingredients somewhere in the back of my bar to make them once again.

Coppa is a wonderful small enoteca in Boston’s South End, featuring small plates by award-winning chefs Ken Oringer and Jamie Bissonette. (They’re also the 2 creative forces behind Toro in Boston and NYC.)

The food was incredible, and this drink, called “Hey, Neon,” was inspired. The glass was rimmed with dehydrated and finely chopped kalamata olives. I tried to recreate that at home, and couldn’t get the texture or the size right. And I could never get it to stick to the glass, either! Ultimately, I simply skewered a few kalamatas and placed them on the glass!


The original “Hey Neon” at Coppa.


“HEY NEON”

1 1/2 oz. Aalborg aquavit
3/4 oz. Punt e Mes
1/2 oz. Cynar
1/2 oz. Green Chartreuse

Add ice to a cocktail shaker and then add the ingredients. Stir well, until very cold. Strain into a martini glass. Add the skewer of kalamata olives.


Aalborg is a brand of aquavit (or akvavit), a clear alcohol similar to vodka but usually infused with other flavors, mainly caraway or dill, popular in Scandinavia.

Punt e Mes is a sweet vermouth, the so-called “little brother” of the granddaddy of all sweet vermouths: Carpano Antica Formula.

Cynar is an Italian bitter and digestif made from herbs, plants and artichokes. Strong in flavor, but delicious!

Chartruese is a French liqueur made by Carthusian monks since 1737, using a recipe that dates back to 1605. It contains 130 herbs and plants. It’s also one of the few liqueurs that ages in the bottle, changing over time. Green Chartreuse is 110 proof, and naturally colored from the maceration of its ingredients. Yellow Chartreuse, at 80 proof, is a milder and sweeter version.


My version of the “Hey Neon.”


It’s never a healthy option to eat fast food. Michael Pollan said it best: “It’s not food if it arrived through the window of your car.”

So while I’m quarantined in my home, it’s really not fair that I’m getting my biggest cravings ever for some of my favorite fast food guilty pleasures. The answer? Try to re-create them at home.

A few years ago, the nephew of Colonel Sanders revealed the 11 secret herbs and spices that made KFC‘s original recipe chicken a worldwide success. He claimed he worked for his uncle for many years and had to make huge batches of the seasoning mix.

For me, KFC is like crack. Although I’m a big proponent of grass-fed this and pastured that, my kryptonite is KFC‘s original recipe chicken. There’s a KFC right next door to a local Home Depot in my area and my car literally drives itself to the pick-up window…I can’t help it. I justify the consumption of this heavenly grease by asking for no sides–no biscuit, no nothing. I get one breast and one thigh, and I drive off, steering my car with my knees as I indulge in my dirty secret, the hot grease dripping down my chin, a roll of paper towels at my side.

Making the KFC chicken recipe at home means I do have some control over product quality. I can use pastured or organic chicken. I can use clean oil. I don’t have the fancy pressure fryer they use at KFC, but I can use the healthier option of oven-frying. That means I fry my chicken in oil until golden brown, then finish the cooking process in the oven.

I have to say, the recipe really works! Maybe if I placed the real KFC side-by-side with my home-made chicken, I’d notice a difference. But it was pretty damn close and absolutely delicious! If I could change one thing, I would use smaller chicken pieces next time. I used large pieces and the meat-to-breading ratio was off. Though it was mighty tasty, I was craving more breading per bite.

The recipe calls for all-purpose flour, but if you follow a gluten-free lifestyle, using Cup4Cup GF flour works just as well.


2 cups all-purpose flour
3 tablespoons paprika
1 tablespoon celery salt
1 tablespoon dried mustard
1 tablespoon garlic salt
1 tablespoon ground ginger
2 teaspoons black pepper
1/2 teaspoon white pepper
1 1/2 teaspoons thyme
1 1/2 teaspoons basil
1 1/2 teaspoons oregano
1 teaspoon salt
1 cup milk
1 egg
5 lbs. chicken pieces…your choice
oil, for frying


Combine the flour and the “11 herbs and spices” in a bowl. Mix well.

In another bowl, whisk together the milk and the egg. Add the chicken pieces to this bowl and let the chicken soak in it for 10 minutes.

Pre-heat the oven to 350 degrees.

Pour a couple of inches of the oil into a pan with high sides and heat it to 340 degrees, using a thermometer. Don’t fill it with too much oil, because oil expands when hot and it could spill over.

Take the chicken pieces out of the milk and egg mixture and coat them with the seasoning mix one at a time, making sure you coat them well. Carefully place the chicken in the hot oil. Don’t overcrowd the pan…work in small batches. Too much chicken could cause the oil to spill over the top.

Fry the chicken pieces just until golden…no need to cook them all the way through. Place the pieces on a baking sheet lined with non-stick aluminum foil. When all the chicken has been fried, place the baking sheet in the oven and cook until the chicken pieces reach an internal temperature of at least 160 degrees.


Make a lot! Leftovers are great, and they re-heat really well in the oven! (Don’t use a microwave…the oven is best.)

I give up! Everyone baking their hearts out right now, so I suppose I should, too! This is one of my favorites because it not only tastes amazing, it freezes really well.

My original banana bread recipe blog is featured directly below. It’s awesome. But if you follow a gluten-free lifestyle, no worries. My gluten-free version of the recipe, at the bottom of the page, is so good, you won’t miss the wheat!


A gluten-free batch.


The original recipe…

What makes this banana bread special is that it uses whole wheat flour…less sugar…and no artificial extracts that make most banana breads taste like crap. It relies on very ripe bananas to give it its wonderful natural flavor.

It’s not always easy to get bananas to ripen exactly when you’re trying to make your banana bread recipe. So I buy a large bunch of bananas and let them get very ripe at room temperature. I then take 5 at a time (for this recipe), peel them, and place the bananas in a Ziploc bag in the freezer. When it’s time to make banana bread, I just pull one of those Ziplocs out of the freezer, let it thaw, and mash with a potato masher.

Since Roundup is a very common herbicide used on wheat, and its cancer-causing characteristics are widely known by now, I always use organic wheat for my baking recipes.

I use organic cane sugar instead of regular sugar when I have it. I don’t use vegetable oils, especially not canola, so I use healthier avocado oil or olive oil. Eggs are pastured when I can get ’em. Bananas are organic. And I rub the pans with coconut oil or I use an olive oil cooking spray.


Nana bread blog


3 cups all-purpose flour
1/2 cup whole wheat flour
2 tsp baking soda
1/2 tsp salt
1 1/4 cup sugar
3/4 cup vegetable oil
2 eggs
5 medium-sized bananas, peeled and mashed
2 tsp real vanilla extract
Cooking spray

Pre-heat the oven to 350 degrees.

Combine the all-purpose flour, whole wheat flour, baking soda and salt in a medium bowl. Set aside.

Combine the sugar and oil in a mixing bowl and mix at medium speed for 2 minutes. (I use the whisk attachment.) Add the eggs, one at a time. Beat until the mixture is light and lemon colored.

With the mixer running at low-speed, add the flour mixture alternately with the bananas, beginning and ending with the flour mixture. Blend well after each addition. Add the vanilla extract and blend some more to mix.

Pour the batter into 2 loaf pans that have been sprayed with cooking spray. Bake for 45 minutes or until a wooden pick inserted in the center comes out clean. Cool 15 minutes in the loaf pan on a wire rack.

Remove from the pan and let it cool completely on the wire rack before slicing.

image


The gluten-free recipe…

My go-to gluten-free flour is the brand called Cup 4 Cup. You can find it in most supermarkets. But this time I tried the gluten-free baking flour by Bob’s Red Mill. Both flours gave excellent–and tasty–results.


If you want a slightly more “rustic” flavor, you can substitute 1/2 a cup of corn meal for 1/2 a cup of the flour.


image


4 cups gluten-free flour
2 teaspoons baking soda
1/2 teaspoon salt
1 1/4 cup cane sugar
3/4 cup avocado or olive oil
2 eggs
5 medium-sized bananas, peeled and mashed
2 teaspoons real vanilla extract
coconut oil


Pre-heat the oven to 350 degrees.

Combine the flour, baking soda and salt in a bowl. Set aside.

Combine the sugar and oil in a mixing bowl and mix at medium speed for 2 minutes. (I use the whisk attachment.) Add the eggs, one at a time. Beat until the mixture is light and lemon colored.

With the mixer running at low-speed, add the flour mixture alternately with the bananas, beginning and ending with the flour mixture. Blend well after each addition. Add the vanilla extract and blend some more to mix.

Pour the batter into 2 loaf pans or one large bundt pan that have been rubbed with the coconut oil. Bake for 45–60 minutes or until a wooden toothpick inserted in the center comes out clean. Cool 15 minutes in the pan on a wire rack.

Remove from the pan and let it cool completely on the wire rack before slicing.