Posts Tagged ‘food’

For me, no dining experience is complete without a great cocktail. If all they’ve got to offer is a martini straight-up with olives, I’ll drink it alright–but I’ll be disappointed there’s nothing more.

Coppa is a wonderful small enoteca in Boston’s South End, featuring small plates by award-winning chefs Ken Oringer and Jamie Bissonette. (They’re also the 2 creative forces behind Toro in Boston and NYC.)

The food was incredible, and this drink, called “Hey, Neon,” was inspired. The glass was rimmed with dehydrated and finely chopped kalamata olives. I tried to recreate that at home, and couldn’t get the texture or the size right. And I could never get it to stick to the glass, either! Ultimately, I simply skewered a few kalamatas and placed them on the glass!

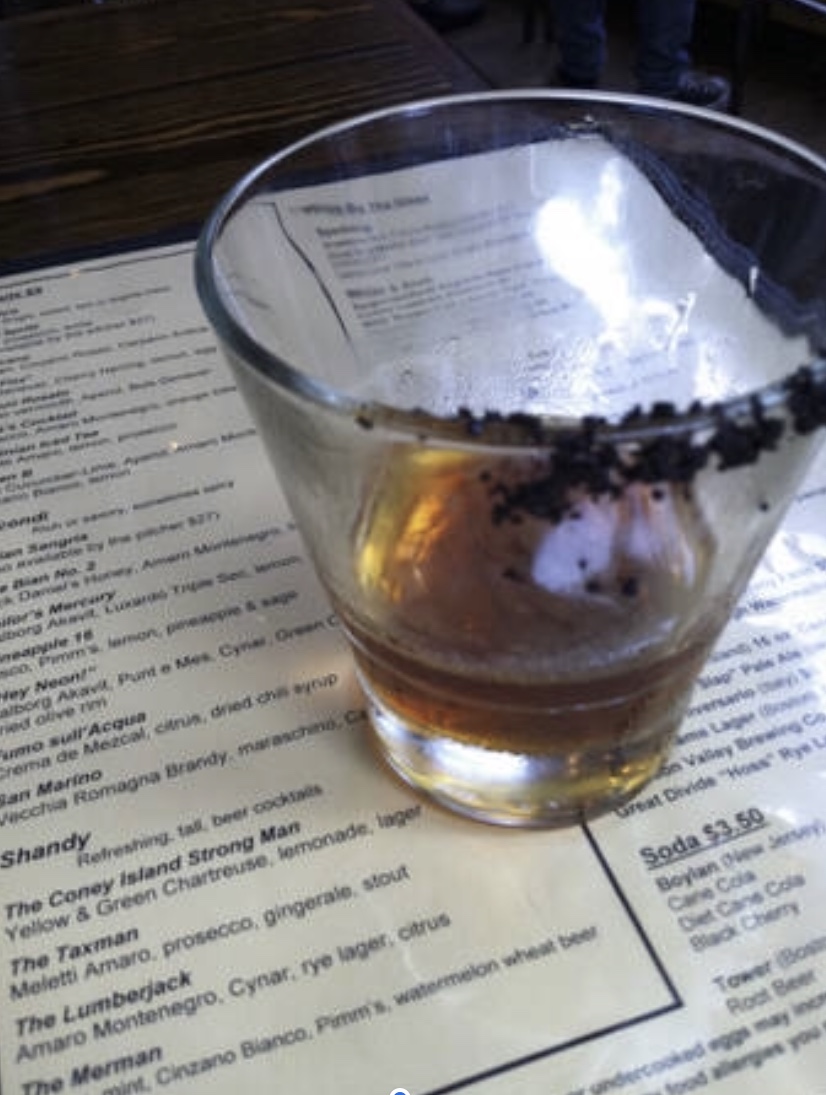
The original “Hey Neon” at Coppa.


“HEY NEON”

1 1/2 oz. Aalborg aquavit
3/4 oz. Punt e Mes
1/2 oz. Cynar
1/2 oz. Green Chartreuse

Add ice to a cocktail shaker and then add the ingredients. Stir well, until very cold. Strain into a martini glass. Add the skewer of kalamata olives.


Aalborg is a brand of aquavit (or akvavit), a clear alcohol similar to vodka but usually infused with other flavors, mainly caraway or dill, popular in Scandinavia.

Punt e Mes is a sweet vermouth, the so-called “little brother” of the granddaddy of all sweet vermouths: Carpano Antica Formula.

Cynar is an Italian bitter and digestif made from herbs, plants and artichokes. Strong in flavor, but delicious!

Chartruese is a French liqueur made by Carthusian monks since 1737, using a recipe that dates back to 1605. It contains 130 herbs and plants. It’s also one of the few liqueurs that ages in the bottle, changing over time. Green Chartreuse is 110 proof, and naturally colored from the maceration of its ingredients. Yellow Chartreuse, at 80 proof, is a milder and sweeter version.

My version of the “Hey Neon.”


Every major city in the United states has a Capital Grille, and it’s a great place to grab a solid dinner if you’re traveling. Although the Capital Grille in my town of Providence, RI has recently moved from its original location, we can still boast that we had the very first one in the USA.

They don’t do crazy-fancy drinks at the Capital Grille. They keep a very well-stocked bar with high-end booze and make solid cocktails. But there is one signature drink you can find there, and that’s the Stoli Doli. A Stoli Doli is simply Stoli vodka that has been infused with fresh pineapple. If you sit at the bar at the Capital Grille, you won’t be able to miss the very large jar of freshly-cut pineapple pieces swimming in vodka. They literally pour it “from the tap,” and serve it straight up, like a martini, or on the rocks. It’s delicious, and I’ve certainly had my share of them over time.

I decided to make my own at home one day, to serve to my friends at an upcoming party. But to my disappointment, I didn’t have any Stoli vodka in the house. I found a bottle of Stoli Vanil, the vanilla-flavored vodka, and it was a real game-changer! I used that instead of regular Stoli and I came up with a sweeter, smoother drink that is legendary among my friends to this day. I called it…

VELVET ELVIS

2 pineapples, peeled, cored, and sliced
1.75ml Stoli Vanil

Find a gallon-sized glass jar with a lid. Peel, core and slice the pineapples and drop the pieces in the jar. Pour the vodka in, mix well, and seal the jar. Keep it at room temperature for a week, giving it a gentle shake every day.

After one week, strain it, squeezing the pineapple pieces to get every bit of liquid out. Keep the Velvet Elvis refrigerated. Serve over ice.

Chicken Rollatini was one of the first dishes I learned how to make back in my teenage days on Long Island, working at a local Italian restaurant called Pizza City East. (The original Pizza City was in Ozone Park, Queens.) It was a simple dish: a chicken breast rolled up with prosciutto and mozzarella, and baked in a mushroom cream sauce. My version these days substitutes ham for the prosciutto, provolone for the mozzarella, and an Alfredo sauce for the mushroom cream sauce.


4 chicken breasts cut lengthwise to make 8 thin breasts, about 2 pounds
8 slices sliced ham
8 slices of provolone cheese
Remove the chicken tender portion of the chicken breasts and set those aside for another day.
I don’t like to pound out my chicken breasts. I like the texture of “real meat.” So I take a large breast, and slice it lengthwise to make 2 thinner breasts. I lay the breast down on the cutting board, add a slice of “real” ham (not the deli-sliced stuff, but a ham that I sliced myself), then a slice of provolone, and carefully roll it up, securing it with toothpicks. Sometimes it’s easier to roll the ham and cheese first, then wrap the chicken around it. Place the rollatinis on a baking sheet. Set aside, preferably in the fridge, until ready to cook.

Rolled and ready!

1/2 cup breadcrumbs
1 teaspoon parsley
1/2 teaspoon oregano
1/2 teaspoon salt
1/4 teaspoon pepper
1/4 teaspoon granulated onion
1/4 teaspoon granulated garlic
Combine these ingredients in a bowl. Set aside.
2 carrots
2 parsnips
2 celery stalks
1/2 medium onion
Olive oil
Peel and chop the parsnips and carrots into quarters. Peel and chop the onion in half. Chop the celery into quarters as well. Place all the vegetables on a sheet pan and drizzle olive oil over the top, tossing them in the oil. Roast the vegetables in a 400° oven until caramelized, and the  carrots and parsnips are fork-tender, about 20 minutes. Remove the sheet pan from the oven and let the vegetables cool. Once the veggies have cooled, chop them finely with a knife or food processor. Set aside.
3 cups your favorite rice, cooked
Cook the rice according to package directions. Once the rice is cooked, mix with the chopped carrots, parsnips, celery and onion. Set aside.
1 cup cream or half-and-half
3 tablespoons butter
1/2 cup freshly grated Parmigiano Reggiano
salt and pepper
For the Alfredo sauce, heat a saucepan over medium heat, melting the butter and then adding the cream or half-and-half. Once it’s warmed through, add the cheese and whisk until it has melted and the sauce is smooth. Season with salt and pepper. Set it aside, to re-warm later.
Take the pan of rollatinis out of the fridge to warm to room temperature, and reduce the heat of the oven to 350°.
Drizzle a little olive oil over the top of the rollatinis and rub it in. Sprinkle the breadcrumb mixture over the top and bake them for 30-45 minutes, until the chicken has cooked through.
To serve, remove the chicken rollatinis from the pan and plate on a bed of arugula (optional) with the rice on the side. Serve with the Alfredo sauce.

JUSTANOTHERRIB RECIPE

Posted: April 4, 2018 in Uncategorized
Tags: , , , ,

Sometimes, only ribs will do.

The classic “Adams Ribs” episode of M*A*S*H is one of my favorites. Hawkeye’s speech about the city of Chicago said it all: “Chicago. Hog butcher for the world. Toolmaker. Stacker of wheat. Player with railroads and the nation’s freight handler. Stormy, husky, brawling, City of the Big Shoulders. Sandberg knew, Radar. Spareribber for the universe! Maker of meat on a bone! The home of the pigsicle! Give me your tired, your poor… your cole slaw.”

There’s a million ways to make great pork ribs….and only a few ways to really ruin them. So, yeah, here’s another rib recipe. But it’s good.

I like using Berkshire pork St. Louis style ribs. They’re fattier than beef ribs, so I don’t have to worry as much about them drying out. I always remove the skin on the back of the ribs before rubbing them down with my spice rub.

Rubbed-down ribs. I let them sit for an hour at room temp before smoking.

8 to 10 lbs. pork ribs
spice rub (see below)
barbecue sauce (see below)


Spice rub

2 tablespoons brown sugar
1 tablespoon granulated garlic
1 tablespoon salt (I like using fine sea salt)
1 tablespoon black pepper
1 tablespoon celery seed (not celery salt)
1 tablespoon granulated onion


Combine all the spice rub ingredients. I like to grind the celery seed in a spice grinder before mixing with the others, so that I don’t get crunchy bits.

If the pork rib slabs are long, cut them in half so they’re easier to work with (and so they fit in the smoker!)

Rub the ribs with the spice rub, and place them in a 250-degree oven or smoker. Place a pan of water underneath to keep them moist and to catch any grease that drips down. I use an electric smoker, so during those 3 hours of cooking, I add hickory chips once an hour.

After 3 hours of smoking with hickory chips. I place one rack on top of another, brushing them with sauce, then wrapping them in foil.


While the ribs are cooking, it’s time to make the barbecue sauce. I like a citrus-based, sweeter sauce, and this time, I had some mandarin oranges in the kitchen. But you can easily substitute regular oranges, lemons, limes or even grapefruit for this recipe.

1 cup ketchup
1/2 cup mandarin orange juice (or other citrus juice)
zest of 2 mandarin oranges (or other citrus)
1/4 cup brown sugar
3 tablespoons butter
1 teaspoon hot sauce (I like Frank’s Red Hot)
1 teaspoon Worcestershire sauce
1 teaspoon granulated garlic
1/4 teaspoon black pepper

Brushed with sauce before wrapping in foil for the last 2 hours of cooking.


Remove the ribs from the smoker, place them individually on a piece of aluminum foil, and brush them with the barbecue sauce on all sides. Wrap them completely with the foil and place them on a baking sheet in a pre-heated 250-degree oven. Cook for 2 hours more.

Why cut them into individual ribs when you know you’re going to eat the rack anyway?


Pork tenderloin is a lean cut of meat that can dry out easily when roasted. It’s usually just a couple of inches around, and over a foot long…a shape that can easily go from juicy to overdone in just a few minutes if you’re not watching it carefully.

I usually cook my pork tenderloin much like I would a pork chop: In one bowl, I’ve got a couple of eggs, scrambled. In another, a mixture of flour with whatever seasonings I like. Cutting the tenderloin into 3 or so pieces to fit the bowls, I coat them in the egg wash, then dredge them in the seasoned flour before browning on all sides in a heated pan with pork lard on the stove top. Then into a 325-degree oven until the temperature just reads 145, letting the meat rest a few minutes before slicing.

But it was time for a change. This recipe really is based on what I had in the fridge and pantry at the time, and it just rocked!

I chose chickpeas (we never called them garbanzos!) as my starch. I don’t worry too much about carbs, as long as they’re good ones and in moderation. I try to avoid the white stuff: potatoes, pasta and white rice.

soup1

1 1/2 lb. pork tenderloin, cut into 1/4″ thick medallions, then cut in half
1 cup all-purpose flour (I use Cup4Cup gluten-free flour)
1/2 onion, finely chopped
3 carrots, peeled and sliced
3 stalks celery, sliced
1 teaspoon garlic salt
1/2 teaspoon pepper
1 pint veal stock or chicken stock
1/2 cup white wine (I like an un-oaked chardonnay like Alice White)
1 pint water
large pinch of bouquet garni
1 15-oz. can chickpeas, rinsed and drained
1 head organic kale, cleaned, stems removed, and chopped


Slice the pork tenderloin into 1/4″ medallions, then cut each medallion in half. Set aside.

In a bowl, add the flour (unseasoned). Set next to the pork.

Heat a heavy skillet big enough to hold all the pork. Add a few tablespoons of olive oil or pork lard. Drop the pork pieces in the flour, coating them well, then shaking off the excess. (No egg wash needed.) Place them carefully in the pan and brown them on both sides. They don’t need to cook all the way through.

Leaving the pork in the pan, add the onions and stir, cooking for a couple of minutes. Then add the carrot and celery slices, stirring again. Sprinkle in the garlic salt and pepper, stirring again.

Add the stock, the wine, and the pint of water. Bring it to a boil and let it simmer for a few minutes, stirring gently.

Add the chick peas. Then add the kale, a handful at a time, waiting for the greens to wilt into the soup before adding another handful. Do this until all the kale is in the pan. Add the pinch of bouquet garni. Bring the soup to a boil again, then reduce it to a medium-low simmer, uncovered.

The soup is ready when the veggies are tender, about 15 minutes. Keep an eye on it, and if the liquid has evaporated and it looks too thick, add more water, bringing to a boil with each addition, then reducing the heat.

Taste for seasoning before serving.


soup2


HOMEMADE MUSTARD

Posted: March 25, 2018 in Food, mustard, Recipes, spicy
Tags: , , ,

It’s so easy to make your own mustard. And really good mustard. Mustard that hasn’t been sitting on the store shelf for a year. Mustard with real flavor.

Once the mustard is made, you’re supposed to wait a few weeks before using, letting its heat mellow a bit. But I enjoy it right from the start. Feel the burn!


mustard

The great thing about this recipe is that you make it with your favorite beer, so use what you drink and you’ll have a mustard like no one else. I used Samuel Adams Boston Ale for this recipe.


1/4 cup yellow mustard seeds
1/4 cup brown mustard seeds
3/4 cup Sam Adams Boston Ale
1/4 cup apple cider vinegar
2 Tbsp. honey
2 Tbsp. brown sugar, firmly packed
2 garlic cloves, smashed
1 bay leaf
2 tsp. fleur de sel
1/8 tsp. freshly ground pepper


Put the yellow and brown mustard seeds in a bowl and pour in 1/2 cup of the beer. Push the mustard seeds down to submerge them in the beer. (I lay a sheet of plastic wrap down on top to keep them submerged.) Cover and refrigerate for 24 hours.

Combine the remaining 1/4 cup of beer, the vinegar, honey, brown sugar, garlic, bay leaf salt and pepper in a small saucepan. Bring the mixture to a boil over medium-high heat, stirring to dissolve the honey and the sugar. Boil for 1 minute, the immediately remove the pan from the heat and let it cool to room temperature.

Toss the garlic and the bay leaf in the trash and pour the liquid into a blender. Add 3/4’s of the plumped mustard seeds and blend to break the seeds. Add the remaining 1/4 of the mustard seeds and pulse just once to mix. You want the mustard thick, with some whole seeds remaining.

Put the mustard in an airtight container in the fridge for at least 3 days, and up to a week, depending on how mellow you want it and how much waiting you can tolerate! After about 3 weeks, the mustard will be at its peak…but it will keep in the fridge for several months. (I can’t imagine it will last that long.)

There’s a wonderful Italian roasted meat dish called Porchetta (por-ketta). Though there are many ways to prepare it, the classic version consists of a pork belly that is seasoned and then wrapped around a pork loin. The meat is tied, then roasted slowly for hours, basted with wine and the meat juices until the pork is cooked and the outside skin is crackly and crispy. Then it’s sliced like a log and served as a sandwich or a main dish. It’s absolutely fantastic! (If you’re in New York City, go to the small restaurant called  Porchetta on the lower east side and taste this porky awesomeness the way it was meant to be.)

I recently purchased a beautiful hunk of grass-fed beef brisket from Pat’s Pastured, a wonderful farm here in Rhode Island. I said to myself: “What if I cook it like Porchetta?”

I searched through a dozen Porchetta recipes and used whatever herbs and spices I liked to make my own special seasoning for this slab of meat I now re-named “Brisketta.” For the most part, I used common ingredients in Italian cooking, but I added toasted fennel seeds, an ingredient in Porchetta, as a tip of the hat to that classic dish.

If you don’t have brisket handy, using a cut like beef flap will work just as well.

image

I flipped the brisket fat-side-down on my cutting board and carefully sliced it down the middle horizontally to make two large–even thinner–slabs of meat. The bottom half, with the fatty side of the brisket, would eventually be my outside layer. The top half would be my inside layer.

image

I took the top half and slathered some of my seasonings on it. Then I rolled it up into a log as tightly as I could. I slathered more of my seasonings onto the bottom half of the brisket, the rolled it around the first log as tightly as I could, so that the fattiest side of the brisket would now be on the outside of this large meat log. I seasoned the fatty side with any leftover seasonings I had.

Now, rather than having a piece of meat that was only 1 1/2″ thick, I had a meat log that was 6″ thick. Much easier to cook and control. I tied the meat log up tightly with butchers’ twine and let it rest in my fridge overnight.

image

The next day, I removed the meat log from the fridge and let it sit on the counter for an hour, so that it would come back up to room temperature. Meanwhile, I started my digital smoker (an electric one), setting the temperature at 250 degrees. I placed the meat log on a rack in my smoker, and a bowl of water on another rack to help keep it moist during the cooking process. I closed the smoker door, and then cooked it low and slow for about 5 hours. My smoker has a side chute that lets me drop wood chips inside, and I used slivers of oak to add some smoke.

I removed the meat log from the pan and put it directly onto the grate before cooking.

I removed the meat log from the pan and put it directly onto the grate before cooking for 4 hours, but returned it to the pan once I wrapped it in foil.


After 5 hours, I removed the Brisketta from the smoker, wrapped it in foil, and returned it for another 2 hours.

image

7 lbs. beef brisket
1 tablespoon fennel seed, toasted and cooled
5–3″ strips of bacon, cooked and cooled
2 tablespoons oregano
2 tablespoons parsley
2 teaspoons basil
2 tablespoons salt
1 teaspoon pepper
2 teaspoons granulated onion
1 teaspoon granulated garlic
Grated zest of 2 lemons
1/2 cup olive oil

Pour the fennel seed in a hot, dry pan on the stove. Toast the seeds until they release their aroma, but don’t let them burn. Set aside to cool.

Crumble the bacon strips and place in the bowl of a food processor. Add the cooled fennel seeds, oregano, parsley, basil, salt, pepper, onion, garlic, and lemon zest.

Run the food processor and slowly pour in the olive oil, until you have a paste much like pesto.

Slice the brisket in half horizontally. Save the piece with the fatty side for last, because this is the piece that will wrap around the others, with the fatty side out. Smear the rub on the first piece of brisket and roll it tightly into a log. Smear the rub on the second piece of brisket and wrap it around the first piece, making sure the fatty side is on the outside.

Once you’ve rolled both pieces into a single meat log, scored the fatty exterior with a knife and rub any leftover seasoning paste onto it. If you have none left, simply season with salt and pepper.

Tie the meat log tightly with butchers’ twine, tucking in all loose ends.

At this point, you can place the meat log in the fridge until ready to cook, remembering to remove it at least an hour before cooking so that it comes back to room temperature.

Pre-heat an oven or smoker at 250 degrees. Place the meat log directly on the grate, with a pan underneath to catch the dripping fat. Place a bowl of water in there as well, to keep the meat moist while it cooks. Cook for 5 hours, then wrap in foil and cook another 2! Let it rest an hour before slicing…if you can wait that long!

The classic French Ratatouille uses eggplant, peppers, wine and herbs. Mine does not. So maybe it’s not ratatouille but a distant cousin. The taste, however, is awesome, and I like to use it in many ways.

Veal and pork meatballs with ratatouille, smothered in mozzarella cheese and baked!

4 strips bacon, chopped
1 large onion, chopped
2 medium green zucchini, diced
1 cup broth veal broth (although beef or chicken broth works fine)
1 (28 oz.) can diced tomatoes
salt, pepper to taste
granulated garlic, to taste
olive oil


Using a large pan, heat a little olive oil and toss in the bacon. Cook it until crisp, then add the onions. (Don’t remove the bacon fat!)

Sauté the onions until translucent and then add the zucchini. Season with salt, pepper, and granulated garlic.

Once the zucchini has softened just a bit, add the broth and the diced tomatoes, mixing well.

Cook over medium heat until most of the liquid has evaporated and you have a nice, thick ratatouille.

It goes great with a delicious pan-seared steak!


The original recipe for this white bean soup used bits of bacon. But it just so happened that I was planning on slow-cooking a pork shoulder in my smoker today. When the smoked pork met the white bean soup, it was a match made in pig heaven!

2 medium onions, finely chopped
1 medium fennel bulb, finely chopped
1 smashed garlic clove
3 cans (15 1/2 oz.) cannellini beans, drained and rinsed, 1 1/2 cups reserved
40 oz. veal bone broth (or chicken broth, if you prefer)
1/4 teaspoon bouquet garni
1 teaspoon salt
1/4 teaspoon black pepper
Bacon fat and/or olive oil
A slab of slow-cooked smoked pork shoulder, pulled and shredded


In a large heavy saucepan, sauté the onion, fennel, and garlic in bacon fat or olive oil until they are tender, about 8 minutes.

Drain and rinse the cannellini beans, reserving 1 1/2 cups for later. Pour the beans in the saucepan.

Add the veal (or chicken) broth, the bouquet garni, and the salt and pepper.

Simmer for 15 minutes, then turn the heat off and let it cool for 15 minutes.

Puree the soup in batches in a blender, until smooth.

Return the soup to the pot and add the reserved beans. Heat for 10 minutes, and then taste it, adding more salt and pepper, if needed.

To serve, place a mound of the pork, cubed or pulled, in the center of a bowl. Pour the soup on top, and drizzle with a touch of extra virgin olive oil. Chopped scallions, or fresh chives, or parsley on top never hurt!


Yes, you can. Wouldn’t make sense to write a blog about it otherwise, right?

They key ingredient in making a good fritter batter is beer. But up until recently, there weren’t many gluten-free beers to choose from…and the ones that were out there tasted like crap. All that has changed.

Now you can pretty much find a gluten-free craft beer in every state, and there are several regional gluten-free beers as well. Easy enough to find: just go to a good beer store and ask. They almost always carry a couple of brands.

Gluten-free beers can be divided into 2 types: truly gluten-free: brewed with gluten-free ingredients and safe for Celiacs to drink…and gluten-reduced: beers that are brewed with ingredients containing gluten, then had an enzyme added to reduce  the gluten. These are fine for those, like my wife, that have an intolerance to gluten, but are not Celiac. Read the labels!


The beer that I used for my recipe is a beer that they say  is “crafted to remove gluten,” meaning there’s still a small amount left in there.

Ultimately, if gluten is not an issue for you, follow the recipe at the bottom of this page. It’s my original, and not only uses a tasty lager full of gluten, but also a special fritter flour, which can be found in many stores.

However, if you have to “live the gluten-free live,” and you’ve told yourself you can never have another fritter, I have good news for you: you can…and they’re delicious! This is a large batch, so feel free to reduce it if needed.


In making this recipe, I tested 3 types of gluten-free flour: Cup4Cup all-purpose flour, Bob’s Red Mill GF Baking Flour, and a Canadian brand (not available here yet.) Cup4Cup (far left) was the clear winner for taste and texture of the fritter.

1 lb. all-purpose gluten-free flour (I like Cup4Cup)
2 lbs. frozen or fresh mussels
1/2 cup (or more) gluten-reduced lager beer (I use Omission)
oil for frying (I stay away from canola, but use what you like)


Pour an inch or two of water in the bottom of a pot, and place a strainer on top. Pour the mussels, fresh or frozen, onto the strainer and cover the pot. Set the heat on high and steam the mussels until they’re cooked, about 5 minutes. If you’re using fresh mussels, throw out any of the ones that didn’t open. Frozen mussel meats (without the shell) are also available in many areas. They work with this method, too.


Steamed New Zealand green-lipped mussels. Available frozen in many stores. Get the plain ones, not the ones that already come with sauce.

Remove the meats from the mussels, and toss them in a food processor. Give them a quick chop…not too fine, because you want to see and taste them in the fritter.

Save the “mussel juice,” the water in the bottom of the pot. It’s got lots of mussel flavor.

Place the flour in a large bowl. Add the chopped mussels. Add a 1/2 cup of the mussel juice and a 1/2 cup of the beer. Mix thoroughly, using a fork or your hands, until you get a batter that’s a bit gooey, but not really wet. You might need to keep adding small amount of broth, beer or flour to get just the right consistency. Once you’ve done that, let the batter rest for 10 or 15 minutes. Keep it at room temperature, and do not stir again! If you need to wait a while before frying, cover the bowl with a wet towel.

In a heavy pan or a fryer, heat the oil to 350 degrees.


Once the oil is hot, take small meatball-sized globs in your hands and gently drop them into the oil. Don’t fry too many at once or the oil temperature will drop too quickly. Fry them until they’re golden brown and cooked all the way through. Drain the fritters on paper towels, and season them immediately with salt and pepper.

The dipping sauce recipe I have listed at the bottom is not gluten-free. But most tartare-type sauces usually are, and are equally delicious.

Of course, you can make fritters with anything, from mussels to shrimp to lobster!


You’d never know they were gluten-free!


Here’s the original recipe, full of glorious gluten!

It was a fall afternoon in Newport, Rhode Island, at the now-defunct Newport Yachting Center’s annual Oyster Festival. We’re gorging on freshly shucked oysters and clams, boiled shrimp, and…what have we here? I never heard of a mussel fritter before, but once I took a bite, there was no turning back.

They couldn’t be easier to make, but it is crucial to have the right fritter batter. And that starts with a Rhode Island product called Drum Rock fritter mix. If you live in New England, you can find it in just about any seafood department at Whole Foods. If you live further away, you can check out their website (www.drumrockproducts.com) or try your luck with a local brand of fritter mix.


fritter ingredients


If you’re using fresh mussels, be sure to clean them well and remove the beards. Steam them in a pot over a small amount of water. As they open, they will release their flavorful juices and you want to save every drop of that broth for the fritters. Here in New England, frozen mussel meats are available in some seafood stores. All you need to do is thaw them, steam them saving the broth, and you’re ready to go.

For the fritters:
1 lb. fritter mix
2 cups cooked mussel meats
1/2 cup mussel broth (saved from steaming mussels)
1/4 to 1/2 cup good quality beer (I use Sam Adams Boston Lager)
Oil for frying (I don’t use canola oil)


Steam the mussel meats until they’re just cooked. Remove the mussel meats, and reserve 1/2 cup of the broth. Pulse the mussel meats in a food processor, but leave ’em chunky…or chop by hand.

Put the fritter mix in a large bowl. Add the mussel meats, mussel broth, and beer. Stir gently until just mixed. Let it sit for 10 to 15 minutes and do not stir again. (If you’ve got guests coming, you can prepare up to this part ahead of time, covering the bowl with a wet towel, and leaving it at room temperature.)

Using a thermometer, heat the oil in a deep pan to 350 degrees, and using a small spoon or scoop, drop the fritters in the hot oil, turning gently, cooking 3 to 4 minutes until golden.

Drain them on paper towels, and season with salt and pepper immediately. Serve right away!


IMG_3043


An easy, delicious dipping sauce:
1 cup mayonnaise
1/4 cup Ponzu sauce

The perfect dipping sauce for these mussel fritters is made from two ingredients: mayo and Ponzu sauce, a citrus-based soy sauce. Combine both ingredients in a bowl. Keep it in the fridge until you’re ready to use it.

Despite that corned beef is not an authentic Irish dish, it seems that everyone thinks they should eat it on St. Patrick’s Day. The phrase “corned beef” was actually coined by the British, and although the Irish were known for their corned beef throughout Europe in the 17th century, beef was far too expensive for the Irish themselves to eat and all of it was exported to other countries. Owning a cow in Ireland was a sign of wealth, and the Irish used theirs for dairy products, not beef.

The Irish ate pork, and a lot of it, because it was cheap to raise pigs, and they traditionally prepared something like Canadian bacon to celebrate St. Patrick’s Day in Ireland.

In the 1900’s, when the Irish came to America, both beef and salt were more affordable, and the Irish, who lived in poor, tight-knit communities, often next to Jewish communities, bought much of their beef from Kosher butchers. And so many of the Irish learned how to corn their beef using Jewish techniques, but added cabbage and potatoes to the mix.

It takes about 3 weeks to make corned beef. But now that you know it’s not Irish anyway, that’s OK! (If you’re dying to have it on St Patty’s Day anyway, just buy yourself a supermarket slab this time, then make your own when the craving hits again.) Doing it yourself is not difficult. It just takes time…and you get a better final product.

Corned beef has nothing to do with corn. ‘Corning’ is a technique for preserving raw meats for long periods by soaking it in salt brine. This method was used in England before the days of commercial refrigeration. Back then, the large salt kernels used in the brine were called “corns.”

Brining is a time-honored way of preserving and it prevents bacteria from growing. Both pastrami and corned beef are made by this method. Both start with a brisket of beef. Corned beef is then cooked–usually boiled–and served. Pastrami is made when the brined meat is rubbed with more spices and smoked to add extra flavor. So corned beef and pastrami are the same meat, just treated differently.

Saltpeter is an ingredient that has been used in brining beef for years. It adds the traditional red coloring to the corned beef and pastrami meat. But since saltpeter can also contain carcinogens, I leave it out. The meat may not be the usual bright red color, but the flavor and texture of the meat will not be affected.

Brining the beef brisket

Brining the beef brisket

Step one: corned beef…

beef brisket (about 8-10 pounds)
2 teaspoons paprika
1/4 cup warm water
3 cloves of minced garlic
2 tablespoons sugar
1 tablespoon mixed pickling spices
3/4 cup salt
2 quarts water

Place the brisket in a large container made of non-reactive material, like glass or plastic.

In the 1/4 cup of warm water, dissolve the sugar, minced cloves, paprika and pickling spices.

Dissolve the 3/4 cup of salt in the 2 quarts of water. Pour in the sugar/garlic/paprika/pickling spices mix and stir everything together. Pour the mixture over the meat in the container. Make sure the meat is totally beneath the surface of the liquid. (You may need to weigh it down to do this.) Cover the container.

Refrigerate the container and its contents for 3 weeks, turning the meat once or twice per week. At the end of the third week, remove the container from the refrigerator and take out the meat. Soak the meat in several changes of fresh cold water over a period of 24 hours to remove the excess salt.

At this point, if you want corned beef, prepare and cook it using your favorite recipe. But I’m all about the pastrami!

Step two: making Pastrami…

pastrami


Brined and rinsed corned beef brisket from above recipe, patted dry with paper towels
1/4 cup Kosher salt
1/4 cup paprika
3 tablespoons coriander seeds
2 tablespoons black peppercorns
2 tablespoons yellow mustard seeds
1 tablespoon white peppercorns
3 tablespoons brown sugar
1 tablespoon granulated garlic

Combine the coriander seeds, black and white peppercorns and mustard seeds in a spice grinder and grind coarsely. Place in a bowl. Add the salt, paprika, brown sugar and granulated garlic. Mix well.

Rub the mix into the brisket well, covering all sides.

Heat your smoker to 225 degrees and smoke for several hours using a less intense wood, like oak. When the internal temperature of the meat has reached 165 degrees, it’s done. It isn’t necessary to smoke pastrami as long as you would a regular brisket because the long brining time makes the meat tender.

It is very important that absolutely everything that comes in contact with the meat is very clean. (This includes your hands.) Also, make very sure that every inch of the meat reaches the 165 degrees before it is removed from the smoker. The corned beef is now pastrami.