
My breakfast of champions: home-cured and smoked bacon, organic garden lettuce and tomato, Wishing Stone Farm free-range egg, on a genuine NYC everything bagel! (Hellman’s mayo a must.)
Cheers!
My breakfast of champions: home-cured and smoked bacon, organic garden lettuce and tomato, Wishing Stone Farm free-range egg, on a genuine NYC everything bagel! (Hellman’s mayo a must.)
Cheers!
The Saturday before Labor Day is traditionally considered to be International Bacon Day. So that makes it September 5th this year.
Let’s face it: there are few foods as magical as bacon. Add bacon to just about any dish you’re preparing, and it elevates it to incredible new heights of flavor. The BLT is possibly the greatest food combination ever invented: just a few simple, fresh ingredients, when placed together, transforming into one of the most amazing sandwiches on planet Earth.
I buy my bacon on-line from Burger’s Smokehouse, a family-run business in Missouri that not only sells some great bacon (get the thick-sliced country bacon—my favorite), but also smoked turkeys, ham and more.
But I also make my own.
Bacon comes from the pork belly. One of the places I buy pork bellies is from my friends at Fire Fly Farms in Stonington, CT (www.fireflyfarmsllc.com). I follow the simple curing techniques outlined in “Charcuterie,” a great book written by Michael Ruhlman and Brian Polcyn.
To cure bacon, all you really need is salt and sugar, and what they in the curing biz call “pink salt,” which is not to be confused with salt that happens to be pink, like Himalayan salt you would find in a gourmet store. Pink salt is bright pink—to let you know that this is special salt that should only be used in small quantities for curing. The reason for that is because it has nitrites. Nitrites delay the spoilage of the meat, and help keep the flavors of spices and smoke. They also keep the meat nice and pink instead of an unappetizing gray. That’s good. But nitrites can break down into nitrosamines, which have been known to cause cancer in lab animals. But let’s face it: you would need to eat a ton of cured meat to really worry about this.
To make the basic dry cure:
Mix the ingredients well. An important note: all Kosher salts do not all weigh the same, so go by the weight and not a cup measurement.
Once you rub the pork belly with the basic dry cure, place it in a Ziploc bag, squeeze the air out of it, and seal it tightly. Place it in the fridge for a couple of weeks, flipping it over every few days to let gravity do its work. You’ll see that the salt will draw moisture out of the meat and form a brine. This brine will continue to cure your pork belly, so leave it in there.
Once the pork belly has been cured, wash the brine off the meat, pat it dry with paper towels. Now it’s time to cook. You can simply cook the pork belly at 200 degrees for about 2 hours, until the internal temperature reaches 160 degrees, or place the pork belly in a smoker, cooking it at 250 degrees for 1 hour, then adding hickory chips and smoking it at 250 degrees for another hour. I use my digital smoker to do this.

Bellies in the smoker.
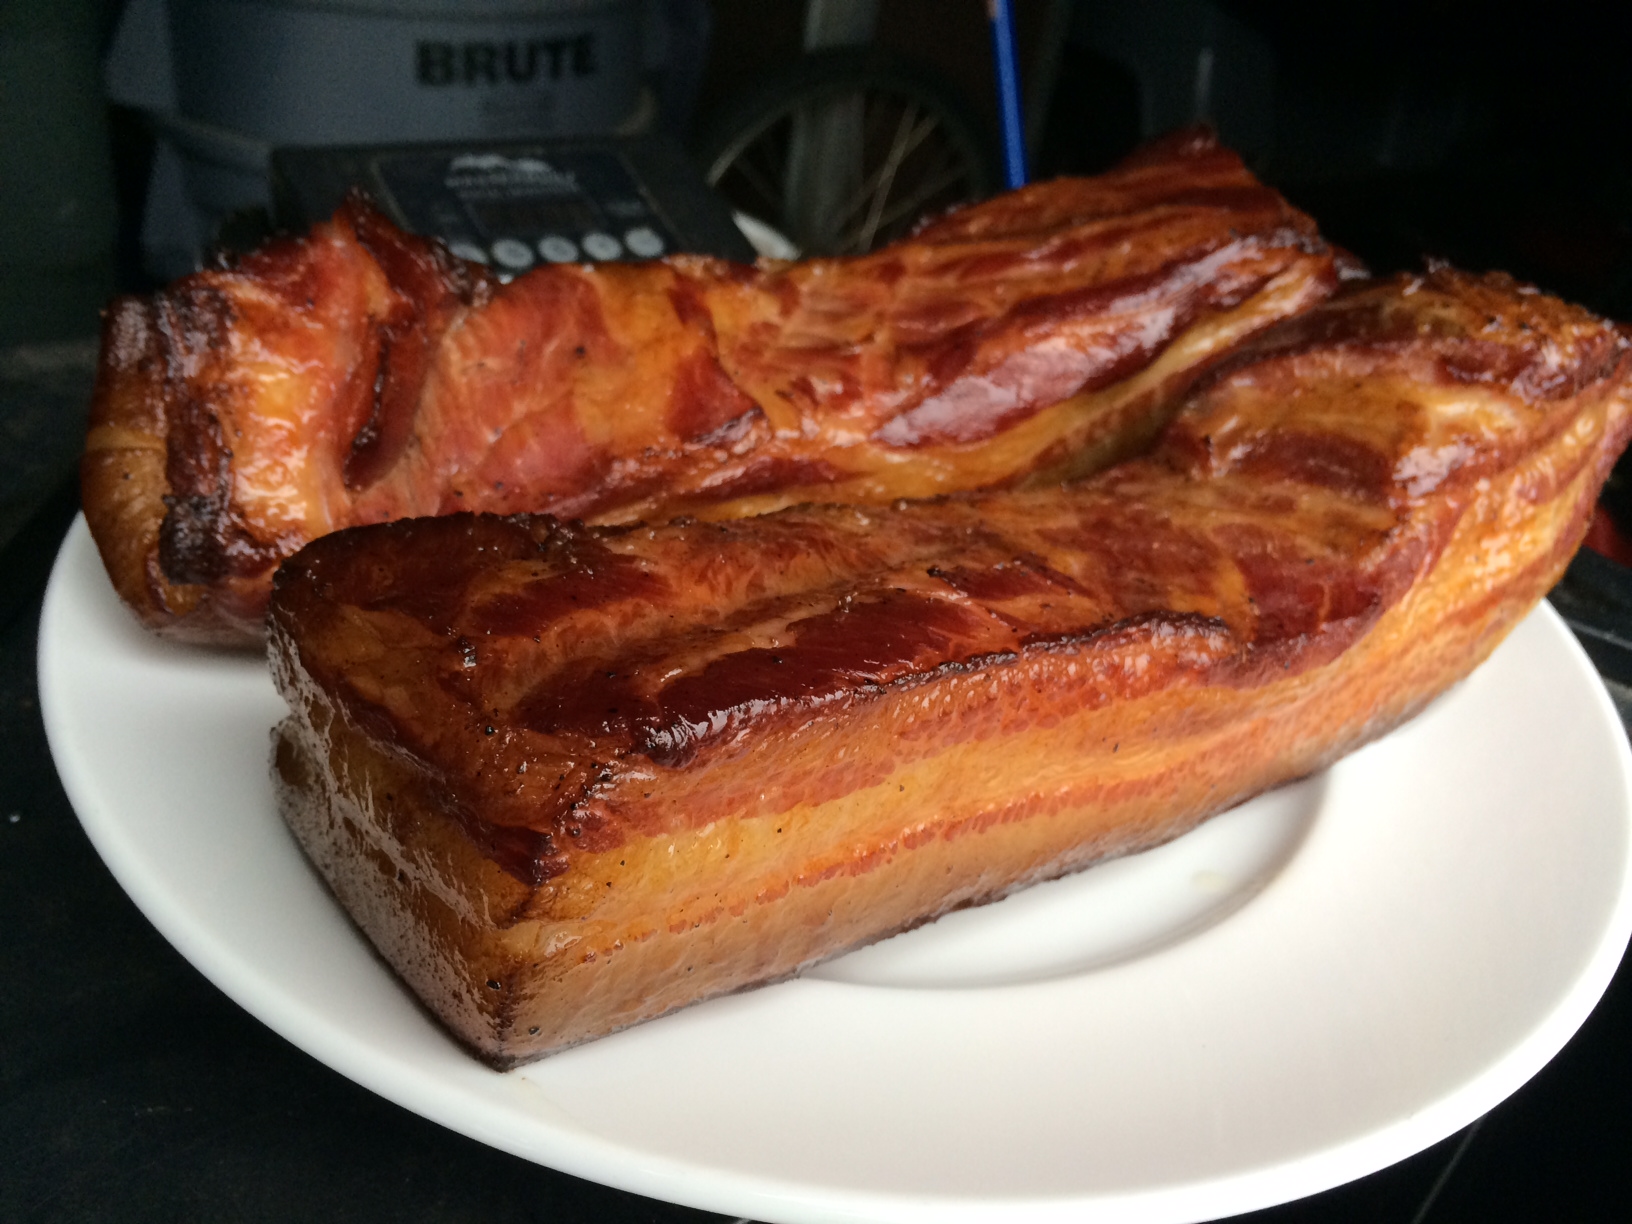
Smoked bacon
That’s it. You have achieved bacon!

Frying in the pan!
My blueberry buttermilk cornmeal pancakes are delicious (see my previous blog), but the recipe leaves some leftovers. So I froze the extra pancakes, not really knowing what I’d do with them later on.
Later in the week when I thawed a pack of chicken thighs, I decided to thaw some of the pancakes as well, planning to use them as a substitute for bread crumbs. Worked out pretty well…a crispy, flavorful piece of chicken. If you don’t make the pancakes, using store-bought cornbread will work just as well.

Break the cornbread (or pancakes) into smaller pieces and place them on a sheet pan in a 200-degree oven. Bake until they dry out but don’t burn, about 30 minutes. Let them cool to room temperature, then place them in a food processor and process until they resemble breadcrumbs. Place the breadcrumbs in a bowl.
Add the salt, garlic, onion and tarragon to the breadcrumbs and mix well.
In another bowl, crack and whisk the 2 eggs.
Pre-heat the oven to 350 degrees.
Heat a frying pan with 2 inches of oil to medium-high. Roll the thighs one at a time in the egg and then in the breadcrumb mixture. Press the breadcrumbs onto the chicken so they stick. Gently place the breaded thigh in the pan with the oil. Fry until golden on one side, then flip the thigh over and fry on the other side. When the thighs are golden and crisp, place them on a sheet pan covered with non-stick aluminum foil. Repeat with all the thighs.
Place the sheet pan with the thighs in the oven and bake until cooked through, about 35 minutes.


Growing up in a Lithuanian family, there was a small group of foods that I had to love to survive, since they constantly appeared on the dinner table: potatoes, cabbage, mushrooms, herring, and beets. Fortunately for me, I loved them all, despite my Mom’s desire to boil everything to death.
One of the many uses for beets, besides soups, was pickling. Pickled beets are an excellent side for any hearty meat dish. (I love ’em with kielbasa or steak!) I add hard-boiled eggs and hunks of onion to the mix because I like them. If you don’t like ’em, leave ’em out and just add more beets.
I combined store-bought already-cooked beets (the brand is called Love Beets) with Chiogga beets that I grew in my own garden and peeled and roasted before pickling.

Pre-heat the oven to 450. Wrap the beets in foil and roast for about an hour, until tender. When cool enough, carefully peel and quarter them.
In a medium saucepan, combine the vinegar, water, garlic, sugar, peppercorns and salt. Bring to a boil and simmer over moderately high heat, stirring until the sugar is dissolved. Let the pickling liquid cool to warm, about 15 minutes.
In a heat-proof glass jar or container, layer the beets, onion, eggs, and dill sprigs and then cover with the pickling liquid. Let stand at room temp for 2 hours, then place in fridge overnight.
They stay fresh for a week, but they won’t last that long!

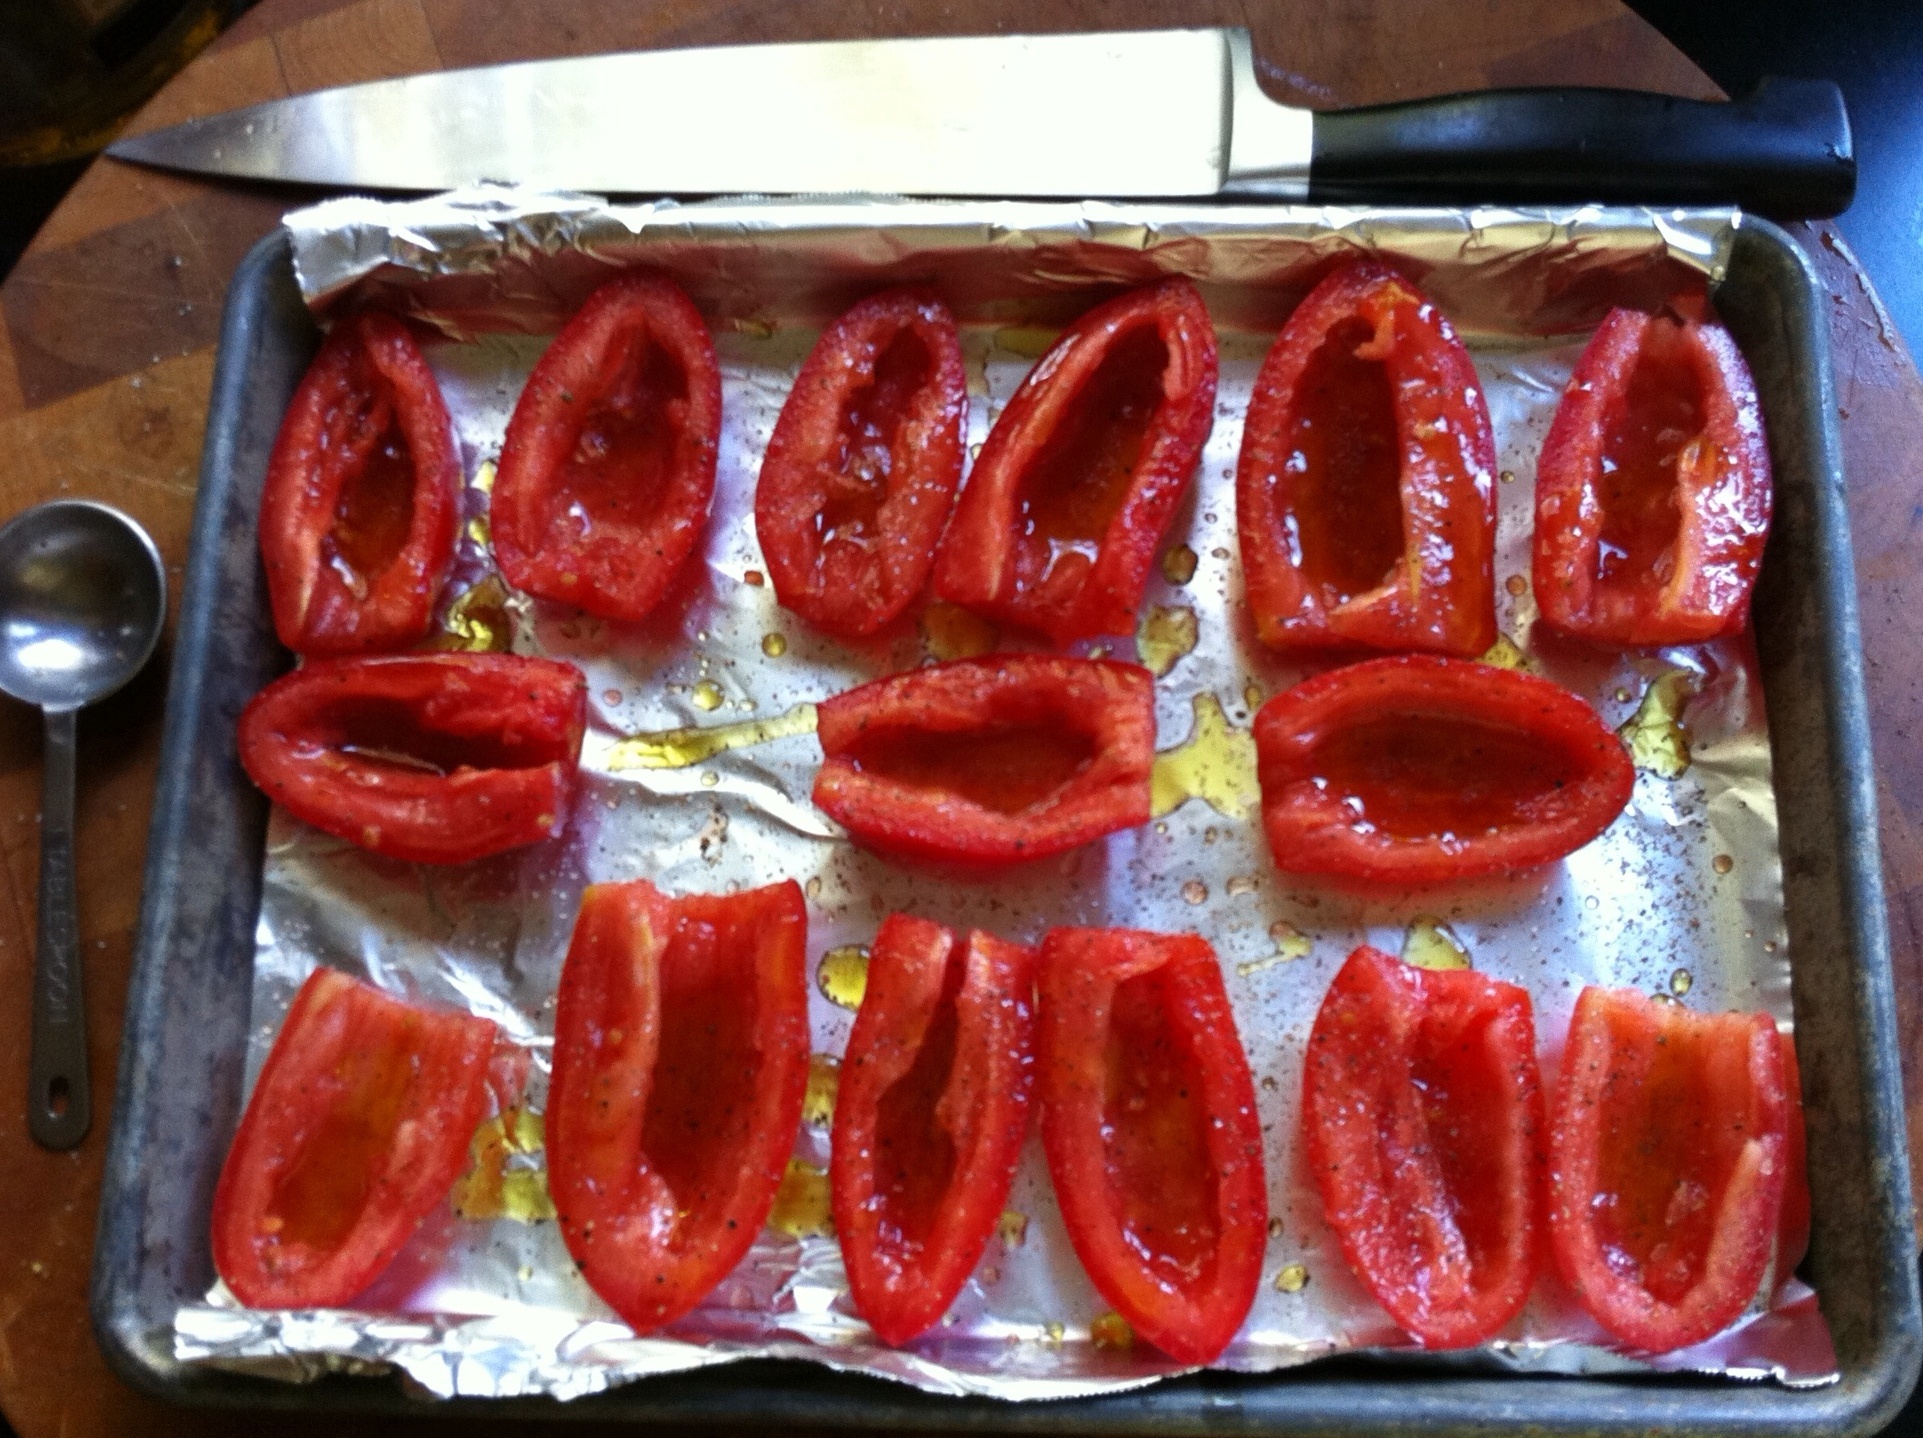
Now’s the time to head to your local farm stand and pick up a bag of gorgeous plum tomatoes, before the season is gone! And this is what you do with them…
These are not sun-dried tomatoes. They’re better, because fresh plum tomatoes are still moist after roasting, with a bit of that magic tomato liquid in every cup! A great, simple platter to offer at parties.
Tomatoes before
Pre-heat the oven to 250.
Line a baking sheet with foil and rub it lightly with olive oil.
Arrange halved and seeded tomatoes on it in a single layer, cut side up. Drizzle evenly with 1/4 cup olive oil, sprinkle with 2 tablespoons sugar, and season with pepper to taste.
Bake the tomatoes until they are still juicy but slightly wrinkled, about 3 hours. Transfer to a platter and let cool slightly.
Just before serving, sprinkle tomatoes with Fleur de Sel, and garnish if you like, with chopped parsley leaves, mint leaves, or basil.

Tomatoes after
I had a pound of leftover lobster meat (I know, I know…how could you ever have leftover lobster?!) So I wrapped it tightly and kept it frozen. When I had a craving for crab cakes, I figured I’d try my recipe out with lobster instead. So good, I sprained my arm patting myself on the back!
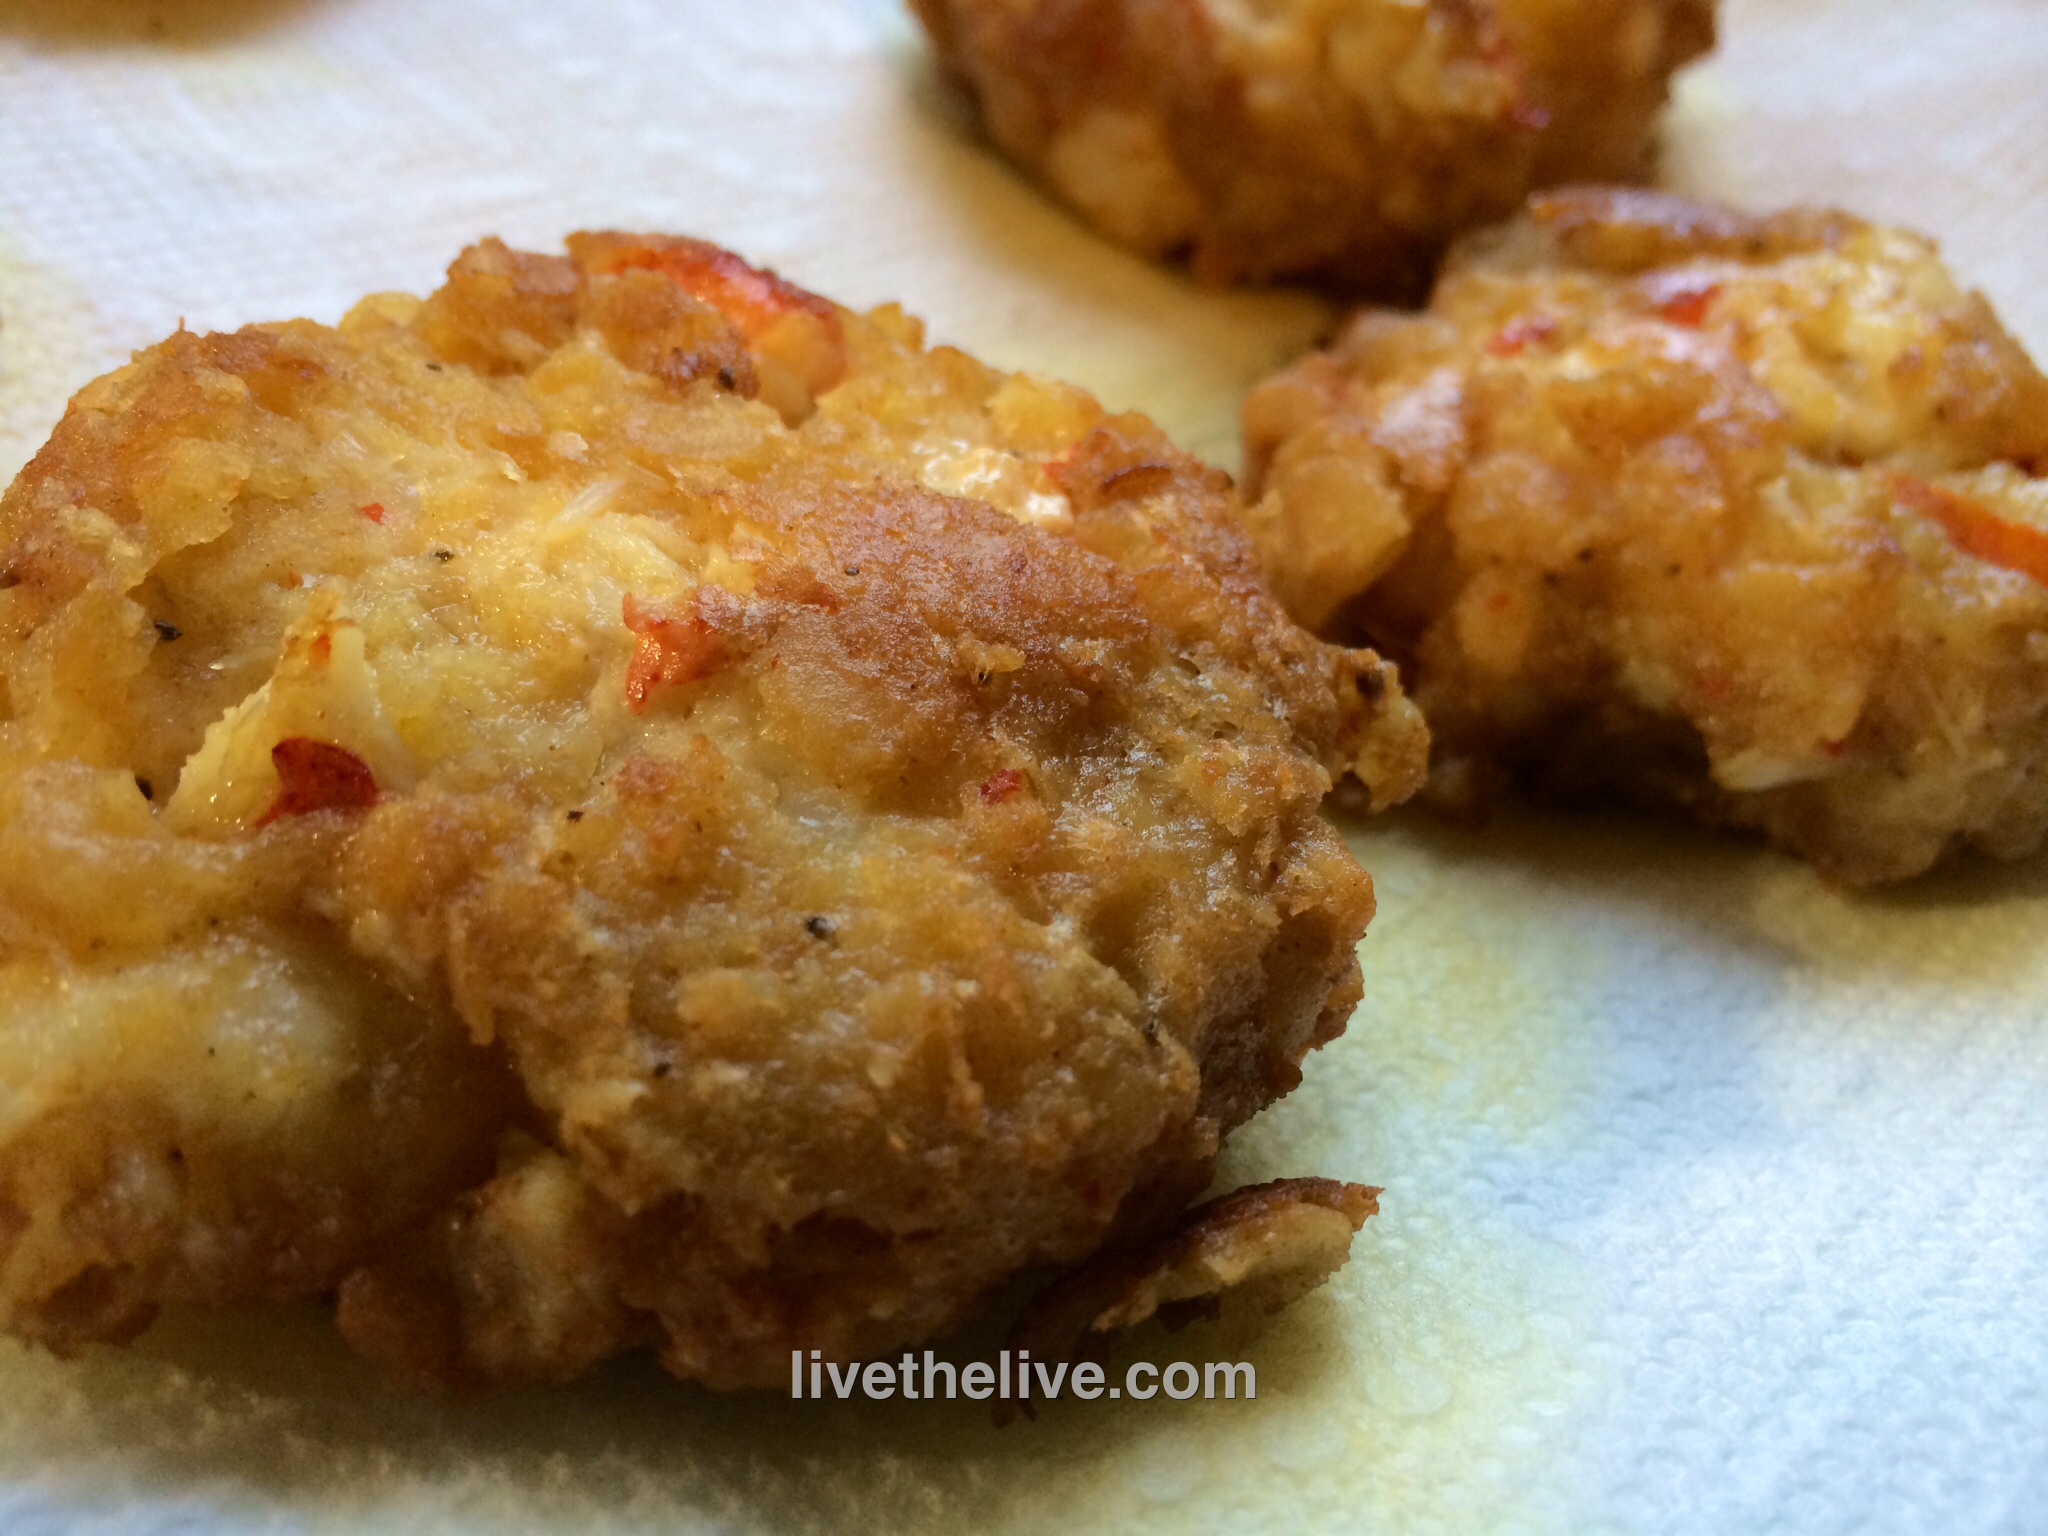
In a bowl, combine mayo, mustard and Old Bay Seasoning.
Chop the lobster into small pieces and add it to the mayo/mustard mix.
Pulse the crackers in a food processor until it resembles oatmeal. Add it to the bowl and gently combine the ingredients.
Form small patties. I use either a small beef slider mold or the lid from a small mouth Mason jar. I won’t kid you: it gets messy, but it’s worth it! Place the patties on a sheet pan lined with Reynold’s non-stick aluminum foil.
Place the sheet pan in the freezer for about 15 minutes to stiffen up the patties.
Heat some olive oil in a pan. Cook the patties on both sides until golden brown.

If you do your share of Italian recipes, a common product found in just about any store has many people confused: San Marzano tomatoes. Most good cooks agree that San Marzano tomatoes are some of the best canned tomatoes you can buy.
But unfortunately, the label can say “San Marzano tomatoes” even if they are not real San Marzano tomatoes.
San Marzano is a region in Italy near Naples and Mt. Vesuvius, and the special combination of climate and volcanic soil make these plum tomatoes world-famous. They have less water, fewer seeds and are picked off the vine when perfectly ripe, then processed the same day.
But San Marzano is a variety of tomato, too…and so you can have a can of San Marzano tomatoes that are not from San Marzano. And to add to the confusion, there’s actually a brand of tomatoes called San Marzano, with tomatoes grown in the United States. Bet your ass the sellers of these tomatoes are counting on you not to know the difference!

Sold everywhere, but not real San Marzanos from Italy. Grown in the USA.

The company has now changed their label, just calling it “SMT.”
Real San Marzano Tomatoes are a very old variety, extremely limited in quantity, grown and produced exclusively in the San Marzano region of Italy. Because production is so very limited, the Italian Government and the European Union have formed a way of protecting consumers from fraud by having San Marzano tomatoes tightly controlled. DOP, or denomination of protected origin, is the mechanism that the government is using to control the production and marketing of genuine San Marzano tomatoes. Labels for DOP products must be individually numbered and manually applied to each can in specific lots and government officials must oversee this application. So here’s the deal: unless you see “DOP” on the label with a hand-stamped number on the can, it’s not a real San Marzano tomato.

Nope. Italian, and the correct variety, but not from the region.

Nope. “San Marzano region,” but not necessarily the variety.

Nope. San Marzan “style.”

Yes! Always look for D.O.P. on the can or jar.
Kohlrabi is probably one of the most misunderstood vegetables you’ll find in the supermarket. Most people don’t have a clue about what to do with them. Kohlrabi is a member of the cabbage family and can be eaten raw as well as cooked.
For me, the real joy of kohlrabi is biting into a crunchy, sweet, freshly picked and peeled bulb right out of the garden. Unfortunately, much of the kohlrabi you find in a supermarket is grown larger than a tennis ball, making it tough, woody and dry. And they usually remove all the leaves, which are delicious cooked or raw.
I decided to make a slaw with the leaves and bulbs of my kohlarabi harvest, to best use all the parts of the plant. I used my Awesomesauce as the dressing. Find the recipe here: http://wp.me/p1c1Nl-gT

Wash the veggies thoroughly before using. Pull the leaves off the kohlrabi bulb, and remove the stems. Grab a bunch of leaves at a time, roll them up tightly, and slice as thinly as you can into thin ribbons. Place in a bowl. Do this with all the leaves.
Peel the thick skin off the kohlrabi bulb and slice it as thinly as you can. Then take the slices and cut thin sticks out of them. Toss into the bowl.
Season the leaves and bulbs slices with a little salt and pepper, then add Awesomesauce to taste and toss well.
Refrigerate covered, and let the flavors blend for a couple of hours before using.
When I used to go to my favorite barbecue place and asked for a pulled pork sandwich, I didn’t realize just how much work went into making it. Now I make my own, and I have a whole lotta new respect for those barbecue folks…

First, I get the pork butt. I buy a heritage breed, like Berkshire (also known as Kurobuta), from a farm that humanely raises them. That’s better for the pig and also better for my family.
Going to a supermarket for pork is what many people do, and the names of the cuts of meat can be a bit confusing. Despite its name, pork butt is not from the back-end of the pig. It’s the shoulder. And the pork butt (or pork shoulder) picnic is a lower cut of the same area. These cuts can also go by: Boston shoulder roast, Boston butt, Boston roast, shoulder butt, and shoulder-blade roast. Whatever the name, these are all nicely marbled hunks of pork that usually weigh in anywhere from 6 to 8 lbs, and are easy to find. Bone-in is for purists…boneless if you’re not.
Once I’ve got my slab, I need to season it. I’ve found that a simple rub is the best way to go for the sauce I’m going to use later.
Place all the ingredients in a jar with a lid and shake it up to blend.
Once I’ve made the rub, I generously sprinkle it all over the pork, and rub it in really well. I have a digital smoker at home, which lets me cook and smoke my pork butt all in one place. I place it on a rack, put a drip tray underneath it to catch the grease, and set the smoker for 225 degrees. I cook the pork for about 6 hours, and then I add hickory chips to the smoker and smoke the butt for another 2 hours. The marbled fat in the pork butt slowly melts over time and the pork becomes incredibly tender and flavorful.
I remove the pork butt from the smoker and let it rest, covered with aluminum foil, for at least 20 minutes before pulling the meat apart with a couple of forks, shredding it into beautiful meaty bits.
While the pork is cooking and smoking, there’s plenty of time to make two other very important parts of this recipe: the sauce and the cole slaw.

Mix all the ingredients in a saucepan and simmer until the flavors have blended, about 20 minutes. Remove from heat and cool to room temp. If you store it in an airtight container in the fridge, it’ll stay good for a few months.
COLE SLAW
My cole slaw recipe uses pickle juice. Just a splash from your favorite jar of pickles is all you need.
There are no real specific measurements for cole slaw, because I’ve found that some people like it dry, others wet…some peppery, some not. Play around with it and make it your own. I prefer a more mayonnaise-y cole slaw, and usually err on the wet side.
In a bowl, combine all the ingredients. Cover with plastic wrap and chill. When ready to use, re-mix, and taste for seasoning before using.
OK…time to make that sandwich!
Drizzle the barbecue sauce on the pulled pork and mix well…trying not to over-sauce the pork! Take a nice amount of pork and place it on a freshly baked bun. Place the cole slaw right on top if you prefer the Carolina method, or on the side if not.
Whether you decide to go through all this trouble to make pulled pork or not, just remember that if you’re at a barbecue joint, someone else did. Whatever you pay for that pulled pork sandwich is a bargain!
