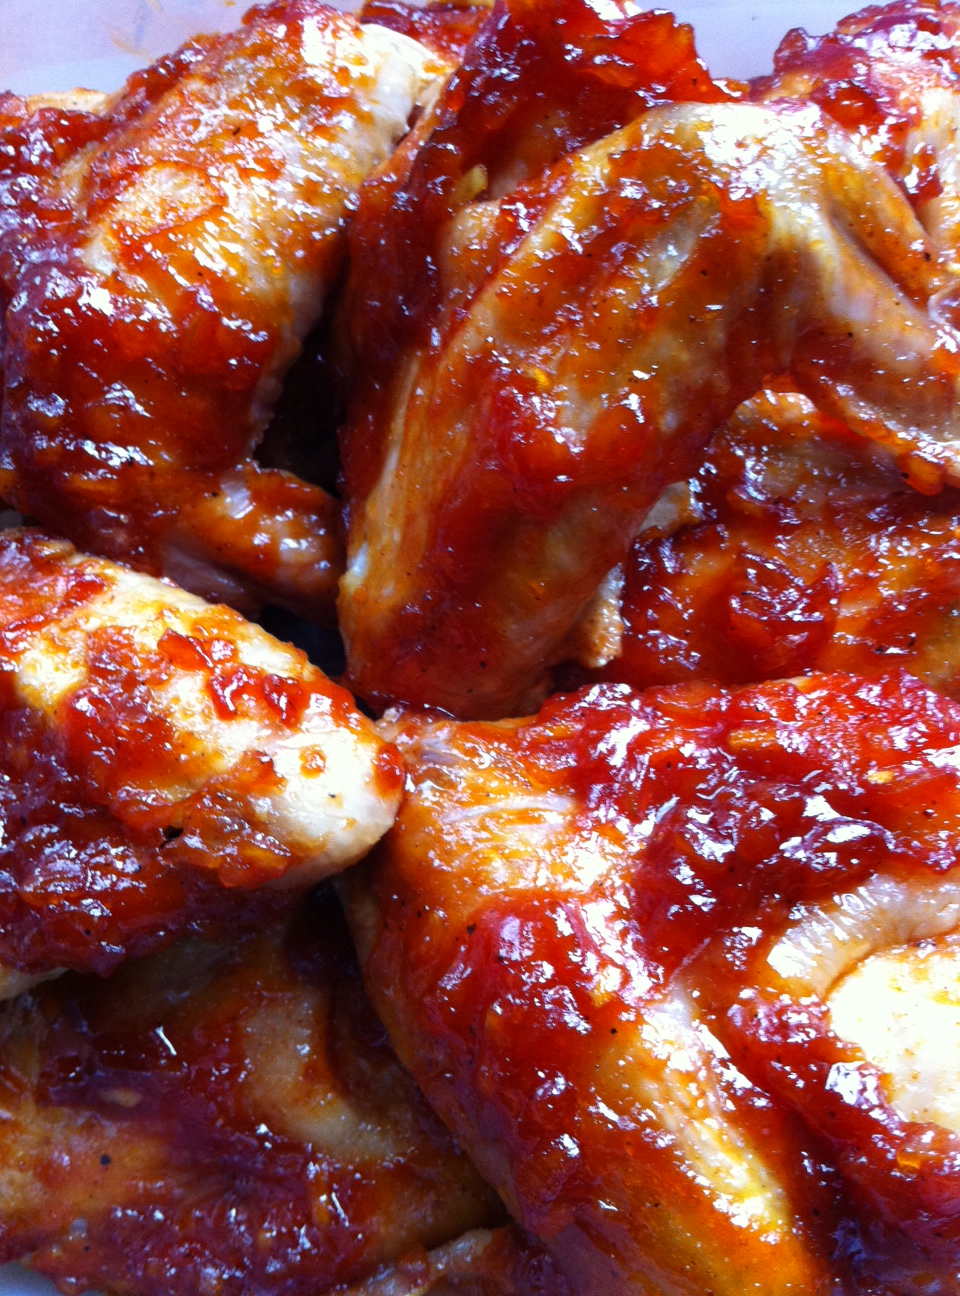
I’ve got dozens of chicken wing recipes, but even so, sometimes I just want something different. I decided to take my favorite taco seasonings recipe and adapt it to chicken wings. Caramba! One of the tastiest wings I’ve made in a long time!
This is such an easy and delicious recipe to make, even for a crowd. At your next party, or watching your favorite football team play on a Sunday afternoon, just double or triple the recipe, as needed. And it works with a whole chicken as well.
Combine the salt, cumin, oregano, paprika, onion, garlic, and pepper in a bowl. Mix well.
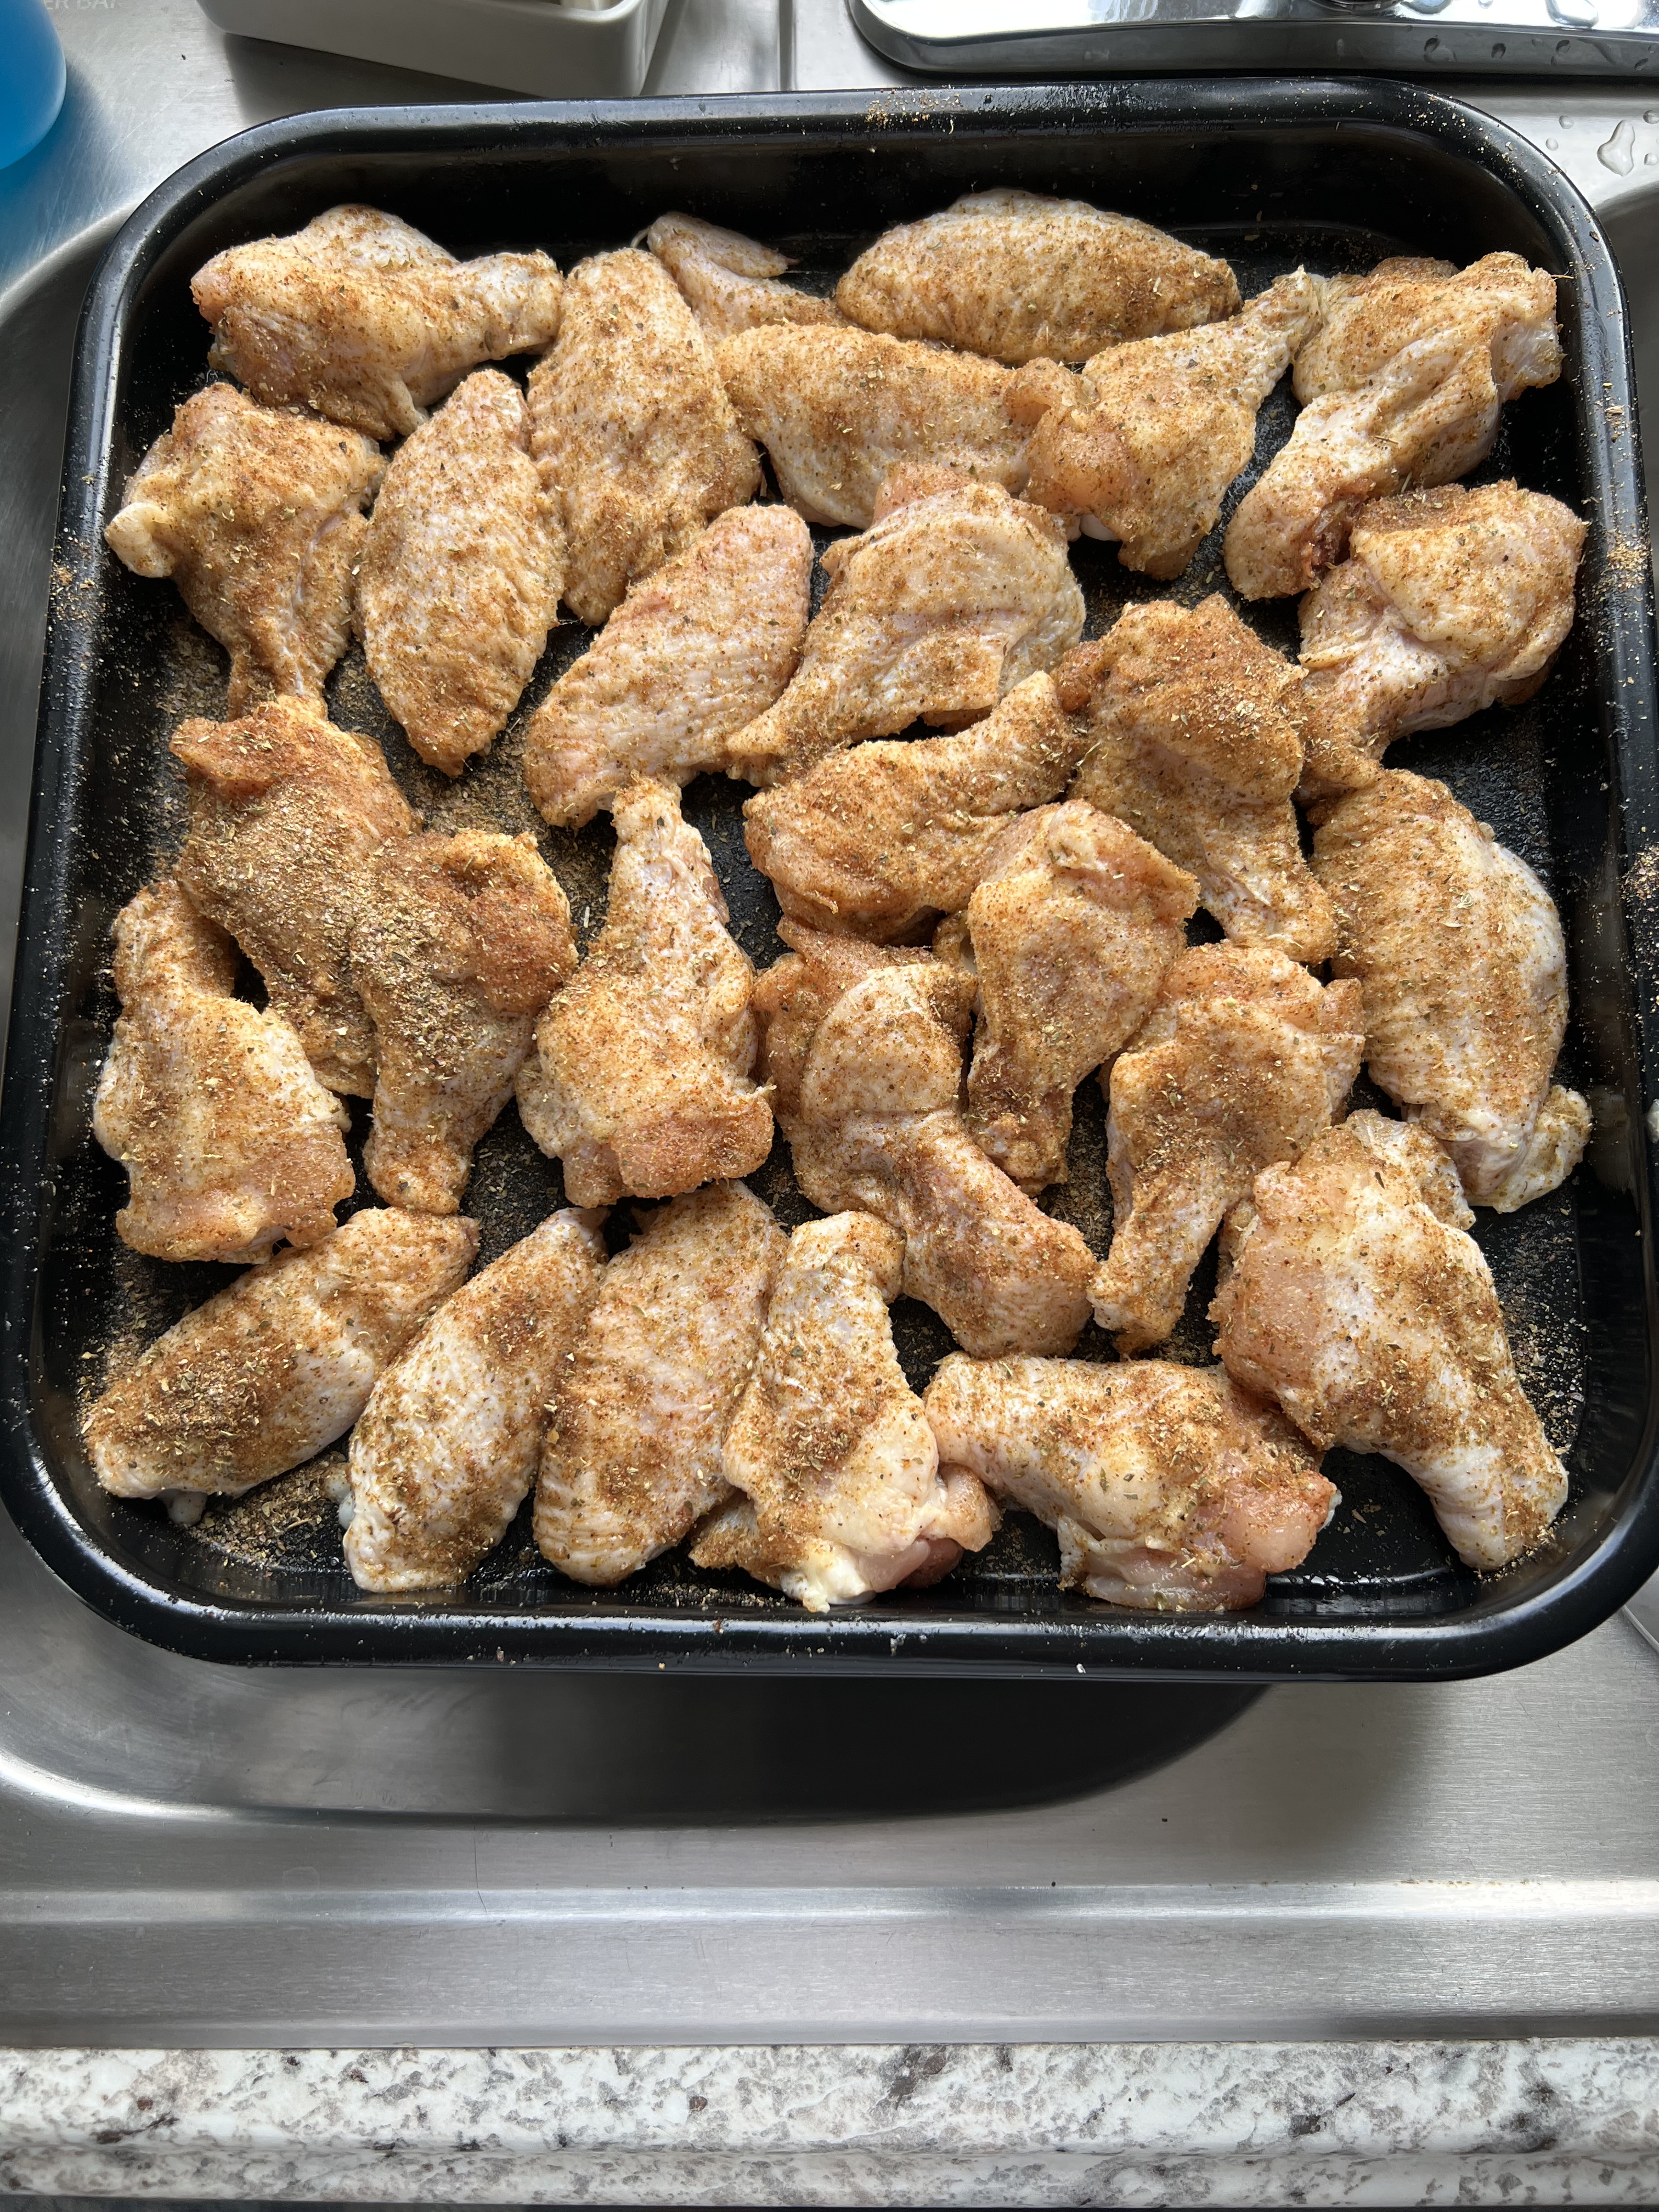
Cover a baking sheet with aluminum foil and spread the wings out on the sheet. Sprinkle the wings with the avocado oil and rub the oil all over the wings. This will help the wings cook evenly, and it’ll help the seasonings stick to the wings.
Turn the wings bottom-side-up and sprinkle with the seasoning mix. Flip the wings over and sprinkle them again, coating them evenly.
Place the baking sheet in the oven and bake for about 45 minutes.
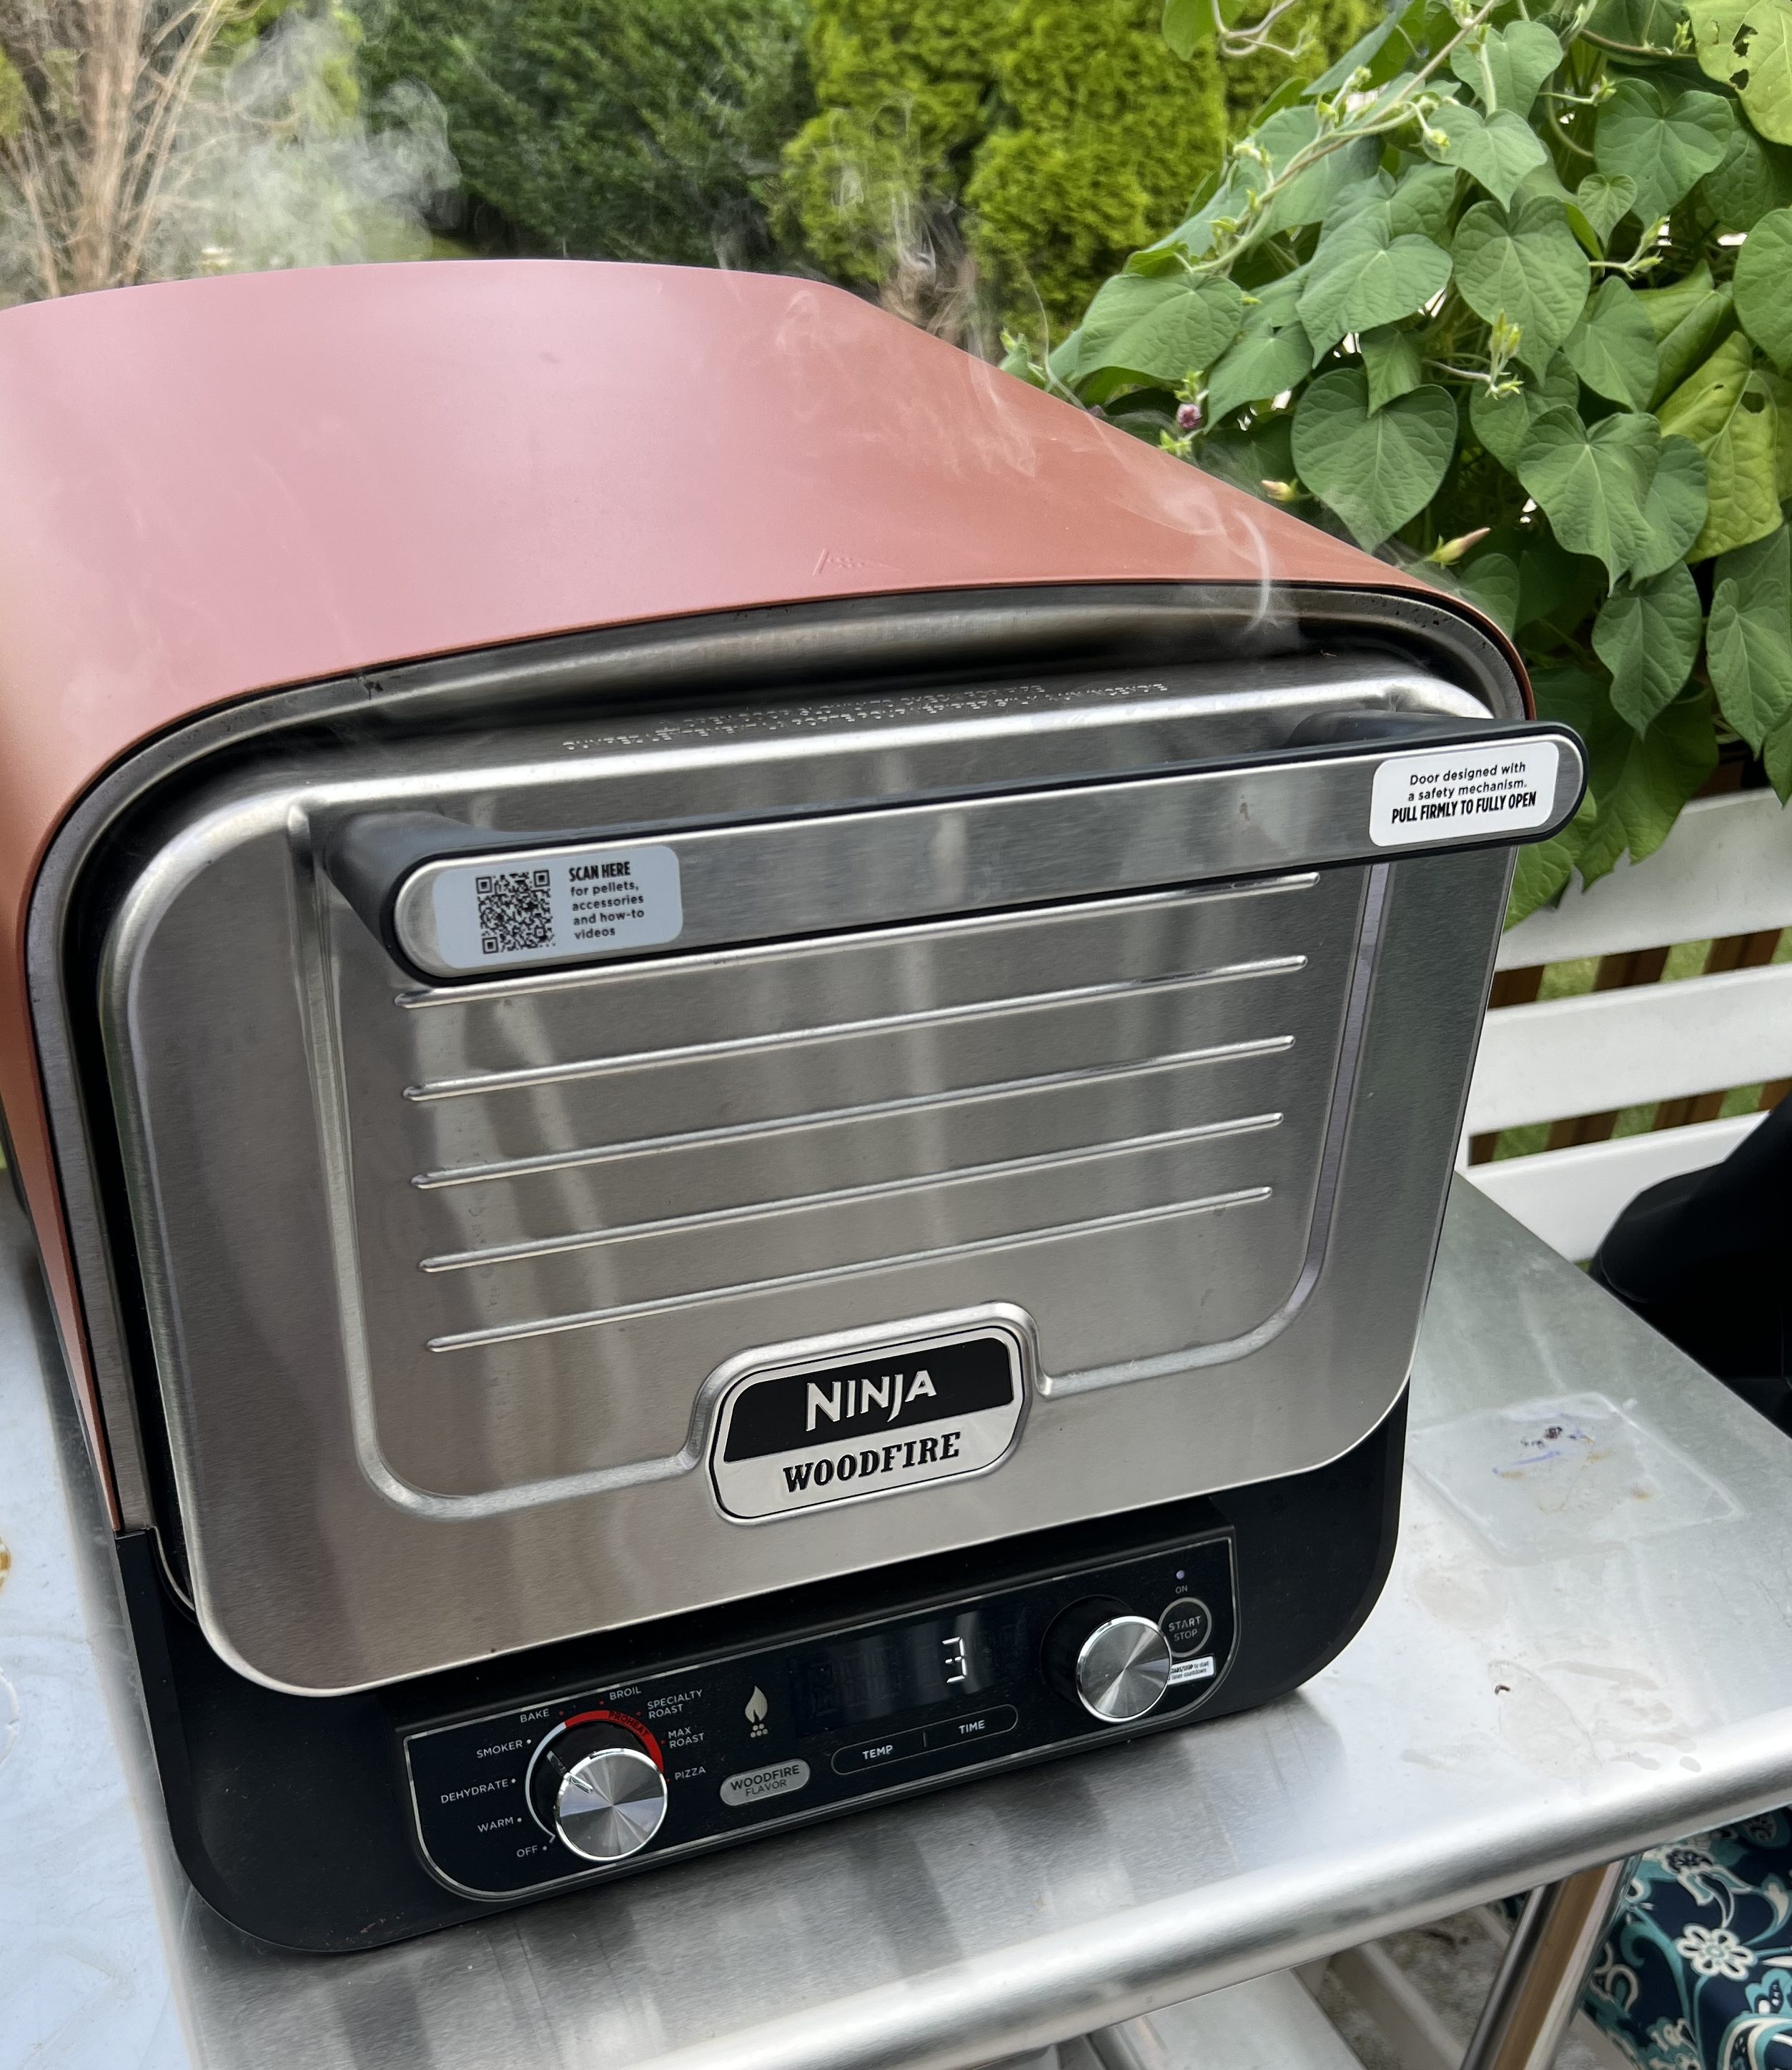
These wings are even better when they’ve been smoked. I recently bought a Ninja Woodfire oven, so it’s a bit of a cheat, since it’s an electric outdoor oven that burns smoking pellets. But the flavor I got was amazing!
Seasoned and ready to go.
After cooking/smoking at 250° for about 90 minutes using hickory pellets, they’re done!
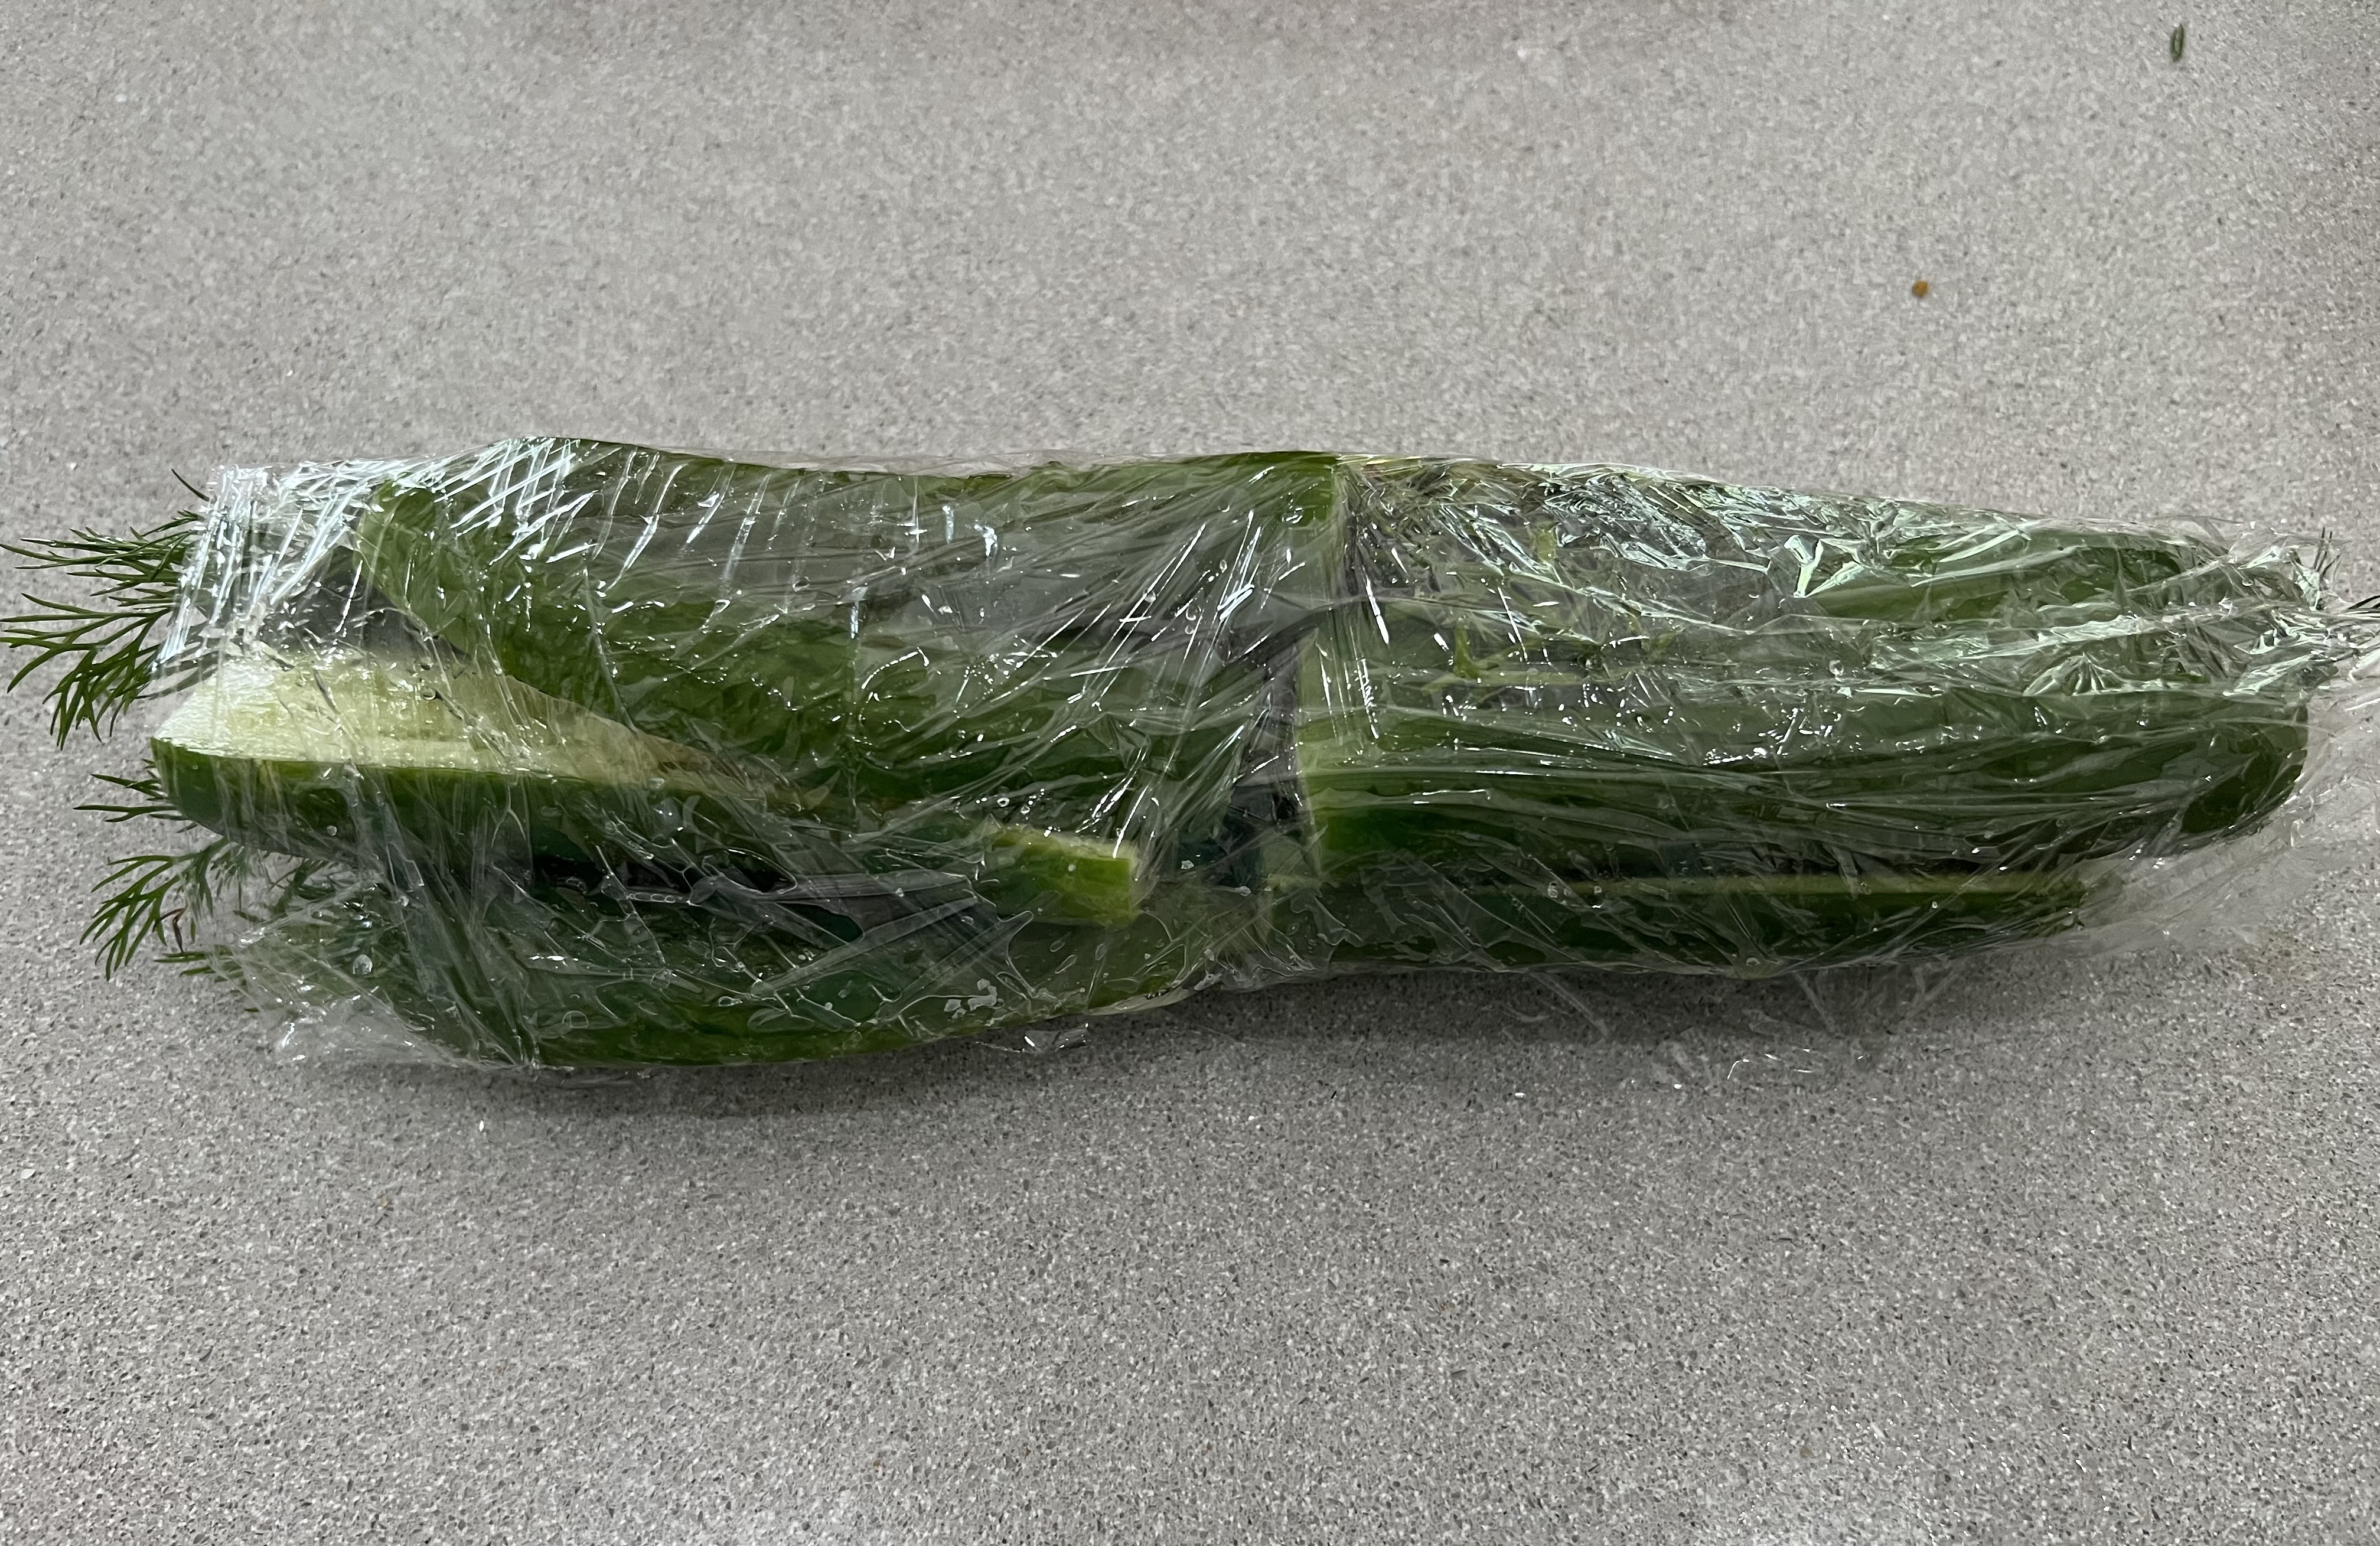
I don’t have the patience to boil Mason jars and lids and all that. But I love me my pickles, especially when this year’s garden cranks out so many cucumbers!
This is such an easy way to make great pickles, it’s almost unbelievable…and no water is needed! The salt extracts just enough moisture to make it work. This method works great if you want fresh pickles to eat immediately, but if you want to keep them for long periods of time, you’ll have to go back to the old tried-and-true methods.
Fortunately for me, I devour these pickles as soon as they’re ready!
I originally used a plastic bag for this, but a plastic container also works well. Use what you have.
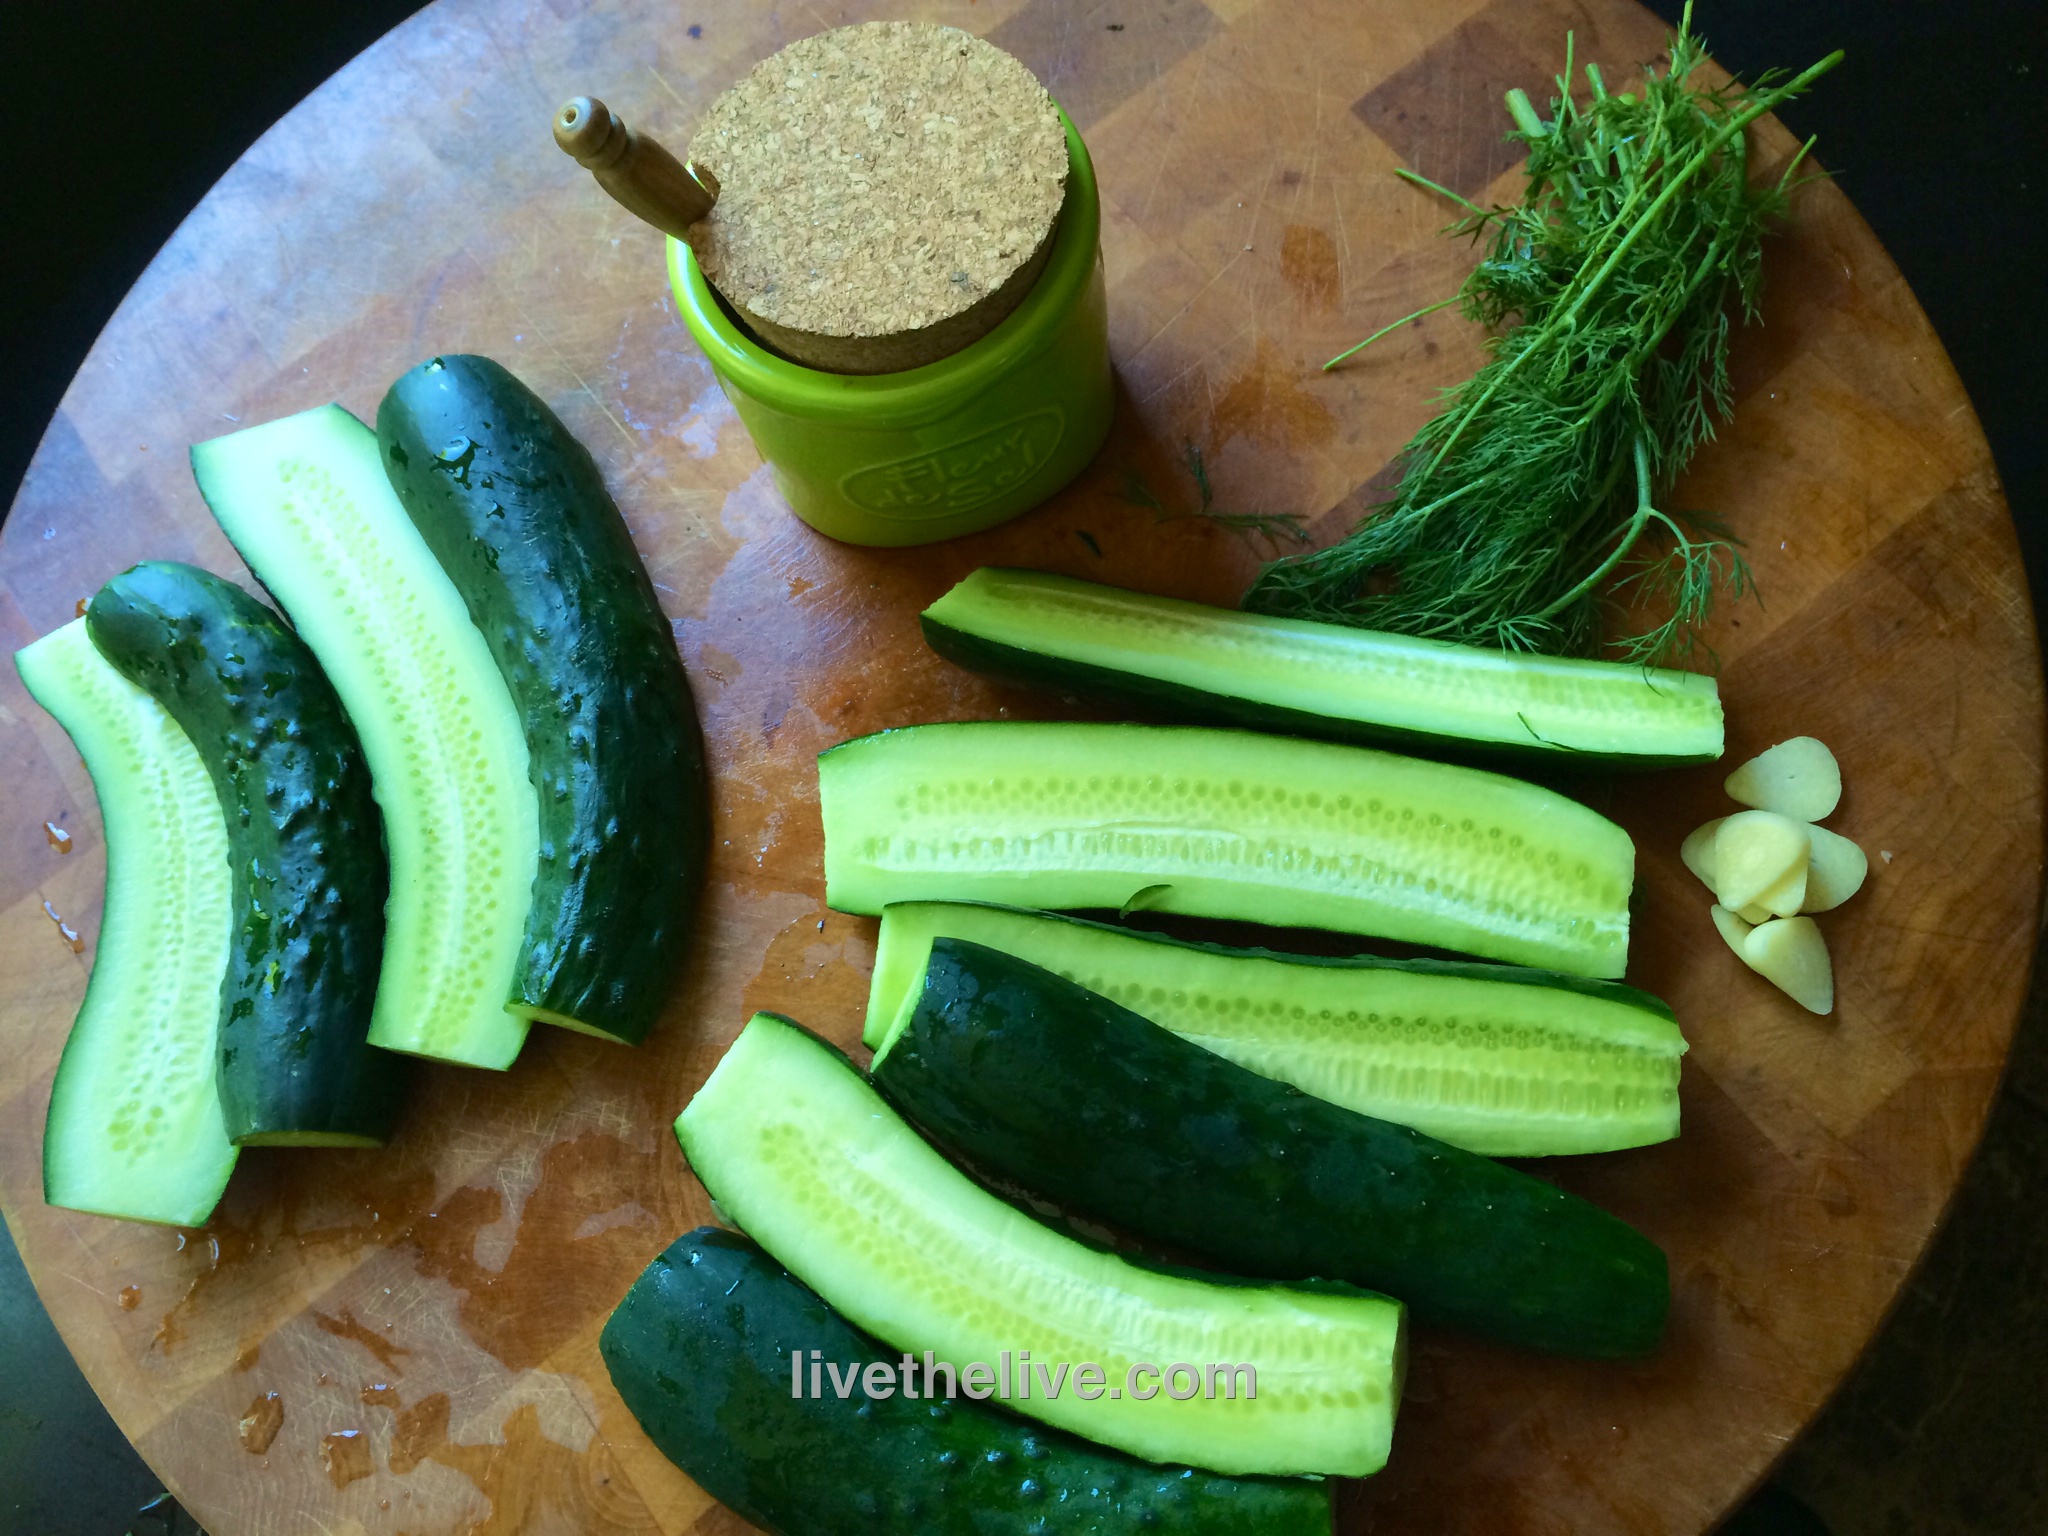
fresh cucumbers sea salt or Kosher salt a handful of fresh dill a couple of cloves of garlic, thinly sliced
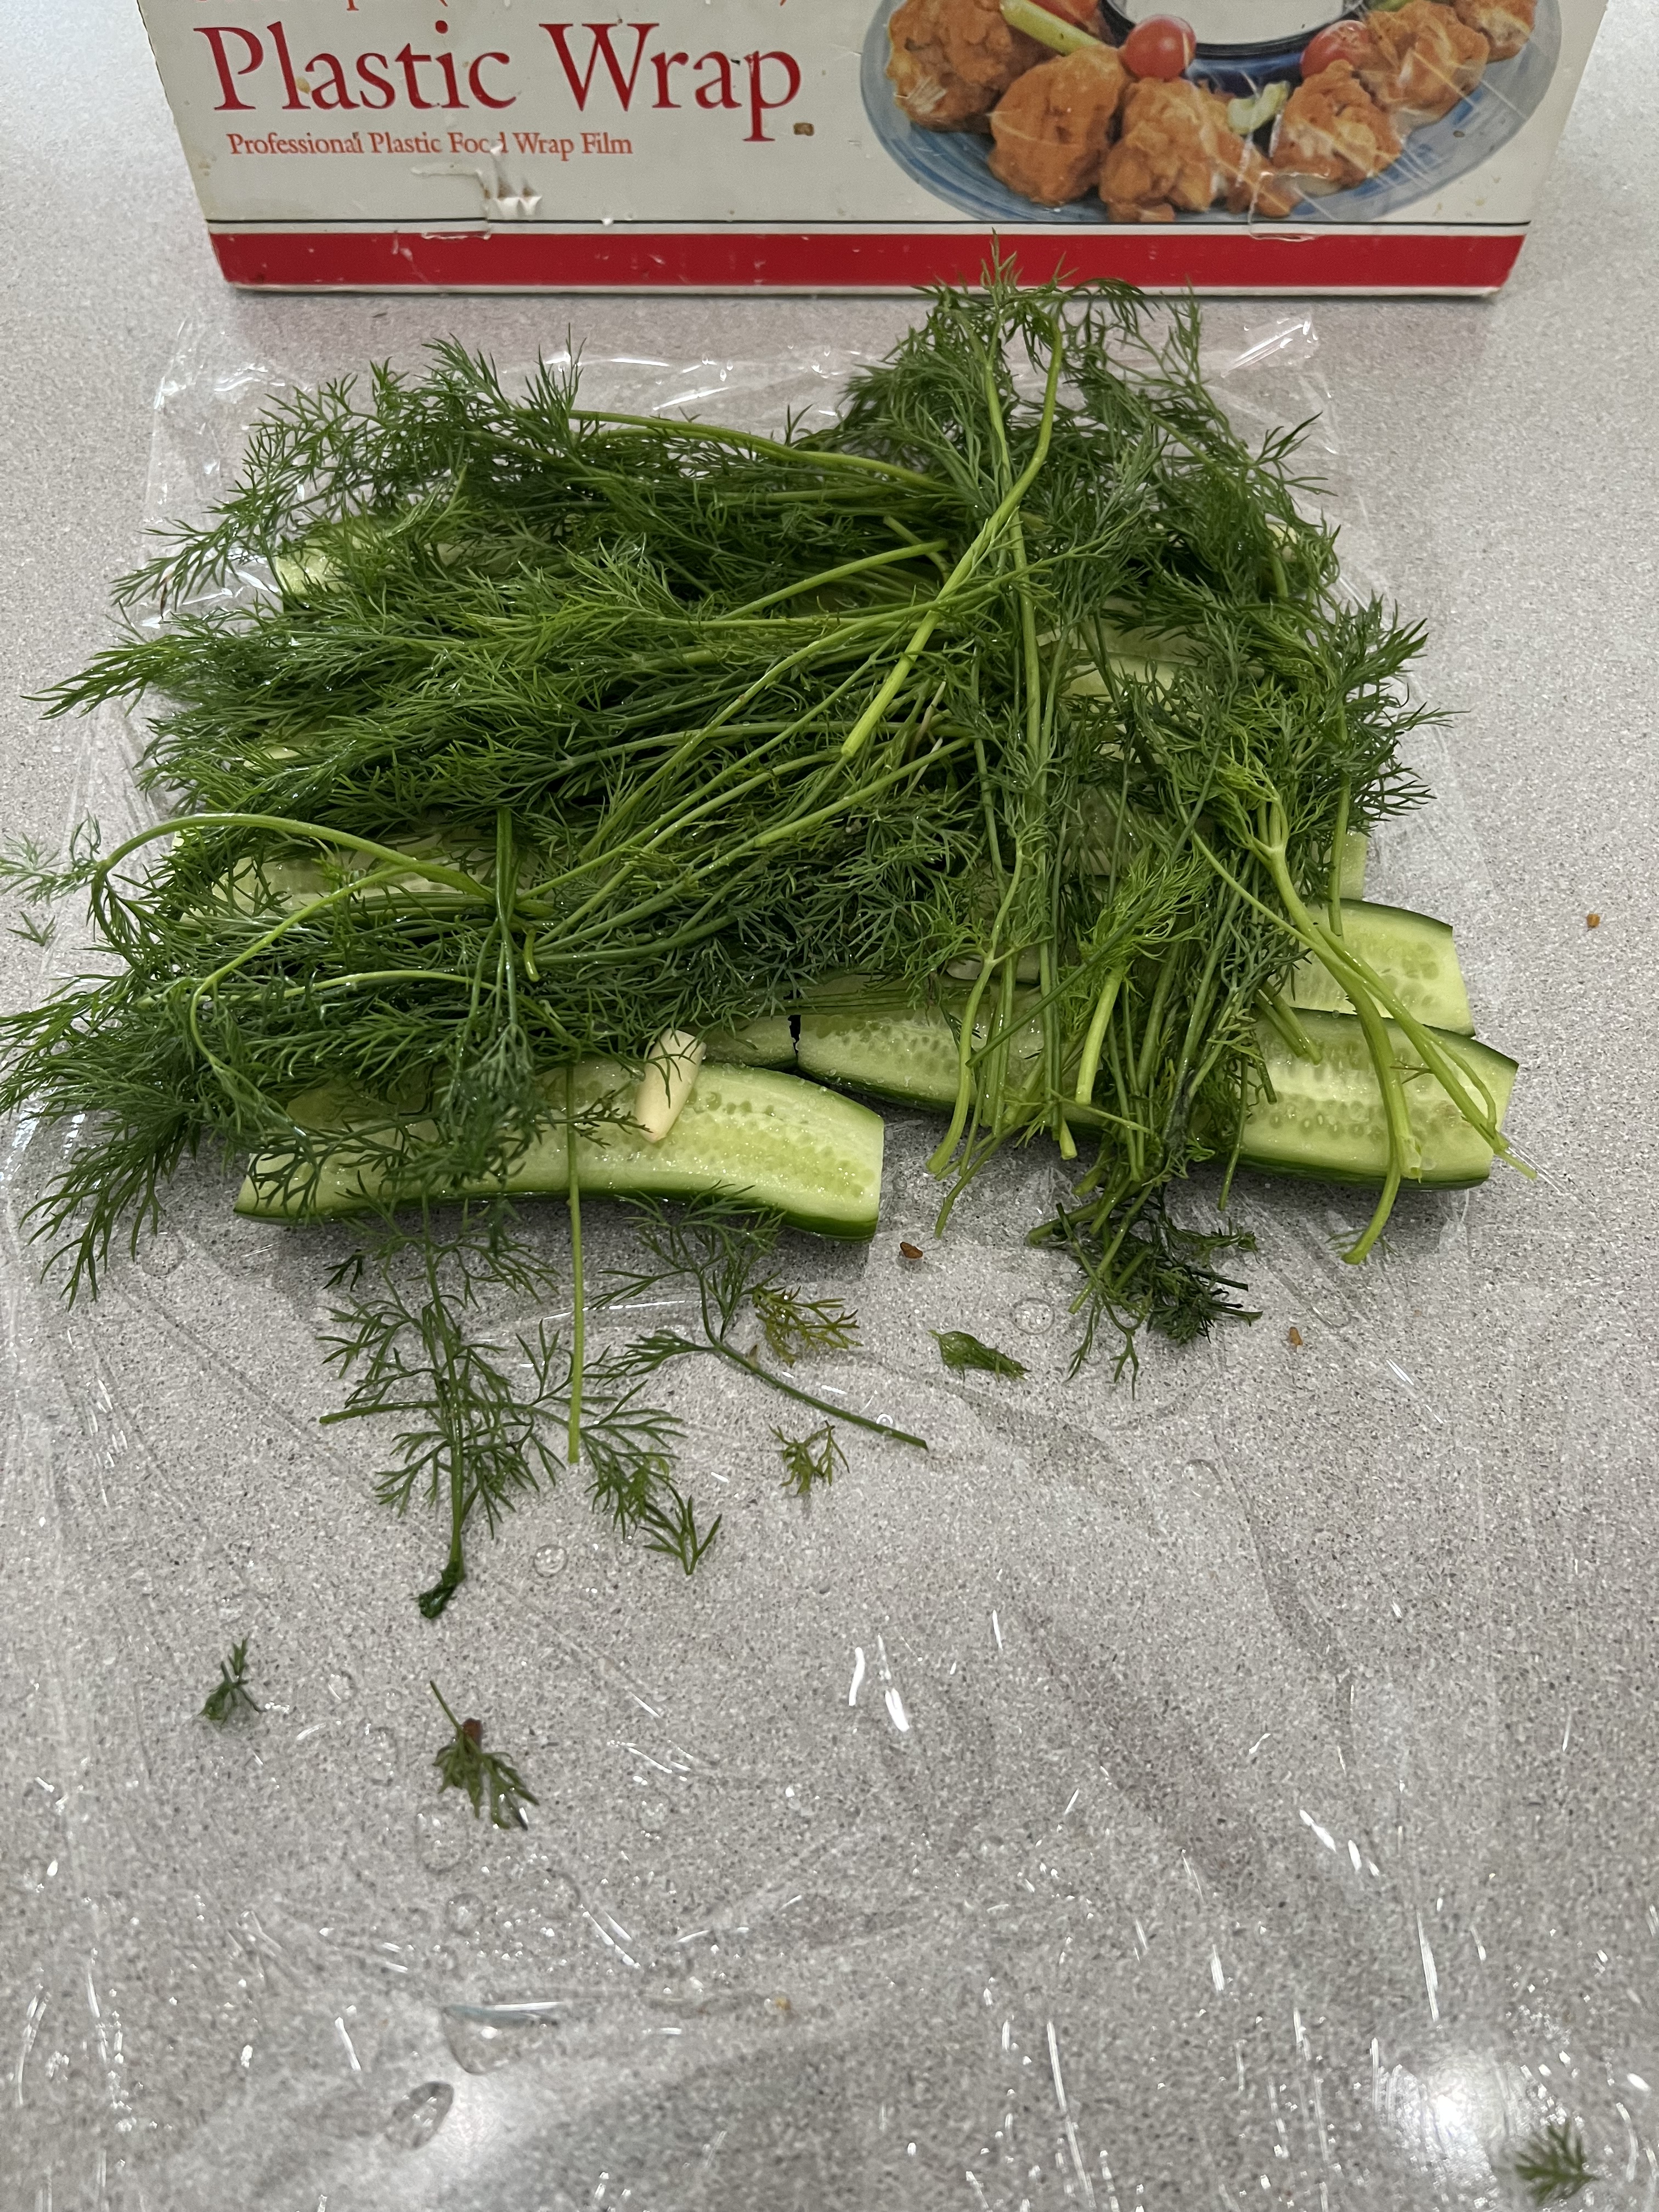
Cut the ends off the cucumbers and then slice them lengthwise, in half or in quarters. Lay them neatly next to each other in one layer in a container, or on a piece of plastic wrap, skin-side down. Sprinkle the salt over the cucumbers. Sprinkle some of the chopped garlic on top. Then, tear off some fresh dill and lay it to cover the pickles.
If using a container, you should be able to get a second row of pickles on top of the first, again sprinkling with the salt, garlic, and topping with dill.
Placing the lid on the container, squeeze out as much air out of the container as you can.
If using plastic wrap, roll it up tightly and place it inside a Ziploc bag, and seal it.
Put the container or bag in the fridge overnight. Making sure the lid is tightly sealed on the container, flip it over every few hours. (I always put a plate underneath it when it’s upside down in case it leaks a little.)
The plastic wrapped pickles don’t need to be flipped.
The pickles will be ready to eat the next day, but they’re even better after 48 hours.
I tried this one yesterday: pickles, sliced carrots, and even small onions in the same mix. Delicious!
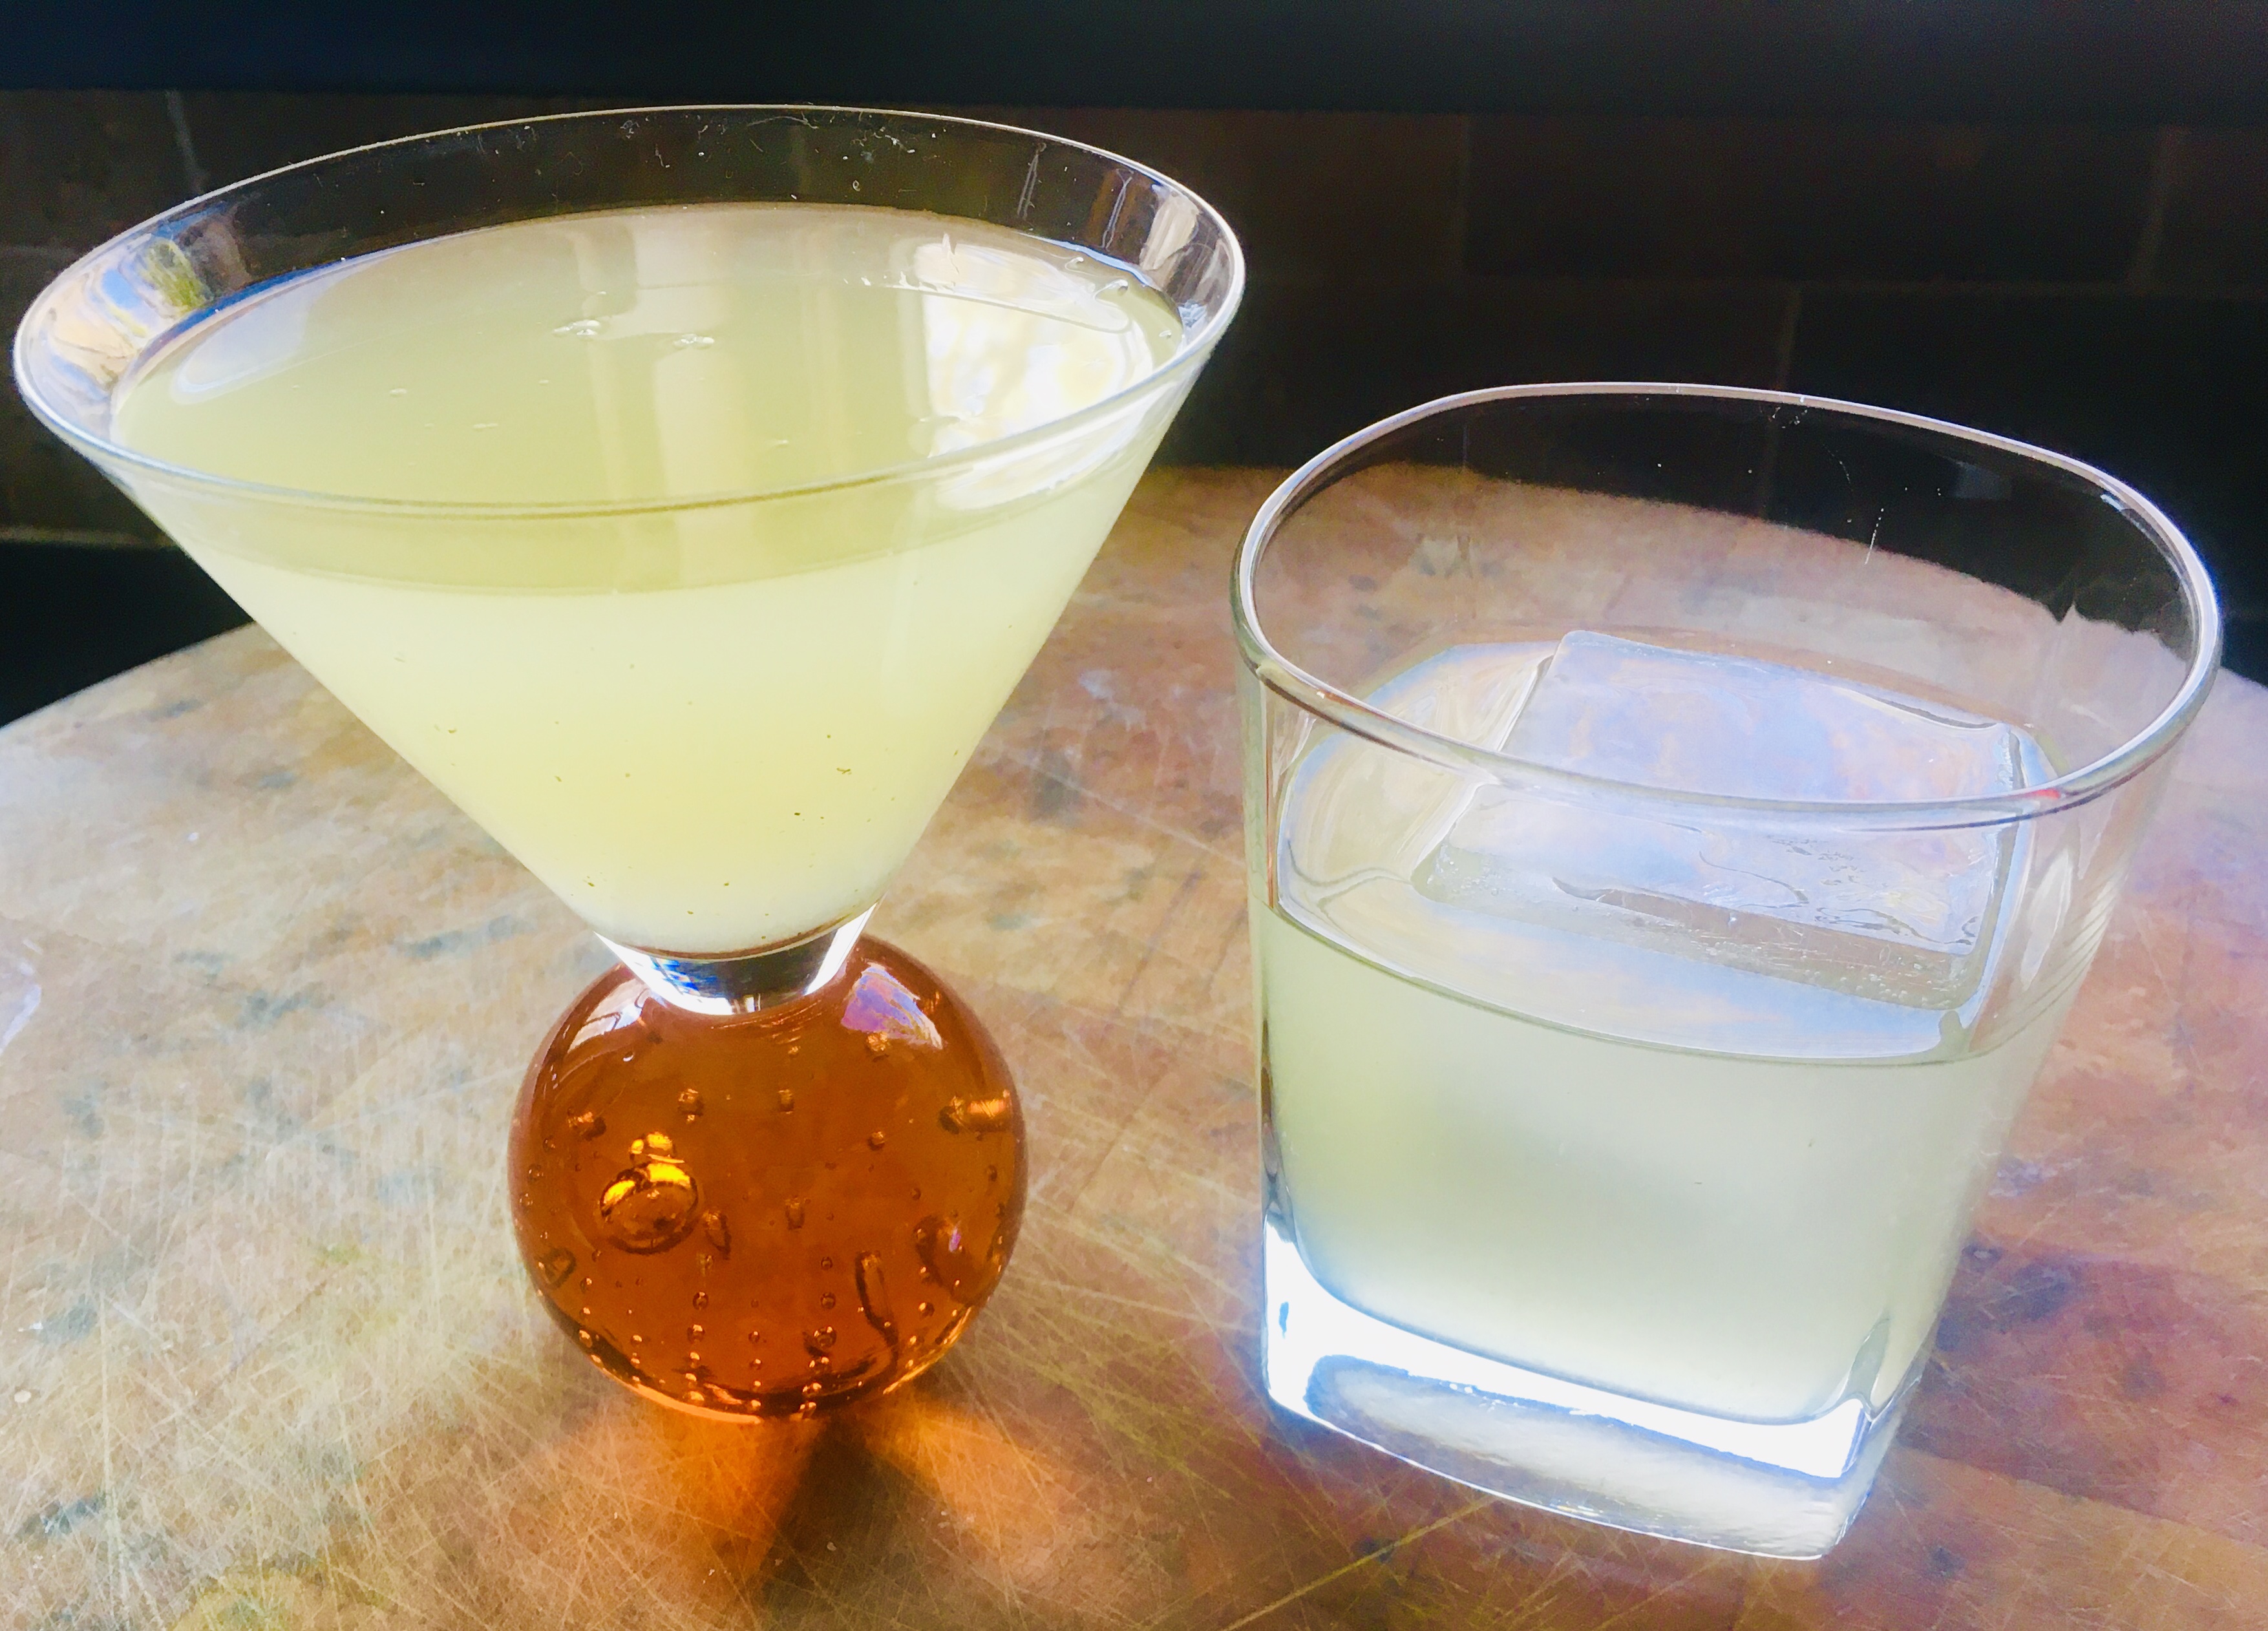
The inspiration for this incredibly easy to make cocktail is the famous Capital Grille Stoli Doli. I think I’ve done it one better with my Velvet Elvis.
A Stoli Doli is simply Stoli vodka that has been infused with fresh pineapple. If you sit at the bar at the Capital Grille, you won’t be able to miss the very large jar of freshly-cut pineapple pieces swimming in vodka. They literally pour it “from the tap,” and serve it straight up, like a martini, or on the rocks. It’s delicious, and I’ve certainly had my share of them.
I decided to make my own at home one day, to serve to my friends at an upcoming party. But to my disappointment, I didn’t have any Stoli vodka in the house. (An embarrassment to most Lithuanians.) But…I found a bottle of Stoli Vanilla, and it changed everything! I used that instead of regular Stoli and I came up with a sweeter, smoother drink that is now legendary among my friends.
Find a gallon-sized glass jar with a lid. Peel, core and slice the pineapples and drop the pieces in the jar. Pour the vodka in, mix well, and seal the jar. Keep it at room temperature for 7–10 days, giving it a gentle shake every day.
After 7–10 days (don’t worry…a little longer won’t hurt anything), strain it, squeezing the pineapple pieces to get every bit of liquid out. Discard the pineapple pieces. (As much as you might think they would be fun to munch, they’ve given up all their flavor to the cocktail, and taste terrible!)
Keep the Velvet Elvis refrigerated. Serve with rocks (or 1 big rock!), or shaken and poured into a martini glass.
I grill year-round. I’ll stand in 3 feet of snow to get smoked ribs just right, if I have to. Through years of tireless experimentation, I’ve come up with a barbecue sauce that I can be proud of. I prefer a slightly sweet and tangy barbecue sauce, and it works really well with pork or chicken.
What makes this sauce special is the citrus. I originally used lemon juice for this recipe and it was good. Lime juice was better. Adding lime zest: even better than that. I tried orange juice and zest, even Meyer lemon. But the Big Daddy of ’em all was grapefruit. I was craving my barbecue sauce one day and only had a grapefruit in the fridge. I thought: how bad could this be? Turned out to be the perfect foil to the sweetness of the brown sugar and ketchup.
Try this sauce on your next rack of ribs, batch of chicken wings, or even a whole bird. Cook the bird almost all the way through, brushing the sauce on for the last 20 minutes so that the sugars don’t burn. Then just try to stop eating it!
GRAPEFRUIT BARBECUE SAUCE
1 cup ketchup
1/2 cup firmly packed brown sugar
Juice and zest of 1 grapefruit
3 tablespoons unsalted butter
1 teaspoon granulated onion
1 teaspoon cayenne pepper sauce, like Frank’s Red Hot
1 teaspoon Worcestershire sauce
1 teaspoon granulated garlic
1/4 teaspoon black pepper
(no salt)
Combine all the ingredients in a sauce pan. Bring it to a boil and then simmer for about 20 minutes on low, until it’s slightly thickened.
If you like a less sweet, more vinegary style to your barbecue sauce, this is the one. How could a sauce that’s inspired by what most people claim to be the best barbecue joint in the USA, Franklin’s Barbecue in Austin, Texas, be bad? People line up early in the morning and wait as much as four hours for a slab of brisket from this place. I’ll get there one day. In the meantime, I have the sauce.
use this sauce on chicken, pork, or beef. The vinegar really cuts through the fat.
2 cups ketchup
3/4 cup water
6 tablespoons cider vinegar
6 tablespoons white vinegar
6 tablespoons brown sugar
3 tablespoons Worcestershire sauce
1 tablespoon chili powder
2 teaspoons salt
2 teaspoons black pepper
1 1/2 teaspoons cumin
Mix all the ingredients in a saucepan and simmer until the flavors have blended, about 20 minutes. Remove it from heat and cool to room temp. If you store it in an airtight container in the fridge, it’ll stay good for a couple of months.
Fourth of July weekend means it’s time to do some serious barbecue!
When I smoke my brisket low-and-slow in my smoker, I use a coffee steak rub that I developed a couple of years ago. It gives a deep, rich crust to the meat that is just fantastic.
Low and slow is the way to go! Deliciously smokey and juicy.
Depending on the size of the brisket, you might need to double the recipe. This is for a brisket that weighs about 9 pounds.
3 tablespoons brown sugar
1 tablespoon Kosher salt
1 tablespoon ground coffee (use your favorite)
1 teaspoon granulated garlic
1 teaspoon granulated onion
1 teaspoon unsweetened cocoa powder
If the brisket is frozen, I like to thaw it a couple of days ahead of cooking it, rubbing it down with the coffee rub, and placing it in the fridge for about 24 hours to rest. I bring it out about an hour before smoking, to let the meat come back to room temperature, and then I place it in the smoker for about 12 hours at 225 degrees, smoking it with hickory wood.
When it’s done, I remove it from the smoker, and wrap in foil and let it rest at least 30 minutes before slicing. If I’m not serving it right away, I place the wrapped brisket in the oven at the lowest setting, about 150 degrees, just to keep it warm.
When I’m ready to serve, I always slice the brisket on the bias, against the grain of the meat.
I find little or no difference between the stove in my kitchen and an outdoor gas grill…so I don’t own one. I can make a perfectly delicious steak by searing it in a cast iron pan on the stovetop, then finishing it in a hot oven. So, for me, if the real reason for outdoor grilling is flavor, nothing can replace a hardwood charcoal grill.
Besides the quality and source of my beef, wood and smoke are what make the difference between a good steak and a great steak.
I know the #1 argument for going with gas over hardwood charcoal is time. “It takes too long to start a charcoal grill.” That’s completely untrue. It takes no more time to light a charcoal fire than it does to start up a gas grill.
Of course, it starts with the grill itself. The classic Weber is still an awesome choice. For larger cooking needs, I also have a Primo ceramic grill.
Then I get a bag of hardwood charcoal. I’m not talking charcoal briquets, like Kingsford, that have a ton of additives in them. And I’m definitely not talking about Match Light. I’m talking pure hardwood charcoal, easily found in supermarkets and home stores.
Next, a charcoal chimney. It’s a metal tube with a handle and a grate at the bottom. I crumble a couple of sheets of newspaper into the bottom, pour charcoal into the top, light it, and I have hot coals in 10 minutes without lighter fluid.
And I NEVER use lighter fluid! Why spend good money on a great steak only to make it taste like gasoline?
The variety of wood chips available for smoking is another flavor factor when it comes to grilling with charcoal. My personal favorite is hickory, especially when I’m cooking pork or chicken. But apple, cherry, oak, mesquite: they all impart their own unique flavors. And they’re all available in most home stores where you find all the other barbecue gear.
Although I have an electric smoker for those low-and-slow jobs, like a big ol’ brisket or pork shoulder, I don’t need it when grilling a steak. I simply soak some wood chips in water for about a 1/2 hour before grilling (I’ve found that hot water speeds the process up), drain the water, and then sprinkle the moist chips on the hot coals in my grill. I throw the meat on the grill, close the lid (opening the vents, of course) and off we go.
So now, in 10 minutes, I’ve got a grill that’s ready to cook a steak with…about the same time as gas.
If you say: “I don’t cook with charcoal because it’s so messy!” …I honestly don’t know if you and I can be friends.
Because I’m using a small amount of hardwood charcoal for the average dinner, I don’t have to clean out my grill every time I use it. After a while, yes, some ashes pile up in the bottom of my grill and I have to dump them. But because they’re pure wood ashes, I can dump mine into my strawberry or raspberry patch. They love the stuff.
You still have to clean a gas grill after a while, and it always runs out of propane halfway through cooking when you have guests over for dinner. So where’s the convenience in that?
Charcoal grills give you everything you could ask for: low maintenance, ease of use–no propane tanks, valves and igniters–real wood flavor, not lava rocks, and the thrill of cooking meat over a real fire, bonding with the caveman in you. Grab a beer–or even better: a bourbon on the rocks–and start grilling!
I was away on a fantastic trip to Poland and Lithuania with my daughter for a couple of weeks, and I’ll be posting some of our food finds soon. Meanwhile, enjoy this summer favorite.
If you’re trying to think of something new and interesting to bring to the July 4th celebration, this is it. It was a huge hit when I brought it to a neighborhood party a while ago.
Imagine the best of a deviled egg and a BBQ chicken sandwich, and you’ve got this appetizer that rocks in more ways than one….and you can make it ahead of time.
I boil the eggs and make the cole slaw the day before, then keep them in the fridge. Even the chicken can be cooked the day before and then warmed through before assembling right before you need it. Be sure to make a lot of them…they’ll go faster than the hard-boiled eggs in “Cool Hand Luke!”
This recipe is gluten-free, as long as you use GF soy sauce.
For the chicken and BBQ sauce:
3 cups ketchup
1 tablespoon apple cider vinegar
2 tablespoons soy sauce
1 teaspoon hot sauce (I use Frank’s Red Hot)
1/4 cup + 2 tablespoons brown sugar
1 lb. boneless skinless chicken breasts
6 hard-boiled eggs
1/4 cup mayonnaise
1 tablespoon mustard (I use Gulden’s)
Pre-heat the oven to 250 degrees.
Combine the ketchup, apple cider vinegar, soy sauce, hot sauce, and brown sugar in a oven-proof pot with a lid. Mix well, then add the chicken breasts, making sure they’re immersed in the sauce. Cook low and slow in the oven for about 2 hours.
When the chicken is cooked through, shred the meat with 2 forks. Set it aside, but keep it warm.
Combine all the cole slaw ingredients in a bowl, mixing well, and place them in the fridge.
For perfectly hard-boiled eggs, place the eggs in a pot of cold water, and turn the heat on high. Just before the water starts to boil, put a lid on the pot and turn the heat off. Let the eggs sit in the hot water for 15 minutes. Once cooked, keep the eggs in the fridge.
Slice the eggs in half and place the yolks in a bowl with the mayonnaise and mustard. Mix well and keep in the fridge.
To assemble, take a teaspoon of the mayo/mustard/yolk mixture and place it in the cavity of one of the egg halves. Place another teaspoon of the shredded chicken on top (I like it warm, to counter the cold of the mayo and cole slaw), drizzling a little of the BBQ sauce that you cooked the chicken with on the meat. Then place a teaspoon of the cole slaw on top of the chicken.
I came up with this crunchy appetizer years ago, when I needed a tasty bite for one of our summer parties. I wanted something fresh that highlighted the veggies of the season, so when I spotted these baby bell peppers in the supermarket, I got the idea.
Baby bell peppers
6 ears fresh corn, removed from the cob…or organic frozen corn
1/2 Vidalia onion, peeled, quartered, grilled, chopped
1 cup mayonnaise
1 teaspoon hot pepper sauce (I use Frank’s Red Hot)
6 oz. feta cheese or Queso Fresco, crumbled
Juice of 1 lime
Pinch of white pepper
1 tablespoon fresh parsley, finely chopped
Cut the corn kernels from the ears, and sauté them very briefly in a little olive oil. Place them in a bowl and let them cool.
Peel and quarter the Vidalia onion, and throw it on a hot grill with a little olive oil to get some nice grill marks on it, leaving the onion still crispy, not soft. If you’re cooking indoors, throw the quartered onion in a hot pan with a little olive oil, and cook it until you get some brown marks on it. Remove it, let cool, then place it in a food processor and pulse it until the onion is chopped into small bits, just smaller than the corn kernels. Add the onions to the corn.
In a separate small bowl, combine the mayonnaise and the Frank’s Red Hot. Pour in the crumbled cheese and mix well. Pour this into the corn and onion bowl and mix well.
Add the lime juice, white pepper and parsley to the bowl and mix well again.
Cut the baby bell peppers in half lengthwise, and remove the seeds and membrane. Stuff the peppers with the corn mixture and garnish with cilantro or parsley.
If you’re preparing this ahead of time, refrigerate the stuffed peppers until you’re ready to eat, but allow some time for them to warm up to a cool, not cold, temperature.
After making a batch of this for my daughter this week, I got a bunch of requests for the recipe. So here we go!
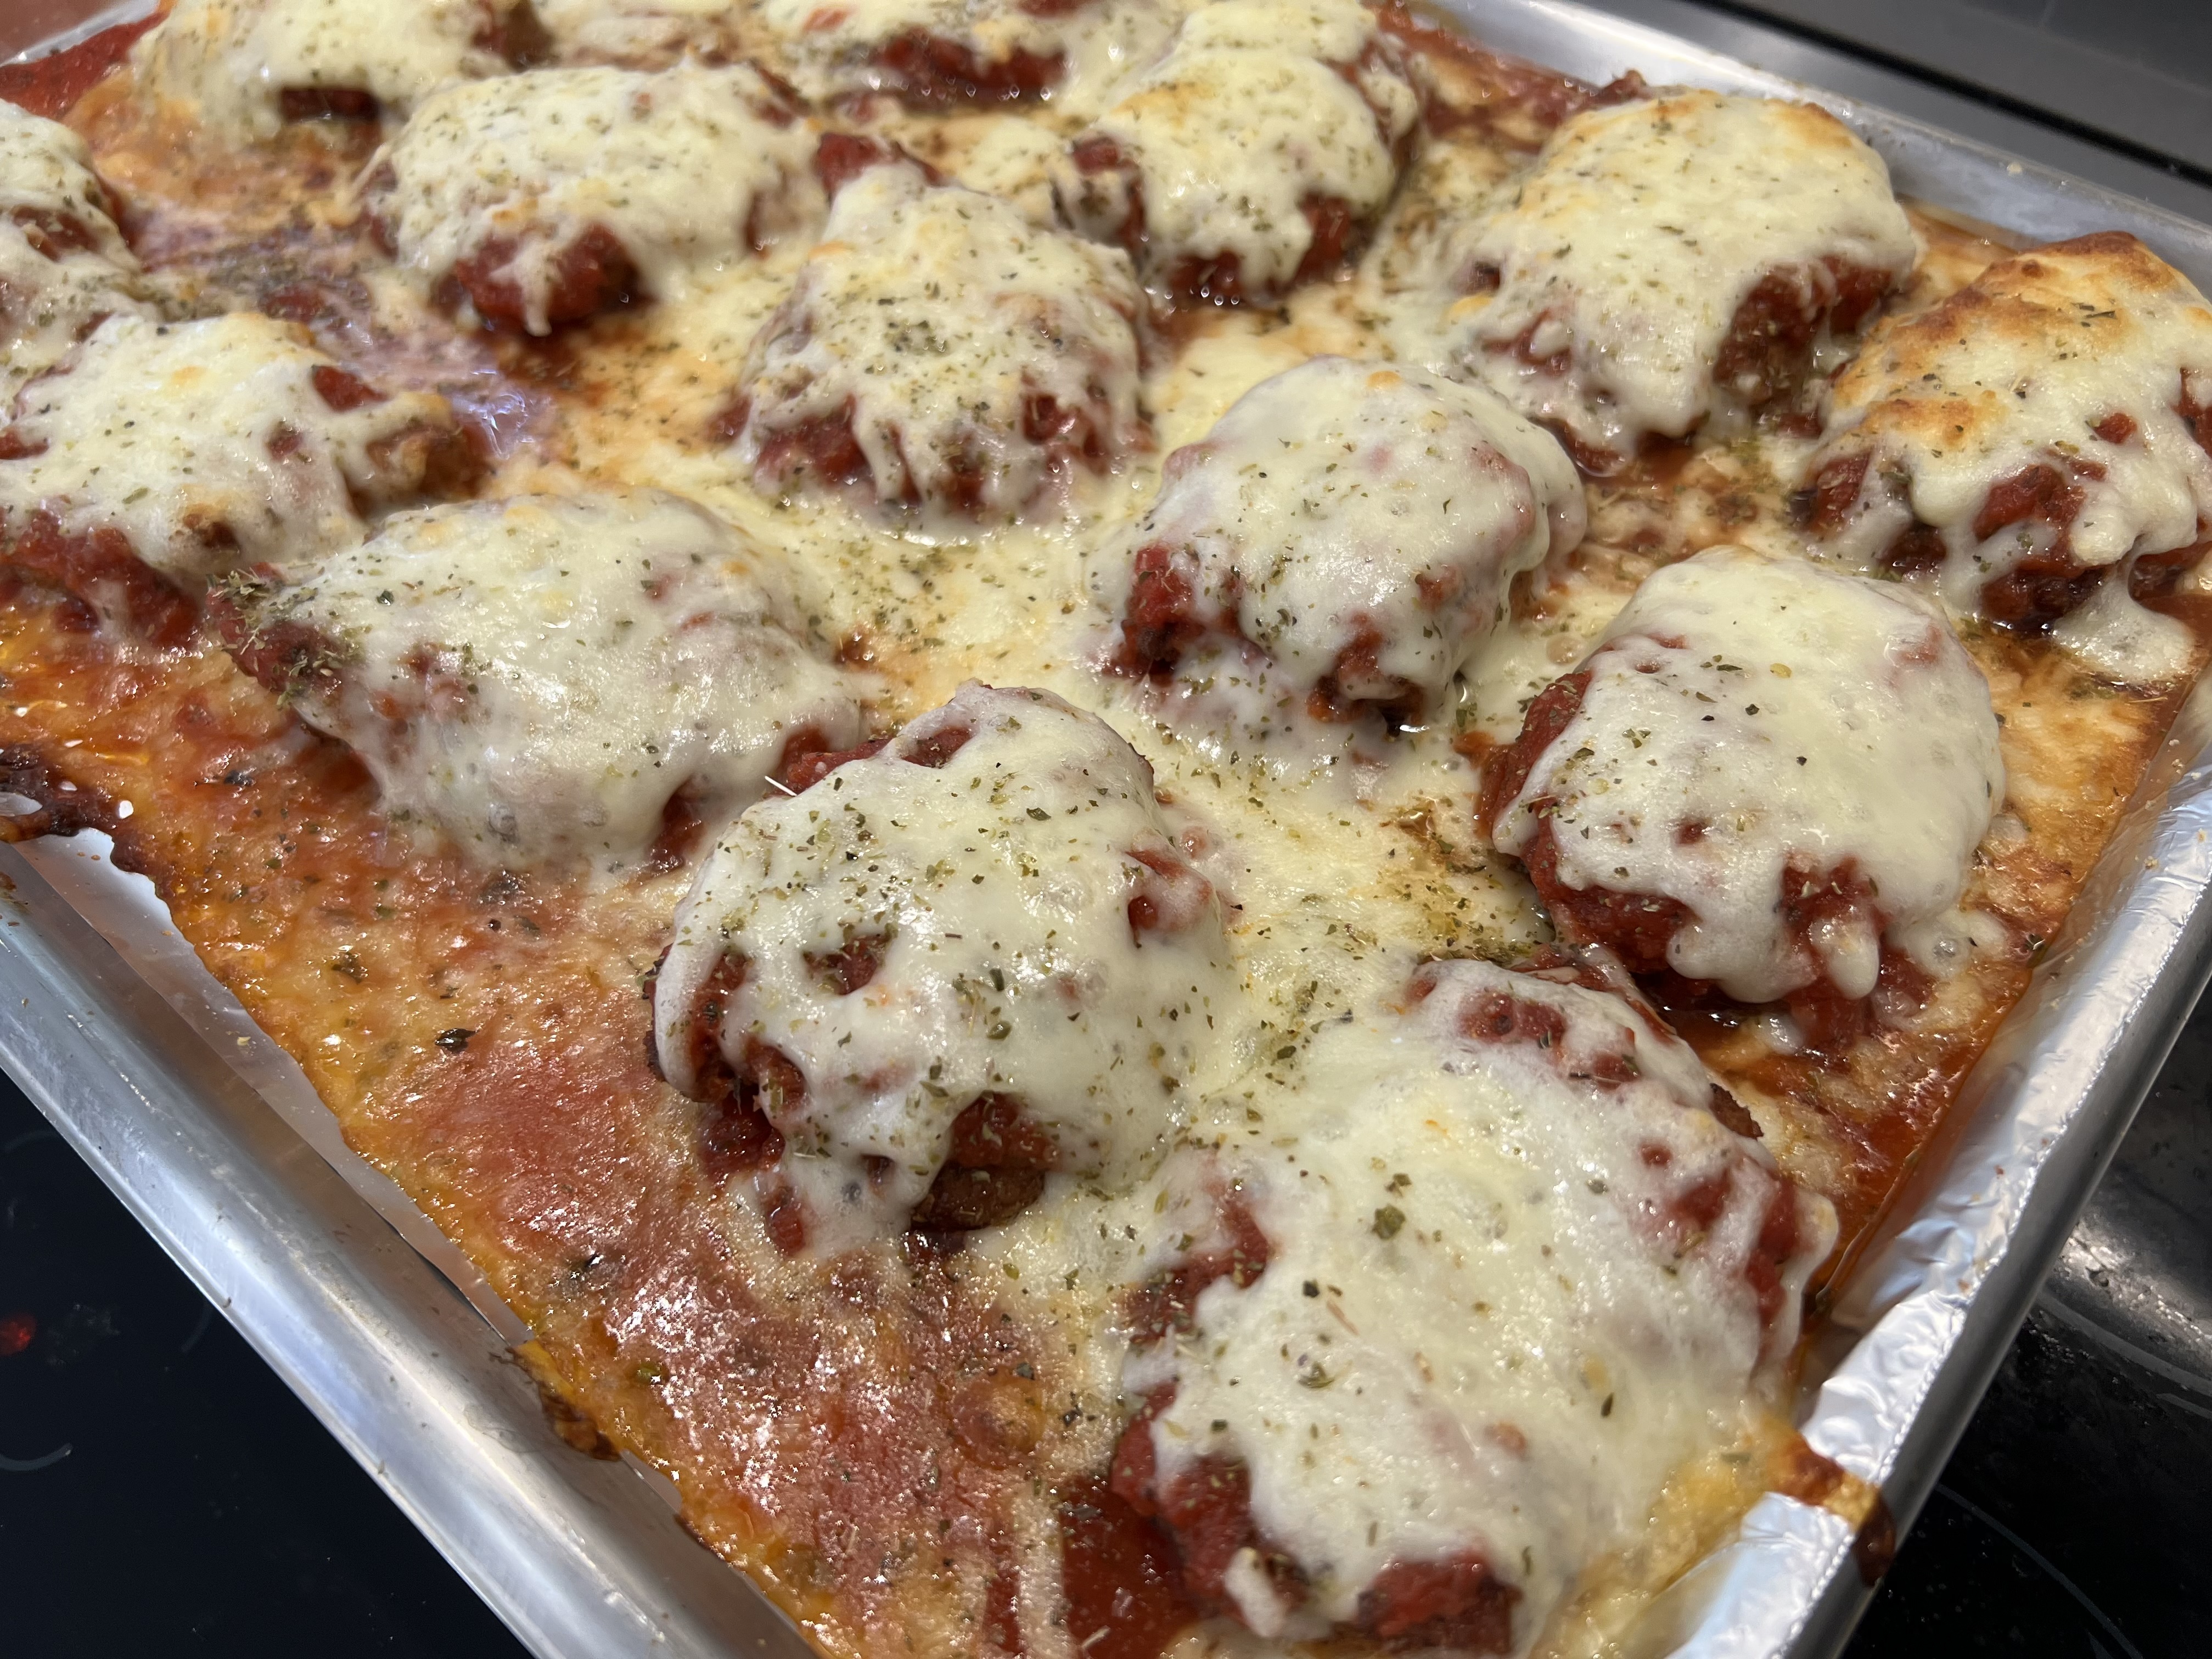
Chicken parmigiana, much like pizza, is a bit more difficult to make than you might think. Sure, there’s plenty of crappy chicken parm out there, made with processed frozen chicken cutlets, bad sauce and cheap cheese. But to make a really fantastic, mind-blowing chicken parm, that takes a little practice!
The key to this recipe is simple: don’t skimp on the quality ingredients. And my recipe makes a lot. Trust me: you will want leftovers.
The recipes for my Italian bread crumbs and my “Don’t Call It Gravy” tomato sauce are at the bottom.
Gooey, cheesy, orgasmic.
6 Chicken breasts, the best quality you can get your hands on Italian bread crumb seasoning (see recipe below) 3 eggs vegetable oil for frying “Don’t Call It Gravy” tomato sauce (see recipe below) Fresh mozzarella cheese oregano
Thaw the chicken breasts. Lay them flat on a cutting board, and you’ll see where the chicken tender is on the side of the breast. Cut the tender off and set aside, leaving the breast which is thinner at one end and thicker at the other. Slice the breast in half lengthwise at the thicker end, keeping the knife level, so that you wind up with 2 pieces of breast meat that are the same thickness, but one will be a longer piece (the bottom) and one about half its size (the top part you sliced off.) Do this with all the breasts.
By slicing the breasts lengthwise into evenly thick pieces, it will take the same amount of time for them to cook. (I prefer not to pound the hell out of the chicken breasts until they’re flat as a pancake.)
Pour the vegetable oil into a large frying pan. (I like to use corn oil or grapeseed oil.) Next to the pan, set up two bowls: one with my Italian bread crumb seasoning (recipe below) and in the other: crack the eggs and whisk them.
Now it’s your standard breading procedure: chicken meat in the egg, then in the breadcrumbs, coating well. Shake off the excess and place carefully in the pan of olive oil when the oil comes to temperature (about 350) for frying.
Fry the chicken in the oil until it’s golden brown. You want it cooked all the way through, but not overcooked. Place the fried chicken pieces on a wire rack to drain the oil. Do this with all the chicken. The fried chicken at this point is delicious all by itself: chop it and use it in a salad, or make a chicken sandwich. (By the way, if there’s breading left over, use it on the chicken tenders you cut off, and fry them up. My daughter gets these instead of store-bought chicken tenders, and she loves them.)
Cover a baking sheet with aluminum foil. Ladle out enough sauce (recipe below) to create a thin layer on the bottom of the baking sheet. Place the fried chicken breasts on top of the sauce. Cover the breasts with more sauce, then place shredded mozzarella on top. Sprinkle the top with a little oregano.
Place the baking sheet in a pre-heated 350 degree oven and bake until the cheese has melted and just starts to brown. Serve it with pasta.
MY “DON’T CALL IT GRAVY” TOMATO SAUCE
It’s not hard to make a good tomato sauce. But it takes a little work to make an amazing tomato sauce. Honed from a recipe handed down by a friend-of-a-friend’s Italian grandma, it is one very important part in two of my favorite Italian comfort food recipes: my meatballs…and my chicken parmigiana recipe.
1 medium onion, finely chopped 2 cloves garlic, finely chopped 1/2 cup extra virgin olive oil 10 cups ground and peeled tomatoes…or 3 cans (28 oz.) tomatoes (real San Marzanos preferred) 2 teaspoons each: dried oregano, basil and parsley 3/4 teaspoon each anise seed and fennel seed 1 1/2 teaspoons salt 1/2 teaspoon black pepper 2 bay leaves 1 small can (6 oz.) tomato paste 1 teaspoon sugar, optional
Heat the olive oil in a large pot and add the onions. Cook until onions are translucent, then add the garlic. Stir for about 10 seconds.
Add the tomatoes and cook until the orange foam disappears, stirring frequently.
Add the oregano, basil, parsley, anise seed, fennel seed, salt, pepper, and bay leaves. Stir to combine. Add the tomato paste, stirring well. Let the sauce just come to a boil (which helps the paste thicken the sauce), then reduce it to a simmer, and cook uncovered for at least an hour, stirring constantly, until the sauce reaches the consistency you like.
MY ITALIAN BREAD CRUMB SEASONING
This is the one part of the recipe (other than the optional pasta) that keeps this dish from being gluten-free. So I use gluten-free breadcrumbs, even if I don’t need to. I buy a loaf of Udi’s frozen gluten-free bread, toast the slices, and them put them in a food processor. I dare you to tell the difference between these and breadcrumbs with gluten!
1 Udi’s loaf, toasted and ground into breadcrumbs 2 teaspoons dried parsley 1 teaspoon dried oregano 1 teaspoon dried basil 1 teaspoon salt 1/2 teaspoon granulated garlic 1/2 teaspoon granulated onion 1/4 teaspoon black pepper
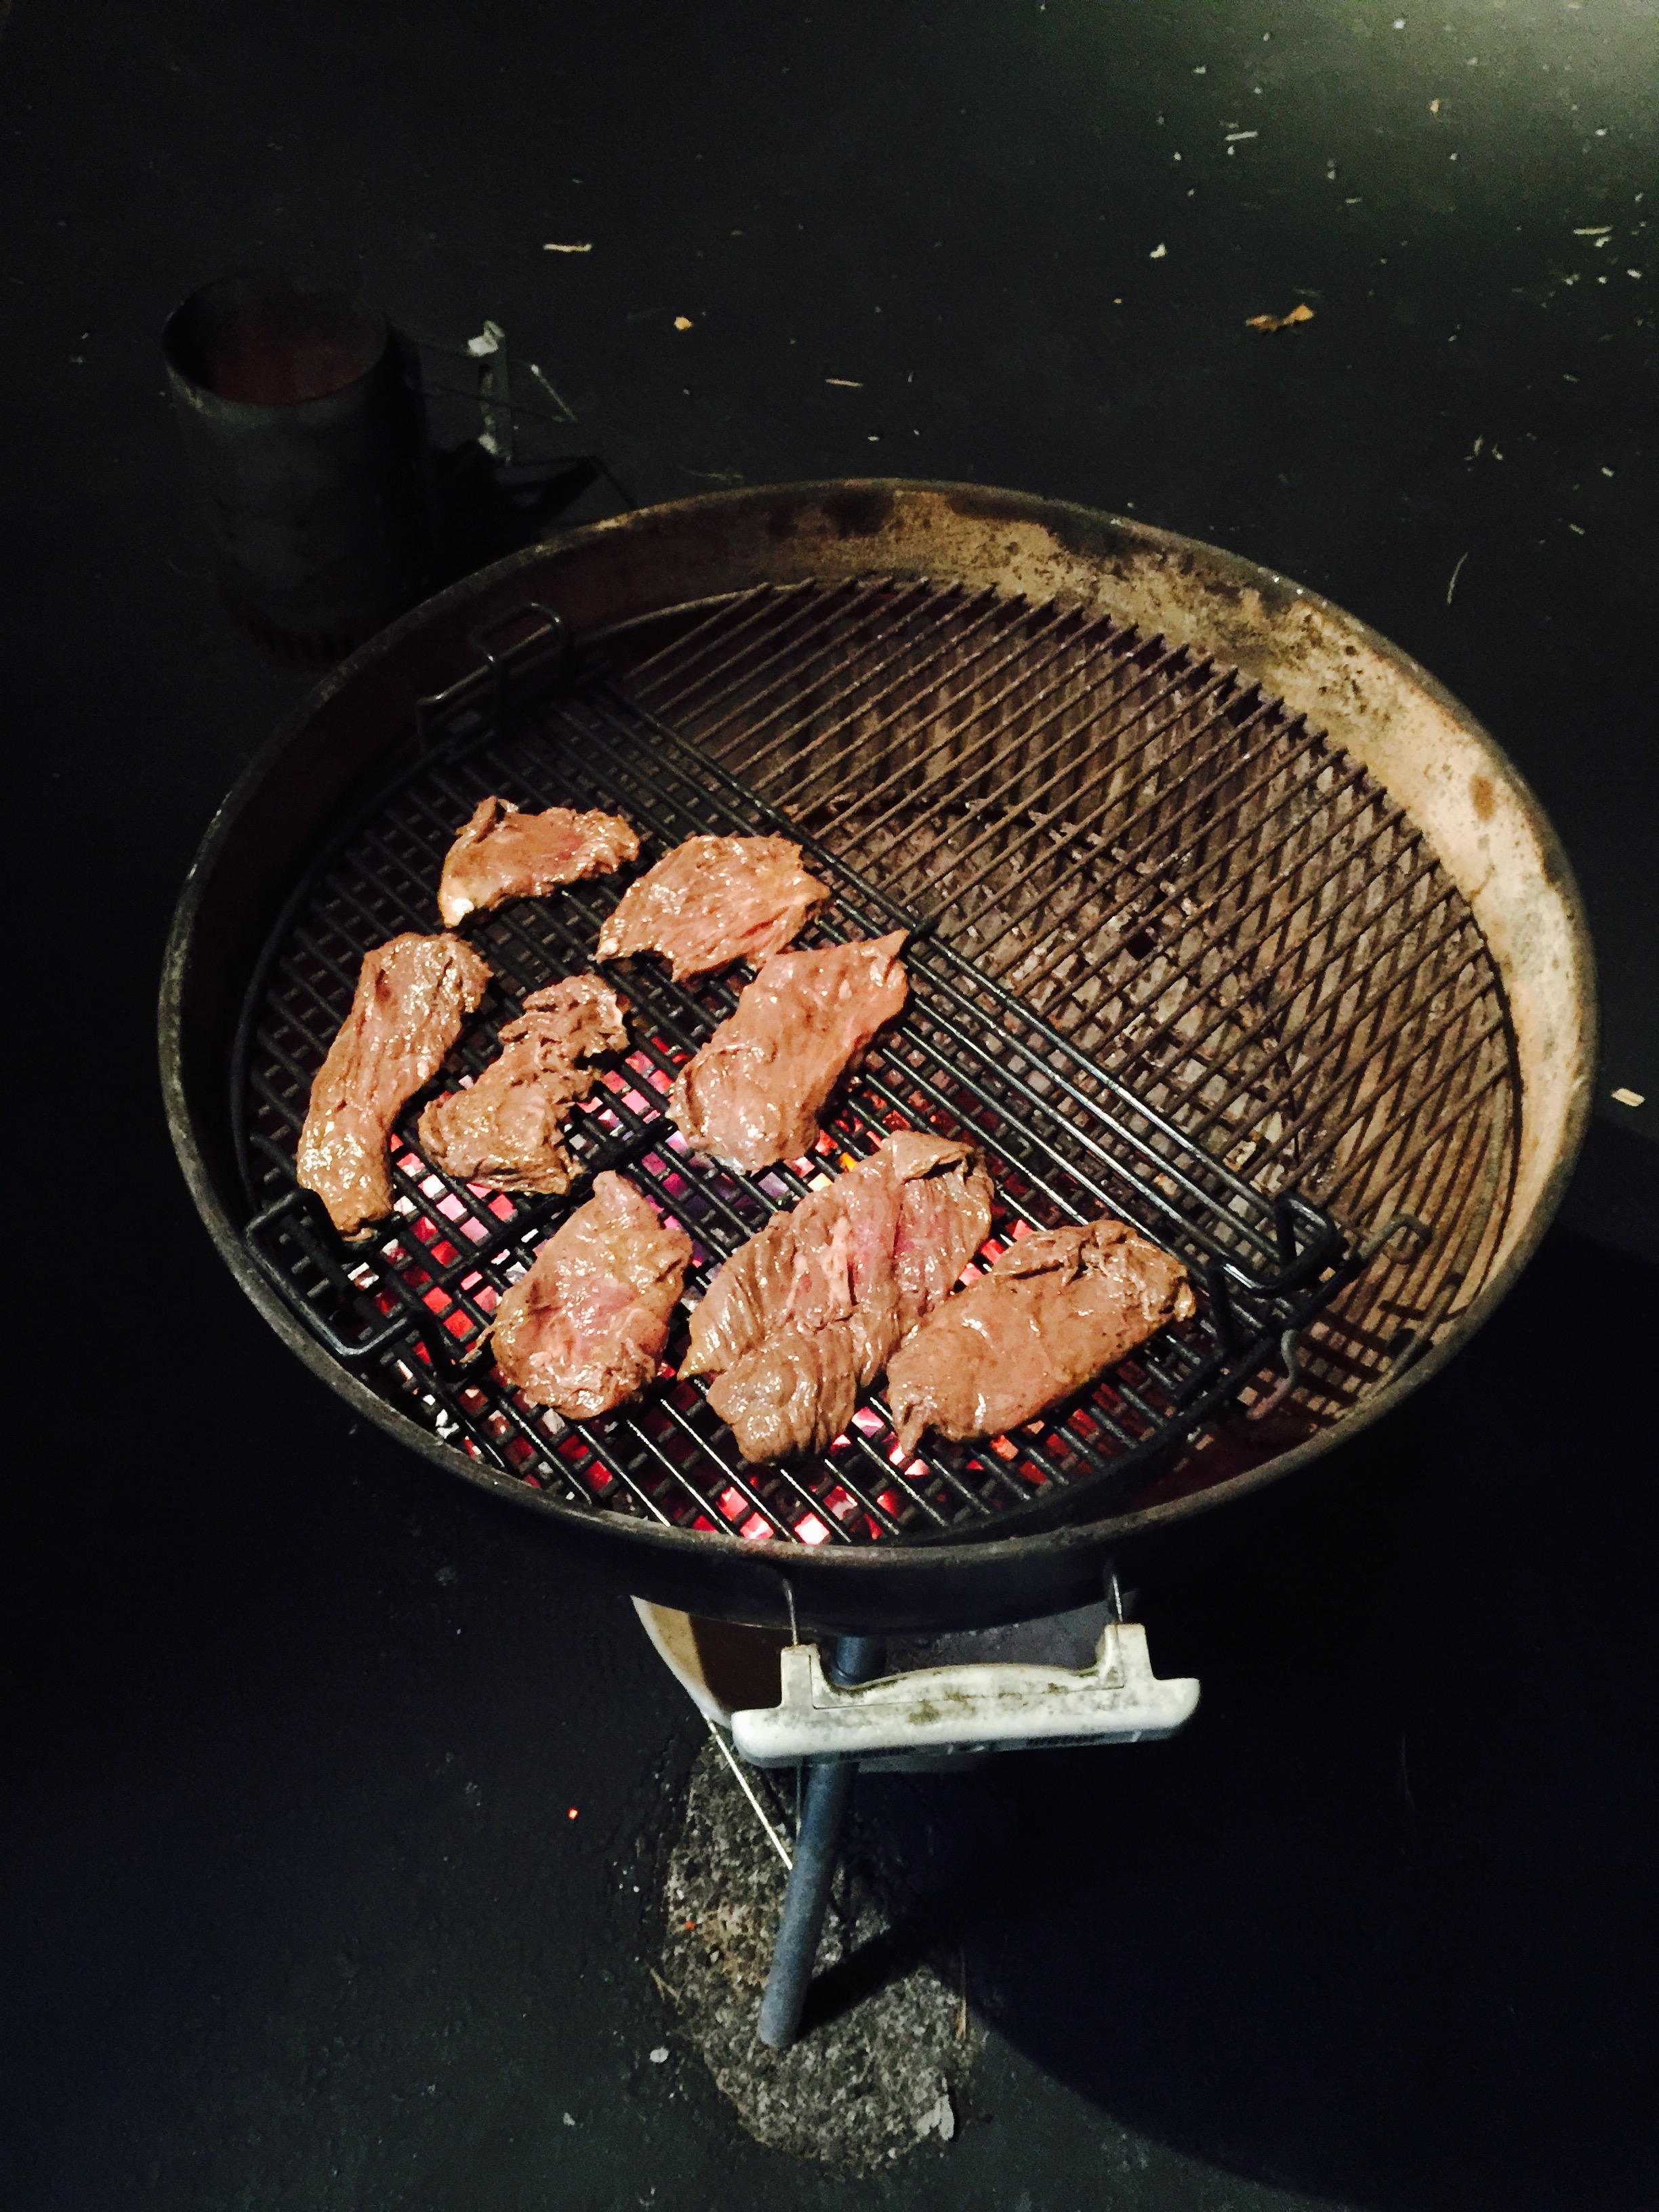
An easy way to marinate beef is to simply throw the meat in a bag and dump some Italian dressing into it. As simple as that sounds, it flavors the meat really nicely. But I’ve got a problem with anything that comes from a jar and was made in a factory, especially when it’s so easy to make my own Italian seasoning.
I recently bought some sirloin beef tips and after trimming the fat and silver skin (they always leave it on the meat), I cut it up into 1 inch cubes. I put the pieces in a glass container–a plastic bag would be fine–and then made my marinade. Combine the first set of ingredients to make the marinade.
1/4 cup decent quality balsamic vinegar–not the expensive stuff
1/4 cup avocado oil
1 teaspoon dried oregano
1 teaspoon dried parsley
1 teaspoon granulated garlic
1 teaspoon granulated onion
1 teaspoon salt
1/2 teaspoon pepper
2 lbs. sirloin beef tips, trimmed and cut into 1″ cubes
avocado oil
3 onions, sliced into rings
2 sweet bell peppers, sliced into thin strips
splash of white wine
Combine the marinade ingredients and pour them into the bag or container with the meat. Mix it around so that every bit of the meat gets coated with the marinade. Seal the container and place in the fridge overnight.
Next day, remove it from the fridge and let it come to room temperature before cooking.
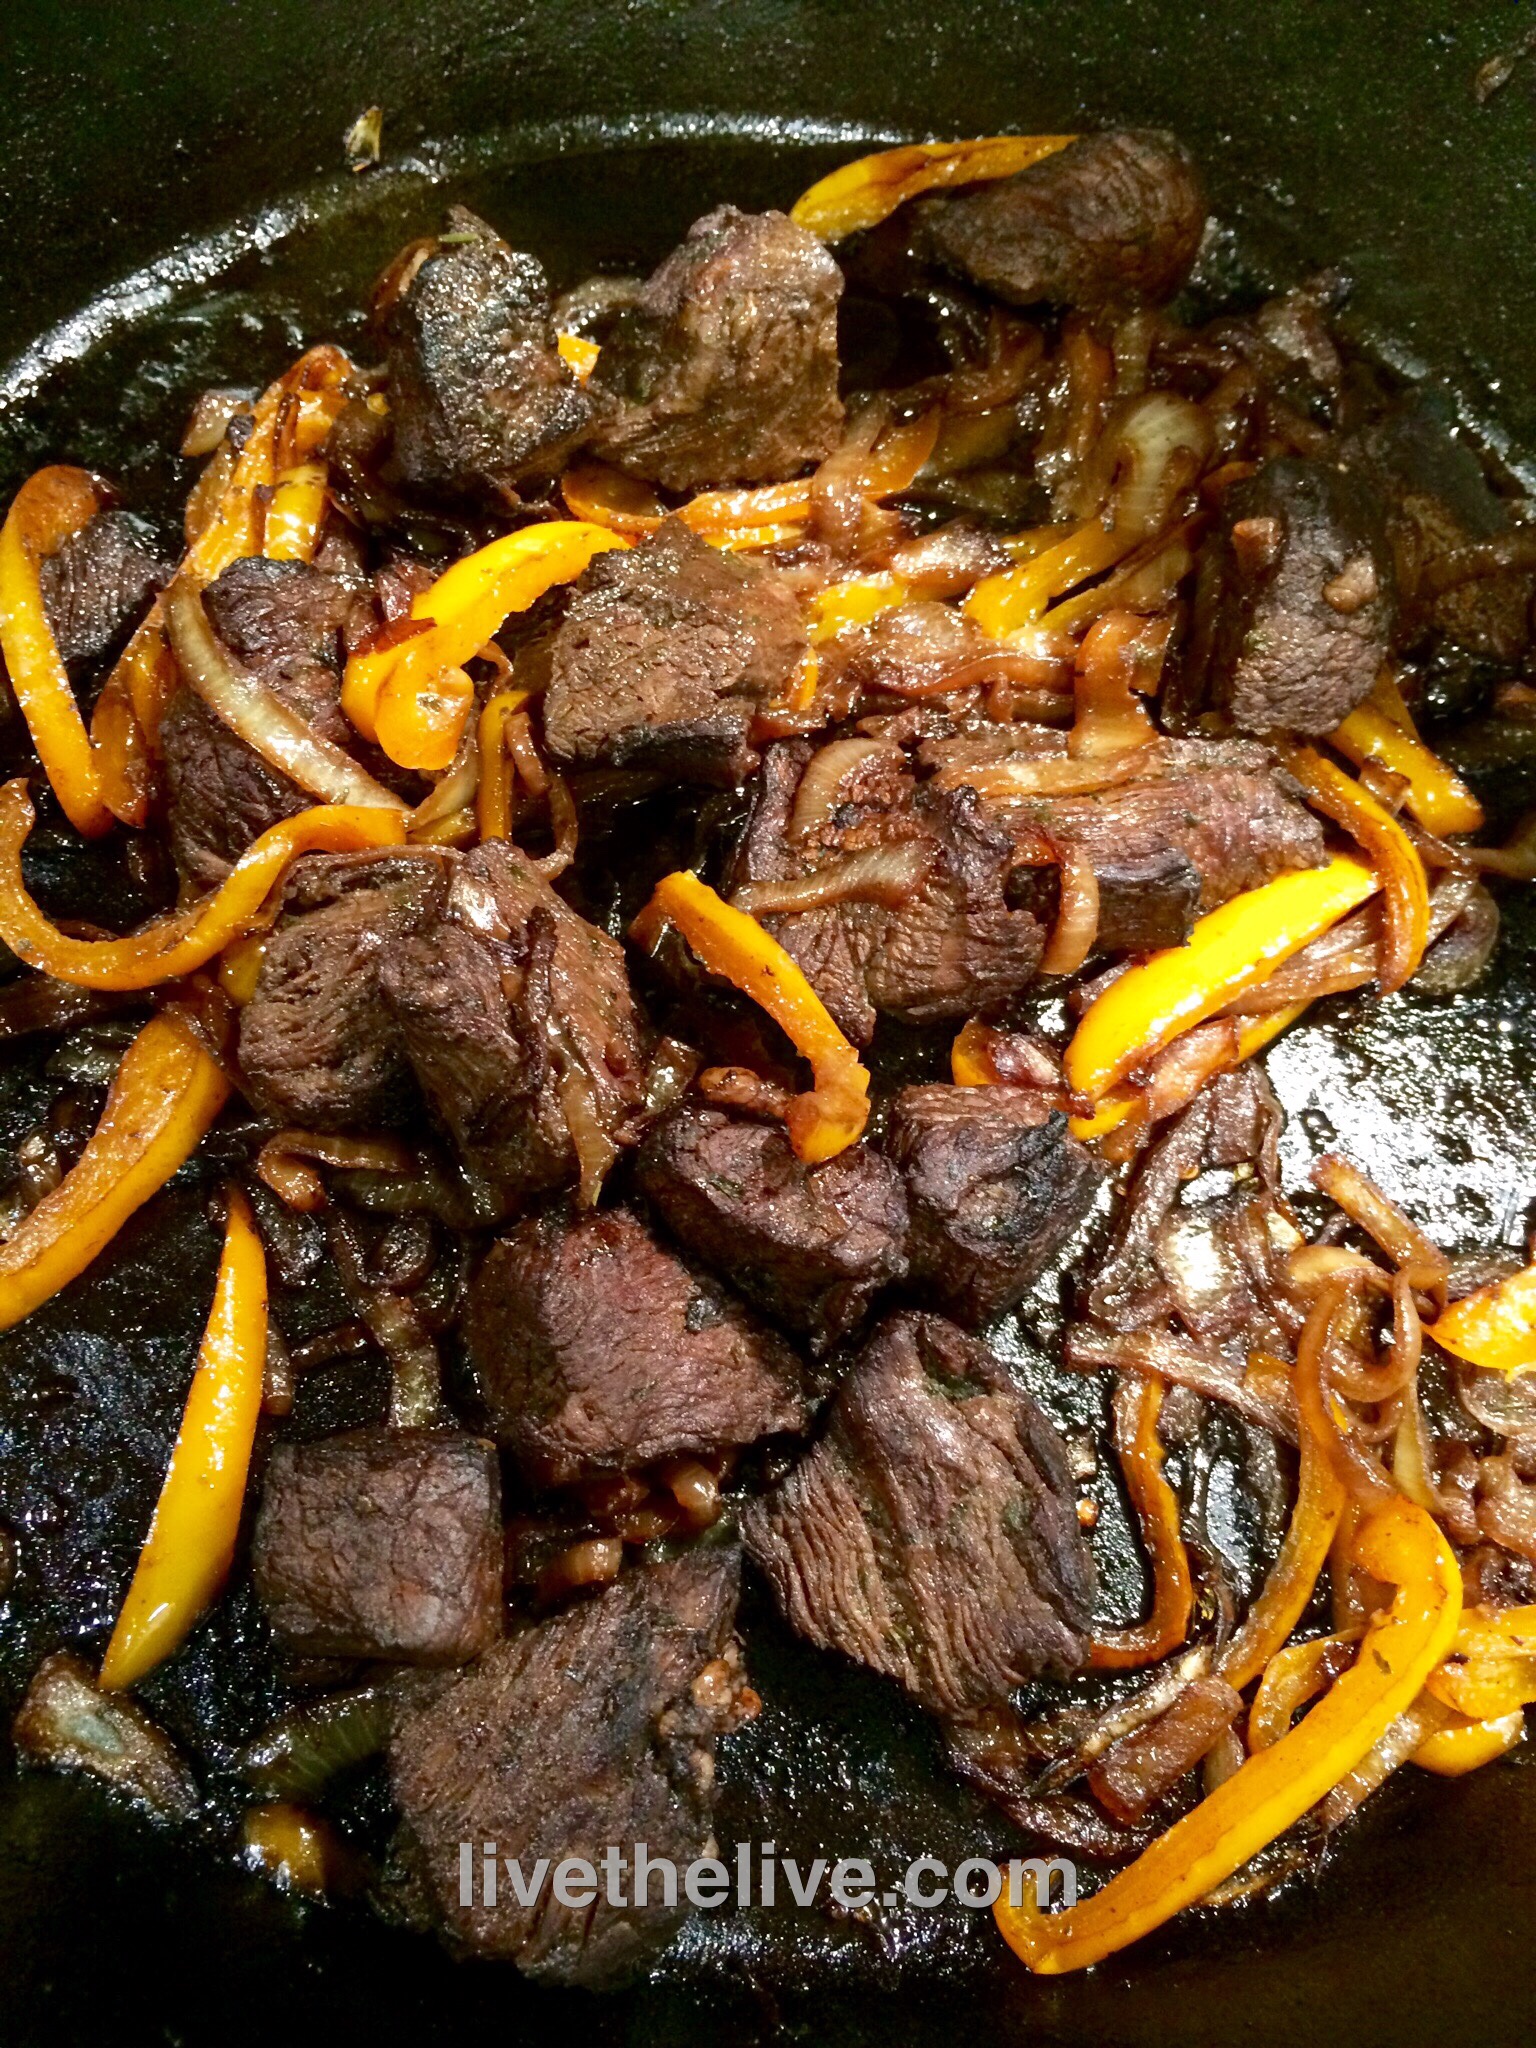
Marinated beef, ready to cook.
Heat a large cast-iron skillet until hot. You may not need to add oil, since the meat has marinated in it. Using tongs to shake off any marinade, place the beef tips in the skillet, and brown on all sides, constantly flipping them. Cook the meat until it is done: medium to medium rare. (Of course, a hardwood fire is great for cooking these, too.)
Remove the meat from the pan and put it in a bowl to the side. In the hot pan, toss in the sliced onions and peppers. Cook until the onions and peppers are caramelized, and splash a little white wine to de-glaze the pan if you like. (The alcohol cooks off.) If there’s any left over marinade in the bag or container, you can pour it into the pan at this time.
Return the beef to the pan, being sure to include all the juices that may have settled into the bottom of the bowl. Mix through until it’s all thoroughly heated and serve immediately.
I made a lot more…forgot to take the pic before devouring!