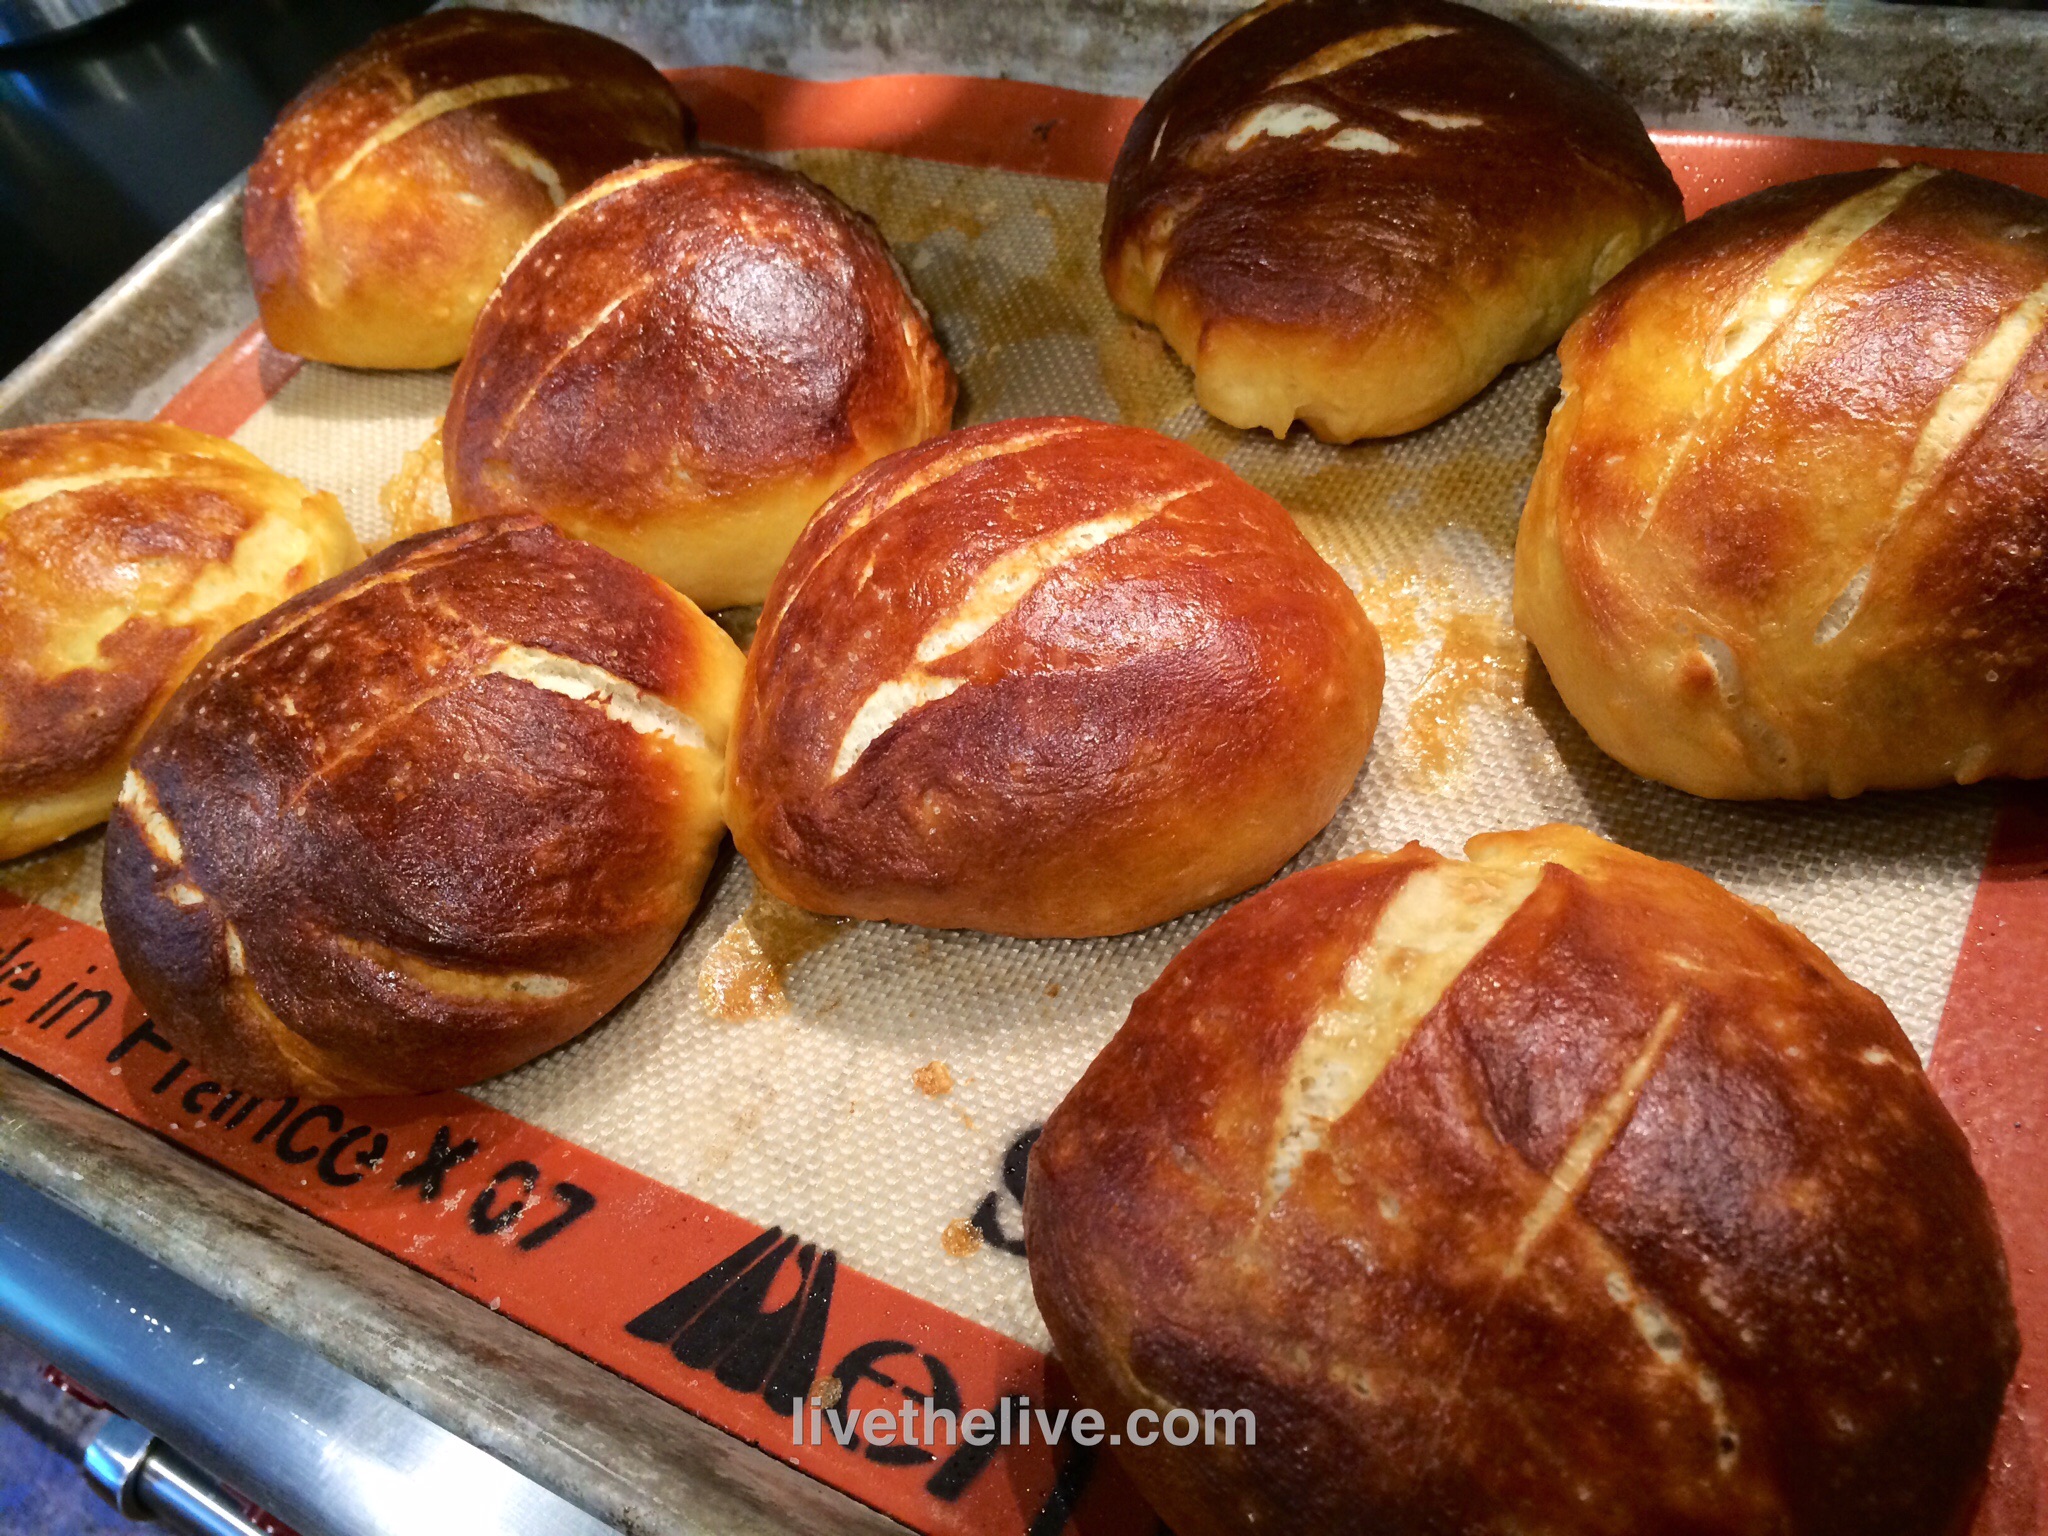
Archive for the ‘Uncategorized’ Category

Inspired by the classic “Pork Chops and Applesauce” Brady Bunch episode, I came up with a recipe for pork chops that uses applesauce in an herb-infused applesauce marinade that later cooks into the meat. I took it one step further this time, using a pork loin, and adding bread crumbs to the applesauce mix to add a crunchy crust to the pork.

Pork loin applesauce


Ingredients:

1 pastured pork loin, about 5 lbs.

1 tablespoon extra virgin olive oil

about 1/2 cup fresh breadcrumbs

2 small tubs (8 oz) organic unsweetened applesauce

2 teaspoons honey

1 tablespoons fresh sage, finely chopped

6 sprigs fresh thyme–leaves only–finely chopped

2 teaspoons salt

1 teaspoon granulated garlic

1/2 fresh cracked black pepper


In a bowl, combine all the ingredients except the pork chops, olive oil, and breadcrumbs.

Place pork loin on cutting board fat-side up, and make diamond-like slices into the fat. Place the pork loin in a non-reactive container and smear about a quarter of the applesauce and herb mixture all over the loin. Place the container in the fridge overnight. Cover the applesauce and herb mixture and place in fridge as well.

The next day, pre-heat the oven to 350.

Remove the applesauce and herb mixture from the fridge, and slowly add breadcrumbs to it until it reaches the consistency of wet sand.

Heat an oven-proof pan. Using a little olive oil, sear the pork loin on all sides until brown. The  turn loin with fat side up and smear the applesauce/breadcrumb mixture over the top to form a crust.

Cook until meat temperature reaches 160 and crust is crunchy and brown on top. Let the pork loin rest before slicing.


As I mentioned a little while ago, I grow two varieties of bamboo in my yard, and although they are quite invasive, I have my own methods of keeping the plants in check.

One stand of bamboo is in a corner of my yard that is overrun by brambles and other nasty vines. So I have no issues with the bamboo taking over this area at all. I’d rather have a desirable invasive than an ugly one.

The other stand of bamboo is a larger variety that grows to 25 feet tall, and it requires more maintenance to keep it in the area I want it to stay in. So, when some of the shoots get in my way, I simply cut them with a hacksaw and use them in my garden.

image

I use them as tomato stakes, supports for my cucumbers vines, and even pea brush, as shown here. For pea brush, I don’t remove the smaller side branches, which gives something for the peas to attach to. The photo above was from earlier in the season. Here’s what it looks like now: over 6 feet tall!

peas1

Another view earlier in the season…

Peas with pea brush, kale, spinach.

Peas with pea brush, kale, spinach.

…And now…

peas2

The kale and spinach have been harvested. (The weather’s too hot for them now.) And I’ve sown some lettuce mixes in their place. Since the bed of lettuce is on the north side of the peas, the lettuce will be shaded by the peas in the hot sun.

Bamboo is a great way to give my garden a more natural look, and not having rusty metal poles everywhere.

Skip the necktie. If your dad’s a foodie, he wants something cool this year! All of these ideas have been rigorously tested by our panel of experts (OK, just me), and get a big thumbs up.

Digital Smoker: I’m a bit of a purist when it comes to grilling. I refuse to use a gas grill because I think there’s no difference between that and my kitchen stove. I use real hardwood charcoal, with real smoke and real flavor. But when it comes to smoking meats, basic smokers require constant maintenance so that the temperatures don’t fluctuate. With a 7-year-old daughter to take care of, that’s something I don’t have time for, especially if I’m cooking something low and slow for about 12 hours. So I have a digital smoker. You plug it in, set the time and temperature, and then periodically add wood chips through a side drawer to smoke the meat. You can literally set it and forget it. I have it cook through the night, so I wake up to a beautifully smoked slab of meat in the morning. Masterbuilt Electric Digital Smokehouse.

Cognac! How can you go wrong with booze for Father’s Day? But if you’re looking for something really special to give Dad (or your favorite morning DJ with a food blog), may I suggest Kelt XO. What makes Kelt XO special is that before bottling, they place the barrels of cognac on board ships that sail the world for months at a time. During this time, the cognac gently rocks back and forth in the barrels, slowly acquiring a smoothness you can’t find in other spirits. Each bottle even comes with a tag that tells you exactly what ports around the world your cognac has been to. At most high-end liquor stores.

jack daniels

Jack Daniels smoking chips: Whether you have a smoker or not, these chips will make anything you cook taste better. Made from the old oak barrels that they use to age Jack Daniels, you get a serious hit of whiskey in every bag…and in your food. Simply toss a handful of chips you’ve soaked in water for about a half hour, and they will infuse the food on your grill with flavor. You can also use them dry, on charcoal or gas grills.

Cookbook favorites: “Jamie at Home,” by Jamie Oliver (a great combination gardening/cookbook), “Charcuterie,” by Michael Ruhlman and Brian Polcyn (the best book on how to cure and smoke meats), “Barbecued Ribs, Smoked Butts, and Other Great Feeds,” by Jeanne Voltz (my absolute barbecue Bible!), and “Martin Yan’s Feast: The Best of Yan Can Cook” by Martin Yan (the authority on Asian cooking.)

BBQ timer: Even someone who has barbecued all their lives runs the risk of burning or undercooking a roast or a large bird. Opening the grill and jabbing the meat with a thermometer several times causes the juices from the meat to run out, leaving it dry…and every time you open the grill, you lose precious heat. This is the better solution: You stick the needle into the roast or bird and leave it in there the entire time it cooks, so no juices leak out. You plug it into the monitor which then calls you when the meat is ready (from as far as 100 feet away!) You set the time or temperature, and then get to join your guests for the party. Redi-Check Remote Cooking Thermometer.

Smoking Gun: This is a fun toy. There are times when you don’t need a full-on smoker. All you want to do is smoke a small piece of fish or a hunk of cheese.  You simply take some of the finely ground wood chip powder (comes with the gun) and place it in the pipe-like bowl. Light it, and the Smoking Gun will blow that smoke through a hose into the Ziploc bag where your piece of fish is waiting for its magical transformation to smoky deliciousness. (Thanks to chef Rizwan Ahmed of the Hourglass Brasserie in Bristol, RI, who introduced me to this very cool device.)

smoking gun


Mason jar cocktail shaker: A fun new way for Dad to make his martini. http://www.masonshaker.com

mason jar, baking steel

Sometimes you take a couple of recipes you have in your file and you combine them to get delicious results. That’s what happened when I took my basic pork dry rub and then added my version of the Franklin barbecue sauce, as featured in a previous blog.

The ribs were intense, delicious, and did not require a smoker to reach fall-off-the-bone amazingness…


Intense ribs LTL


Alz Pork Rub


Ingredients:

2 tablespoons salt

1 tablespoon black pepper

1 tablespoon granulated garlic

1 tablespoon onion powder

1 tablespoon paprika


Combine ingredients and sprinkle liberally onto meat, rubbing it in well.


The Barbecue Sauce


Ingredients:

2 cups ketchup

3/4 cup water

6 tablespoons cider vinegar

6 tablespoons white vinegar

6 tablespoons brown sugar

3 tablespoons Worcestershire sauce

1 tablespoon chili powder

2 teaspoons salt

2 teaspoons black pepper

1 1/2 teaspoons cumin


Mix all the ingredients in a saucepan and simmer until the flavors have blended, about 20 minutes. Remove from heat and cool to room temp. If you store it in an airtight container in the fridge, it’ll stay good for a few months.


To cook the ribs…


Rub the ribs with the dry rub on all sides and wrap in aluminum foil. If you have a lot of ribs, it’s okay to stack them on each other for now. Place the wrapped ribs on a sheet pan and cook in a 250-degree oven for about 4 hours.

After 4 hours, unwrap the ribs and pour off any fat. Lay the ribs flat in one layer, uncovered, on the sheet pan and brush on all sides with the barbecue sauce. Cook for 1 hour more.


I grow two varieties of bamboo in my yard, and although they are quite invasive, I have my own methods of keeping the plants in check.

One stand of bamboo is in a corner of my yard that is overrun by brambles and other nasty vines. So I have no issues with the bamboo taking over this area at all. I’d rather have a desirable invasive than an ugly one.

The other stand of bamboo is a larger variety that grows to 25 feet tall, and it requires more maintenance to keep it in the area I want it to stay in. So, when some of the shoots get in my way, I simply cut them with a hacksaw and use them in my garden.

image

I use them as tomato stakes, supports for my cucumbers vines, and even pea brush, as shown here. For pea brush, I don’t remove the smaller side branches, which gives something for the peas to attach to.


Peas with pea brush, kale, spinach.

Peas with pea brush, kale, spinach.


A great way to give my garden a more natural look, rather than having rusty metal poles everywhere.

Though it may sound Japanese, the word “saganaki” refers to a small frying pan used in Greek cooking. The most famous of these dishes, simply called saganaki, is a fried cheese, often flamed at the end with a little ouzo.

Shrimp saganaki is one of my favorite Greek dishes, and it usually involves cooking shrimp in a tomato-based sauce with plenty of feta cheese sprinkled in. It’s a simple yet fantastic dish if the ingredients are fresh. Doesn’t hurt to be sitting in a taverna on the beautiful island of Santorini while eating it, either!

Graviera cheese

Graviera cheese

I had a slab of Graviera cheese from my most recent trip to Santorini, and decided to recreate shrimp saganaki using that instead of feta. It was pretty damn amazing…

Melty, gooey, delicious!

Melty, gooey, delicious!


Ingredients:


300 g grated Graviera cheese

1 can (28 oz) whole tomatoes

1 lb (about 24) shrimp, peeled and deveined

1 medium onion, chopped

juice of 1/2 lemon

1/4 cup olive oil

2 cloves garlic, through a press

pinch red pepper flakes

1 1/2 tablespoons fresh dill, finely chopped

1 tablespoon fresh oregano, finely chopped

1 1/2 tablespoons Ouzo

salt and pepper


Peel and devein the shrimp. Squeeze the juice of  1/2 of a lemon on to the shrimp and toss. Set aside.

In a large pan, saute the onions in the olive oil until translucent. Add garlic and cook for a few seconds more.

Crush or puree tomatoes and add to the pan. Add red pepper flakes, dill and oregano, and salt and pepper. Add Ouzo.

Let this sauce cook down for a bit until all the flavors have blended together.

Pour a layer of the sauce on the bottom of a metal broiler-proof pan. Lay the shrimp in a single layer into the sauce. Cover the shrimp with the rest of the sauce and sprinkle the grated Graviera on top.

Place the pan in the broiler and cook until the cheese is brown and bubbly.

shrimp saganaki


CHIVE TALKIN’

Posted: May 20, 2014 in Food, garden, pizza, Uncategorized
Tags: , , , , ,

This is the time of year when the chives in my herb garden are busting out with blossoms. Before they pop, I head out every few days and snip the larger blossoms off the chive plants and wrap bunches of them in Ziploc bags and freeze them.

image

I use those blossoms over the course of the next year on my signature marinated beef and chive blossom pizza. I just take a packet of chive blossoms out of the freezer, and sauté them for just a bit in olive oil and salt and pepper, then place them on the pizza before baking.

image

The chive blossoms not only add great flavor, but they look cool on the plate, too. Great as a side for almost any meat dish.


The Mint Julep is such a perfect, classic and historic bourbon drink, it seems silly to wait until Derby day to have one. Of course, as any aficionado of spirits will tell you, there are as many right ways as wrong ways of making one. And I enjoy the taste of bourbon in my Manhattans so much that I don’t really get a craving for a Mint Julep as often as one might think.

The first step in my Mint Julep is making the simple syrup. I use the standard ratio of 1 cup of clean, filtered water to 1 cup of sugar, but I use an organic product like Woodstock Farms Organic Pure Cane Sugar. Place the sugar and water in a saucepan and heat until just boiling. I’ve found that it needs to reach this stage for the unbleached sugar to really dissolve. As soon as it starts to boil, remove the saucepan from the heat, and throw in a handful of freshly picked mint leaves. Stir to make sure the mint gets in there, and then leave the saucepan to cool to room temperature. Once it’s at room temp, strain the simple syrup into a bottle with a tight sealing lid, and place in the refrigerator to cool. It will keep for about a week.

The next step is the tough part: the battles of the bourbons! The recent explosion of choices on the bourbon market has made it all but impossible for the average imbiber to know which bourbon is best for their tastes. My suggestion for this is to go to a trusted bartender and explain that you’re new to the bourbon world, and could you have the tiniest of tastes and sniffs of what he’s got at his bar. Chances are, you’ll get a sampling of some of the better known brands: Maker’s Mark, Woodford Reserve, perhaps Buffalo Trace or Bulleit, and the standard Jim Beam. This is a very good start. If you have deeper pockets, go to the manager of a trusted higher end liquor store and explain that you’ve had all the rest, now what does he think is the best? This is how I came across a fabulous 17-year-old bottle of Eagle Rare, my choice for my Mint Julep, though currently incredibly difficult to find. And of course, hinting to wife and friends that “I’m trying new bourbons” around your birthday or the holidays inevitably gets you a few bottles as well!

Other ingredients for my perfect Mint Julep include crushed ice from clean, filtered water. Don’t even think of using tap water for any cocktail much less this one. Why ruin an expensive bottle of bourbon by going cheap on the ice? I make my own ice cubes, then put them in a canvas ice bag and bash them to the perfect crushed size.

And a Mint Julep needs a metal–not glass– Julep cup. Made of pewter or aluminum, it frosts on the outside as you stir your drink, keeping your beverage ice-cold on even the hottest of days. You simply need to have one to make the perfect Mint Julep.

So many choices...

From left to right: the now hard-to-find Eagle Rare 17-yr-old, Bulleit, Maker’s Mark, Jim Beam, and the now impossible to find Pappy Van Winkle 15-yr-old.


So here’s my recipe…


ALZ MINT JULEP


Ingredients:

3 oz bourbon (my go-to these days is Russell’s Reserve Single Barrel)

1 oz mint-infused simple syrup

crushed ice

Julep cup

Fresh mint for garnish

Crush the ice and pack it into the Julep cup, even letting it dome slightly over the top. Don’t worry…the alcohol will melt it.

I like to add 1 jigger of bourbon (1.5 oz), then the shot of simple syrup (1 oz), then another jigger of bourbon on top. Break off a few mint leaves from the stem and push into the ice. Using a long spoon, stir the drink well. A beautiful layer of frost will form on the outside of the cup. Add more ice, if necessary, and garnish with a sprig of mint.


Through years of tireless experimentation, I’ve come up with a barbecue sauce that I can be proud of. I prefer a slightly sweet and tangy barbecue sauce,  and it works really well with chicken.

What makes this sauce special is the citrus. I originally used lemon juice for this recipe and it was good. Lime juice was better. Adding lime zest: even better than that. I tried orange juice and zest: a little too sweet. Meyer lemon: very good. But the Big Daddy of ’em all: grapefruit. I was craving my barbecue sauce one day and only had a grapefruit in the fridge. I thought: how bad could this be? Turned out to be the perfect foil to the sweetness of the brown sugar and ketchup.

Try this sauce on your next batch of chicken wings or even a whole bird. Cook the bird almost all the way through, brushing the sauce on for the last 20 minutes so that the sugars don’t burn. Then just try to stop eating it!

Chix BBQ


ALZ GRAPEFRUIT BARBECUE SAUCE


Ingredients:


1 cup ketchup

1/2 cup firmly packed brown sugar

Juice and zest of 1 grapefruit

3 tablespoons unsalted butter

1/4 cup dried onion flakes

1 teaspoon cayenne pepper sauce, like Frank’s Red Hot

1 teaspoon Worcestershire sauce

1 teaspoon granulated garlic

1/4 teaspoon black pepper

(no salt)


Combine all ingredients in a sauce pan. Bring to a boil and then simmer for about 30 minutes on low, or until slightly thickened.

saucey

How could a sauce that’s inspired by what most people claim to be the best barbecue joint in the USA, Franklin’s Barbecue in Austin, Texas, be bad? If you’ve seen Chef Nobu standing in a long line, waiting for his barbecue in that American Express commercial, then you’ve seen Franklin’s. People line up early in the morning and wait as much as four hours for a slab of brisket from this place. I’ll get there one day. In the meantime, I have the sauce…


Ingredients:


2 cups ketchup

3/4 cup water

6 tablespoons cider vinegar

6 tablespoons white vinegar

6 tablespoons brown sugar

3 tablespoons Worcestershire sauce

1 tablespoon chili powder

2 teaspoons salt

2 teaspoons black pepper

1 1/2 teaspoons cumin


Mix all the ingredients in a saucepan and simmer until the flavors have blended, about 20 minutes. Remove from heat and cool to room temp. If you store it in an airtight container in the fridge, it’ll stay good for a few months.


Clam fritters, conch fritters, lobster fritters…I suppose you could fritter anything. But the first time I had them with mussels, I knew that I would never fritter my life away with any other!

It was a fall afternoon in Newport, Rhode Island, at the Newport Yachting Center’s annual Oyster Festival. We’re gorging on freshly shucked oysters and clams, boiled shrimp, and…what have we here? I had never heard of a mussel fritter before, but Wendy, the lovely lady behind the counter, convinced me that her secret recipe would knock my socks off. I took one bite, then another, then another…There was no turning back.

They couldn’t be easier to make, but it is crucial to have the right fritter batter. And that starts with a product called Drum Rock fritter mix. If you live in New England, you can find it in just about any seafood department at Whole Foods. If you live further away, you can check out their website (http://www.drumrockproducts.com/index.php) or try your luck with a local brand of fritter mix.

fritter ingredients


If you’re using fresh mussels, be sure to clean them well and remove the beards. Steam them in a pot over a small amount of water. As they open, they will release their flavorful juices and you want to save every drop of that broth for the fritters. Here in New England, frozen mussel meats are available in some seafood stores. All you need to do is thaw them, steam them saving the broth, and you’re ready to go.


Ingredients:


1 lb Drum Rock fritter mix

2 cups cooked mussel meats

1/2 cup mussel broth (saved from steaming mussels)

1/4 to 1/2 cup good quality beer, such as Sam Adams Boston Lager

Peanut oil for frying


Be sure to let the batter rest. If you're waiting for guests to arrive, just cover the batter bowl with a moist towel and it will keep for several hours at room temperature.

Be sure to let the batter rest. If you’re waiting for guests to arrive, just cover the batter bowl with a moist towel and it will keep for several hours at room temperature.


Steam mussel meats until just cooked. Remove mussel meats, and reserve 1/2 cup of the broth. Pulse mussel meats in a food processor, but leave chunky…or chop by hand.

Put Drum Rock fritter mix in a large bowl. Add mussel meats, mussel broth, and beer. Stir gently until just mixed. Let it sit for 10 to 15 minutes and do not stir again.

Using a thermometer, heat oil to 350 degrees, and using a small spoon or scoop, drop fritters in hot oil, turning gently, cooking 3 to 4 minutes until golden.

Drain on absorbent paper, and season with salt and pepper immediately. Serve right away!

IMG_3043


The perfect dipping sauce for these mussel fritters is made from two ingredients: mayonnaise and Ponzu sauce, which is a citrus-based soy sauce. Combine both ingredients in a bowl. How much you use of each is a matter of personal preference. I usually use a ratio of 4 parts mayo to 1 part Ponzu.