Posts Tagged ‘food’

Despite what many of the labels on the bottles say, there are really only two kinds of balsamic vinegar: the highly prized, DOP-regulated, aceto balsamico tradizionale (or traditional balsamic vinegar)—and everything else.

balsamic1

Much like the olive oil market, the world of balsamic vinegar has been so messed up and confused that what most of us consider to be balsamic vinegar really has nothing to do with the genuine article.

Aceto balsamico tradizionale is the pinnacle of all vinegars: produced by hand in small quantities using methods that are hundreds of years old, it has the consistency of maple syrup, and costs anywhere from $150 to $400 for a 3.4 ounce bottle.

That doesn’t mean there aren’t any good (even excellent) non-DOP balsamic vinegars out there. It just means you have to do a lot of label reading to make sure you’re getting a good thing. DOP stands for Denominazione de Origine Protetta, meaning food products whose origins are identifiable in the taste, texture or “perfume” of the product and produced in a specific region with all the ingredients coming from that region. This is all carefully overseen by the Italian government and it is a big deal when it comes to quality.

In order to bear the name aceto balsamico tradizionale, every aspect of its creation, from grape to bottle, is carefully regulated by DOP standards. The vinegar undergoes a lengthy transformation that takes a minimum of 12 years. To keep competition fair, each producer is allotted a specific number of bottles he can sell, which is indicated by a numbered tag on the bottle’s neck. Bottles from Modena are usually bulb-shaped, while bottles from Reggio nell’Emilia are bell-shaped. A red cap means the vinegar is at least 12 years old, while a vinegar that is 25 years of age or more has a gold cap.

Back in the 1980’s, when the balsamic vinegar craze hit the United States, many chefs looking for exotic ingredients in their dishes, started using balsamic vinegar. It became an overnight sensation, and the demand was too great for these small handmade batch producers to handle. And so the market for inexpensive balsamic vinegars was born: vinegars that bear little resemblance to the real thing, using ingredients like cider or red wine vinegar, sugar and artificial coloring.

So can you buy a good vinegar if you don’t have wads of money to spend?

Well, the next step down from the good stuff is called aceto balsamico condimento—what we see in the stores as Balsamic Vinegar of Modena (although some are produced outside of Modena) and they average in price from $20 to $60 a bottle. They’re kept in less expensive wood barrels, and are aged less than 12 years.

And then there’s everything else.

Some simple tips on what to look for on the ingredients label: Since the really good stuff is very expensive and should never be cooked or reduced, look for high quality non-DOP balsamic vinegars. Look for those from Modena and Reggio nell’Emilia with Consorzio di Balsamico Condimento on the label to guarantee the age. Even if this stuff is too expensive for you, at the very least, make sure that “grape must” is the first ingredient on the label and that its acidity is not above 7 percent.

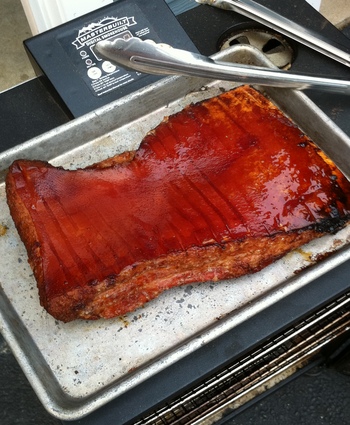
I recently found a bottle of balsamic vinegar under the brand name Rozzano. A 34 oz bottle goes for about 9 bucks. Is it the good stuff? Not really. But does it work in a salad dressing or a marinade? Absolutely. The only ingredient listed is balsamic vinegar of Modena, and its acidity is 6%.

balsamic2

Here’s a really simple recipe you can make with this inexpensive vinegar…

PORT WINE/BALSAMIC VINEGAR STEAK SAUCE

Ingredients:


½ cup port wine

½ cup balsamic vinegar

¼ cup red grapes, sliced lengthwise (optional)

Place ingredients in a small sauce pan and reduce by half. Use this sauce on steaks, burgers, etc.

Despite gardening for almost 50 years, I sowed and harvested my first batch of fennel this season. Having received a recent shipment of heritage Berkshire pork chops, I thought it was time to get creative. This is a rustic Italian-style recipe that works great for pork and fennel…

fennelfrond


PORK WITH FENNEL AND CAPERS


Ingredients:


4 Berkshire pork chops, medium thickness

2 fennel bulbs with stems and fronds, finely chopped

2 shallots, finely chopped

1/2 cup fresh parsley, chopped

olive oil

salt and pepper

1 28 oz can tomatoes

1 tablespoon capers

Zest of 1 lemon

1/2 cup dry white wine

pork and fennel


In a large pan, heat some olive oil. Season the pork chops on both sides with salt and pepper, then brown on both sides in the pan with the olive oil. Remove chops from pan and set aside.

Add a little more olive oil to the pan and add the chopped fennel and shallots, stirring for a few minutes. Add the white wine, and stir well to get the tasty bits of pork from the bottom of the pan. Add half of the parsley. Add the can of tomatoes, squishing the tomatoes between your fingers so that they are broken up when they hit the pan. Stir for a few minutes over medium heat.

Return the pork chops to the pan, nestling the in the sauce. Add the capers, lemon zest and remaining parsley. Stir in a bit, and then let the chops cook for about 10 to 15 minutes..


There’s something about Asian noodles with peanut sauce that I find addictive. They are great hot or cold, and desperately in need of a fix, I decided it was time to make them at home. I have an arsenal of basic Asian ingredients in my pantry, so slapping this together was no effort at all, and damn, does it taste good!

Since the only peanut butter I had at home when I first created this recipe was the portable Jif-to-Go containers, I still use them to this date!

Asian noodles

Ingredients:

4 Tablespoons creamy peanut butter (or 2 Jif-to-Go containers)

2 teaspoons sesame oil
2 Tablespoons Satay sauce
1 teaspoon Chinese chili garlic sauce
12 oz package Chinese noodles

Combine all ingredients except noodles in a bowl. Set aside.
Boil noodles until al dente. Drain.
Mix noodles with the sauce. Devour.

Stuffies, or stuffed clams, are a very personal matter here in Southern New England. There are as many stuffies recipes as there are chowder recipes, and everyone thinks they’ve got the best one. Most stuffies that I’ve had in restaurants, like most meatballs I’ve had, have too much bread and not enough of the good stuff.

I use medium-sized clams for this recipe and not the traditional quahog, a large clam often used in chowders that I find to be too chewy.

Dropping the clams in hot water in the beginning helps make opening the clams a lot easier.

This recipe makes a lot of stuffies, but they freeze well so you can have them when you want.

stuffies

ALZ STUFFIES

Ingredients:

4 dozen medium neck clams

1.5 pounds chopped chourico, skin removed (I use Mello’s from Fall River, Mass)

3 onions, finely chopped

3 tablespoons garlic, finely chopped

3 cups frozen or fresh corn kernels

3 cups toasted and coarsely ground Portuguese bread

3/4 cup chopped fresh oregano (or 1 Tablespoon dried)

1 1/4 cups chopped fresh sage (don’t use dried)

Salt and pepper

Butter

For the aioli:

Sambal chili paste

Mayonnaise

In a large pot of boiling water, drop the clams in, about a dozen at a time. Remove them after about 30 seconds, before they open. Place in bowl to cool. Do this with all the clams.

Open the clams with a clam knife over a bowl, making sure you save all the liquid from the clams. Put clam shells to the side. Throw away any broken shells, and wash the empty shell halves thoroughly.

Move clam meat to a cutting board or food processor and chop to medium-fine. Set aside. Let clam juices sit in bowl and then pour off to another bowl, leaving behind sand and grit.

In a large frying pan, add olive oil, onions, and chourico and cook on medium heat for a few minutes. Add oregano and sage and cook a few more minutes. Add corn and cook a few more minutes, a little more if the corn was frozen. Add chopped clams and stir, cooking for a few more minutes. Add breadcrumbs a little at a time until you have a nice balance of bread and other ingredients. Add the clam juice a little at a time as well, so that you can add all the breadcrumbs, but the mix isn’t runny. There’s lots of flavor in the clam juice, so use as much as you can! Season with salt and pepper.

Remove the pan from the heat and fill the empty clam shells with the stuffing.

At this point, you can freeze the clams. I put them on small sheet pans in the freezer until they harden, then I wrap them 6 at a time, and put them in freezer bags. Keep frozen!

To make the aioli, mix mayonnaise and Sambal in a bowl, to taste. Sambal is hot, so a little goes a long way. Keep covered and refrigerated.

When ready to bake, remove clams from freezer and place on a sheet pan in a pre-heated 350 degree oven. Top each clam with a small ¼” square piece of butter. Bake about 15 minutes, until the clams are sizzling and light brown. Top with a small dab of aioli.


There are a million banana bread recipes out there, so let’s just get this over with and call mine a million-and-one! What makes this banana bread special is that it’s got loads of flavor. It uses whole wheat flour…less sugar…and no artificial extracts that make most banana breads taste like crap. This one relies on very ripe bananas to give it its wonderful natural flavor.
It’s not always easy to get bananas to ripen exactly when you’re trying to make your banana bread recipe. So here’s what I do: I by a large bunch of bananas and let them get very ripe at room temperature. I then take 5 at a time (for this recipe), peel them, and place the bananas in a Ziploc bag in the freezer. When it’s time to make banana bread, I just pull one of those Ziplocs out of the freezer and let it thaw. This also works really well when you need bananas for smoothies.


Nana bread blog

ALZ BANANA BREAD

Ingredients:

3 cups all-purpose flour
1/2 cup whole wheat flour
2 tsp baking soda
1/2 tsp salt
1 1/4 cup sugar
3/4 cup vegetable oil
2 eggs
5 medium-sized bananas, peeled and mashed
2 tsp real vanilla extract

Cooking spray

Pre-heat oven to 350 degrees.
Combine all-purpose flour, whole wheat flour, baking soda and salt in a medium bowl. Set aside.
Combine sugar and oil in mixing bowl and mix at medium speed for 2 minutes. Add eggs, one at a time. Beat until mixture is light and lemon colored.
With mixer running at low speed, add flour mixture alternately with bananas, beginning and ending with flour mixture. Blend well after each addition. Add vanilla and blend some more to mix.
Pour batter into 2 loaf pans that have been sprayed with cooking spray. Bake for 45 minutes or until a wooden pick inserted in the center comes out clean. Cool 15 minutes in loaf pan on wire rack.
Remove from pan and let cool completely on wire rack.

This was my most popular blog post of 2012. Thought I’d re-run it here this week…


Food magazines and cooking shows are pretty obvious places to be inspired by new recipes from common ingredients. But I’ve found inspiration from some strange places, including old TV sitcoms. I had some nice thick pork chops thawed, and I was trying to think of something new to do with them. The classic “pork chops and applesauce” episode of The Brady Bunch was on TV that afternoon. I looked in the pantry, found a small container of my daughter’s applesauce, and came up with this recipe.

The applesauce and honey creates a tasty crust.

pork chop 2
Ingredients:

2 nice, thick cut pastured pork chops
1 small tub (4oz) unsweetened apple sauce
1 tablespoon fresh sage, finely chopped

A few sprigs of fresh thyme–leaves only–finely chopped

1 teaspoon honey

1 teaspoon salt
1/2 teaspoon granulated garlic
1/4 teaspoon fresh cracked black pepper

In a small bowl, combine everything but the pork chops.

Smear this applesauce mix all over the pork chops, place in a non-reactive covered container in the fridge, and let it marinate overnight.

The next day, make sure all the gooey applesauce mix gets re-smeared on the chops. You want it nice and thick on the meat.

On the stove, heat an oven-proof pan. Use a little olive oil. Place the chops in the pan gooey side down, then re-smear with any leftover applesauce on what is now the top side. Let the first side sear to a golden brown before flipping the chops over. Once you’ve flipped the chops, place in a pre-heated 350-degree oven. Cook the pork chops until just pink. (It’s no longer necessary to cook pork to death like our parents used to do.)

This is a great dish that was inspired by chef Jamie Oliver and his “Jamie at Home” cookbook. A couple of years ago, when I received a shipment of venison from my father-in-law, an avid hunter that lives in the Upper Peninsula of Michigan, I knew that although I could certainly use beef for this dish, it would be absolutely stellar with venison. And though the original recipe calls for Guinness, I knew that I couldn’t miss with my latest favorite local brew from my buddy Sean Larkin of Revival Brewing Co: his Double Black IPA…


beer pix

DOUBLE BLACK I.P.A. VENISON STEW WITH PUFF PASTRY


Ingredients:

Olive oil
3 red onions, peeled and chopped
3 cloves of garlic, peeled and chopped
3 Tablespoons butter, plus extra
3 carrots, peeled and chopped
3 celery stalks, trimmed and chopped
10 oz baby bella mushrooms, chopped
3 lbs venison, cut into 3/4″ cubes
A few sprigs of fresh rosemary, leaves picked and chopped
Sea salt and black pepper
2 bottles (24 oz) Revival Brewing Company Double Black IPA, with a swig for the cook
3 Tablespoons flour
12 oz freshly grated cheddar cheese
1 1/2 pounds store-bought puff pastry (all butter is best)
1 large egg, beaten


_DSC0404

Preheat the oven to 375.
In a large ovenproof pan, heat a few tablespoons of the olive oil. Add the onions and fry gently for about 10 minutes. Turn the heat up and add the garlic, butter, carrots, celery and mushrooms. Stir well, then add venison, rosemary, a pinch of salt and about a teaspoon of pepper.
Fry on high for about 4 minutes, then add the beer, making sure you take a swig for,luck! Stir in the flour and add just enough water to cover. Bring to a simmer, cover the pan with a lid or foil, and place in the preheated oven for about 1 1/2 hours.
Remove after 1 1/2 hours and stir. Put it back in the oven and cook another hour, until the meat is cooked and the stew is rich, dark and thick. If it’s still liquidy, place the pan on the stove top and reduce until the sauce thickens. (You don’t want a soupy stew or you’ll get soggy puff pastry later on.) Remove the pan from the heat and stir in half the cheese. Season with salt and pepper to taste and set aside to cool.
Depending on whether your puff pastry comes in sheets or a block, you’ll need to use a rolling pin to get it into sheets about 1/8″ thick. Butter a good-sized pie dish or an ovenproof terrine. Line the dish with the sheets of pastry, letting the pastry hang over the sides. Pour in the stew, even it out with a spatula, and add the rest of the grated cheese on top.
Use another 1/8″ thick sheet of pastry (or a couple if they’re not wide enough) to cover the top of the pie dish. Lightly crisscross the top with a knife, then fold over the overhanging pieces of pastry over the lid, making it look nice and rustic. Don’t cut or throw any of the pastry away! Use as much as you can, since everyone will want some.
Brush the top with the beaten egg and then bake the pie on the bottom of the oven for about 45 minutes, until the pastry has cooked, and it’s beautifully puffed and golden.
Serve with a side of peas.

_DSC0418

HONEY GLAZED CHICKEN WINGS

Posted: February 17, 2013 in chicken, Recipes, wings
Tags: , , , ,

I can’t get enough of chicken, and I cook it at least a couple of times a week. So I have to keep coming up with new flavors to challenge my tastebuds as well as myself. Previous posts have included Cantonese Chicken (https://livethelive.com/2013/01/11/cantonese-chicken/), Asian-style chicken wings (https://livethelive.com/2012/11/01/asian-style-chicken-wings/), and oven fried chicken wings (https://livethelive.com/2012/12/05/oven-fried-chicken-wings/).

This time around, it’s a honey glaze with hints of ginger that couldn’t be simpler. Feel free to use any chicken parts you like. Even a whole roasted chicken would work with this recipe. And choosing the right bird, a pasture-raised chicken like the ones I get from my friends at FireFly Farms in Stonington, CT (http://www.facebook.com/pages/FireFly-Farms/242699329121278) makes all the difference.

honey glazed chicken


Ingredients


4 lbs chicken wings

1/2 cup honey

1/2 cup water

1/4 cup soy sauce

1/4 cup apple cider vinegar

2 Tablespoons sesame oil

1 teaspoon cayenne pepper sauce, like Frank’s Red Hot

1/2 teaspoon fresh ginger, minced

1/4 cup onion, minced

1 Tablespoon garlic, minced

1 cup chicken stock, preferably homemade


Thaw chicken wings and place in a Ziploc bag.

In a separate bowl, whisk together all the other ingredients, except chicken stock, to make a marinade. Pour this marinade into the Ziploc with the chicken and seal, squeezing the air out of the bag. Squish the bag around so that the marinade thoroughly covers all of the chicken wings. Place the bag in the fridge to marinate for about 4 hours, squishing it around every hour.

Preheat the oven to 325.

Carefully pour out the marinade into a saucepan, adding the chicken stock, and reduce until it becomes a thick, gooey glaze. Be careful not to burn the sugars in the honey. Honey can also foam up and overflow if you’re not watching it.

Remove the chicken pieces from the bag and place them on a baking sheet covered with non-stick aluminum foil. Bake for about 30 minutes.

The reduced marinade glaze should be ready right around the time the chicken has cooked for 30 minutes or so. Brush the glaze on to the chicken, and place back in the oven to cook 15 more minutes.


I love fried chicken. And despite what most people think, fried food is really not that bad for you if you fry it properly. Use clean oil every time, and get the oil to the right temperature: two key factors that will result in crispy chicken that isn’t bogged down with grease. But frying also means you have to stand over the chicken and watch it all the time…especially a pain in the butt if you’ve got guests and you’re making a lot of chicken! What makes this recipe great is that you get all the benefits of a crispy fried chicken without all the grease and without standing watch over it the whole time.

You can use chicken wings or any chicken parts for this recipe. Either way, I fry the chicken until it just turns golden brown and then bake it in the oven.

Ingredients:

10 lbs large chicken wings or chicken pieces

Vegetable oil, for frying

For soaking:

1 quart buttermilk

2 teaspoons Frank’s Red Hot, or other hot sauce

For the seasoned flour:

1 ½ cups all purpose flour

½ cup whole wheat flour

1 Tablespoon sea salt

1 teaspoon freshly ground black pepper

1 teaspoon paprika

1 teaspoon granulated garlic

1 teaspoon onion powder

1 teaspoon basil

1 teaspoon oregano

Open the bottle or carton of buttermilk and add 2 teaspoons of hot sauce. Close container and shake to combine. Place chicken pieces in a bowl and cover with buttermilk, letting the chicken soak in it for at least several hours or overnight.

Chicken soaking in buttermilk/hot sauce mixture overnight.

Pre-heat oven to 350 degrees.

Combine all purpose and whole wheat flours in a bowl. Add salt, pepper, paprika, granulated garlic, onion powder, basil and oregano. Mix well.

After chicken has soaked in the buttermilk, remove the pieces one at a time, leaving the buttermilk on them as you toss the pieces into the seasoned flour. Set pieces aside on a metal baking rack placed on a sheet pan.

Pour the vegetable oil into a large heavy-bottomed stock pot to a depth of 1-inch. Heat the oil to 360 degrees on a thermometer.

From the buttermilk, to the breadcrumb mixture, to the oil.

From the buttermilk, to the breadcrumb mixture, to the oil.

Working in batches, place the chicken pieces in the oil, being careful not to overcrowd them. Fry the chicken until it is golden brown on both sides, then place each piece back on the metal baking rack set on the sheet pan.

Once all the chicken has been fried, place the sheet pan in the oven for 30 to 40 minutes, until fully cooked and crispy.

fried chix

Feast!

MAKIN’ BACON!

Posted: December 1, 2012 in bacon, Food, pork, smoking, Uncategorized
Tags: , , , , ,

There are few foods as magical as bacon. Add bacon to just about any dish you’re preparing, and it elevates it to incredible new heights of flavor. The BLT is possibly the greatest sandwich ever invented: just a few simple, fresh ingredients, when placed together, transforming into one of the most amazing treats on planet Earth.

And it all depends on the bacon.

For so many years, I’ve bought my bacon on line from Burger’s Smokehouse, a family run business in Missouri that not only sells some of the best bacon I’ve ever had (get the thick-sliced country bacon—my favorite), but also smoked turkeys, pork, beef, chicken and more. The prices are very fair and they include shipping, so you know exactly what it’s going to cost you right from the start. (www.smokehouse.com)

But it was time to take the next step: I had to make my own bacon!

My favorite source of heritage breeds of pork, pasture-raised with tender loving care, is Caw Caw Creek, based out of North Carolina. They raise only a handful of pigs in an area that other pig farms would jam in hundreds. The pigs are allowed to roam freely and forage for their food. And as a result, the pork is some of the most flavorful you will find anywhere. (www.cawcawcreek.com) Tell Emile I sent you.

Bacon comes from the pork belly. So I bought a couple slabs from Caw Caw Creek, and followed the simple curing techniques outlined in a great book about making all kinds of prepared meats (sausages, salamis, and of course, bacon): “Charcuterie,” by Michael Ruhlman and Brian Polcyn.

If there is a skin on the belly, I choose to remove it before curing, but that’s a personal preference. I don’t eat it, so why have it? And it’s so thick, it blocks the cure.

To cure bacon, all you really need is some salt, some sugar, a little pepper, and what they in the curing biz call “pink salt,” which is not to be confused with salt that happens to be pink, like you would find in a basic spice catalog. Pink salt is bright pink—to let you know that this is special salt that should only be used in small quantities for curing. And the reason for that is because it contains nitrites. Nitrites delay the spoilage of the meat, and help preserve the flavors of spices and smoke. That’s good. But nitrites can break down into nitrosamines, which have been known to cause cancer in lab animals. But let’s face it: you would need to eat a ton of cured meat to really worry about this.

Once you rub the pork belly with the salt and sugar mixture, place it in a Ziploc bag, squeeze the air out of it, and seal it well. Place in the fridge for about a week, flipping it over a few times to let gravity do its work. You’ll see that the salt will draw moisture out of the meat and form a brine. This brine will continue to cure your pork belly, so leave it in there.
Once the pork belly has been cured, wash the brine off the meat, pat dry with paper towels. Now it’s time to cook. You can simply cook the pork belly at 200 degrees for about 2 hours, until the internal temperature reaches 160 degrees, or do what I did: place the pork belly in a digital smoker, cooking it at 200 degrees for 1 hour, then adding hickory chips and smoking it at 200 degrees for another hour.

That’s it. You have achieved bacon!

Bacon, straight out of the smoker.

Bacon, straight out of the smoker.

Let me tell you…that first slice you cut off that bacon and toss in a pan to lightly fry for a few moments will be the best bite of bacon you have ever had in your life!
The reward is so worth the effort. If you don’t want to bother going online to buy your pork, simply go to your favorite butcher and ask for pork belly. It’s usually available. And if you’re making one slab of bacon, why not make it three or four? It freezes well. And…you will eat it. You know you will!


Sliced, and ready for frying.

Sliced, and ready for frying.