Archive for the ‘Carnivore!’ Category

Porchetta is a savory, fatty, herby, delicious slab of pig that is slow roasted…a favorite in Italy. Porchetta is also the name of a small eatery on the Lower east side of New York City, the baby of chef Sara Jenkins, where they serve this Italian classic almost exclusively, with lines of people winding down the block, waiting for their taste of pig heaven.

porchetta1

Traditional porchetta is made from a hog that is butchered, boned and roasted. Porchetta in New York City takes the pork loin, wraps it with the belly and skin, and slow roasts it in their special Combi oven. The result is nothing short of fantastic.

porchetta2

Both methods are way too big for my kitchen, so I took a page out of one of my favorite cooking magazines, La Cucina Italiana , where chef Jenkins described how a homemade version of porchetta was possible using boneless pork shoulder.
Well, I didn’t have a boneless pork shoulder, dammit! I had two beautiful pork tenderloins…not nearly as fatty, and no pork skin to wrap them with. I knew that I would have to be extremely careful not to totally dry my pork out.

Before...

Before…

Ingredients:

10 small fresh sage leaves
3 fresh small rosemary sprigs, leaves only
1 garlic clove, chopped
2 tablespoons wild fennel pollen (see below)
1 1/2 teaspoons sea salt
1 1/2 teaspoons coarsely ground black pepper
2 pork tenderloins (2 1/2 to 3 lb total)
2 tablespoons extra virgin olive oil
1/2 cup dry white wine

Heat oven to 250 degrees.

Finely chop the sage, rosemary and garlic. (I place them in a food processor.) Place mixture in a small bowl and add fennel pollen, salt and pepper. Stir together well.

Rub the herb mixture all over the 2 tenderloin pieces. Tie the tenderloins together with butcher twine. (Usually one end of the tenderloin is fatter and the other thinner. Line them up so that one fat end is tied with one thin end, making the pork package of equal thickness.)

Set pork fat side up in a roasting pan. Drizzle with olive oil.

Roast the tenderloins, basting with the wine and pan juices every 15 minutes. Cook until pork has an internal temperature of 140 degrees.

After!

After!

Despite that it came out somewhat awesome, I plan on using a pork shoulder next time. Leftovers make great sandwiches!

I’ve made some changes to my bacon blog of over a year ago, taking many more steps toward true bacon greatness. Scroll down for my updates…

There are few foods as magical as bacon. Add bacon to just about any dish you’re preparing, and it elevates it to incredible new heights of flavor. The BLT is possibly the greatest sandwich ever invented: just a few simple, fresh ingredients, when placed together, transforming into one of the most amazing treats on planet Earth.

And it all depends on the bacon.

For many years, I’ve bought my bacon on-line from Burger’s Smokehouse, a family run business in Missouri that not only sells some great bacon (get the thick-sliced country bacon—my favorite), but also smoked turkeys, ham and more. The prices are excellent and they include shipping.

But it was time to take the next step: I had to make my own bacon!

Bacon comes from the pork belly. So I bought a few slabs of insanely good pork from my friends at Fire Fly Farms in Stonington, CT (www.fireflyfarmsllc.com), and followed the simple curing techniques outlined in a great book about making all kinds of prepared meats (sausages, salamis, and of course, bacon): “Charcuterie,” by Michael Ruhlman and Brian Polcyn.

To cure bacon, all you really need is some salt and some sugar, and what they in the curing biz call “pink salt,” which is not to be confused with salt that happens to be pink, like Himalayan salt you would find in a spice catalog. Pink salt is bright pink—to let you know that this is special salt that should only be used in small quantities for curing. And the reason for that is because it has nitrites. Nitrites delay the spoilage of the meat, and help keep the flavors of spices and smoke. That’s good. But nitrites can break down into nitrosamines, which have been known to cause cancer in lab animals. But let’s face it: you would need to eat a ton of cured meat to really worry about this.

To make the basic dry cure:

1/2 lb. kosher salt

4 oz sugar

1 ounce (5 teaspoons) pink salt

Combine these ingredients well. You won’t need all of it unless you’ve got a lot of pork belly. An important note: kosher salts do not all weigh the same, so that’s why I go by the weight and not a cup measurement.

Once you rub the pork belly with the basic dry cure, place it in a Ziploc bag, squeeze the air out of it, and seal it well. Place in the fridge for about a week, flipping it over a few times to let gravity do its work. You’ll see that the salt will draw moisture out of the meat and form a brine. This brine will continue to cure your pork belly, so leave it in there.
Once the pork belly has been cured, wash the brine off the meat, pat dry with paper towels. Now it’s time to cook. You can simply cook the pork belly at 200 degrees for about 2 hours, until the internal temperature reaches 160 degrees, or do what I did: place the pork belly in a digital smoker, cooking it at 250 degrees for 1 hour, then adding hickory chips and smoking it at 250 degrees for another hour.

That’s it. You have achieved bacon!

Bacon, straight out of the smoker.

Bacon, straight out of the smoker.

Let me tell you…that first slice you cut off that bacon and toss in a pan to lightly fry for a few moments will be the best bite of bacon you have ever had in your life!
The reward is so worth the effort. If you don’t want to bother going online or if you don’t have a local farm to buy your pork, simply go to your favorite butcher and ask for pork belly. It’s usually available. And if you’re making one slab of bacon, why not make it three or four? It freezes well. And…you will eat it. You know you will!

Sliced, and ready for frying.

Sliced, and ready for frying.

Since I posted the above information, I’ve had the opportunity to tweak my bacon curing recipe. The result was a more balanced, less salty bacon with tons of flavor…

Ingredients:

1/4 cup of the basic dry rub (recipe above)

1/2 cup light brown sugar

1/2 teaspoon ground black pepper

Combine these ingredients and rub on all sides of the pork belly. Place in Ziploc bags and squeeze all the air out of them. Place in a container in the fridge and turn them over every day to let gravity do its work. A brine will form inside the bag…this is good. It will cure the pork belly. After about a week, remove the pork bellies and rinse them with cold water. Pat them dry with paper towels and then proceed to the smoker.

Bellies in the smoker

Bellies in the smoker

I use a digital smoker, so I set the temp for 250 degrees and cook the pork bellies at this temperature for one hour. I then add hickory chips and smoke the bellies at 25o degrees for one more hour.

Smoked bacon

Smoked bacon

At this point, you have achieved bacon! While the bellies are still warm, you can easily slice off the pork skin off the belly. I discard it. Slice the bacon into whatever thickness you like, and fry some up immediately! Once the rest of the bacon has cooled to room temp, cut them into chunks, wrap individually, and freeze until ready to use.

Frying in the pan!

Frying in the pan!

Inspired by a garden full of fennel and my fanatical love for all things pork, this recipe just happened this past fall. I use Berkshire heritage pork when possible, a far tastier and healthier choice over standard pork you find in a supermarket. I get it at: http://www.heritagepork.com.

pork chop fennel


Ingredients:


4 Berkshire pork chops

4 tablespoons finely chopped fennel bulb

2 teaspoons finely chopped fresh sage

4 teaspoons garlic salt

1 teaspoon ground black pepper

3 tablespoons extra virgin olive oil

extra fennel bulb and fennel fronds

extra olive oil, salt and pepper for sauteing


Combine the chopped fennel, sage, garlic salt, black pepper and olive oil in a bowl. Mix well and spread it all over the pork chops. Let them stand for an hour at room temperature.

Light a hot grill. Grill pork chops until done…with quality pork, that does not mean cook it to death!

Chop extra fennel bulb into thin strips about an inch long. Remove fennel fronds from their stems. Saute bulb strips in olive oil, salt and pepper until they are almost crisp. Toss in fennel fronds and cook until fronds and bulb strips are crisp.

Serve pork chops with crispy fennel and fronds on top.

The concept of a deep-fried turkey sounds pretty cool. But for me, it’s just too much damn work: finding a safe spot in the yard to blast the propane-fueled fryer so that you don’t burn your house down, standing outside and freezing your ass off while it fries, and then disposing of gallons of used oil at the end of it all. And making sure the oil is at the right temperature so you don’t get a scorched turkey on the outside and raw turkey on the inside. Sure, they now have indoor turkey fryers, but I’m not crazy about that idea, either.

I get great results by cooking my turkey in my Weber grill. The standard Weber allows you to cook up to a 15 lb. bird–big enough for my purposes–and it comes out crispy, smokey and delicious. If you’re afraid to try this for the first time at Thanksgiving when it really matters, wait a few months and buy a turkey when you have the craving and try it out.

The charcoal chimney with hot coals awaits.

Although I’ve stopped using charcoal briquettes a long time ago, and now strictly use natural hardwood charcoal, this recipe works best with Kingsford. The idea is for the coals to cook slowly and evenly. And never use lighter fluid…always start your fire with a few pieces of crumbled newspaper under a charcoal chimney.

Needed:

Weber grill, with the dome top

Kingsford charcoal briquettes (do not use Match Lite or other pre-soaked briquettes)

Heavy duty aluminum pan (disposable)

Ingredients:

Whole turkey, up to 15 lbs, thawed and previously brined (see my blog about brining a turkey)

Olive oil (to rub on turkey)

2 yellow onions, chopped

4 stalks of celery, chopped

½ lb (2 sticks) of unsalted butter, melted

1 tablespoon granulated garlic

1 tablespoon onion powder

2 tablespoons salt

1 tablespoon pepper

Spreading the coals away from the center of the grill.

If you want stuffing, make it separately and cook it separately. (A great recipe in my next blog.)

Light 8 to 10 lbs of charcoal in the grill…depending on the size of the turkey and how cold it is outside.

Remove the giblets from the turkey. Place the bird in the aluminum pan.

In a small bowl, mix granulated garlic, onion powder, salt and pepper Add any other seasonings you like.

Coarsely chop onions and celery. Place in a another bowl. Mix with the melted butter and 1/3 of the salt/pepper/garlic powder mixture. Place a small handful of this “stuffing” mixture in the neck cavity of the turkey. Place the rest in the body cavity (where the stuffing would usually go.) You can fasten the bird with turkey skewers if you like. This “stuffing” is strictly to flavor the turkey…you don’t eat it!

The rubbed, stuffed and seasoned bird.

Rub the outside of the entire turkey with the olive oil and sprinkle the rest of the garlic/onion/salt/pepper mixture on the outside of the bird. Make sure you get the bird on the bottom as well.

When the coals in the grill have ashed over, spread them to the outside edges of the Weber equally. Put the cooking grill rack in place. Place the aluminum pan with the turkey in the center of the grill, keeping it away from the direct heat of the coals. If using a meat thermometer, insert the probe into the thickest part of the breast, being careful not to hit the bone. Place the lid on the grill. (You may need to bend your pan a bit.) Open the vents on the bottom of the Weber as well as the lid. Important to get air circulating!

My meat thermometer calls me from as far as 100 feet away when the turkey reaches the optimum temperature that I pre-set. Time for a drink!

No basting is necessary.

Now here’s the tough part: DO NOT OPEN THE GRILL TO CHECK ON THE TURKEY! (If you must look, shine a flashlight into the vent holes on the lid to take a peek at the pop-up timer, if there is one.) The whole point is to keep the heat inside the kettle. You’ll know your turkey is done when no more smoke or heat rises from the grill, and the turkey inside stops making sizzling noises.

Remove the turkey and let it rest at least 15 minutes before carving.

Beautifully grilled, cooked to 180 degrees in less than 2 hours!

It takes about 3 weeks to make corned beef, but it’s not difficult to do. Doing it yourself gives you a better quality product than that nasty slab from the supermarket that is full of chemicals and preservatives.

Corned beef has nothing to do with corn. ‘Corning’ is a technique for preserving raw meats for long periods by soaking it in salt brine. This method was used before the days of commercial refrigeration. Back then, the large salt kernels used in the brine were called “corns.”

Brining is a time-honored way of preserving and it prevents bacteria from growing. Both pastrami and corned beef are made by this method. Both corned beef and pastrami usually start with a brisket of beef. Corned beef is then cooked–usually boiled–and served. Pastrami is made when the brined meat is rubbed  with more spices and smoked to add extra flavor. So corned beef and pastrami are the same meat, just treated differently.

Saltpeter is an ingredient that has been used in brining beef for years. It adds the traditional red coloring to the corned beef and pastrami meat. But since saltpeter can also contain carcinogens, I leave it out. The meat may not be the usual bright red color, but the flavor and texture of the meat will not be affected.

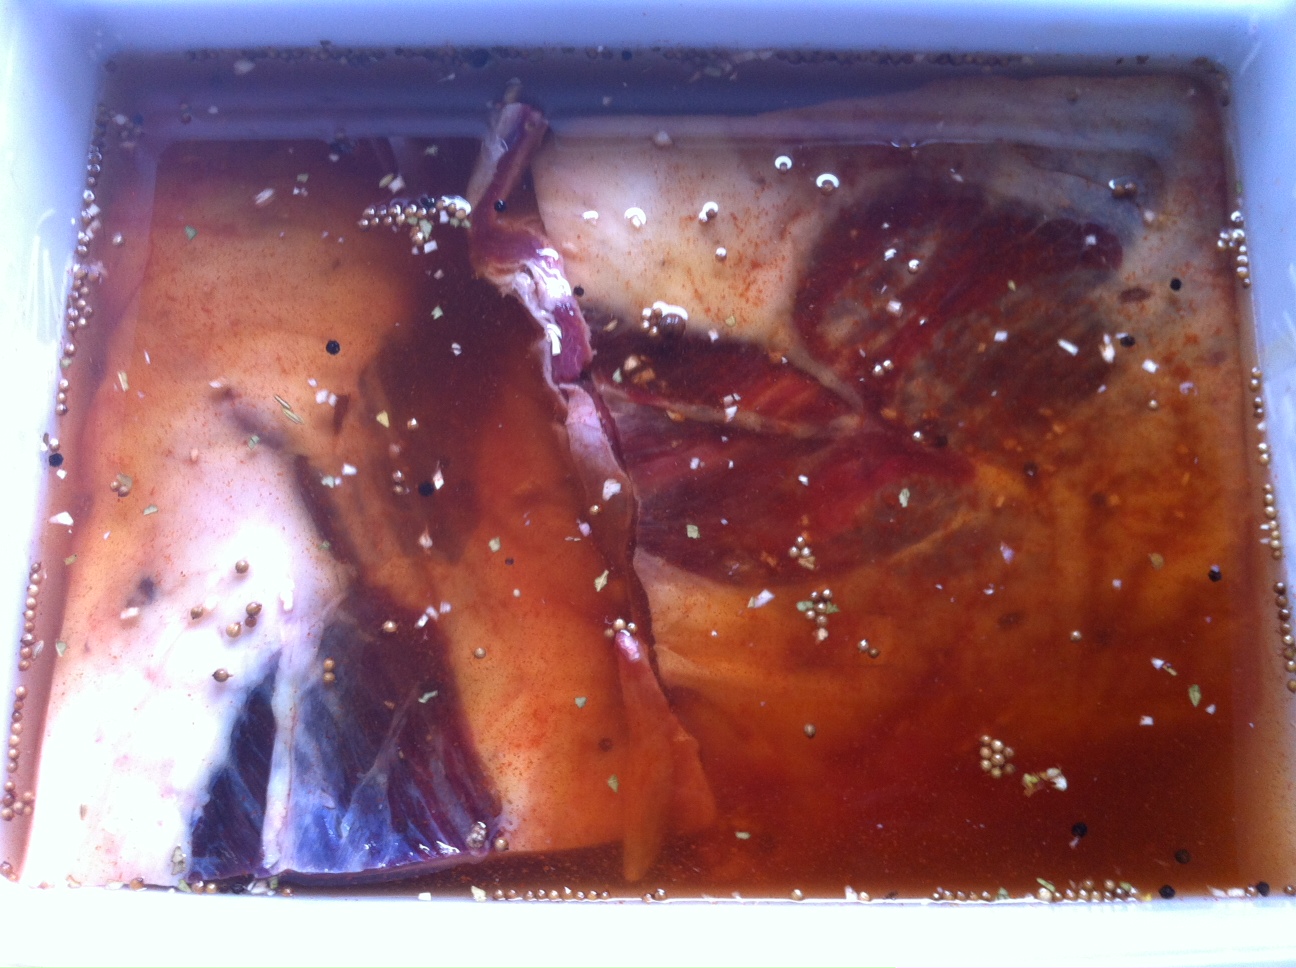
Brining the beef brisket

Brining the beef brisket

Step one: corned beef…

Ingredients:
beef brisket (about 8-10 pounds)
2 tsp. paprika
1/4 cup warm water
3 cloves of minced garlic
2 tablespoons sugar
1 tablespoon mixed pickling spices
3/4 cup salt
2 quarts water

Place the brisket in a large container made of non-reactive material, like glass or plastic.

In the 1/4 cup of warm water, dissolve the sugar, minced cloves, paprika and pickling spices.

Dissolve the 3/4 cup of salt in the 2 quarts of water. Pour in the sugar/garlic/paprika/pickling spices mix and stir everything together. Pour the mixture over the meat in the container. Make sure the meat is totally beneath the surface of the liquid. (You may need to weigh it down to do this.) Cover the container.

Refrigerate the container and contents for 3 weeks, turning the meat once or twice per week. At the end of the third week, remove the container from the refrigerator and take out the meat. Soak the meat in several changes of fresh cold water over a period of 24 hours to remove the excess salt.

At this point, if you want corned beef, prepare and cook it using your favorite recipe. But I’m all about the pastrami!

Step two: making Pastrami…

pastrami

Ingredients:

Brined and rinsed corned beef brisket from above recipe, patted dry with paper towels

1/4 cup Kosher salt

1/4 cup paprika

3 tablespoons coriander seeds

2 tablespoons black peppercorns

2 tablespoons yellow mustard seeds

1 tablespoon white peppercorns

3 tablespoons brown sugar

1 tablespoon granulated garlic

Combine coriander seeds, black and white peppercorns and mustard seeds in a spice grinder and grind coarsely. Place in a bowl. Add salt, paprika, brown sugar and granulated garlic. Mix well.

Rub the mix into the brisket well, covering all sides.

Heat smoker to 225 degrees and smoke for several hours using a less intense wood, like oak. When the internal temperature of the meat has reached 165 degrees, it’s done. It isn’t necessary to smoke pastrami as long as you would a regular brisket because the long brining time makes the meat tender.

It is very important that absolutely everything that comes in contact with the meat is very clean. (This includes your hands.) Also, make very sure that every inch of the meat reaches the 165 degrees before it is removed from the smoker. The corned beef is now pastrami.

When I used to go to my favorite barbecue place and asked for a pulled pork sandwich, I didn’t realize just how much work went into making it. But now that I make my own, I have a whole lotta respect for those barbecue guys…

pulled pork

First, I get a hunka pork. The kind of pig I get matters to me, and so I buy a heritage breed, like Berkshire (also known as Kurobuta), from a farm that humanely raises them in an environment that is not only better for the pig, but ultimately better for my family and me as a result.

Going to a supermarket for pork is certainly what most people do, but the names of the cuts of meat can be a bit confusing. Despite its name, pork butt is not from the back-end of the pig. It’s the shoulder. And the pork butt (or pork shoulder) picnic is a lower cut of the same area. These cuts can also go by the following names: Boston shoulder roast, Boston butt, Boston roast, shoulder butt, and shoulder-blade roast. Whatever the name, these are all nicely marbled hunks of pork that usually weigh in anywhere from 6 to 8 lbs, and are easy to find. Bone in or boneless doesn’t matter.

Once I’ve got my slab, I need to season it. I’ve found that a simple rub is the best way to go for the sauce I’m going to use later. Here are the ingredients for the basic rub I use when roasting pork:

BASIC DRY RUB

Ingredients:

1/4 cup kosher salt

1/4 cup black pepper

1/4 cup paprika

¼ cup brown sugar

1 tablespoon granulated garlic

1 tablespoon onion powder

Place all the ingredients in a jar with a lid and shake it up to blend.

Once I’ve made the rub, I generously sprinkle it all over the pork, and rub it in really well. I have a digital smoker at home, which allows me to cook and smoke my pork butt all in one place. I place the pork butt on a rack, put a drip tray underneath it to catch the grease, and set the smoker for 200 degrees. I cook the pork at 200 degrees for about 6 to 8 hours, and then I add hickory chips to the smoker and smoke the butt at 200 degrees for at least another 2 hours. The marbled fat in the pork butt slowly melts over time and the pork becomes incredibly tender and flavorful.

I remove the pork butt from the smoker and let it rest, covered with aluminum foil, for at least 20 minutes before pulling the meat apart with a couple of forks, shredding it into beautiful meaty bits.

While the pork is cooking and smoking, there’s plenty of time to make two other very important parts of this recipe: a vinegar-based barbecue sauce, and the cole slaw.


BARBECUE SAUCE


Ingredients:

1 1/2 cups cider vinegar

1/2 cup ketchup

1 teaspoon salt

1/2 teaspoon cayenne pepper

1/8 teaspoon red pepper flakes

1 tablespoon granulated sugar

1/2 cup water

Combine all the ingredients in a saucepan. Bring to a boil, then simmer and stir until sugar is dissolved. Cool to room temp.


COLE SLAW

My unusual cole slaw recipe uses an interesting ingredient: pickle juice! Just a splash of juice from your favorite jar of pickles is all you need.


Ingredients:

1 package of cole slaw veggies

splash of pickle juice

1/4 cup mayonnaise (more to taste)

teaspoon celery seed (not salt)

salt and pepper

There are no real specific measurements for cole slaw, because I’ve found that some people like it dry, others wet…some peppery, some not. Play around with it and make it your own. I prefer a more mayonnaise-y cole slaw, and usually err on the wet side.

In a bowl, combine all the ingredients. Cover with plastic wrap and chill. When ready to use, re-mix, and taste for seasoning before using.


OK…time to make that sandwich!

I drizzle the barbecue sauce on the pulled pork and mix well…trying not to oversauce the pork! Then I take a nice amount of pork and place it on a freshly baked bun and then add the cole slaw on top. Yes…right on top of the pork! (That’s the way they do it in the Carolinas.)

Whether you go through all this trouble yourself or not, just remember that if you’re at a barbecue joint, someone else did. Whatever you pay for that pulled pork sandwich… it’s a bargain!

Despite gardening for almost 50 years, I sowed and harvested my first batch of fennel this season. Having received a recent shipment of heritage Berkshire pork chops, I thought it was time to get creative. This is a rustic Italian-style recipe that works great for pork and fennel…

fennelfrond


PORK WITH FENNEL AND CAPERS


Ingredients:


4 Berkshire pork chops, medium thickness

2 fennel bulbs with stems and fronds, finely chopped

2 shallots, finely chopped

1/2 cup fresh parsley, chopped

olive oil

salt and pepper

1 28 oz can tomatoes

1 tablespoon capers

Zest of 1 lemon

1/2 cup dry white wine

pork and fennel


In a large pan, heat some olive oil. Season the pork chops on both sides with salt and pepper, then brown on both sides in the pan with the olive oil. Remove chops from pan and set aside.

Add a little more olive oil to the pan and add the chopped fennel and shallots, stirring for a few minutes. Add the white wine, and stir well to get the tasty bits of pork from the bottom of the pan. Add half of the parsley. Add the can of tomatoes, squishing the tomatoes between your fingers so that they are broken up when they hit the pan. Stir for a few minutes over medium heat.

Return the pork chops to the pan, nestling the in the sauce. Add the capers, lemon zest and remaining parsley. Stir in a bit, and then let the chops cook for about 10 to 15 minutes..


When I can’t get to Chinatown in Boston or New York, I cook my version of a recipe I discovered many years ago in “The Chinese Cookbook,” a wonderful source of information by former NY Times food critic Craig Claiborne and Virginia Lee. I prefer using a whole pasture-raised organic chicken from my good friends at Fire Fly Farms in Stonington, CT (www.fireflyfarmsllc.com).


Cantonese chicken


Ingredients:

1 whole chicken, about 6 lbs, or 2 smaller chickens (pictured)

1 tablespoon Peanut oil

1 tablespoon Soy sauce

6 tablespoons Hoisin sauce

2 teaspoons Sesame Oil

4 teaspoons Chinese Five Spice powder

2 teaspoons Garlic Powder

2 teaspoons Salt

1/2 teaspoon Black Pepper


Remove all giblets from chicken. Rub the soy sauce all over the chicken. Then rub the peanut oil all over the chicken.

Combine Chinese Five Spice, garlic powder, salt and pepper in a bowl. Season entire chicken, including inside the cavity, with this mixture.

Pre-heat oven to 300 degrees. Place chicken in a pan lined with aluminum foil (cleanup will be easier) and bake.

Meanwhile, combine hoisin sauce and sesame oil in a small bowl. When chicken is about 15 minutes away from being done, brush with hoisin/sesame oil mixture. Cook another 15 minutes until chicken has a nice dark glaze…do not burn!


Let rest about 15 minutes before carving.


Portland, Maine has always been a foodie destination, but the number of consistently amazing food experiences you can have in this waterfront town has just recently exploded. When my wife and I get a chance to have a date weekend, we avoid expensive New York, by-pass the Boston traffic, and head right to Portland.

Bar Lola, a small, out-of-the-way bistro, raises the bar on fabulous food in Portland. Our best food experience in Portland to date, and that includes the landmark Fore Street.
Sure, it was a hot night and they didn’t have air conditioning. But the ceiling fans and window fans were on, the wonderfully inventive cocktails (“Atlantic & Congress” a personal favorite) were flowing, and the food was fantastic. Small bites, and lots of them…the kitchen cranked them out and we devoured them with pleasure.

photo
Radishes with marrow butter on a baguette…Spanish sardines…rabbit confit with frisee and tomato mostarda (I told the chef I wanted that one to be super-sized so I could just shovel it into my mouth)…a wonderful pulled pork taco special…seared steak with wheatberries and dried fruit…a delightfully tender roasted half poussin with farro, pea shoots and garlic jus. We savored it all.
An not-on-the-menu bowl of pasta with butter for our daughter was not a problem for this busy kitchen. And a unique wine list was assisted by a knowledgeable staff to help with the selections.
Bar Lola is a small, cool, funky out-of-the-way neighborhood restaurant.
If you really are all about the food in Portland, this is where you go.

Eventide Oyster Company is a great little space around the corner from the waterfront, located next door to Hugo’s, which now shares a the kitchen with Eventide after renovations. (A visit to Hugo’s is tops on our list for our next visit.)

IMG_2930

At Eventide: fresh oysters from all over the country, and fabulous small plates to go with them. Razor clams are tough to prepare properly, but they slice them and grill them to create a wonderful small plate. The fried oysters…the crudos (raw fish plates)…beautifully presented. The tuna deviled eggs: a home run. This is what an oyster bar should be. The staff is friendly and not jaded, despite the fact that it can get very crowded, spilling out into the street in the summertime. A good bar with interesting drinks and a nice choice of wines.

IMG_2925

IMG_2823

Probably the most amazing discovery for us was Eventide’s shaved ice accompaniments for their oysters, especially the red onion, horseradish and kimche shaved ice: intense flavors that just melt in your mouth. The red onion shaved ice was so good, I asked for a martini with a small bowl of it on the side. My wife and I came up with an oyster shooter: shot glass, small oyster of their choice, chilled Belvedere vodka, topped with the red onion shaved ice. WOW! You can thank me later!!!

IMG_2924

We were in Portland for 48 hours and stopped by Eventide twice.

555 (Five Fifty-Five) served an excellent Sunday brunch…this coming from a guy that hates brunch. Going to a restaurant to eat eggs and drink bad champagne drinks is not my speed. But the lobster eggs Benedict was killer. Steak and eggs featured some of the tastiest, tenderest steak I’ve had anywhere. Fresh salads with local greens. A wonderfully satisfying creamy parsnip soup. Inventive cocktails. Live music. If I’m gonna have brunch, this is where I’m gonna have it! Can’t wait to come back to try 555 out for dinner. A great find, recommended to us by several servers from other restaurants. Always a good sign.

IMG_2846

555's Steak and Eggs

555’s Steak and Eggs

Killer lobster benedict!

Killer lobster Benedict!

Fore Street: In some ways, this can still be considered the best restaurant in Portland. Earning great reviews and national attention year after year is not an easy accomplishment. And for the most part, Fore Street is really special. Tell anyone in the food business in Portland that you’ve got reservations at Fore Street, and they all swoon.

IMG_2921

Unusual charcuterie plates with lamb hearts, foie gras stuffed pork trotters and beef tongue: a fun trip for the adventurous, but not particularly flavorful or inspired on our visit. However, roasted quail…roasted chicken…fabulous salads with seasonal greens…ravioli with pesto…all beautifully prepared in their open kitchen.

IMG_2997

Fore Street keeps their produce local and seasonal, so I ordered an English pea and carrot salad that was at its seasonal peak. Then we ordered the ravioli: covered in English peas. Then the chicken: covered in English peas. Really? In this case, I wouldn’t mind if they brought in some veggies from out-of-town. I love peas. But I don’t need them in three separate dishes on the same night. Dropped the ball there.

We stayed away from any seafood because we had gorged on it the entire weekend at Eventide!

Although our Fore Street server tried to move the meal along a little faster than we were comfortable with, she got the message after a while and let us be. (It was an 8PM reservation on a Sunday night…she wasn’t going to have another seating at that table anyway.) Wine suggestions and selections were excellent, and though we took home a box of house-made chocolates, we really didn’t have room for dessert, with the exception of a refreshing espresso shaved ice.

Vignola Cinque Terre was intended to be a quick stop for just a glass of wine. Several cheese plates and many cocktails later, we realized we’ve got to come back to this place to enjoy some of their authentic Italian cuisine. Some places feel sterile…this place has loads of good ju-ju. And a great selection of cheeses, by the way.

IMG_2971

The Porthole Restaurant is a Portland classic: off the main drag, down and dirty on the dock, serving great drinks and fun food. Featured on Food Network’s “Diners, Drive-Ins and Dives.” And just when you think they’re shutting down for the night, they get ready to re-open for breakfast! Shrimp and grits, lobster benedict…and a great Bloody Mary. What else do you need?

1785_1341913290

1785_1341913321

Becky’s Diner: a classic, tight-spaced breakfast joint, extremely popular, no doubt due to a very loyal following and constant rave reviews from magazines like Esquire and Gourmet. Get ready to wait in line!

J’s Oyster: the quintessential seafood dive. J’s is a Portland legend. Great oysters, lobster rolls, strong drinks, sassy bartenders, crotchety locals. If you haven’t been to J’s, you haven’t been to Portland, Maine. Plain and simple.

IMG_2962

Infiniti, a brand spankin’ new and beautiful brew pub, serves atypically creative dishes, and they are just steps away from starting up their own distillery. It should be ready to rock on our next visit to Portland. We just popped in for a peek at the menu and the young, hip crowd that packed the place on a Saturday night.

Other FOOD FINDS…

Standard Baking Co: Some of the most delicious breads in town, just steps away from the Hilton Garden Inn, where we stayed…and just under Fore Street. (They bake the bread for the restaurant.) Not a lot of pastries and cakes…more of a rustic bakery. But what they’ve got is wonderful.

IMG_3005

IMG_3004

Harbor Fish Market: Bring a cooler and load up on the freshest seafood that Portland has to offer. This fish market is the real deal: Maine shrimp, Maine crab meat, lobsters, clams, oysters and a huge selection of  fresh fish. We always stop here on the way home after our long Portland weekend. Order your breakfast to go right across the way at the Porthole, then come here for the seafood, and your breakfast will be ready to go by the time you’re done shopping.

IMG_3014

The MISSES…

Otto has good pizza, perhaps, for Maine, but definitely not great. I give them credit for some not-so-simple toppings: potato, bacon and scallion on a pizza…pretty cool. But I really didn’t like that they had a shelf with a huge stack of already-made pizzas just sitting there, so nothing was fresh out of the oven. Everything had to be re-heated. As a Brooklyn boy raised on arguably the best pizza in the USA, and as a serious home pizza maker, I was not impressed.

IMG_2857 IMG_2859

Some personal favorites, like The Salt Exchange, have fallen from grace in recent years. A change of ownership can do that. Foodie magazines love to chatter about Duck Fat, a small establishment that became famous for serving up french fries cooked in duck fat. The fries are good, not great, and the other dishes I’ve had there didn’t impress me. Same goes for anything with the name David’s in the title. Chef David Turin is a local legend, and quite frankly, I don’t know why. David’s was the most hyped and most disappointing dining experience we’ve had in Portland.

The HOTELS…

We don’t look for 5-star accommodations when we’re in Portland. We look for clean and close to the water.

Hilton Garden Inn: If we have a choice of where to stay in Portland, this is without a doubt our #1 pick. You cannot beat its location right on the Portland waterfront. Doesn’t hurt that the rooms are clean and the staff is friendly.

Hampton Inn Portland Downtown Waterfront: not really waterfront…a couple of blocks away. But it’s close enough, it’s relatively new and clean, and it’s another good option.

Holiday Inn Portland By the Bay: It’s easy to walk anywhere in downtown Portland, so this hotel, though not on the waterfront, is fine. The rooms are clean–though we did have to call housekeeping to change the sheets on the fold-out couch–they were pretty nasty. But we don’t come to Portland to live in our hotel room.
Beds are comfortable, there’s room service for breakfast, and most importantly: a hotel shuttle that means you can drink without driving.
I could be wrong, but it looks like a new Holiday Inn is being built along the waterfront at this moment. Worth keeping an eye on.

When it comes to grilling, lamb is often overlooked. Yet it’s a wonderful, flavorful meat that makes a great burger. The taste of lamb can be a bit strong, however, so I mix 1 lb of ground lamb with 1 lb of ground grass-fed beef.

Ingredients:

1 lb ground lamb
1 lb ground beef
2 Tablespoons + 2 teaspoons extra Virgin olive oil
4 Tablespoons minced Spanish onion
2.5 teaspoons whole grain Dijon mustard
1 teaspoon each fresh parsley, mint, and dill, finely chopped
1 teaspoon dried Greek oregano
.5 teaspoon cumin
1 large clove garlic, squeezed through a garlic press
1 scallion, finely chopped, green part only
1 teaspoon salt
.5 teaspoon black pepper

Heat 2 Tablespoons olive oil in a skillet over high heat. Add onions. Cook until browned, about 6 minutes. Transfer onions to a plate. Let cool.
In a bowl, mix onions, lamb, pork, mustard, herbs, spices, garlic, scallions, salt and pepper.
Form meat into slider-sized patties. Place on baking sheet covered with non-stick foil, and place in fridge.
Prepare a medium-hot charcoal fire.

lamburger

To keep the Greek flavors going, I came up with this feta cheese dressing that works great with the lamburgers.

Ingredients:
3/4 cup plain Greek yogurt
1  cup mayo
1 teaspoon Worcestershire sauce
1/2 teaspoon cayenne pepper sauce, like Franks Red Hot
1 teaspoon Dijon mustard
1/2 teaspoon granulated garlic
1/2 teaspoon salt
1/2 teaspoon ground black pepper
4–5 ounces crumbled feta cheese

Combine all ingredients in a bowl. Mix well. Cover and refrigerate. Best the next day.

Don’t let the lamburgers get too cold in the fridge…just enough to firm the meat up a bit. If it gets too cold, give it a few minutes at room temp to warm up again.  Grill burgers until cooked to medium. Place on slider buns with lettuce and tomato, and smear the bun with the feta cheese dressing.