Posts Tagged ‘food’

The corn is still out on farm stands in my neighborhood, and it’s really hard to resist, despite the fact that corn is at the top of the loaded-with-pesticides list of veggies. Organic farmers struggle with corn because it demands a lot and produces little in return, but you can find it if you look hard enough. It’s easier to find it frozen, but that’s something you don’t want to do in season, especially when you see those beautiful ears just waiting for you at the local farm stand!

By now, I’m sure you’ve seen those videos where the person takes corn still in the husk, pops it in the microwave, and then slips out a perfect ear of corn without any silk minutes later. If you haven’t, here’s one of them…

There are 2 problems with this method: 1) It takes forever to do a dozen ears…and 2) It ruins the damn corn!

corn1

Why would anyone who’s passionate about fresh corn, stick it in a microwave and nuke the living hell out of it? Fresh corn needs a minimalist approach. It should be eaten practically raw…not bombarded with gamma rays and dehydrated in to shriveled kernels.

I love my corn right off the cob…and I still stick to the tried-and-true method of putting it in a pot of water and boiling it for a very short time. Do I get a few strands of silk? Sure. That’s part of the deal. Real corn has silk…just like real fish has bones. Get over it.

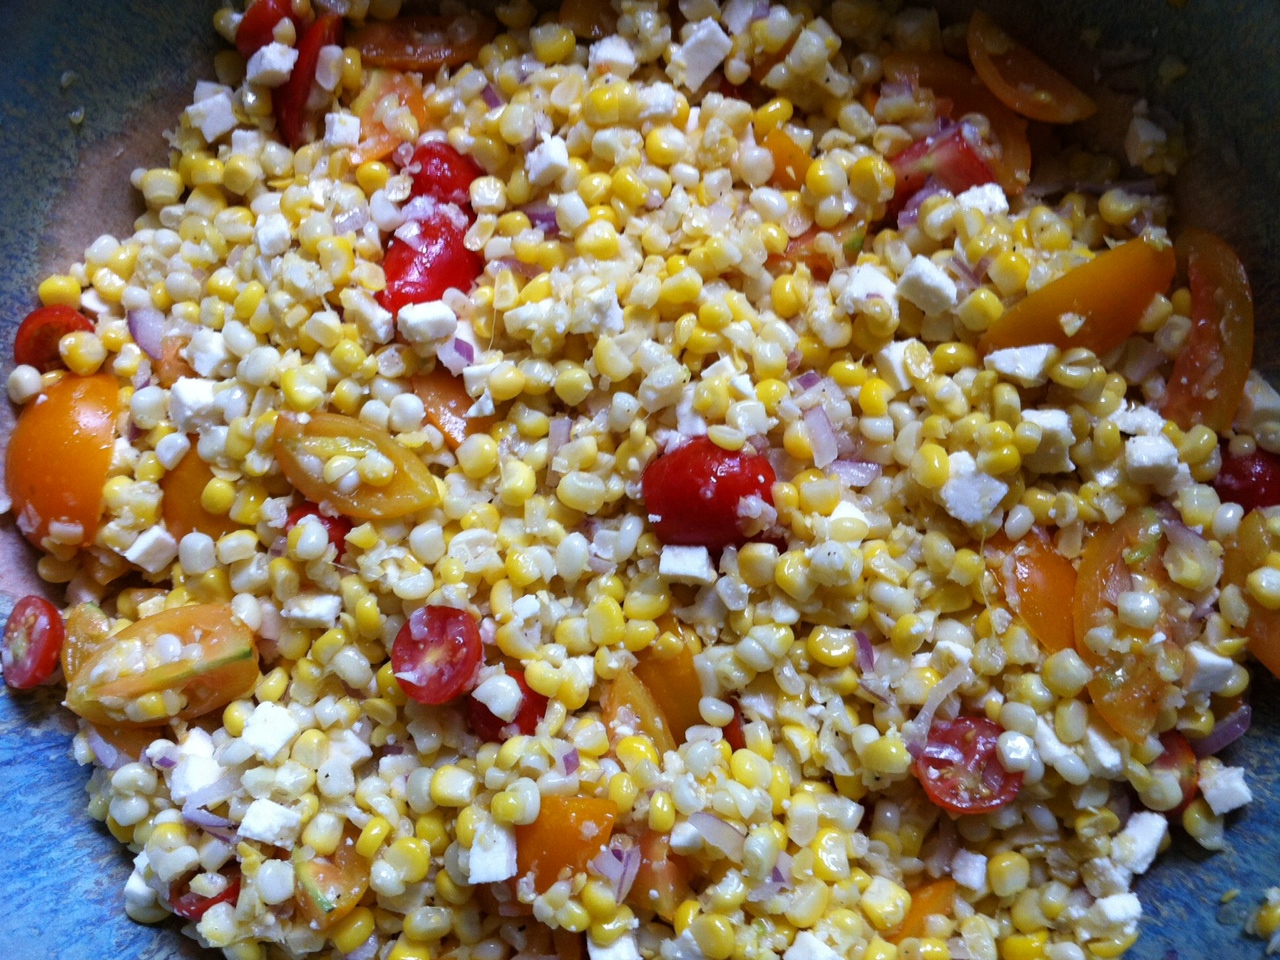
My wife and daughter like their corn off the cob. In that case, I shuck the corn, standing the raw ear up in a bowl or bundt pan, slicing down with a knife to remove the kernels. I then lightly saute the corn in a pan with unsalted organic butter and a pinch of Fleur de Sel. Those pieces that have several rows of kernels stuck together, across and down, are the favorites.

corn2


One other way I’ve cooked corn is the “cooler corn” method, which is great when you have a really large crowd to feed. Get your favorite cooler and make sure it’s clean inside. Shuck your corn and place the ears in the cooler. Boil a large pot of water on the stove and then pour the hot water over the corn. Close the cooler lid tightly and let it sit for about 20 minutes. You’ll have perfect corn for a crowd every time.


I always thought that spaghetti squash was a sort of “gimmick” vegetable. But once I roasted it, I realized just how delicious it could be. And I hit the “squash lottery” the other day, when my friend, Karen, stopped by with a bunch of beautiful spaghetti squash straight from her and her husband, Bill’s, garden. It was time to cook!

FullSizeRender

Cooking them is easy. I wash them, cut them in half, and remove the seeds and membrane stuff with a spoon. I flip them onto their backs, skin side down, and drizzle some extra virgin olive oil on them. A little sea salt and pepper, and then I flip them back down, skin side up, on a sheet pan lined with non-stick aluminum foil. Into a pre-heated 350 degree oven for 30–40 minutes. When they’re soft to the touch, I remove the sheet pan from the oven, flip them back over again, and let them cool to room temperature. Then I simply scrape out the flesh with a fork, and it comes out in strands, like spaghetti.

image

While the squash roasts in the oven, I make the meatballs…


1 lb. ground grass-fed beef
1 lb. pastured ground veal (substitute ground beef if you can’t get this)
1 cup breadcrumbs (I use gluten-free)
2 eggs, cracked and scrambled
2 tablespoons dried parsley
2 tablespoons dried oregano
1 tablespoon dried basil
1 tablespoon granulated garlic
1 tablespoon granulated onion
1 teaspoon black pepper
2 teaspoons salt

Mix all the ingredients in a large bowl and form into meatballs. Place them in a hot pan with 1/4 cup of extra virgin olive oil. Cook until the meatballs are browned on all sides.


And you need homemade sauce…

2 cans (28 oz.) of tomatoes, pureed
olive oil
1/2 onion, finely chopped
1 tablespoon dried parsley
1 tablespoon dried oregano
1 teaspoon dried basil
1 teaspoon granulated garlic
2 teaspoons salt
1/2 teaspoon fennel seeds

In a large pot, saute the onions in a little olive oil until translucent. Add the pureed tomatoes and cook at medium heat until the foam disappears.

Add all the herbs and spices and mix well. Continue cooking on medium heat, lowering to a simmer if the sauce seems to be boiling too hard.

Add the meatballs to the sauce when the meatballs have been browned on all sides. Pour the entire contents of the meatball pan, including the olive oil and fat, into the tomato sauce pot.

Make sure all the meatballs are covered with the sauce. Place a lid on the pot, and simmer for at least an hour, until the meatballs are cooked all the way through.

image


Scrape the spaghetti squash with a spoon and place a mound of it in the center of the serving dish. Top it with the meatballs and sauce. Grate some Parmigiano-Reggiano over the top, or do what I did this time, and cut a slab of mozzarella di bufala into small cubes and toss on top. A little sprinkle of oregano and olive oil for good measure on top.


As if I needed more reasons to eat bacon, this Saturday, September 3rd, is International Bacon Day!

Let’s face it: there are few foods as magical as bacon. Add bacon to just about any dish you’re preparing, and it elevates it to incredible new heights of flavor. The BLT is possibly the greatest food combination ever invented: just a few simple, fresh ingredients, when placed together, transforming into one of the most amazing sandwiches on planet Earth.

Bacon comes from the pork belly. One of the places I buy pork bellies is from my friends at Fire Fly Farms in Stonington, CT (http://www.fireflyfarmsllc.com). I also get Berkshire pork bellies from Heritage Pork International (http://www.heritagepork.com). I follow the simple curing techniques outlined in “Charcuterie,” a great book written by Michael Ruhlman and Brian Polcyn.

To cure bacon, all you really need is Kosher salt and what they in the curing biz call “pink salt,” which is not to be confused with salt that happens to be pink, like Himalayan salt you’d find in a gourmet store. Pink salt is bright pink—to let you know that this is special salt that should only be used in small quantities for curing. The reason for that is because it has nitrites. Nitrites delay the spoilage of the meat, and help keep the flavors of spices and smoke. They also keep the meat nice and pink instead of an unappetizing gray. That’s good. But nitrites can break down into nitrosamines, which have been known to cause cancer in lab animals. But let’s face it: you would need to eat a ton of cured meat to really worry about this.

To make the basic dry cure:

1/2 lb. kosher salt
1/2 cup light brown sugar
1 ounce (5 teaspoons) pink salt

Mix the ingredients well. An important note: all Kosher salts do not all weigh the same (Diamond Crystal weighs less than Morton), so go by the weight and not a cup measurement. You can use this rub on your pork belly, but I make a large amount of the dry rub and keep it stored in my pantry. When it’s time to make bacon, I take it out and add other ingredients…


Bellies in the smoker

Bellies in the smoker.


Alz Bacon Rub:

1/2 cup basic dry cure
1/2 cup turbinado sugar (Sugar in the Raw brand)
1 teaspoon fresh cracked black pepper
1 teaspoon granulated garlic

Once you rub the pork belly thoroughly, place it in a Ziploc bag, squeeze the air out of it, and seal it tightly. another method is to wrap it tightly in plastic wrap, then seal it with tape. Place it in the fridge for a couple of weeks, flipping it over every few days to let gravity do its work. You’ll see that the salt will draw moisture out of the meat and form a brine. This brine will continue to cure your pork belly, so leave it in there.

After a few weeks, once the pork belly has been cured, wash the brine off the meat, pat it dry with paper towels. Now it’s time to cook. You can simply cook the pork belly at 200 degrees for about 2 hours, until the internal temperature reaches 160 degrees, but I always place the pork belly in a smoker, cooking it at 250 degrees for 1 hour, then add hickory chips and smoke it at 250 degrees for at least another hour.

Smoked bacon

Smoked bacon

That’s it. You have achieved bacon!

The reward is so worth the effort. You still have to fry it at this point…you can’t just take a bite out of the slab! But that first slice you cut off your bacon and toss in a pan to lightly fry for a few moments will be the best bite you’ve ever had in your life!
And if you’re making one slab of bacon, why not make it three or four? It freezes well. And…you will eat it. You know you will!

Frying in the pan!

Frying in the pan!

At a recent summer garden dinner for 12 of our friends, I wanted to serve my corn and tomato salsa that I featured here a few weeks ago.

We “smuggled” a few treats from a recent visit to Santorini Greece: capers, caper leaves and sun-dried tomatoes. Adding them to fresh corn and tomatoes gave it that salty bite that. I usually use feta cheese in this recipe, but we served a cheese plate as an appetizer, so I left the feta out. Turns out we like it even better this way…

1 dozen fresh ears of corn, lightly sautéed in olive oil
2 dozen (or more) tiny tomatoes, cut in half
1/2 small red onion, finely chopped
2 tablespoons capers
1 tablespoon caper leaves
2 tablespoons finely chopped sun-dried tomatoes
1/4 teaspoon black pepper
2 tablespoons white vinegar
1 tablespoon extra virgin olive oil (in addition to what you saute the corn with)

Slice the kernels of corn off the ears with a sharp knife. Saute them in a little olive oil, just to remove the raw taste. Don’t over cook them!

Combine the corn with all the other ingredients and place in a bowl in the fridge.

Just before serving, let it come back to cool, not cold, and check for seasoning. The capers and caper leaves are salty, so I’m careful not to over-salt.

The definition of a consomme is: “a clear soup made with concentrated stock.” I might add “mind-blowing” to that sentence, especially with this recipe. The key to success– and this is crucial–is to use absolutely garden-fresh, in-season ingredients. If you try this with greenhouse or supermarket tomatoes, you’re just wasting your time.

FullSizeRender (9)

4 1/2 lbs. of fresh garden tomatoes (my favorite is the heirloom: Brandywine)
1 large bunch of fresh basil, leaves and stems
1 2-inch piece of fresh horseradish, peeled
1 clove of garlic, peeled
1 tablespoon white wine vinegar (I use Alessi)
2 oz. vodka (I use Tito’s)
sea salt and pepper


Remove the core of the tomatoes, but leave everything else, including seeds and skin.

Put all the tomatoes, basil, horseradish, garlic, vinegar and vodka in a blender or food processor. You might need to do this in batches if your equipment can’t handle it all.

Process until you get a kind of slush.

Line a mixing bowl with a double layer of cheesecloth and pour the tomato slush mixture into it. Gather up the corners of the cheesecloth carefully, and tie them securely so you can lift the bundle up by the knot. Hang the bundle from a hook over a clean bowl in the fridge so that it catches the liquid that drips out, and leave the whole thing in there overnight. The liquid that drips out will be clear. (You can place an optional slice of beet in the bowl to add color, but I choose not to, because I think it changes the flavor.)

Cheesecloth bundle dripping overnight in the fridge.

Cheesecloth bundle dripping overnight in the fridge.

To serve, chill bowls (or in this case: the sipping glasses) in the fridge. When ready to serve, ladle out the consomme and garnish with a tiny basil leaf. A drop of excellent quality olive oil is optional.

Synthetic cheesecloth apparatus. The real thing works better.

Synthetic cheesecloth apparatus. The real thing works better.


I tried using a synthetic cheesecloth for this recipe, and I found that it doesn’t filter out enough of the solids to make a clear consomme. You could use it along with real cheesecloth, just to use the stand, or just hang it all in real cheesecloth, as described in this recipe.

I came up with this crunchy tasty appetizer a few years ago, when I needed a tasty bite for one of our famous summer parties. I wanted something fresh that highlighted the veggies of the season, so when I spotted these baby bell peppers in the supermarket, I came up with this tasty, crunchy appetizer. I get requests for the recipe every year. (I  grow my own baby bell peppers, but when we’re talking about feeding a large party, it’s time to go to the supermarket! )

image


Baby bell peppers
6 ears fresh corn, removed from the cob…or organic frozen corn
1/2 Vidalia onion, peeled, quartered, grilled, chopped
1 cup mayonnaise
1 teaspoon hot pepper sauce (I use Frank’s Red Hot)
6 oz. feta cheese or Queso Fresco, crumbled
Juice of 1 lime
Pinch of white pepper
1 tablespoon fresh parsley, finely chopped


image


Cut corn from ears, and saute very briefly in a little olive oil. Place in a bowl and let cool.

Peel and quarter the Vidalia onion, and throw it on a hot grill with a little olive oil to get some nice grill marks on it, leaving the onion still crispy, not soft. If indoors, throw the quartered onion in a hot pan with a little olive oil, and cook until you get some brown marks on it. Remove, let cool, then place in a food processor and pulse until the onion is chopped into small bits, just smaller than the corn kernels. Add onions to corn.

In a separate small bowl, combine the mayonnaise and Frank’s Red Hot. Pour in the crumbled cheese and mix well. Pour this into the corn and onion bowl and mix well.

Add the lime juice, white pepper and parsley to the bowl and mix well again.

Cut the baby bell peppers in half lengthwise, and remove the seeds and membrane. Stuff the peppers with the corn mixture and garnish with cilantro or parsley.


If you’r preparing this ahead of time, refrigerate the stuffed peppers until you’re ready to eat, but allow some time for them to warm up to a cool, not cold temperature.


We slurp down more clams and oysters in the summer here in New England than at any other time of year. Freshly shucked oysters and clams–or in this case–beautiful boiled wild-caught American shrimp, call for an equally amazing cocktail sauce…and this sauce kicks butt! And it features a key ingredient that you might not expect: vodka. The small amount of vodka in the mix keeps the cocktail sauce from freezing solid when stored in the freezer. Just scoop out what you need, let it thaw, and put the rest back in the freezer.

image


2 cups ketchup
4 tablespoons prepared horseradish
1 tablespoon fresh lemon juice
1 teaspoon Worcestershire sauce
1/2 teaspoon Frank’s Red Hot, or other hot pepper sauce
5 grinds of fresh black pepper
1/4 teaspoon salt
1 teaspoon good quality vodka, like Tito’s

Combine all the ingredients. Store in a tight plastic container in the freezer.

Corn and tomatoes…they’re in season and you just can’t beat the combination! This is a very simple salsa that takes advantage of their natural sweetness.

salsa


1 dozen fresh ears of corn or lb. frozen organic corn
2 large ripe organic tomatoes, seeded and chopped
1/4 small red onion, finely chopped
6 oz. mild crumbled cheese, like feta, cotija, or queso fresco
1 teaspoon Fleur de Sel or sea salt
pinch of black pepper
2 teaspoons white vinegar
2 tablespoons extra virgin olive oil


If you’re using fresh corn, remove the kernels from the ears by running a knife down the sides, slicing through the kernels. I stand my ear of corn up on the center hole of a bundt pan, letting the kernels fall into the bowl below. Pan sauté the corn for just a few minutes in a little olive oil, but leave it crisp! If you can roast the ears of corn over some coals, even better. Let it cool.

Mix the corn with all the other ingredients in a bowl. Cover and refrigerate.


We’re in Santorini, Greece! Besides being one of the most magnificent places on earth, it’s where we first feasted on a beautiful lobster and pasta dish that we only dreamed about when we got home…until I got up the nads to give it a try. It’s one of those dishes that takes time to prepare…time consuming but so spectacular.

Where we first had our pasta with lobster sauce in Santorini.

Where we first had our pasta with lobster sauce in Santorini.

Love the signs!

Love the signs!

It’s absolutely important to make a good stock: the base for all the other flavors to follow.

Cooked lobster LTL


For the stock…
2 1-1/2 lb. lobsters, slightly under-cooked
12 cups water
1/2 onion, chopped into quarters
3 celery stalks, chopped into quarters
1 carrot, chopped into quarters


Under-cook (steam or boil, whatever your favorite method) the lobsters, less than the usual 8 minutes. Remove the lobster meat from the shells and set aside.

Place the cleaned lobster shells, claws, tails, legs and bodies in a large pot. (You don’t want any of the internal organs or tommaley.) Crush the shells so they fit in the pot. Add the water, onion, celery and carrot. Set the heat on high. Cook until it is reduced by half.

Strain the stock, discarding the lobster shells and veggies. Bring the stock back to the heat and reduce it until all you have left is 1 cup of intense stock.


Pasta with lobster sauce

For the lobster sauce…
1/2 onion, finely chopped
1 garlic clove, finely chopped
pinch of Italian red pepper flakes
teaspoon parsley
extra virgin olive oil
1/2 cup lobster stock
1/4 cup San Marzano tomato sauce (see below)
splash of white wine (I use Alice White Chardonnay)
salt and pepper


Final ingredients…
reserved lobster meat
1/2 lb. cooked pasta


Add some olive oil to a large pan and saute the onions until translucent. Season with salt and pepper. Add the garlic and cook for 10 seconds. Add the red pepper flakes and parsley.

Add 1/4 cup of the lobster stock and let it cook, reducing by half. Add the other 1/4 cup of lobster stock and the tomato sauce. Let it cook for a couple of minutes and add the white wine. Cook for a few minutes more.

Cook the pasta and drain it even before it reaches the al dente stage. Place the pasta in the pan with the sauce, heating and coating thoroughly. Add the reserved lobster pieces and warm them through, tossing in the sauce. Serve immediately.

For the San Marzano tomato sauce: I take a can of San Marzano tomatoes and place it in a food processor or Vita-Mix and blend. Pour into a pan and reduce over medium heat by half, until sauce has thickened.

My friend, Cindy, has cucumber overload in the home garden right now. Thanks to her for requesting a re-post of this recipe.

I don’t have the patience to boil Mason jars and lids and all that crap. But I love me my pickles, especially when I’ve got a cucumber surplus in the garden. These won’t last beyond the season, but if you want fresh pickles in a hurry, this is a great method to use.

No water is needed! The salt extracts just enough moisture, like when curing meat, to make it work.

pickles


6 fresh cucumbers
1 1/2 teaspoons sea salt (I like Fleur de Sel)
handful of fresh dill
1 clove garlic, thinly sliced


Get a large plastic Ziploc bag.  Add the salt, dill and garlic and gently mix everything in the bag.

Cut the ends off the cucumbers and then slice them lengthwise, in half or in quarters. Add them to the bag and gently mix again.

Squeeze to remove air from the bag, close it tightly and place it in the fridge overnight. The pickles will be ready to eat the next day, but they’re even better after 48 hours.